1
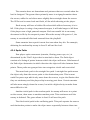
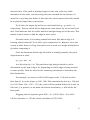
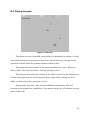
Chris Orona
CS491B
Spring 2005
Contents
1. Introduction................................................................................................ 1
2. Technological Background .......................................................................... 1
3. System Architecture .................................................................................... 2
3.1 Hardware Configuration ......................................................................... 2
3.2 Software Configuration........................................................................... 2
4. Design and Implementation Details ............................................................. 3
4.1 GUI Design ............................................................................................ 3
4.2 Game Design ......................................................................................... 4
4.2.1. Game Loops .................................................................................... 4
4.2.2. Player Ships.................................................................................... 5
4.2.3. Enemy Aliens .................................................................................. 6
4.2.4. Sprite Paths .................................................................................... 7
4.2.5. Levels ........................................................................................... 11
5. Deployment............................................................................................... 12
5.1 Java Web Start .................................................................................... 12
5.1.1. Creating a Java Web Start application........................................... 13
5.1.2. Security ........................................................................................ 14
6. Performance Evaluation ............................................................................ 14
6.1 Experimental Setup ............................................................................. 14
6.2 Experimental Results ........................................................................... 14
6.3. Performance Enhancements................................................................ 15
6.4. Analysis .............................................................................................. 15
7. Conclusion................................................................................................ 16
8. References ................................................................................................ 16
8.1. Software.............................................................................................. 16
8.2. API and References ............................................................................. 16
Appendix A. Function API ............................................................................. 17
A.1. Class Hierarchy .................................................................................. 17
A-2. Methods used ..................................................................................... 17
Appendix B. User Manual ............................................................................. 18
B.1. Installation ......................................................................................... 18
B.2. Compilation ........................................................................................ 19
B.3. Starting a game .................................................................................. 19
B.4. Playing the game ................................................................................ 22
Deep Space 2
Abstract: Players are always looking for the next new and fun game, and “Deep
Space 2” delivers. Using the Java 2D API, this project will show that the Java
programming language can be used for cross-platform game development.
1. Introduction
Aliens are attacking Earth! Five years ago, a lone space ship attempted to
save mankind from aliens. That mission succeeded, but now the aliens are
back with reinforcements. Earth’s forces have sent you back once again to
eradicate this threat to humanity once and for all.
In this game, you’ll be able to take control of a ship and attack the
enemies head-on. Using different weapons you can blow up the enemies and
destroy them from the face of the universe. You too can be a hero!
2. Technological Background
Deep Space 2 is a 2D game written in the Java programming language.
The Java language was chosen because of familiarity with the language, its
cross-platform ability, and the curiosity to see how well game development can
be done in this language.
This game was based on an earlier project, Project: Deep Space, which
used Java 1.2. However, due to the lack of graphics support for this project, it
was not as good as it should have been. In a later version of Java, 1.4, the
Java2D API was introduced which made graphics development easier, so it
would be interesting to see how well game development would be using this
improved interface.
Deep Space 2 also uses the Java Sound library to provide background
music and sound for the game. Using multiple sound clips, many different
1
sound effects can be played simultaneously along with background music, with
little performance penalty.
The newest version of Java, Java 5, introduced several new features.
Many of the new language constructs, such as generics and improved for loops
made programming the more tedious and often-repeated portions easier.
However, due to these improved constructs, there were some
incompatibilities with Java 1.4. Since it would be cumbersome to maintain
compatibility with both platforms, the Java 5 methods were chosen and thus
Java 5 was used as the minimum required version for this project.
Java 5 was also chosen due to the library improvements. The new
PriorityQueue class allows for efficient scheduling, and the improvements to
the Java Sound API make sound programming easier.
3. System Architecture
3.1 Hardware Configuration
There were two main machines used in this project for development and
testing:
•
Computer I - Pentium II, 400 MHz, Windows XP
•
Computer II - AMD Athlon 64 3400, 2.2 GHz, Windows XP & Linux
It has also been tested on various other machines, but not extensively.
Since many computers at school are still only installed with the Java Runtime
version 1.4 or below, it was not possible to test with these computers.
3.2 Software Configuration
Software used in this project included:
•
Eclipse IDE – for development and testing of Java code
2
•
Audacity – an open source sound editor used to edit the sound data for
the game. Sound data was acquired from a sound effects CD, and then
shortened/downsampled for game use.
•
Paint Shop Pro – graphics program used for sprite creation.
4. Design and Implementation Details
4.1 GUI Design
This game runs in full screen mode using the Java 2D API. A “JPanel” is
used for the action, and separate panels are used for the scrolling
backgrounds. Additional panels are used for score, life and high score
placement. (See Appendix B.2)
When the game is started up, an Attract mode panel is displayed on the
screen. In the old arcade games, the “attract mode” was where a demo of the
game would be playing and would attract people to play the game. However,
there’s no demo in this project. The title screen is displayed and the player is
invited to start a new game.
During play or the title screen display, the player can open up a menu.
This menu is implemented as a transparent panel that is overlaid above the
screen using a JLayeredPane. This is like a regular Java container, but can
have several panels which are placed above or below it.
Before play begins, the attract panel is replaced with a Game panel
which handles the actual game. This panel contains several layers which are
used for the positioning of the menus, and scrolling backgrounds.
The player and enemy sprites are drawn directly on the main level. The
background is drawn on a layer underneath the action, while the score and life
displays are drawn above it.
3
When the game is over, this panel is replaced by a Game Over panel
which merely displays the ‘Game Over’ screen. After a few seconds, it returns to
the title screen.
4.2 Game Design
Game design is split up into several design components which were used
as development cycles. The game was designed using a spiral development
method in which a basic implementation was designed during the first quarter,
and improved upon during the second quarter. During the first quarter, the
game was playable but limited. The second quarter focused upon improving the
quantity and variety of each of the various components.
4.2.1. Game Loops
When the game begins, there are several different threads that run in the
background. These threads help to maintain game flow and stability.
The main visible thread that runs is the update loop. This refreshes the
screen at a constant rate. In this game, the rate is fixed at 1 refresh per 20
milliseconds, or a 50 frame per second rate. Previously each component would
update itself, however they were not able to synchronize well with each other,
especially as some objects would be moving faster than the frame rate.
The input loops are important, too. The player has several control
listeners attached to it. One listener checks the keyboard, another the mouse,
and yet another checks for cheat codes.
The old system used in the first quarter was completely event-driven.
When a key was pressed, the ship would move in a particular direction. This
worked well enough to start, however the keys had erratic repeat rates. When a
key is first pressed there is a slight pause before the repeat sets in.
With the improved version, flags for each direction are set when the keys
are pressed or released. Then the input thread reads the flags periodically and
4
moves the ship as appropriate. This allows for a smoother control using the
keyboard.
The mouse is slightly different. The player can move the mouse quickly
or slowly, but it wouldn’t be a good idea if the ship moved quickly along with
the player’s mouse pointer. So the mouse’s input loop checks the mouse
position and slowly moves the player toward the current position. Therefore if
one uses the mouse to play it is recommended to move the mouse pointer more
slowly.
4.2.2. Player Ships
The player has a ship object attached to it. There are several methods
that are usable to move the ship around, the keyboard and the mouse. Due to
the way the keyboard handles input, it’s recommended to use the mouse for
movement and the keyboard for firing.
There are several different ships the player can choose from. Depending
on the ship chosen, the availability of weapons, velocity, and power are
affected.
The ships the player can choose from are:
•
Deep Space Ship: Moves at regular speed. It can handle many different
kinds of weapons, but not the most powerful version of each weapon.
•
Royal Ship: This ship moves slowly and fires slow bullets. When
powered up, it can shoot three bullets at once.
•
Hyper Ship: This ship fires wave-like shots with a large target area.
When powered up, the waves’ areas are even larger.
•
Speed Ship: This ship is small, fast, and hard to hit. It also shoots very
rapidly. However, its attacks do not do much damage. When powered up,
its shots spread out a bit, and become faster and weaker.
5
In addition, the player can acquire power up weapons during the course
of the game.
•
Gun Powerup: This increases the power level of the ship’s gun. Which
weapon this turns into exactly is dependant on the ship and is covered
above.
•
Double Gun Powerup: Takes the player’s current weapon and creates
two of them. However, this takes into account only the actual bullets, not
where the player’s original gun is shooting them. So for example if the
player is using the Royal Ship and shooting three bullets at a time,
picking this up would only shoot two bullets at a time, not six.
•
Life Powerup: Gives the player an additional life.
•
Shield Powerup: When the player picks this up, the ship begins blinking
and is immune to enemies or enemy bullets for a short while.
Each powerup weapon has several components associated with it: The
particular shots it fires, the damage it does to enemies, and the velocity of the
bullets.
4.2.3. Enemy Aliens
There are several kinds of enemies implemented in the main game:
Green Alien: moves slowly in a zigzag pattern across
the screen. Takes one shot to kill.
Red Alien: Moves straight down the screen quickly,
harder to kill.
UFO: Moves across the screen, firing shots at the
player.
Mothership: A large version of the UFO. Summons
three small UFOs and shoots flames.
6
The enemies have set formations and patterns that are created when the
level is designed. The green aliens primarily move in a zigzag formation down
the screen, while the red aliens move slightly faster straight down the screen.
The UFOs tend to move back and forth, all the while shooting at the player.
Each enemy will have a hidden life value which affects how easy it is to
kill. If the player is using a low powered weapon, it will take longer to kill than
if the player uses a high powered weapon. Each successful hit to an enemy
decreases its life by the weapon’s power. When the enemy’s life goes to 0, the
enemy is considered killed and removed from the playfield.
Some enemies have special events that run when they die. For example,
defeating the mothership enemy in Level 3 will end the level.
4.2.4. Sprite Paths
Non-player sprite movement (enemies, floating power-ups, etc.) is
determined by the “Path” object that is attached to them. The Path object
consists of a listing of points between which the object will move. Subclasses of
the Path object determine in which direction the object will take between those
points. These paths are grouped into two categories: trivial and non-trivial.
The most basic path is the straight line path. A straight line path moves
the object only from the source point to the destination point. This is most
useful for power ups which only move down the screen, to give the illusion that
they are stationary and the player ship is moving past them. Certain enemies
will also move simply down the screen, but with a high velocity to make them
more difficult to hit.
Another trivial path is the random path. An enemy will move to a point
on the screen, then move to another random point. This continues until the
enemy is defeated. The green aliens in Level 2 will use this path.
The third trivial path is the oscillating path. This path repeats the source
and destination points to make the object move repeatedly between these two
7
points. The UFO enemy uses this as it flies back and forth across the screen.
The number of oscillations can be either fixed or infinite. The UFOs are set to
infinite, so they will continue to harass the player until they are dealt with.
One of the complex paths is the enemy shot path. The path itself is not
that complex, as enemies shoot in a straight line. However, calculations must
be made to determine the end point of the line.
(x0, y0)
(x1, y1)
(x1’, y1’)
Figure 1. A shot path showing the extrapolated shot point.
When an enemy fires a bullet from the point (x0, y0) to the player’s point
(x1, y1), it cannot actually have this as an endpoint. If it used that path as an
endpoint, it would stop after reaching that point. However, the player’s ship
has most likely moved away from that point during that time. Therefore, the
point needs to be extrapolated past the player’s position.
Since we aren’t too concerned with displaying objects that are past the
screen edge, we need only to find the point (x1′, y1′) where the path intersects
the edge of the screen. However, it is necessary to find which edge it will
8
intersect first. If the path is heading largely on one axis, with very small
movement in the other, and the wrong axis was checked for the intersect, it
would be a very long time before it hits that axis, which means the bullet would
be in play far longer than is necessary.
To do this, the slopes Δy and Δx are calculated from y1- y0 and x1- x0
respectively. First we check for the degenerate cases where Δy, Δx (or both?) are
zero. This indicates that the bullet was fired straight along one of the axes. This
makes it much easier to find the edge in these cases.
For most cases, it is heading toward both axes. But which edge is it
heading closest towards? To do that, Δy is compared to Δx. However, since the
screen is wider than it is long, the aspect ratio is used as a weight multiplied to
Δy before comparing it.
Once we determine which edge the bullet is heading towards, the point
slope formula is used:
(y – y0) = m(x – x0)
m is the slope Δy / Δx. The particular edge being traveled to can be
determined by the sign of Δy or Δx, depending on which edge is being traveled
to most quickly. Then we solve for the remaining coordinate to determine the
final destination.
For example, our screen is 800 x 600 (aspect ratio 1.33) and an alien
fires from (0, 0) to the player at (120, 100). This conveniently sets Δy = 100 and
Δx =120. Since 120 < 100 * 1.33, the y axis will be reached before the x axis. In
this case, y is positive, so we know the bottom coordinate y = 600 will be the
final point.
Plugging into the equation gives (600 – 0) = (100/120)(x – 0) or 600 =
0.833x, therefore x = 720 for a final coordinate of (720, 600).
9
With the Zigzag path, several intermediate points are calculated from the
source and destination points, and are translated along an axis to determine
the final locations.
(x3, y3)
(x2, y2)
(x1’, y1’)
c
d’
(x0, y0)
θ0 ’
θ0
(x1, y1)
d
(x2’, y2’)
Figure 2. A path component modified by the ZigZag class
First, the path is split into equal segments. The segments are given as a
series of points (x0, y0), (x1, y1), etc. as in Figure 2.
Secondly, the distance d for each segment is calculated using the
Pythagorean Theorem. The angle θ0 is also calculated by obtaining the
arctangent of y0 / x0,. A constant c is given which indicates the number of
pixels to move each point segment. For each segment, c is flipped between c
and –c to move the path in different directions.
What we want now is the coordinate of the new point, (x1′, y1′). Since we
have two edges of a right triangle (d and c), we can figure out the remaining
side d′, which is the distance between the original point and the new point.
Now that we have the distance to the new point, what is needed is the
angle so we can determine where the new x and y are. We can obtain the angle
10
θ0′ by calculating the arctangent of c / d. Therefore, θ0 + θ0′ is the angle
required for the new point.
There are several identities in trigonometry which help out at this point.
sin θ = opposite / hypotenuse, and cos θ = adjacent / hypotenuse.
We apply θ0 + θ0′ as the angle. Referring to Figure 2, the hypotenuse is
the distance d′, and the adjacent and opposite sides are x1′ and y1′. Therefore,
x1′/d′ = cos(θ0 + θ0′) and y1′/d′ = sin(θ0 + θ0′).
This formula is then applied to all points on the path except the final
one, creating a jagged path.
4.2.5. Levels
Levels consist of two main things: A set of backdrops for the action to
take place, and a scheduler that keeps track of items and places them on the
screen. In addition, each level has a number and a music file that plays while
the level is being played.
The backdrop for the first level is a star field. Several threads run, one to
scroll the star field and the other to change the color of the stars to make the
effect more dynamic. The position of each star is tracked separately. When one
moves off the bottom edge it is moved to the top edge in a random position.
This keeps the playing field looking random.
In the second level, two background layers are created. A cloud image is
loaded and tiled to create a background with many clouds. One of the layers is
placed above the player and enemies, to give the illusion of depth. These two
layers scroll independently of each other to further add to the display of depth.
The scheduler is implemented by a PriorityQueue object. This places
scheduled events in a tree for fast, ordered access of approximately O(log n)
access time. There are two kinds of events: Level events, and item events. What
the events have in common is the placement time. When the level starts,
11
objects are placed into the scheduler according to the placement time. A level
end event is placed into the scheduler also at the end of levels 1 and 2. When a
certain time has elapse, the level will end and the player will move on to the
next level.
For items and enemies, several fields are kept track of: the object to be
placed, the initial position, and the Path it is to take when moving. When this
object is taken off the scheduler, it is moved to the initial location and sent
across the specified path.
However, during level execution, objects could also place their own
events into the scheduler. For example, in level 3, the large UFO enemy will
periodically place new enemies onto the play field. In addition, since completion
of the level depends on defeating this enemy, it does not have a normal level
end event. Instead, when the large UFO is defeated, a level end event is added
to the scheduler.
5. Deployment
5.1 Java Web Start
One of the problems involving Java applications is how to distribute the
application. True, a JAR (Java Archive) file can be packaged and given out,
however it is not clear how to run these files. There is no apparent difference to
the end-user between a JAR file that contains an application and one that
merely contains class files or resources used by one. Also, it is difficult to
provide updates since the user would have to look for a new version each time.
Previously, applets were used. The original Project: Deep Space game ran
as an applet. However, this was dependant on which browser and version of
Java was used. Some people had Sun’s JRE installed but their browser was
still using Microsoft’s VM. Also, applets require the web browser to run, and
this might hinder performance of the browser while the applet is running.
12
Applets are not as powerful as applications. Applications can create their
own dialogs, or run in full screen mode. For this reason, there needed to be an
easy way to run applications online, so Sun created the Java Web Start
platform.
5.1.1. Creating a Java Web Start application
Java Web Start applications are not much different than regular
applications. All class files and resources must be packaged in JAR files. Since
this is a recommended practice even for regular applications, this part is not a
problem.
The main portion of a Java Web Start application is creating a JNLP
(Java Network Launching Protocol) file which explains the application and the
resources used.
<?xml version="1.0" encoding="utf-8" ?>
<jnlp spec="1.5+" codebase="http://cs.calstatela.edu/~corona/cs491/"
href=“DeepSpace2.jnlp">
<information>
<title>Deep Space 2</title>
<vendor>C. O.</vendor>
<homepage href="http://cs.calstatela.edu/~corona/cs491/" />
<description kind="short">Deep Space 2 - the game</description>
<icon href=“DeepSpace2.gif" width="50" height="50" />
<offline-allowed />
</information>
<resources>
<j2se version="1.5+" initial-heap-size="8m" />
<jar href="DeepSpace2.jar" />
</resources>
<security>
<all-permissions />
</security>
<application-desc main-class="DeepSpace2.GameManager" />
</jnlp>
13
Figure 3. JNLP File
A JNLP file is an XML file which contains information such as title,
software vendor, links to the home page, and a description. Additionally, an
icon can be displayed which will be shown while launching the application.
The JAR files required for the application are given in the resources
section. When the Java Web Start launcher starts, it checks online to see if
newer versions of these files exist. If so, then only the ones that have changed
are downloaded. In the Deep Space 2 game, the images and sounds are placed
in separate JAR files. This way, if a change to the code is made, the resources
will not have to be downloaded again.
5.1.2. Security
One additional feature is the security requirement specified in the JNLP
file. Since Deep Space 2 requires full-screen mode, the application must be run
in secure mode. If it is not, security exceptions will be thrown at run time.
In order for the application to run, the JAR files must be signed with a
security certificate. These are generated using the keytool and jarsigner
applications included with the JDK.
6. Performance Evaluation
6.1 Experimental Setup
This game was run on the two different computers mentioned in section
3. The native modes for each were one at 1280x1024, the other at 1280x800.
Both the native resolutions and the game’s recommended resolution of
800x600 were used.
14
6.2 Experimental Results
The older computer run way too slow at 1280x1024, however
performance was acceptable when the resolution was lowered. The more
powerful computer performed much faster in either graphics mode.
Using bitmapped graphics seems to be much slower than dynamically
generated graphics using the Java 2D API. In both cases, the data for the ship,
aliens, bullets, etc. is either loaded from a file or generated with Java2D calls
(fillOval to draw ovals, etc.), saved as a BufferedImage, and then cached for
later retrieval. Despite their caching as similar images, the performance
improved noticeably when the generated graphics were used.
For the sky background level, performance degraded largely when
bitmapped images were used instead of generated graphics. Even on a more
powerful machine, the entire game was slowed down by this degradation.
If time were less of a concern, performance could be maximized by
converting all graphics used to generated graphics. However, the time required
to do this is prohibitive, since instead of drawing them using a paint program,
they must be written down as a set of instructions, tested, debugged, and
modified.
6.3. Performance Enhancements
The performance of this application was improved in several ways. One
way was in reuse of objects. In the first quarter’s demo, performance was
degraded by the creation of many small objects. A sprite cache and sound
cache was created to cache images and sounds so they would not have to be
reloaded constantly. These are implemented using a hash map where keys
(strings) would be matched to created images or sounds.
Increasing the heap size had a small improvement. When running the
program using the –verbose:gc logging parameter, the heap size would quickly
pass the 4MB default size and hover slightly above there. When the heap size
was increased to 8MB, performance was a little better at the beginning, due to
15
less frequent garbage collection required. However, this only affected the
beginning when the application is first loaded, since later the JVM would
automatically increase the heap size itself.
6.4. Analysis
This game works a lot faster on a more powerful computer. Perhaps it is
due to non-optimized programming or the Java platform itself, however
additional overhead seems to be required when playing this game. A relatively
fast computer is recommended.
On the Linux platform, performance is much slower. There are vendor
specific modules for the video card I was using, however they were not available
for the particular kernel I had, and since they were not open source, I could not
compile them myself. Therefore, I used the standard drivers. Performance on
this system was much slower, even slower than the Pentium II system.
However, the Java sound capabilities were not affected.
7. Conclusion
This project shows that the Java platform has matured enough to allow
development for high-speed games where previously it did not.
However, there is still enough overhead that the game does not run very
fast on older computers. Improvements in the game’s design can be made to
help alleviate this problem.
8. References
8.1. Software
Java Development Kit: http://java.sun.com/
Eclipse IDE: http://www.eclipse.org/
Audacity Sound Editor: http://audacity.sourceforge.net/
16
8.2. API and References
Java2D: http://java.sun.com/products/java-media/2D/
Java Sound: http://java.sun.com/products/javamedia/sound/index.jsp
Java Web Start: http://java.sun.com/j2se/1.5.0/docs/guide/javaws/
Video Game Music: http://www.vgmusic.com/
Appendix A. Function API
A.1. Class Hierarchy
Important classes used in this project were:
Sprite: An object with an image attached to it. It has basic components such
as location x/y, velocity, and destination (for moving objects).
Shooter: A subclass of Sprite that defines a moving object (either player or
enemy) that has the capability to fire weapons. In this case only the player
object was using it.
Ship: A subclass of Shooter that defines the player’s ship. It contains interfaces
to be moved around by the player.
Gun: This class is what Shooter objects use to fire weapons. It contains
information such as the bullets able to be fired, the sound effects used, and the
rate of fire. When firing a bullet, it generates a Shot object and sends it to the
top of the screen.
Shot: A bullet fired by a Gun object, this inherits from Sprite. The main
difference is its drawing model. It is smoother than the player’s object model
since it typically only moves in a single direction.
Enemy: An enemy that moves around the screen. If it comes into contact with
the player, the player will take damage.
Fatal: This is an interface used by Shot and Enemy. This denotes any object
capable of inflicting harmful damage.
17
Level: The base class of all levels.
A-2. Methods used
This section only covers the more important methods.
Sprite.checkintersects()
Checks to see if a sprite intersects any ‘interesting’ sprites. For shots it
checks the enemies, and for the enemies it checks the player.
Sprite.intersect(Sprite)
Called on the target sprite when hit. Does nothing by default, but can be
overridden.
Shooter (player/enemy): calls hit()
Powerups: Player gains weapon.
Shooter.hit(Fatal)
Object is hit by a harmful bullet. Calls .damage to subtract the bullet’s power.
Shooter.damage(int health)
Target loses life. If life goes to 0, calls .die()
Shooter.die()
Enemy is removed from play and score is added. If player is killed, player loses
a life.
Appendix B. User Manual
B.1. Installation
Deep Space 2 requires the Java Runtime Environment (JRE), version 5.0
or above. The latest version of the JRE can be installed from
http://java.sun.com/.
The easiest way to play is to run the program using Java Web Start,
which is included with the JRE. Open the game URL:
18
http://cs.calstatela.edu/~corona/cs491/DeepSpace2.jnlp and the game will
download automatically. Your browser may require you to ‘open’ the file first.
A security warning will come up, at which point you should click ‘yes’ to
continue. The security warning is necessary because the game uses full screen
mode.
An alternate way is to use the included DeepSpace2.jar file. With most
installations of Java you can double click on this file and it will start. From the
command line you can use this command:
java -jar DeepSpace2.jar
B.2. Compilation
This game can also be compiled from source. If you have the source
directory, open it in your favorite IDE and compile it from there. From the
command line, compilation is a little different since there are several different
packages to compile. Unfortunately, there is no Ant build script available. The
command to compile the packages is:
javac -classpath .. *.java enemies/*.java levels/*.java
ships/*.java weapons/*.java
if you are in the directory named DeepSpace2 where the sources are.
To run it afterwards you will also need to set the class path, using the
command:
java -classpath .. DeepSpace2.GameManager
B.3. Starting a game
Once the game is started, you will see the Deep Space 2 title screen. (See
Figure 4).
Press ESC to bring up the menu. The menu can be brought up at any
time during play.
19
Figure 4. Title Screen
From this screen, you can either start a new game, or quit.
The ‘n’ button may also be used to start a new game, but only from the
title screen.
Once you start the game, you’ll be presented with the ship selection
screen. (See Figure 5)
20
Figure 5. Ship Select
There are four different ships you can select from:
•
Deep Space Ship: Moves at regular speed. It can handle many
different kinds of weapons, but not the most powerful version of
each weapon.
•
Royal Ship: This ship moves slowly and fires slow bullets. When
powered up, it can shoot three bullets at once.
•
Hyper Ship: This ship fires wave-like shots with a large target
area. When powered up, the waves’ areas are even larger.
•
Speed Ship: This ship is small, fast, and hard to hit. It also shoots
very rapidly. However, its attacks do not do much damage. When
powered up, its shots spread out a bit, and become faster and
weaker.
21
B.4. Playing the game
Figure 6. Game Play
The player can be controlled using either the keyboard or mouse. Use the
keyboard’s arrow keys or move the mouse to control the ship, and press the
spacebar or hold down the primary mouse button to fire.
The upper left hand corner of the screen displays the score. When an
alien is shot, the score increases. Aim for the high score!
The player starts with three ships. If the ship is struck by an alien then it
will be destroyed and one of the player’s spare ships will be deployed. If all
ships are destroyed, then the game is over.
During play, you may come across additional armaments that will
increase your destructive capabilities. Use these to wipe out all enemies in your
path! Good luck!
22