1
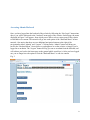
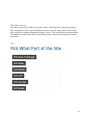
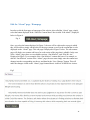
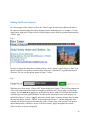
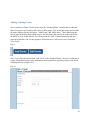
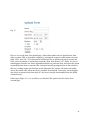
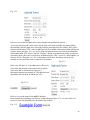
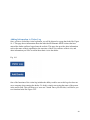
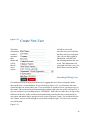
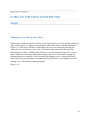
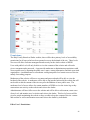
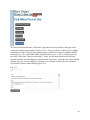
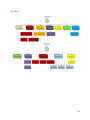
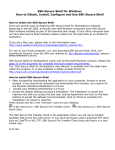
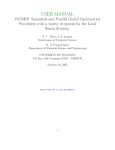
HOLY FAMILY HOME AND SHELTER WEBSITE USER MANUAL 1 Table of Contents Preface: ......................................................................................................................................................... 3 History of the Student Chapter of AITP at ECSU ....................................................................................... 3 ECSU’s Involvement with Holy Family Home and Shelter ........................................................................ 3 Overview of the Website: ............................................................................................................................. 5 Terms You Will Need to Know: ..................................................................................................................... 7 Site Tutorials ................................................................................................................................................. 8 Site Login ................................................................................................................................................... 8 Accessing Admin Backend ......................................................................................................................... 9 Edit Site Content ..................................................................................................................................... 10 Edit the “About” page / Homepage ........................................................................................................ 11 Editing Site Picture Uploads .................................................................................................................... 12 Adding / Editing Events ........................................................................................................................... 13 Creating a recurring event ...................................................................................................................... 16 Editing Pre-existing Events ...................................................................................................................... 18 Adding Downloadable Forms .................................................................................................................. 20 Visitor Log ............................................................................................................................................... 23 Adding Information to Visitor Log........................................................................................................... 24 Searching/Editing Users .......................................................................................................................... 25 Adding log entry/edit log entry/delete ................................................................................................... 26 Permissions: ............................................................................................................................................ 27 Links: ....................................................................................................................................................... 28 Site Map .................................................................................................................................................. 30 Technical User Manual................................................................................................................................ 31 Technical Support Team Contact Information ............................................................................................ 32 Academic Advisor Contact Information ...................................................................................................... 32 2 Preface: History of the Student Chapter of AITP at ECSU The Eastern Connecticut State University (ECSU) Student Chapter for the Association of Information Technology Professionals (AITP) is dedicated to providing opportunities to expand knowledge of Information Systems and Technologies to student chapter members. AITP also demonstrates professional development through service learning projects, guest speakers, company visits, and business networking. The mission of the ECSU AITP Student Chapter is to provide students in the Business Information Systems, Business Administration, and Computer Science fields an opportunity to be exposed to important technology/information systems related information and skills that may not be taught in classes which can help them develop professionally, find jobs, and will help them in their future careers. ECSU AITP has been facilitating professional networking amongst students and community and industry professionals since its founding in Fall 2006. The ECSU AITP Web Application Project Team was awarded an Honorable Mention at the 16th Annual Association of Information Technology Professionals National Collegiate Conference held in Orlando, Florida for the We-Care-Info information hub. At the 15th Annual Association of Information Technology Professional National Collegiate Conference held in St. Louis, Missouri, Eastern Connecticut State University’s AITP Student Chapter Database Driven - Web Application Project Team won first place in the national championship of the Web Team Project Contest sponsored by the Institute of Certified Computer Professionals. ECSU’s Involvement with Holy Family Home and Shelter The ECSU AITP Student Chapter first involvement with Holy Family Home and Shelter during the Fall 2006 Semester. The ECSU AITP Chapter for community service that year decided to bake homemade pies with half of the proceeds going to the pie ordering individual’s choice of one of four charities and the other half to help pay for chapter members to go to the 2007 AITP National Collegiate Conference in Detroit, Michigan. The four charities were: Covenant Soup Kitchen, Community Prevention Addition Services (CPAS), Windham Regional American Cancer Society, and Holy Family Home and Shelter. Thus, in early 2007, ECSU AITP Student Chapter members presented a check to Holy Family Home and Shelter, which provided an opportunity for more AITP members to see firsthand the smiling faces of the children at the shelter. During subsequent years, when the ECSU AITP Student Chapter would do a pie baking 3 charity fundraiser, Holy Family Home and Shelter was always included among the four designated local charities that pie buyers could select. While working on designing and building the database driven website for Covenant Soup Kitchen for the 2010 AITP National Collegiate Conference Competition, the close collaboration with and importance of Holy Family Home and Shelter became apparent. For the 2011 AITP National Collegiate Competition, Holy Family Home was one of the key non-profits in creating a local nonprofit inter-organizational website and database. During the 2011 competition project, the dire needs of Holy Family for a better website and Internet presence became apparent to all ECSU AITP Student Chapter members. Thus, this led to the current ECSU AITP Student Chapter officers to ask Holy Family if they wanted to take part in the 2013 competition to which they agreed. 4 Overview of the Website: The new replacement version of Holy Family Home and Shelters’ website will provide additional new benefits to this non-profit organization and the Willimantic community as a whole. This new website will provided much needed functionality, organization, easily accessible information, and a new modern look compared to the shelters’ old website. The added functionality of the website will prove to be useful because of the ease of use of editing site content, recording visitors in a chronological log, storing volunteers hours, uploading forms and documents that the public may need to access, and have an events list feed that is edited on the backend and displayed on the general public front end. Overall, the improvements made to the website will prove to be beneficial to HFHS in the long run because of the added functionality and the ease of use of the website. Before the Holy Family Homeless Shelter’s website was revised, the old site provided a brief description of the organization, provided links to its nonprofit partners, and provided dates to upcoming events. This unaltered version had an outdated look, dead links, and old noncurrent information. These problems have contributed to confusion and frustration to people looking at the site and potential clients and donors may have been turned off by those issues. The site has been neglected and has not been changed or even maintained until this new version was made, mainly because the previous design was not able to be maintained by the HFHS staff. The Holy Family Homeless Shelter website was not as effective as it could have been because of its outdated content and information. There are many new features that have been introduced into the revised website. These features include a user friendly interface, easy to update events and content, a visitor log to track shelter visitors and volunteers, updated organizational content, and a brand new look to the whole website. These added features and updates were greatly needed due the great demand for easy to access information and the need to convey new information to potential clients and donors. The new interface will allow people to easily navigate the site without problems due to its simple design. The navigation buttons are conveniently placed on the top of the page and information is placed in easy to read blocks with an appropriate easy to read font. The back end has been designed to be user friendly so that no coding is required by HFHS staff to change the content of their website. A visitor log has been added so an admin can monitor visitors and content edit capabilities have been added to the website. It was also updated with current information so people will not confuse it with old information and on top of all that it was given a new more modern look. These new features and updates will benefit the Willimantic community HFHS serves greatly by allowing greater communication and ease of use. These new updates and features will allow the Holy Family Homeless Shelter to communicate with volunteers and the needy more effectively. They will also be able to convey their needs to a much wider audience so that they may be able to more effectively serve the needs of the 5 Willimantic homeless children and families in the community. Their newly revised website will allow this non- profit to become more efficient and effective in its activities. The site before its revisions was able to serve its purpose but it was not able to grow and improve along with the Holy Family Homeless Shelter. The site was not updated previously because the content was not able to be edited by the HFHS staff, but only by the creator of the website who neglected to maintain and update the content and related information. An administrator user interface was added to the site and the overall styling of the site was replaced. These new update allows the site to be functional for HFHS staff, volunteers, and those in need. It is now easy to update so that it will provide current information for the foreseeable future. 6 Terms You Will Need to Know: Administrative Users: Those individuals who have access to the backend of the website and have the permission levels to change the content (website text, forms, volunteer log) on the website. They also have the ability to add new users who have access to the backend. Backend: The private side of the website that administrative users must log into in order to add/edit/delete information for public and private viewing. Frontend: The frontend of the website is what the general public sees when they visit the Holy Family Home and Shelter (HFHS) website. Address Bar: The address bar is the long box on the top of the internet browser, this is where the URL of the website is entered in order to view the website. URL (Uniform Resource Locator): The link of the website entered into the address bar (http://www.holyfamilywillimantic.org). Button: A button is a styled link to another section of the website. Click: Shorthand referring to left clicking the mouse. Cursor: The arrow or that moves around the screen when the mouse is moved. Database: A database is where information entered into the website is stored. Edit: The ability to change or modify information. Volunteer: A volunteer is a person from the community who is donating their time to the HFHS shelter. Their personal information is stored within the database and a username and password is created for them. Their information is also added into the visitor log every time they arrive and leave the shelter. Visitor Log: The visitor log is a portion of the website that keeps track of volunteer’s hours, so that the information is easily accessible and compiled into reports. Navigation Header: At the top of the website pages where the buttons are located which allow users to easily access different portions of the website Permission Level: The access level granted to an organizational member to allow administrative rights to (Add/Edit/Delete/View) in each category if the site. Private: Information that has been assigned restricted access, only available to backend members. Public: Information that can be accessed/viewed by the general public. 7 Right Click: A Right Click is the same action as a ‘Click’, only you use the button on the right side of your mouse. HFHS: An acronym for Holy Family Home and Shelter Site Tutorials Site Login By logging in to the back end of the Holy Family website, authorized users can access the Administrator (Admin) Portal which allows users to edit site content, add events, forms, edit the visitor log, and change other content that’s visible to the general public. This step by step tutorial will guide users through the actions required to access the Admin Portal, and explain how to edit the content on the website. In order to access the webpage which allows users to edit site content as an admin, visit the URL (www.holyfamilywillimantic.org/login.php). This page allows you to enter in an admin username and password, and will allow the user to view the “backend” of the website, from which content can be added, uploaded, edited and replaced. Fig. 1 Figure 1 above displays what should appear when a user enters in the URL in the above Address Bar URL text. Enter an authorized username and password in the above text boxes and hit the “Login” button in order to access the admin portal. 8 Accessing Admin Backend Once you have logged into the backend of the website by following the “Site Login” instructions above, you will be redirected to the “backend” menu page of the website. On this page, the menu displayed in Figure 2 will appear, from which you are able to select various parts of the website to edit/add/revise content. This tutorial will go into each option of the “Backend Menu” in later tutorials. Also notice that there are two additional navigation buttons to the right of the navigation bar titled “Admin” and “Logout.” Clicking on the “Admin” button will bring you back to the “Backend Menu” from wherever you happen to be on the website, as long as you’re logged in as an admin. The “Logout” button will log you out as an admin from the backend, and will redirect you back to the home page as the general public would see it. After you have logged out, you no longer have the option to visit the “Backend Menu” or edit site content. Fig. 2 9 Edit Site Content Once the user selects the “Edit Site Content” from the “Backend Menu” displayed in Figure 2, they will be redirected to a page which allows the user to specify which section of the website they would like to change as displayed in Figure 3 below. This tutorial will go into detail about each editable section of the website on the following pages and provide relevant task stepwise instructions. Fig. 3 10 Edit the “About” page / Homepage In order to edit the front page or homepage of the website, also called the “About” page, simply select the button displayed in the “Edit Site Content Menu” that is titled “Edit About”, displayed below in Figure 4. Fig. 4 Once you select the button displayed in Figure 5, the user will be redirected to a page in which they will be able to simply edit the titles for the page content, as well as the content that is to be displayed on the “About” page. This edit page is displayed in Figure 5 below. The edit content page will display two content edit boxes for each section of the page that is editable. In the case of the “About” page, there are two editable sections; “Our Mission”, and “Who We Are.” Displayed in Figure 5 is an example of the “Our Mission” content edit boxes. For example, to edit the “Our Mission” section of the “About” page, the user must simply enter the content text changes into the corresponding text boxes, and then hit the “Save Changes” button. This will make the changes visible on the “About” page frontend that is visible to all HFHS site visitors. Fig.5 11 Editing Site Picture Uploads On various pages of the website (such as the “About” page the tutorial just addressed) there is the option to upload images that will be displayed on the frontend page. For example, view the image on the right side of Figure 6 below which displays on the front end general Internet public “About” page. Fig. 6 In order to change the image that is displayed above in the “About” page in Figure 6, there is an option to upload a new picture to that location in the same “Edit About” page that this tutorial discusses. We can see this upload option in Figure 7 below. Fig. 7 When the user clicks on the “Choose File” button displayed in Figure 7, they will be prompted to select a file stored somewhere on their computer to upload to the “About” page section of the website. The file must be a .jpg image, preferably less than a width of 450 pixels and less than 120 KB to prevent slow page load times, in order for the upload process to work properly (as specified in Figure 7). Once a .jpg file has been selected from a computer storage drive location, the user only has to click the “Upload” button displayed in Figure 7, and the image they have selected will then be displayed automatically on the “About” page of the website. This picture upload functionality is found in various “Edit Site Content” pages throughout the website wherever there are pictures displayed. 12 Adding / Editing Events If we remember in Figure 2 in the above steps, the “Backend Menu” contains links to edit and add various pieces of content for the various website pages. Two of the links in the menu include the pages displayed below in Figure 8; “Add Events” and “Edit Events.” These links bring the user to pages that allow them to add, remove, and edit future and past events to the website for the public to view. In this tutorial, we will start with the “Add” events functionality and then proceed to edit that event. For the purposes of this tutorial, we will create a new event titled “Test Event.” Fig. 8 Once a user clicks the button titled “Add Event” in the “Backend Menu”, the user is redirected to a page which allows them to enter information about a particular upcoming or past event which is displayed below in Figure 10-1. Fig. 9-1 13 Once a user selects the “Add Event” Button they will be brought to the “Event Creation Form” that is displayed between Figures 9-1 (immediately above) and 9-2 (displayed below). This editable form page allows users to enter in information related to an event such as an event name, contact person, location, description, and details regarding the date(s) and times of the event. Fig. 9-2 Once the primary information has been entered for the event such as event name, contact person, event type, and other related details, the user can select the event’s date options. For selecting a date for an event, there are several options that are available to the user given the various reoccurring styles of events that organizations and groups commonly user such as Weekly, Monthly, Yearly, etc. In Figure 9-3 below, we can see that when a user selects the box to enter in start / end dates for an event, a calendar pops up which allows for easy selection of the respective dates. Fig. 9-3 14 Similarly, when a user needs to select a start time / end time for a particular event, they can simply select the time of day by manipulating the up and down arrows in the respective boxes. This option is displayed in Figure 9-4 below. (Note: for some old browser versions, time may need to be entered manually. Fig. 9-4 15 Creating a recurring event In Figure 9-4 above, there is an option to select from a dropdown menu to determine whether or not an event is recurring, or in other words, occurring more than one time over the course of a year. Looking at Figure 9-5 below, we can see in greater detail what options appear based on which selection the user chooses in the “Recurring” drop down menu. Fig. 9-5 When a user selects the option “Daily” in the “Recurring” drop down menu, two additional text boxes appear in which the user can specify how often they would prefer an event recur. For example, in Figure 9-5 when we enter in “2” in the “Repeat” text box and have recurring “Daily” selected, this causes the event to be displayed as recurring every other day. The date that we select from the calendar for the “Until” box specifies until which date the event should be held on every other day. This option in the “Recurring” dropdown menu is best for events that occur multiple times within the span of a week. If an event is going to occur multiple times over the 16 course of several weeks, the “Weekly” option might be more useful, which this tutorial will explain in greater detail with the following Figure 9-6. Fig. 9-6 Here in Figure 9-6, we can see what happens when a user selects the “Weekly” option from the “Recurring” dropdown menu. In addition to the “Repeat” and “Until” text boxes that appear when the “Daily” option is select, the user will now see an “On” selection appear which allows them to specify which days of the week they would like to have the event occur. Now, instead of the “Repeat” box specifying the days as above, it specifies the number of weeks after which the event should occur. In the example in Figure 9-6, where “2” is selected for “Repeat Every”, this will cause the event to be listed as recurring every other week, until the date specified in the “Until” box is reached. If an event occurs on multiple days each week, then the user can specify that by checking which days of the week the event is held for each week that the event repeats. The “Monthly” and “Yearly” options displayed in the “Recurring” dropdown menu operate basically the same way as the “Daily” option, with the obvious exception that it displays the event as recurring every month or year respectively until the end date that is specified. The “Event Status” dropdown menu that is displayed most clearly in Figure 9-4 allows the user to choose what status the event has when displayed to the public. In the following Figure 9-7, we 17 can see all of the various options that are available for determining the status of any particular event. Fig. 9-7 Editing Pre-existing Events Once a user has created an event, it is likely that they may wish to edit the contents of that event’s details, the initial date of the event, and potentially add additional dates for holding the event. In order to edit an event that has already been created, let’s refer to Figure 9 where we can see a button that exists in the “Backend Menu” called “Edit Events.” Once the user selects this button, they will be brought to a backend version of the “Events” page which contains “Edit” buttons next to each event listing. We can see an example of this page below in Figure 10. Fig. 10 Once a user selects the “Edit” button that is displayed to the left of each event listing, they will be brought to a page similar to what is displayed when a user is creating an event, but the preexisting information for that event will be visible in the respective text boxes for editing. We can see an example of an editable preexisting event in the following Figure 11-1 and 11-2. 18 Fig. 11-1 In Figure 11-1 above, we can see how the information previously entered for this particular event is visible to the Admin user if they wish to edit any aspect of the event. Fig. 11-2 In Figure 11-2 above, we can see that the information for each date is available for editing, considering many events will have multiple dates, especially if they are recurring events. There is also the option to add an additional date for an event, if the user decides that an event should be extended, or held on multiple dates in the future. Selecting either of these options will bring the user to pages similar to Figure 9-4 above, where the user will be able to either edit preexisting event date information, or add an entirely new date for an event. Once the user 19 selects the “Update Event” button for the event, all of the changes will be saved and displayed on the frontend “Events” page accordingly. This concludes the portion of the tutorial related to creating and editing events. Adding Downloadable Forms There is a section of the website where users may download forms related to the various operational activities and tasks of the organization such as volunteer applications, assistance applications, and various other forms, reports and policy guidelines. Admin users are able to add, and remove the particular form files that are available for download to the general public for their use. In order to access the “Edit Forms” page, please refer to Figure 2 where the button “Add Forms” is visible. Once a user clicks on this button, they will be redirected to a page that looks like Figure 12 below. Fig. 12 Here the admin user is able to see the current listings of forms which are available to the general public for download. Users are also able to upload additional forms in .pdf format for downloading. When a user selects the “Add Form” button displayed above in Figure 12, they are redirected to a page which allows them to upload a form (from a local storage location on the computer’s drive), and enter in details related to a particular form which is to be displayed to the general public as shown in Figure 13 below. 20 Fig. 13 Here we can see the basic form upload page, which allows admin users to upload forms from either a website URL or from their computer by selecting the respective radio button selections titled “URL” and “File.” First, this tutorial will discuss how to upload a form from a particular URL, and will continue to explain how to upload a form from the user’s PC. Below we can see what happens when the user enters information related to a particular form, and selects the option to upload the form from an external URL. Instead of actually posting the form to the website in this case, clicking on the specified form on the frontend of the website will redirect the public user to the website URL where the form is available for download. Conversely, when an admin user selects to upload a form from their PC, the form is actually downloadable from the HFHS website directly. Following in Figure 13-2, we are able to see what the URL option looks like for the form creation page. 21 Fig. 13-2 Here we can see that the admin user in this example has specified the website “www.test.com/form.pdf” as the source for the form to be made available for general public downloading. When a public user selects the form for download from the website, they will be redirected to the above URL, where a .pdf form will be available for download from a third party website. Below in Figure 13-3, we can see what is displayed when a user selects the alternative radio button titled “File” there is also the “Replace” option, if an admin user wishes to replace a preexisting form with a new revised form. In addition to the “URL” and “File” radio buttons, we can also see the “Required Yes / No” radio buttons which allow the admin user to specify whether or not a particular form is required for an instance. Fig. 13-3 In the case of Figure 13-3, the admin user will have to select a file that already exists on their PC for public users to be able to download. In Figure 14-4, this tutorial displays an example of a file that has been uploaded to the site from an admin user’s PC. Fig. 13-4 Here we can see the name of the .pdf file that has been selected for uploading to the website. In the following Figure 13-5, we can see the end result of a form file uploaded to the frontend of the website. Fig. 13-5 22 Now when a user clicks on the link for “Example Form” displayed in Figure 13-5, it will automatically prompt them with the option to download the form to their PC. This concludes the section of the tutorial for adding and uploading forms. Visitor Log The backend of the website also contains a visitor log that describes when individuals (volunteers, etc.) enter and leave the shelter. You can access this by logging in using the same method as before and clicking on “Visitor Log.” Fig. 14 23 Adding Information to Visitor Log Once you have clicked the visitor log button, you will be directed to a page that looks like Figure 14-1. This page shows information about the individual Willimantic HFHS visitors that have entered the shelter and have logged onto the website. This page also provides other information such as the name of their organization, the start time of their visit, end time of their visit, and other information you’d like to add in about their visit to the shelter. Fig. 14-1 One of the functions of the visitor log includes the ability to add a user to this log who does not use a computer when entering the shelter. To do this, simply start typing the name of the person in the search field. This will bring up a “new user” button. Once you click this, it will direct you to a form that looks like Figure 14-2. 24 Figure 14-2 This form information to add so username. their button and will be then be to the system. will allow you to add about the user you would like that they can log in using their Once you are done typing in information, click the Save the information about this user saved. This information will associated with their every visit shelter that is entered into the Searching/Editing Users Given that there may be many users that will be logging into the website visiting the shelter, there needs to be a search function. If you refer back to Figure 14-1, you will notice the same search box that you used to add a user. If you would like to search for a user, just start to type in their name. The search results will automatically populate right below the search. In Figure 14-3, you can see that we are searching the user “Will Smith”. Notice that we didn’t have to type in the full name of the user, as the results list will automatically search and retrieve results based on your input, and match what is typed in it to all or part of the user’s name. You can then click the user’s name, and you will be brought to a form that resembles Figure 14-2 where you can edit user information. Figure 14-3 25 Adding log entry/edit log entry/delete We have also included the ability to edit the visitor log at any time. You will be able to add a log entry, edit a log entry, or delete an entry altogether. Moderators will see a display identical to Figure 14-2. This screen will allow a moderator to log a user out remotely by checking the “check out” box, and clicking “Save Visit”. This allows some control, but allows no other information to be edited. Administrators will have a view that looks like Figure 14-4, which allows much more control than what moderators have. Here, you will be able to change any information that you would like. This can range from changing a user’s visiting time/date to removing the log entry altogether if recorded into the log by mistake. Once changes are made, clicking “save” will make the change permanent. Figure 14-4 26 Permissions: The Holy Family Homeless Shelter website, there will be three primary levels of accessibility permissions for all users who have been granted access to the backend of the site. These levels of access will allow for better management and security for the whole website of HFHS. Users with public level will only be able to view the contents of the website and will not be given a username and a password. A person with moderator or administrator permissions could create a public user by inputting the public user’s name, contact information, and their associated organization. An administrator or a moderator could grant public level status to users of the site mainly for tracking purposes. Moderators of the website will have a user name and password and will be able to view the backend of the website. A moderator will be able to log into the backend of the website but will not be able to edit the content of the site except for the addition of more public users. The moderator level of access allows for certain members of HFHS to view the visitor log so they can monitor user activity on the website and visits to the shelter. Administrators will have full access to the website and will be able to edit content, create users of any level, and monitor users’ activities and visits to the shelter. This level of access will be given to people maintaining the website so they are able to keep the content of the site current and accurate as well as and monitor users and visits to the shelter by individuals. Edit a User’s Permissions: 27 To edit a user’s permissions, you must be logged in to the backend as an administrator, or a moderator. 1. Click on the “Admin” button in the navigation bar on top of the screen. 2. Click on the “Visitor Log” button. This will show all current activities performed by users. 3. Type the name of the new user into the search box labeled “Search User by Last Name:” 4. Click on the New User button that will pop up under the search box. 5. Input the new user’s information such as their name, user name and password (if they are being given Moderator or Administrator permissions), contact information, permissions level, organization level, e-mail address, and their date of birth. 6. Click the “Save” button to save and create the new user. Links: To edit the links page of the website, you will have to click on the “Edit Links” button from the “Edit Site Content” page displayed on the following Figure 15. Fig. 15 28 The user will be directed to the “Edit Links” page where they may edit the Links page of the website provided to general public website viewers. They can edit the “Links Page” by adding or taking away links. The user may segment groups of links into sections by using the HTML break tag (ex. (</br>)) and bolden lables using the header tag (ex. (</H1>)) in the second edit box in the “Edit Links” page as shown below. Lastly, the user may edit the title of the page currently named Links and change it to another name if necessary. After the user is done making changes, they may save the changes by clicking “Save Changes” button below the edit boxes. An example is shown in the following Figure 15-1. Fig. 15-1 29 Site Map 30 Technical User Manual 31 Technical Support Team Contact Information Academic Advisor Contact Information 32