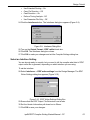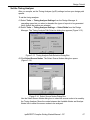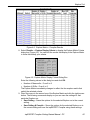
1
ispEXPERT Compiler
Getting Started Manual
Version 7.2 for PC
Technical Support Line: 1-800-LATTICE or (408) 428-6414
ispEXPERT-PC-GS Rev 7.2.1
Copyright
This document may not, in whole or part, be copied, photocopied, reproduced,
translated, or reduced to any electronic medium or machine-readable form without
prior written consent from Lattice Semiconductor Corporation.
The software described in this manual is copyrighted and all rights are reserved by
Lattice Semiconductor Corporation. Information in this document is subject to change
without notice.
The distribution and sale of this product is intended for the use of the original
purchaser only and for use only on the computer system specified. Lawful users of
this product are hereby licensed only to read the programs on the disks, cassettes, or
tapes from their medium into the memory of a computer solely for the purpose of
executing them. Unauthorized copying, duplicating, selling, or otherwise distributing
this product is a violation of the law.
Trademarks
The following trademarks are recognized by Lattice Semiconductor Corporation:
Generic Array Logic, ISP, ispANALYZER, ispATE, ispCODE, ispDCD,
ispDOWNLOAD, ispDS, ispDS+, ispEXPERT, ispGDS, ispGDX, ispHDL, ispJTAG,
ispSmartFlow, ispStarter, ispSTREAM, ispSVF, ispTA, ispTEST, ispTURBO,
ispVECTOR, ispVerilog, ispVHDL, ispVM, Latch-Lock, LHDL, pDS+, RFT, Total ISP,
and Twin GLB are trademarks of Lattice Semiconductor Corporation.
E2CMOS, GAL, ispGAL, ispLSI, pDS, pLSI, Silicon Forest, and UltraMOS are
registered trademarks of Lattice Semiconductor Corporation.
Microsoft Windows and MS-DOS are registered trademarks of Microsoft Corporation.
Other brand and product names have been used for identification purposes and may
be trademarks of their respective companies.
Lattice Semiconductor Corporation
5555 NE Moore Ct.
Hillsboro, OR 97124
(503) 268-8000
September 1999
ispEXPERT Compiler Getting Started Manual – PC
2
Limited Warranty
Lattice Semiconductor Corporation warrants the original purchaser that the Lattice
Semiconductor software shall be free from defects in material and workmanship for a
period of ninety days from the date of purchase. If a defect covered by this limited
warranty occurs during this 90-day warranty period, Lattice Semiconductor will repair
or replace the component part at its option free of charge.
This limited warranty does not apply if the defects have been caused by negligence,
accident, unreasonable or unintended use, modification, or any causes not related to
defective materials or workmanship.
To receive service during the 90-day warranty period, contact Lattice Semiconductor
Corporation at:
Phone: 1-800-LATTICE
FAX: (408) 944-8450
E-mail: [email protected]
If the Lattice Semiconductor support personnel are unable to solve your problem over
the phone, we will provide you with instructions on returning your defective software
to us. The cost of returning the software to the Lattice Semiconductor Service Center
shall be paid by the purchaser.
Limitations on Warranty
Any applicable implied warranties, including warranties of merchantability and fitness
for a particular purpose, are hereby limited to ninety days from the date of purchase
and are subject to the conditions set forth herein. In no event shall Lattice
Semiconductor be liable for consequential or incidental damages resulting from the
breach of any expressed or implied warranties.
Purchaser’s sole remedy for any cause whatsoever, regardless of the form of action,
shall be limited to the price paid to Lattice Semiconductor for the ispEXPERT
Compiler software.
The provisions of this limited warranty are valid in the United States only. Some states
do not allow limitations on how long an implied warranty lasts, or exclusion of
consequential or incidental damages, so the above limitation or exclusion may not
apply to you.
This warranty provides you with specific legal rights. You may have other rights that
vary from state to state.
ispEXPERT Compiler Getting Started Manual – PC
3
Table of Contents
Preface . . . . . . . . . . . . . . . . . . . . . . . . . . . . . . . . . . . . . . . . . . . . . . . . . . . . . . . . . . . . . . . . . . . . 7
What Is In this Manual . . . . . . . . . . . . . . . . . . . . . . . . . . . . . . . . . . . . . . . . . . . . . . . . . . . . . . . . 8
Where to Look for Information . . . . . . . . . . . . . . . . . . . . . . . . . . . . . . . . . . . . . . . . . . . . . . . . . . 8
Documentation Conventions . . . . . . . . . . . . . . . . . . . . . . . . . . . . . . . . . . . . . . . . . . . . . . . . . . . 9
ispEXPERT Documentation. . . . . . . . . . . . . . . . . . . . . . . . . . . . . . . . . . . . . . . . . . . . . . . . . . . 10
Chapter 1 Installing ispEXPERT . . . . . . . . . . . . . . . . . . . . . . . . . . . . . . . . . . . . . . . . . . 11
Installation Introduction . . . . . . . . . . . . . . . . . . . . . . . . . . . . . . . . . . . . . . . . . . . . . . . . . . . . . .
Minimum System Requirements for ispEXPERT . . . . . . . . . . . . . . . . . . . . . . . . . . . . . . .
Disk Space Requirements . . . . . . . . . . . . . . . . . . . . . . . . . . . . . . . . . . . . . . . . . . . . . . . . .
Directory Structure and Contents . . . . . . . . . . . . . . . . . . . . . . . . . . . . . . . . . . . . . . . . . . . .
ispEXPERT System Installation . . . . . . . . . . . . . . . . . . . . . . . . . . . . . . . . . . . . . . . . . . . . . . .
ispGDX Development System Installation . . . . . . . . . . . . . . . . . . . . . . . . . . . . . . . . . . . . .
ISP Daisy Chain Download Installation . . . . . . . . . . . . . . . . . . . . . . . . . . . . . . . . . . . . . . .
Interface Kit Selection . . . . . . . . . . . . . . . . . . . . . . . . . . . . . . . . . . . . . . . . . . . . . . . . . . . .
Sentinel Driver Installation (Windows NT 4.0) . . . . . . . . . . . . . . . . . . . . . . . . . . . . . . . . . .
Adobe Acrobat Reader Installation. . . . . . . . . . . . . . . . . . . . . . . . . . . . . . . . . . . . . . . . . . .
ispCODE and ispGDS Compiler File Installation . . . . . . . . . . . . . . . . . . . . . . . . . . . . . . . .
ispEXPERT Package Options . . . . . . . . . . . . . . . . . . . . . . . . . . . . . . . . . . . . . . . . . . . . . . . . .
ispEXPERT Compiler BASE Package . . . . . . . . . . . . . . . . . . . . . . . . . . . . . . . . . . . . . . . .
ispEXPERT Compiler ADVANCED Package . . . . . . . . . . . . . . . . . . . . . . . . . . . . . . . . . . .
ispEXPERT Registration . . . . . . . . . . . . . . . . . . . . . . . . . . . . . . . . . . . . . . . . . . . . . . . . . . . . .
ispEXPERT Licensing . . . . . . . . . . . . . . . . . . . . . . . . . . . . . . . . . . . . . . . . . . . . . . . . . . . . . . .
Node-Locked License – BASE Package . . . . . . . . . . . . . . . . . . . . . . . . . . . . . . . . . . . . . .
Floating License – BASE Package. . . . . . . . . . . . . . . . . . . . . . . . . . . . . . . . . . . . . . . . . . .
Node-Locked License – ADVANCED Package . . . . . . . . . . . . . . . . . . . . . . . . . . . . . . . . .
Floating License – ADVANCED Package . . . . . . . . . . . . . . . . . . . . . . . . . . . . . . . . . . . . .
Floating License Server Setup . . . . . . . . . . . . . . . . . . . . . . . . . . . . . . . . . . . . . . . . . . . . . .
Floating License Configurations . . . . . . . . . . . . . . . . . . . . . . . . . . . . . . . . . . . . . . . . . . . . .
Network Installation. . . . . . . . . . . . . . . . . . . . . . . . . . . . . . . . . . . . . . . . . . . . . . . . . . . .
Local Installation . . . . . . . . . . . . . . . . . . . . . . . . . . . . . . . . . . . . . . . . . . . . . . . . . . . . . .
Floating License Management. . . . . . . . . . . . . . . . . . . . . . . . . . . . . . . . . . . . . . . . . . . . . . . . .
Starting a License Daemon. . . . . . . . . . . . . . . . . . . . . . . . . . . . . . . . . . . . . . . . . . . . . .
Checking the License Server Status . . . . . . . . . . . . . . . . . . . . . . . . . . . . . . . . . . . . . . .
Shutting Down a License Manager . . . . . . . . . . . . . . . . . . . . . . . . . . . . . . . . . . . . . . . .
Troubleshooting . . . . . . . . . . . . . . . . . . . . . . . . . . . . . . . . . . . . . . . . . . . . . . . . . . . . . .
ispEXPERT Compiler Getting Started Manual – PC
13
14
14
15
17
18
19
19
19
20
20
21
21
21
22
24
24
24
24
25
25
27
27
27
27
27
28
28
29
4
Configuring your PC. . . . . . . . . . . . . . . . . . . . . . . . . . . . . . . . . . . . . . . . . . . . . . . . . . . . . . . . .
Windows-NT Environment . . . . . . . . . . . . . . . . . . . . . . . . . . . . . . . . . . . . . . . . . . . . . . . . .
Windows 95/98 Environments . . . . . . . . . . . . . . . . . . . . . . . . . . . . . . . . . . . . . . . . . . . . . .
ISP Encyclopedia . . . . . . . . . . . . . . . . . . . . . . . . . . . . . . . . . . . . . . . . . . . . . . . . . . . . . . . . . .
ISP Cost-of-Ownership. . . . . . . . . . . . . . . . . . . . . . . . . . . . . . . . . . . . . . . . . . . . . . . . . . . .
Product Selector Guide . . . . . . . . . . . . . . . . . . . . . . . . . . . . . . . . . . . . . . . . . . . . . . . . . . .
ISP Hardware and Software . . . . . . . . . . . . . . . . . . . . . . . . . . . . . . . . . . . . . . . . . . . . . . . .
Data Sheets . . . . . . . . . . . . . . . . . . . . . . . . . . . . . . . . . . . . . . . . . . . . . . . . . . . . . . . . . . . .
Architecture Descriptions, Development Tools, Application Notes. . . . . . . . . . . . . . . . . . .
Software Update Service . . . . . . . . . . . . . . . . . . . . . . . . . . . . . . . . . . . . . . . . . . . . . . . . . . . . .
Customer Hotline . . . . . . . . . . . . . . . . . . . . . . . . . . . . . . . . . . . . . . . . . . . . . . . . . . . . . . . . . . .
30
30
31
32
32
32
32
32
32
33
33
Chapter 2 Installing Interface Kits . . . . . . . . . . . . . . . . . . . . . . . . . . . . . . . . . . . . . . . . 34
Installation Procedure . . . . . . . . . . . . . . . . . . . . . . . . . . . . . . . . . . . . . . . . . . . . . . . . . . . . . . .
Design Environments. . . . . . . . . . . . . . . . . . . . . . . . . . . . . . . . . . . . . . . . . . . . . . . . . . . . . . . .
Viewlogic Interface Kit . . . . . . . . . . . . . . . . . . . . . . . . . . . . . . . . . . . . . . . . . . . . . . . . . . . .
Design Environment Setup – Schematic Entry . . . . . . . . . . . . . . . . . . . . . . . . . . . . . . .
ViewDraw Library Setup . . . . . . . . . . . . . . . . . . . . . . . . . . . . . . . . . . . . . . . . . . . . . . . .
Design Environment Setup - ispLSI 6000 Device Family . . . . . . . . . . . . . . . . . . . . . . .
Exemplar Interface Kit . . . . . . . . . . . . . . . . . . . . . . . . . . . . . . . . . . . . . . . . . . . . . . . . . . . .
Exemplar Galileo Library Menu Setup . . . . . . . . . . . . . . . . . . . . . . . . . . . . . . . . . . . . .
Exemplar Leonardo Library Menu Setup . . . . . . . . . . . . . . . . . . . . . . . . . . . . . . . . . . .
Exemplar LeonardoSpectrum . . . . . . . . . . . . . . . . . . . . . . . . . . . . . . . . . . . . . . . . . . . .
Lattice Synthesis and Symbol Library Setup. . . . . . . . . . . . . . . . . . . . . . . . . . . . . . . . .
Lattice Symbol Library Setup . . . . . . . . . . . . . . . . . . . . . . . . . . . . . . . . . . . . . . . . . . . .
35
37
37
37
37
38
39
39
39
39
39
40
Chapter 3 Tutorial . . . . . . . . . . . . . . . . . . . . . . . . . . . . . . . . . . . . . . . . . . . . . . . . . . . . . . . . 41
A Brief Tour of the Screen . . . . . . . . . . . . . . . . . . . . . . . . . . . . . . . . . . . . . . . . . . . . . . . . . . . .
ispEXPERT Compiler Overview. . . . . . . . . . . . . . . . . . . . . . . . . . . . . . . . . . . . . . . . . . . . . . . .
Design Tutorial. . . . . . . . . . . . . . . . . . . . . . . . . . . . . . . . . . . . . . . . . . . . . . . . . . . . . . . . . . . . .
Create the Project. . . . . . . . . . . . . . . . . . . . . . . . . . . . . . . . . . . . . . . . . . . . . . . . . . . . . . . .
Set the EDIF Reader Settings . . . . . . . . . . . . . . . . . . . . . . . . . . . . . . . . . . . . . . . . . . . . . .
Change the Device . . . . . . . . . . . . . . . . . . . . . . . . . . . . . . . . . . . . . . . . . . . . . . . . . . . . . .
Lock the Pins . . . . . . . . . . . . . . . . . . . . . . . . . . . . . . . . . . . . . . . . . . . . . . . . . . . . . . . . . . .
Set the Pin Attributes . . . . . . . . . . . . . . . . . . . . . . . . . . . . . . . . . . . . . . . . . . . . . . . . . . . . .
Set the Compiler Control Options. . . . . . . . . . . . . . . . . . . . . . . . . . . . . . . . . . . . . . . . . . . .
Select an Interface Setting . . . . . . . . . . . . . . . . . . . . . . . . . . . . . . . . . . . . . . . . . . . . . . . .
Save the Project Settings . . . . . . . . . . . . . . . . . . . . . . . . . . . . . . . . . . . . . . . . . . . . . . . . . .
Run the Compiler . . . . . . . . . . . . . . . . . . . . . . . . . . . . . . . . . . . . . . . . . . . . . . . . . . . . . . . .
View the Compilation Results. . . . . . . . . . . . . . . . . . . . . . . . . . . . . . . . . . . . . . . . . . . . . . .
Set the Timing Analyzer . . . . . . . . . . . . . . . . . . . . . . . . . . . . . . . . . . . . . . . . . . . . . . . . . . .
Check the Timing Matrix . . . . . . . . . . . . . . . . . . . . . . . . . . . . . . . . . . . . . . . . . . . . . . . . . .
Download to a Device. . . . . . . . . . . . . . . . . . . . . . . . . . . . . . . . . . . . . . . . . . . . . . . . . . . . .
ispEXPERT Compiler Getting Started Manual – PC
42
43
45
45
46
47
48
51
52
53
54
54
56
57
59
60
5
Chapter 4 Advanced Features Tutorial . . . . . . . . . . . . . . . . . . . . . . . . . . . . . . . . . . . . 61
Explore Tool. . . . . . . . . . . . . . . . . . . . . . . . . . . . . . . . . . . . . . . . . . . . . . . . . . . . . . . . . . . . . . .
Post Compile Update Tool . . . . . . . . . . . . . . . . . . . . . . . . . . . . . . . . . . . . . . . . . . . . . . . . . . . .
ispANALYZER . . . . . . . . . . . . . . . . . . . . . . . . . . . . . . . . . . . . . . . . . . . . . . . . . . . . . . . . . . . . .
Physical Viewer . . . . . . . . . . . . . . . . . . . . . . . . . . . . . . . . . . . . . . . . . . . . . . . . . . . . . . . . . . . .
Path Tracer. . . . . . . . . . . . . . . . . . . . . . . . . . . . . . . . . . . . . . . . . . . . . . . . . . . . . . . . . . . . .
Obtaining Additional Information . . . . . . . . . . . . . . . . . . . . . . . . . . . . . . . . . . . . . . . . . . . .
Timing Viewer . . . . . . . . . . . . . . . . . . . . . . . . . . . . . . . . . . . . . . . . . . . . . . . . . . . . . . . . . . . . .
Constraint Manager . . . . . . . . . . . . . . . . . . . . . . . . . . . . . . . . . . . . . . . . . . . . . . . . . . . . . . . . .
Setting Attributes . . . . . . . . . . . . . . . . . . . . . . . . . . . . . . . . . . . . . . . . . . . . . . . . . . . . . . . .
ispEXPERT Compiler Getting Started Manual – PC
62
67
69
70
72
73
75
77
78
6
Preface
The ispEXPERT™ Compiler (ispEXPERT) software is used to optimize, partition,
place, and route logic designs for the Lattice Semiconductor (LSC) in-system
programmable Large Scale Integrated (ispLSI®) devices.
This installation guide provides information for installing the ispEXPERT Compiler. It
also includes two step-by-step tutorials to take you through the process of using the
Design Manager.
ispEXPERT Compiler Getting Started Manual – PC
7
What Is In this Manual
What Is In this Manual
This installation guide contains the following:
■
■
■
Installation procedures for the ispEXPERT Compiler and libraries software
Setup requirements for different design environments
A comprehensive design tutorial
Where to Look for Information
Chapter 1, Installing ispEXPERT – Provides an overview of the ispEXPERT
Compiler installation program and includes installation and environment setup
instructions for the ispEXPERT Compiler.
Chapter 2, Installing Interface Kits – Provides instructions for installing ispEXPERT
Interface Kits and setting environment variables.
Chapter 3, Tutorial – Provides step-by-step instructions for designing with the
ispEXPERT Design Manager (from creating a project to downloading a design into
Lattice ispLSI devices).
Chapter 4, Advanced Features Tutorial – Provides step-by-step instructions for
using the Explore, ispANALYZER, Physical Viewer, and Timing Viewer tools.
ispEXPERT Compiler Getting Started Manual – PC
8
Documentation Conventions
Documentation Conventions
This manual follows the documentation conventions listed in the following table:
Convention
Italics
Definition and Usage
Italicized text represents variable input. For example:
design.1
This means you must replace design with the file name you
have used for all the files relevant to your design.
Valuable information may be italicized for emphasis.
Book titles also appear in italics.
The beginning of a procedure appears in italics. For example:
To open a design:
Bold
Valuable information may be boldfaced for emphasis.
Commands are shown in boldface. For example:
Type dpm at the command line.
Courier Font
Monospaced (Courier) font indicates file and directory names
and text that the system displays. For example:
set path = ($path $LATTICE)
Bold Courier
Bold Courier font indicates text you type in response to system
prompts. For example:
copy license.pds license.dat
|...|
Vertical bars indicate options that are mutually exclusive; you
can select only one. For example:
REGTYPE GLB|IOC
“Quotes”
✍ NOTE
Titles of chapters or sections in chapters in this manual are
shown in quotation marks and bold, blue, underscored type to
indicate jumps to the specified chapter, section, or page. For
example:
See Chapter 1, “Installing ispEXPERT”
Indicates a special note.
▲CAUTION
Indicates a situation that could cause loss of data or other
problems.
❖ TIP
Indicates a special hint that makes using the software easier.
⇒
Indicates a menu option leading to a submenu option. For
example:
File ⇒ New
ispEXPERT Compiler Getting Started Manual – PC
9
ispEXPERT Documentation
ispEXPERT Documentation
The ispEXPERT Compiler software compiles designs from many different design
environments. The following is a list of manuals that Lattice Semiconductor provides
as support to the ispEXPERT Compiler and the various third-party interfaces.
■
■
■
■
■
■
■
■
■
■
■
ispEXPERT Compiler User Manual
ISP Daisy Chain Download User Manual
Macro Library Reference Manual
5K/8K Macro Library Supplement
ispEXPERT Compiler Release Notes
Altera to Lattice Semiconductor Design Conversion Application Notes
ispEXPERT Compiler and Exemplar Logic Design Manual
ispEXPERT Compiler and Synplicity Design Manual
ispEXPERT Compiler and Viewlogic Design Manual
VHDL and Verilog Simulation User Manual
Lattice Semiconductor ISP Encyclopedia
ispEXPERT Compiler Getting Started Manual – PC
10
Chapter 1
Installing ispEXPERT
The Lattice Semiconductor (LSC) design tool strategy for the ispLSI device families
supports a wide range of design environments. The Lattice Semiconductor
ispEXPERT Compiler solution combines third-party CAE tools for design entry and
verification with the ispEXPERT software to offer a complete development solution.
The ispEXPERT software uses architecture-specific algorithms to synthesize a logic
description into an ispLSI device. Steps in the device fitting (design compilation)
process include design optimization, automatic logic partitioning, and automatic
placement and routing.
The ispEXPERT solution also supports design verification. Design verification options
include both functional and timing simulation. Various combinations of graphical and
text-based functional and timing simulators are supported by third-party CAE
vendors. ispEXPERT also includes the timing analyzer (ispTA™) and Timing Viewer,
the ispANALYZER™ for debugging, and the Physical Viewer for viewing the device
implementation.
Following design verification, ispEXPERT generates a JEDEC fuse map for device
programming. Lattice Semiconductor ispLSI devices can be programmed directly
from a PC using an ispDOWNLOAD™ cable.
A diagram of the compilation process is shown in Figure 1-1.
ispEXPERT Compiler Getting Started Manual – PC
11
SCHEMATIC
VERILOG-HDL
VHDL
ABEL-HDL
OTHER HDLs
Third-Party Design Entry, Synthesis, and Compilation
EDIF
PLA
ispEXPERT Compiler
– Design Analysis
– ispLSI Architecture-Specific
Synthesis and Partitioning
(Optimization and Mapping)
– Placement and Routing
Pin
File
Property
File
– Pin Assignment Editor
– Design Explorer
– Physical Viewer
– Static Timing Analyzer and Timing Viewer
– ispANALYZER
Parameter
File
.log
Reports
.rpt
JEDEC
EDIF
Programming
Verilog
SDF
Viewlogic
Output Simulation Netlists
VHDL
LMC
Logic
Models
Figure 1-1. ispEXPERT Design Flow
ispEXPERT Compiler Getting Started Manual – PC
12
Installation Introduction
Installation Introduction
Lattice Semiconductor Corporation (LSC), the leader in In-System Programmable™
(ISP™) products, has compiled the software tools and the information you need to
know about ISP technology, devices, and tools so you can begin designing with
Lattice Semiconductor ISP devices. The products on this CD-ROM are broken into
three groups: the ispEXPERT software, the ispGDX software, and the ISP
Encyclopedia.
This package includes the following components:
■
■
■
ispEXPERT Compiler Software
• ispEXPERT Compiler
• ISP™ Daisy Chain Download
• Exemplar Logic Design and Simulation Libraries
• VHDL Simulation Libraries
• Verilog Simulation Libraries
• Synplicity Design and Simulation Libraries
• Viewlogic Design and Simulation Libraries
• ispCODE™ and ispGDS™ Compiler
• Software Documentation
ispGDX™ Software and Documentation
ISP Encyclopedia
• ISP Cost-of-Ownership Analysis
• Product Selector Guide
• ISP Hardware and Software
• Data Sheets
• Application Descriptions, Development Tools, Application Notes
This package also includes setup guides for the Acrobat Reader by Adobe to access
the documentation resources.
ispEXPERT Compiler Getting Started Manual – PC
13
Installation Introduction
Minimum System Requirements for ispEXPERT
■
■
■
■
■
■
■
■
■
■
IBM® 486, Intel Pentium, or Pentium-compatible PC
1 parallel port
16 MB memory (32 MB highly recommended) for ispLSI 1000, 2000, 3000, and
6000 device families
32 MB memory (64 MB highly recommended) for ispLSI 5000V and 8000 device
families
250 MB of disk space for a full install, or about 170 MB for a typical install (not
including manuals)
SVGA graphics display 800 X 600 (up to 1024 X 1024)
CD-ROM drive (2X or above)
Microsoft Windows-compatible mouse and driver
Lattice Semiconductor security key for ADVANCED packages
Windows NT® 4.0, Windows® 95, or Windows 98
▲ CAUTION
Do not connect anything except a printer or another
Rainbow Technologies reprogrammable security key to
the same parallel port as the ispEXPERT security key.
Data transfer programs, such as Laplink or Iomega Zip
Drive, deprogram the security key and any other Rainbow
Technologies reprogrammable security key you may be
using.
Disk Space Requirements
During installation, you may need more disk space available than is actually required
for the software being installed. If you do not have enough disk space available, a
message asks you to make more space available. Free additional space on the target
drive, and click OK in the dialog box to resume installation. You can minimize space
overhead requirements by installing ispEXPERT Compiler and Interface Kits
separately.
ispEXPERT Compiler Getting Started Manual – PC
14
Installation Introduction
Directory Structure and Contents
The directory structure when ispEXPERT is installed is shown in Figure 1-2 and the
contents of the directories for ispEXPERT are described. This shows the default
directories; the install directories of isptools\ispcomp are referred to as
<ispcomp_path> in future references in the ispEXPERT Compiler manuals. You have
the option of changing the name of isptools.
isptools
ispcomp
bin
macro
license
config
manuals
expand
examples
Figure 1-2. ispEXPERT Directory Structure
■
■
■
■
■
■
■
The bin subdirectory contains the executables for ispEXPERT.
The macro subdirectory contains files that represent macros.
The license subdirectory contains the license template, temporary, and/or
permanent license files.
The config subdirectory contains device data files.
The expand subdirectory contains files for macro expansion.
The examples subdirectory contains examples of design files.
The manuals directory contains ispEXPERT Compiler manuals if you install them
on a local drive.
ispEXPERT Compiler Getting Started Manual – PC
15
Installation Introduction
The directory structure when ispGDX is installed is shown in Figure 1-3.
isptools
ispgdx
bin
config
examples
Figure 1-3. ispGDX Directory Structure
The ispGDX directory contains the following files:
■
■
■
The bin directory contains the executables for ispGDX.
The config subdirectory contains device data files.
The examples subdirectory contains examples of design files.
ispEXPERT Compiler Getting Started Manual – PC
16
ispEXPERT System Installation
ispEXPERT System Installation
If your package came with a Lattice security key, connect the Lattice security key to
the parallel port of your PC before installing ispEXPERT.
To install the ispEXPERT software:
1. In the Run text box (from the Start menu), enter:
<drive>:\SETUP.EXE
where drive is the disk drive letter for the CD-ROM and click OK. The Lattice
Semiconductor main installation window appears (Figure 1-4).
Figure 1-4. Lattice Semiconductor Main Installation Window
The installation program provides four buttons:
• Install Lattice Software – Installs ispEXPERT Compiler, ispGDX, ISP Daisy
Chain Download, Interface Kits, and manuals.
• Install Document Viewer – Installs the Adobe Acrobat Reader so you can
access the ispEXPERT manuals and the ISP Encyclopedia on the CD-ROM.
• What Do I Get? – Describes the features of the ispEXPERT Compiler.
• Registration – Accesses the online registration form for registering the
ispEXPERT software.
2. Click the Install Lattice Software button; the Welcome to Lattice Semiconductor
dialog box appears. The Welcome to Lattice Semiconductor Setup dialog box
displays Setup recommendations and copyright information.
3. Click Next; the Software License Agreement dialog box appears. To install ISP
software, you must accept the license agreement.
4. Click Yes (if you choose No, setup will close); the Choose Destination Location
dialog box appears and prompts you for a destination folder (the default is
c:\isptools). If you already have a version of ispEXPERT Compiler in that directory,
a dialog box will display asking if you want to start the uninstall procedure. You
should uninstall or select a different directory.
ispEXPERT Compiler Getting Started Manual – PC
17
ispEXPERT System Installation
5. Select your destination folder and click Next; the Product Options dialog box
appears. The Product Options dialog box (Figure 1-5) displays the installation
options and the amount of disk space needed for loading each option. The
amount of disk space will vary depending on your PC platform and hard drive
configuration. The default option is the ispEXPERT Compiler.
Figure 1-5. Product Options Dialog Box
6. Be sure ispEXPERT Software is selected in the Product Options dialog box and, if
desired, Interface Kits. Refer to Chapter 2, “Installing Interface Kits,” for
information on installing Interface Kits.
7. Click Next. Follow the instructions that appear on your screen.
ispGDX Development System Installation
The ispGDX Development System is a stand-alone application used to create
designs for LSC’s family of ispGDX devices. You can load the ispGDX software from
the Product Options dialog box by performing the following steps:
1. In the Product Options dialog box (Figure 1-5), select the ispGDX Development
System option, deselect all other options, and click Next.
2. Follow the instructions that appear on your screen.
✍ NOTE
If you are installing ispGDX, the following Interface Kits are
recommended: Viewlogic, VHDL, and Verilog.
ispEXPERT Compiler Getting Started Manual – PC
18
ispEXPERT System Installation
ISP Daisy Chain Download Installation
ISP Daisy Chain Download is installed as part of the full ispEXPERT installation.
You can also load ISP Daisy Chain Download as a stand-alone application by
performing the following steps:
1. In the Product Options dialog box (Figure 1-5), select the ISP Daisy Chain
Download option, deselect all other options, and click Next.
2. Follow the instructions that appear on your screen.
If you install ISP Daisy Chain Download as part of the ispEXPERT Compiler
installation, the files are placed in the <ispcomp_path>\bin directory. If you install ISP
Daisy Chain Download as a stand-alone application, the files are placed in the
<drive>:\isptools\ispdcd directory.
Windows NT users: If you are going to use a Windows NT 4.0 platform for
downloading to devices, you must select the ISP Daisy Chain Download check box in
the Product Options dialog box during setup. This ensures installation of the ISP
Daisy Chain Download driver (ispDev). If this driver is not installed, the ispDCD™
software will not be able to detect the ispDOWNLOAD™ cable.
✍ NOTE
You will need administrative privileges to install the Download device driver.
Interface Kit Selection
To install one or more Interface Kits, perform the following steps (See Chapter 2,
“Installing Interface Kits” for installation and setup requirements):
1. In the Product Options dialog box (Figure 1-5), select the Interface Kits option,
and click Change in the Description box; the Select Sub-components dialog box
appears.
2. Select the name of the Interface Kit(s) you wish to install, and click Continue.
3. Follow the instructions that appear on your screen.
Sentinel Driver Installation (Windows NT 4.0)
The Sentinel driver is required to run the ispEXPERT ADVANCED package (with a
security key) on the Windows NT 4.0 platform and is automatically installed during
the ispEXPERT installation procedure.
If you need to install the driver without reinstalling ispEXPERT, turn off all the options
in the ispEXPERT Product Options dialog box and click Next. You will be asked if you
want to install the driver. If you install the driver, you need to reboot your system prior
to starting ispEXPERT.
ispEXPERT Compiler Getting Started Manual – PC
19
ispEXPERT System Installation
Adobe Acrobat Reader Installation
To install the Adobe Acrobat Reader:
Select the Install Document Viewer button in the Lattice main installation window
(Figure 1-4). A dialog box asks if you wish to install the Adobe Acrobat Reader. If you
do not have Adobe Acrobat installed and wish to install it, click OK and follow the
instructions on the screen. When the License Agreement displays, you must click Yes
to continue the installation.
ispCODE and ispGDS Compiler File Installation
The files for ispCODE and ispGDS are available in the ispcode directory on the
CD-ROM. These products can be installed on your PC by copying the files from the
CD-ROM to a local drive. Refer to the readme.txt files in their subdirectories for
descriptions of these products. You can obtain ispCODE updates for new device
support by accessing the Lattice web site at http://www.latticesemi.com
ispEXPERT Compiler Getting Started Manual – PC
20
ispEXPERT Package Options
ispEXPERT Package Options
The ispEXPERT Compiler software is available in either the BASE package or the
ADVANCED package. The BASE package provides all of the ispEXPERT Compiler
features. The differences between the BASE and ADVANCED packages are the
devices supported and the type of licensing.
ispEXPERT Compiler BASE Package
The BASE package does not require the Lattice security key. Instead, the license
program reads your primary (c:) hard disk ID number during the setup and
registration procedures.
Once you install the ispEXPERT Compiler software, you need to complete the online
registration form and fax it or e-mail it to Lattice Semiconductor (e-mail to
[email protected] or fax to 1-408-944-8450) to obtain your license. Your
license will be returned by e-mail the next business day. Be sure your e-mail address
is included on your registration form.
When you receive your license file, copy it to the <ispcomp_path>\license directory
and verify that your environment variables are set as described on page 31.
ispEXPERT Compiler ADVANCED Package
The ADVANCED package provides additional support for higher density devices with
a larger number of macrocells.
The ADVANCED package requires that the Lattice security key be installed on the
parallel port of the PC running ispEXPERT (for a node-locked license) or on the
server (for floating licenses).
When you run the ispEXPERT Compiler ADVANCED Package as a new user, a
node-locked, 30-day license is activated that allows you to use the ispEXPERT
application immediately. You must use the Lattice security key with the temporary
license to run the ispEXPERT software. Because this license expires 30 days after
you install the software, e-mail or fax your online registration form to Lattice
Semiconductor before the end of the 30 days to obtain a permanent license.
ispEXPERT Compiler Getting Started Manual – PC
21
ispEXPERT Registration
ispEXPERT Registration
The ispEXPERT software has an online registration capability that you can use to
register your software and to obtain a permanent license file for ispEXPERT.
If you purchased the ispEXPERT Compiler BASE package, you must register to
obtain your license file so you can use ispEXPERT. If you purchased the ispEXPERT
Compiler ADVANCED package, you must register within 30 days to obtain your
permanent license.
Registering your software provides a method to ensure that you receive future
updates. Use the following procedure to complete the online registration.
To obtain a license file:
1. Select the Registration button in the ispEXPERT main installation window, and the
Product Registration dialog box appears (Figure 1-6). Either your Lattice security
key ID or your hard disk ID number should display in the appropriate fields.
Figure 1-6. Product Registration Dialog Box
2. Provide the information requested on the form.
If you are using Synplicity or Viewlogic products, select the appropriate entry from
the Third Party Key ID field. Then enter your key ID.
If you select the floating license radio button, you will receive a single-user floating
license. Multiple-user floating licenses are available as an ispEXPERT Compiler
upgrade; contact your LSC sales representative for information.
3. Complete this form and click OK.
4. The Save Registration File As dialog box displays so you can save the information
in these registration dialog boxes to a file. Enter the requested information.
ispEXPERT Compiler Getting Started Manual – PC
22
ispEXPERT Registration
5. E-mail or fax a copy of the file to Lattice Semiconductor. E-mail to
[email protected] or fax to 1-408-944-8450.
6. Within one working day, Lattice Semiconductor will e-mail back to you the
permanent license file with the required information to permanently enable the
ispEXPERT software.
7. After you receive your permanent license file from Lattice Semiconductor, copy
the license file to <ispcomp_path>\license. If you are using the ispEXPERT
ADVANCED package, overwrite the 30-day temporary license file under
<ispcomp_path>\license with the permanent license. Be sure the
LM_LICENSE_FILE variable points to the permanent license. For example,
LM_LICENSE_FILE=<license_path>\license.dat
A sample license.dat file with a hard disk ID for a BASE package is shown in
Figure 1-7.
FEATURE LSC_BASE lattice 7.200 01-Jan-00 0 EC72AF6D7257C1301013 \
"ispEXPERT Software (BASE)" DISK_SERIAL_NUM=1c3e17ee
Figure 1-7. Sample BASE Package Node-Locked License File
8. Set the PDSPLUS environment variable in your autoexec.bat file or Control
Panel to the directory that contains the ispEXPERT software. For example:
SET PDSPLUS=<drive>:\<ispcomp_path>
9. Set the path in your autoexec.bat file or Control Panel to the directory that
contains the ispEXPERT software. For example:
PATH=<drive>:\<ispcomp_path>\bin
10. If desired, you may specify the location where the manuals are located. Manuals
can be accessed from the Help ⇒ Manuals menu item. Manuals may be used
from the CD-ROM, copied to your PC’s hard drive as part of the installation
procedure, or copied to a server location. Set the PDS_MANUAL_DIR
environment variable in your autoexec.bat file or Control Panel. For example:
SET PDS_MANUAL_DIR=<drive>:\<manuals_path>
If you use select Manuals in the Product Options dialog box during installation,
this variable is set automatically to the isptools_path.
11. After you change your autoexec.bat file, you must reboot your system.
ispEXPERT Compiler Getting Started Manual – PC
23
ispEXPERT Licensing
ispEXPERT Licensing
The PC version of the ispEXPERT software uses the FLEXlm™ license manager. Two
types of licenses are available for ispEXPERT, node-locked single user and floating
licenses.
If you are a current ispDS+ user (ispDS+ 5.1 or later), no new license registration is
required.
If you are using an earlier version of ispDS+ (5.0 or before) and had the PDS_LIC
environment variable pointed to a valid LSC license file, remove the PDS_LIC
environment variable and request a new license.
Node-Locked License – BASE Package
Node-locked licensing means that each PC running ispEXPERT has its own license.
The license is obtained from Lattice Semiconductor by e-mailing or faxing the
registration form. Your license will be returned to you the next business day. An
example of a node-locked license is shown in Figure 1-7. Copy the license to
<ispcomp_path>\license\license.dat.
When you access the registration form, the volume serial number of your primary
hard drive displays in the Hard Disk ID field. The DISK_SERIAL_NUM field in the
license file is used with the hard disk ID for the BASE package. Complete the rest of
the fields on the form (except the LSC KEY ID field).
Floating License – BASE Package
If you want to use a floating license for ispEXPERT, the ispEXPERT software must be
installed on a Windows NT server. When you complete the registration form, select a
floating license. Copy the license you receive from Lattice to
<ispcomp_path>\license\license.dat on the server. Each user points to the license
file on the server. Users can then access ispEXPERT and run from supported PCs as
clients.
When you access the registration form, the volume serial number of your primary
hard drive displays in the Hard Disk ID field. The Lattice_ID field in the license file is
used with the LSC security key for the ADVANCED package. Complete the rest of the
fields on the form (except the LSC KEY ID field).
Refer to the information beginning on page 25 regarding server setup and floating
license management.
Node-Locked License – ADVANCED Package
Node-locked licensing means that each PC running ispEXPERT has its own license
and an LSC security key is connected to the parallel port on that PC. An example of a
node-locked license is shown in Figure 1-7. The LSC security key ID is specified in
the license file.
ispEXPERT Compiler Getting Started Manual – PC
24
ispEXPERT Licensing
If you are a new ispEXPERT ADVANCED user, a temporary license file with default
license options is created and placed in <ispcomp_path>\license\license.dat the first
time you run the ispEXPERT software. This temporary license file is a node-locked
license and allows you to immediately run the ispEXPERT Compiler software without
having to wait for your authorized permanent license. However, the temporary
license.dat file will expire 30 days after you run ispEXPERT the first time.
Floating License – ADVANCED Package
If you want to use a floating license for ispEXPERT, the ispEXPERT software must be
installed on a Windows NT server. The first time you execute ispEXPERT on the
Windows NT server, a 30-day, node-locked license file is created. The ispEXPERT
software can only be run on the server in a single-user, node-locked mode until the
floating license is placed on the server. The LSC security key must be connected to
the parallel port on the Windows NT server. After you receive your floating license,
users can access ispEXPERT and run from supported PCs as clients.
Floating License Server Setup
To enable your license, you need to set up a license server on a Windows NT server
to monitor your ispEXPERT license. Each client PC must have the
LM_LICENSE_FILE variable set to point to the license file on the server.
Before you start the server setup, ensure you have TCP/IP installed and that the
client machines can ping the server by name. Ping is a command entered from the
prompt in an MS-DOS window. Type ping <hostname>.
The following files are in the <ispcomp_path>\bin directory. They are used for license
management.
lflxutil.dll
lmgrd.exe
lmutil.exe
ispdsdmn.exe
lmgrd95.exe
installs.exe
flexlm.cpl
Lattice FLEXlm interface DLL
The license server program
FLEXlm utility for diagnosing, reporting, and controlling licensing
The ispEXPERT licensing daemon
Used for Windows 95 operating systems
May be needed for server management
Sets up the server for floating licenses
An example of a floating license file with an LSC security key for an ADVANCED
package is shown in Figure 1-8.
SERVER PCQA10 LATTICE_ID=0220000002 7788
DAEMON lattice F:\ISPTOOLS\ISPCOMP\BIN\ispdsdmn.exe
FEATURE LSC_ADVANCED lattice 7.200 01-Jan-00 1 \
CC73C58A3111B5864BCD "ispEXPERT Software (ADVANCED)"
Figure 1-8. Sample Floating License
ispEXPERT Compiler Getting Started Manual – PC
25
ispEXPERT Licensing
The LATTICE_ID field for the LSC security key ID is not required as part of the
FEATURE line in a floating license. The “\” followed by a carriage return indicates a
line continuation.
To set up your license manager as a system service:
1. Copy <ispcomp_path>\bin\flexlm.cpl to c:\winnt\system32.
2. Restart the NT system.
3. Move or rename your 30-day license file (license.dat) and then replace it with
the permanent floating license in <ispcomp_path>\license\license.dat.
4. Bring up the Control Panel for FLEXlm license and choose the Setup tab.
5. Change Service Name to “Lattice FLEXlm License Manager”.
6. Use Browse to set lmgrd.exe to <ispcomp_path>\bin\lmgrd.exe.
7. Use Browse to set the license file to <ispcomp_path>\license\license.dat.
8. Use Browse to set the debug log file to <ispcomp_path>\license\lattice.log.
9. Select Use NT Service.
10. Select Start Server at Power-up.
11. Select Apply to save.
12. Select the Control tab.
13. Select Start.
The <ispcomp_path>\license\lattice.log can by viewed to confirm that the Lattice
license manager has started. Run the ispEXPERT software to confirm that the
license is issued and the software will initiate. On some systems it may take a while
for the service to start even though the control panel services indicate it has started.
You may need to execute the following command a few times before the content of
the file indicates the service has actually started.
DOS>TYPE <ispcomp_path>\license\lattice.log
Multiple vendor floating license servers can be started as a service by repeating
steps 3 - 13. Use a service name that reflects the vendor and indicate the vendor’s
lmgrd.exe path, license file path, and a debug log file name. If there are problems,
use a copy of the lmgrd.exe from LSC instead of the vendor’s file but save the
original lmgrd.exe first.
Be sure the port addresses (“7788” in Figure 1-8) of multiple vender license files are
unique.
To return to a non-floating, node-locked license (such as the 30-day license):
1. Shut down the system service using the services dialog box from the control
panel.
2. Select the Lattice FLEXlm license manager and select Stop.
3. To terminate the startup at boot time, use the Startup button or use the FLEXlm
license control panel to reset and save the startup option.
ispEXPERT Compiler Getting Started Manual – PC
26
Floating License Management
4. Replace the floating license file (license.dat) with the non-floating,
node-locked license file (license.dat). Make sure the LSC security key is
connected to the parallel port of the computer.
5. Run the ispEXPERT software to confirm a license is issued with this license file.
Floating License Configurations
This section discusses two typical installation configurations to take advantage of the
ispEXPERT floating license feature.
Network Installation
In this configuration, the ispEXPERT application is installed only on your NT license
server. The LSC security key is connected to the NT license server. The advantage to
this configuration is that ispEXPERT only needs to be installed one time, on the
license server. The disadvantage to this configuration is that heavy network use may
affect run time performance.
Clients access the ispEXPERT application by setting LM_LICENSE_FILE to point to
the <ispcomp_path>\license\license.dat file on the license server and creating a
shortcut or using the Run menu to point to <ispcomp_path>\bin\ispdspg.exe on the
license server.
Local Installation
In this configuration, the ispEXPERT application is installed on your NT license server
(for license manager utilities and daemons) and on each client that uses the
ispEXPERT application. This configuration gives the best run time performance.
Install ispEXPERT on the license server first. After you receive your floating license
and ensure the license manager is running, install ispEXPERT locally on each client
that will use the floating license.
Set LM_LICENSE_FILE to point to the <ispcomp_path>\license\license.dat file on the
license server.
Floating License Management
The ispEXPERT software is supported by a floating license manager, FLEXlm,
Version 6.1a, from Globetrotter Software. If other applications on your network use
the FLEXlm license manager, you must resolve the conflicts between ispEXPERT
and the other applications before you start the license daemon.
Starting a License Daemon
Ensure that LM_LICENSE_FILE=<license_path>\license.dat is set in the
Control Panel of the server. After setup, the default location is
<ispcomp_path>\license\license.dat.
ispEXPERT Compiler Getting Started Manual – PC
27
Floating License Management
Enter the following command from an MS-DOS Prompt window to restart the license
daemon for the new version of ispEXPERT (version 7.0 or above):
<ispcomp_path>\bin\lmgrd -app -c <license_path>\license.dat
Ensure that <license_path>\license.dat is your new floating license and that the
license file has the server line, daemon line, and node name activated.
The license daemon only reads the license.dat file at start-up; changes will not
take effect without restarting the license daemon and manager.
✍ NOTE
The license daemon must be restarted if the server is shut
down or rebooted.
Checking the License Server Status
To check the status of your daemon, enter the following command as a single-line
entry from an MS-DOS Prompt window:
<ispcomp_path>\bin\lmutil lmstat -c <license_path>\license.dat
-a
This command provides the location of the license file, the status of the vendor
daemon, and the feature usage information in the floating license file.
Shutting Down a License Manager
If you must shut down the license manager, use the lmdown utility in the current
<ispcomp_path>\bin subdirectory. If there are multiple license files set in your
LM_LICENSE_FILE environment variable, enter the following command from an
MS-DOS Prompt window to terminate the daemon:
<ispcomp_path>\bin\lmutil lmdown -c <license_path>\license.dat
ispEXPERT Compiler Getting Started Manual – PC
28
Floating License Management
Troubleshooting
If ispEXPERT does not run after you install your new license file, do the following:
1. From an MS-DOS Prompt window, issue the command set > env.txt to
create a text file that contains a listing of the environment setup for your PC.
2. Combine your autoexec.bat file, license.dat file, and the env.txt file in a
zip file and send it via e-mail to [email protected]. Please include an
explanation of your problem.
The following table lists common FLEXlm error messages and describes possible
causes or solutions.
FLEXlm Error Message
Possible Causes or Solutions
Invalid parameter [-42, 252]
• The LM_LICENSE_FILE variable has not
been set properly.
• The license file is invalid.
• An invalid feature is specified in the license
file.
Invalid parameter [-42, 252:10061]
Winsock error code
• You have a floating license, and the license
daemon has not been started at the
Windows NT server.
• The network connection between the
server and the client has not been
established.
Invalid parameter [-12, 122]
Invalid returned data from license
server
• The node name of the Windows NT server
does not match the one in your floating
license file.
• For the ADVANCED package, the ID of the
LSC security key connected to the parallel
port of the server does not match the value
of LATTICE_ID in your floating license file.
For the BASE package, the hard disk ID
does not match the value of
DISK_SERIAL_NUM in your license file.
Invalid parameter [-5, 222]
No such feature exists
The features could not be found in the
license file.
! License Check Failed
You have a node-locked license, and the ID
of the LSC security key connected to the
parallel port of your PC does not match the
value of LATTICE_ID in your license file.
ispEXPERT Compiler Getting Started Manual – PC
29
Configuring your PC
Configuring your PC
This section presents examples of user and environment setups for effective use of
the ispEXPERT software on Windows NT 4.0 and Windows 95/98 platforms.
Windows-NT Environment
If you have used version 5.1 or later of the ispDS+ software, your license.dat file
for ispEXPERT Compiler should be generated automatically. Your
LM_LICENSE_FILE setting should already point to a license file that is valid for
ispEXPERT 7.0. Move this license file to <ispcomp_path>\license\license.dat and
point LM_LICENSE_FILE to it. Change the System dialog box in the Control Panel to
set the user environment variables. Perform the following steps:
3.
4.
5.
6.
7.
8.
9.
Access the System icon in the Control Panel.
Select the Environment tab.
Select LM_LICENSE_FILE in the User Variable field.
Enter the installation path in the value field.
Click Set.
Select PDSPLUS in the User Variable field.
Enter the ispEXPERT installation path (<drive>:\<ispcomp_path>) in the
value field.
10. Click Set.
11. Select PATH in the variable field.
12. Enter the ispEXPERT executable path (<drive>:\<ispcomp_path>\bin) in
the value field.
13. Click Set.
14. Select PDS_MANUAL_DIR in the variable field.
15. Enter the ispEXPERT manuals directory
(<drive>:\<isptools_path>\manuals) in the value field.
16. Click Set.
17. Click OK to close the dialog box.
ispEXPERT Compiler Getting Started Manual – PC
30
Configuring your PC
Windows 95/98 Environments
The following sections show sample settings for PC start-up files.
AUTOEXEC.BAT File
The following is a sample autoexec.bat file with the optional environment variables
for ispEXPERT:
@echo off
set
path=c:\;d:\ISPTOOLS\ISPCOMP\BIN;
set PDSPLUS=d:\ISPTOOLS\ISPCOMP
set LM_LICENSE_FILE=d:\ISPTOOLS\ISPCOMP\LICENSE\LICENSE.DAT
set PDS_MANUAL_DIR=d:\ISPTOOLS\MANUALS
set
prompt $p$g
ver
The PDS_MANUAL_DIR environment variable is not required. If it is set, it should be
entered similar to the example shown here.
If you are using other software packages that use FLEXlm licensing, all license files
must be referenced in the same statement. If all of your software packages using
FLEXlm use FLEXlm version 5.0 or above, the license paths must be separated by a
semicolon. The ispEXPERT setup procedure sets this automatically, as follows:
set LM_LICENSE_FILE=d:\<third_party_directory>\<license_file>;
d:\ISPTOOLS\ISPCOMP\LICENSE\LICENSE.DAT
To determine the FLEXlm version of your software, contact the software vendor.
CONFIG.SYS File
The minimum size of the FILES and BUFFERS variables for ispEXPERT is 30. The
following is a sample config.sys file with settings for ispEXPERT.
stacks=0,0
files=30
buffers=30
device=c:\dos\ansi.sys
device=c:\dos\mouse.sys 1
lastdrive=d
shell=C:\command.com c:\ /p /e:1024
ispEXPERT Compiler Getting Started Manual – PC
31
ISP Encyclopedia
ISP Encyclopedia
The Lattice Semiconductor ISP Encyclopedia directory (databook) contains a
compilation of technical information on ISP programmable logic devices (PLDs).
Together, these files serve as a comprehensive reference library for efficiently
choosing, designing, and implementing ISP solutions. These files may be accessed
using the Adobe Acrobat Reader.
ISP Cost-of-Ownership
The ISP Cost-of-Ownership Analysis compares the cost of ownership for ISP and
standard PLDs at each stage of their lifecycles: system design, system
manufacturing, and field repair/updates. A Microsoft Excel worksheet (Excel v.5, file
name: isp_coo5.xlw and Excel v.4, file name: isp_coo4.xlw) that allows you to create
a customized cost analysis is included on this CD-ROM.
Product Selector Guide
The Product Selector Guide is a comprehensive listing of available Lattice
Semiconductor products. For an up-to-date listing of available products, contact
Lattice Semiconductor at 1-888-ISP-PLDS or download the Product Selector Guide
from the Lattice Semiconductor web site (www.latticesemi.com).
ISP Hardware and Software
The ISP Hardware and Software section contains a complete guide to using
In-System Programmable devices and design tools. Compiled from the collective
experience of Lattice Semiconductor Applications Engineers and our customers, this
section demonstrates the ease of using Lattice Semiconductor ISP silicon and
software solutions.
Data Sheets
The Data Sheets section contains full specifications for the entire line of Lattice
Semiconductor high-performance E2CMOS® devices and design tools. Included are
architectural descriptions for the industry-leading ISP high-density PLDs and
industry-standard GAL® products from Lattice Semiconductor.
Architecture Descriptions, Development Tools, Application Notes
Other sections include product and architecture overviews, application notes, and
more practical information about PLDs and development tools from Lattice
Semiconductor.
ispEXPERT Compiler Getting Started Manual – PC
32
Software Update Service
Software Update Service
You will receive free software updates for one year when you fill out and return to
Lattice Semiconductor the License File/Registration Request Form that is included
with your software. Extended maintenance agreements are available for purchase.
Please contact your local Lattice Semiconductor Sales Representative for additional
information.
Customer Hotline
If you have any questions or problems with this software, please call the Lattice
Semiconductor Applications Hotline at 1-800-LATTICE (1-800-528-8423) or
(408) 428-6414. The Hotline is available from 8:00 AM to 5:00 PM, Pacific Time.
Or, send e-mail to [email protected].
Information
Need
ispLSI
Applications
Support
GAL/ispGAL/
ispGDS/ispGDX
Applications
Support
Literature
Customer
Resource
USA & Canada
Other Locations
Telephone Hotline
1-800-LATTICE
(408) 428-6414
Fax
(408) 944-8450
Bulletin Board
System
(408) 428-6417
E-mail
[email protected]
Licensing
[email protected]
FTP Site
http://www.latticesemi.com/ftp
World Wide Web
http://www.latticesemi.com
Telephone Hotline
1-888-ISP-PLDS
Fax
(503) 268-8037
Bulletin Board
System
(503) 693-0215
E-mail
[email protected]
FTP Site
http://www.latticesemi.com/ftp
World Wide Web
http://www.latticesemi.com
Telephone Hotline
1-800-327-8425
Fax
(503) 268-8037
E-mail
[email protected]
FTP Site
http://www.latticesemi.com/ftp
ispEXPERT Compiler Getting Started Manual – PC
(503) 268-8000
(503) 268-8000
33
Chapter 2
Installing Interface Kits
The following Interface Kits are available with ispEXPERT:
■
■
■
■
■
■
■
Viewlogic
Verilog
Exemplar
Synplicity
VHDL
OrCAD
VeriBest
The Product Options dialog box shows the amount of hard disk space needed for
each Interface Kit. Be sure you have enough hard disk space before attempting the
installation.
ispEXPERT Compiler Getting Started Manual – PC
34
Installation Procedure
Installation Procedure
1. In the Run text box from the Start menu, enter:
drive:\SETUP.EXE
where drive is the disk drive letter for the CD-ROM and click OK. The ispEXPERT
main installation window appears.
2. Click the Install Lattice Software icon; the Welcome to Lattice Semiconductor
dialog box appears.
The Welcome to Lattice Semiconductor dialog box displays Setup
recommendations and copyright information.
3. Click Next; the Software License Agreement dialog box appears. To install ISP
software, you must accept the license agreement.
4. Click Yes (if you choose No, setup will close); the Choose Destination Location
dialog box appears and prompts you for a destination folder.
5. Select your destination folder and click Next; the Product Options dialog box
appears. The Product Options dialog box displays the installation options and the
amount of disk space needed for loading each option. The default is the
ispEXPERT Compiler; deselect that option if you already installed the ispEXPERT
Compiler as described in Chapter 1, “Installing ispEXPERT.”
Figure 2-1. Product Options Dialog Box
6. Highlight the Interface Kits field and click Change in the Description box; the
Select Sub-components dialog box appears.
ispEXPERT Compiler Getting Started Manual – PC
35
Installation Procedure
Figure 2-2. Select Sub-components Dialog Box
7. Highlight the name of the Interface Kit(s) you wish to install and click Continue to
close the Select Sub-components dialog box.
✍ NOTE
You can install ispEXPERT software and multiple Interface Kits
at the same time. However, because of the hard disk space
requirements during the installation, this is not recommended.
8. Click Next in the Product Options dialog box and follow the instructions that
appear on your screen.
Refer to the appropriate online ispEXPERT Compiler and “third party” Design Manual
for complete information on using Interface Kits. These manuals include information
on the versions of the third-party software supported, the directory structure of the
files, and any setup requirements.
ispEXPERT Compiler Getting Started Manual – PC
36
Design Environments
Design Environments
Most of the Interface Kits are ready for use as soon as they are installed. However, for
Viewlogic and Exemplar, you need to set the design environment. These changes are
described in this section as well as in the appropriate third party manual.
Viewlogic Interface Kit
Design Environment Setup – Schematic Entry
Before using Lattice Design Attributes or macros in your Viewlogic schematic design,
you must add Lattice Viewlogic library path statements to the following files:
■
■
autoexec.bat file (Windows 95/98) or Control Panel (Windows NT)
viewdraw.ini file (use the Project Manager in Workview Office)
ViewDraw Library Setup
■
Add the LSC-specific items to your autoexec.bat file (Windows 95), or set them
from the Control Panel (Windows NT):
SET PATH=C:\<ispcomp_path>\BIN;C:\WVOFFICE
SET PDSPLUS=C:\<ispcomp_path>
WVOFFICE_HOME=C:\WVOFFICE
SET WDIR=C:\<ispcomp_path>\VL\STANDARD;
C:\<ispcomp_path>\VL\VHS;C:\WVOFFICE\STANDARD
LM_LICENSE_FILE=C:\WVOFFICE\STANDARD\LICENSE.DAT;
C:\<ispcomp_path>\LICENSE\LICENSE.DAT
■
Set <ispcomp_path>\v\standard before <wvoffice_path>\standard in the WDIR
path. The path order in the WDIR (ispEXPERT Compiler path placed first) is
required for the ispEXPERT and Workview Office environment.
Use the WorkView Office Project Manager to add libraries to your
viewdraw.ini file. For a new design targeted for ispLSI 1000, 2000, 3000, or
6000 devices, add the following lines to the end of the viewdraw.ini file in your
project directory in the order shown below:
DIR [rm] <ispcomp_path>\vl\lsc (lsc)
DIR [rm] <ispcomp_path>\vl\lscsub (lscsub)
DIR [rm] <ispcomp_path>\vl\lsc_mod (lsc_mod)
■
✍ NOTE
Do not add the mod_dsn library path to your viewdraw.ini
file. The macros in this library are meant to be copied to your
project directory for local editing.
ispEXPERT Compiler Getting Started Manual – PC
37
Design Environments
■
■
For ispLSI 5000V device family designs, use the WorkView Office Project
Manager to add the isp5000 and lscsub libraries to your viewdraw.ini file. The
path order is optional, but should resemble the following example:
DIR [rm] <ispcomp_path>\vl\isp5000 (isp5000)
DIR [rm] <ispcomp_path>\vl\lscsub (lscsub)
DIR [rm] <ispcomp_path>\vl\lsc (builtin)
The lsc library path is optional. However, if used, it must be at the end of the
order and aliased as builtin as shown in the example above.
For ispLSI 8000 device family designs, use the WorkView Office Project Manager
to add the isp8000 and lscsub libraries to your viewdraw.ini file. The path
order is optional, but should resemble the following example:
DIR [rm] <ispcomp_path>\vl\isp8000 (isp8000)
DIR [rm] <ispcomp_path>\vl\lscsub (lscsub)
DIR [rm] <ispcomp_path>\vl\lsc (builtin)
The lsc library path is optional. However, if used, it must be at the end of the
order and aliased as builtin as shown in the example above.
Design Environment Setup - ispLSI 6000 Device Family
The Viewlogic Interface Kit supports ispLSI 6000 device family designs via VHDL and
schematic entry, and gate-level functional and post-route timing simulation.
If you use ViewDraw to create your design, copy the module macros you need from
the SCH and SYM directories under the c:\<ispcomp_path>\vl\mod_dsn library into
your working SCH and SYM project directories. If you are using FPGA Express to
create your design, you must copy the module macros from
c:\<ispcomp_path>\vl\vhs\mod_vhd into your project directory. Do not point to the
mod_dsn or mod_vhd library in your .vpj file. Refer to the online ispEXPERT
Compiler and Viewlogic Design Manual for detailed information.
ispEXPERT Compiler Getting Started Manual – PC
38
Design Environments
Exemplar Interface Kit
Exemplar Galileo Library Menu Setup
To use the Lattice-provided synthesis library, you must modify your galileo.ini file
in the <exemplar_path>\data directory. Different versions of the tool may have slightly
different customization formats. Refer to the galileo.ini file to customize your
specific version.
For Exemplar Galileo Extreme release version 4.2.2, add the following lines to the
galileo.ini file:
{ “Lattice ispLSI 5000 Synthesis
Logic” “” }
{ “Lattice ispLSI 8000 Synthesis
Logic” “” }
{ “Lattice Synthesis Library” IO
{ “Lattice Timing lib” IO lscsub
Library” IO isp5000 lsc 4 “Exemplar
Library” IO isp8000 lsc 4 “Exemplar
lsc lsc 4 “Exemplar Logic” “” }
lscsub 4 “Exemplar Logic” “” }
Exemplar Leonardo Library Menu Setup
For Exemplar Leonardo Extreme, add the following lines to the leonardo.ini file:
{ “Lattice ispLSI 5000 Synthesis Library” isp5000 none FPGA 4
“Exemplar Logic” “” }
{ “Lattice ispLSI 8000 Synthesis Library” isp8000 none FPGA 4
“Exemplar Logic” “” }
{ “Lattice Synthesis Library” lsc none FPGA 4 “Exemplar Logic” “” }
{ “Lattice Timing Library” lscsub none FPGA 4 “Exemplar Logic” “” }
Exemplar LeonardoSpectrum
For Exemplar LeonardoSpectrum, add the following line to the
<exemplar_path>\lib\devices file:
“lattice”, “PLSI-5000”, isp5000”, none, “FPGA”, “BOTH”,
“Lattice Semiconductor Corp”, “”, “”
Lattice Synthesis and Symbol Library Setup
After modifying the appropriate .ini file in your <exemplar_path>\data directory,
copy the Lattice synthesis library (lsc.syn) into the Exemplar library directory as
follows:
■
■
If you are using Galileo Extreme 4.2.2 release, copy the
<ispcomp_path>\exemplar\library\gal_422\lsc.syn file to the <exemplar_path>\lib
directory.
If you are using Leonardo Extreme or Spectrum, copy the
<ispcomp_path>\exemplar\library\leo_422\lsc.syn file to the <exemplar_path>\lib
directory.
ispEXPERT Compiler Getting Started Manual – PC
39
Design Environments
✍ NOTE
For designs using the ispLSI 5000V device family, copy
isp5000.syn.
For designs using the ispLSI 8000 device family, copy
isp8000.syn.
You may copy multiple synthesis libraries, depending on the
devices for which you are designing.
Lattice Symbol Library Setup
Copy the Lattice symbol library (lsc.eds and lsc.idx) into the Exemplar library
directory as follows:
■
■
Copy the <ispcomp_path>\exemplar\library\sym\lsc.eds file to the
<exemplar_path>\lib\sym directory.
Copy the <ispcomp_path>\exemplar\library\sym\lsc.idx file to the
<exemplar_path>\lib\sym directory.
ispEXPERT Compiler Getting Started Manual – PC
40
Chapter 3
Tutorial
This chapter is designed to help you become familiar with the Lattice Semiconductor
ispEXPERT Compiler tool for design compilation. Through a series of steps, this
tutorial leads you through the design flow.
The following assumptions are made:
■
■
You have read and understood the ispEXPERT Compiler User Manual
You are familiar with your Microsoft Windows environment
The ispEXPERT software uses a Windows-standard Graphical User Interface (GUI)
with pull-down menus, text editing commands, and screen control commands. The
ispEXPERT interface is called the Design Manager.
ispEXPERT also supports command-line syntax. Refer to the ispEXPERT Compiler
User Manual for the command-line syntax.
ispEXPERT Compiler Getting Started Manual – PC
41
A Brief Tour of the Screen
A Brief Tour of the Screen
When you invoke the Lattice Semiconductor ispEXPERT Compiler software, the
Design Manager appears (Figure 3-1).
Banner
Menu Bar
Tool Bar
Session Log
Status Bar
Figure 3-1. Design Manager Window
The Design Manager includes the application banner, menu bar, tool bar, and work
space. The Session Log, located near the bottom of the screen, contains useful
messages relating to the operation that you are performing such as task prompts,
task verification, error and warning messages, and various general messages. The
Status Bar provides information on menus and icons.
This tutorial shows you how to begin using the development software by creating a
project. The examples directory included with the ispEXPERT software package
contains sample design projects. The ispEXPERT Compiler software accepts the
following types of input files:
■
■
Electronic Design Interchange Format (EDIF)
Programmable Logic Array (PLA)
Before you begin, it is essential that you understand the design flow. Refer to
Figure 1-1 for an overview of how the ispEXPERT software works.
ispEXPERT Compiler Getting Started Manual – PC
42
ispEXPERT Compiler Overview
ispEXPERT Compiler Overview
The ispEXPERT Compiler software imports existing designs from third-party CAE
design-entry environments. It compiles designs created using schematic capture
tools or synthesis tools, and fits these designs into Lattice Semiconductor ispLSI
devices.
The ispEXPERT Compiler software performs synthesis and partitioning of the logic
into Generic Logic Blocks (GLBs) and Input/Output Cells (IOCs), compilation,
placement, and routing. It outputs various netlist files used for timing simulation, a
standard JEDEC file used for device programming, and all report and log files
necessary to help you understand the routed design.
You can achieve the best utilization and routability by allowing the ispEXPERT to
assign the I/O pin placement. Once the software assigns the pin placement the first
time, you can fix the pins and make minor changes to the design. Each time you
change your design, you must recompile.
The following steps outline the overall flow of the ispEXPERT design solution:
1. Create a new project. Create a project in the ispEXPERT environment by
importing a design file from a third-party CAE design-entry environment.
2. Lock the pins. Fix the individual input and output signals to specific device pins
(optional). You can use Pin Attributes to set pull, slow slew, open drain, reserve
pin, voltage, and outdelay attributes. These attributes are device specific; not all
devices use all options. To obtain the best placement and routing of your design,
do not fix pins unless it is absolutely necessary.
3. Use the Explore function. Generate multiple design compilations and examine
the results to find the best implementation of your logic. For additional information
on using this feature in your designs, refer to the Chapter 4, “Advanced
Features Tutorial.”
4. Set the Compiler Control Options. Determine the compiler’s flexibility to
complete your design, define the global objectives for design implementation, and
allocate the physical device resources in support of specific device options. Using
the Compiler Control Options, you can produce a physical netlist of your design.
5. Compile the design. Use the compiler to place and route the logic. When
possible, the compiler adheres to the pin assignments included in your pin source
file or assignments that you made using the Design Manager during your pin
locking sessions. The compiler determines if the logic can fit into the assigned
GLBs and IOCs. It maps logic to the cells and provides input to the fuse map
generation process.
6. Check the compilation results. Study the compiler results for ways to best
improve your design. The compiler report file provides information about the
design environment, the design being processed, and a description of the
processed design.
7. Make Post Compile Updates. Use the Post Compile Update tool to change pin
attribute assignments, security, and speed grades.
ispEXPERT Compiler Getting Started Manual – PC
43
ispEXPERT Compiler Overview
8. Set and run the Static Timing Analyzer (ispTA). Analyze the performance of
your design after compilation. The ispTA traces all the signal paths and their
delays, determines critical (timing) paths, and evaluates maximum frequency of
the design and setup/hold requirements. Review timing reports.
9. Run the ispANALYZER. Connect an internal node to output pins without
repeating design entry and verification steps. This feature manipulates the
compiler output, changes only the routing paths of the desired internal nodes, and
preserves the original implementation of the design. The ispANALYZER
recognizes internal nodes and resources available for adding required new routing
paths. New JEDEC and SIM files are generated to continue testing.
10. Run the Physical Viewer. Review the design implementation details for the
compiled project. Display timing paths and ispANALYZER connections.
11. Use the Timing Viewer. Review the timing tables using the Timing Viewer. Use
the Timing Viewer to obtain additional timing information, to move between tables,
and to request the display of timing paths.
12. Download your design. Open the ISP Daisy Chain Download program and
download your design to a device. For additional information on using this feature
in your designs, refer to the ISP Daisy Chain Download User Manual.
ispEXPERT Compiler Getting Started Manual – PC
44
Design Tutorial
Design Tutorial
In the following tutorial, you take an EDIF design through the compilation process and
generate compiler result reports, a fuse map file (JEDEC), and output netlists for
timing simulation and static timing analysis. A sample design called cnt4.edn in the
examples directory is included with the software. If you installed ispEXPERT in a
directory other than the default, substitute your directory in the examples shown. In
the tutorial, the sample design will use an ispLSI 2032E-180LT48 device.
Refer to the Lattice Semiconductor ISP Encyclopedia and the ispEXPERT Compiler
User Manual for complete information on device architecture and compiler options.
Create the Project
1. Select Project ⇒ New from the Design Manager. The Create New Project dialog
box appears (Figure 3-2).
Figure 3-2. Create New Project Dialog Box
2. Select EDIF from the Project Type field. The EDIF Reader Settings button
appears to the right and all the EDIF files available in the directory are listed.
✍ NOTE
If you were using a PLA design, the EDIF Reader Settings box in the Create
New Project dialog box would be replaced by the Case Sensitive check box.
3. Select the drive and directory where you stored the design source file. You need a
design file to create a project in ispEXPERT. Choose the following path and drive
information:
c:\isptools\ispcomp\examples\edif
4. Select cnt4.edn from the File Name list. The ispEXPERT software shows a
project directory and a project with the same name as your source file, cnt4.
ispEXPERT Compiler Getting Started Manual – PC
45
Design Tutorial
Set the EDIF Reader Settings
If you were using a PLA design, you would skip Steps 5 through 7 and continue with
Step 8.
5. Click the EDIF Reader Settings button. The EDIF Reader Settings dialog box
appears (Figure 3-3). The EDIF Reader Settings that are set are applicable only
for this project. To set default EDIF Reader options, use the Interface ⇒ EDIF
Reader Settings menu item before opening a project.
Figure 3-3. EDIF Reader Setting Dialog Box
6. Choose Others from the Vendor pull-down list. Leave the rest of the options as
they appear. You do not need to attach a Property File in this example.
If you attach a Property File, the ispEXPERT EDIF reader compiles the Design
Attributes in the Property File together with your cnt4.edn file. Any attributes
specified in the Property File overwrite corresponding attributes in the cnt4.edn
file. Certain Design Attributes, such as pin locking attributes, are extracted by the
Design Manager, allowing you the opportunity to make further modifications to
your design after the design is read in successfully.
7. Click OK to close the EDIF Reader Settings dialog box and return to the Create
New Project dialog box.
ispEXPERT Compiler Getting Started Manual – PC
46
Design Tutorial
Change the Device
The cnt4.edn design uses a default device setting (the ispLSI5384V-125LB388).
For the purposes of this tutorial, change the device to the ispLSI2032E-180LT48
device.
8. Click Select Device on the Create New Project dialog box. The Device Selection
dialog box opens (Figure 3-4).
Figure 3-4. Device Selection Dialog Box
9. Select the ispLSI2032E-180LT48 device. There are two ways to select the device:
a. Select ispLSI2000 in the Family field of the Device Filter section (deselect all
other choices) and select your device from the Select New Devices field.
b. Select ispLSI2000 in the Family field of the Device Filter section. In the
subselection section, select 2032E in the Device field. Go through the
remainder of the fields, selecting an option for each. The Select New Device
field will show the correct device when you finish.
10. Be sure Y1_AS_RESET and ISP are turned on in the Device Options field (since
these are defaults, they should already be set).
11. Click OK to close the Device Selection dialog box.
12. Click OK in the Create New Project dialog box. The project opens and more menu
options become available. The name of your project appears in the banner.
ispEXPERT Compiler Getting Started Manual – PC
47
Design Tutorial
Lock the Pins
After you open a project and select a device, you can connect the design pins to the
device pins. Ordinarily, you would not lock pins unless absolutely necessary to obtain
the best placement and routing of your design. The ispEXPERT software performs
better and quicker if you do not lock pins. This section shows you how to lock pins.
To connect the pins to the ports:
13. Select Assign ⇒ Pin Locations or the Assign Pin Locations icon from the
Design Manager. The Assign Pin Locations window appears (Figure 3-5).
Show Pins
area
Unassigned
pins
Assigned
pins
Pin Assignment Area
Package View
Figure 3-5. Assign Pin Locations Window
This window contains a pin browser and a package view. The pin browser
contains the following pin options:
• Show Pins area – Shows the input, output, and bidirectional pin types. You can
limit the pins that display by changing the selected pin types or by entering a
partial pin name.
• Free Pins area – Frees the input, output, bidirectional, or all the pins.
• Unassigned Pins list box – Shows all the currently unassigned pins.
• Assigned Pins list box – Shows all the currently assigned pins.
• Import Pin Assignment area – Allows you to import the post-route compiler pin
assignment or to import a different pin file. For detailed information on these
two options, see the “Changing the Pin Assignment” and “Importing a Pin
File” sections in the ispEXPERT Compiler User Manual. A button is grayed out
if the compilation has not been performed or is not successful.
ispEXPERT Compiler Getting Started Manual – PC
48
Design Tutorial
• Save Pin Assignments button – Saves the current pin assignment to a text
file. For information on how to use a text file, refer to the ispEXPERT
Compiler User Manual.
• Package View – Shows a diagram of your device type with pins assigned to
GND, VCC, clock, etc.
Use the Show Pins area to change the Unassigned Pins and Assigned Pins lists.
For example, type the letter C in the Pin Name field. Only pins that begin with the
letter C appear in the lists. Also, if you deselect output and bidirectional, only the
input pins beginning with C appear in the lists.
Customize your screen to easily work with the Pin Locations window. Close the
Session Log by deselecting Session Log from the View menu. Enlarge the
package view by sliding the margins of the Pin Assignment area, if necessary.
Use the Zoom Bar tools to change the size of the device representation, if
necessary. You can drag and drop the zoom bar icons to the tool bar area or turn
off the display of all icons.
If you want to change the color or shape of the pins when they appear on your
desktop, select Edit ⇒ Options. Select the Pin Color Shape tab. For complete
instructions on how to set the pin colors and shapes, refer to the ispEXPERT
Compiler User Manual.
14. Click on a pin in the Unassigned list. It is highlighted. You can also use a
combination of the space bar (selects and deselects) and the arrow keys
(navigates up and down) to move around the list.
15. On the package view, double-click the left mouse button on the device pin where
you wish to connect this pin. The pin changes to light blue for inputs, bright yellow
for outputs, and pink for bidirectional pins (the defaults). Check the Session Log or
Status Bar for messages.
Or you can press Shift and single-click the left mouse button on the port name
then Shift-click on the device pin to assign a pin. The pin moves to the Assigned
Pins list.
Click on a pin to see Pin Tips, a bubble box that displays the pin name, cell name,
and pin assignment for that pin. You can also see Pin Tips by holding the left
mouse button down and moving the cursor slowly over each pin.
❖ TIP
You can also assign a pin by clicking on the pin name and
dragging it to a pin in the package view. When you click on the
pin name, the cursor changes to a hand; hold the mouse
button down and drag to the pin. When the pin tip displays,
release the mouse button. The pin is assigned. By holding the
Ctrl key down, you can drag pin assignments from one device
pin to another.
ispEXPERT Compiler Getting Started Manual – PC
49
Design Tutorial
To see more than one area of your package view:
16. Use the right split bar and drag it left. Use the arrow keys and scroll boxes to
customize your desktop to view two separate areas of the package view
(Figure 3-6).
Figure 3-6. Using a Split Screen
17. Make the following changes to the file by connecting these pins (these
assignments are already shown in Figure 3-6):
Input pins:
D0 to pin 35
D1 to pin 2
Output pins:
CO to pin 13
Q0 to pin 25
To remove a pin assignment, double-click on the pin in the package view and the
pin returns to the Unassigned Pins list (in alphabetical order).
18. Close the Assign Pin Locations window. Your pin locking session is saved to the
project directory when you select Project ⇒ Close or Project ⇒ Save As
Setting from the Design Manager.
ispEXPERT Compiler Getting Started Manual – PC
50
Design Tutorial
Set the Pin Attributes
After you connect the pins to each port, you may want to set Design Attributes or
Compiler Control Options, depending on your design constraints and requirements.
To set the pin attributes:
19. Select Assign ⇒ Pin Attributes or the Pin Attributes icon from the Design
Manager. The Pin Attributes dialog box appears (Figure 3-7).
Attribute Tabs
Pin Name Field
Pin Type
On/Off Lists
Figure 3-7. Pin Attributes Dialog Box
The Pin Attributes dialog box allows you to set the CRIT, pull, slew rate, open drain,
reserve pin, voltage, and outdelay pin attributes for each pin individually. These
attributes are device specific; not all devices support all options. See the Lattice
Semiconductor ISP Encyclopedia and the ispEXPERT Compiler User Manual for
complete information about device architecture.
You can select a pin attribute function by selecting the tab at the top of the dialog box.
You can select the types of pins you want to display from the check boxes in the Show
Pins Area. If you want to display only those pins that begin with a certain letter, type
that letter in the Pin Name field.
You can highlight a pin from either list by clicking on it. The function buttons are
enabled or disabled depending on your choices. To select a range of pins, press and
hold the Shift key while you click the first and last pins in the range. To select more
than one pin, press and hold the Ctrl key while you click each pin name. Click Add or
Remove to move the pins between the lists. Click Add All or Remove All to move all
the pins from one list to the other list without selecting each pin.
ispEXPERT Compiler Getting Started Manual – PC
51
Design Tutorial
20. Set the individual slow slew rate for the following pins:
CO
Q1
Q2
21. Select Apply to make the changes and keep the dialog box open for more
changes. You can also select OK to make the changes and close the dialog box,
or select Cancel to ignore your changes and close the dialog box.
22. Close the Pin Attributes dialog box.
You have set the desired Pin Attributes. Now you need to set the Compiler Control
Options.
Set the Compiler Control Options
To set the Compiler Control Options:
23. Select Tools ⇒ Compiler Settings from the Design Manager. The Compiler
Settings dialog box appears (Figure 3-8) with the default settings.
Figure 3-8. Compiler Settings Dialog Box
This dialog box contains the most commonly used options. Set the options as
follows:
• Strategy – Area
• Effort – High
• Use Global Reset – On
• Maximum GLB Inputs – 12
• Maximum GLB Outputs – 4
• Free All Pin Locks – Off
• Ignore Reserved Pins – Off
ispEXPERT Compiler Getting Started Manual – PC
52
Design Tutorial
• Use Extended Routing – On
• Carry Pin Direction – Off
• Case Sensitive – On
• Perform Timing Analysis - Off
• Use Parameter File Only – Off
24. Click the Interfaces button. The Interfaces dialog box appears (Figure 3-9).
Figure 3-9. Interfaces Dialog Box
25. Turn on the Output Format – EDIF netlist check box.
26. Click OK. The Interfaces dialog box closes.
27. Click OK to make your changes and exit the Compiler Settings dialog box.
Select an Interface Setting
You are almost ready to compile, but you need to tell the compiler what kind of EDIF
output netlist file to generate, depending on which interface you are using.
To set the interface:
28. Select Interfaces ⇒ EDIF writer settings from the Design Manager. The EDIF
Writer Settings dialog box appears (Figure 3-10).
Figure 3-10. EDIF Writer Settings Dialog Box
29. Ensure that the EDIF Output File Extension is set at edo.
30. Set the Vendor Information pull-down box to Others.
31. Click OK to save your changes.
ispEXPERT Compiler Getting Started Manual – PC
53
Design Tutorial
Save the Project Settings
After you assign Design Attributes and set the Compiler Control Options, you can use
the Save As Settings option to name and save these project settings. This function
allows you to retrieve the project settings later.
32. Select Project ⇒ Save As Setting from the Design Manager. The Save As
Setting dialog box appears (Figure 3-11).
Figure 3-11. Save As Setting Dialog Box
33. Name the setting test1. After you compile, the ispEXPERT software creates a
subdirectory called test1 in the project directory. It includes all these specific
project settings (pin locking, Pin Attributes, Compiler Control Options, etc.). Look
for the output simulation files under the subdirectory because these files will not
appear in the main project directory after you use the Save As Settings function.
34. Click OK. The project settings are named and saved.
Run the Compiler
Once you set all the Compiler Control Options and Pin Attributes, make pin
assignments, and specify the type of output netlist files to generate, you are ready to
compile your design.
To run the ispEXPERT compiler:
35. Select Tools ⇒ Compile or the Compiler icon or the Compile button in the
ispSmartFlow window. The ispEXPERT jet moves, showing that your instructions
are processing. The compiler fits your design, with the options and attributes you
selected, into the Lattice Semiconductor ispLSI device.
To terminate the compile process, click on the Stop icon or the Stop button in the
ispSmartFlow window.
During the compile process, messages display in the Session Log, which contains
information relating to the operation that you are performing. Session Log information
includes task prompts, task verification, error and warning messages, and various
general messages.
If an error or warning displays, you can get more information about the message by
double clicking on the message number in the Session Log or by selecting the Error
Messages menu item from the Help menu and selecting the error number. You can
clear all messages from the Session Log using Edit ⇒ Clear Messages.
ispEXPERT Compiler Getting Started Manual – PC
54
Design Tutorial
During the compile, the ispSmartFlow™ window shows the compile processes
currently being performed. You can double-click on the compiler report icon or the
compiler log icon to display the results; this is the same as opening the file from the
Results menu. You can also move the cursor to a process block and click the right
mouse button to display the Results commands that are available for that step of the
compilation. Use the View ⇒ ispSmartFlow menu item to turn on or off the display of
the ispSmartFlow window.
Figure 3-12 shows an example of the ispSmartFlow window. An existing
ispSmartFlow reflects the last compile status if it exists (the successful process boxes
are blue) or the compile settings when the project opens (the process boxes are
gray). If a process box is red, that process encountered errors. When a process box is
tan, that process is currently being performed by the compiler.
Figure 3-12. ispSmartFlow Window
Check the compiler log for a detailed history of the processes that were run and any
errors or warnings. The compiler log is similar to the Session Log except it only
contains information about the processes that occurred during the compilation.
ispEXPERT Compiler Getting Started Manual – PC
55
Design Tutorial
View the Compilation Results
Once the compiler successfully completes fitting your design into the device, you can
check the compiler reports, display the post-route pin layout, or look for ways to
improve the overall design connectivity. You can also print any of these reports.
To view the compiler log:
36. Select Results ⇒ Compiler Log from the Design Manager. The compiler log
appears. This log file resembles the Session Log, but you can search for
information strings in this log file.
To view the compiler report:
37. Select Results ⇒ Compiler Report or the Compiler Report icon from the
Design Manager. The compiler report for your design appears in a text window.
For detailed information about how to interpret the compiler report, see the
ispEXPERT Compiler User Manual.
You can also click on the Log or Report icon from the ispSmartFlow window to view
the log or report.
To view the compiled pin layout:
38. Select Results ⇒ Pin Layout or the Pin Layout icon from the Design Manager. A
view of your post-route pin layout appears. For detailed information about how to
interpret the pin layout, see the ispEXPERT Compiler User Manual.
To view the EDIF netlist file:
39. Select Results ⇒ EDIF Netlist from the Design Manager. The file appears in a
text window.
To print a report:
40. Access the report to be printed. Select File ⇒ Print or the Print icon from the
Design Manager. The standard Windows-type print dialog box appears. Set print
options and click OK.
ispEXPERT Compiler Getting Started Manual – PC
56
Design Tutorial
Set the Timing Analyzer
After you compile, set the Timing Analyzer (ispTA) settings to show your design path
speeds.
To set the timing analyzer:
41. Select Tools ⇒ Timing Analyzer Settings from the Design Manager. A
cascading menu lets you select or deselect the types of reports to be generated.
Verify that all the reports are selected.
42. Select Tools ⇒ Timing Analyzer Settings ⇒ Select Paths from the Design
Manager. The Timing Analysis Path Selection dialog box appears (Figure 3-13).
Figure 3-13. Timing Analysis Path Selection Dialog Box
43. Click Select Source Nodes. The Select Source Nodes dialog box opens
(Figure 3-14).
Figure 3-14. Select Source Nodes Dialog Box
Use the Select Source Nodes dialog box to select the source nodes to be used by
the Timing Analyzer. Move the nodes between the Available Nodes and Analyze
Nodes lists to select the source nodes to be analyzed.
ispEXPERT Compiler Getting Started Manual – PC
57
Design Tutorial
You can highlight a pin from either list (Available Nodes and Analyze Nodes) by
clicking on it. The function buttons are enabled or disabled depending on your
choices. To select a range of pins, press and hold the Shift key while you click the
first and last pins from a list. To select more than one pin, press and hold the Ctrl
key while you click each pin name. Click Add or Remove to move the pins
between the lists. The pins change lists.
Click Add All or Remove All to move all the pins from one list to the other list
without selecting each pin.
44. Click Add All to move the nodes from the Available Nodes to the Analyze Nodes
list in the Select Source Nodes dialog box. Select OK to make the changes and
close the dialog box and return to the Path Selection dialog box.
45. Click Select Destination Nodes. The Select Destination Nodes dialog box opens
(Figure 3-15).
Figure 3-15. Select Destination Nodes Dialog Box
46. Click Add All to move the nodes from the Available Nodes to the Analyze Nodes
list in the Select Destination Nodes dialog box. Select OK to make the changes
and close the dialog box.
47. In the Path Selection dialog box, click All in the Analysis Path Criteria area.
48. In the Report Type area, click the Summary & Detailed radio button. Selecting
Summary & Detailed results in more data being available for each path in the
summary report and in the timing matrix.
49. Click OK to save your changes and close the Path Selection dialog box.
50. Select Tools ⇒ Timing Analysis from the Design Manager. The ispEXPERT jet
moves, showing that your instructions are processing. You can terminate a
compile process at any time by clicking the Stop icon.
Check the Session Log for a successful completion message.
ispEXPERT Compiler Getting Started Manual – PC
58
Design Tutorial
Check the Timing Matrix
51. Select Results ⇒ Selected Paths Timing Matrix or the Timing Matrix icon from
the Design Manager. The timing matrix appears (Figure 3-16). Use the scroll
boxes or arrow keys if necessary to view the entire matrix.
Figure 3-16. Timing Matrix Window
A number of right mouse button commands are available from the Timing Matrix.
Refer to the ispEXPERT Compiler User Manual for descriptions of these
commands.
To view other timing analysis tables:
52. Select Results ⇒ Clock Frequency Table, Results⇒ Setup and Hold Table,
Results ⇒ Tco Table, or Results ⇒ Tpd Table to display timing results in table
format.
To view a timing analysis report:
53. Select Results ⇒ Timing Report from the Design Manager. This cascades to
show the following reports: Selected Path Detailed, Selected Path Summary,
Selected Path Boundary, or 6192. Click on Selected Path Detailed. The timing
report for your design appears in a text window. For detailed information about
how to interpret the timing report, see the ispEXPERT Compiler User Manual.
ispEXPERT Compiler Getting Started Manual – PC
59
Design Tutorial
Download to a Device
After compilation, your design should fit effectively and compactly into the selected
Lattice Semiconductor ispLSI device.
To download your design onto a device:
54. Select Tools ⇒ ispDCD from the Design Manager. This command automatically
launches the ISP Daisy Chain Download software if you installed the download
application in the same directory as the ispEXPERT software.
55. Refer to the ISP Daisy Chain Download User Manual for complete instructions
about how to download your design onto a device.
ispEXPERT Compiler Getting Started Manual – PC
60
Chapter 4
Advanced Features Tutorial
This chapter provides an introduction to other features in the ispEXPERT Compiler.
While use of these features is not required to create and compile a project, their use
provides additional information that may help you fine tune your design.
The features that will be described in this chapter are:
■
■
■
■
■
Explore Tool
Post Compile Update Tool
ispANALYZER
Physical Viewer
Timing Viewer
Refer to the ispEXPERT Compiler User Manual for additional details on these
features.
This tutorial uses the CNT4 design that was compiled in Chapter 3, “Tutorial.” If
necessary, recompile your design before continuing with this tutorial.
ispEXPERT Compiler Getting Started Manual - PC
61
Explore Tool
Explore Tool
Once you select a device and make pin assignments, you can generate multiple
design compilations and examine the results using the Explore function. You can
select multiple settings of Compiler Control Options and examine the compiler results
for the best possible implementation of your logic. The Explore function keeps track
of the results and stores them in a subdirectory of the project directory called
ispds.run.
To generate multiple compilations of one project:
1. Select Tools ⇒ Explore Settings from the Design Manager. The Explore
Settings dialog box appears (Figure 4-1).
Figure 4-1. Explore Settings Dialog Box
2. Select the following options. Hold the Shift key to select multiple choices of one
Compiler Control Option.
• Strategy – Area, Delay
• Effort – Medium
• Use Global Reset – On
• Max Input – 8, 15
• Max Output – 2, 4
• Extended Routing – On
• Use GUI Pin Locks – On
• Free All Pin Locks – On
• Use Reserve Pins - On
ispEXPERT Compiler Getting Started Manual - PC
62
Explore Tool
• Ignore Reserve Pins - Off
• Resource Limit – Unlimited
• Calculate Frequency – On
• Append to Current Explore Log – Off
3. Click Advanced to access the Advanced Explore Settings dialog box (Figure 4-2)
with additional settings. This dialog box is used for Explore Settings that
correspond to the Advanced Compiler Settings.
Figure 4-2. Advanced Explore Settings Dialog Box
For purposes of this tutorial, do not turn on any of these options. Click Cancel to
close the dialog box.
4. Click Explore Criteria to display the Explore Criteria dialog box (Figure 4-3). This
dialog box is used to specify that the Explore process should terminate when it
meets specific conditions rather than going through all Explore cycles.
Figure 4-3. Explore Criteria Dialog Box
For purposes of this tutorial, do not turn on any of these options. The Explore
process will calculate all combinations of requested options. Click Cancel to close
the dialog box.
5. Click OK in the Explore Settings dialog box to set the Explore compile choices
and close the dialog box.
6. Select Tools ⇒ Explore from the Design Manager menu. A message box
displays showing the number of Explore runs that will be performed. Click OK to
start the exploration. The Status Bar shows the number of Explore runs that have
completed and the number that remain.
ispEXPERT Compiler Getting Started Manual - PC
63
Explore Tool
To examine the Explore Matrix results:
7. Select Results ⇒ Explore Matrix or the Explore Matrix icon from the Design
Manager. The Explore Matrix appears (Figure 4-4 and Figure 4-5). Scroll to see
the entire matrix. The device name displays above the User Settings. Each
combination of options displays on a separate line.
Figure 4-4. Explore Matrix – User Settings
ispEXPERT Compiler Getting Started Manual - PC
64
Explore Tool
Figure 4-5. Explore Matrix – Compiler Results
8. Select Results ⇒ Explore Display Criteria to display the Explore Matrix Criteria
dialog box (Figure 4-6). You can limit the results that display in the Explore Matrix
to those that satisfy your criteria.
Figure 4-6. Explore Matrix Display Criteria Dialog Box
Enter the following values in this dialog box and click OK:
• Number of Macrocells – From 8 to 8
• Number of GLBs – From 4 to 5
The Explore Matrix immediately changes to reflect the four explore results that
satisfy the selected criteria.
9. Place the cursor in the second row of the Explore Matrix and click the right mouse
button. The following commands display so you can save the settings for that
particular Explore run:
• Save Setting – Saves the options for the selected Explore run in the current
setting.
• Save Setting & Compile – Saves the options for the selected Explore run in
the current setting and runs the ispEXPERT Compiler using those settings.
ispEXPERT Compiler Getting Started Manual - PC
65
Explore Tool
• Save As Setting – Displays the Save As Setting dialog box and saves the
options for the selected Explore run in the specified setting.
• Save As Setting & Compile – Displays the Save As Setting dialog box and
saves the options for the selected Explore run in the specified setting and runs
the ispEXPERT Compiler using those settings.
Select Save As Setting & Compile. Enter test2 as the setting name. Click OK.
The test2 project settings will be created and the design will be compiled with
these settings. Use the test2 settings for the Post Compile Update section of the
tutorial.
ispEXPERT Compiler Getting Started Manual - PC
66
Post Compile Update Tool
Post Compile Update Tool
You can change the Open Drain, Pull, Slow Slew, OutDelay, Voltage, and Turbo
(LowPower) attributes for specific pins in the fuse map file without recompiling the
project. You can also select a new speed grade for the device. You may update the
pin attributes, perform Timing Analysis, and generate new output files. If you changed
the Security option from the Device Options dialog box or the UES from the UES
dialog box prior to selecting this option, you can also have these changes reflected in
your output files.
This menu item is enabled only when the existing compiler results are valid and the
current device is the same as the device used in the last compilation.
To update the pin attributes in the fuse map file (using the test2 project settings):
1. Select Tools ⇒ Post Compile Update. The Post Compile Update dialog box
(Figure 4-7) displays (pin attributes are device dependent).
Figure 4-7. Post Compile Update Dialog Box
2. Click the tab corresponding to the attribute you wish to set. Use the Show Pins
area to filter the pin listings, if necessary. Click on the pin(s) you want to change.
Use Add and Remove to move pins between the unassigned and assigned lists,
Pull Up, Pull Off, or Pull Hold to change the Pull attribute, or Turbo On and
Turbo Off to change the LowPower (Turbo) attribute (for ispLSI 5000V and 8000
devices).
To change the speed, click the part with the speed you want to use for the design.
ispEXPERT Compiler Getting Started Manual - PC
67
Post Compile Update Tool
3. Make the following changes to the attributes:
• Select the OpenDrain tab; set OpenDrain ON for pins C0 and Q3.
• Select the Speed tab; change the device speed by selecting the ispLSI
2032E-110LT48 device.
4. Click Actions to display the Actions dialog box (Figure 4-8) and specify the types
of files to be updated. Turn off Update Security and Update UES, and click OK to
close the Actions dialog box.
Figure 4-8. Actions Dialog Box
5. Click Update to close the Post Compile Update dialog box and update the
appropriate files. A dialog box asks you to confirm that the Update is to be
performed.
6. When the update is complete, review the Frequency Table and the Compiler
Report.
7. Use the Project ⇒ Select Setting to select the test1 settings before continuing
with this tutorial.
ispEXPERT Compiler Getting Started Manual - PC
68
ispANALYZER
ispANALYZER
Use the ispANALYZER to connect observable nodes to output pins without repeating
design entry, compilation, and verification steps.
1. Select Tools ⇒ ispANALYZER from the ispEXPERT Design Manager.
The ispANALYZER window opens and displays a window showing the observable
nodes (Figure 4-9). The device pins to which they can be connected are enabled
for interaction.
Figure 4-9. The ispANALYZER Window
2. Assign the macrocell names to device pins as follows:
• Macrocell 01 to pin 21
• Macrocell 02 to pin 22
• Macrocell 03 to pin 17
3. Select Tools ⇒ Compile from the ispANALYZER window to generate new .jed,
.sim, and .apt files to reflect the node and device pin connections.
4. Select File ⇒ Return to ispEXPERT to return to the ispEXPERT Design
Manager.
ispEXPERT Compiler Getting Started Manual - PC
69
Physical Viewer
Physical Viewer
The Physical Viewer is a tool for viewing the implementation details of the
ispEXPERT Compiler graphically. It helps increase your understanding of the
implementation details. It uses a functional block representation of the ispLSI device
that shows the GLBs, IOCs, and Dedicated/Control Input resources.
The Physical Viewer allows you to inspect the logical resource assignments, signal
path trace, and functional logic of selected components. The primary components of
this tool include a Design Navigator, Connectivity display, Signal Path and Equation
tracer, and Timing Viewer. Objects can be selected either in the connectivity views or
in the Design Navigator window.
The design implementation details are characterized in two groups: the usage of logic
resources and the connectivity across those logic blocks. It shows how the design
logic is implemented in the device using the GLB, IOC, and Dedicated/Control Input
logic resources. It shows how data is being propagated between the logic resources
by displaying point-to-point routing information at the GLB level. It also lets you
graphically view and change ispANALYZER node connections.
You can control what information is displayed and how it is displayed by selecting
view modes and by selecting the GLB, GLB output pin, IOC, or Dedicated/Control
Input pin for which you wish to see information.
To start the Physical Viewer :
1. Select Tools ⇒ ispEXPERT Physical Viewer from the ispEXPERT Compiler
Design Manager.
When the Physical Viewer opens in default mode, it shows the Design Navigator
window on the left side of the screen and the Connectivity window on the right
side of the screen. The design implementation reflects the current ispEXPERT
compiled project. Figure 4-10 shows the Physical Viewer with the Design Tree
expanded.
ispEXPERT Compiler Getting Started Manual - PC
70
Physical Viewer
Figure 4-10. Physical Viewer Window
2.
3.
4.
5.
The Design Navigator window contains a design tree depicting the design and
device logic resource usage. The Design Navigator shows all pins in the design.
You can determine the GLB input pins that are used in the Design Navigator. GLB
input pins do not show in the Connectivity view.The Connectivity window provides
a block diagram showing how the design logic is implemented in the device and
how data is propagated across GLBs, IOCs, and Dedicated/Control Inputs.
Click on the entries in the Design Navigator to expand the design tree.
Highlight the CO output pin in the Design Navigator.
Click the right mouse button to display the popup menu, and select the Go to
Connectivity View.
Look at the Connectivity window to determine the location of the CO output pin.
To view the various types of display path information that is available in the
connectivity window, perform the following steps:
6. Select the Fan-In icon, and click on pin 00 in GLB A1 to view fan-in information.
In Fan-In mode, you can see signals that drive the selected IO, Dedicated/Control
Input, or other GLB output pin. These signals could be coming from other IOCs,
Dedicated/Control Input pins, or GLB output pins.
ispEXPERT Compiler Getting Started Manual - PC
71
Physical Viewer
7. Deselect the Fan-In icon and select the Fan-Out icon. Click on pin 01 in GLB A5
to view fan-out information.
In Fan-Out mode, you can see the IOCs, Dedicated/Control Input pins, and GLB
output pins the currently selected component drives. Click on the GLB output pin,
Dedicated/Control Input pins, or IOC for which you wish to see fan-out
information. Both Fan-In and Fan-Out can be on at the same time.
8. Select the Path icon. Click on pin 02 in GLB A1, hold down the Ctrl key, and click
on pin 01 in GLB A5.
Path mode shows the path between two GLB pins, Dedicated/Control Input pins,
or IOCs.
9. Select the Observable icon. Select pin 02 in GLB A1, click the right mouse
button, and select Compute Observability.
The Analyzer mode displays observability paths from the ispANALYZER. The
assigned observable path displays as a solid line and other observable paths
display as dotted lines. The observable IOCs are highlighted.
You can remove an assignment by holding the Shift key while clicking the left
mouse button on the IOC. The solid line will change to a dotted line. You can make
a new assignment by holding the Shift key while clicking the left mouse button on
the IOC.
Path Tracer
The Path Tracer provides a method for navigating the fan-ins and fan-outs in a
design. For example, you can start from a known input signal and trace how the
signal is propagating inside the device. You can follow a signal from its source to its
destination as well as from its destination to its sources.
The Path Tracer window (Figure 4-11) has three sections:
■
■
■
Fan-In Information – Shows the fan-ins for the selected GLB output pin,
Dedicated/Control Input pin, or IOC.
Selected Component – Shows the selected GLB output pin, Dedicated/Control
Input pin, or IOC. The equation shows how the GLB connects to outside signals.
Fan-Out Information – Shows the fan-outs for the selected GLB output pin, IOC, or
Dedicated/Control Input pin.
ispEXPERT Compiler Getting Started Manual - PC
72
Physical Viewer
Output pin 03 of
glb01 drives signal
$1N365
Input pin I1 of glb01
is driven by signal CDX
Exclusive OR Gate
OR Gate
And Gate
Inverted Signal
Figure 4-11. Path Tracer Window
10. Highlight pin 03 in GLB A1. Select Path Tracer from the command pop-up menu.
The macrocell $1N365 displays in the Selected Component section. The Fan-In
and Fan-Out information for the selected component displays in the appropriate
sections. Double click on a component in the Fan-In or Fan-Out sections to move
that pin to the Selected Component section. The Fan-In and Fan-Out sections are
updated to reflect the new selection.
Obtaining Additional Information
Additional information is available on GLBs, GLB output pins, Dedicated/Control Input
pins, Modules, IOCs, and Module IOCs. The following instructions provide examples
of how to obtain that information.
To obtain information about a GLB:
11. Right-click on GLB A1 and select Device Characteristics from the pop-up menu.
The GLB Information dialog box displays. Four tabs are available; check the
information in each one:
• Resources – Shows the resources of the GLB. This information is the same for
all the GLBs in the device.
• Utilization – Shows the used and available resources of the selected GLB. This
information is only available for GLBs used in the design implementation. You
can also open the dialog box to this tab by selecting Design Usage from the
right-click pop-up menu.
ispEXPERT Compiler Getting Started Manual - PC
73
Physical Viewer
• Internals – Provides a pictorial description of the selected GLB. It shows all the
output pins of the GLB. The output pins that are used as feedbacks have a
circle inside. The output pins that are registers have an X. You can also open
the dialog box to this tab by selecting Internals from the right-click pop-up
menu.
• Function – Shows the logic function equations for the GLB. You can select
either VHDL or Equation format as the HDL format. The Equation format is
Boolean, similar to that in the Compiler report file. You can also open the
dialog box to this tab by selecting Function from the right-click pop-up menu.
The default HDL format is based on your setting in the Customize dialog box.
To obtain IOC information:
12. Right-click on IOC IO3 in the Connectivity window and select IOC
Characteristics from the pop-up menu. The IOC information includes the usage,
the user design signal name, the package pin location, and whether the IOC
bypasses the ORP.
To obtain Dedicated/Control Input information:
13. Right-click on Dedicated/Control Input pin Y0 in the Connectivity window and
select Dedicated/Control Input Characteristics from the pop-up menu. The
Dedicated/Control Input information includes device information, whether the
compiler used the Dedicated/Control Input pin, the external signal name, and the
package pin location.
To obtain GLB pin information:
14. Right-click on pin 01 in GLB A1 in the Connectivity window and select Utilization
Information from the pop-up menu. You can click the Function tab to obtain
additional information.
To obtain design usage statistics:
15. Access design usage statistics and the device statistics by right clicking in an
unoccupied area in the Connectivity View and selecting Utilization or Resources
from the pop-up menu.
ispEXPERT Compiler Getting Started Manual - PC
74
Timing Viewer
Timing Viewer
The Timing Viewer provides an interactive method for viewing and querying timing
information for the design. The Timing Viewer is accessed through pop-up menus in
the Physical Viewer. Information is calculated in response to your query, and the turnaround time is fast. Only the data you requested displays.
The Timing Viewer consists of the Signal Navigator and several tables. These tables
can be requested from various locations in the Timing Viewer, usually using the right
mouse button popup menus.
The Signal Navigator (Figure 4-12) lists design signals in a tree format and groups
them into four categories—Inputs, Outputs, Bidirectional, and Registers.
Figure 4-12. Signal Navigator
The following tables are available in the Timing Viewer. They are displayed when you
request that timing information from the Physical Viewer, or from within the Timing
Viewer, from the ispEXPERT Compiler Results menu.
■
■
■
■
■
Timing Matrix Table
Clock Frequency Table
Tco Table
Setup and Hold Table
Tpd Table
ispEXPERT Compiler Getting Started Manual - PC
75
Timing Viewer
The following steps show some of the ways you can move between the Physical
Viewer and the Timing Viewer to display information. Try these procedures and any of
other commands you see in the popup menus. Refer to the ispEXPERT Compiler
User Manual for detailed information on the commands that are available in the
Physical Viewer and the Timing Viewer.
1. From the Physical Viewer connectivity window, right click on output pin IO1. Select
Timing Viewer ⇒ Source Tag. The Timing Viewer opens with the Timing Matrix
table displaying the timing for signal CD.
2. Move the cursor to the column heading containing Q10. Click the right mouse
button and select Show Timing Data. Timing values for that column display. You
can obtain additional timing data by repeating this procedure for any row, column,
or cell.
3. Move the cursor to the Signal Navigator and right click on CNT4. Select
Frequency. The Frequency Table displays, with the design frequency highlighted.
4. In the Signal Navigator, expand CNT4 ⇒ Registers ⇒ Q10 ⇒ INODE_START ⇒
Q10. Highlight Q10 and right click. Select Tco Path to display the Tco Table.
5. Go back to the Signal Navigator, highlight Q10, and right click. Select Setup and
Hold to display the Setup and Hold Table.
6. Move between the tables using the appropriate tool bar icons.
7. Return to the Timing Matrix Table. Right click on the cell for Source D0,
Destination Q10. Select Display Timing Path ⇒ Longest Path. The display
returns to the Physical Viewer, with the Timing Path icon active, and shows the
longest path between the signals D0 and Q10.
8. Return to the Timing Matrix Table in the Timing Viewer. Right click on the cell for
Source D0, Destination Q10. Select Display Timing Path ⇒ Report Timing
Path. The Boundary Report displays. Select the Detailed Report button to view
the Detailed Report.
ispEXPERT Compiler Getting Started Manual - PC
76
Constraint Manager
Constraint Manager
The Constraint Manager allows you to set attributes in your EDIF project, make
changes to an EDIF Property File, or create a new Property File. You can set pin, net,
and symbol attributes using the Constraint Manager.
The Constraint Manager is accessed by selecting Tools ⇒ Constraint Manager
from the ispEXPERT Compiler Design Manager.
Figure 4-13. Constraint Manager Main Window with
Output Pins Expanded
The window on the left contains a Design Browser that lists all the pins, nets, and
cells in the design. The window on the right shows the attribute table that can be used
to set attributes. There are attribute tables to set pin attributes, net attributes, and
symbol attributes.
When you expand the browser to show the Input Pins, Output Pins, and Bidirectional
Pins, you can add these pins to the Pin Attributes Table and assign pin attributes to
them. When you expand the browsers to show Cells, you can assign Symbol
attributes when you double click on Cells; you can assign net attributes to the nets
when you expand the Cells to the lowest level. You can also assign net attributes to
the signals in the Nets category.
ispEXPERT Compiler Getting Started Manual - PC
77
Constraint Manager
Setting Attributes
This section describes the procedures for adding pins and signals to property tables
and for assigning attribute values.
To add all the pins or signals to a table:
1. Expand the Output Pins area of the Design Browser.
2. Double click on Output Pins. All the output pins will be added to the Pin Attributes
Table table. Notice the characters before the pin name in the Design Browser turn
from green to blue when the pin is added to the property table.
To assign constant values to an attribute for individual pins:
3. Move the cursor to the table cell for the CRIT attribute for pin Q3. Click the right
mouse button.
4. From the list of values, select the ON value.
To assign constant values to an attribute for multiple pins:
5. Click on the SLOWSLEW attribute name in the column header. The column is
highlighted.
6. Click the right mouse button to display the list of values.
7. Select the ON value; it is entered for all the pins currently in the table.
8. You can then change individual values if desired.
9. With the column highlighted, place the cursor in the attribute name and click the
right button. Select Sort to sort based on the values for that attribute.
You can also as sign nonadjacent cells within an attribute by holding down the Ctrl
key and using the left mouse button to select the cells you want to assign.
To assign a variable to an attribute:
10. Click the cursor in the table cell for the LOCK attribute for pin Q1. Click the right
mouse button.
11. Select Edit. The cursor changes position, and you can type any value into the
cell. Enter the value 16 and press Enter.
When you are in edit mode, you can click the right mouse button to access edit
commands—Undo, Cut, Copy, Paste, Delete, and Select All.
✍ NOTE
The Constraint Manager does not check the validity of data
entered into the cell using the Edit command. When you type
in a value using the Edit command, be sure the entire value is
in either all upper case or all lower case characters.
ispEXPERT Compiler Getting Started Manual - PC
78
Constraint Manager
To clear an existing value assigned to an attribute:
12. Highlight the cell containing 16 for the LOCK attribute for pin Q1.
13. Click the right mouse button and select Clear. The attribute value is removed.
You can also clear non-adjacent cells in all columns by holding down the Control key
while selecting cells.
To delete attributes:
14. Highlight the SLOWSLEW attribute.
15. Select Edit ⇒ Delete from the pull down menu. All attribute values are cleared
from the cells.
OR
Highlight a row corresponding to a signal or pin name. Select Edit ⇒ Delete. The
row is removed from the property table, and all attributes assigned to that signal or
pin are deleted.
Check the other attribute tables to see which attributes are assigned. Feel free to
make any attribute changes you wish.
Once you set your attributes, these are reflected in your project. You can save them to
a named Property File if desired. When you compile, these attributes are used.
ispEXPERT Compiler Getting Started Manual - PC
79
Index
A
Actions for post compile update 68
Adobe Acrobat Reader 20
Advanced package 21
Analyzer Mode 72
Attributes
updating pin 67
Authorization number 22
Autoexec.bat file 31
Downloading 60
exploring 62
statistics 74
Design flow 43
Design Manager 42
Device
Changing 47
statistics 74
Directory structure 15
B
E
Base package 21
Batch compiling 62
Boolean Equation
GLB Function 74
GLB Pin Information 74
EDIF reader settings 45
Environment
Variables 23
Environment Setup
Variables 31
Viewlogic 37
Equation
GLB Function 74
Exemplar
design environment 39
Explore
criteria 63
matrix 64
using 62
Explore Matrix
saving settings from 65
Explore matrix 64
Explore Matrix display criteria 65
C
Compile 54
Design 54
from Explore Matrix 65
Report 56
Settings 52
status window 55
Compiler log 55
Compiler Result
on Explore Matrix 64
Config.sys file 31
Connectivity views 71
Connectivity window 71
Analyzer 72
Fan-In 71
Fan-Out 72
Path 72
Customer Hotline 33
D
Daemon
License 27
Dedicated/Control Input information 74
Design
analyzing 69
Compile 54
F
Fan-In Mode 71
Fan-Out Mode 72
Feedbacks 74
File
compiler log 55
Filter
explore matrix display 65
FLEXlm licensing 24
Floating license 24, 25
Function 74
Fuse map generation 67
ispEXPERT Compiler Getting Started Manual – PC
80
Index
G
Galileo Library setup 39
Generic Logic Blocks (GLBs)
Function 74
Internals 74
Resource Information 73
Utilization 73
GLB Pins
information 74
Go to Connectivity View 71
H
Hotline 33
I
I/O Cell (IOC)
information 74
Icon
explore matrix 64
fan-in 71
fan-out 72
observable nodes 72
path 72
Installation
Adobe Acrobat Reader 20
Driver 19
Interface Kit 19, 35
ISP Daisy Chain Download 19
ispCODE and ispGDS 20
ispEXPERT Compiler 17
ispGDX 18
Internals 74
IOC Information 74
IOC Utilization 74
ISP Daisy Chain Download 60
ISP Encyclopedia 32
ispANALYZER 69
assigning nodes 72
displaying paths in Physical Viewer 72
ispSmartFlow 55
J
JEDEC file 67
L
Leonardo Library setup 39
Library Setup
ViewDraw 37
Library setup
Galileo 39
Leonardo 39
symbol 40
synthesis 39
License
Floating 24, 25
Node-locked 24
Server 25
License file
Floating 25
Node-locked 23
Permanent 23
Thirty day 21, 22
License manager 27
Log file
compiler 55
M
Manuals 23
Matrix
Explore 64
N
Netlist
updating 67
Netlists 53
Node-locked license 24
Nodes
observable 69
O
Observable nodes 69
P
Path Mode 72
Path Tracer 72
Physical Viewer
accessing 70
Connectivity window 71
Path Tracer 72
popup commands 76
relationship to Timing Viewer 76
Pin Attributes
updating 67
Pins
Assigning 48
Attributes 51
Colors 49
Splitting assignment screen 50
ispEXPERT Compiler Getting Started Manual – PC
81
Index
Popup commands 76
Pop-up menus
Physical Viewer 73
Post Compile Update
actions 68
Tools 67
Product Options 17, 35
Project
Creating 45
Settings 54
R
Registers 74
Resource information 73
Results
compiler log 55
Explore Matrix 64
S
U
User Settings
on Explore Matrix 64
Utilization 73, 74
of Dedicated/Control Inputs 74
of IOCs 74
V
VHDL
GLB Function 74
View
ispSmartFlow 55
Viewlogic
Environment setup 37
Z
Zoom Bar
moving 49
Security key 14, 25
Service 33
Settings
saving from Explore Matrix 65
Setup
environment 39
Signal Navigator 75
Single-user license 24
Speed grade
changing 68
Statistics
Design 74
Device 74
Symbol Library setup 40
Synthesis Library setup 39
System requirements 14
T
Timing Analyzer 57
Report 59
Timing Matrix 59
Timing Viewer
accessing 75
popup commands 76
Signal Navigator 75
Tools
Explore 63
Explore Settings 62
ispANALYZER 69
Path Tracer 73
Post Compile Update 67
Trial compilations 62
Troubleshooting 29
ispEXPERT Compiler Getting Started Manual – PC
82