1
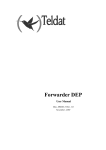
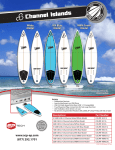
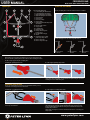
USER MANUAL
CROSSOVER BAR
WITH PUSH AWAY SAFETY RELEASE
3
2
1
4
4
5
5
6
10
11
12
14
13
15
14
16
17
LINE
9
7
LINE
TOP
8
Attach your flying lines to the kite and Crossover bar as follows:
R
REA
7
Crossover bar terminology
1. Left rear flying line attachment
2. Left top flying line attachment
3. Right top flying line attachment
4. Right rear flying line attachment
5. Crossover lines
6. Center V-line
7. Crossover pulleys
8. Center pulley
9. Relaunch handle with safety leash
attachment
10. Primary safety release
11. Stopper ball
12. Left leader line
13. Right leader line
14. Endcap with integrated
bungee chord
15. Bar with EVA foam grip
16. Swivel
17. Centrix harness loop with
push-away safety release
18. Harness loop tube
19. Harness loop lock-in pin
LINE
3
LINE
2
REA
R
1
FLYING LINE ATTACHMENTS
TOP
TERMINOLOGY
Attach the flying lines to the bar using laskhead knots:
FLYING LINE
FLYING LINE
FLYING LINE
18
19
LINE ATTACHMENT
ON BAR
LINE ATTACHMENT
ON BAR
LINE ATTACHMENT
ON BAR
PRIMARY SAFETY RELEASE
When things get out of hand you might want to use your safety release. The
Crossover bar has a primary release above the bar. After activating the release,
the kite is only supported by the rear flying lines.
Activating the primary quick release
Re-connecting the primary safety release
To activate your primary quick release, push the red release cuff towards you.
Re-connect the primary safety release by placing the loop on the end of the line
connected to the center pulley over the stainless steel pin, folding the pin down
an sliding the release cuff back in place.
SECONDARY QUICK RELEASE
In case you completely want to disconnect yourself from the kite, you can
activate the secondary quick release afterwards.
Activating the secondary quick release
Re-connecting the secondary quick release
To activate your secondary quick release, push the red release cuff on the harness loop towards the kite.
Re-connect the secondary safety release by placing stainless steel ring on the
end of the depower loop tube into the Centrix push-away center piece until
it locks in behind the hook inside the center piece. Now slide the release cuff
towards the spreader bar.
Always make sure all parts are free of sand and snow before re-connecting your
safety system.
www.peterlynn.com
USER MANUAL
CROSSOVER BAR
WITH PUSH AWAY SAFETY RELEASE
SWIVEL
HARNESS LOOP LOCK-IN PIN
After hooking in your harness loop,
you can use the security pin to prevent
your harness loop from accidentally
unhooking from your spreader bar.
Place the lock-in pin through the
spreader bar hook, just below the harness loop tube.
The top section of the Centrix
harness loop is fitted with a swivel to
unspin your top flying lines. To prevent
any wear and tear, as well as any
malfunctioning of the safety system,
regularly unspin your top flying lines
by using the swivel.
SAFETY LEASH ATTACHMENT
RELAUNCH HANDLE
When using an additional safety leash,
for example when flying your kite
unhooked, the safety leash can be attached to the small loop in the center
of the relaunch handle.
To relaunch your kite with the
leading edge down, pull on the
relaunch handle. The kite will fly up
backwards and will slowly turn around.
Once the kite has completely turned
around, let go of the relaunch handle
and continue flying your kite.
SECURING YOUR KITE WITH A GROUNDSTAKE
When using a groundstake to secure
your kite, the groundstake can be
placed though the small loop in the
center of the relaunch handle.
TOP/REAR LINE ADJUSTMENTS
1
2
To set the difference between the top
and rear lines, the Crossover bar has
two settings on the rear line attachments:
1.• Faster flying kite
• Better upwind
• Less power
• Less stalling in light winds or when
the kite is wet
2.• More direct steering
• More power
CROSSOVER LINES ATTACHMENT KNOT
In case the knot connecting the crossover lines with the center v-line has come undone,
re-attach it as shown.
www.peterlynn.com