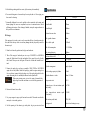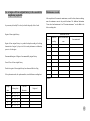
1
Key Largo Owner’s Manual INTRODUCTION Thank you for your selection of this Key Largo motorcycle. It represents high technology and reliability, the vehicle tail gas discharge meets the latest national emission standard, therefore it is a fairly environment-friendly motorcycle that may satisfy the demands of modern society. It has been manufactured technically in accordance with a lot of experience that our company obtained in manufacturing sports, race and tourist etc. vehicles. And it is just these experiences that have made this motorcycle take a large lead in the like products. This User's Manual will help you to know the operating method of this model, and obtain the knowledge relating to operation, basic check-up, service and maintenance and etc. Please contact your dealer or appointed maintenance center when you have problems in driving and maintenance. Note All configurations and parameters are for reference only, not contracted ones. Please refer to the actual configuration of the manufacturer. The product is designed and manufactured in accordance with the standard of GB7258-2004 "Safety Specifications for Operation of Vehicles", and the enterprise standard Q/ (PY) HNM-2005" The following information appears as signs in this Instruction Manual Danger Warning This sign indicates procedures that must be followed to avoid immediate hazard to you. This sign indicates procedures that must be followed to avoid injury to you, other people or the motorcycle. Notice This sign indicates procedures that must be followed to avoid damage to the motorcycle and yourself. Note This sign indicates procedures with further information. Note This User's Manual should be considered as part of the motorcycle and should be kept with the motorcycle for use in case of emergency. Even if this motorcycle is resold, it should also be kept with the motorcycle. Our company is endeavoring to improve product design and quality all the time. Therefore, when this User's Manual was being printed, it had already included the latest product information. As a result, it may not be exactly the same as the motorcycle you purchased. For any questions, please contact the dealer from whom the motorcycle was originally purchased or contact the appointed maintenance station. Be sure that you have read this User's Manual Before drive the motorcycle 1 CONTENTS Main points for safe riding ----------3 Names of parts of the motorcycle ----------4 Regular maintenance Motorcycle identification ----------5 Driver's tool---13 ----------5-8 Torque force specifications---14 Functions of the controllers Main switch---5 Indicator ---6 Oil capacity indication meter---6 handlebar---7 Speedometer Air filter ---6 Handlebar switch---6 Rear brake ----------13-22 Regular Maintenance /Lubrication Form---14 ---16 Engine oil---15 Maintenance for the air filter Adjustment of carburetor---17 Replacement of gear oil---16 ---17 Adjustment of idle speed---17 Adjustment of the throttle rotate handle---17 Adjustment of valve clearance---18 Front brake handlebar---7 seat pad lock included---7 Inspection of spark plug---18 Fuel tank cap---7 Front trunk lid ---7 Adjustment of rear brake---18 Starting lever---8 Free travel of front brake---18 Trunk ---8 Front brake---19 Rearview mirror---8 Inspection of brake fluid amount---19 Kickstand---8 Replacement of brake fluid---19 Check of kickstand switch holding function---8 Checking and lubricating the wire cable---20 Checking before riding Engine oil---10 Check of steering post---20 Air filter---10 Wheel bearing---20 Storage battery---21 Replacement of strip fuse---21 Tubeless tire and cast wheel felloe---11 Headlamp---21 Check if each component has been tightened---11 Switches---11 2 Lubrication main stand and kickstand---20 Check of brake fluid leakage---9 Check of front fork---20 Throttle rotate handle---10 Lubrication of throttle valve wire cable and rotate handle---20 ----------9-11 Lubrication of brake handlebar---20 Front and rear brakes---9 Tires---10 Rear brake---19 Gasoline---11 Cleaning and maintenance---21 Lamps and signal lamps---11 Specifications ----------22-23 Repair and maintenance Engine starting and pre-warming---12 Acceleration---12 Braking---12 ----------12-13 Starting of the motorcycle---12 Engine running-in---13 Parking---13 Use of engine oil from original factory is the essential for lengthening engine life ----------24 Maintenance records ----------24 Schematic circuit diagram ----------25 3 Main points for safe riding Danger Please give clear signals in case of the situations listed below: Left turn Right turn It's very dangerous to brake on a damp road. Please avoid any emergency brake to prevent slip of the motorcycle. When parking on a damp road, put on the brake slowly. Slow down your motorcycle when approaching street corners or crossroads and accelerate only when having passed the turn. Take cautions in riding while passing by side of a parked vehicle. Because the vehicle driver may not notice you’re passing and open the door suddenly. Rails, iron plates paved at a construction site or manhole covers are especially slippery when they are wet, please take care and lower your driving speed while passing these installations. And in the meantime, keep the motorcycle vertical, or otherwise it may slip. Rinsing motorcycle will wet the brake shoe block and lower the brake performance, check if the brake is in good state before riding. While driving the motorbike, you must wear safety helmet, gloves, preventive trousers (please fasten any ruffle part and part around the ankle of the trousers so that the trousers will not flap) as well as clothes with bright color Do not load too many things on the motorcycle, or it will affect the stability of the motorcycle. Please refer to section "Tire." Things should be fixed at the luggage carrier with rope. Loose load will also affect the stability of the motorcycle, as well as distract your attention on road situation. Each time before riding your motorcycle, you need to check the performance related items, including: brake, steering, tire pressure, fuel, engine lubricating oil and rearview mirror. 4 Names of parts of the motorcycle 1. Taillight / rear stop lamp 2. Exhaust muffler 3. 4. Front trunk Main stand 5. Storage battery (fuse included) 6. Main switch (seat pad lock included) 7. Headlamp 8. Kickstand 9. Front wheel 10. Front Fender 11. Rearview mirror 12. Trunk 13. Seat pad 14. Fuel cap 15. Starting lever 16. Rear wheel For vehicle color, style and equipment, refer to the real motorcycle 5 Motorcycle identification Functions of the controllers Frame number Main switch 车架号码打刻在车架中部左下方位置 Frame number is carved on the main beam tube at its left lower position and in the middle part of the frame The main switch controls the ignition and nose locking system. The operation method is the following: Engine number Engine number is stamped on the left upper part of the left crankcase. Note : The power is switched on and you can start the engine. When the Switch is turned to this position; the key can not be pulled out. : All the power supply is cut off. When the switch is turned to this position, the key can be pulled out. Please learn by heart your engine number so that when you are purchasing parts from a dealer, you can get the components for this type of motorcycle quickly. : This position can lock the steering handle and cut off all power supply. When the switch is turned to this position, the key can be pulled out. For operation details, please refer to section "Steering lock" (Page 7). Note When not riding the motorcycle, turn the key to “ position and pull out the key. 6 ” or “ ” Handlebar switch Indicator 1. High and low beam switch 2. Turn signal lamp switch 3. Horn switch High and low beam switch 1. Turn signal indicator: When the turn signal lamp switch functions, this indicator flashes. 2. High beam indicator: when the motorcycle uses high beam lamp, this indicator is on. Speedometer Speedometer can display the riding speed of the motorcycle (in mph). It is equipped with a mile meter that may add up your riding mileage. When using high beam, turn the switch to “ beam, turn the switch to “ ” position. ” position. When using low Turn signal lamp switch To send out right turn signal, push the switch to “ ”. To send out left turn signal, push the switch to “ ”. The switch will automatically return to the central position when it is released. To turn off the turn signal light, push down the reset button in the middle after the switch returns to the central position. Horn switch: Press this button and the horn will promptly send out sounds. Fuel indication meter Lighting switch Fuel indication meter can display the gasoline capacity inside the gasoline tank. When gasoline capacity decreases, oil gauge pointer will move from “F” (FULL) position to “E” (EMPTY) position. Please timely refill the oil when the pointer moves to the red zone or “E” position. Note When the lighting switch is on “●” position, all the illuminating lamps will be off. Shift the lighting switch to position “ ”, you can light up the headlamp, taillight, position lamp, instrument light. Shift the lighting switch to position “ ”, you can light up the front position lamp, taillight, and instrument light. Refill the oil timely before the gasoline inside the gasoline tank is 7 used up. The pointer of oil capacity indication meter can give right indication only when the main switch is in “ Electric starting switch ” position. While switching on the main lock and holding the front brake or rear brake handlebar (the kickstand is in back state), push the starting button and you can start the engine Notice 8 Before starting the engine, please read the relevant instructions on start-up. Rear brake handlebar Steering lock The rear brake handlebar is located at the left handgrip and when grasping the handlebar toward the handgrip, the braking is applied. 前刹车把手柄 Front brake handlebar The front brake handlebar is located at the right handgrip and when grasping the handlebar toward the handgrip, the braking is applied. 。 To lock the steering handle, make left rotation of motorcycle steering handle through to the end, and when the key is in “ ” position, press the main switch and then turn counterclockwise directly to “ ” position to lock the steering handle, and pull out the key. Turn the clockwise to “ ” position and you can unlock the steering lock. When riding the motorcycle, never turn the key to “ ” position. Warning Fuel cap Open: open the seat pad and just turn the counterclockwise. Seat pad lock Open: Insert the key to the seat pad lock switch, and just turn the key 45 degrees clockwise. Close: Join the bulge on the fuel tank cap with the groove on the fuel tank and just turn the cap clockwise. Before riding motorcycle, make sure the fuel tank cap has been Warning properly installed and locked to its original place Close: Press the seat pad to its original position Then pull out the key Try to lift up the end of the seat pad to confirm whether it is locked in. Before locking, confirm the seat pad key is not inside the trunk. 9 Starting lever Rearview mirror Screw out the starting lever towards the outer side of the engine. Tread the starting lever slightly with foot till the gear gets engaged and then start the engine by fast and forceful treading of the starting lever. Notice When using starting lever, use throttle handlebar to refuel slightly and this will help motorcycle starting. Trunk The trunk is located under the seat pad Warning Notice 10 When loading, never exceed the max. load of 10.0 kg. The trunk, when exposed under the sunshine, will easily get hot and do not place any flammable articles inside the trunk. Do not put any valuables or breakables inside the trunk. The trunk will easily get wet in rainy days or during motorcycle cleaning. Use a spanner to adjust the assembling nut at the lower end of rearview mirror and then you can adjust the rearview mirror angles. Kickstand This motorcycle has equipped with a shutting off system for ignition return circuit. When the kickstand is laid down, you will not be able to start the motorcycle. And only when the kickstand is retracted, can the engine be started. The kickstand is at the left pedal position of the frame. For taking into account of your safety, please timely spring up the kickstand before riding, our Company has set up a safety protection system for this motorcycle and the engine will not get started with the kickstand in laid down state. Please check carefully each of the following operating instruction steps. In case of any failures, you should send your motorcycle to the dealer from whom you purchased the motorcycle or to the appointed maintenance station for repair. Check of kickstand switch holding function Note Articles liable to get damp should be well wrapped before placing into the trunk. Be sure to store an appropriate size of safety helmet into the trunk. When you leave your motorcycle, make sure not to leave the seat pad in open position. Check the kickstand switch for its motion state in accordance with the following methods Warning For your safety, should any abnormal kickstand motion is found; go to the dealer from whom you originally bought your motorcycle or the appointed maintenance station for checkout. During this checkout, use the main stand to support the vehicle body. Turn the main switch to “ ” Spring up the kickstand Press starting switch while grasping brake handlebar and the engine can get started. Lay down the kickstand The engine will get a flameout Kickstand functions normally 11 Check to be made before riding Before using your motorcycle, the following items should be checked: Item Front and rear brakes Throttle rotate handle Engine oil Wheels and tires Various wire cables Brake handlebar pivot Main stand and kickstand shafts Lock tightness Gasoline tank Lamps and signal lamps Storage battery Note Checking contents Check the operation, status and free travel stroke. And adjust when necessary Check of motion. Adjust the free gap when necessary. Check of the operation state. Lubricate and adjust if necessary. Check of oil level. Fill engine oil if necessary. Tire pressure, wear and deflection status Check of the motion state. And lubricate when necessary Check of the motion state. And lubricate when necessary Check of the motion state. And lubricate when necessary Check the tightness of linkages between various components of the frame. When necessary, make adjustment to the lock tightness. Gasoline capacity. And refill when necessary Check of the working state. Make corrections when necessary Check of the voltage. Charge the battery when necessary Checking before use should be carried out before each time you ride the motorcycle. You can complete all the above checks within a very short time, but the safety and value that will result from the checks are far worthy of the time you spend, therefore make sure to carry out all these checks before using of your motorcycle. Warning Should any of the above items is found nonconforming or can not work normally, make sure to have it repaired and corrected to normal conditions before you can ride the motorcycle. Go to the original dealer from whom you purchased your motorcycle or the appointed maintenance station for assistance when necessary. 12 Front and rear brakes 1. Front and rear brake handlebars Check whether the front and rear brake handlebars have proper free stroke and make adjustment when necessary. Before riding, carry out a checking and confirmation for brake performance while the motorcycle is running at low speed 2. Check of braks When you feel that the front brake handlebar is unable to or can not stop the vehicle in operation, it indicates that there is a risk of insufficient braking force for your brake system and the brake system has got a failure. Be sure not to ride the motorcycle before removal of the failure. And go immediately to the dealer from whom the motorcycle was originally purchased or the appointed maintenance station for checking and repairing. Check of brake fluid leakage Make the front brake in motion for several minutes, and check the oil pipe joint or main brake cylinder for any brake fluid leakage. Brake fluid will damage the painting coat or the structure of the Notice plastic parts and it also has corrosion to man's skin. In case of any splatters or sprays, clean at once with dry cloth or paper towel and wash with clean water; See a doctor at once if it is sprayed into the eyes. Warning If leakage of brake fluid is found, immediately go to the dealer from whom the motorcycle was originally purchased or to the appointed maintenance station for checking and repairing. Leakage of brake fluid means there is dangerous status in the brake system. Throttle rotate handle Tires Rotate the throttle rotate handle to confirm if it is in normal operating state and check if the free travel stroke (2~6mm) is correct. The throttle rotate handle, if released, will return to its original position by force of spring. If the rotate handle needs any adjustment, it should be done by the dealer from whom the motorcycle was originally purchased or at the appointed maintenance station. The vehicle uses tubeless tires, and for ensuring optimum tire performance, lengthening service life and enabling safe operation, each of the following items should be carefully observed: Warning Be careful not to use too much force for this operation for fear of the throttle blocking and causing overspeeding. Check and adjust the tire pressure only when the air temperature inside the tire is equal to outside air temperature. Tire pressure Warning adjustment should be made according to the total weight of the loaded goods, passenger and the components as well as the vehicle speed. Engine oil Engine oil volume should be kept in a standard position. You should add engine oil if the volume is below the standard position. Recommend engine oil: (see Fig. 1 on page 23) Upper limit Pressure of a cold tire: 下限 Lower limit Regular oil replacement amount: 1.1L Note 1. Tire pressure: Make sure to check or adjust before riding. Note: Recommended oil grade: APISE, SF types or other same grades (such as “SF-SE”, “SF-SE-CC”, “SF-SE-SD” etc.) Air filter Air filter can prevent dust from entering into the engine. But if the air filter is not properly maintained, dust will still enter into the engine. So the air filter should be regularly cleaned and for the Regular Maintenance Form, please refer to page 16. In case of the passenger only, front tire: 150kPa In case of the passengers with 2 passenger, tire: 225kPa rear tire: 200kPa front tire: 175kPa rear Warning Motorcycle load has an absolute affect to various characteristics of the motorcycle itself, such as operation and control, braking, performance and even safety. Articles, if loaded, must be tightly tied and must not get loose. The heaviest objects should be packed and placed close to the motorcycle center with weight distributed evenly to the two sides of the motorcycle. Make proper adjustment to the damper in accordance with the load, and check tire state and tire pressure. In any case,never overload the motorcycle. Make sure that the total weight of the driver, passenger, and fittings should not exceed the maximum load of the vehicle. Riding an overloaded motorcycle may cause tire damages, unexpected accidents, or even personal injury or death. 13 Notice In case you run your motorcycle in a dusty, muddy or damp environment, you should check or clean the air filter after you have rode your motorcycle each time. 2. Check: Driving a motorcycle with excessively serious tire attrition will decrease driving stability, and may cause loss of control. It is recommended to replace the tire when the front tire engraving depth has been decreased below 1.6 mm, and the rear tire, if its engraving depth has been decreased below 2 mm, should also be replaced with a new one. Front wheel tire Rear wheel tire Specifications Specifications Limit of attrition (front and rear wheel tires) 14 3.50-10-51J 3.50-10-51J 0.8mm Tire engravings Tubeless tire Tire wear mark “△” Tubeless tire and cast wheel felloe This motorcycle uses cast wheel felloes fit for both tube type and tubeless type tires, and tubeless tires are standard configuration. Warning Make sure not to attempt using tubeless tire onto a wheel felloe specially designed for tube type tire. Otherwise tire may get damaged and cause personnel injury due to sudden air leak of the tires. 2. After replacing the tire, ride your motorcycle carefully so as to allow the tire to match the wheel rim completely. The tire matching, if it is not fully done, will probably affect the tire pressure and make the driver unable to control. 3. Please have your tires replaced by professional maintenance people Check if each component has been tightened Check if the components of the motorcycle at each location have been securely tightened before riding the motorcycle. Refer to page 14 for tightening torque force. Lamps and signal lamps Check the headlamp, turn signal lamps, taillight, position lamp, stop lamp and all other indicators for their motion operation. Switches Check the operation of headlamp, turn signal lamps, stop lamp, taillight, position light, horn, starting motor and master lock switch, etc.. Wheel felloe When using a tire with an inner tube, be sure that the inner tube Warning has been properly installed. For ensuring optimum tire performance, lengthening service life and enabling safe operation, each of the following items should be carefully observed: 1. Before riding your motorcycle, check if the tire is with crackles, folding or warping. If any abnormality has been found with the tires, go to the dealer from whom the motorcycle was originally purchased or to the appointed maintenance station for checking. Do not check or repair the tires yourself. If the tires are found warped or crackled, replace them with new ones. Gasoline Make sure that the fuel tank has adequate gasoline before riding the motorcycle. Warning Make sure not to make gasoline overflow from the fuel tank. Prevent gasoline from splashing and spattering onto the engine with high temperature. When filling gasoline, filling level should not exceed the bottom of the filling mouth, or otherwise the gasoline will get bloating at warm temperature and cause gasoline overflow 15 This model of motorcycle uses #90 or above lead-free gasoline and total capacity of the gasoline tank is 4.5 L 16 Main points for motorcycle using and riding Starting of the motorcycle After the engine pre-warming: Before riding this motorcycle, make sure that you are fully familiar Warning with each of the operation controls and functions of the motorcycle. Should there be any item that you do not fully understand, contact your dealer from whom the motorcycle was originally purchased or the appointed maintenance station. ● ● Never start your engine at any enclosed places as the exhaust gas the motorcycle discharges has toxicity and will make you lose consciousness and even cause death. Therefore,make sure to operate your motorcycle at a well-ventilated place. Make sure that you have retracted the kickstand before riding, or you will not be able to start your vehicle. 1. Hold the rear handrail of the motorcycle by right hand and push the motorcycle forward to make the main stand spring up. 2. Before starting the motorcycle, check the viewing mirror angle and make sure you can see clearly the road surface condition at your back 3. Pay attention to the traffic status for coming and going vehicles, and switch on the turn signal lamp before getting going. 4. Turn slowly the throttle rotate handle and make the motorcycle start. After making the starting, turn off the turn signal lamp. Notice Before first operating of a new motorcycle, please read the instructions in section “Running in of the Engine” (page 13). Engine starting and pre-warming 1. 2. Turn the main switch to “ ”. While grasping the front brake or rear brake handlebar, hold the throttle rotate handle for a little wide opening of the throttle (1/8 throttle travel or 1/4 throttle travel), press starting switch or tread the starting lever to start the engine. Note ● ● ● Before starting the engine, make sure that the kickstand has been back to its up position . In case of a failure to start the engine, release the starting switch, and try again after a few seconds. The time for starting the engine should not exceed 5 seconds every time when you start the engine so as to avoid large consumption of battery power. In case of a failure to start the engine with the starting switch, start the engine by starting lever instead. If the engine can not be started even when the starting button has been pressed 4-5 times, turn the throttle rotate handle with Acceleration Turn the throttle rotate handle to adjust the running speed. When turning the throttle rotate handle towards yourself you can increase the speed, and when turning in the reverse direction, you will lower the speed. Braking 1. Release the throttle rotate handle. 2. Apply force slightly to the front and rear brake and then slowly increase the applied brake pressure. Warning ● Avoid any urgent or sudden braking, otherwise it will make the motorcycle slide or overturn ● Carefully apply force to the brake so as to prevent any motorcycle direction deviation, improper braking will cause motorcycle sideslip. 17 ● Train rails, iron plates used for road construction and manhole covers are especially slippery when they are wet, therefore drive with special care while passing these locations. Engine pre-Heating ● In order to extend the engine’s service life, pre-warm the engine for 1-3 minutes before riding your motorcycle, but never try swift acceleration in a cold engine state. Braking on a wet road surface will lead to a very poor braking effect and braking distance will be lengthened, bringing in an unusual danger. ● It will be also dangerous if braking is made on a road surface with a slope. Slowly apply braking force to the brake while running on a downward slope. a 1/8, 1/4 throttle travel and then press the starting button again. Engine running-in Nothing is more important than the 0~1000 kilometers for a brand-new motorcycle at any of its operational stages. Based on this reason ,we recommend you to read carefully the information below. As the engine is brand new, you must be able to avoid any overload of the engine in initial 1000 kilometers driving. Each of the components inside the engine needs an interactive running in for a certain length of running time. Therefore, in this period, try to avoid any full throttle valve operation for a long time or any occurrence of the conditions that will cause overheating of the engine. G Regular maintenance Regular inspection, adjustment and lubrication will keep your motorcycle to a maximum safe and efficient state at all times. “Safety”is the logos that every user should hold and keep in mind all the times. The Regular Maintenance and lubrication Form should be regarded seriously as the guide to maintenance and lubrication. While conducting maintenance and lubrication to the motorcycle, consideration should be given to the geographic environment at the time of using and purpose of the user, so as to reach the final target for maintenance. The important items relating to motorcycle check-up, adjustment and lubrication will be described in the following pages. 1. 0-150 kilometers Prevent the engine from continuous running with the throttle rotate handle turned above 1/3 throttle travel. Each time when the engine has run for 1 hour, stop the engine and allow it to cool for 5 to 10 minutes and drive your motorcycle with frequent change of speed. 2. 150-500 kilometers Prevent the engine from running for a long time with the throttle rotate handle turned above 1/2 throttle travel. Run your motorcycle at various speeds but do not use full throttle valve operation at anytime. Warning Driver's tool In this User's Manual, some information has been provided for you to perform maintenance and simple repairing work. And driver's tool provided with the vehicle has offered you most of the tools that are required for regular maintenance. But however, other tools such as torque spanners and so forth will be required when you performing correctly some of the maintenance work. 3. 500-1000 kilometers Note Prevent the engine from running for a long time with the throttle rotate 18 In case you are not familiar with the checking and repairing work of the motorcycle, leave your motorcycle to the dealer from whom the motorcycle was originally purchased or the appointed maintenance station for checking and repairing. When you perform maintenance and repair work for your motorcycle but you don't have the required tools, send your motorcycle to the dealer from handle turned above 3/4 throttle travel. whom the motorcycle was originally purchased or the appointed maintenance station for checking and repairing. 4. Above 1000 kilometers Avoid full throttle valve operation of the engine for a long period of time but change the speed occasionally. Notice Change the engine oil, air filter element and gear oil after 500 kilometers running. In case any problems occur with the engine in running in period, contact with the dealer from whom the motorcycle was originally purchased or with the appointed maintenance station. Parking Warning When parking your motorcycle, shut down the engine and take out the key. Park your motorcycle at the place where kids and pedestrians can not touch the muffler and the exhaust pipe as they are very hot. Do not park your motorcycle at a slope in order to avoid overturning of the motorcycle. 19 Regular Maintenance /Lubrication Form Item Checking contents Valve clearance* Spark plug Air filter Carburetor* Fuel system* Engine oil Gear oil Front brake rear Rear arm pivot* Wheels* Wheel bearings* Direction bearing* pole Front fork* 后减震器* Rear shock absorber* Main stand and kickstand Tightness of components* Storage battery* ○ ○ Every 3000 km or three months later on ○ ○ ○ ○ ○ ○ Draining of the waste oil ○ ○ ○ Clean or replace if necessary ○ ○ ○ The initial 500 km Engine oil of the motorcycle should be replaced after riding of initial 500 km or after one month so as to ensure the smooth running of the engine. And this replacement should be done preferably by the dealer from whom the motorcycle was originally purchased or the appointed maintenance station. Replacement of brake fluid: ● When disassembling the brake master cylinder or caliper , the brake fluid should be replaced at the same time. And in addition brake fluid level should be checked frequently and refilled when necessary. ● Oil seal of the master cylinder or caliper should be replaced roughly once every 2 years. ● Brake oil pipe should be replaced roughly once every 4 years .And in this period instant replacement should be made in case of damage. ● Please send to the dealer from whom the motorcycle was originally purchased or appointed maintenance station for replacement. Every 600 km later on ○ ○ ○ ○ ○ ○ ○ ○ ○ ○ ○ ○ ○ ○ ○ ○ ○ ○ ○ ○ ○ ○ ○ ○ ○ ○ *: Indicates checking by the dealer from whom the motorcycle was originally 20 Note ○ ○ Damage and attrition check, replace it if necessary Check the motion and oil pipe for any oil leakage. Make corrections when necessary Check of motion state. And adjust it if necessary Check of the tightness. Make corrections when necessary Check of balance, extent of damage and out of round Replace it if necessary Check of the assembly and looseness, replace it if necessary Check the tightness and adjust it when necessary Check the motion for oil leakage and repair it if necessary 作动情形,有否漏油。必要时更换 Check the motion state for oil leakage. Replace it if necessary Check the service functions, replace it if necessary Check if each of the components of the motorcycle is tightly secured, make adjustments if necessary Check if the voltage is above 12.8 V, and if the tester pointer is pointing to the green zone. Charge the battery if necessary. Note ○ ○ Change regularly V belt* 3000 km or three months The initial 500 km Change regularly Engine oil drain bolt (at side*) Engine oil filter screen (bottom side) * Front and brakes Check and set the valve clearance to the specified value when the motorcycle is in cold state. Check the state, adjust the clearance, make cleaning and replace it if necessary. Make cleaning. Replace it if necessary Check the engine idle speed/ starting conditions. And adjust it when necessary Check the gasoline pipe if it is with crackle or blocked, replace it if necessary The initial 1000 km or one month Torque force specifications Use torque spanners to lock these items tightly. And these items should be frequently checked, especially when having a long distance of riding, and when these items are getting loose due to some reasons, instant check-up should be made to these items. A (nut) 10mm B (bolt) 6 mm General torque force specifications N·m 6 12 mm 8 mm 15 14 mm 10 mm 30 purchased or the appointed maintenance station. Unit: km 17 mm 12 mm 55 19 mm 14 mm 85 22 mm 16 mm 130 Items Spark plug Engine oil drain bolt Engine oil filter screen lid Gear oil drain bolt Torque force 17 23 32 23 21 Engine oil 1. Check of oil amount: a. Hold the motorcycle with the main stand. When checking the oil amount, always keep the Note motorcycle at vertical direction. You will not be able to read the oil amount correctly with a leaning motorcycle body. Note b. Engine oil filter screen lid Before checking, wait for several minutes until the oil level is stable. The engine oil amount should be at the position between the upper-limit mark and lower-limit mark. When oil amount is below the lower limit, fill engine oil until it reaches the upper limit. Spring: 1. Upper limit 2. 2. Lower Limit O-ring Engine oil filler cap Replacement of engine oil a. After several minutes of pre-warming, shut down the engine. Place an oil holder under the engine and remove the engine oil filler cap. 22 Filter screen d. Clean the oil filter screen and replace it if it is damaged. Notice Oil drain bolt When the oil filter screen lid is disassembled, the O-ring, spring and filter screen will drop off at the same time, so please be careful not to lose these parts. e. Check the O-ring, and replace it if it is damaged. b. Remove the engine oil drain bolt. f. Remove the oil drain bolt and check the gasket. c. Disassemble the oil filter screen lid to clean the filter screen. G. Reassemble the oil drain bolt and engine oil filter screen lid (be sure it is firmly locked) Check the gasket Torque force for oil drain bolt: 23N.m Torque force for engine oil filter screen lid lock: 32N.m 23 H.Prop up the motorcycle horizontally. Fill in engine oil through the oil filler until oil level reaches the upper-limit position of the dipstick. Oil amount: Change at regular intervals: 1.1L Recommended oil grade: API SE, SF type or other same Note grades (such as “SF-SE”, “SF-SE-CC”, “SF-SE-SD” etc.) Notice Never add any chemical additives. Chemical additives will damage engine components. 3. Replace and lock the gearcase oil drain bolt. Torque force for gear oil drain bolt: 23 N.m 4. Add gear oil Gear oil capacity: 130mL Do not let any foreign substances enter into the crankcase. Recommend gear oil: SAE 85W/140 or API GL-4 gear oil Notice Note GL-4 is a quality and auxiliary parameter. “GL-5” gear oil can also be used for replacement. i. Install the engine oil filler cap and lock it securely. J. Start the engine and pre-warm for several minutes. Check for any engine oil leakage in course of pre-warming. If any leakage is found, shut down the engine immediately and check for the cause. Notice Do not start the engine before engine oil filler cap (oil scale) is placed and securely locked Replacement of gear oil Do not let any foreign substances enter into the gearcase. And gear oil should be protected from adhering to tires. 24 5. Replace the gear oil filler cap. 6. After change of gear oil, check for any oil leakage. Air filter Air filter element should be cleaned regularly. If the motorcycle is used frequently in extremely damp or dusty places, cleaning work should be carried out more frequently. 1. Remove the air filter cover. 2. Take out the filter element assembly and then use compressed air to clean it, or simply replace it. 1. Put an oil holder under the gear case. Air filter cover 2. Remove the gear oil filler cap and oil drain bolt for draining the gear oil. Notice Gear oil filler cap Gear oil drain bolt Ensure that filter element has been properly installed on the air filter. Do not run the engine before the filter element is mounted for fear of suction of any silts, causing heavy wear to the piston and cylinder. Adjustment of idle speed 1. Start the engine and preheat the engine at the speed of 1000 to 2000r/min for several minutes (normally 1 or 2 minutes) Occasionally you can raise the speed to 4000 to 5000r/min. When engine speed gives a quick response to the throttle rotate handle, it means that the engine has got the required pre-warming Filter element holder Filter element Use solvent for cleaning fitter cartridge sponge Maintenance for the air filter 2. Adjust the idle speed regulating screw to set the idle speed. Screw in the regulating screw, the engine speed is raised, and screw out the regulating screw, the engine speed is reduced. 1. Remove the filter element holder and filter element. 2. Clean the dust on the filter element with compressed air, or replace the filter element. Idle speed regulating screw 25 Notice Standard idle speed: See page 22 (specification) Never twist and fold the filter element, or it will get damaged. Ensure that the filter element is properly mounted on the filter element holder Adjustment of carburetor Carburetor is an important part that affects engine performance, which requires extremely precise adjustment. Therefore, most of the adjusting work should be carried out by those dealers who possess professional knowledge and experience. But the following adjustments can be carried out when you are doing routine maintenance. Note Adjustment of the throttle rotate handle Note Notice The carburetor has been adjusted and set accurately by our company after several tests. Change to these settings will cause poor performance or damage to the engine If the engine's idle speed cannot be adjusted to the value within the standard specifications, go to the dealer from whom the motorcycle was originally purchased or to the appointed maintenance station for checking. Before adjusting the free travel for the throttle rotate handle, adjust the engine idle speed first. Turn the regulator to adjust the filling wire cable so that the throttle rotate handle can obtain the proper free gap. Free gap: 2-6mm Fixing nut 26 Regulator Before installation of a spark plug, use a feeler gauge to measure the spark plug clearance. Adjust the clearance if it doesn't conform to the specifications. Spark plug clearance: 0.6-0.8mm Gum cover of the regulator 1. Pull out the gum cover of the regulator. Before installation of the spark plug, clean off the oil stain on the screw thread of the spark plug. While locking the spark plug, tighten it with the specified torque force. Spark plug locking torque force: 17N.m 火花塞间隙 Spark plug clearance 2. Loosen the fixing nut. 3. Screw in or screw out the regulator till the free travel meets the specification. 4. Lock the fixing nut. 5. Replace the gum cover of the regulator. Note You may use your hand to screw in 1/2 of the spark plug first. Then tighten the spark plug with a torque spanner to the above torque force Free travel of front brake Adjustment of valve clearance After a certain period of use, the valve clearance will get larger, and this will cause the poor supply of the mixed gas and noises of the engine. Valve clearance must be adjusted regularly in order to prevent occurrence of this situation. The adjustment work should be performed by the dealer from whom the motorcycle was purchased or by the appointed maintenance station. Free travel of front brake handlebar is 10-20mm. 27 Inspection of spark plug Adjustment of rear brake Spark plug is a very important component of the engine and easy for checking. You can judge the engine running state through ceramic magnet and electrode of the spark plug. Under normal service state, the white ceramic magnet portion around the central electrode of the spark plug should have the same color. Generally speaking,for a normal running motorcycle, this portion should be of maple color. In case the color and luster of the spark plug has much difference, it means that the problem exists with the combustion state. Do not try to solve this problem yourself but have it checked by the dealer from whom the motorcycle was purchased or at the appointed maintenance station .You must conduct periodical checks of the spark plug. Because heat and deposit will slowly lower the spark plug functions and cause corrosion. In case the spark plug has got serious corrosion or excessive carbon deposition and other deposits, it should be replaced immediately with a proper one. Free travel of rear brake handlebar should be regulated to 10-20mm. While adjusting, rotate the regulator clockwise for reducing the brake handlebar free travel; And rotate the regulator counterclockwise for increase the handlebar free travel. Warning If the brake cannot be adjusted, go to the dealer from whom the motorcycle was originally purchased or to the appointed maintenance station for checking and repairing Standard spark plug: P-RZ9HC Regulator 28 Front brake 1. When checking brake fluid amount, rotate the handlebar to make the upper end of the main brake cylinder keep at a horizontal level. It is required to check the wear condition of the brake block for the brake. If the brake block is worn to its limit line, go to the dealer from whom the motorcycle was originally purchased or to the appointed maintenance station for replacement of the brake block. 2. Only refill the specified brake fluid, or it will damage the rubber oil seal, which will cause leakage of brake fluid and poor performance of the brake. Recommended brake fluid: DOT3# Notice If no DOT#3 is available for use, DOT#4 can be used instead. 3. Use the same type of brake fluid for refilling. Mixed brake fluid will generate chemical reaction, which will cause poor barking performance. Attrition limit line 4. When refilling brake fluid, never let any water enter into the main brake cylinder, because water will lower the boiling point of brake fluid and thus cause air resistance of the brake system. Rear brake It is required to check the wear indicator condition of the brake block for the brake. If the wear indicator points to the wear limit line, go to the dealer from whom the motorcycle was originally purchased or to the appointed maintenance station for replacement of the brake block. Wear indicator 5. Brake fluid may corrode painted surface or plastic parts. If brake fluid is splashed or prayed, it must be cleaned out timely and we recommend you replace it by professionals. 6. When the brake fluid amount is reduced, go to the dealer from whom the motorcycle was originally purchased or appointed maintenance station for checking of the cause. Attrition limit line Brake fluid amount limit line Inspection of brake fluid amount Replacement of brake fluid 29 When brake fluid is insufficient, air will enter into the brake system, which will cause failure of the brake. Before riding the motorcycle, check the amount of brake fluid first and fill brake fluid if it is insufficient. Please pay attention to the following points when checking and refilling brake fluid: 1. Replacement of brake fluid should be carried out by the original dealer who has received professional training or the appointed maintenance station. 2. At the time when the regular maintenance should be performed or damage or leakage is found with the brake fluid, please go to the dealer from whom the motorcycle was originally purchased or the appointed maintenance station for replacement of the following components: A. All the rubber oil seals that should be replaced every 2 years. B. All the brake oil pipes that should be replaced every 4 years. 30 Checking and lubricating the wire cable Damaged wire cable surface will cause rust to the wire cable and Warning affect its braking performance. Replace the damaged wire cable as soon as possible to avoid danger occurrence. Lubricate the internal and end parts of the wire cable. In case the wire cable can not offer a smooth braking, go to the dealer from whom the motorcycle was originally purchased or the appointed maintenance station for replacement. Check of front fork Warning When checking, make sure the motorcycle is kept at a steady position so as to avoid occurrence of turnover. 1. Visual inspection: Check if the surface of the handle pipe for the front fork is with scratches, damages or oil leakage. 2. Motion inspection: Place the motorcycle at a level place. Recommended lubricant oil: Oil dedicated for chain and wire cable or SAE 10W30 type engine oil Lubrication of throttle valve wire cable and rotate handle When lubricating wire cable, apply grease to throttle rotate handle and its joint with the wire cable at the same time. When lubricating, disassemble the fixing screw of the fueling wire cable and take out the wire cable head. Life it up and fill in lubricant. While assembling the throttle rotate handle, apply grease to the metal surface for rust prevention. Lubrication of brake handlebar Lubricate each pivot location. Recommended lubricant oil: Oil dedicated for chain and wire cable or SAE 10W30 type engine oil Lubrication main stand and kickstand A. Hold the motorcycle handlebar with hand and make the motorcycle keep in an upright position, hold the front brake handlebar with the right hand to apply braking force to the front brake. B. Make pressurization for several times to check the motion of the front fork, and observe if there is any gap that makes its turning not flexible and etc. Warning If there is any damage or poor motion of the front fork, go to the dealer from whom the motorcycle was originally purchased or to the appointed maintenance station for checking and repairing. Check of steering post Check the status of the steering post regularly. Worn or loose steering post bearing will cause the occurrence of danger. Place an appropriate support at the bottom of the engine to lift off the front wheel. If there is a loose feeling when you hold the bottom of the front fork and shake frontward and rearward, go to the dealer from whom the motorcycle was originally purchased or to the appointed maintenance station for checking and adjusting the steering post. Disassembling the front wheel will make the checking much easier. Lubricate each pivot location. Check if the kickstand can be freely laid 31 down and sprung up. Recommended lubricant oil: Oil dedicated for chain and wire cable or SAE 10W30 type engine oil Warning 32 If kickstand can not give a free motion, go to the dealer from whom the motorcycle was originally purchased or the appointed maintenance station for checking. When checking, make sure the motorcycle is kept at a steady position so as to avoid the occurrence of turnover. Warning Wheel bearing If any looseness is found with the bearing inside the front wheel hub, or the wheel tire does not rotate evenly, go to the dealer from whom the motorcycle was originally purchased or the appointed maintenance station for checking the bearing motion. The front wheel bearing should be checked periodically as per the Regular Maintenance Form. Battery This motorcycle adopts maintenance-free battery, so it's not necessary to check battery liquid or add distilled water. If the battery has no power, please contact with the dealer from whom the motorcycle was originally purchased or with the appointed maintenance station. Notice Never try to disassemble each of the small caps on the battery, or it will damage the battery. Battery is a kind of noxious and hazardous substance, which contains sulphuric acid content, so please avoid its touch with skin, eyes or clothes. Extrication method: When it touches the skin, use large amount of water to wash the skin. When drinking it by mistake, drink large amount of boiled water or milk immediately, and then take milk of magnesia, broken raw egg or vegetable oil, and go to see an internist immediately for treatment. When it touches with your eyes, wash them with large amount of clear water for 15 minutes and go to see an oculist immediately for treatment. Battery will generate explosive gas, so when using battery, keep it far away from spark, fire source or lighted cigarette etc. The charging and Warning using of battery should be carried out in places with good ventilation. When disposing battery, wear goggles. In any case, never let a child get close to the battery. battery If the strip fuse is blown out, turn off the ignition switch and the return circuit switch relevant to the malfunction. Install a new strip fuse with the same specification. Turn on the switch to check if electric appliances work normally. If the strip fuse is blown out again instantly, go to the dealer from whom the motorcycle was originally purchased or to the appointed maintenance station for checking. Strip fuse specification: 15A Notice Do not use the strip fuse with specifications higher than the standard. Use of the fuse that does not meet the standard specification will cause damage to the electrical system or even a fire. Headlamp If aiming of the headlamp beam or replacement of the headlamp bulb is required, go to the dealer from whom the motorcycle was originally purchased or to the appointed maintenance station for aiming and replacement. Cleaning and maintenance A. Cleaning Frequent and thorough cleaning of your motorcycle will not only make the appearance more beautiful, but also bring the best performance to its components and lengthen the service life. Replacement of strip fuse 1. Before cleaning of the motorcycle: Fuse is on the fuse holder inside the storage battery box located in the pedal. a. Plug up the exhaust pipe outlet to avoid moisture content from entering. Or wrap it with a plastic bag and plastic rope. b. Make sure that the spark plug and all the filler caps have been locked and well secured. 33 2. Clean the engine with a brush if it is very dirty. But be careful not to remove the lubricating oil at the pivot location. 3. Use relatively small water pipe to clean and wash with water pressure. Too high water pressure will wash off the lubricant on various Notice parts of the motorcycle, and water will leak into the wheel bearing, which will cause damage to parts. Many expensive repair costs come from improper high pressure washing manner. 4. Wash off plenty of dust with water first, and then use warm water with detergent to wash the exterior. Use brush to clean those places that are not easy to clean. 34 5. After finishing washing with clear water, dry the motorcycle immediately. 6. Use neutral detergents to clean and wipe the seat pad, and etc. After wiping, use clear water for cleaning. 7. Automobile dedicated wax can be applied on those materials with coating and chrome plating. But never use compound wax, since it contains abrasive, which will damage its structure. After cleaning is finished, start up the engine and run it at idle speed for several minutes. B. Storage If the motorcycle is stored or not in use for more than 60 days, clean the motorcycle first, and follow the steps below to avoid any damage that may be possibly caused to the motorcycle 1. Drain the oil stored in gasoline tank, oil pipe and carburetor. 2. Take off the empty oil tank and pour in a cup of SAE10W30 or SAE20W40 engine oil. Shake from left to right, and right to left to spread a layer of oil inside the oil tank. Then pour out the engine oil from the oil tank and reinstall the oil tank. 3. Remove the spark plug,and pour a spoonful of SAE 10W30 or SAE 20W40 engine oil into the cylinder. Install the spark plug, tread the engine starting lever for several times (connect the high voltage wire of the spark-plug) and allow the engine lubricating oil to be uniformly distributed on the cylinder wall . When using starting motor to start the engine, disassemble the Warning high-voltage wires and earth them so as to avoid the generation of spark. Specifications Model Overall length 1640mm FY50QT-8 Overall width 620mm Overall height 1060mm Distance between axles 1160mm Min. ground clearance 80mm Max. vehicle speed ≤45km/h Min. fuel consumption ≤1.5L/100km Min. turning diameter 3600mm Total weight (when the engine oil and 85kg gasoline tanks are full) Model FY139QMB Engine type Single cylinder forced air-cooled four strokes Cylinder arrangement Single cylinder Total working capacity of cylinder 49.5mL Cylinder diameter × stroke 39mm×41.5mm Compression ratio 10:5:1 Nominal power / relevant rotation speed [kw/(r/min)] 1.6/7500 Max. torque/relevant [N.m(r/min)] 2.2/6000 4. Lubricate all control wire cables. 5. Use proper support to prop up the front and rear wheel. Then make sure that the motorcycle is in a steady position. 6. Seal the opening of the exhaust pipe with plastic bag to prevent water from rotation speed Idle rotation speed(r/min) 1700±100 Starting mode Electric /tread starting two way 35 entering in. 7. Apply a coat of antirust oil on all metal surfaces if it is stored in a place with high moisture and salt content. But be careful not to allow the rubber parts or seat pad of the motorcycle to touch the oil. 8. Take out the battery for charging, and store it in a dry place. Charge it at least once every month, and do not store it in hot (higher than 30℃) or cold (lower than 0℃) place. Notice Do all care and maintenance work properly prior to storing the motorcycle 36 Lubrication method Pressure and splash lubrication Engine oil (four-stroke engine oil) SAE 10W-30/40 Lubricant number See attached drawing 1 Capacity of periodic oil replacement Gear oil: 1000mL SAE85W/140 Lubricating oil SAE10W-30/40 Capacity of periodic oil replacement 130mL Total capacity 140mL Air filter type Paper quality dry type filter element Fuel: Fuel oil trade mark 90# and above gasoline Fuel-tank capacity Carburetor: 4.5L Type / model Plunger piston type Shock absorber: Front Hydraulic pressure and adjustable Rear Electric fitting: Hydraulic pressure spring type Ignition system C.D.I. Generator type ACG flywheel, PM AC Storage battery type / model Model P-RZ9HC Capacity of storage battery Dry-charge type YTX7A-BS (maintenance free) 12V 6.5Ah Clutch type: Dry type, internal expanding and weight type Fuse specification Headlamp type 12V 15A Semi-sealed Transmission: Stepless speed control Bulb 12V 35W/35W Headlamp 12V 21W Tubeless type stop lamp 12V 10W×4 Front 3.50-10-51J Turn signal lamp 12V 5W×2 Rear 3.50-10-51J Position light 12V 5W 12V 3.4W×2 Spark plug: Tire: Type Specification Brake: Front brake type Disc brake Taillight Instrument indicator Operation mode Operation by right hand Turn signal indicator 12V 3.4W Rear brake type Drum type brake High beam indicator 12V 1.7W Operation mode Operation by left hand or brake pedal 37 Attached drawing 1 38 Use of engine oil from original factory is the essential for lengthening engine life Is your motorcycle healthy? It is closely related to the quality of the oil used. Maintenance records After completion of the normative maintenance, record the date, odometer readings, name of maintenance man in the provided columns. The additional information “Owner check and maintenance” and “Constant maintenance” can be added to the below recording sheet. Maintenance records Engine oil from original factory Date Odometer Name of maintenance reading man Items maintained Engine oil from original factory is a product developed according to the design characteristics of engine. It plays a vital role in such performances as lubrication, power etc. for the engine. Recommended engine oil: Engine oil recommended by original factory Gear oil: Gear oil from original factory Dealers for engine oil from original factory have them available for selling Oils replacement records, oils replacement date, traveled distance recording sheet. Remark: Change times 1 Exchange date M D Y 2 3 M M D D Y Y 4 5 M M D D Y Y Traveled kilometers Engine oil 39 6 7 M M D D Y Y 8 9 M M D D Y Y 10 Remark: M D Y 40 K Schematic circuit diagram Schematic circuit diagram for motorcycle FY50QT-8 (without headlight switch /with anti-theft device) Red/white green Starting relay: Side motion switch Start switch Flameout switch Red/white Red Light/Brown Green Orange Green Blue/white Yellow Yellow Orange Light blue Blue/white Yellow Yellow Orange Light blue Greed Yellow/White Yellow/White Right turn signal lamps (12V, 1.7W) Left turn signal lamps Black Yellow Yellow/Red Green/Yellow Greed Fuse (15A) Greed Red/White Black Black Yellow Yellow/Red Green/Yellow sensor Ignition switch Kickstand shutting down switch Blac k/wh ite Green Blue/white Yellow/white Fuel-gauge Fuel level green Yellow Instrument light (12V, 1.7W) green Greed Yellow/White Yellow/White Stora ge batter y Green Yellow/Red Black/white Green Green / yellow Black Yellow Green Instrument assembly Yellow/Red Headlamp (12V, 30/35W) Light blue Green Green / yellow Front Position light (12V, 5W) Burglarproof device Yellow/Red Light Black Orange Red/White Black/white Black Red Green Brown Front right turn signal lamp (12V, 10W) Red Greed Black / white Black Green / yellow Master lock switch Rear right turn signal lamp (12V, 10W) Light Blue Green Ail light / stop lamp (12V, 21/5W) Light Blue Green/Yellow Green Brown orange Light Blue Green/Yellow Green Brown Orange Green Orange Rear left turn signal lamp (12V, 10W) Blue High beam indicator (12V, 1.7W) Electric horn switch High beam and low beam switch Turn signal lamp switch Turn signal lamp switch Orange Grey Light Electric horn switch Blue Light Green Electronic Throttle Green Black/Yellow Black/White Black/Yellow Green/White Blue/White Green Black/Red Black/Red White Black/Red Yellow Blue/Yellow White Red Yellow Green/ Ignition coil Spark plug Rectifier: Electric horn Green Yellow Yellow Wight Blue Orange Light Blue Grey Black Green Grey Light Green Green Flasher Black Front left turn signal lamp (12V 10W) Light Green Light green Yellow Green Black/red White Blue Green Green Yellow Green Orange Yellow Green Front left turn signal lamp (12V,3W) Green/Yellow Green Yellow Magneto Electronic ignition device Speed Limiter Master lock switch High beam and low beam switch Blue Wight Blue Wight Flameout switch Start switch Yellow/ Red Green Yellow Green Black Black Wight Green Red Black Wight 41 3939 Royal Drive NW, Suite 139 Kennesaw, Georgia 30144 www.peirspeed.com 42