1
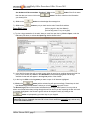
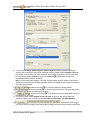
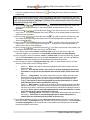
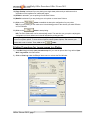
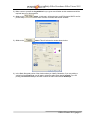
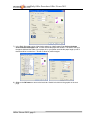
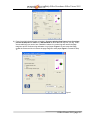
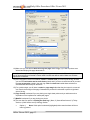
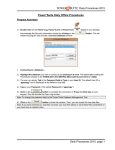
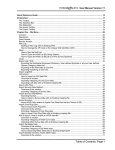
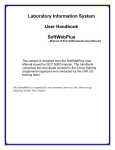
Daily Office Procedures Office Viewer 2015 Daily Office Procedures Exp Files Attached to an email 1.) The user must first detach the Well file (*.exp) from the email and then save it to a location that they can find later. Program Activation 1.) Double click on the Power*Log (Vertical, Build Section on Horizontal Wells or Deviated Wells) or Power*Curve (lateral or horizontal section) Security Information window by clicking on the and activate a Connect Database window. Icons on your desktop. Acknowledge the button. This will initiate the program Connecting to a Database… 2.) Highlight the database you wish to connect to by clicking on it once. The default after loading the Power*Suite software is the Pgeology 2015 Metric VW (Microsoft Access Driver [*.mdb]). 3.) The user can simply Tab to the Password field or Type in your User ID. The default User ID is “pgeology” and is displayed as the default in this field. 4.) Type in your Password. (The default Password is "pgeology"). 5.) Click on the button to complete the connection or Press the Enter key on your keypad. This will activate the Open Log window. Note: To change the password refer to the Power*Suite Database Management Tool. 6.) Click on the button to close this window. Then, you can import the new data files. Note: If you have received our .exp files via email, you must first detach or save these files somewhere on your hard drive or network drive. Office Viewer 2015, page 1 Daily Office Procedures Office Viewer 2015 Data Import (refer to page 9 in the User Manual) (On-line help press F1 key on keypad) If the data file *.exp is attached to an email the user must first detach the file or save it to a place so that it can be found within your file format structure to import. 1.) Select Import Log/Well, under the File menu pull down. This will activate the Import window 1.) Click on the button. This will activate the Import from window. 2.) Select the appropriate drives and or directories as well as files you wish to import by highlighting the file name and clicking the button. This will place the selected files into the Power*Log Data Transfer: Import V 2015 Window. Repeat this step as many times as necessary. N.B. Any of our exported files will have an *.exp extension. If the files are corrupted a message will tell you so. Some files may be encrypted and you will have to decrypt the files using the appropriate decryption password using all upper case letters. 3.) Highlight the files you wish to import by clicking on the file name. 4.) Once the files are selected (highlighted) click on the button. This will activate a message box asking, “Do you really want to import the highlighted files?” 5.) Click on the button to begin the file importation. When the files have been imported you will be presented with a message window stating “Data has been imported successfully.” N.B. If an exported file had the option of an entire well activated a message box will appear asking the user “About to IMPORT ENTIRE WELL data. All information associated with this well in Office Viewer 2015, page 2 Daily Office Procedures Office Viewer 2015 the database will be overwritten. Continue?” Click on the than the data you have or click on the you already have. 6.) Click on the 7.) Click on the button if the file is newer button if the file is older than the information button to acknowledge this message box. button to put you back into the main Power*Suite window. Open Well / Log (refer to page 6 in the User Manual) (On-line help press F1 key on keypad) 1.) To view a log presentation of the wells’ data you must first open the log. Click on Open, under the File menu pull down, to activate the Open Log window shown below: 2.) In the Well List locate the well you wish to open either by querying or scrolling through the Well List portion of the window and Click on the Well Name so it becomes highlighted, and the logs available for that well will appear in the Log List portion of the window. 3.) In the Log List Click on the log name you want to open. It will become highlighted. 4.) Click on the button and the selected log will open accordingly. Please keep in mind that Power*Log / Core & Curve™ allows you to have multiple logs open at once. The Recent Logs portion of the window indicates the last 10 logs / wells opened. You may wish to select one of these rather than looking through the well list. Also if you are reopening the last well used it is already highlighted in the Recent Logs list and can be reopened easily by clicking on the button or by depressing your enter key on your keypad. Note: Logs with the letter "V" in front of their names are Vertical logs, and can only be used with Power*Log. Likewise, Logs with the letter "H" in front of their names are Horizontal logs, and can only be used with Power*Curve™. Office Viewer 2015, page 3 Daily Office Procedures Office Viewer 2015 N.B. If a well / log is already open and you have imported an updated file, the user must click on Option on the Menu Bar and click on Refresh Data and the well / log will be updated with the new updated database entries. To scroll click on the up/down arrows to scroll ¼ page, the space between the thumb and the arrow for a page up/down, or if the print section has been completed pull the thumb up or down to go to the start or end of a log. If your mouse has a roller wheel you can use that as well to scroll the log. To go directly to a depth on the log, type a number in the go to depth box on the toolbar and then tab out of the box to place that depth at the top of the log. To change screen scales either select a scale from the pull down menu on the toolbar or type a scale between 1:5 and 1:5000 to view the log in a different scale. The screen default scale is 1:240. Striplog Printing (refer to page 11 in the User Manual) (On-line help press F1 key on keypad) You can only print the active log at the time when the Print Log Window is implemented. Also, once you are in the Print window you can not edit the log. The printing is WYSIWYG (What you see is what you get), so before you activate the Print Log window the log has to be what you want to print with respect to track widths, ordering, active layers within the tracks and layer ordering within a track. If the appearance of the log is not right you must then get your wellsite geologist to export another log so it is. 1.) If the Well / Log is already open proceed to step 2. If you want to open a Well / Log refer to Open Well / Log section of this document. 2.) Click on Print Log under the File pull down menu to activate the Print Window. Office Viewer 2015, page 4 Daily Office Procedures Office Viewer 2015 3.) To print the Title Page, Symbol Legend / dynamic legend (dynamic legend prints only the symbols that are printed for the interval requested in step 6), Logo, and/or Formation Tops with the striplog you must make sure these selections are selected. If they have a check in the check box they will be printed. Activate or click on the check box beside these selections to activate/deactivate these print selections. N.B. If you are printing the striplogs’ Title Page, Symbol Legend, and/or Formation Tops with the striplog you must make sure the page orientation drop box corresponds to the Paper orientation in the Printer Setup window. 4.) 5.) Activate this check box , if you wish to printout a Striplog header. Activate this check box , if you are printing the Striplog Title page and you are in Alberta the EUB UWI format should be selected. 6.) Activate this check box , if you wish to printout an abbreviated version of the Sample Log Title Page. 7.) If you wish to make further remarks on the Title Page we give you two lines to make any comments. Type in your comments in the two fields provided under Title Page Remarks. 8.) Activate this check box , if you wish to printout a location map following the title page, and then the user select a location map Office Viewer 2015, page 5 Daily Office Procedures Office Viewer 2015 from your computers drives by clicking on the location map. and finding the file you want to print out as a Note: This must be a bitmap image file (*.bmp) if you want a location map to be printed out. Also, the bitmap image must be a square image, because Power*Suite will shrink or expand the image to fit the location map space following the Title Page. This bitmap can be placed anywhere as the file location is saved within the Power*Suite ini file. 9.) Survey views Activate this check box , if you wish to have the plan view (view of the well bore from surface) printed out in the striplog header as captured in the Survey View application. 10.) Survey views Activate this check box , if you wish to have the user defined view (view of the well bore as manipulated by the user) printed out in the striplog header as captured in the Survey View application. 11.) Survey views Activate this check box , if you wish to have the azimuth view (view of the well bore along the target azimuth) printed out in the striplog header as captured in the Survey View application. 12.) Survey views Activate this check box , if you wish to have the cross section view (view of the well bore at right angles to the target azimuth) printed out in the striplog header as captured in the Survey View application. 13.) Survey views Activate this check box , if you wish to have all the views printed out in the striplog header as captured in the Survey View application. 14.) If you wish to make further remarks on the Title Page we give you two lines to make any comments. Type in your comments in the two fields provided under Title Page Remarks. 15.) In the Log portion of the Print window, select the vertical scale you wish to print the log, whether you want a Track header printed, and or the core accessories printed in the main log. Click the check box beside these selections to activate/deactivate these print selections. 16.) The user has five options in Printing the main log 1) None, 2) User-defined Interval, 3) Today Section, 4) Well Section and 5) Lithology Section. Option 1) None. If this option is selected (highlighted) this means that there will be no main log printed. Option 2) User-defined Section. If this option is selected (highlighted) this means that whatever is typed in the User-defined Interval fields will be printed as the main log. Option 3) Today Section. This option can be filled out by the wellsite geologist in the Export module of the program. This option was implemented to facilitate the operations geologist job so that they would not have to figure out what has been updated on the striplog. If this option is selected (highlighted) this means that whatever is viewed within the parenthesis will be printed as the main log. Option 4) Well Section. This option can be filled out by the wellsite geologist in the Well Section of the program. This option has been implemented to suggest the print section for the entire log so as to incorporate any comments above and below the lithologic interval of the striplog. If this option is selected (highlighted) this means that whatever is viewed within the parenthesis will be printed as the main log. Option 5) Lithology Interval. This option is controlled by the lithologic intervals drawn on the striplog. . If this option is selected (highlighted) this means that whatever is viewed within the parenthesis will be printed as the main log. 17.) In the Cores portion of the Print window, select the vertical scale you wish to print the Core log, whether you want a Track header printed, and which cores you want printed out. If a Core Interval is selected (highlighted) it will be printed with a Core Header which indicates the Core Number, Interval, percentage recovered etc. Office Viewer 2015, page 6 Daily Office Procedures Office Viewer 2015 18.) Page Overlap is selected if you are printing to a single sheet printer and you wish some minor duplication on the top/bottom of subsequent pages. 19.) Default is selected if you are printing to most Laser Printers 20.) Metafile is selected if you are printing to a color printer or some Laser Printers. 21.) Click on the button to establish the best print configuration for your printer. N.B. If you are printing in color make sure in the dithering portion of the window you select Diffusion or Error Diffusion. 22.) Click on the button to start printing. N.B. The Print Window will now be automatically saved. The next time you go to print a striplog this configuration will be its default and it should facilitate the printing process. Note: If printings for descriptions do not look exactly like they do on the screen, you will want to change some of our system options. To do so click on Options, select System Options, and measure your monitor with a ruler in inches. Then, click on the button. Printing Procedures for Longer pages to a Plotter 1.) If the Well / Log is already open proceed to step 2. If you want to open a Well / Log refer to Open Well / Log section of this document. 2.) Click on Print Log under the File pull down menu to activate the Print Window. Office Viewer 2015, page 7 Daily Office Procedures Office Viewer 2015 3.) Make a note to yourself the Log width before you go too much further as this measurement will be required later on in this procedure. 4.) Click on the button. In this case I will be printing to an HP DesignJet 500 PC and its printer setup window. Most of the other Versions or Writers have similar windows. 5.) Click on the button. This will activate the window shown below. 6.) In the Basic Setup tab portion of the window where you identify Orientation, if you are printing a vertical log from Power*Log you will want to select the radio button beside portrait. If you are printing form Power*Curve you will want to select the radio button beside landscape. Office Viewer 2015, page 8 Daily Office Procedures Office Viewer 2015 7.) In the Basic Setup tab portion of the window where you identify paper Size click on the down arrow and select Edit paper List. This will activate the paper Size window. The width of the log is the paper width and the width of your paper roll on your plotter would be the paper length (a rule of thumb would be to make it an 1” shorter to allow for printer margins. 8.) Click on the OK button to return to the basic tab. Should look similar to the graphic on the next page. Office Viewer 2015, page 9 Daily Office Procedures Office Viewer 2015 9.) Power*Log printing (portrait page orientation). If you are printing from Power*Curve (horz logs) proceed to Step 10 Now click on the Advanced tab to define the final output of your log. There are several things you can do here. Disable the cutters for a vertical log and remove the page margins to print a continuous log and waste a log of paper. Figure 1 Or auto rotate the image, enable the cutters and do not remove the page margins to save paper Figure 2. Proceed to Step 11 Figure 1 Office Viewer 2015, page 10 Daily Office Procedures Office Viewer 2015 Figure 2 10.) Power*Curve printing (landscape page orientation). Now click on the Advanced tab to define the final output of your log. There are several things you can do here. Disable the cutters for a horizontal log, remove the page margins and auto rotate the image to print a continuous log and waste a log of paper. Figure 3 Or none of the above to save paper Figure 4. Figure 3 Office Viewer 2015, page 11 Daily Office Procedures Office Viewer 2015 Figure 4 11.) Click on the Print Window. button. This will close the Printer Setup window and return you to the 12.) Click on the window. button. This will close the Print window and return you to the Print Log Office Viewer 2015, page 12 Daily Office Procedures Office Viewer 2015 13.) Make sure you activate the Bore Hole Log Title page check box abbreviated Striplog title page shown above. , if you wish to printout a an Note: You will not print out the Striplog Title Page, the legend selections or the Formation tops as each one of these selections will create a custom page size that was defines earlier. Make sure all these options are unchecked. 14.) In the Log portion of the Print window, select the vertical scale you wish to print the log, whether you want a Track header and or track footer printed, and if you have a cored interval do you want the core accessories printed in the main log. Click the check box beside these selections to activate/deactivate these print selections. 15.) For a printer output you will have to make the page margin 0 so that the print output is not moved over from the left margin of the page. Otherwise the printer will not be able to print the right hand side of the log. 16.) Page Overlap is selected if you are printing to a single sheet printer and you wish some minor duplication on the top/bottom of subsequent pages. 17.) Metafile is selected if you are printing to a printer. 18.) The user has five options in Printing the main log 1) None, 2) User-defined Interval, 3) Today Section, 4) Well Section and 5) Lithology Section. Option 1) None. If this option is selected (highlighted) this means that there will be no main log printed. Office Viewer 2015, page 13 Daily Office Procedures Office Viewer 2015 Option 2) User-defined Section. If this option is selected (highlighted) this means that whatever is typed in the User-defined Interval fields will be printed as the main log. Option 3) Today Section. This option can be filled out by the wellsite geologist in the Export module of the program. This option was implemented to facilitate the operations geologist job so that they would not have to figure out what has been updated on the striplog. If this option is selected (highlighted) this means that whatever is viewed within the parenthesis will be printed as the main log. Option 4) Well Section. This option can be filled out by the wellsite geologist in the Well Section of the program. This option has been implemented to suggest the print section for the entire log so as to incorporate any comments above and below the lithological interval of the striplog. If this option is selected (highlighted) this means that whatever is viewed within the parenthesis will be printed as the main log. Option 5) Lithology Interval. This option is controlled by the lithologic intervals drawn on the striplog. . If this option is selected (highlighted) this means that whatever is viewed within the parenthesis will be printed as the main log. 19.) Click on the button to start printing. This will initiate the printing. N.B. The Print Window settings including your paper size will now be automatically saved. The next time you go to print a striplog this configuration will be its defaults and it should facilitate the printing process. If you do make changes and you do not proceed with actually printing you will be prompted with a system message to Save your print settings. Office Viewer 2015, page 14