1
GRIDPAD 2390
User's Mantm,l
rQ a o
o
a
a
o
a a s/0
trr
r
PALM
n^
"InU[t
<-]o=o*o^*"
W
ii
Contents
Using the Writing Grid 27
Using the Pen and Handwriting Recognition
Contents
Writing with the Pen 28
Handwriting Recognition
Chi:$1*t
:
Getting Started
Introduction
Pen
1
Using the Sketch
This!
2
Make a Backup! 2
General
Precautions
2
Using File in the Menu
Using this Manual 3
Getting Acquainted 4
Replacing Batteries 5
Battery Precaulions 5
Searching for
Providing Startup
Date
10
Cir;*Ftr,
10
Tips
39
:l:l
Book
4t
Book 4l
Leaving the Date
Book
Moving Around the Date
41
Book 4l
The Six-Month View 42
The Month View 42
The Week View 43
The Day View 44
Going to a Specific Date 44
11
12
Using the Event Page 45
Adding an Event 45
Adding a Repeating Event 47
)
Basics l5
Using the Pen 15
The
Editing an Event 48
Showing and Hiding Empty Events 49
Showing Event Duration 49
Pen 15
Working with Applications 15
About the Address Book 16
About the Date Book l7
About the Note Book 19
Storing the
tlsing the To Do Page
Starting Applications and Accessories
Fixed Icons 22
Choosing from Menus 22
Bar
21
23
Controls 24
EnteringInformation 25
Using
Typing with the On-Screen Keyboard 26
Switching Keyboards 27
50
To Do Item 50
Editing a To Do Item 5l
Showing All To Do Items 51
Adding
About Pocket Quicken 20
Displaying the Menu
31
38
40
Starting the Date
10
Currency Formatting I I
Numeric Formatting 11
Setting the Time and Date
Name
Glossary 12
37
Bar
Covered Elsewhere 40
Time and Date Formats 10
Your
Help
tl,l:tit#?*r
Information
Pen
Text
Information Storage
Using
8
Adjusting the Contrast
Calibrating the
33
Using the Memory 39
RunningApplications 39
Replacing the Main Batteries 5
Replacing the BackuP Batteries 7
Unit
9
Unit
the
Starting
Page
Managinglnformation
FCC Information 3
Initializing the
29
Using Sketch Page Tools 34
Using the Sketch Tools for Ink or Text 35
Copying or Cutting a Whole Sketch Page 36
1
Read
Tips
Gestures 32
a
tJsing the Date Book Sketch Page 52
Sctting Date Book Preferences 52
I'urging the Date
Book 53
Book
('rcating a New Date
Switching to a Different Date
l'r'inting
54
('overed Elsewhere 54
53
Book
53
28
Contents iii
{'i!t;iLrtu""l '*
Address
Book
55
Book
55
Moving Around the Address Book
Adding an Address Book EntrY 56
Editing an
Entry
Customizing
55
Fields
Entry
59
Covered Elsewhere 86
Book
61
EnteringCalculations
63
Book
Book
63
63
PerformingConstantCalculations
Deleting a Note Book Page 67
Creating a New Note Book 67
Switching to a Different Note
Book
67
67
Covered Elsewhere 68
i:;"ili"i:
Pocket Quicken 69
Starting Pocket Quicken
Leaving Pocket Quicken
What To Do
First
88
Copying the PaperTape 89
Using Memory 89
63
Creating Groups of Pages 65
Expanding and Collapsing the Table of Contents 66
Moving a Page in the Table of Cohtents 66
Views
87
With the Keypad 88
With Pen and Ink 89
Moving Around the Note Book
Adding a Note Book Page 64
Pocket Quicken
87
Closing the Calculator 87
Calculator Keys and Buttons 88
ilir*1:t*r *
Printing
Chapter 7
Accessories
Starting the Calculator
Covered Elsewhere 62
Leaving the Note
85
Using a Different Currency 85
61
Starting the Note
84
61
Switching to a Different Address
Book
83
Switching to a Different Document 85
Changing Customized Field Names 59
Hiding Empty Fields 60
Changing How Fields are Displayed 60
Book
8l
Getting Document Information 85
Creating a New Pocket Quicken Document
59
Creating a New Address
List
PurgingTransactions
58
Duplicating an Address Book
a Transaction
Printing a Transaction List 82
Deleting or Editing a Transaction
Changing a Category 83
Deleting an Account 84
s5
Leaving the Address
Note
Contents
Viewing
Book
Starting the Address
Printing
iv
69
69
69
'70
Recording Your Spending 71
About Categories 74
Recording Deposits, Transfers, and Withdrawals 14
Setting Up a New Account 78
Changing Account Information 79
Setting an Account Balance 80
Starting the
Dictionary
89
91
Checking the Spelling of a Word 91
Looking Up a Definition or Synonym 92
Playing Flash 92
Playing Jumble 92
Viewing a History 93
Starting the Form Calculator 93
Using the Form Calculator 93
Ceneral Conversion Forms 94
Financial Forms 94
Currency Form 96
Changing the Displayed Currencies 91
Starting the World Clock 98
Using the World Clock 98
Changing the Home City 98
Changing the Destination City 99
Selecting by City or Country 99
Adding Your Own Home Town 99
Checking the Time 100
Changing to Daylight Saving Time 100
Changing the System Clock to the Destination Time
l0t
Contents v
Information
Using America Online los
America Online Departments
News 106
Travel 106
Stocks 107
Product Support
105
105
106
107
Members' Online SuPPort 107
Ask America Online 107
Account & Billing OPtions 107
Flashbar
108
Navigating America Online 108
Guide to Communications 109
Electronic
Mail
109
Offline Mail Manager 109
For More Information 110
Downloading
Files
110
What is Downloading? 110
How Do I Download a File? 110
Where Will My Files Be Downloaded? 111
Attaching a File to a Message 111
Answers to Common Downloading Questions 111
Directory
Printing ll2
Signing Off rt2
Member
111
Options
119
Chapter IS
Manager t2t
For Advanced Users 121
File Management 121
File Manager Icons 122
About the File Manager 122
About Documents and Folders I22
Using the Pen in File Manager 123
Selecting More Than One Document or Folder 123
Opening Documents and Folders 123
Moving and Copying Documents and Folders 124
Renaming Documents and Folders 124
Deleting Documents and Folders 125
Viewing Options 125
Getting Information About Documents and Folders 125
Creating Folders 126
Formatting Cards 126
About
Drives
126
Covered
Elsewhere
Chapt#r t
1
126
Setting Preferences tzl
SettingCommunicationsOptions 127
Setting File Link Options 127
Setting Modem and Protocol Options 128
Setting Page Send/Receive Options 129
Setting File Transfer Options 129
I{ecalibrating the
Pen
129
Settings 130
Changing International Settings 131
Changing Keyboard Settings 132
Sctting Up a Printer 132
113
Starting a Game
Leaving the
118
C-hanging Hardware
i}
Games
Changing the Serial
113
Game
Sctting the Time and
113
Solitaire I l3
Rules ll4
Changing the Level ofPlaY I 15
Choosing the Scoring Method 115
Standard Scoring 1 l5
Resetting the Score I 16
Setting the Countdown Time 116
Playing
Setting Other OPtions 116
Playing
1Oz
File
Welcome to America Online
Signing On for the First Time
Uki
Setting Game
,jn;ItJt{,: 3
i:hft*{*!
Contents
Playing
Starting the Language Translator 102
Using the Language Translator 102
Starting the Consumer, U.S., and World
vi
Pyramid ll7
Setting Game
OPtions
118
Changing User
Options
Date
133
134
Information
135
Chapter 12
System Settings, Add-Ons, and Communications
tJsing Add-On
Cards
137
Removing a PCMCIA Card 138
Accessing Data Files Stored on a PCMCIA Card 139
Using Battery Power with a PCMCIA Card 139
137
Contents vii
Resetting the
Unit
139
Errors 140
Using an AC Adapter l4l
Setting Up for Communications l4l
Data
Sending and Receiving
Pages
l4l
Linking to Another Unit or Computer 142
Transferring Files 143
Connecting to a Modem 144
Connecting to a Printer 144
Printing 144
Technicallnformation
145
Aooendix
tiicommended Peripherals and Options
Printers 146
Modems 146
AC Adapter 146
RS-232C Cable 146
Other
146
Customer Support
147
146
I
.lln l)I f:Fl
2
The Basics
A llcr you follow the instructions in "Chapter l: Getting started" and enter the
s(iutr.lp information, you can run any of the unit's built-in applications. Before you
rkr so, read this chapter for some basic information about using the unit,s menus
rrrrrl
controls, and storing records.
Using the Pen
I
lsc the pen to start applications, select menus and tools, and enter information.
use the pen, remove it from its slot. Then pull it to its full length.
'lir
'l'hcrc are two basic pen actions:
'lirp
Selects an application, icon, menu, command, or button. you can also
cancel a selection by tapping elsewhere on the screen.
l)rag Selects text or an area on the sketch page.
'l'o select text, hold down
the pen and drag it across the text. To select an area on
thc sketch page, drag the pen diagonally on the screen to form a rectangle. you
irlso drag the pen to move floating menus and file manager icons in applications.
Storing the Pen
when you are not using the pen, push it together and then insert it into the storage
cornpartment. Push the pen in all the way so it clicks, locks in place, and does not
slicle out. To remove the pen, press it in until it releases.
I
l you lose the pen, you can substitute
a
plastic or wooden item (such as the cap of
ir hallpoint pen or a chopstick), as long as it does not have a sharp tip.
'lir avoid damaging the display, do not use:
o Any sharp object
r Metal
o Standard ink pen (ifit doesn't have a plastic cap)
r Knife
Working with Applications
All of the applications were designed to work in similar ways. The applications
include consistent graphical cues to help you work and make learning easy.
Working with
The Basics
Applications 17
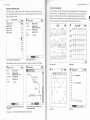
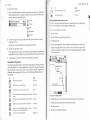
About the Address Book
About the Date Book
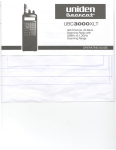
'Ihe Acldress Book is like an office card file to help you keep track of your contacts. The Address Book has two views: an index of address book entries and the
lrt' l)irte Book works like a desk calendar and appointment book. The Date Book
lirrr views: six-month, month, week, and day. You can move among the views
r;rrrt'kly with the tap of the pen. You can schedule meetings and have the Date
llook rcrnind you about them. You can schedule recurring events, such as birthdays
, rr rvcckly meetings. You can also keep track of important to do items.
address book entry view.
rorr( )
M
llGrul
, Sher
BiI
8B
, Harq
CD
, oave
EF
ag, Mike
GH
IJ
KL
@n
hlonroq
Mtry
{ }
t!EItE:
l{onroq hlary
Address:
1il10 Star Elvd.
H
ome Fh,rtre:
Holly,vood. CA
o14l555-1131
I
lr,rs
1
glllS
Jenurrl
February
T I4T F S S HT +{T F
12
123456
5 6 7 E S 7 I 910 11 12 13
Ml 14 l5 16 14 l5 1ri 17 lE 19 20
1'.1:0 2t 22 23 2t 2t 23 14 25 26 t7
S
o14] 555-1128
Birthday:
Ivl+3
15
OP
UR
l'1
Address:
H
ome Phone:
13
tE 1r rE 19 20
S I.{T WT F
4 5 6 7 I I 10
1t IE r3 r4 15 t6 17
18 19 t0 21 22 23 24
t1 2E 21 28 2S 30
S
l.,la y
Ju ne
s t4T WT F
" tlT !!r F 5112345
:r r 4 5 6 7 I E 7 I S l0 1l 12
'r lu 11 12 13 l4 15 1l 14 15 trl l7 18 19
l[ 1? t€ 19 2t 21 22 20 2t 22 23 24 25 2E
::? :.1 25 26 2? 28 23 27 28 29 30
Address book entry view
ilr
I{+g
Six-month View
SlllS
UH
{ }
I.IDN
l1
TUE
Y+ED
Trir-r-'t
THU FRI
t3
t4
l5
t6
SAT
tl
I
t
15
10
rnlln
11
1
U
l1
2
t1
E ls
ts
20
E
ZE
l5
l4
{}
SAT
l0
l5
1E
l7
22
4A
4
Chapter 4 covers the Address Book application in detail.
9:00-l
1l:00
12:00-
I:00
Lunchwilh Pall
1:0ll
2:0 0
5:0 0
Week View
0:00 Slafl ltleeting
l0:00
4:00
7
tFf,
8:0 0
4
I
Use the sketch page to take noles lor the
contact or draw a maP.
E
1?
r [oEn
E:00
7:00. B:00
=
Day View
ofJ bnll
U
I
F
N
o
30
7t Monday
m
I
3
l
E
E
THU FHI
I
l
E
information
SUH MON TUE WED
E
3r00
2
contact.
leee
Month View
'q April
5
Use the address page to enter the
on a
April
tl1
o14I555-1131
Eirthday:
fr
S
F14I555-l 123
Fax:
12
30 3t
{ }
hlonroq ltlary
Ittr0 Sttr Blrd.
Hollyr.,ood. CA
S
UU
Each address book entry view has two pages: an address page and a sketch page.
t!HiltE:
April
F
5T
lndex to names in the address book
llonmq hltry
rrch
T !!T
tl.{56
91ri ll
HX
Y7
*
{>
999
a
o
a
{}
18
The Basics
Working with
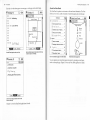
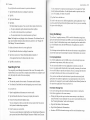
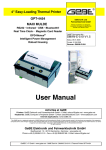
About the Note Book
Each day view has three pages: an event page, a to do page, and a sketch page.
Z
Monday
12
tif, { )
E
Monday
1?
tif, {
Applications 19
>
'l'lrc Note Book is a place to write notes or lists and store information. The Note
llook has two views: a table of contents of note book pages and a sketch page.
8:00
ll
l0:00
Il:00
1
fi,na*ivesi*ofPtands o { }
Hote Book
9:00'l0:00
AETEoNoMy______
H
2:00' 1 :00
I
flstronomical Terms
l:00
3:0 0
m
5
Mercury
iN
Venus
I
E
5
Phu=*= of the Hoon
Str''.+- -
-
4
6
5:00
13 pnusics
?
6r00
El
I
?:00'9:00
5
of1 ball
Z
Monday
Use the Sketch page to take noles for the day
or draw a map to a meeting.
e
5
tlf, {
>
lNeu To
Do
Crll Grand ma
lnstall
Drq
r)
nat
computers
fleqnir'o
Wedding gilt for
lItde
--
-
and JodY
Euent @fsketchJ
Use the To Do page to make a list of to do
ilems lor the day.
Chapter 3 covers the Date Book application in detail.
U
I
o
O
O
O
'ii:';.
Earth
Mars
lserods
Terms 9
lo
E Proofreaders Harks
E 0iacritical Harks
Table of contents of pages in the Note
1?
rinrity
I
2
Basic Formulas
EI Heating & Electrical
l=.1 )5 n+b" ts
Use the Evenl page to plan your day.
o
a
Ploa+l
E Petrtiue Size of Planets
tr B'ij[ttsl
4:0 0
a
?
E Ttr
2:00
I
Book
Note Book sketch page view
Yru can organize your note book pages into topics by grouping several pages
rrnder a main topic page. Chapter 5 covers the Note Book application in detail.
o
Starting Applications and
The Basics
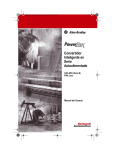
About Pocket Quicken
Starting Applications and Accessories
Pocket Quicken lets you keep track of where your money goes. Pocket Quicken
has three views: wallet, bank, and file cabinet.
I lrr'r'c
o
o
FaUment l"lethods
:king
tercard
Accessories 21
arc three ways to enter applications and accessories. You can:
'lirp one of the fixed application icons at the bottom of the display.
'lirp the Launcher fixed icon to display the application menu..
a
Ia
o
U
I
882.01
272.85
666.42
F
N
I
o
Ig*ffi]tffi*@-l
I
ttennsil
II
Hathdraual
I
@€Elpffiml
I
Transfer
II
Neu Hccount
I
lap the Launcher fixed icon
to switch to another application.
(io to the File Manager and select an application or file to
ERHA
Wallet view to enter transactions
LI\CEOHORKS\HORLO
rur
Bank view to record deposits, transfers, and
withdrawals
RElerence
Utilitier
America of,line
l=r{+t
E
lftEl/
rs-af
trj.B\
tri+lionar!
open.
'-'r
Form EilculatrrLinquBqe Tra...
Tap an icon or
lile twice lo slart an
application.
Scc Chapter
( )rrce
File cabinet view to see account registers
Chapter 6 covers Pocket Quicken in detail.
l0 for detailed instructions on using the File Manager.
you open an application, you can enter your information or view reference
irrlilrrnation. The information is saved automatically, even if you turn off the unit.
'l he unit also remembers where you were in an application when you turned it off.
'l hc next time you switch the unit on or return to an application, it takes you to the
sirrrrc location.
22
The Basics
Choosing from Menus
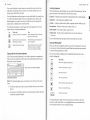
Fixed Icons
Certain icons (called fixed icons) always appear along the bottom ofthe screen.
These provide access to features and applications no matter where you are.
23
l\losl rncllll choices represent commands. Others represent settings that can be
rrtlrt'r'on or off. These items have special symbols that indicate whether they are
ol
otr
ol'l'.
7z
To
Name
Display a menu of applications
Launcher fixed icon
a
lt ll0
Open the Address Book application
Address Book fixed icon
't t1U.l0
I@
Preferences...
I Shou, Emptu Times
I Shotu Euent Duration
|[ilt)
ll00
tr Shour Ell To llo's
ll' tlIJ' lr00
Text 5earch...
Open the Date Book application
Date Book fixed icon
I00
:'00
Open the Note Book application
Note Book fixed icon
4U0
m
This item is turned on.
This item is turned off.
Go To OaU...
r t)0
!i tl0
lr 00
Open the Pocket Quicken application
Pocket Quicken fixed icon
Display the World Clock
World Clock fixed icon
/ 00.
s:r' 5 af_l
ball
Tnp a menu name to open a menu and tap a
Display the Calculator
Calculator fixed icon
rnonu choice to select it.
Displaying the Menu Bar
Display a floating menu bar
Menu Bar fixed icon
ln thc applications, the menu bar provides commands you can use. You can show
llrc rnenu bar in one of two ways:
Show or hide the on-screen keyboard
Keyboard fixed icon
o
o
Display help
Help fixed icon
Choosing from Menus
Most of the tasks and commands you need are available on the screen as buttons or
icons. The menus include additional commands and options. Menu names appear
in the menu bar. When you tap a menu name, the menu itself appears. Some menu
choices appear dimmed (light gray), which means that they're unavailable for use.
Some items become available only after you make a selection.
As a floating menu bar you can move or hide to save space on the screen
As a permanent menu bar displayed at the top of the screen
'lirp the Menu Bar fixed icon to display the menu bar.
U
I
F
N
I
O
24
The Basics
Entenng lnformation
Control
| ;Nme--=
What lt Does
Name
Opens a pop-up menu (a list of items),
which you can then select.
Pop-up menu control
Tap lhe Exit icon to hide the menu bar.
I,,,,u!iil
Displays a submenu for the menu item
Submenu control
Tap and drag here to move the floating
menu bar.
EE@
Move between views in applications.
Tab
tiutton or
The menu bar floats on the screen, which means you can move it where you want
it. You select the menu item you want and then hide the menu bar.
Delete EntrU
Tap this bution to keep the menu bar at the
top of the screen, so that it is always
l':rch application has additional buttons and controls, which are explained in the
;r; rllropriate chapter.
available.
a
o
U
I
t
o
( )rr
The floating menu bar.
The menu bar is now always available until
you hide it again.
a sketch page, you enter information directly on the screen. Just draw or write
ilrcnlos as you would on a piece of paper. In the Address Book entry view or Date
lkxrk day view, you enter information through dialog boxes.
To hide the permanent menu bar, tap the
Menu Bar fixed icon.
event
box.
ln the Date Book day view, you enter
lnformalion throush the Edit Event dialos
The permanent menu bar.
ln the Address Book entry view, you enter
throush the Edit Fietd
;ijl:Tl#:rr"tion
You enter information in one of three ways. You can:
Using Controls
The following table lists the navigational buttons and controls common to most
applications:
Button or Control
a
I
Entering lnformation
I{etU Entru...
Duplicate Entrg.,.
Delete EntrU
I
o
HetU Entrg.,.
0uplicate EntrU,..
25
What lt Does
Name
Moves to the next page.
Right arow
Moves to the previous page
Left arrow
Moves back one level (from month to sixmonth, for example) or hides an element
(such as the keyboard or floating menu bar).
Exit icon
)
{
o Type using the on-screen keyboard
o Print with the pen and have it converted
to typed characters (called handwriting
recognition or PalmPrintrM)
r
Write with the pen and leave the information as you wrote it (called ink or
PowerlnkrM)
The Basics
Enteringlnlormation 27
You can use Powerlnk or typed characters when and where you want in most
applications. You decide what you want to use. From the dialog box you can
always convert Powerlnk to text later.
You enter information onto sketch pages or in areas called fields. For example, you
use a field in the Address Book when you're entering the name, address, and
phone numbers for a contact. You also use a field when you're entering information about a scheduled event in the Date Book.
The following tools appear on sketch pages and some dialog boxes. First, you
indicate that you're entering information:
Text
Tap
To Enter
tr
tr
Tap the Text tool to use the
E
Then
keyboard.
Tap the Text tool to use the pen
and
recognition.
Tap the Ink tool to use the pen.
handwriting
Tap the Keyboard fixed icon, and then
tap the keys with the pen.
Print with the pen; each character you
print is recognized.
Write with the pen; your ink, called
Powerlnk, is left as is and shrunk
down to fit on the page or display.
Typing with the On-Screen Keyboard
You use the on-screen keyboard iust as you would a typewriter or computer keyboard, except you tap the keys with the pen. You tap the Keyboard fixed icon to
display the on-screen keyboard.
Tap the Exit icon to hide the keyboard.
Switching Keyboards
Whcn the keyboard is selected (black), you can switch the keyboard type. Tap the
rrppcr right corner of the keyboard to select from these types.
Kcyboard Standard qwerty (typewriter-like) keyboard in the current language.
Alphabetic Letters displayed in alphabetic order
Symbols Common symbols such as bullets, copyright, percent, dollar sign, etc.
lrtlernational Characters with accents, umlauts, tildes, etc.
Math Symbols Plus, minus, equals, square root, etc.
Writing
Grid
Sclcct the desired keyboard and tap the letters and symbols to enter them.
Using the Writing Grid
Whcn you select the writing grid keyboard, you write each character in a box and
lltc unit converts it into a letter on the screen. Blank boxes between letters translate
irs spaces between typed letters or words.
You use these controls to display boxes for additional characters and to move
rrlong the writing grid.
Button
tr
tr
tr
Tap the keys to enter text.
Note: Ifthe keyboard
appears gray, you cannot use it to enter text. This occurs
when:
r
You need to tap the pen in the text area to indicate where you want to enter
the text.
o
You may be in a field but the Ink tool is currently selected. Tap the Text tool
to make the keyboard available.
The unit converts each character you write into letters on
the screen.
tr
tr
tr
@
What lt Does
Moves to the beginning of the boxes
Moves the boxes back one screen
Moves back one box
Moves forward one box
Moves the boxes forward one screen
Moves to the end of the boxes
Enters the insert mode
'lir change characters, simply write over the previous one in the box. To insert
characters, tap the insert button so it is highlighted on the screen and then write
over the character where you want to begin inserting.
a
o
a
o
U
I
F
N
I
o
Enteringlnformation 29
The Basics
Using the Pen and Handwriting Recognition
Handwriting Recognition Tips
You use handwriting recognition when you want to use the pen to store and
display what you print as typed characters.
'l'he unit recognizes hand printed letters
and numbers. You can enter hand-printed
t haracters in text fields or on the sketch page. When you use hand-printed char;rclcrs in the field or on the sketch page when the Text tool is active, your handlrlinted characters are converted into typed characters.
'l'lrc lbllowing tips will help the unit to recognize your handwriting:
Print each letter or number clearly. Each character needs to be clear enough to
bc recognized. You can use upper or lower case letters.
555-l t25
Keep your letters upright. Try not to write letters with a slant.
Tap the Text tool to tell the unit to recognize
a
your printing, then print with the pen. Your
ink is converted to text.
a Use as few strokes as possible in writing a letter.
a
Make sure you keep the pen on the screen as you write-you don't need to
press down hard, but you don't want to hold the pen so lightly that it doesn't
rnake good contact with the screen.
a
Don't write too slowly.
a Print large characters. You can use the whole dialog box.
a
Writing with the Pen
You use Powerlnk when you want to write or draw with the pen and you want to
keep what you enter as it is. You can use the pen both on the sketch page and in
fields.
If the position that the ink appears on the screen doesn't match the position
the pen, you need to recalibrate the pen. See Chapter I L
'lb write several words, write one below another
of
so that the unit inserts spaces
between the words correctly.
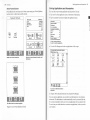
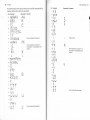
Some characters are so similar they can't be distinguished by the computercharacters such as Z andZ, S and 5, O and 0, and I and 1. The following table
shows how to make each character clearer.
Nlay l5
Writing the Z with a slash through il
ZZ
Writing the 5 in two strokes instead
sJ
of one
Writing the 0 (zero) with a slash
Tap the lnk tool to specify that you're going
through it
to enter ink. Your ink will be left as you
wrote it.
Note: If you enter ink into a field, your pen markings are left intact and
aren't converted to text. Later, you can convert your ink into text by tapping
the Text tool.
Writing the
1
with a line under it
,fr
,l
The Basics
Enteringlnformation 31
The following table shows characters that can be successfully recognized by the
computer and those that could not be recognized:.
Char. Successful
^
A,qAAA
:r3fi13
".CC
,, lDm
Unsuccessful Comments
{+A
B
, $l-tt+t^l
lr
,' J,J
- Kr(
Ll_
, Ynr,4 mmrl"l
t{H
Can be confused for a lowercase "I",
or the number I if surrounded by other
numbers.
W W\,./
xI
'.ZZ
YYY )'
.g
dt
a
o
o
o
U
r
t
N
rli
'
it.
I JIJI
*'l('l<
,rl I
Must be dotted.
K
Can be confused for a capital "[', or
the number 1 ifsurrounded bv other
numbers.
n rh t/l
t*
I
t-
n 16TltV|1
K
'oo-
, 'f ,fl'P
0"6
'1rr
.5
1
tt
a
' l\Jll-A
" qul'\f
* JWW
xN
,.ZZ
YY
,tu
w
e
n
"(J
, V\/
. ec
,qi
th
Can be confused for the number 6.
Unsuccessful Comments
h lb tbrb
,f+
,.NT\ NNI\I
" FPt,
"GQ
- Rf,.RR
r'5-l-T t
, d,a
d /dtc[ 1dr
a
ze rt_ El=-\;
' [E - F
C $GGGG6
Char. Successlul
\J
Can be confused for the number 2
Z
Can be confused for the number 2.
32
Using the Sketch
The Basics
,lt
Unsuccessful Comments
Char. Successful
,12
I 1
J -L
I
,33
'4 t
Can be confused for a capital
lowercase "l".
"l"
or
a
Can be confused for the letter
'777
'tg
'12
,fio
2ol
a
period, decimal
space
"S"
Hold down the pen (pause for
word
a moment) and drag
"O".
Make a small round mark, do not just tap
the screen. (used in numeric fields only.)
words when you write.
T
+
Plus, equals and divide are recognized in
the calculator only.
equals :
it across
Draw a vertical line up
through the selected text and
put a loop or pigtail at the end
(called the pigtail gesture).
Tap the pen where you want
the next character to go. Then,
write the character or word
somewhere in the text field or
screen.
Insert text in a text field
aiter existing text
Write the next characters;
what you enter gets added at
the end of existing text.
more than
o*EEI@E@
,???llTt?
a ()
The unit recognizes "-" as a minus sign tn
the calculator and as a hyphen elsewhere.
Mercury
Venus
Earth
._-lt
Mars
Pen Gestures
When you write or edit with the pen, certain gestures have special meanings. The
following table explains these gestures.
To
Do This
Enter a space as you're
Leave a space between words
as you write, or if using
handwriting recognition,
write a "space character"
(two short horizontal lines).
Asbroijs
Jupiler
Example
=o*"
fy7 fl
o
U
I
F
N
ro
insert
acharf:br A
dd characbrsl, thd
En d
lrr the Date Book, Address Book, and Note Book, you use a sketch page to draw,
rrake handwritten notes, or enter text. You can enter text using the pen, handwriting recognition, or the on-screen keyboard. Think ofthe sketch page as having
lwo layers: what you write or draw with the pen (ink) appears on one layer; text
you enter with the on-screen keyboard appears on another layer. The sketch page
tlisplays up to 170 lines oftext, but can only print the first 60. For ink entries, this
is cqual to about 3 screens.
o
Saturn
The sketch pages in the Date Book, Address
Book, and Note Book are identical.
a
(t)
lt
delete au,urd9iE
Using the Sketch Page
ft Aa*ive Sire of Flands
o
_-
lrrase a selected word or
cxisting text
!
writing
Example
Select more than one
Insert text within
Can be confused for the letter
33
sebcEd[@
words
The double-underline space symbol must be
written at the baseline. You must write the b
in a single stroke in order for the unit to
as a space. You can also get a
recognize
space simply by leaving a space between
WM
-
newrine
Quickly tap the word rwice.
pen
b
777
'"6',b
divide
Do This
Select a word with the
the words.
'55
plus
To
page
34
Using the Sketch Page
The Basics
To use the sketch
I
page:
l,{
1 From the Note Book table of contents, tap the page you want to use. In the Date
Book, display the day view and tap the Sketch tab. In the Address Book, display
the entry page and tap the Sketch tab.
Eea*iu"simofPlurds
x ll e llfi I
4{ }
lneur
E
E
tr
tr
E
2
3
Name
Return to normal size view
Magnity Out
Hide thc skctch tools
Exit icon
a
Text tool
\ r ril ('iilr cut or copy an item, and then paste it somewhere else on a sketch page.
\'o11 f i111 also magnify an area for editing or adding details.
o
Clear
Backspace
Tool box
next section for information on using the sketch tools.
To enter text, tap the Text tool.
1,,
r'ttt ot' copy and paste an Ink item:
| 'lhp the Ink tool.
2 'lirp the Tool box to display the sketch tools.
:l 'l lp the Select tool.
4 I )r ag the pen diagonally to draw a boundary around the ink you want to edit.
lruagine a rectangle for the area you want to select. Start at one corner ofthis
irnaginary rectangle. Drag the pen on the screen diagonally until the rectangle
is the size you want.
Tap Backspace to erase the last letter or ink segment you entered.
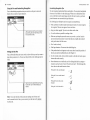
Using Sketch Page Tools
The sketch page includes tools for entering text using the pen, keyboard, or handwriting recognition (see "Entering Information" earlier in this chapter). The sketch
page also provides sketch tools you use to draw or edit text and ink. Display these
additional tools by tapping the Tool box icon. The following table describes the
bketch tools.
Tap
To
Name
tr
tr
Display the sketch tools
Tool box
Write or draw in ink with the pen
Sketch pen
ffi
tr
tr
tr
@
E
Erase by hand (as
I
llalrtg the Sketch Tools tor lnk or Text
After tapping the Text tool, you can use the on-screen keyboard or handwriting
recognition to enter text. Whatever you print with the pen gets converted to text.
4
@
To
lnk tool
To enter ink, tap the Ink tool, and then draw ink. Tap the Tool box to display
more sketch tools.
See the
ill)
35
if using a pencil eraser)
Eraser
Select a portion of the sketch page (drag the pen to
select)
Select tool
Cut (delete) the selected portion of ink or selected
text
Cut icon
Copy the selected portion of ink or selected text
Copy icon
Paste the cut or copied portion of ink or selected
text (must cut or copy something first)
Paste icon
Zoom in on the selected portion
Magnify In
Drag the pen to make a selection.
5 Tap the Cut tool to remove the item, or tap the Copy tool to copy the item.
6 Display the sketch page where you want the item to go.
7 Tap the Paste tool.
I Tap where you want the item to go.
o
a
rI
t
N
I
(J
36
Managinglnformation 37
The Basrcs
To
5
cut or copy and paste a Text item:
ll sornething already exists on the sketch page, you see a message warning you
lhat the contents of the sketch page will be replaced. Select Yes to replace or No
Io cancel.
1 Tap the Text tool and enter the text.
2 Hold down and drag the pen across the text you want to edit.
3 Tap the Tool box to display the sketch tools.
4 Tap the Cut tool to remove the item, or tap the Copy tool to copy the item.
5 Display the sketch page where you want the item to go.
6 Tap where you want the text to go.
Managing Information
A tkrcument is a group of related information you store in an application. For
t'rrrrnple, in the address book, you could create two documents: one for personal
,rtlth'csses and one for business contacts. Documents let you retrieve information
',(, y()u can view or edit it.
To paste the text within existing text, tap where you want the text to start.
The text is pasted after the cursor.
7
To
llrc lirst time you start the unit, you begin with a new document in each applit'rrlion. After you have created documents in an application, you return to the last
rkrcurnent you worked on when you quit the application.
Tap the Paste tool.
Note: If you paste text which exceeds the 17O-line display limit, the text which
exceeds 170 lines will not be displayed, though the hidden text remains stored
with the page. To reveal the hidden text, cut visible text from the page and paste
on another sketch page.
it
magnify an area:
1 Tap the Tool box to display the sketch tools.
2 Tap the Select tool and drag the pen diagonally
4
to draw a boundary around the
Tap the Magnify In tool to magnify the selected area.
Note: In the Note Book and Address Book, you can also switch documents by tappirrg the document title in the index view. See Chapters 4 and 5 for more details.
lrilc allows you to switch documents, start new documents, display document
irrlirrmation, and print documents. It also displays information about the current
rrpplication.
You can add text or ink in the magnified area.
lit tlisplay information about the current document:
Tap the Magnify Out tool to returx to normal magnification.
1
You can copy or cut everything on a sketch page (including all text and ink) at
once. Then you can paste the whole page on another sketch page in the Date Book,
Note Book, or Address Book.
Note: Pasting
a whole page onto another sketch page replaces the contents of the
destination sketch page.
To copy
1 Display the sketch page that you want to copy.
2 Tap the Menu Bar fixed icon to display the menu bar.
3 Choose Copy All or Clear All from the Edit menu.
see a message asking
A dialog box appears that includes the document name, the document size,
the total amount of memory the document uses, and other system information.
3
you to conflrm the deletion.
Display the sketch page where you want the information to go.
Tap OK to close the box.
'lit .start a new document in an application:
1
or cut a whole sketch page:
If you choose Clear All, you
Tap the Menu Bar fixed icon to display the menu bar.
2 Tap Info on the File menu.
Copying or Cutting a Whole Sketch Page
4
l'lrcre are two basic ways to access documents and display information about docunrcnts: using File in the menu bar or using the File Manager. Chapter l0 covers
tlrc lrile Manager in detail.
Using File in the Menu Bar
area you want to magnify.
3
('lroose Paste All from the Edit menu.
Tap the Menu Bar fixed icon to display the menu bar.
2 Tap File.
3 Tap Switch Document.
4 Tap New to create an empty document.
I
a
o
a
o
-F
U
N
I
o
The Basics
To switch
Using the Memory
from the cunent document to a previous document:
I lsc the Asterisk (*) to represent several characters. For example, Smx finds
Srrrith, Smythe, and Smothers. Use the Question mark to represent one charrrclcr. For example, 2?3 finds 213 and 203.
1 Tap the Menu Bar lixed icon to display the menu bar.
2 Tap File.
3 Tap Switch Document.
4 Tap Open.
5
lirp Find Next to find the text.
lir
rg1s1s6
for the same text in a different application, tap that application's fixed
orr. thcn select Text Search frorn the Options menu. The text you were searching
lrrl irppcars in the dialog box.
rr
The Open dialog box appears. You can select these options from the box.
a To open a document, tap the document name then tap Open.
Note: The Simple box only displays a list of documents. The Advanced box displays more detailed information about directories and drives. See "Chapter l0:
File Manager" for more information.
1 Tap the Menu Bar fixed icon to display the menu bar.
2 Tap the last menu item ("About Notebook/Address Book/etc.")
Tap OK to close the box.
Searching for Text
You can quickly search through a document to find a word. For example, in the
Address Book, you can search for a company name and then you can jump to each
entry for people who work at the same company.
Notes:
a The unit only searches for text entries. You cannot search ink entries.
a Text Search in Date Book does not find repeating events or to do items.
1
Open the application and document you want to search.
2 Tap the Menu Bar fixed icon
if necessary to display the menu
Not all of the applications can fit in 640K at once, so the unit only keeps some
rrpplications in open memory while others are closed.
'l lrc unit can usually
hold two or three applications in memory at a time. If,
Iror.vever, you open another function that is not currently in memory, the unit must
t losc one of the three to open the new f'unction. You see a message that the unit is
rrctivating the function, and it takes several seconds for it to open.
Alicr you have used the unit for the first time, it opens the most recently used
irpplications. The number of applications it can open depends on the size of the
rrpplication. For example, if you last used the Date Book and Pocket Quicken, the
trnil opens those applications when you power it on.
Information Storage Tips
ll'you see the message that your information storage memory is running low,
lirllow these suggestions to free some memory.
bar.
3 Choose Text Search from the Options menu.
You see a dialog box where you enter the word you want to find. You can use
the keyboard or handwriting recognition.
4
l'lrc lbllowing sections explain how the unit uses the memory to run applications
provides some tips for maximizing the amount of information you can store.
;rrrtl
Running Applications
A box appears that shows the release date and version.
searchfor text:
l'lrt: unit has a I megabyte memory: 352K is used for infbrmation storage (user,
;rpplication and system information) and 640K is used to run the applications. The
innount of space for information storage varies, depending on how much and thc
lypc of information stored, but the 640K memory for applications cannot be
t luurged.
display information about the curent application:
To
a
o
a
m
u
r
i
I
Using the Memory
a To cancel and return to the current document, tap Cancel.
3
I
o
a To switch to the Advanced box, tap Advanced.
To
39
Enter the name you want to find.
You can use special characters to help find the word. Tap the Special Characters
pop-up menu and choose Match Multiple Characters or Match Any Character.
o Writing with the pen takes up to ten times more memory to store than text
entered with the on-screen keyboard. You can convert your handwriting to text.
(See "Entering Information" earlier in this chapter.)
o Purge the Date Book of old information.
r Purge Pocket Quicken ofold transactions.
o Purchase a PCMCIA information storage card for extra information storage.
40
The Basics
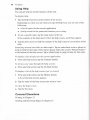
Using Help
You can get help on all the functions of the unit.
To
display help:
1
Tap the Help fixed icon at the bottom of the screen.
Depending on where you are when you tap the Help icon, you see one of the
following:
r
r
2
A list of topics for the current application
A help screen for the particular function you're using
To see a specific topic, tap the topic name in the list.
If the contents of the help doesn't fit in
3
the help screen, scroll bars appear.
Tap the down arrow to shift the contents of the help screen to reveal more of the
help.
Some help screens have links to other topics. Tap an underlined word or phrase to
jump to help for that topic. Other topics appear under the section "Related Topics"
at the bottom of the help screen. Tap a related topic to jump to help for that topic.
To
display a list oftopicsJbr the current application:
r
From any help screen, tap the Contents button.
To retrace your step,s through the help screens:
o
From any help screen, tap the Go Back button.
To
display a list of the help screens you've viewed:
1 From any help screen, tap the History
button.
A list of the help screens appears.
2
Tap the name of the help screen you want to view.
To
t'losc the help screen:
o
Tap the Exit icon.
Covered Elsewhere
Printing in Chapter 12
Sending and Receiving Pages in Chapter
l2
AST Research, Inc.
16215 Alton Parkway,
Inine, CA92718
040006-501