1
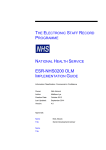
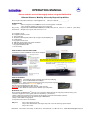
OPERATING MANUAL
Please read this manual thoroughly before using the BioSlimDisk
Ultimate Slimness, Mobility & Security Beyond Capabilities
Please register for product warranty at [email protected]
(note your serial No: _ _ _ _ _ _ _ _ )
INTRODUCTION
Security
– Data is encrypted and can ONLY be accessed via fingerprint verification.
Your fingerprint template can not be accessed via PC
Plug ‘n’ Play – Supports Win CE.NET/98/ME/2000/XP/Server2003, MAC OS 8.6*, Linux 2.4.x* , Solaris 8* (*and above)
Convenience – Weighs only 27 grams and measures 7.5 cm
A - Fingerprint sensor
B - Fingerprint protective metal
C - Cover (slide off)
D - Enrolment Switch (operate with the tip of a paper clip or ballpoint pen)
E - USB Interface
F - Fingerprint Sensor Cover
G - RED LED for fingerprint entry & data read/write
H - LED for OK/NG fingerprint entry
I - Fingerprint Enrolment LED
J - For neck strap
HOW TO ENROLL FOR THE FIRST TIME?
Set Enrolment Switch to NORMAL and insert into USB port.
Note: Remember how you placed your finger on the sensor: only same
part of your finger and same direction will be recognized to open
NORMAL USAGE
Use the tip of a paper clip or ballpoint pen to operate the
Enrolment Switch
HOW TO RE-ENROLL
Set Enrolment Switch to "Enroll” (away from the USB plug)
Re-Insert BioSlimDisk into USB port
Place registered finger onto sensor to clear previous fingerprint enrolments.
Fingerprints are cleared when Orange LED lights up.
Repeat "How to enroll for the first time" above
CAUTION Remove BioSlimDisk ONLY after all 3 LEDs went off.
Remember to slide Enrolment Switch back to ”Normal” upon completion.
BioSlimDisk Care
Please handle your BioSlimDiskTM with care. The suggestions below will help you enjoy this product for many years.
• Clean the fingerprint sensor regularly with clean dry cloth (e.g. micro fiber).
• Always replace the fingerprint cover to protect the fingerprint sensor from unintentional scratches.
• Run Scandisk regularly to ensure the data integrity of BioSlimDisk.
• Always enroll a total of 5 fingerprints.
• Keep it out of the reach of small children.
Daily use:
Step 1: Place finger on sensor
Step 2: After authentication, slide finger away from sensor to clear finger print residuals
Step 3: Close cover
Switzerland: C&I ComTec / bit-factory, Im Neusatz 8, 4144 Arlesheim, Tel: 061 701 15 15, eMail: [email protected]
OPERATING MANUAL
BioSlimDisk WINDOWS 98/98SE Installation (USB Mass Storage Driver Installations):
Do not plug in the BioSlimDisk driver before installation. Please download the BioSlimDisk driver at www.bioslimdisk.com
Unzip the file ”ritech98.zip” into a directory, like C:\4trust98. There are a total of seven files in the directory.
Plug in the BioSlimDisk and authenticate with the authorized fingerprints or complete the enrolment.
Set up is preparing to install the drivers to the operating system. Click ”Next” to continue.
Select ”Search for the best driver for your device. (Recommended)” Click ”Next” to continue.
Check ”Specify a location” and browse to the directory where ”ritech98.zip” is unzipped. E.g. C:\4trust98; Click
”Next” to continue. First part of the driver is then installed.
The PC then identifies a ”USB disk controller” and asks for a driver. Repeat as shown above.
The driver should now be completely installed. You should find a ”Removable Disk” shown in My Computer.
WINDOWS CE.NET*/ WINDOWS ME/ WINDOWS XP/ WINDOWS 2000 Installation
For these operating systems, no driver is needed because Windows has a built-in driver that can support BioSlimDisk.
Simply plug the BioSlimDisk into the USB port and upon authentication by an authorized fingerprint, the BioSlimDisk
will be recognized by the operating system. Once installation is completed, plug the BioSlimDisk into the USB port
and you will see an icon showing ”Removable Disk” drive.
Note: Stop the device before removing the BioSlimDisk (otherwise data transfer may not be finished)
*CE.NET formats a removable storage device, like the BioSlimDisk, when it is inserted the first time and all data
will be erased. After being formatted on CE.NET it can be used to transfer data beween other systems.
.
BioSlimDisk Installation: MAC and LINUX
MAC OS 9.X / MAC OS X Installation
Plug BioSlimDisk into the USB port of your Mac computer.
A new icon name ”Untitled” representing BioSlimDisk will display on the desktop and you can use it as storage device.
Before removing BioSlimDisk, please drag the icon to ”Trash”
Note if you use MAC OS10: The BioSlimDisk might activate itself after you pul it to the “Trash”
You should wait until no LED blinks and ignore the error message when you pull it from the USB port.
Linux 2.4.X Installation
BioSlimDisk is formatted to FAT file system before shipping to you. It can be used with any Linux OS 2.4.x.
Be sure that the Linux kernel supports USB and USB file systems. Plug BioSlimDisk into the USB port
Enter the system user ID ”root” and input the command ”Mount/dev/sda/mnt”
Before removing the BioSlimDisk, please input the command ”umount/mnt”
BioSlimDisk Warnings and Hints
1. Do not unplug the BioSlimDisk during fingerprint enrolment and during data read/write. This may cause data
corruption to fingerprint templates and files and, in the worst case, permanent damage to the BioSlimDisk.
2. Do not apply any fluid to BioSlimDiskd during cleaning especially not on the fingerprint sensor.
Do not use harsh chemicals, cleaning solvents, or strong detergents to clean the BioSlimDisk
3. Do no store the BioSlimDisk in hot areas. High temperature can shorten the live of electronic devices or melt
certain plastics.
4. Do not store the BioSlimDisk in dusty, dirty areas. It's moving parts can be damaged.
5. Do not store the BioSlimDisk in cold areas. When it warms up (to it's normal temperature), moisture can form
inside, which may damage electronic circuit boards.
6. Do not attempt to open the BioSlimDisk. Non-expert handling may damage it.
7. Do not paint the BicSlimDisk. Paint can clog the moving parts and prevent proper operation.
8. Keep a backup copy of your data, in case the BioSlimDisk gets lost or damaged.
Warranty Policy
1. Our product is guaranteed for a period of two years after the date of purchase against defects due to faulty
workmanship or materials.
2. The guarantee is invalid if the defect is due to accidental damages (including transport), misuse, abuse,
tempering, failure of purchaser to follow normal procedures outlined in the user manual, neglect and in case
of alteration or repair carried out by unauthorized persons and normal wear and tear & corrosion.
3. Service under guarantee is only provided when the registration is mailed in within 14 days from the date of
purchase on the receipt.
4. Please register for warranty by sending an E-mail to [email protected] (1. Name, 2. Address, 3. Country,
4. Phone/Fax, 5. Product, 6. Model/Number, 7. Serial Number, 8. Date Purchased):
Dr. Fehr GmbH IS NOT RESPONSIBLE FOR ANY LOST PROFITS, LOST DATA OR OTHER INCIDENTAL
OR CONSEQUENTIAL DAMAGES ARISING OUT OF THE USE, OR INABILITY TO USE OF THIS PRODUCT.
Dr. Fehr DOES NOT GUARANTEE THE BioSlimDisk TO WORK ON ALL COMPUTERS.
THE GOVERNING LAWS OF THIS PRODUCT ARE THE LAWS OF GERMANY.
Dr. Fehr Gmbh, Wilhelm-Busch-Str. 16, 65479 Raunheim/Germany Phone: +49 06142 9485-0 Fax: +49 6142 41815
Switzerland: C&I ComTec / bit-factory, Im Neusatz 8, 4144 Arlesheim, Tel: 061 701 15 15, eMail: [email protected]