1
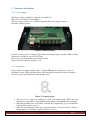
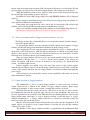
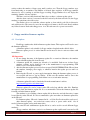
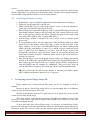
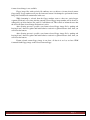
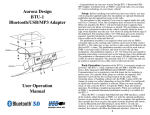
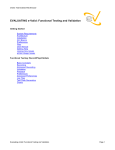
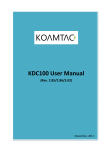
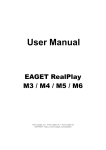
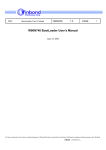
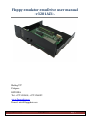
Haldag UÜ
Palupera
ESTONIA
Tel: +372 5535498, +372 5284102
www.floppydrive.eu
E-mail: [email protected]
Floppydrive.eu
EmuDrive
Page 1
The Haldag UÜ guarantees the final consumer in the case of appropriate use that the device will be
for a period of 24 months without any material damage and free of caused labour costs. In case of
production errors or damaged material, the Haldag UÜ will do anything to restore the normal
operating status (i.e. repair or exchange parts or the whole product), within the warranty period and
if the receipt is available. In free discretion of the Haldag UÜ, the exchange may contain new or as
good as new devices or parts which have the same functionality like the original device.
This warranty will expire instantly if the device is modified, used incorrect or damaged. This also
takes effect if the product is affected through force majeure orby using the device out the proper
working conditions.
Floppy emulator is equipped with a 7 - segment LED display.
Floppy emulator allows to use up to 72 floppy image files in one SD card.
Floppy emulator can use 16-bit or 32-bit file allocation table-formatted SD cards.
Floppy emulator supports IBM and CP / M systems.
Floppy emulator support next floppies:
160KB
180KB
320KB
360KB
720KB
820KB
1,2MB
1,44MB
Figure 1. Front description
Floppydrive.eu
EmuDrive
Page 2
!
The Floppy emulator- EmuDrive will work only with 5V dc.
The power source must be at least 500mA.
The power supply connector is a standard floppy disk drive power supply connector.
Below the connector pinout:
Figure 2. Connector pinout
Check for correct polarity of voltage supply when connecting the floppy emudrive. GND is usually
indicated by a black wire, and +5V by red wire.
Please also correctly attach the 34-pin connection cable.
Figure 2: Red wire must be on the pin 1 side.
"
Floppy emulator is equipped with a single 7 - segment LED display and displays a variety of
information on this. Display the Information of the inserted SD card analysis results according to
the analysis stages and information about emulator status.
Figure 3. 7-segment layout
1. After the power is turned on emulator is booted, and commissioning. While the clock
frequency becomes stabile 7-segment LED display indicator will illuminate the A-segment.
2. After SD card SPI mode is successfully activated, the A-segment(fig. 3) goes off and the Bsegment will be turned on (fig. 3).
3. After SD card initialization done and successful transition to full speed mode is achieved,
the B-segment go off and the C-segment will turn on (fig. 3).
Floppydrive.eu
EmuDrive
Page 3
4. After reading of master boot record, the B- and C-segments go off and the D-segment will
be turned on (fig. 3).
5. After file allocation table reading is finished, the D-segment goes off and the E-segment will
turn on (fig. 3). If the SD card have block address based structure, then the B-segment will
turn on simultaneously. If the SD card have byte address based structure, B-segment does
not light up.
6. After root directory reading is finished and data processing compete both D-and B-segments
on the LED display will turn off. If the SD card is formatted as 16-bit file allocation table,
then the F-segment will turn on. If the SD card is formatted as 32-bit file allocation table,
then the F-segment does not light up.
Short breaks between stages of diagnosis allow the user to monitor and track segments’, providing
information about the operation of the SD card.
At the end of the diagnostic LED indicator displays the selected floppy image file number or
letter. If the SD card does not contain any floppy image files, G-segment will be displayed in the
middle of the horizontal dash. In addition, the segment DOT turns on between segments B, C and D
if the SD card’s mechanical write protection is activated. Segment DOT stays on until the new SD
card without write protection is entered.
If the floppy image file attributes “Read-only” is activated, then segment DOT is displayed
simultaneously with the selected floppy image file number or letter. Switched on segment DOT also
activates floppy emulator output WPT and recording to floppy is prohibited.
#
"
$
Figure 4. 7-segment symbols
Figure 4 shows what symbol is used by emuDrive for image numeration.
%
"&
" &
'
&
$
In addition to 36 floppy image files with normal not hidden file attributes, the floppy
emulator will allow the use of 36 more floppy image files.
To activate hidden files using the mode needes, push and hold any, but only one of the
Floppydrive.eu
EmuDrive
Page 4
buttons in the front panel at the moment of SD card insertion. Keystroke is recorded after SD card
insertion diagnosis, between time of A-and B-segment display. You can then release the button.
While the hidden files mode is active, small "h"(hidden) letter will be displayed shortly after
the current floppy image number or letter is displayed.
In hidden files mode ONLY floppy image files with HIDDEN attributes will be displayed
and used.
Floppy emulator’s permanent memory stores the last selected floppy image file number or a
letter, and also the hidden or not hidden mode.
Latent image files using the mode can be exited only by removing the SD card from the
emulator, and re-entering the SD card in the normal, not hidden mode selected.
There is not automatic mechanism built in the emulator to exit the hidden image files mode.
NB! The use of latent image files mode operation is the user'
s responsibility.
('
&
&
The Floppy emulator has a feature that allows you to display the currently installed software
version in segment indicator.
To start using the function view, the currently installed software version number of floppy
emulator, the SD-card write-protect mechanical switch must be in the locked position.
After inserting the SD card (using the normal, non-hidden files mode, no button pushed at
the moment of SD card insertion), while the SD card diagnostics is finished and selected floppy
number or letter appears, you can now press and hold two buttons at once about half a second to
initiate the show of current software version number function.
Then, the floppy emulator will show one by one current installed software version on the
segment indicator, first the letters "v", "e" and "r" and the version number of the software are
shown, for example. 3.00. Newer versions are displayed at the end letter "Z", which shows the
system of software update version.
Software upgrades are available only for the same letter versions of the software update.
After the current software version is shown, the floppy emulator will reset itself. Thus, viewing the
version of the software will allow you to do floppy emulator reset function without interrupting the
power supply.
A short description of each specifics software version capabilities, and features can be read
in the manufacturer'
s website.
)
&&
The manufacturer is able to program floppy emulator as demo-version by customer'
s
request. Demo-version is limited in the number of floppy emulator activities. Every floppy
emulation programmed as demo version contains a unique demo unlock code inside.
The Demo Version can be easily converted to a full version at any time. In order to do this,
the manufacturer will send the client the demo unlock code in the attachment, that need to be
received, unpacked and save to the SD card. When the SD card containing this file is entered to the
floppy emulator then small letter "u" will be displayed and the second after letter "u" will be
changed automatically to "o". Floppy emulator will reboot -no button is not needed to push. The
Demo version has become the full version.
After the SD card is inserted, three horizontal lines and, at the same time, Segments A, G, D
shaped symbols are displayed on the segment indicator. It informs the user, that this emulator
software it is a demo version.
The Number of demo floppy emulator activities is programmed by the manufacturer. Each
Floppydrive.eu
EmuDrive
Page 5
activity reduces the number of demo usage until it reaches zero. Then the floppy emulator stops
from functioning as an emulator. The Number of allowed demo activities of the floppy emulator
decreases by one by reading as well the floppy recording. Floppy Emulator does not display the
remaining number of demo activities.
The Demo version is fully functional. But it does not have a software update option.
After the demo version is converted to the full version by the demo unlock code, the floppy
emulator is equivalent to the full version.
The emulator does not search the software update or demo unlock code files in directories
and sub-directories. They must be stored in uncompressed format to the SD card directly without
any folders between. Demo unlocking process is no SD card removal or power-cut sensitive.
*
&
*
Each floppy emulator has built-in firmware update feature. This requires an SD card to store
the firmware update file.
A firmware update is only suitable for floppy emulator bought from the official dealer.
Firmware update process is critical function and it must be done in strict accordance with
instructions.
NB! Important:
1. Do not change the name of the firmware update file or extension. Otherwise, the emulator
can not find the update file from SD card.
2. A firmware update file contents not allowed to be modified. Such an act violates floppy
emulator software, and it should be sent to the manufacturer for reprogramming. Such
failure is not covered under warranty .
3. After the firmware update process has been accepted, DO NOT REMOVE the SD card from
the emulator, interrupt power supply or otherwise interfere the update process until it is
finished
4. Removing the SD card, or power supply interruption during the firmware update process is
not accepted and leaves a gap in software. In this case, the emulator must be sent to the
manufacturer for reprogramming. Such failure is not covered under warranty .
A firmware update file can be downloaded from the manufacturer'
s website:
http://www.floppydrive.eu/software.html
Firmware update file can be located on the SD card along with the other files. Emulator
automatically finds the firmware update file. It is recommended to delete the firmware update file
from SD card after firmware update.
The emulator is not searching software update file in directories and sub-directories, it must
located directly on the SD card. It is not recommended to place more than one firmware update files
on the SD card.
For firmware update- SD cards formatted in 16 - or 32-bit file allocation tables can be used.
After firmware update - not needed any restart, reboot or power swich on/off. Also if
needed - firmware update can be made many times.
The same SD card with firmware update file in it, can be used in several different floppy
emulators.
(Floppy emulator with demo version is not firmware update capable until converted to full
Floppydrive.eu
EmuDrive
Page 6
version.)
A firmware update is not allowed with mechanical write-protect switch lock activated on the
SD card. Optionally, it is possible before the firmware update, check the current installed firmware
version number using emulation firmware version viewing function.
*
' " ' &
+
1. Download the compressed firmware update file from the manufacturer’s homepage.
2. Unzip and copy the update file to the SD card.
3. While inserting SD card, press and hold two buttons at once, to allow the simulator to
search and locate firmware update file in SD card.
4. SD card diagnostics with results displaying on the 7-segment LED display will start and
when finished then the emulator will start search and locate software update file and if
this is found, the floppy emulator will display a flashing big upside down A symbol with
a non-active DOT segment on the 7-segment LED display.
5. Now the floppy emulator is waiting for the user to accept or reject a software update
process start.
6. To accept firmware update start press right button (SD-Card Holder-sided knob, which
usually increases the number of the floppy disk, or letters) in the front panel of the
floppy emulator, for reject press left button(LED display side button, which usually
reduces the floppy disk numbers or letters). If no button are pressed while the upside
down A symbol has been blinking for 10 times, then the floppy emulator will
automatically exit firmware update acceptance wait mode, rebooting and starting in the
normal mode. Until the acceptance of firmware update start is not pressed, the SD card is
allowed to be removed.
7. After the right button is pressed, the upside down A symbol stops blinking and remains
steadily lit, In addition, the segment DOT start flashing. The Segment DOT flashes 32
times, and at the same time inverted big A segments will be partially extinguished in
order B,C,G,D,F,E until all segments are extinguished. The process takes about 30
seconds. Then firmware update is done and floppy emulator will automatically restart.
NB! Never remove the SD card from the emulator or interrupt power while segment
DOT is blinking and firmware update process is in progress.
,
"
&
" &
Floppy emulator has a format function. The image can also be formatted by the host
machine.
Because all data in selected floppy image will be lost after formatting, there is an additional
security step before the main format can be used.
The SD card mechanical write-protect switch must be set in unlocked position to use the
format selected on the current floppy.
The Format selected on the current floppy images with hidden file attributes is not possible
because it is not possible to push and keep down 2 buttons together and 1 button only at the same
time while inserting the SD card.
To allow the format of the selected floppy image, it is necessary to push and keep down 2
buttons at the same times at the SD card insertion moment, like with firmware update function use.
If firmware update file is present on SD card, then firmware update function has the priority and
Floppydrive.eu
EmuDrive
Page 7
format selected image is not available.
Floppy image files with read-only file attributes are not subject to format selected current
floppy image, floppy emulator will pass the format and restart if it attempted to perform the format.
Image files and data will remain intact in this case.
While formatting is selected, then the floppy emulator starts to show two vertical upper
segments F,B shortly every time after the currently selected floppy image number will be shown or
cahanged by up /down buttons, like small “h” in hidden mode. This is made to inform the user, that
the allowed format selected image file function is active.
After allowing present is possible, start format selected floppy image file by pushing and
keeping down 2 buttons together until anticlockwise rotation in segment indicator starts, then you
can release the buttons.
After allowing present is possible, start format selected floppy image file by pushing and
keeping down 2 buttons together until anticlockwise rotation in segment indicator starts, then you
can release the buttons.
Format selected current floppy image is now done, all data in it are lost, we have CP/M
formatted blank floppy image on the selected current floppy.
Floppydrive.eu
EmuDrive
Page 8