1
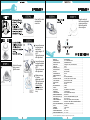
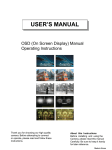
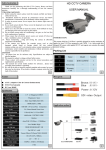
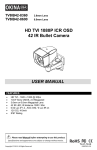
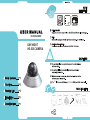
IV-HDCM-500DF
DAY/NIGHT
HD-SDI CAMERA
21
7/14/21
Camera Unit
User Manual
1
O-ring
7
Positioning stricker
2
Wall Anchor Plastic
Sheath
Wrenches
3
4
Wall Anchors
5
6
STEP 7
Open the IR module,
and adjust the
zoom lens.
Align the marks of
black mount plate and
camera cover,then
tighten the vandal
screw as figure.
Camera cover
UP
STEP 5
Loosen the screws
to adjust camera
direction,the
vertical angle is 15°
to 90°.
Tighten the screws
after adjustment.
STEP 3
Rotate to the angle
what you want,
Tight the screw.
Loosen the screws
to adjust horizontal
angle,the angle is
±150°.
Tighten the screws
after adjustment.
Maximum range
of rotation
adjustment is 350°.
Tighten the screws
after adjustment.
Caution:While
rotating object to
360,take care to
drop.
LEFT SET RIGHT
DOWN
MODEL NO.
IMAGE SENSOR
IDV-2LP5N4HEx2
1/2.7” 2.1MP CMOS Sensor
SCANNING SYSTEM
RESOLUTION
LENS TYPE
SENSITIVITY (F1.2)
PROGRESSIVE SCAN
2.1Megapixel 1080p, 1920*1080(30FPS)
4.0mm
1.0 Lux
EFFECTIVE PIXELS
S/N RATIO
SYNCHRONIZATION
GAMMA CORRECTION
DEFOG
ELECTRONIC SHUTTER
O.S.D. LANGUAGE
GAIN CONTROL
3DNR
MOTION DETECTION
PRIVACY
Mirror (H-REV)
SHARPNESS
D & N SELECTION
BLEMISH COMPENSATION
VIDEO OUTPUT (BNC Type)
POWER SUPPLY
POWER CONSUMPTION
WHITE BALANCE
BACK LIGHT COMPENSATION
IR LED
DIMENSION
NET WEIGHT
STORAGE TEMPERATURE
OPERATING TEMPERATURE
1944(H)*1092(V)
More than 50dB
Internal
0.45
ON / OFF (FOG OR RAIN)
1/30 / 1/60 (1/50) / FLK / 1/250 ~ 1/50000
ENG / JPN / CHN1 / CHN2
OFF / LOW / MID / HIGH
ON / OFF
3 AREA
8 AREA
OFF / MIRROR / V-FLIP / ROTATE
Level Adjustable
AUTO / COLOR / B&W / EXT(ICR)
OSD Control
HD-SDI : 1.485G/s(SMPTE292M)1.0Vpp-75Ω
DC 12V / AC 24V
IR OFF : 400 mA (MAX) / IR ON : 600mA (MAX)
ATW / AWC -->SET / INDOOR / OUTDOOR / MANUAL
OFF / BLC / HBLC (Selectable)
21 IR LED
138mm * 79mm
630g
-30° ~ +60° C
-10° ~ +45° C
*The above specification is subject to change without prior notice
SET UP MENU
LENS
EXPOSURE
• SHUTTER •AGC •SENS-UP •BRIGHTNESS
When DC is select, you can control screen brightness. The range
• ACCE •DEFOG •BACKLIGHT •RETURN
WHITE BAL
•ATW •AWC→SET •INDOOR •OUTDOOR •MANUAL
DAY&NIGHT
•AUTO •COLOR •B/W
NR
● DC : Select Auto Iris Lens
•DC•MANUAL
of bright control is between 0 and 100 (45 in case of WDR mode).
Adust the brightness appropriately for optimal screen brightness.
● Manual : Select Manual Lens
•2NR •3NR •LEVEL •SMART NR •RETURN
• CAM TITLE •FREEZE •MOTION •PRIVACY
SPECIAL
• LANGUAGE •DEFECT •RS485 •VERSION
• RETURN
ADJUST
• SHARPNESS •MONITOR •OSD •LSC
• NTSC/PAL •RETURN
RESET
•FACTORY •RETURN
► Some lenses may not work properly, depending on the setting of
the BRIGHTNESS LEVEL.
► It may not work properly depending on the installed lens. Set the
Level of the lens to the optimal value.
1/50000, x2, X3, AUTO.
‧AGC : LOW, MIDDLE, HIGH.
‧SENSE-UP : x2 , x3. (In Auto mode)
‧BRIGHTNESS : 1 ~ 100.
﹥AREA : Select POSITION, SIZE, RET, AGAIN.
﹥DEFAULT : Reset the BLC setting to the factory defaults.
﹥RETURN : (RET / END)
–HSBLC : If there is a high light installed in a limited environment such as an
apartment parking garage or gas station entrance, removing the high
﹥DISPLAY : (ON / OFF) You can use ↑, ↓, ←, → to adjust POSITION and SIZE.
﹥LEVEL : 0 ~ 100.
﹥MODE : ALL DAY / NIGHT.
﹥BLACK MASK : ON / OFF
﹥DEFAULT : Reset the HSBLC setting to the factory defaults.
﹥RETURN : (RET / END)
‧RETURN : (RET /END)
‧ACCE (D-WDR) : OFF / LOW / MIDDLE /HIGH
NR
•2 DNR : OFF/ON
•3 DNR : OFF/ON
﹣OFF : Deactivates the DNR Function. Noise in not reduced.
﹣ON : Activates the DNR so that noise is not reduced.
Press the SET button then you can adjust the noise reduction level.
﹥S-LEVEL : 0 ~ 100.
﹥E -LEVEL : 0 ~ 100.
‧ LEVEL : 0 ~ 100.
‧ SMART NR : OFF/ON (SMART NR working when 3DNR level >40)
‧RETURN : (RET/END)
•AUTO : If use IR LED with Light Sensor, it is no function.
﹣DELAY : 0 ~ 60 seconds.
﹣D→N (AGC) : 0 ~ 100.
﹣N→D (AGC) : 0 ~ 100.
•COLOR : This picture is always displayed in color.
•B/W : This picture is always displayed in black and white.
﹣BURST : (ON / OFF)
﹣IR SMART:OFF/ON
﹥LEVEL : 0 ~ 15.
﹥AREA : You can use ↑, ↓, ←, → to adjust POSITION and SIZE.
﹥IR LED : ON /OFF
﹥IR PWM : 0 ~ 15.
﹥RETURN : RET/END.
video the area more clearly.
﹥GAIN : MIDDLE, HIGH, LOW.
light makes it possible to view car license plates efficiently.
‧SHUTTER : 1/30,FLK, 1/250, 1/500, 1/1000, 1/2000, 1/5000, 1/10000,
•ATW : 1800°K ~ 10500°K.
•AWC→SET : Shoot a white paper push SET button..
• INDOOR : 4500°K ~ 8500°K.
• OUTDOOR : 1800°K ~ 10500°K.
•MANUAL : Select this to fine-tune White Balance manually.
Set White Balance first by using the ATW or AWC mode.
After that switch to MANUAL mode, fine-tune the White
Balance and then press SET button.
–BLC : Enables a user to directly select a desired area from a picture, and to
﹥SELECT : AREA 1 ~ AREA 4.
EXIT
► RETURN :
RET(RETURN) : Select this to save the setting for this menu and
return to the upper menu.
END : Select this to save the setting for this menu and exit the
SET UP menu.
‧DEFOG : DEFOG or Rain
‧BACKLIGHT : OFF, BLC,HBLC
Enter a title, move the cursor to “POS” and press
SET button. The entered title appears on the screen.
Select the positon to displayed the title on the screen
by using the 4 direction button and press the SET
button. When the position is determined, select
“END” and press the SET button to return to the
SPECIAL menu.
ABCDEFGHIJK
LMNOPQRSTUV
WXYZ► ( )
■ / = &: ~ , .
-_
123456789
→ ←
•CAM TITLE : If you enter a title, the title will appear on the monitor.
- OFF : No title will be displayed on the monitor even if you enter one.
- ON : Press the SET button to the menu.
Use the 4 direction button to move to a desired letter and select the
letter by pressing the SET button. Repeat this to enter multiple letters.
You can enter up to 15 letters.
CLR POS END
►If you move the cursor to CLR and press the SET button, all the
letters are deleted. To edit a letter, change the cursor to the bottom
left arrow and press the SET button. Move the cursor over the letter
to be edited, move the cursor to the letter to be inserted and then
press the SET button.
•D-EFFECT : Select this to adjust the image.
﹣FREEZE : OFF/ON
﹣MIRROR : OFF/MIRROR/V-FLIP/ROTATE
﹣D-ZOOM : x 2.0~64.0. (Analog video no picture when D-Zoom ON)
﹥PIP : ON/OFF
﹥D-Z00M : x 2.0~64.0
﹥PAN&TILT : PIP / D-ZOOM
﹥DEFAULT : Reset the D-ZOOM setting to the factory default.
﹣NEG. IMAGE : Yan can make the negative image effect.
﹣RETURN : (RET/END)
‧ MOTION : If you connect an alarm device to this camera, you can monitor
activity more efficiently, because a signal is generated by the
camera whenever motion detection signal is output through the
MD OUT port.
﹣SELECT : You can select up to 3 area.
﹣DISPLAY : (OFF/ON) You can use ↑, ↓, ←, →
to adjust POSITION and SIZE.
﹣SENSITIVITY : 0 ~ 60.
﹣MOTION VIEW : ON/OFF
﹣DEFAULT : Reset the motion setting to the factory defaults.
﹣RETURN : (RET/END)
‧PRIVACY : Hide an area you want to hide on the screen.
﹣SELECT : You cam select up to 8 area
﹣DISPLAY : Determines weather to use the area selected. You can use
↑, ↓, ←, → to adjust POSITION and SIZE.
﹣COLOR : Determines area color. You can select 16 kinds of color.
﹣DEFAULT : Reset the privacy setting to the factory defaults.
﹣RETURN : (RET/END)
‧LANGUAGE : You can select the menu language according to your
requirement.(ENG / JPN / CH1)
﹣RETURN : (RET/END)
‧RS485 : (Communication adjust menu )
This function sets up the camera communication status when
controlling the camera through an external control device.
﹣CAM ID : 0 ~ 255
﹣ID DISPLAY : Display camera title on the screen.
﹣BAUD RATE : 2400 / 4800 / 9600 / 19200 / 38400 bps.
﹣RETURN : (RET/END)
‧VERTION : 000000
‧RETURN : (RET/END)
•SHARPNESS : As you increase this value, the picture outline becomes
stronger and clearer. Adjust this appropriately depending
on the sharpness of the picture.
•MONITOR : LCD / CRT monitor.
﹣LCD MONITOR :
﹥GAMMA : USER / 0.45 / 0.50 / 0.55 / 0.60 / 0.65 /0.70 / 0.75 / 0.80 / 0.85
/ 0.90 / 0.95 / 1.00 value.
﹥BLUE GAIN : 0 ~ 100.
﹥RED GAIN : 0 ~ 100.
﹥RETURN : (RET/END)
﹣CRT MONITOR :
﹥BLACK LEVEL : -30 ~ +30.
﹥BLUE GAIN : 0 ~ 100.
﹥RED GAIN : 0 ~ 100.
﹥RETURN : (RET/END)
‧DEFECT :
﹣LIVE DPC : Dead pixel compensation on live.
﹣LEVEL : 0 ~ 60.
﹣STATIC DPC : Dead pixel compensation on static.
﹣START : Close the lens then press the enter key.
﹣LEVEL : 0 ~ 60.
﹣SENS-UP : When it is night or dark, the camera automatically
detects the light level and maintains a clear picture
if this mode is activated.
►If you press the SET button in “x3” or “x2” mode, you can
adjust brightness by increasing or decreasing the shutter speed.(x2~x3)
►Note that the higher the zoom level, the brighter the screen, but the more
likely it is that an after-image will appear.
►Although Noise, Spots, and Whitish symptoms may occur in SENSE-UP
operation when the zoom level is increased, this is normal.
•OSD :
﹣TEXT COLOR : You can select 0 to 8 text color.
﹣OUTLINE : ON/OFF
﹣RETURN : (RET/END)
•LSC : (Lens Shielding Compensation)
•NTSC/PAL : You can select NTSC / PAL system.
•RETURN : (RET/END)
•FACTORY : Reset the camera setting to the factory defaults.
•RETURN : (RET/END)
Press the SET button in the EXIT menu to save the current setting and exit the
SET menu.