1
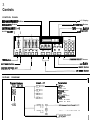
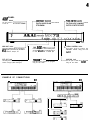
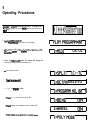
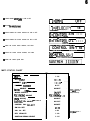
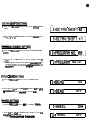
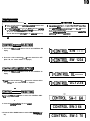
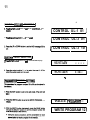
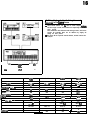
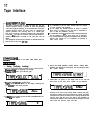
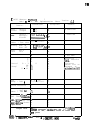
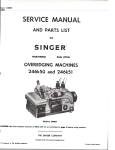
MX73
MIDI MASTER KEYBOARD
,
1
Warning
Precautions
,
Power requirements
power requirements for electrical equipment differ from area to area.
The operating voltage of this machine is preset at the factory according
to It’s intended destination. However. some models are equipped with a
voltage selector. If your machine is so equipped. before connecting,
check to see that the VOLTAGE SELECTOR on the bottom panel is set
to the votfaga for your area.
If n& pbaea set it correctly before pfuggfng in the power cord.
220 v , 50 Hz for Europe except the UK.
240 V, 50 Hz for UK and Australia.
12DV,gDHzforUSAandCanada.
If the VOLTAGE SELECTOR is not set for your
area:
Confirm that the power cord is disconnecbd.
Move the VOLTAGE SELECTOR with
a screwdriver so that the marker is
above the voftags for your area.
What you should know to protect yourself and
the Akai MX73.
WakhdlYcwnJgM~nebcwcehock.
NsvertotJchmephtgwtthwethands.
l AfWayspuWoutbytfrep&gand~the~d.
l Only fet a quafWd professional repair or reassemble the Akai MX73.
An unauUmxized person might touch the internal parts and receive a
serbusefectrkshock.
l Never albw a child to put anything, especially metal, into the Akai
MX73.
.
Lofs protactthe Akai MX73 too.
l Use onfy a houuhdd AC power source. Never use a DC power
wtrce.
l If water is spilted on the Akai MX73. disconnect it and call your
dsabr.
l Make
sure that tfre AKai MX73 is well ventilated and away from direct
sunttght.
l To l
vofd danrags
to the internal circuits and the external surface,
keweww hn fteet htiovea, etc.).
l Avoid using spray type insecticide near the Akai MX73. It can
da- tfte finbh and might ignite suddenly.
l To avoid damaging the finish, never use denaturated alcohol, paint
thinner or other simibr chemicals to ctean the Akai MX73.
l pbcs the Akal MX73 on the fl8t and soffd surface.
TO enjoy the Akal MX73 for a long time, please read this operator’s
manwl thomghfy.
Sharld a pmbbm -ht. write down the
aI perWreM dsta regarding warranty coverage
model and serial numbers and
as welt as a ctear descriptfon of the exktlng troubfe. Then, contact your nearest authortzed Akai
Bewke Bfatkm. or the Service Department of Akai Electric Company,
.Tokp,JWJUt.
FOR CUSTOMERS
IN THE UK
IMFORTANT FOR YOUR SAFETV
The flex supplied with your machine will have hue &ices as shown in the
illustration.
TWO CORE FLEX
IMPORTANT
The wtrea in this mains bad are cotoured in
accordanca
with the folkwing code:
Blue: Neutral
Brown: Ltve
As the cokurs of the wires fn the mains fesU
of thfs appentus may not correspond with the
cotoured markings identifying the terminals in
your plug, proceed as Mows: The wire which
is coloured blue must be connected to the
terminal which is marked with the letter N or
cofouredbtack.
The wire which is coloured brown must be
Ruwll
connected to the terminal which is marked w
madrd)
O.hd
wttfttfrebtterLacokurrdred.
l
Do not connect any wire to the larger ptn marked E or -+ whe
wiring a plug. Enaure that all terminals am securefy tfghtened I
that no loose strands of wfre exist.
CAUTION: TO REDUCE THE RISK OF ELECTRIC SHOCK.
DO NOT REMOVE COVER (OR BACK).
NO USEA-Sf%VtCEABLB PARTS INSIDE.
RERR SERVICING TO OUALIFIED SERVfCE PERSONNEL.
2
Features
Table of Contents
1. The MX73 can be used as a MIDI master control keyboard for
control of all MIDI functions.
2. There are a total of 100 program memories @D-99), and four
areas (I--IV) for each program.
3. Each parameter can be preset for’ the four MIDI output systems (areas I-IV).
4. MIDI messages DO-34 (control change) can be set freely by
four control sliders, and messages 64-95 can be set by four
control switches (ON/OFF).
5. A key velocity function makes it possible to create of a natural
touch response.
Warning.. . . . . . . . . . . . . . . . . . . . . . . . . . . . . . . . . . . . . . . . . . . . . . . . .
Precautions . . . . . . . . . . . . . . . . . . . . . . . . . . . . . . . . . . . . . . . . . . . . . . .
Features . . . . . . . . . . . . . . . . . . . . . . . . . . . . . . . . . . . . . . . . . . . . . . . .
Specifications . . . . . . . . . . . . . . . . . . . . . . . . . . . . . . . . . . . . . . . . . . . . .
Controls.. . . . . . . . . . . . . . . . . . . . . . . . . . . . . . . . . . . . . . . . . . . . .
OperatingProcedures.. . . . . . . . . . . . . . . . . . . . . . . . . . . . . . . . . . . .
Programming . . . . . . . . . . . . . . . . . . . . . . . . . . . . . . . . . . . . . . . . . . . . .
Operations . . . . . . . . . . . . . . . . . . . . . . . . . . . . . . . . . . . . . . . . . . . . . .
Example of Programming Patterns . . . . . . . . . . . . . . . . . . . . . . . .
............................................
TapeInterface
MIDI Implementation chart . . . . . . . . . . . . . . . . . . . . . . . . . . . . . . . .
NOTE:
The MX73 unit does not include a sound source. Use it
in connection with other MIDI-compatible instruments.
Specifications
Keyboerd :
Internal Memory:
Extemat Memory:
Functions:
External Jacks:
Displey:
ExtemelDimenskns:
weight:
73-key 6-octave C scale
1 CID programs
Cassette
interface
Master level
TUNE request ON/OFF
Key transpose
Programmable
control
Changevolumes x4
Programmable
control
change switches x4
Programmable
parameters
Wheel
Bend
MIDI Channel
Program number
Split point
Octave shift
PoLY/MONo
OMNI ON/OFF
Control select
Control switch select
Control number set
Switch number set
Sustain ON/OFF
MIDI OUT x2
EXT OUT x 1
TAPE (IN/LOAD. OUT/SAVE)
PROGRAM UP
SUSTAIN PEDAL
CONTROL (1-4): For foot switch
CONTROL (1-4): For foot control
LC display
l.l52MxllOfH)x364fD)mm
13kg
For improvement purposes. specifications and design are
subject to change without noble.
1
1
2
2
3
5
7
12
14
17
18
3
Controls
CONTROL PANEL
1lBl ?mouI IlUlBEl Button
,
EXT COIITIOL Button
1111 cllAllllE1 Button
C.llTI.1 WOLYMES
MASTER VOLUME
lA?E Interface ButtOn
(l-4)
1
MlKButton
i
TWE Button-
OUTLINE
- PIOQMI SELECT Buttons
I
DIAGRAM
(00-99)
/ElII, Butto
Ares8 (I-IV)
ON
OFF
I
PSrsmaerS
r-
-Mlol cti.
SF’LIT P O I N T
OCTAVE
El
8
I
I
I
8
6
SHIFT
PflOGRAM
BEN0
q
WHEEL
NUMBER
SELECT
SELECT
POLY/MONO
SELECT
OMNI O N / O F F
CONTROL SW. SELECT
- CONTROL VOL. SELECT
&
LC Display
I
.&AR PANEL
POWER Switch
Use this switch to turn the MX73 power
on and off.
-1
Use this control to adjust the contrast
r ~h~~s~~.contro’
MIDI OUT Jacks 1
TAPE IN/OUT Jacks 2
These are output jacks for transmitting
MIDI signals processed by the MX73
to a synthesizer, sampler, etc.
Use these jacks to store memory data
set in the MX73 on a cassette tape or
to recall the data from a cassette tape.
EXT OUT Jack
PROGRAM UP Jack
Use this jack to transmit only program
number changes (MIDI messages).
Use this jack to switch the program
using the foot switch.
Use these jacks to operate the control
[ ~~i~~~~n~~e~~~~itch
I- PEDAL CONTROL Jacks
Use these jacks to control the
CONTROL volume using the fool
swrtch.
L-
SUSTAIN Jack
Use this jack to switch the sustam
using the loot switch.
EXAMPLE OF CONNECTIONS
L.
MX13
MX13
data
5
Operating Procedures
in of&r to pfopedy comprehend the MX73, we suggest you
s e t t h e p a r a m e t e r s a s s h o w n below. c h e c k i n g t h e d i s p l a y a t
eech step.
1. Tumthe-switchON.
“PLAY PFIOGRAM:
00” will appear on the display.
1 PLAYPROGRfIM:00
2. Next press the EDIT button. The indicator will light. “I: MIDI
Cii. 01” will appe~ on the display and the MIDI channel can
tJevatfbd.
1 1:MIDI
1
CH.O1 1
3. Press the FWD/LOAD button. The display will change as
shownbelcweachtimethebuttonispfessed.
0 Checkthesplitpoint.
IsSPLIT
. chscktheoctaveshift.
1:OCTAU SHIFT0
l Check
the poqam
whether
number.
l
Check
pitch bend is ON or OFF.
l
Chack whether the modulation wheel is ON or OFF.
l
CheckwhetherintheMlDlPOLYorMONOmode.
lCf,7C
/ I:PROGRAMNO.00
/ 1:BEND
1 IsWHEEL
1 ItPOLYMODE
/
0 Check whether MIDI OMNI
is ON or OFF.
0 Check thevelocitylevel.
1 1:OMNI
18
j__-..
I:UELOUTY
j
0 Check whether the control switches are ON or OFF
/ IXONTROL S W - - - - /
0 Check whether the control volumes are ON or OFF.
,
___~-- ---
-7
1 IKONTROL U L - - - - )
I
I__-_--..---
.---.
-
--
0 Check the control switch numbers, and value.
r-
0 Check the control volume numbers, and value.
--
0 Check the sustain pedal data.
[SUSTtii-1
1__--__CONTROL
-. - SW-1
__- 64 1
/ CONTROL
88
UL-1
__-~.------_
MX73 STATUS CHART
Parameter
lC-7c
SPLIT POlNT
OCTAVE SHIFT
PROGRAM NUMBER
hD SELECT
.- __WHEEL SELECT
POCY/MONO
Value
l-16
nml cl-l.
SELECT
I
-3w+3
O-127
ON/OFF
ON/OFF
Areas I through IV
can each be set
independently.
PoLY/MoNo O-15
OMNI ON/Off
,-~- -. -~------ - - ---~~-------COIWROL SW. SELECT
ON/OFF
CONTROL VOL. SELEiT
ON/OFF
ON/OFF
SW. No. SET
64-W
VOL. No. SET
o-31
KEY VELOCITY
l-10
SUSTAIN PEDAL SELECT
I-IV
Same for areas I
through IV.
1
j
7
Pmgfaming
l
UH the SELECT button8 (7.4,l and 0) to select the area.
blw
[MIDI CHANNEL SElTlNOj
1. Preu the FWDILOAD
MKncHd@lay.
or BWDNERlFY
button to set to the
1 IrMIDI
CH.O1 1
2. Prom the UP or DOWN button to Wect the desired MIDI
r 1:MIDI
CH. 05
[SPUT~NT sEmNGJ
1. Pmnk FmMOADbunonloutbtho8PLlTdl8phy.
1 DSPLIT
lCc*7c I
1 IWLIT
3. Prom the doairmd key. The curmor will dlw and the
nlmbudth8pnmdk8ywlak~
6. Pm00 tha dmotmd key. The cursor wilt dlaa&r md the
numbud~urandk,8YwYk~.
0 8pJlt polnto cm bo rot for oath of Arms I--W, 80 tha
-spmt--c-8bo
IWLIT
1 w7c
MPLIT
1 c-7c
IWLIT
1 c-3c I
- - - HAVE st4lm scm~ol
1. Press the FWDILOAD button to set to the OCTAVE
display.
SHIFT
-- -. - .- -.
[ ItOCTiiU SHIFT 8 ,
2. Press the UP or DOWN button to set to the de&red octave
value (-3 to +31.
1. Press the FWDILOAD button to set to the PROGRAM NO.
dlsptay.
2. Press the UP or DOWN button to set the program number (0
to 127).
l The program number on the MX73 is compstibte with the
program number on the slave side. Depending on the
equipment. however, the actual -am number may be
different.
1 I~PROGRfVlNO. St3-]
I:PROGRfWl NO.127
IPITCH BEND SETTING]
1. Press the FWDILOAD button to set to the BEND display.
2. Press the UP tbN) or DOWN (OFFI button to set the pitch
bemdoNoroFF.
0 The amount of bend Is adJuated on the stave Ma.
MEND
ON
_ WEND
OFF
WHEEL smlNG
1 . Press the FWDILOAD button to set to the WHEEL dlaptay.
Press the UP (ON) or DOWN (OFF) button to sot the
modulation wheel ON or OFF.
. Adjust tbs modutatton whaet on the stave at&.
1 ItWHEEL
It WHEEL
ON I
OFF
IFOLY/MONO SoTlNGj
1. Pro88 the FWDILOAD
dWw
button to set to the POLY MODE
2. Preu the UP (POLY)
MIDI MODE.
or DOWN (MONO) button to set the
1 IrPOLY MODE
1 DMONO MODE 88 1
iOMNl SEllINGi
ThoMfDfmo&ontheafave8ldecanba8etloeftharOMNlONor
OMNIOFF.
1. PmrtheRVD/LOADbuttontoaettotheOMNldisptay.
2. Pros. tha UP (ON) or DOWN (OFFI button to set the MIDI
[KEY VELOCITY SETTING
1 DOMNI
1 I:OMNI
ON /
1
This 8etstha stran@h of the MX73 key velocity. There are 10
porrlblo 8teps. from 1 for no velocity to 10 for maximum
*@-fmvdodty.
1 . Prwe tha FWD/LOAD button to aet to the VELOCITY diaptay.
WELOCITY
1 WELOCITY
10 I
10
I’
:
0 There are two types of contrdlera:
controf volumes and
control awltches.
0 The control vofumea (l-4) are of the continuous variable
type. Ona MIDI meaaa~e kontrd change) from 0 to 31 can
be set for each control slider.
The aet effect becomes StronQer as the ahder ia moved up.
----- _
0 The~trdswitches(1--4)afedtheON/~~.~n
ON, the LED lbhta.
One MIDI meaaa~~ (controf change) from Q4-95 can ba
aet for eech control awitch.
Theae e&ht progammabfe
controller8 can ba wed whlb
performing for real time oparatii.
I
.
I~~NTR~L swmH SELECTION]
1. Press the FWDILOAD button to aet to the CONTROL SW
display.
2. Press the control switches (l-4) to turn them ON or OFF.
(When ON, the switch number is displayed.)
.
1 MONTROL S W - - - - j
,
I
1 KONTROL SW 1234 1
[CONTROL VOLUME SELECTION 1
1. Press the FWDILOAD button to set to the CONTROL VL
display.
1 IXONTROL UL---- 1
2. Press the control switches (l-4) to turn the vofumea ON or
OFF. (When ON, tha switch number is displayed.1
/ KONTROL U L 1 2 3 4 (
I
[VENTRAL
SWITCH
PRESETTING!
1. Press the FWDILOAD button to aet to the CONTROL SW-l
64 display.
2. Preaa the controf awftcha (l-4) to ba used.
3. Preaa the UP or DOWN button to aet tha MIDI meaaaQa 64 to
95).
- --mCOE(TROLW-1641
CONTROL SW-3 64
1 CONTROL SW-3 70 1
11
[CONTROL VOLUME
PRESETTING 1
I. has the FWDILOAD button to set to the CONTFKx vL-1 01
my.
j CONTROL UL-1 01 ]
2. Roes the amtrot switch3 (l-4) to be used
/ CONTROL UL-3 01 j
1 CONTROL UL-3 10 1
LSUSTAIN PEDAL SELECTION ]
I. Press tha FWDILOAD button to set to the SUSTAIN display.
SUSTAIN
---- ]
SUSTAIN
I II--
1
.
~PARAMErER MEMORY SEmJGj
WRITE PROGRflM -WRITE PROGRAM 12 !
12
Use the follawing
procedure to recall a program In the memory:
1 . Press the BANK buMn. (The LED will light.)
2. Use the SELECT buttons to select the &aired program
number. (00 to OB)
3. When the program number is selected, the number of the
selected program will appear on the display as follows: PLAY
PROGRAM: 12
Itisnow~iblekper(ormusingtheparameters~inthe
memary for program number 12.
When the control switches (l-4) set by the parameter ara
pressed at this time, the sustain data for the connected
sound8curcecanbecontrolledu8ingthefcotswltch.
Also, the control didas (l-4) set by the
usedtocontrolthemoduhticn.~
zF--
PLFlY PROGRftMU2 ~
NOTE: Avoid operating the modulatkn control or master
VOlUlIKJcdkrse#ingthOCQtlbUddidm.
~CHANGIIH~ mE Mm CHANNELI
1. WhentheMlDlCHbuttmCfweswd,theMtDlcftannelfor
eachareaisdispkyed.
0186 16 86
2. With the MlDl CH button ~~tkFWDOrBWD
buttontomovethecumorbtheereebbechanged.
81 86 16 86
3. with the MIDI CH but&n ~txeeatheuPorDowN
bumnlochangetheMtDlchu#rel.
0 Anar~(ItoIV)~n~tumedOFFby~theMIM
CdBWtd~lo’--“.
NOTE: The changed data ir cancelled when the power is
tumedOFForprognmselectbutkm&pmaaad.Uw
the WFttTE button to rtore the changed data in the
-;
81
.WhentheEXTCONTROL butmhprwaod,thenulnberof
the program currently ptaying isdirplayed.
(The LED wtlt
mm-l
068906
01 86 -- 86
1E X T PROGRfW .1.2 .a
13
2. Press the BANK button. then use the SELECT buttons to set
the fnogmm number @O--99).
3. The data for this program number is transmitted once only
from the EXT OUT jack.
NOTE: When the EXT CONTROL button is released, the EXT
OUT jack can be used for the normal MIDI OUT operahon. This program number is not stored in the memory.
~CHAFiGlNG
_._..--- _
_ -__
1 EXT PROGRfiM 16 !
.-
-.--___
_---.---I
- _J
THE PROGRAM NUMBER]
I. When tha MIDI PROGRAM NUMBER button is pressed, the
v number (1 - 127) for each area is displayed.
2. With the MIDI PROGRAM NUMBER button depressed, press
the PWD or BWD button to move the cursor to the area to be
changed.
1271
-0 1- -6 2 4 6 ---2?!!!------
3. With tha MIDI PROGRAM NUMBER button depressed, press
the UP or DOWN button to change the program number.
01 62 46 95
[KEY TRANS BUTTON1
1. A key is transposed by depressing the KEY TRANS button
and pressing the desired key. (The LED will light.)
2. When the KEY TRANS button is pressed again, the LED will
turn off and the key will no longer be transposed.
l The range for transposing is 2Cr -3C-38 with 3C at the
center.
ITUNE mo~J
AS there is no sound source in the MX73. pressing the, TUNE
button transmits a tune request message to the slave side.
When the TUNE button is depressed, “TUNE REQUEST” is disphyed and all the connected MIDI sound sources are tuned.
WE: The TUNE function only operates when the equipment
on the slave side is equipped with a tune request function.
[---<TUNE REQUEST> Al
14
Example of Programming Patterns
lSplitting Keyboard Into 4 Sound Sources]
Example
1. U~AAreaIfortheharmony,AreaIIfocthemdody.andA~
III and IV for effects.
II -Flute
I-Elect&Piano
IV -Orchestra
Ill -Wind
Example
2. Set each area to a percussion instrument and use the
keyboard as a rhythm box.
II -snares
I -Tam-tams
IV -Handclaps
Ill -Chimes
Example
3. This method can also be used to check the tuning, volume. or
tone of the different instruments.
I
I
I
I
MIDI CH.,
SPLIT POINT
,
OCTAVE SHIFT
PROGRAM NUMBER
BEND SELECT
WHEEL SELECT
POLY/MONO SELECT
OMNI ON/OFF
CONTROL SW. SELECT
CONTROL VOL. SELECT
SW. NO. SET
VOL. No. SET
KEY VELOCITY
( S T A I N PEDAL
Areal
vx90
I
I
Ama II
I
Area Ill
I
Ax60
I
Ax73
I
ANaIV
SB12
4
1
1C -28
2
3C -48
3
5C -5B
SC-7c
+1
0
+1
- 2
OFF
ON
OFF
O N
PCXY
_-.
urmm
._.-._-
OFF
O FF
I---
1 ---
12-S W - 1 64
VL-101
12--
POLY
FF
c..
1 -em
12--
s<W-l
64
VL-1 01
VL-2 07
3
ON
VL-207
10
ON
CSF
I
I ONO
M
OFF
1 --1 -_-
S W - 1 64
VL-101
SW-1 64
10
‘10
VL-207
VL-101
VL-207
I
I
15
cl
Area II
S612
Ax60
Area IV
Splitting Keyboard Into 2 and Using for 4
Sound Sources
In this method, two sound sources can be mixed to form a voice,
providing rich possibilities for expression.
Areas I and II: Harmony
I
Areas Ill and IV: Melody
Of
Areas I and II: Base
Areas II1 and IV: Harmony
Many other patterns can also be used.
kw
I, II
Ill,lV
MIDI CH.
SPLIT POINT
vx90
AX60
1
2
1C -228
1C -228
+1
-
OCTAVE
PROGRAM NUMBER
BEND SELECT
WHEEL
POLYMONO
S900
3
3c -7c
___--
+1
__---__
0
-
-
_ _ _ _ _ 3c -7c
- 2
.-.__
OFF
Oii
OFF
ON
OMNI ON/OFF
CON SW. SEL.
POLY
OFF
1 --_
POLY
OFF
I_--
POLY
O F -F - I---
CON VOL. SEL.
SW. NO. SEL.
12--
12--
12--
12--
SW-l 6 4
SW-l 64
SW-l 6 4
VL-1 01
VL-2 0 7
VL-1 01
VL-2 07
10
10
OFF
OFF
VOL. NO. SEL.
KEY VEL.
SUSTAIN PEDAL
-
VL-1 01
VL-2 07
3
ON -
SW-l 64
’
VL-1 01
VL-2 07
10
ON
ON
ON
S612
4
__-___
-
ON
ON
POLY
OFF
l---
-.
16
Splitting Keyboard Into 2, Using 3 sound
.Sources in the Same Areas
0 Three sound sources can bs used to create complex vokes.
As the range is wide, this method is especially suited for
piano sounds.
This method is also effective with strings, brass, and voice
sounds. An ensemble effect can be obtained by slightly offsetting the three pitches.
0 Use Area IV for special sound effects, animal noises for
example.
ic-
l
VXKI
~Axso
sem
shc-7i;
5012
I. IlJll
&mm
Iv
VXBO
Ax60
SQOO
MIDI CH.
SPLIT POtNT
1
1c -56
3
S612
4
OCTAVE
PRO0 RAM
BEND BEL
_--.
+1
2
1C -58
0
1C -5B
+1
6cw7c
-2-
ifo.
’
I
CON SW. SEL.
CON VOL.&L.
SW. NO. BEL.
VOL. No. BEL.
KEY VEL.
WSTAtN PEDAL
ON
I
ON
POLY
WHEEL
POLY/MONO
OMNI ON/OFF
I
1
1 -s12-SW-1 64
VL-101
VL-2 07
3
ON
Cm
ON
ON
POLY
I
I
1
-
I
I
1 --12-SW-1 64
VL-101
M-2 07
10
ON
ON
POLY
FF
c..
l---
II
I
12-SW-1 64
VL-1 01
VL-2 07
10
ON
POLY
OFF
-. .
l---
12-SW-1 64
VL-101
VL-2 07
10
I
ON
I
*
17
Tape Interface
SAVE/VERIFY/LOADThe MX73 is equipped with an input and output jack and tape
interface functions making it possible to store the parameters
set in the program memory on a cassette tape. The tape
interface functions include the save mode for outputing the
program parameters and recording them on a cassette tape,
the verify mode for checking whether the parameters
recorded ori the tape are correct, and the load mode for
resetting the parameters recorded on the tape back onto the
MX73.
The programs can be seved, verified. or loaded either one
bank at a time or all at once (0 to 99).
0 It is advisable to use the same cassette tape and recorder
for both recording and playback.
0 Do not subject the cassette recorder to shock or vibration
when saving or loading, as this will make it impossible to
save or load the parameters correctly.
0 It is advisable to save two copies of the same parameters
(one for backup) in case for some reason one is destroyed.
l It is not advisable to copy the parameters from one tape
recorder onto another, as it is sometimes not possible to
make correct copies.
[~~NNECTI~NS ]
thmcta
cassette recorder to the MX73 TAPE IN/OUT jacks.
l
Saving (Verifying, Loading)
1. Set the connected tape recorder to the record mode
@layback moda for for Vefifying and Loading).
2. Preaa theTAPE button. (The LED will light.)
5. Press the SAVE (VERIFY, LOAD) button. “TAPE: SAV
START” will appear on the display, and counting will star,
after several seconds.
Tf3PEMWE STARTA
1 TAPEGELECT SAL /
3. Press the SAVE (VERIFY, LOAD) button.
“TAPE: SAVE ALL” will appear on the display, indicating that
it is c@aaible to save all the programs.
(
TAPEWWE
ALL
1
4. To save only one bank, press the UP or DOWN button to
select the bank number.
TAPEMUE
9
6. “SAVE END” will appear on the display when all the data has
been saved. (In the verify mode, “GOOD” will be displayed.
/
TAPEWWE
END
1
If there is an error in the verify mode, change the tape
recorder’s output level and perform the verify operation
several times. If there is still an error, change the tape and
save the voice data. Also fill in the data for the parameters on
a data sheet. If data is for some reason destroyed, use this
follow sheet and reset the same voice data.
198
[ MIDI Master KeyBoard
Model MX - 73
MIDI
1
Implementation
Transmitted
Chart
Version :l.O
Remarks
Recognized
Function . . .
Basic
Channel
Default
Changed
1 - 16
1 - 16
Mode
Default
Messages'
Altered
X
MODE 1.2-3.4
OMNI ON/OFF M.P x
**************
X
Note
Number : True voice
Velocity
After
Touch
Pitch
0 0 - 120
**************
Note ON
Note OFF
Key's
Ch's
Bender
Control
Change'
9nH V=l-127
9nH V=O ,8nH
X
X
x
X
X
0
X
X
X
X
X
X
X
X
Prog
Change : True #
0 0 - 127
**************
X
X
System Exclusive
X
X
System : Song Pos
: Song Se1
Common : Tune
X
5
X
X
x
X
x
x
0
x
X
X
X
X
X
X
X
System
:Clock
Real Time :Commands
Aux, :Local ON/OFF
:A11 Notes OFF
Mes- :Active Sense
sages:Reset
Notes
MIDI EXT
Output Jack
memorized
X
X
0
memorized
X
X
1 0
4 0
7 0
8 - 3 1
64
0
65
6 6 - 95
::
l
X
7 bit RESO
Modulation
Foot
Controller
Volume
Continuous
Sustain foot sw
Portament sw
Switches(on/off)
The MIDI EXT output jack transmits only Prog
mange messages (O-99) when the EXT CONTROL
switch is "ON", otherwise works as other MIDI.
OUT jacks
Model : OMNI ON, POLY
'Mt+le 3 :oMN1 OFF, POLY
Mode 2 : OMNI ON, MONO
Mode .I :OMNI OPP,MONO
0 : Yes
X
:
no