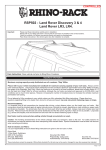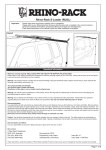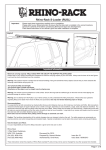
1
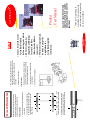
Remove pivot bolts and lift ActionRack off
your vehicle.
Turn ActionRack over, extend slides out.
With clean rag wipe old grease from eight
(8) different surfaces in which they ride.
(See Picture)
slide
back
and
forth
Move
several times then repeat cleaning process.
Using an exterior water resistant grease,
add the new grease onto the surfaces
where the ball bearings ride. (see picture)
•
•
•
•
Slide Lubrication
Depending on the amount and the climate
where you play/work, it will be necessary to
apply new grease to slides and locks
Care and Maintenance
Repeat on the other slide
•
Remove bolt from rear of lock and take the
pawl off. Pull lock out from front of housing
clean/remove old grease and crud.
Insert and turn key so locking mechanism
can be cleaned
Add thin layer of new grease
•
•
•
Lock lubrication
Move slide back and forth while working the
grease into the ball bearing tracks. When the
slide is sliding freely, wipe excess grease
from slide
•
ACTIONRACK
• Always be sure that your
ActionRack is locked
before moving your vehicle
• Do Not Overload. See
suggested Load Ratings
for your Load Bars.
(bikes, kayaks, ladders,
canoes, skis)
• While lowering to unload,
be ready to accept the
weight when the
ActionRack is pulled
towards you.
Safety
R
Thank you for purchasing an
ActionRack. Take a moment and
read to ensure safe and long lasting
use of your ActionRack.
ActionRack’s LOADING POSITION IS
ADJUSTABLE TO SIMPLIFY LOADING
AND UNLOADING OF YOUR ROOF TOP
EQUIPMENT
Product
User Manual
ACTIONRACK
ActionRack should
ALWAYS be locked when
driving.
♦Your
aware of the weight of
the equipment being
loaded as it may cause
the ActionRack to flex
downward into the side of
you vehicle. If necessary ,
move the pivot pins to the
next hole.
♦Be
FOLLOW THE
WEIGHT GUIDELINES OF
YOU LOAD BARS, DO NOT
DROP YOUR EQUIPMENT
ON THE ActionRack, IT’S
STRONG, HOWEVER IT CAN
BE DAMAGED.
♦ALWAYS
Guidelines
your ActionRack
nor your load bars, are
indestructible! You should
always hold the weight
and gently lower the
ActionRack down to the
Down Position. Also when
raising your ActionRack
feel when the load is up at
its Pivot Point. Let it gently
lower down into the
latching blocks. Don’t
slam the ActionRack into
the locking position as this
could cause the latching
blocks to move on the
load bars and make
locking difficult.
♦Neither
lowering the
ActionRack don’t forget
GRAVITY . You will be
holding the weight of the
equipment once it gets
past the Pivot Point.
♦When
Unlock both locks by
inserting the key and turning
counter clockwise to the
vertical position. Grab the
bar with both hands and pull
toward you. When you have
pulled the ActionRack
approximately half way, the
far end of the slide will
release from the latching
blocks. Now let the
ActionRack start to pivot
down, continuing to pull and
pivot, until the ActionRack
is down in the loading and
unloading position. Set your
equipment on the
ActionRack and secure
properly to manufacturing
guidelines. Next ……
HOW TO USE THE
ACTIONRACK
ACTIONRACK
Now remember, it is up to you to
lift the weight of the equipment
you’ve loaded. Grab the handle
with both hands, then start lifting
the ActionRack. At the same time
you also want to start sliding the
ActionRack away from you,
toward the center of your vehicle.
As the weight of what you are
lifting reaches the pivot point, it
will take less effort. The far end of
the slides will drop into the
latching blocks. Now push the
ActionRack in the remainder of the
way toward the center of your
vehicle.
CAUTION: NEVER SLAM THE
ActionRack INTO THE
LATCHING BLOCKS AS THIS
MAY CAUSE THEM TO MOVE
ON THE LOAD BARS. A
GENTLE PUSH IS ALL THAT IS
REQUIRED TO PUSH THE
ActionRack INTO THE
LOCKING POSITION. Now turn
each lock clockwise to latch, then
lock and go.
….GET-IT-UP