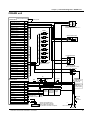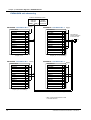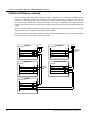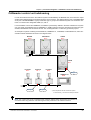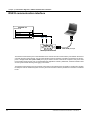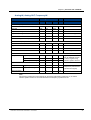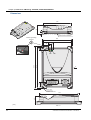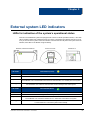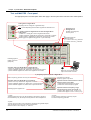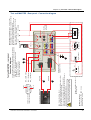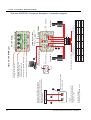
1
© Copyright HYDRATRONICS AB, 2005-2006
Hydratronics CANmaster® Technical Data & Installation - User Manual
This manual, as well as the software for Hydratronics CANmaster control systems, is furnished under license and may only be used or copied in accordance with the terms of such license. The information in
this manual is furnished for informational use only, is subject to change without notice, and should not be
construed as a commitment by Hydratronics AB. Hydratronics AB accepts no responsibility for possible
errors or inaccuracies that may appear in this manual. All trademarks in this manual are properties of their
respective owners. Hydratronics and Hydratronics CANmaster are registered trademarks of Hydratronics
AB.
____
Edition 04, Nov. / 2006
Printed document, Part No: 5011 0003-GB
Hydratronics AB
SE 191 81 Sollentuna
Sweden
www.hydratronics.com
Hydratronics AB is a company within the KG Knutsson AB company group, Sweden.
CANmaster Technical Data & Installation - User Manual
Contents
About this manual
General information ............................................................................................. 1
CANmaster Control- and Test units. Part Numbers. ......................................... 1
1.
Safety & OEM responsibility
Basic safety requirements for the electric system design ............................... 3
Recommended warning signs on the machine ................................................. 4
2.
General system description
System setup ........................................................................................................ 5
CAN-bus data commmunication ......................................................................... 6
Control units ......................................................................................................... 6
Master ............................................................................................................................. 6
Crane ............................................................................................................................... 7
Expansion ........................................................................................................................ 7
Terminal T2 ..................................................................................................................... 7
Joystick H5-S50 ............................................................................................................... 8
Power supply ........................................................................................................ 8
3.
Installation guidelines
Basic requirements .............................................................................................. 9
Chair or Door safety switch ............................................................................................. 9
Emergency stop .............................................................................................................. 9
Grounding principles ........................................................................................................ 9
Enclosure class & Mounting position .............................................................. 10
Wiring guidelines ............................................................................................... 10
4.
Connection diagrams
General ................................................................................................................ 11
MASTER unit ....................................................................................................... 12
MASTER unit - Pressure sensors with voltage or current output .................................. 13
MASTER unit - Accelerator pedal, potentiometers & temperature sensor .................... 14
CRANE unit ......................................................................................................... 15
CRANE unit addressing ................................................................................................. 16
EXPANSION unit ................................................................................................. 17
EXPANSION unit adressering ....................................................................................... 18
TERMINAL T2 ...................................................................................................... 19
JOYSTICK H5-S50 .............................................................................................. 20
JOYSTICK H5-S50 unit addressing .............................................................................. 21
CAN-bus/CANopen network .............................................................................. 22
CANmaster control unit addressing ................................................................. 23
RS232 communication interface ....................................................................... 24
5.
PIN ASSIGNMENT
MASTER unit - Connector A .............................................................................. 26
MASTER unit - Connector B .............................................................................. 27
CRANE unit Connector A .................................................................................. 28
CRANE unit - Connector B ................................................................................ 29
EXPANSION unit - Connector A ........................................................................ 30
EXPANSION unit - Connector B ........................................................................ 31
TERMINAL T2 Connector ................................................................................... 32
CANmaster Technical Data & Installation - User Manual
i
JOYSTICK H5-S50 Connector A ........................................................................ 33
JOYSTICK H5-S50 Connector B ........................................................................ 33
6.
Connectors & Cables
MASTER, CRANE & EXPANSION ...................................................................... 35
Connector pin location ...................................................................................................35
Mating connectors - AMPSEAL® ...................................................................................36
Assembly instructions- AMPSEAL® connector ..............................................................37
MASTER, CRANE & EXPANSION - Recommended cable type ...................................39
TERMINAL T2 ...................................................................................................... 40
Connector pin location ...................................................................................................40
Mating connector & contacts ..........................................................................................40
Recommended cable type .............................................................................................41
JOYSTICK H5-S50 .............................................................................................. 42
Connector pin location ...................................................................................................42
Mating connector & contacts ..........................................................................................42
Recommended cable type .............................................................................................43
7.
Electrical data
General ................................................................................................................ 45
Maximum operating data ................................................................................................45
Analogue inputs .............................................................................................................45
PWM outputs on Master, Crane and Expansions units ..................................................45
MASTER .............................................................................................................. 46
Power supply ..................................................................................................................46
Data communication ......................................................................................................46
Microprocessor and built-in functions .............................................................................46
Analog-IN, Analog-OUT, Frequency-IN .........................................................................47
Digital-IN, Digital-OUT ....................................................................................................48
PWM-OUT ......................................................................................................................48
Environmental & Mechanical data ..................................................................................49
CRANE ................................................................................................................. 50
Power supply ..................................................................................................................50
Data communication ......................................................................................................50
Microprocessor and built-in functions .............................................................................50
Analog-IN .......................................................................................................................51
Digital-IN, Digital-OUT ....................................................................................................51
PWM-OUT ......................................................................................................................52
Environmental & Mechanical data ..................................................................................52
EXPANSION ........................................................................................................ 53
Power supply ..................................................................................................................53
Data communication ......................................................................................................53
Microprocessor and built-in functions .............................................................................53
Analog-IN, Analog-OUT, Frequency-IN .........................................................................54
Digital-IN, Digital-OUT ....................................................................................................54
PWM-OUT ......................................................................................................................55
Environmental & Mechanical data ..................................................................................55
TERMINAL T2 ...................................................................................................... 56
Power supply ..................................................................................................................56
Data communication ......................................................................................................56
Microprocessor and built-in functions .............................................................................56
DIGITAL-IN, DIGITAL-OUT ............................................................................................57
Environmental & Mechanical data ..................................................................................57
ii
CANmaster Technical Data & Installation - User Manual
JOYSTICK H5-S50 .............................................................................................. 58
Power supply ................................................................................................................. 58
Data communication ...................................................................................................... 58
Microprocessor & built-in functions ................................................................................ 58
Analog-IN ...................................................................................................................... 59
DIGITAL-IN, DIGITAL-OUT ........................................................................................... 59
PWM-OUT ..................................................................................................................... 59
Environmental & Mechnical data ................................................................................... 60
8.
Dimensions & Mounting
General ................................................................................................................ 61
MASTER, CRANE & EXPANSION ...................................................................... 61
Dimensions .................................................................................................................... 62
Mounting ........................................................................................................................ 63
TERMINAL T2 ...................................................................................................... 64
Dimensions .................................................................................................................... 64
Panel mounting ............................................................................................................. 65
JOYSTICK H5-S50 .............................................................................................. 66
Dimensions .................................................................................................................... 66
Mounting ........................................................................................................................ 66
9.
External system LED indicators
LEDs for indication of the system’s operational status ................................. 67
LED flash frequency ...................................................................................................... 68
Example of fault indication ............................................................................................. 68
10. Test units
General description ............................................................................................ 69
Test units - Connection diagram overview .................................................................... 71
Test unit MASTER - Front panel ................................................................................... 72
Test unit MASTER - Rear panel - Connection diagram ................................................. 73
Test unit CRANE - Rear panel - Connection diagram ................................................... 74
Test unit EXPANSION - Rear panel- Connection diagram ............................................ 75
Test unit JOYSTICK- Frontpanel, Rearpanel - Connection diagram ............................. 76
Test unit TERMINAL - Front panel, Rear panel - Connection diagram ......................... 77
Spare parts .......................................................................................................... 78
Dimensions ......................................................................................................... 78
11. Sensors
Calibration values for analog sensors ............................................................. 79
Pressure sensors ........................................................................................................... 79
Electric accelerator pedal (speed pedal) with VDO-potentiometer ................................ 80
Electric accelerator pedal (speed pedal) with Hall-effect sensor ................................... 80
Temperature sensor ...................................................................................................... 81
Non-linear sensors ........................................................................................................ 82
12. Application examples
Forwarder - All-terrain timber transporter ....................................................... 83
Description of the machine type .................................................................................... 83
CANmaster control units ................................................................................................ 84
Output list - main functions ............................................................................................ 85
Control unit placement ................................................................................................... 86
Distribution of I/Os ......................................................................................................... 87
CANmaster Technical Data & Installation - User Manual
iii
About this manual
General information
This manual is designed to be a comprehensive reference tool for vehicle OEM design and engineering
personnel. The manual provides technical data, general specifications, I/O configuration, environmental
ratings, connection diagrams and installation details for the electronic control units in the CANmaster system. It is one of two primary sources of CANmaster product technical information. The other source is the
CANmaster PC-Tool User Manual.
CANmaster Control- and Test units. Part Numbers.
This manual includes detailed descriptions and connection diagrams for CANmaster components listed
in the table below:
Component
Part No.
MASTER-unit
5010 3000
CRANE-unit
5010 3500
EXPANSION-unit
5010 4000
TERMINAL T2
5010 1000
JOYSTICK H5-S50
5010 2500
TEST unit - MASTER
5010 3050
TEST unit - CRANE
5010 3550
TEST unit - EXPANSION
5010 4050
TEST unit - JOYSTICK
5010 2550
TEST unit -TERMINAL
5010 4550
Comment
*1)
*1) Prepared connection cables for the test units, see Chapter 10, page 78.
CANmaster Technical Data & Installation - User Manual
1
Chapter 1
Safety & OEM responsibility
The OEM of the machine or vehicle in which CANmaster control system components are installed has
the full responsibility for all consequences that might occur. Hydratronics AB has no responsibility of any
consequences, direct or indirect, caused by failures or malfunctions. Hydratronics AB has no responsibility for any accidents caused by incorrectly mounted or maintained equipment and does not assume
any responsibility for CANmaster components being incorrectly applied or the system being programmed
in a manner that jeopardizes safety.
Basic safety requirements for the electric system design
Installation instructions in this manual appearing together with the safety/alert symbol must be followed.
These instructions are of vital importance for the system´s basic functionality, reliability as well as product
safety.
An emergency stop switch must be installed in the supply voltage to the control system, placed in a position that is easily accessed from the ordinary operator’s station. When activated, the switch must cut
the voltage to all control system components with a persistent mechanical circuit breaker function.
A chair or door activated switch must be installed to block all the machine’s electronically controlled functions if the operator should leave the ordinary operator’s station.
CANmaster Technical Data & Installation - User Manual
3
Chapter 1 | Safety & OEM responsibility - Recommended warning signs on the machine
Recommended warning signs on the machine
Following warning signs, intended as information for the operators and service personnel is recommended to be fastened to the machine and to be printed in the service manuals:
In the event of system errors, the electronics in the machine system can cause unforeseeable
manoeuvres in controlled machine components. Ensure that no unauthorised persons are in
the vicinity of the machine’s work area when the diesel engine is running.
The machine may only be controlled from the ordinary operator’s station.
The control system power supply must be cut completely during all work with the machine system
cables, during welding work on the machine chassis, and when fast-charging the batteries that
power the machine’s electronic control system. Disconnect both the positive and negative cables
from the batteries.
Disconnect both terminals!
Do not use high pressure cleaning in areas
close to the electronic installations.
4
CANmaster Technical Data & Installation - User Manual
Chapter 2
General system description
Hydratronics CANmaster® is a CAN-bus based electronic control system designed to control and monitor
complete transmissions and working hydraulic systems in mobile machinery.
The system is comprised of separate electronic units with a Master unit as the overall control unit in the
system. Communication between the electronic units takes place via the CAN-bus/CANopen protocol
standard. Communication with external systems is via CAN-bus in accordance with SAE J1939 protocol
standard. Two extra CAN ports are available in the system which can be used for special applications
with demands on CAN-bus communication with customer-specified CAN protocols.
The minimum CANmaster system comprises a MASTER unit and a TERMINAL T2. The system is complemented according to I/O needs with the EXPANSION, CRANE, and JOYSTICK H5-S50 units.
System setup
The general system setup for a CANmaster control system comprising a MASTER-unit, a CRANE-unit,
a TERMINAL T2, and two JOYSTICKS, type H5-S50 is shown in the diagram below:
Hydratronics CANmaster® control system with CAN-bus data communication
MASTER-unit
CRANE-unit
CAN-custom spec.
CAN-SAEJ1939
JOYSTICK
H5-S50
TERMINAL T2
CANopen
120 Ω
signal CAN_H
signal CAN_L
120 Ω
+24V
GND
RS232 interface, 9-pin D-sub for
software download & system service
CANmaster Technical Data & Installation - User Manual
+
CAN - Controller Area Network
12 - 24 VDC
5
Chapter 2 | General system description - CAN-bus data commmunication
CAN-bus data commmunication
CAN-bus is a communication bus where data information is transferred serially between separate control
units. The bus is comprised of two wires, designated CAN_L and CAN_H. All electronic units in the system are connected in parallel to the CAN-bus, with the outer ends of the wires connected to two 120 Ω
terminating resistors. Connecting the electronic units to the data bus in parallel makes for a simple wiring
and the communication possibilities between the units does not depend on unit placement in the network.
In the CANmaster control system, the Master unit comprises the central system unit. The Master unit’s
basic program contains data about which units are included in the system and which addresses they
have. The controlled machine’s application program and the program’s configuration parameters are also
stored in the Master unit and this unit controls and monitors all other units in the system.
Each electronic control unit contains a microprocessor with a built-in CAN-controller, which sends and
receives data via the CAN-bus and each unit have a unique network address. The information sent out
on the CAN-bus can be “monitored” by all electronic units in the system but each individual unit only processes data with that particular unit’s address and the special data sent out as general ‘broadcast messages’ from the Master unit to all system units.
The CANmaster control system uses a derivative of the CANopen protocol standard between the control
units with a connection speed of 500 kbps. The Master unit also has a separate CAN port for integrated
control and monitoring of external systems, such as electronically controlled diesel engines and gearboxes that use CAN-bus in accordance to SAE J1939 protocol standard. Two extra CAN ports are available
through the Expansion unit and the Terminal T2, which can be used for special applications with demands
on CAN-bus communication with customer-specified CAN protocols.
Control units
Master
The Master unit comprises the central control unit in a CANmaster system. The Master unit contains the
control system’s basic program, the controlled machine’s application program, and the program’s configuration parameters. The communication between the Master unit and other CANmaster units takes place
via the CANopen protocol standard.
A separate CAN port is included with CAN-bus communication according to SAE J1939 protocol for integrated control of electronically controlled diesel engines and gearboxes.
The Master unit contains 4 double-acting PWM outputs for controlling 8 proportional solenoid valves with
a current capacity of 0-1600 mA and 23 I/Os for analogue and digital signals, of which 4 are frequency
inputs for measuring rpm. Thirteen I/Os are user-configurable as alternative input or output. The configuration is determined during the initial programming process when setting up the I/O table for the unit using the CANmaster PC-Tool software. This increases flexibilty and the possibilty to use the same control
unit for different type of machine applications.
The RS232 communication port on the Master unit is used as the main communication port between the
control system and the system service-computer. A permanent RS232 9-pin D-sub female connector
should be mounted in the machine for this purpose.
The Master unit contains a central error log where all errors that occur in the entire system are saved;
errors programmed as error levels in the application program, errors in the basic software and errors in
the electronic hardware for each connected control unit. Unit address, error type, time stamp and date
are registered for simple and effective service follow-ups. In order to view all datas in the error log, a service computer with installed CANmaster PC-TOOL software must be connected to the RS232 port on the
Master unit. A summary of the error log, but with less information can also be viewed on the Terminal.
6
CANmaster Technical Data & Installation - User Manual
Chapter 2 | General system description - Control units
A CANmaster system must always contain one MASTER unit and the minimum system includes the Master unit and a Terminal.
Crane
The CRANE unit is specially adapted to the control of complex groups of working hydraulics systems,
such as the complete valve system for a crane, hoisting crane or excavator arm, and contains 8 doubleacting PWM outputs for controlling 16 proportional solenoid valves with a current capacity of 0-1600 mA.
The unit also contains five analogue inputs that can be used, for example, in the measurement of load
weights, positions, and angles when the application program includes weight measurement, overload
protection, or similar functions.
The CRANE unit can be placed in the vicinity of the valve systems irrespective of the environment, which
keeps cable lengths for the power outputs between the control unit and the valves to a minimum.
A CANmaster system can be configured with 0 - max. 4 CRANE units.
Expansion
The EXPANSION unit is mainly used to supplement the system with additional analogue inputs, digital
inputs, and digital outputs. The expansion unit also includes an output for the control of a servomotor.
The expansion unit, like the Master unit, has 4 double-acting PWM outputs for controlling 8 proportional
solenoid valves with a current capacity of 0-1600 mA. A number of the analogue inputs and digital outputs
can be configured as alternative inputs or outputs in the same way as for the Master-unit. The expansion
unit also contains a separate CAN-port that can be used if there is a need for integrated control of external
systems with customer-specified CAN protocols.
A CANmaster system can be configured with 0 - max. 4 EXPANSION units.
Terminal T2
The TERMINAL T2 is included in a CANmaster system as an important component in communication between the user and the control system. The terminal is used in daily work to display the machine’s operating data, to select an operating mode, and to display error messages and operational warnings. Error
messages appear as separate “pop-ups” on the screen.
Terminal T2 display showing main operating data for
the diesel engine and transmission.
The terminal is equipped with a white-LED backlit 240 x 128 pixel LCD display with adjustable brightness
and contrast. A photocell on the front panel of the terminal provides automatic brightness adjustment according to ambient lighting. Terminal functions are accessed via a standard menu structure wherein navigation between menus and changes to parameters are made using backlit membrane pushbuttons.
Instructions for the different menus are shown on the display.
The terminal can also be used as an advanced service tool for adjusting parameters, calibrating sensors,
troubleshooting inputs and outputs, and retrieving the central system error log from the Master unit. It is
CANmaster Technical Data & Installation - User Manual
7
Chapter 2 | General system description - Power supply
possible to show signal values for all inputs and outputs in the entire control system and to log selected
signals with a graphic display when a separate service computer is not available.
All terminal functions, the basic menu structure and screen visuals, including function symbols, can be
customized to suit the machine application and user with the aid of the Terminal Design program, which
is included as a part of the CANmaster PC TOOL software package.
Terminal T2, like the Expansion unit, contains a separate CAN-port that can be used if there is a need for
integrated control of external systems with customer-specified CAN protocols. The terminal is also fitted
with 3 digital I/Os that can be configured as alternative digital inputs or digital outputs for the connection
of indicator lamps or on/off switches.
A CANmaster system can only contain one Terminal T2.
Joystick H5-S50
The JOYSTICK H5-S50 unit is included as a main component in the CANmaster control system. This
control functions as a combined standard triple-axis joystick and an advanced I/O unit in the system. All
signals from the joystick are transferred via CAN-bus data communication to the system’s MASTER unit.
In addition to the three built-in analogue joystick axes X/Y/Z, with 10-bit resolution, 10 digital inputs and
2 analogue inputs are also available for the connection of external on/off switches, potentiometers, and
linear levers. Two of the digital inputs are also equipped with multiple-function capability and can be used
as alternative low power digital outputs or low power PWM outputs for such things as indicator lamps or
analogue display instruments. The power supply for the external inputs is available through the joystick
connector, with two separate +5V outputs, one for analog input devices and one for digital input devices.
The ability to connect a large number of control switches and separate potentiometers to the joystick for
direct transfer to the system’s MASTER unit via the CAN-bus enables the cabling around the operator’s
seat to be kept to a minimum compared to conventional technics where each control must be connected
separately to the control system’s central control unit.
A CANmaster system can be configured with 0 - max. 4 JOYSTICK H5-S50 units.
Power supply
Each control unit in the CANmaster control system is powered separately. The units are designed to operate with a 12 or 24 VDC power supply voltage within the range 11- 30 VDC. See Chapter 7 for maximum
required current for each control unit.
8
CANmaster Technical Data & Installation - User Manual
Chapter 3
Installation guidelines
Basic requirements
Chair or Door safety switch
A chair or door activated switch must be installed to block all the machine’s electronically controlled functions if the operator should leave the ordinary operator’s station.
Emergency stop
An emergency stop switch must be installed in the supply voltage to the control system, placed in a position that is easily accessed from the ordinary operator’s station. When activated, the switch must cut
the voltage to all control system components with a persistent mechanical circuit breaker function.
Grounding principles
(-) GND
Control unit A
On/off-valves
(-) GND
(-) GND
(-) GND
Other components (-) GND
(-) GND
with separate
(-) GND connection (-) GND
Common (-) GND point
for component group
Control unit A
Common (-) GND point
for complete system
(-) GND
Control unit B
On/off-valves
(-) GND
(-) GND
(-) GND
Battery
Other components (-) GND
(-) GND
with separate
(-) GND connection (-) GND
(-) GND
Control unit C
On/off-valves
(-) GND
(-) GND
(-) GND
Do not use chassis grounding
System
components
Other components (-) GND
(-) GND
with separate
(-) GND connection (-) GND
CANmaster Technical Data & Installation - User Manual
9
Chapter 3 | Installation guidelines - Enclosure class & Mounting position
Enclosure class & Mounting position
The MASTER, EXPANSION and CRANE units use the same robust die-cast aluminium housing with Oring sealed cover and heavy duty AMPSEAL® connectors. The units can be placed freely on the machine,
but must be protected from direct soaking with water, mechanical knocks, impact and powerful high-frequency vibrations. In order for air to be exchanged between the enclosure and the surroundings without
water or impurities intruding, a GORE-TEX® membrane is mounted in the bottom cover and this must not
be blocked. The enclosure has an enclosure class equivalent to IP65 and is dust and waterproof.
The TERMINAL’s enclosure is made from robust aluminium with moulded end-pieces of ABS/PC plastic.
The display is protected by a plexiglass cover and protective film. The terminal shall be placed in a protected place by the ordinary operating position and must not be directly exposed to water. Enclosure class
IP40.
The enclosure for the JOYSTICK H5-S50 unit is made from a robust, deep drawn, aluminium enclosure
with rubber bellows seals. It is protected against direct intrusion from water and dirt in its standard mounting position with the connector facing down. The joystick shall be placed in a protected location in the
machine’s operator’s cab. Enclosure class IP52.
Wiring guidelines
10
•
Use 85º C wire with abrasion resistant insulation. 105º C wire should be considered near hot surfaces.
•
The cables for data communication CAN_L and CAN_H must be twisted-pair in order to reduce the
risk of electromagnetic interference from external systems. For cables longer than 5 m, the use of
shielded twisted-pair cable is recommended. See section ‘Connectors & Cables’ in this manual.
•
Ensure that the stripping of wires and crimping of contacts is carried out in accordance with the instructions provided by the connector manufacturer. Never attach more than one wire to each connector pin.
•
Run all cables for the control units separately from other cables on the machine that can generate
electromagnetic interference, such as communication equipment, antenna cables, alternators etc.
Avoid long stretches of loose cable and if possible run the cables in interference suppressing steel
tubing, beams etc. that have good contact with the machine chassis.
•
Ensure that the cables for the electronic units are installed so that water cannot run along the cables
and into the connectors.
•
Ensure that the machine’s basic power supply source (battery/alternator and main supply wires)
have enough capacity to supply the correct voltage-level for the control units in the worst case.
Measure the voltage supply at low ambient temperatures with all electric powered equipment turned
on, all working lights, aircondtioning, fans etc. including all optional electric powered equipment. Run
the machine in normal operation and test all functions with all the extra loads activated.
•
All electronic units in the CANmaster control system fulfil EMC requirements in accordance with the
applicable standard for individual components in mobile machinery (95/54/EC-automotive standards). Be sure to follow the applicable general instructions for the design of the machine's electrical
system and cabling so that the machine as a whole can be EMC-approved in accordance with the
EU directives for the appropriate machine class. Correct groundings for the main electrical system
and for the electronic control system is of vital importance for both the EMC-approval as well as the
basic function of the control system.
CANmaster Technical Data & Installation - User Manual
Chapter 4
Connection diagrams
General
The wiring diagrams included in this chapter give examples of how sensors, potentiometers and control
levers are to be connected to the control units and how the power supply for each unit should be arranged.
All control units must have a separately fused power supply and the (-) connection from each control unit
group of components must be connected to a (-) point that is common for the entire system. CANmaster
control units may not be grounded to the chassis. See also Chapter 3, section "Grounding principles" on
page 9.
Note that the Master unit and the Expansion unit each have two separate power supply connections. One
of the connections only supplies the control unit's internal electronics while the other supplies the power
outputs. These components are separated in the control unit and they must be provided with separate
fuses so that the power supply to the control unit's electronic components does not cut out if a power output becomes short-circuited and the external fusing cuts the power supply.
Connection examples are given for each control unit and for how the addressing is done when using several control units of the same type. At the end of this chapter is an illustration of how the CAN-bus/CANopen is connected depending on the types of control units. There is also an example showing the
addressing of a complete system with different types of control units, and how the connection is to be
made between a service computer and the RS232 communication port on the Master unit.
CANmaster Technical Data & Installation - User Manual
11
Chapter 4 | Connection diagrams - MASTER unit
MASTER unit
Connector A
Analog-IN 04
01
Analog-IN 05
02
Analog-IN 06
03
Analog-IN 14*/Digital-IN 00
04
Analog-IN 13*/Digital-IN 01
05
Frequency 00/Digital-IN 10
06
Digital-OUT 00
07
Digital-OUT 01
08
PWM-OUT 00(+)
09
PWM-OUT 01(+)
10
PWM-OUT 02(+)
11
PWM-OUT 03(+)
12
Analog-IN 07
13
Analog-IN 08
14
Analog-IN 12*/Digital-IN 02
15
Analog-IN 11*/Digital-IN 03
16
Frequency 01/Digital-IN 11
17
Digital-OUT 02
18
Digital-OUT 03
19
PWM-OUT 00 RETURN
20
PWM-OUT 01 RETURN
21
PWM-OUT 02 RETURN
22
PWM-OUT 03 RETURN
23
Analog-IN 09
24
Analog-IN 10/Analog-OUT00
25
Frequency 02/Digital-IN 04
26
Frequency 03/Digital-IN 05
27
Digital-OUT 04/Digital-IN 06
28
Digital-OUT 05/Digital-IN 07
29
Digital-OUT 06/Digital-IN 08
30
Digital-OUT 07/Digital-IN 09
31
PWM-OUT 00(-)
32
PWM-OUT 01(-)
33
PWM-OUT 02(-)
34
PWM-OUT 03(-)
35
Connector B
Chassis ground
01
Vbatt GND
02
-Vref Sensor GND
03
+Vref Sensor (+5V)
04
+Vbatt Power OUT
05
CAN1_L
06
CAN1_H
07
CAN1_L
08
CAN1_H
09
CAN2_L
10
CAN2_H
11
RS232 GND
12
RS232 Rx
13
RS232 Tx
14
+5V
0V
Potentiometers
1-5 kΩ
RΩ
1-5 kΩ
RΩ
Pressure sensor
3-wire voltage type
1- 5 V. Supply 5V
P
S+
GND
UB+ U
On/Off-switches
+Vref
+5V
-Vref
GND
RPM / Hz
On/off-valves
D-OUT00
Inductive
sensor
(-) PWM00(+)
(-) PWM01 (+)
D-OUT01
RPM / Hz
1
4
D-OUT02
3
D-OUT03
Square
wave
220Ω
(-) PWM02(+)
D-OUT04
(-) PWM03 (+)
PWM
proportional
valves
Temp. sensor
ST-20M
D-OUT05
to
D-OUT06
D-OUT07
1A
Emergency
stop
(-)
Key switch
Common
GND point for
Master unit
15A
OTHER CANMASTER UNITS
+12V/+24V
CRANE
GND
CAN-bus EXPANSION Power
CANopen JOYSTICK supply
TERMINAL
Common
GND point for
control system
External systems
CAN-bus SAE J1939
Main fuses
Battery
disconnect
Shield GND
straight serial cable
(DB9M-DB9F pin to pin)
(-)
5 4 3 2 1
9 8 7 6
(*) Note: Analog INPUT 11-14: Low impedance inputs.
12
1-axis control lever
S+
1-5 kΩ
2A
Vbatt SYS
Accelerator pedal
with potentiometer
incl. safety switch
4.7 kΩ
Housing GND terminal
RS232 com. port
9-pin D-sub
female conn.
CANmaster PC-TOOL
System service &
SW download/retrieve
+12 V / +24 VDC
CANmaster Technical Data & Installation - User Manual
Chapter 4 | Connection diagrams - MASTER unit
MASTER unit - Pressure sensors with voltage or current output
Connector A
Analog-IN 04
01
Analog-IN 05
02
Analog-IN 06
03
Analog-IN 14/Digital-IN 00
04
Analog-IN 13/Digital-IN 01
05
Freq. 00/Digital-IN 10
06
Digital-OUT 00
07
Digital-OUT 01
08
PWM-OUT 00(+)
09
PWM-OUT 01(+)
10
PWM-OUT 02(+)
11
PWM-OUT 03(+)
12
Analog-IN 07
13
Analog-IN 08
14
Analog-IN 12/Digital-IN 02
15
Analog-IN 11/Digital-IN 03
16
Freq. 01/Digital-IN 11
17
Digital-OUT 02
18
Digital-OUT 03
19
PWM-OUT 00 RETURN
20
PWM-OUT 01 RETURN
21
PWM-OUT 02 RETURN
22
PWM-OUT 03 RETURN
23
Analog-IN 09
24
Analog-IN 10/Analog-
25
Freq. 02/Digital-IN 04
26
Freq. 03/Digital-IN 05
27
Digital-OUT 04/Digital-IN 06
28
Digital-OUT 05/Digital-IN 07
29
Digital-OUT 06/Digital-IN 08
30
Digital-OUT 07/Digital-IN 09
31
PWM-OUT 00(-)
32
PWM-OUT 01(-)
33
PWM-OUT 02(-)
34
PWM-OUT 03(-)
35
Pressure sensor, current type
Outputsignal: 4-20 mA
Supply voltage: 10-36 Volt
+24V Supply
P
0.96-4.8V
S-
+24V Supply
1.0 - 5.0 V
02
03
+Vref Sensor (+5V)
04
+Vbatt Power OUT
05
CAN1_L
06
CAN1_H
07
CAN1_L
08
CAN1_H
09
CAN2_L
10
CAN2_H
11
RS232 GND
12
RS232 Rx
13
RS232 Tx
14
P
S+
U
Pressure sensor voltage type, ratiometric
Output signal: 10-90% of supply voltage
Supply voltage: 5 Volt, (+/-)0.5 volt
250 Ω
0.6W
UB+
0.5-4.5V
01
-Vref Sensor GND
UB+
GND
*)
Vbatt GND
I
Pressure sensor, voltage type
Output signal: 1-5 Volt
Supply voltage: 10-36 Volt
Connector B
Vbatt SYS
UB+
P
S+
GND
U
+5V Supply
*) Resistor mounted as close as possible to control unit for
minimum electrical disturbance.
CANmaster Technical Data & Installation - User Manual
13
Chapter 4 | Connection diagrams - MASTER unit
MASTER unit - Accelerator pedal, potentiometers & temperature sensor
Connector A
Analog-IN 04
01
Analog-IN 05
02
Analog-IN 06
03
Analog-IN 14*/Digital-IN 00
04
Analog-IN 13*/Digital-IN 01
05
Freq. 00/Digital-IN 10
06
Digital-OUT 00
07
Digital-OUT 01
08
PWM-OUT 00(+)
09
PWM-OUT 01(+)
10
PWM-OUT 02(+)
11
PWM-OUT 03(+)
12
Analog-IN 07
13
Analog-IN 08
14
Analog-IN 12*/Digital-IN 02
15
Analog-IN 11*/Digital-IN 03
16
Freq. 01/Digital-IN 11
17
Digital-OUT 02
18
Digital-OUT 03
19
PWM-OUT 00 RETURN
20
PWM-OUT 01 RETURN
21
PWM-OUT 02 RETURN
22
PWM-OUT 03 RETURN
23
Analog-IN 09
24
Analog-IN 10/Analog-OUT00
25
Freq. 02/Digital-IN 04
26
Freq. 03/Digital-IN 05
27
Digital-OUT 04/Digital-IN 06
28
Digital-OUT 05/Digital-IN 07
29
Digital-OUT 06/Digital-IN 08
30
Digital-OUT 07/Digital-IN 09
31
PWM-OUT 00(-)
32
PWM-OUT 01(-)
33
PWM-OUT 02(-)
34
PWM-OUT 03(-)
35
4.7 kΩ
to Temp. sensor
ST-20M
Accelerator pedal
with Hall-effect sensor
incl. safety switch.
+5V
Signal
GND
A
B
Sensor
C
E
SW
D
On/off-switch
Connector B
Vbatt SYS
01
Vbatt GND
02
-Vref Sensor GND
03
+Vref Sensor (+5V)
04
+Vbatt Power OUT
05
CAN1_L
06
CAN1_H
07
CAN1_L
08
CAN1_H
09
CAN2_L
10
CAN2_H
11
RS232 GND
12
RS232 Rx
13
RS232 Tx
14
0V
RΩ
S+
1-5 kΩ
1-axis control lever,
potentiometer type
RΩ
+5V
Power supply
*) Note: Low impedance inputs 11-14 (4 inputs) must not be used for
current sensitive potentiometers such as control levers. Use the high
high-impedance analog inputs 04-10 in this case.
14
CANmaster Technical Data & Installation - User Manual
Chapter 4 | Connection diagrams - CRANE unit
CRANE unit
Housing GND terminal
Connector A
Chassis ground
Analog-IN 08 (0-5V)
01
S+
Analog-IN 09 (0-5V)
02
GND
Digital-IN 00
03
Digital-IN 01
04
PWM-OUT 00(+)
05
PWM-OUT 01(+)
06
PWM-OUT 02(+)
07
PWM-OUT 03(+)
08
PWM-OUT 04(+)
09
PWM-OUT 05(+)
10
PWM-OUT 06(+)
11
PWM-OUT 07(+)
12
Analog-IN 10 (0-5V)
13
Digital-IN 02
14
Digital-IN 03
15
PWM-OUT 00 RETURN
16
PWM-OUT 01 RETURN
17
PWM-OUT 02 RETURN
18
PWM-OUT 03 RETURN
19
PWM-OUT 04 RETURN
20
PWM-OUT 05 RETURN
21
PWM-OUT 06 RETURN
22
PWM-OUT 07 RETURN
23
Analog-IN 11 (0-5V)
24
Analog-IN 12 (0-5V)
25
Digital-OUT 00
26
Digital-OUT 01
27
PWM-OUT 00(-)
28
PWM-OUT 01(-)
29
PWM-OUT 02(-)
30
PWM-OUT 03(-)
31
PWM-OUT 04(-)
32
PWM-OUT 05(-)
33
PWM-OUT 06(-)
34
PWM-OUT 07(-)
35
Connector B
UB+ U
PRESSURE SENSOR
3-WIRE VOLTAGE TYPE 1- 5 V
(-) PWM00 (+)
(-) PWM01 (+)
01
Vbatt GND
02
-Vref Sensor GND
03
+Vref Sensor (+5V)
04
not used
05
CAN1_L
06
CAN1_H
07
CAN1_L
08
CAN1_H
09
Address 1
10
Address 2
11
RS232 GND
12
RS232 Rx
13
RS232 Tx
14
ON/OFF-SWITCHES
(-) PWM02 (+)
(-) PWM03 (+)
(-) PWM04 (+)
(-) PWM05 (+)
(-) PWM06 (+)
POTENTIOMETER
+5V
PWM07
S+
8x double acting PWM
proportional valves
1-5 kΩ
0V
ON/OFF-VALVES
Max. 2x (Digital OUT 01-02)
D-OUT00
D-OUT01
1A
15A
Vbatt Power
P
Emergency
stop
(-)
Key switch
Common
GND point for
Crane unit
Common
GND point for
control system
OTHER CANMASTER UNITS
+12V/+24V
CRANE
GND
CAN-bus EXPANSION
Power
CANopen JOYSTICK supply
TERMINAL
Shield GND
(Unit type No. 0:
no address jumpers required)
Main fuses
Battery
disconnect
5 4 3 2 1
9 8 7 6
CANmaster Technical Data & Installation - User Manual
RS232 communication port.
9-pin D-sub female connector.
Boot- & Middle-SW download.
No permanent connection is required.
(-)
+12V / +24 VDC
15
Chapter 4 | Connection diagrams - CRANE unit
CRANE unit addressing
OTHER CANMASTER UNITS
MASTER
EXPANSION
TERMINAL
CAN_L CAN_H JOYSTICK
CAN-bus/
CANopen
Battery
(-)
Unit type CRANE No. 0
Connector B
Unit type CRANE No. 3
01
Vbatt GND
Battery
(-)
Connector B
01
02
Vbatt GND
02
03
03
04
04
05
05
CAN1_L
06
CAN1_L
06
CAN1_H
07
CAN1_H
07
CAN1_L
08
CAN1_L
08
CAN1_H
09
CAN1_H
09
Address 1
10
Address 1
10
Address 2
11
Address 2
120 Ω
11
12
12
13
13
14
14
Jumper: none
Jumper, pin: 10-11-02-GND(-)
Unit type CRANE No. 1
Battery
(-)
Connector B
Unit type CRANE No. 2
02
Battery
(-)
Connector B
01
Vbatt GND
Terminating*)
resistor at the end
of CAN-bus line:
01
Vbatt GND
02
03
03
04
04
05
05
CAN1_L
06
CAN1_L
06
CAN1_H
07
CAN1_H
07
CAN1_L
08
CAN1_L
08
CAN1_H
09
CAN1_H
09
Address 1
10
Address 1
10
Address 2
11
Address 2
11
12
12
13
13
14
14
Jumper, pin: 10-02-GND(-)
Jumper, pin: 11-02-GND(-)
*) Max. 2 x terminating resistors 120Ω
in the CAN-bus line
16
CANmaster Technical Data & Installation - User Manual
Chapter 4 | Connection diagrams - EXPANSION unit
EXPANSION unit
VDO servomotor p/n: 408 422 006 001
Housing GND terminal
Chassis ground
01
Analog-IN 05 (0-5V)
02
Analog-IN 06 (0-5V)
03
Analog-IN 13*/Digital-IN 00
04
Servo OUT A - PWM 04
05
Frequency 00/ Digital-IN
06
Digital-OUT 00
07
Digital-OUT 01
08
PWM-OUT 00(+)
9
PWM-OUT 01(+)
10
PWM-OUT 02(+)
11
PWM-OUT 03(+)
12
Analog-IN 07 (0-5V)
13
Analog-IN 08 (0-5V)
14
Analog-IN 12*/Digital-IN 01
15
Analog-IN 11*/Digital-IN 02
16
Servo OUT B - PWM 04
17
Digital-OUT 02
18
Digital-OUT 03
19
PWM-OUT 00 RETURN
20
PWM-OUT 01 RETURN
21
PWM-OUT 02 RETURN
22
PWM-OUT 03 RETURN
23
Analog-IN 09
24
Analog-IN 10
25
Digital-IN 03
26
Digital-IN 04
27
Digital-OUT04/Digital-IN05
28
Digital-OUT05/Digital-IN06
29
Digital-OUT06/Digital-IN07
30
Digital-OUT07/Digital-IN08
31
PWM-OUT 00(-)
32
PWM-OUT 01(-)
33
PWM-OUT 02(-)
34
PWM-OUT 03(-)
35
Connector B
Vbatt SYS
+5V
clutch
Servomotor
diesel engine
fuel pump
M
1 4
3
2
7
5
RΩ
S+
1-axis
1-5 kΩ control lever
0V
RΩ
6
+24V (-)
RPM / Hz
+Vref
+5V
-Vref
GND
Inductive
sensor
Pressure sensor
3-wire voltage type
1- 5 V. Supply 5V
P
S+
GND
UB+ U
On/Off-switches
On/off-valves
D-OUT00
(-) PWM00(+)
(-) PWM01 (+)
D-OUT01
4.7 kΩ
Analog-IN 04/Servo return
D-OUT02
to
Temp. sensor
ST-20M
D-OUT03
(-) PWM02(+)
(-) PWM03 (+)
4 x PWM
proportional
valves
Temp. sensor
ST-20M
4.7 kΩ
Connector A
D-OUT04
to
D-OUT05
D-OUT06
D-OUT07
1A
2A
(-)
Emergency
stop
Key switch
Common
GND point for
Expansion unit
01
Vbatt GND
02
-Vref Sensor GND
03
+Vref Sensor (+5V)
04
+Vbatt Power OUT
05
CAN1_L
06
CAN1_H
07
CAN2_L (custom spec.)
08
CAN2_H (custom spec.)
09
Address 1
10
Address 2
11
RS232 GND
12
RS232 Rx
13
RS232 Tx
14
15A
OTHER CANMASTER UNITS
MASTER +12V/+24V
CRANE
GND
CAN-bus
CANopen EXPANSION Power
JOYSTICK
supply
TERMINAL
(Unit address No. 0:
no address jumpers
required)
Shield GND
Common
GND point for
control system
CAN-bus customer specified protocol
External systems
Main fuses
*) Note: Low impedance analog inputs 11-13 (3 inputs) must not
be used for current sensitive potentiometers, control lever type.
Use the high impedance analog inputs 04-10 in this case.
(-)
RS232 communication port
5 4 3 2 1
9 8 7 6
CANmaster Technical Data & Installation - User Manual
9-pin D-sub female connector.
Boot- & Middle-SW download.
No permanent connection is required.
Battery
disconnect
+12V /+24 VDC
17
Chapter 4 | Connection diagrams - EXPANSION unit
EXPANSION unit adressering
OTHER CANMASTER UNITS
MASTER
CAN-bus/
CRANE
CANopen
TERMINAL
CAN_L CAN_H JOYSTICK
Battery
EXPANSION - Unit address No. 0
(-)
Connector B
EXPANSION - Unit address No. 3
Connector B
01
Vbatt GND
(-)
01
02
Vbatt GND
02
03
03
04
04
05
Terminating *)
resistor at the end
of CAN-bus line:
05
CAN1_L
06
CAN1_L
06
CAN1_H
07
CAN1_H
07
CAN2_L (CAN-custom)
08
CAN2_L (CAN-custom)
08
CAN2_H (CAN custom)
09
CAN2_H (CAN custom)
09
Address 1
10
Address 1
10
Address 2
11
Address 2
120 Ω
11
12
12
13
13
14
14
Jumper, pin: 10-11-02-GND(-)
Jumper: none
EXPANSION - Unit address No. 1 Battery
(-)
Connector B
EXPANSION - Unit address No. 2
02
Battery
(-)
Connector B
01
Vbatt GND
Battery
01
Vbatt GND
02
03
03
04
04
05
05
CAN1_L
06
CAN1_L
06
CAN1_H
07
CAN1_H
07
CAN2_L (CAN-custom)
08
CAN2_L (CAN-custom)
08
CAN2_H (CAN custom)
09
CAN2_H (CAN custom)
09
Address 1
10
Address 1
10
Address 2
11
Address 2
11
12
12
13
13
14
14
Jumper, pin: 10-02-GND(-)
Jumper, pin: 11-02-GND(-)
*) Max. 2 x terminating resistors 120Ω
in tne CAN-bus line
18
CANmaster Technical Data & Installation - User Manual
Chapter 4 | Connection diagrams - TERMINAL T2
TERMINAL T2
ON/OFF-SWITCHES.
Max. 3 x (Digital-IN 00-02)
Indicatorlamp. Max. 3x
(Digital-OUT 00-02)
Connector
RS232 Tx
01
RS232 Rx
02
Digital-IN 00/Digital-OUT 00
03
Digital-IN 01/Digital-OUT 01
04
Digital-IN 02/Digital-OUT 02
05
Vbatt GND
06
RS232 GND
07
CAN_1L
08
CAN_1H
09
CAN_2L
10
CAN_2H
11
Vbatt SYS
12
RS232 communication port
9-pin D-sub female connector.
Boot- & Middle-SW download.
No permanent connection is required.
5 4 3 2 1
9 8 7 6
OTHER CANMASTER UNITS
MASTER
CRANE
CAN-bus/
CANopen EXPANSION
JOYSTICK
Shield GND
GND
Common
GND point for
control system
External equipment.
CAN-custom spec.
2A
Power supply
relais,
main fuses and
emergency stop
Battery
disconnect
(-)
+12 V / +24 VDC
CANmaster Technical Data & Installation - User Manual
19
Chapter 4 | Connection diagrams - JOYSTICK H5-S50
JOYSTICK H5-S50
(Unit address No. 0:
no address jumpers required)
JOYSTICK - Unit address No. 0
Connector B
Vref Digital-IN, Output +5V
01
(Not used)
02
RS232 GND
03
RS232 Tx
04
RS232 Rx
05
Address 1
06
Address 2
07
+Vbatt Power
08
+Vref Analog-IN, Output +5V
09
-Vref Analog IN (0V)
10
CAN1_L
11
CAN1_H
12
CAN1_L
13
CAN1_H
14
Address GND
15
-Vbatt
16
1-AXIS CONTROL LEVER,
POTENTIOMETER TYPE
Max. 2x (Analog-IN 00-01)
RS232 communication port
9-pin D-sub female connector.
Boot- & Middle-SW download.
No permanent connection is required.
+5V
RΩ
S+
1-5 kΩ
RΩ
0V
5 4 3 2 1
9 8 7 6
OTHER CANMASTER UNITS
MASTER
CRANE
CAN-bus/
CANopen EXPANSION
JOYSTICK
TERMINAL
Shield GND
+5V
Connector A
Analog-IN 03 (0-5V)
01
Analog-IN 04 (0-5V)
02
Digital-IN 06
Digital-OUT 00
PWM-OUT 00
03
Digital-IN 07
Digital-OUT 01
PWM-OUT 01
04
Digital-IN 08
05
Digital-IN 09
06
Digital-IN 05
07
Digital-IN 04
08
Digital-IN 03
09
Digital-IN 02
10
Digital-IN 01
11
Digital-IN 00
12
S+
Indicatorlamp. Max. 2x
D-OUT00-01
1-5 kΩ
0V
POTENTIOMETER
Max. 2x (Analog-IN 00-01)
Common
GND point for
control system
1A
Power supply
relais,
main fuses.
emergency stop
Battery
disconnect
Analog
instrument
Max. 2x
(PWM-OUT00-01)
ON/OFF-SWITCHES.
Supply voltage +5V from
connector A, pin 01.
Max. 10x (Digital-IN 00-09)
(-)
+12V / +24 VDC
Note: Vref (+5V) for external Analog input supply and Vref (+5V) for Digital input supply must be used to supply the externally
connected analog and digital input devices and must not be used to supply any other separate circuits.
20
CANmaster Technical Data & Installation - User Manual
Chapter 4 | Connection diagrams - JOYSTICK H5-S50
JOYSTICK H5-S50 unit addressing
OTHER CANMASTER UNITS
MASTER
EXPANSION
TERMINAL
CAN_L CAN_H
CRANE
CAN-bus/
CANopen
JOYSTICK H5-S50 - Unit address No. 0
Connector B
JOYSTICK H5-S50 - Unit address No. 3
Connector B
01
01
02
02
03
03
04
04
05
05
Address 1
06
Address 1
06
Address 2
07
Address 2
07
08
08
09
09
10
10
CAN1_L
11
CAN1_L
11
CAN1_H
12
CAN1_H
12
CAN1_L
13
CAN1_L
13
CAN1_H
14
CAN1_H
14
Address GND
15
Address GND
15
16
Jumper: none
Terminating*)
resistor at the end
of CAN-bus line:
120 Ω
16
Jumper, pin: 6-7-15
JOYSTICK H5-S50 - Unit address No. 1
Connector B
JOYSTICK H5-S50 - Unit address No. 2
Connector B
01
01
02
02
03
03
04
04
05
05
Address 1
06
Address 1
06
Address 2
07
Address 2
07
08
08
09
09
10
10
CAN1_L
11
CAN1_L
11
CAN1_H
12
CAN1_H
12
CAN1_L
13
CAN1_L
13
CAN1_H
14
CAN1_H
14
Address GND
15
Address GND
15
16
Jumper, pin: 7-15
16
Jumper, pin: 6-15
*) Max. 2 x terminating resistors 120Ω
in system CAN-bus line
CANmaster Technical Data & Installation - User Manual
21
Chapter 4 | Connection diagrams - CAN-bus/CANopen network
CAN-bus/CANopen network
When connecting a unit to the CAN bus network, the CAN1_L and CAN1_H are connected in parallel for all units.
Note that the MASTER, CRANE and JOYSTICK control units are fitted with twin pairs of contact pins for
CANopen in order to simplify connection to the CAN-bus. The EXPANSION unit and the TERMINAL T2, on the other hand, have only one single pair of contact pins for CAN1_L and CAN1_H respectively, as the other pins in these
units are used for other functions. For these units, the CAN-bus connection points must be extended externally with
cables.
See the connection diagram below that includes all type of CANmaster control units and the general connections
diagram for each type of control unit in the beginning of this chapter.
Note that the control units can be connected to the CAN-bus network where desired. The connection diagram below
is just one example in order to show connecting principles:
120 Ω
MASTER
Connector B
120 Ω
EXPANSION
Connector B
05
05
CAN1_L
06
CAN1_L
CAN1_H
07
CAN1_H
07
CAN1_L
08
CAN2_L
08
09
CAN2_H
09
CAN1_H
10
06
External
connection
points
10
TERMINAL T2
JOYSTICK H5-S50
Connector B
Connector
07
CAN_1L
08
CAN_1H
09
CAN_2L
10
CAN_2H
11
10
External
connection
points
CAN1_L
11
CAN1_H
12
CAN1_L
13
CAN1_H
14
12
CRANE
Connector B
05
CAN1_L
06
CAN1_H
07
CAN1_L
08
CAN1_H
09
10
22
CANmaster Technical Data & Installation - User Manual
Chapter 4 | Connection diagrams - CANmaster control unit addressing
CANmaster control unit addressing
In order for the electronic units in the CAN-bus system to be identified by the MASTER unit, each unit has a unique
address that is determined by the external jumpers in each connector. The address refers in part to the type of unit
and in part to the unit number in a group of the same type. A group in the CANmaster system can consist of a maximum of 4 units that are designated as No. 0, 1, 2 or 3.
For the MASTER unit and the TERMINAL, the address is permanently defined in the basic software and a system
can only contain one MASTER and one TERMINAL. In addition to these unit types, there are three other unit types:
CRANE, EXPANSION and JOYSTICK H5-S50. The unit designated No. 0 is the unit type without jumpers.
An example of a system consisting of a MASTER unit, TERMINAL T2 , 2 CRANES, 1 EXPANSION unit, and 3 JOYSTICKS would be addressed as shown in the diagram below.
MASTER
Fixed
Terminating
resistor 1
CRANE
No. 0
EXPANSION
No. 0
CAN-bus/CANopen
*1)
CRANE
No. 1
JOYSTICK
No. 0
JOYSTICK
No. 1
JOYSTICK
No. 2
Jumper 1
TERMINAL T2
Fixed
Terminating
resistor 2
*1)
Jumper 1
Jumper 2
*1) Note: Expansion unit and Terminal T2 requires
an external CAN_1 connection to CANopen CAN bus.
Note: The control units can be connected to the CAN-bus network where desired and unit numbers do
not need to follow any particular order with regard to their placement in the CAN-bus network.
CANmaster Technical Data & Installation - User Manual
23
Chapter 4 | Connection diagrams - RS232 communication interface
RS232 communication interface
MASTER unit
Connector B
11
RS232 GND
12
RS232 Rx
13
RS232 Tx
14
GND
Rx
Tx
5 4 3 2 1
DB9F-DB9M pin-to-pin
RS232 9-pin D-sub female
The RS232 communication port on the MASTER-unit is used as the main communication port between the service
computer and the control systems. A 9-pin D-sub female connector should be mounted in the machine for this purpose. A straight serial cable (DB9F-DB9M pin-to-pin) is used to connect to the service computer. This port is used
for the all the normal service work, for downloading the application software, parameters, terminal font/menu-data
and for system trouble shooting and logging of I/O-status.
The RS232 communication ports on the other control units in the system (Crane, Expansion, Terminal and Joystick
H5-S50) are used for advanced system work only and does not have to have a permament connection to a RS232
D-sub.
24
CANmaster Technical Data & Installation - User Manual
Chapter 5
PIN ASSIGNMENT
This chapter contains tables showing the pin assignments for the control units included in CANmaster
systems. For connector pin location in the connectors, see the chapter 'Cables & Connectors'.
Note that the pin assignments for connector A and connector B are different for all types of Master, Crane
and Expansion control units.
Inputs and outputs are located in Connector A.
Power supply and data communication are located in Connector B.
CANmaster Technical Data & Installation - User Manual
25
Chapter 5 | PIN ASSIGNMENT - MASTER unit - Connector A
MASTER unit - Connector A
26
Pin No.
Signal name
Comment
01
Analog-IN 04 (0-5V)
02
Analog-IN 05 (0-5V)
03
Analog-IN 06 (0-5V)
04
Analog-IN 14 (0-5V)
Digital-IN 00
05
Analog-IN 13 (0-5V)
Digital-IN 01
06
Frequency 00
Digital-IN 10
07
Digital-OUT 00
08
Digital-OUT 01
09
PWM-OUT 00(+)
10
PWM-OUT 01(+)
11
PWM-OUT 02(+)
12
PWM-OUT 03(+)
13
Analog-IN 07 (0-5V)
14
Analog-IN 08 (0-5V)
15
Analog-IN 12 (0-5V)
Digital-IN 02
16
Analog-IN 11 (0-5V)
Digital-IN 03
17
Frequency 01
Digital-IN 11
18
Digital-OUT 02
19
Digital-OUT 03
20
PWM-OUT 00 RETURN (Analog-IN 00)
Common return PWM-OUT 00 (+)/(-)
21
PWM-OUT 01 RETURN (Analog-IN 01)
Common return PWM-OUT 01 (+)/(-)
22
PWM-OUT 02 RETURN (Analog-IN 02)
Common return PWM-OUT 02 (+)/(-)
23
PWM-OUT 03 RETURN (Analog-IN03)
Common return PWM-OUT 03 (+)/(-)
24
Analog-IN 09 (0-5V)
25
Analog-IN 10 (0-5V)
Analog-OUT 00 (0-5V)
26
Frequency 02
Digital-IN 04
27
Frequency 03
Digital-IN 05
28
Digital-OUT 04
Digital-IN 06
29
Digital-OUT 05
Digital-IN 07
30
Digital-OUT 06
Digital-IN 08
31
Digital-OUT 07
Digital-IN 09
32
PWM-OUT 00(-)
33
PWM-OUT 01(-)
34
PWM-OUT 02(-)
35
PWM-OUT 03(-)
CANmaster Technical Data & Installation - User Manual
Chapter 5 | PIN ASSIGNMENT - MASTER unit - Connector B
MASTER unit - Connector B
Pin No.
Signal name
Function
Fuse (A)
01
Vbatt SYS
+12 V / +24 V power supply control electronics
2A
02
Vbatt GND
0 V for MASTER-unit
03
-Vref Sensor GND
04
+Vref Sensor
05
+Vbatt Power OUT
06
CAN1_L
CAN-bus signal L, CANopen
07
CAN1_H
CAN-bus signal H, CANopen
08
CAN1_L
CAN-bus signal L, CANopen
09
CAN1_H
CAN-bus signal H, CANopen
10
CAN2_L
CAN-bus signal L, CAN-SAE J1939
11
CAN2_H
CAN-bus signal H, CAN-SAE J1939
12
RS232 GND
13
RS232 Rx
Receive data RS232 from PC
14
RS232 Tx
Transmit data RS232 to PC
0 V reference for analog sensors
+5 V output supply voltage for analog sensors
+12V / +24 V power supply for power outputs
15 A
Ground terminal RS232
CANmaster Technical Data & Installation - User Manual
27
Chapter 5 | PIN ASSIGNMENT - CRANE unit Connector A
CRANE unit Connector A
28
Pin No.
Signal name
Remarks
01
Analog-IN 08 (0-5V)
02
Analog-IN 09 (0-5V)
03
Digital-IN 00
04
Digital-IN 01
05
PWM-OUT 00(+)
06
PWM-OUT 01(+)
07
PWM-OUT 02(+)
08
PWM-OUT 03(+)
09
PWM-OUT 04(+)
10
PWM-OUT 05(+)
11
PWM-OUT 06(+)
12
PWM-OUT 07(+)
13
Analog-IN 10 (0-5V)
14
Digital-IN 02
15
Digital-IN 03
16
PWM-OUT 00 RETURN (Analog-IN 00)
Common return PWM-OUT 00 (+)/(-)
17
PWM-OUT 01 RETURN (Analog-IN 01)
Common return PWM-OUT 01 (+)/(-)
18
PWM-OUT 02 RETURN (Analog-IN 02)
Common return PWM-OUT 02 (+)/(-)
19
PWM-OUT 03 RETURN (Analog-IN 03)
Common return PWM-OUT 03 (+)/(-)
20
PWM-OUT 04 RETURN (Analog-IN 04)
Common return PWM-OUT 04 (+)/(-)
21
PWM-OUT 05 RETURN (Analog-IN 05)
Common return PWM-OUT 05 (+)/(-)
22
PWM-OUT 06 RETURN (Analog-IN 06)
Common return PWM-OUT 06 (+)/(-)
23
PWM-OUT 07 RETURN (Analog-IN 07)
Common return PWM-OUT 07 (+)/(-)
24
Analog-IN 11 (0-5V)
25
Analog-IN 12 (0-5V)
26
Digital-OUT 00
27
Digital-OUT 01
28
PWM-OUT 00(-)
29
PWM-OUT 01(-)
30
PWM-OUT 02(-)
31
PWM-OUT 03(-)
32
PWM-OUT 04(-)
33
PWM-OUT 05(-)
34
PWM-OUT 06(-)
35
PWM-OUT 07(-)
CANmaster Technical Data & Installation - User Manual
Chapter 5 | PIN ASSIGNMENT - CRANE unit - Connector B
CRANE unit - Connector B
Pin No.
Signal name
Function
Fuse (A)
01
Vbatt Power
+12 V / +24 V power supply CRANE-unit
15 A
02
Vbatt GND
03
-Vref Sensor GND
04
+Vref Sensor
05
not used
06
CAN1_L
CAN-bus signal L, CANopen
07
CAN1_H
CAN-bus signal H, CANopen
08
CAN1_L
CAN-bus signal L, CANopen
09
CAN1_H
CAN-bus signal H, CANopen
10
Address 1
Unit address pin 1
11
Address 2
Unit address pin 2
12
RS232 GND
13
RS232 Rx
Receive data RS232 from PC
14
RS232 Tx
Transmit data RS232 to PC
0 V for CRANE-unit
0 V reference for analog sensors
+5 V output supply voltage for analog sensors
Ground terminal RS232
CANmaster Technical Data & Installation - User Manual
29
Chapter 5 | PIN ASSIGNMENT - EXPANSION unit - Connector A
EXPANSION unit - Connector A
Pin No.
Signal name
01
Analog-IN 04 (0-5V)
02
Analog-IN 05 (0-5V)
03
Analog-IN 06 (0-5V)
04
05
06
30
Analog-IN 13 (0-5V)
Comment
Digital-IN 00
Servo OUT A - PWM 04
Frequency 00
Servomotor potentiometer return
Servomotor output A
Digital-IN 09
07
Digital-OUT 00
08
Digital-OUT 01
09
PWM-OUT 00(+)
10
PWM-OUT 01(+)
11
PWM-OUT 02(+)
12
PWM-OUT 03(+)
13
Analog-IN 07 (0-5V)
14
Analog-IN 08 (0-5V)
15
Analog-IN 12 (0-5V)
Digital-IN 01
16
Analog-IN 11 (0-5V)
Digital-IN 02
17
Servo OUT B - PWM 04
18
Digital-OUT 02
19
Digital-OUT 03
20
PWM-OUT 00 RETURN (Analog-IN 00)
Common return PWM-OUT 00 (+)/(-)
21
PWM-OUT 01 RETURN (Analog-IN 01)
Common return PWM-OUT 01 (+)/(-)
22
PWM-OUT 02 RETURN (Analog-IN 02)
Common return PWM-OUT 02 (+)/(-)
23
PWM-OUT 03 RETURN (Analog-IN 03)
Common return PWM-OUT 03 (+)/(-)
24
Analog-IN 09 (0-5V)
25
Analog-IN 10 (0-5V)
26
Digital-IN 03
27
Digital-IN 04
28
Digital-OUT 04
Digital-IN 05
29
Digital-OUT 05
Digital-IN 06
30
Digital-OUT 06
Digital-IN 07
31
Digital-OUT 07
Digital-IN 08
32
PWM-OUT 00(-)
33
PWM-OUT 01(-)
34
PWM-OUT 02(-)
35
PWM-OUT 03(-)
Servomotor output B
CANmaster Technical Data & Installation - User Manual
Chapter 5 | PIN ASSIGNMENT - EXPANSION unit - Connector B
EXPANSION unit - Connector B
Pin No.
Signal name
Function
Fuse (A)
01
Vbatt SYS
+12 V /+24 V power supply control electronics
2A
02
Vbatt GND
0 V EXPANSIONS-unit
03
-Vref Sensor GND
04
+Vref Sensor
+5 V output supply voltage for analog sensors
05
+Vbatt Power OUT
+12 V / +24 V power supply for power outputs
06
CAN1_L
CAN-bus signal L, CANopen
07
CAN1_H
CAN-bus signal H, CANopen
08
CAN2_L
CAN-bus signal L, CAN customer specified protocol
09
CAN2_H
CAN-bus signal H, CAN customer specified protocol
10
Address 1
Unit adress pin 1
11
Address 2
Unit adress pin 2
12
RS232 GND
13
RS232 Rx
Receive data RS232 from PC
14
RS232 Tx
Transmit data RS232 to PC
0 V reference for analog sensors
15 A
Ground terminal RS232
CANmaster Technical Data & Installation - User Manual
31
Chapter 5 | PIN ASSIGNMENT - TERMINAL T2 Connector
TERMINAL T2 Connector
32
Pin No.
Signal name
01
RS232 Tx
Transmit data RS232 to PC
02
RS232 Rx
Receive data RS232 from PC
03
Digital-IN 00
Digital-OUT 00
04
Digital-IN 01
Digital-OUT 01
05
Digital-IN 02
Digital-OUT 02
Function
Fuse (A)
06
Vbatt GND
Power supply GND for Terminal-unit, 0V
07
RS232 GND
Ground reference RS232
08
CAN_1L
CAN-bus signal L, CANopen
09
CAN_1H
CAN-bus signal H, CANopen
10
CAN_2L
CAN-bus signal L, CAN-customer spec.
11
CAN_2H
CAN-bus signal H, CAN-customer spec.
12
Vbatt SYS
+12V / +24V power supply Terminal-unit
2A
CANmaster Technical Data & Installation - User Manual
Chapter 5 | PIN ASSIGNMENT - JOYSTICK H5-S50 Connector A
JOYSTICK H5-S50 Connector A
Pin No.
Signal name
Comment
Internal
Analog IN 00, joystick X-axis
Internal
Analog IN 01, joystick Y-axis
Internal
Analog IN 02, joystick Z-axis
01
Analog-IN 03 (0-5V)
02
Analog-IN 04 (0-5V)
03
Digital-IN 06
Digital-OUT 00
PWM-OUT 00
04
Digital-IN 07
Digital-OUT 01
PWM-OUT 01
05
Digital-IN 08
06
Digital-IN 09
07
Digital-IN 05
08
Digital-IN 04
09
Digital-IN 03
10
Digital-IN 02
11
Digital-IN 01
12
Digital-IN 00
JOYSTICK H5-S50 Connector B
Pin No.
Signal name
Function
01
Vref Digital-IN
02
(Not used)
03
RS232 GND
04
RS232 Tx
Transmit data RS232 to PC
05
RS232 Rx
Receive data RS232 from PC
06
Address 1
Unit address pin 1
07
Address 2
Unit address pin 2
08
+Vbatt Power
09
+Vref Analog-IN
Power supply OUTPUT for external Analog-IN, +5VDC
10
-Vref Analog-IN
0 V reference for external Analog-IN
11
CAN1_L
CAN-bus signal L, CANopen
12
CAN1_H
CAN-bus signal H, CANopen
13
CAN1_L
CAN-bus signal L, CANopen
14
CAN1_H
CAN-bus signal H, CAnopen
15
Address GND
Ground reference for unit address
16
-Vbatt
0 V power supply for Joystick unit
Fuse (A)
Power supply OUTPUT for external Digital-IN, +5VDC
Ground reference RS232
+12 V / +24VDC Power supply input for Joystick unit
CANmaster Technical Data & Installation - User Manual
1A
33
Chapter 6
Connectors & Cables
MASTER, CRANE & EXPANSION
Connector pin location
A
1
13
24
CANmaster Technical Data & Installation - User Manual
B
12
23
35
1
6
10
5
9
14
35
Chapter 6 | Connectors & Cables - MASTER, CRANE & EXPANSION
Mating connectors - AMPSEAL®
A
Mating connectors
A
B
AMP, type
AMPSEAL®
AMPSEAL®
Number of contacts
35
14
Color
Black
Black
AMP part no.
776164-1
776273-1
Assembly instruction
AMP document part no. 114 160-16/nov. 95 rev. D
Contacts
36
B
A
B
AMP, type
Cu-Sn, 0.5-1.5 mm2/16-20 AWG
Gold plated, 0.5-1.5mm2/16-20 AWG
- Loose contacts, AMP part no.
770854-1
770854-3
- Contacts on strap, AMP part no.
770520-1
770520-3
- Sealing plug, nylon, AMP part
no.
770678-1
CANmaster Technical Data & Installation - User Manual
Chapter 6 | Connectors & Cables - MASTER, CRANE & EXPANSION
Assembly instructions- AMPSEAL® connector
For detailed assembly instructions for contacts and connector unit, see AMP service instructions,
document part no.: 114 160-16/nov. 95 rev. D.
General design
Wedge lock & wire seal
holder are on delivery
in the proper position for
cables with attached contacts
to be fitted.
Wire seal
Wedge lock
Locking tabs (2x) for
wire seal holder
In order to loosen attached
cables with contacts, the
wedge lock must be opened:
Push back the red locking tabs (2x)
with a screw driver (3.8 mm) and pull
the wedge lock backwards.
Connector housing
Locking tabs(2x) for wedge lock
Sealing plug
Wire seal holder
Stripping & Crimpning
Wire insulation diameter:
min 1.7 - max 2.7 mm
Size: AWG 16-20
min. 0.5 - max. 1.5 mm2
STRIPPING
Strip length =5 mm
Never attach more than
one wire to each contact!
CRIMPING
Wire strands and insulation shall
both be visible in this area
Wire barrel shall be closed at seam
with no strands protruding or showing
Rear bellmouth:
min 0.13-max. 0.75 mm
CANmaster Technical Data & Installation - User Manual
Wire strand ends must
be visible in this area
Front bellmouth:
min. 0.13-max. 0.25mm
37
Chapter 6 | Connectors & Cables - MASTER, CRANE & EXPANSION
Attaching the cables
Diaphragm
The wire with attached contact is
inserted into the contact holder at
which point a hole is made in the
diaphragm part of the wire seal.
Wire seal holder
Wire seal
Retension fingers
Wedge lock in open position
Pull the wire carefully to see that the
mounted contact is in the correct position.
Contact
Figure shows the contact in proper position before
A the wedge lock is pressed in to lock the contact in position.
In this position the contact can be removed by pulling
and at the same turn the wire.
Wedge lock in closed position
Press in the wedge lock in order
to lock the contact in position.
B Contact in locked position.
Retension fingers are locked by the
wedge lock
A hole is made in the sealing diaphragm when the wire with attached contact is inserted in the connector.
Ensure that the contact is in the correct position for the the retention fingers to hold the contact. See figure
above position A.
When all the wires with contacts have been attached, the contacts are locked in position by the wedge
lock being pressed together with the connector housing until the locking tabs on both sides click into
place. See the figure above, position B.
NOTE: If some connectors are not used, seal plugs are not required as long as no piercing is made. The
diaphragm in the wire seal provides a suitable seal. If, on the other hand, the attached contacts with cables are removed, sealing plugs must be fitted in order for the holes in the diaphragm to be sealed. The
conical sealing plugs is inserted with the wider end first. Se figure on page 37.
Tools for crimping and disassembly of connnector
38
Crimp tool
Disassembly of connector
Type
Hand tool
Standard screwdriver, 3.8 mm wide
AMP part no.
58529-1
-
CANmaster Technical Data & Installation - User Manual
Chapter 6 | Connectors & Cables - MASTER, CRANE & EXPANSION
MASTER, CRANE & EXPANSION - Recommended cable type
Connector A - Inputs & Outputs:
I/O
Recommended
wire area mm2
Recommended cable type
Recommended
max. length (m)
PWM (+), (-) & retur
0.75 (3x)
Twisted 3-wire cable *1)
10
Others
0.75
*1) 3-wire cable for double acting PWM-outputs:
PWM-return
black
PWM-OUT(+)
red
PWM-return
black
PWM-OUT(-)
green
Make: HABIA CABLE, type: ZN 1819 T3
Twisted 3-wire cable for running in plastic
tubing.
PWM-OUT(+)
red
Protective jacket
PWM-OUT(-)
green
Make: HABIA CABLE, type: ZN 1819 Ti3
Twisted 3-wire cable for free attachment.
Habia Cable Co. website: www.habia.se
Connector B - Power supply & System communication:
Recommended
wire area mm2
I/O
Recommended cable type
Recommended
max. length (m)
Power supply and supply voltage for sensors
1.5
CAN
0.50 - 0.75
CAN_L + CAN_H : Low capacitance
shielded data cable for CAN-bus.
Twisted pair.
40
RS232
0.50 - 0.75
RS232 Rx/Tx/GND
15
Note: The cables for data communication CAN_L and CAN_H must be twisted-pair in order to reduce the
risk of interference from external systems. For cables longer than 5 m, the use of shielded twisted-pair
cable according to the table above is recommended.
CANmaster Technical Data & Installation - User Manual
39
Chapter 6 | Connectors & Cables - TERMINAL T2
TERMINAL T2
Connector pin location
7 8 9 10 11 12
1 2 3 4 5 6
Terminal connector - terminal housing rear side
Mating connector & contacts
Connector
Data
Type
AMP Multilock®
Number of contacts
12
Color
Black
AMP part no.
174045-2
Contacts
Data
Type
Cu-Sn, 0.2-0.6 mm2/20-24 AWG
Loose contacts, AMP part no.
175062-1
Crimp tool, AMP part no.
0-0091577-1
Note: The connector for the Terminal T2 unit is the equivalent of connector A for the Joystick H5-S50 unit.
40
CANmaster Technical Data & Installation - User Manual
Chapter 6 | Connectors & Cables - TERMINAL T2
Recommended cable type
Connector
Pin No.
Recommended
wire area mm2
Recommended cable type
06/12
0.50-0.75
Power supply / Supply GND
01-02/07
0.50-0.75
RS232 Rx/Tx/GND
03-05
0.50-0.75
Digital-IN, Digital-OUT
08-09
10-11
0.50-0.75
CAN 1 & CAN 2: CAN_L + CAN_H : Low capacitance
shielded data cables for CAN-bus. Twisted pair.
Recommended
max. length (m)
15
40
Note: The cables for data communication CAN_L and CAN_H must be twisted-pair in order to reduce the
risk of interference from external systems. For cables longer than 5 m, the use of shielded twisted-pair
cable according to the table above is recommended.
CANmaster Technical Data & Installation - User Manual
41
Chapter 6 | Connectors & Cables - JOYSTICK H5-S50
JOYSTICK H5-S50
Connector pin location
8 7 6 5 4 3 2 1
B
16 15 14 13 12 11 10 9
7 8 9 10 11 12
A
1
2 3 4
5
6
Joystick connector - joystick bottom side
Joystick H5S50 connector bottom side
Mating connector & contacts
B
Connector
B
A
Type
AMP Multilock®
AMP Multilock®
Number of contacts
16
12
Color
Black
Black
AMP part no.
174046-2
174045-2
Contacts
42
A
B
Type
Cu-Sn, 0.2-0.6 mm2/20-24 AWG
Loose contacts - AMP part no.
175062-1
Crimp tool, AMP part no.
0-0091577-1
A
CANmaster Technical Data & Installation - User Manual
Chapter 6 | Connectors & Cables - JOYSTICK H5-S50
Recommended cable type
Connector A - Inputs & Outputs
Pin No.
Recommended
wire area mm2
01-12
0.5
Recommended cable type
Recommended
max length (m)
Connector B - Power supply & System communication
Pin No.
Recommended
wire area mm2
01
0.50-0.75
02
(not used)
03-05
0.50-075
06-10
0.50-0.75
11-12
13-14
0.50-0.75
15-16
0.50-0.75
Recommended cable type
Recommended
max length (m)
RS232 Rx/Tx/GND
15
CAN-1(CANopen): CAN_L + CAN_H: Low capacitance
shielded data cables for CAN-bus. Twisted pair.
40
Note: The cables for data communication CAN_L and CAN_H must be twisted-pair in order to reduce the
risk of interference from external systems. For cables longer than 5 m, the use of shielded twisted-pair
cable according to the table above is recommended.
CANmaster Technical Data & Installation - User Manual
43
Chapter 7
Electrical data
General
This chapter presents basic electrical data for all control units included in CANmaster control systems.
The following control units are included:
•
MASTER
•
CRANE
•
EXPANSION
•
TERMINAL T2
•
JOYSTICK H5-S50
Maximum operating data
The data indicated for maximum current consumption and the range for supply voltages must not be exceeded. The control units are supplied with all the necessary short circuit protection and protection
against both under- and overvoltages, but despite these measures, exceeding the stated limits can result
in serious and irreparable damage to the electronics.
Recommended fuses are indicated for each control unit in the chapter 'Pin assignments' under 'Power
Supply & System communications'. See also the wiring diagrams in the chapter 'Connection diagrams'.
Analogue inputs
There are two types of analogue inputs with the voltage range 0-5V on the Master and Expansion unit.
One group of these inputs has an input impedance of 100 kΩ, while the other group has an impedance
of 18 kΩ. The inputs with18 kΩ should not be used for current-sensitive potentiometers, for example operating levers with potentiometers. In these cases use the inputs with the higher impedance of 100 kΩ.
PWM outputs on Master, Crane and Expansions units
The PWM outputs in CANmaster systems may only be used for valve coil-type inductive loads. Check
that the resistances of the solenoids used are within the ranges for 12 V and 24 V systems, as shown in
chart data for each control unit under the heading PWM outputs.
CANmaster Technical Data & Installation - User Manual
45
Chapter 7 | Electrical data - MASTER
MASTER
MASTER unit - Part No: 5010 3000
Power supply
Data range
Function
min.
typical
max.
Unit
Comment
Supply voltage
11
24
30
V
Applies to both Vbatt SYS and
Vbatt Power-OUT
Vbatt SYS
Max. current
1
Vbatt Power-OUT
15
Ripple supply voltage
Vref-Sensor 5V
4.95
5.00
Load on Vref-Sensor 5V
A
0.5
Vp-p
5.05
V
200
mA
Output configuration must be adapted to the maximum permissible
total current for the control unit.
Internal short-circuit protection
Data communication
Data range
Function
min.
typical
max.
Unit
Comment
CAN port 1
500
kbps
Derivat of CANopen/CAN2.0B
Physical layer: ISO11898
CAN port 2
250
kbps
CAN SAE J1939/CAN2.0B
RS232
9600
bps
8 bit, 1 stop bit, no parity check
Microprocessor and built-in functions
46
Function
Comment
Processor
ST Microelectronics 16-bit microprocessor
System SW, Application SW and configuration parameters
Flash memory
Primary memory
RAM
Error log
EEPROM
CAN controller
2 FULL CAN controllers/ CAN 2.0B
External communication
1 UART-RS232
A/D converter
10-bit
Watchdog
Internal for CPU and external for program execution
CANmaster Technical Data & Installation - User Manual
Chapter 7 | Electrical data - MASTER
Analog-IN, Analog-OUT, Frequency-IN
Data range
min.
Function
typical
max.
Unit
0
0.05
V
5.0
5.05
V
Comment
ANALOG IN (0-5V)
Low limit
High limit
4.95
Impedance, Analog IN 04-10
100
kΩ
Impedance, Analog IN 11-14
18
kΩ
Not intended for joysticks
Signal resolution
5
mV
10-bit
Resistance range, external potentiometers
1-5
kΩ
ANALOG OUT (0-5V)
Low limit
High limit
4.95
Signal resolution
0
0.05
V
5.00
5.05
V
20
Current
mV
8-bit
20
mA
Short circuit protected
Inputs adapted to measure, for example, the rpm
of diesel engines using
inductive passive sensors.
FREQUENCY IN
Freq.- IN 00 & 01
Signal amplitude 1 V
3
1000
Hz
Signal amplitude 10 V
3
15000
Hz
Signal amplitude range
1
60
V
Signal resolution
Freq. -IN 02 & 03
1
Signal ampl. 11-30 V
3
Signal current range
10
Signal resolution
1
Hz
15000
Hz
40
mA
Opto-connected inputs
adapted for pulse sensors
(square-wave signal).
Hz
Note:
Puls sensors (square wave output signal) can be used for all frequency inputs 00, 01, 02 and 03.
Inductive passive sensors is not recommended for the frequency inputs 02 and 03.
CANmaster Technical Data & Installation - User Manual
47
Chapter 7 | Electrical data - MASTER
Digital-IN, Digital-OUT
Data range
Function
min.
typical
max.
Unit
Comment
OFF at open input
DIGITAL IN (24V nom.)
Low limit
0
0.8
V
High limit
2.0
45
V
Impedance
18
kΩ
DIGITAL OUT - high side (24V nom.)
Output activated
11
24
Output inactive
30
V
0
V
Max. load
1.5
Max. load total
Equals system supply voltage
12
A
Load on each output
A
Total, activated outputs
The outputs are short circuit protected
PWM-OUT
Data range
min.
Function
typical
max.
Unit
Comment
1600
mA
Accuracy +/- 2 mA
mA
10-bit
Less than set min. current value
PWM OUT +/- (0-1600 mA)
Current RMS (effective)
0
Resolution current value
1.6
Ripple current, amplitude
0
50
300
mA
Ripple frequency
80
100
350
Hz
Baseline frequency
5
20
20
kHz
Valve coil resistance, 24 V coils
20
22
30
Ω
Supply voltage 20-30 V
Valve coil resistance, 12 V coils
5
8
10
Ω
Supply voltage 11-15 V
A
Triggered after 150-200 ms
Short circuit protection
3.6
Note: PWM outputs may only be used for valve coils (inductive loads).
Note:
For special applications, output PWM-OUT 03 (connector pin no. 12, connector A) can be configured as
a non-feedback PWM output with Pulse Width Modulation:
Amplitude: Vbatt, nom. 24 V
Nominal output frequency: 500 Hz
Duty cycle: 7.5 - 92.5 %.
For further details, contact Hydratronics Technical Support.
48
CANmaster Technical Data & Installation - User Manual
Chapter 7 | Electrical data - MASTER
Environmental & Mechanical data
Function
Data
Comment
Temperature range
Operating temperature
min. -40 oC - max. +70oC
Storage temperature
min. -40 oC - max. +80 oC
EMC class
Radiated emission
95 / 54 / EC
Automotive
Radiated RF immunity
95 / 54 / EC
Automotive
Electrostatic discharge
ISO 10605
Transient immunity
ISO 7637-2
Mechanical environment
Vibrations
IEC 60068-2-64
Random broad-band
Shock
IEC 60068-2-27
Bump
IEC 60068-2-29
Enclosure class
IP65 acc. to IEC 60529 / SS EN 60529 / EN60529
Dust and waterproof
Weight
0.95 kg
Excl. connected contact
Housing material
Pressure die-cast alum., powder coating
Housing breathing
GORE-TEX® membrane
Outer dimensions
223 x 152 x 47 (mm)
Housing & Dimensions
CANmaster Technical Data & Installation - User Manual
49
Chapter 7 | Electrical data - CRANE
CRANE
CRANE unit - Part No: 5010 3500
Power supply
Data range
Function
min.
typical
max.
Unit
Comment
Supply voltage
11
24
30
V
Vbatt Power
Max. current
15
A
Output configuration must be
adapted to the maximum permissible total current for the control unit.
Ripple supply voltage
0.5
Vp-p
5.05
V
200
mA
Inernal short-circuit protection
max.
Unit
Comment
Vref-Sensor 5V
4.95
5.00
Load on Vref-Sensor 5V
Data communication
Data range
Function
min.
typical
CAN port 1
500
kbps
Derivat of CANopen/CAN2.0B
Physical layer: ISO11898
RS232
9600
bps
8 bit, 1 stop bit, no parity check
Microprocessor and built-in functions
50
Function
Comment
Processor
ST Microelectronics 16-bit microprocessor
System SW
Flash memory
Primary memory
RAM
Error log
EEPROM
CAN controller
1 FULL CAN controller /CAN 2.0B
External communication
1 UART-RS232
A/D converter
10-bit
Watchdog
Internal for CPU and external for program execution
CANmaster Technical Data & Installation - User Manual
Chapter 7 | Electrical data - CRANE
Analog-IN
Data range
min.
Function
typical
max.
Unit
0
0.05
V
5.0
5.05
V
Comment
Analog IN (0-5V)
Low limit
High limit
4.95
Impedance, Analog IN 08-12 (4 inputs)
100
kΩ
Signal resolution
5
mV
Resistance range, external potentiometers
1-5
kΩ
10-bit
Digital-IN, Digital-OUT
Data range
Function
min.
typical
max.
Unit
Comment
OFF with open input
DIGITAL IN (24V nom.)
Low limit
0
0.8
V
High limit
2.0
45
V
Impedance
18
kΩ
DIGITAL OUT high side (24V nom.)
Output activated
11
Output inactive
24
0
Max. load
Ma. load, total
30
Equals system supply voltage
V
1.5
3
V
A
Load each output
A
Total, activated outputs
The outputs are short-circuit protected
CANmaster Technical Data & Installation - User Manual
51
Chapter 7 | Electrical data - CRANE
PWM-OUT
Data range
min.
Function
typical
max.
Unit
Comment
1600
mA
Accuracy +/- 2 mA
mA
10-bit
Less than set min. current value
PWM OUT +/- (0-1600 mA)
Current RMS (effective)
0
Resolution current value
1.6
Ripple current, amplitude
0
50
300
mA
Ripple frequency
80
100
350
Hz
Baseline frequency
5
20
20
kHz
Valve coil resistance, 24 V coils
20
22
30
Ω
Supply voltage 20-30 V
Valve coil resistance, 12 V coils
5
8
10
Ω
Supply voltage 11-15 V
A
Triggered after 150-200 ms
Short circuit protection
3.6
Note: PWM outputs may only be used for valve coils (inductive loads).
Environmental & Mechanical data
Function
Data
Comment
Temperature range
Operating temperature
min. -40 oC - max. +70oC
Storage temperature
min. -40 oC - max. +80 oC
EMC class
Radiated emission
95 / 54 / EC
Automotive
Radiated RF immunity
95 / 54 / EC
Automotive
Electrostatic discharge
ISO 10605
Transient immunity
ISO 7637-2
Mechanical environment
Vibrations
IEC 60068-2-64
Random broad-band
Shock
IEC 60068-2-27
Bump
IEC 60068-2-29
Enclosure class
IP65 acc. to IEC 60529 / SS EN 60529 / EN60529
Dust and waterproof
Weight
0.95 kg
Excl. connected contact
Housing material
Pressure die-cast aluminum, powder coating
Housing breather filter
GORE-TEX® membrane
Outer dimensions
223 x 152 x 47 (mm)
Housing & Dimensions
52
CANmaster Technical Data & Installation - User Manual
Chapter 7 | Electrical data - EXPANSION
EXPANSION
EXPANSION unit - Part No: 5010 4000
Power supply
Data range
Function
min.
typical
max.
Unit
Comment
Supply voltage
11
24
30
V
Applies to both Vbatt SYS and
Vbatt Power-OUT
Vbatt SYS
Max. current
1
Vbatt Power-OUT
15
Ripple supply voltage
Vref-Sensor 5V
4.95
5.00
Load on Vref-Sensor 5V
A
0.5
Vp-p
5.05
V
200
mA
Output configuration must be adapted to the maximum permissible
total current for the control unit.
Internal short-circuit protection
Data communication
Data range
Function
min.
CAN port 1
typical
500
CAN port 2
RS232
max.
1000
9600
Unit
Comment
kbps
Derivat of CANopen/CAN2.0B
Physical layer: ISO11898
kbps
CAN custom spec. /CAN2.0B
Physical layer: ISO11898
bps
8 bit, 1 stop bit, no parity check
Microprocessor and built-in functions
Function
Comment
Processor
ST Microelectronics 16-bit microprocessor
System SW
Flash memory
Primary memory
RAM
Error log
EEPROM
CAN controller
2 FULL CAN controllers / CAN 2.0B
External communication
1 UART-RS232
A/D converter
10 bit
Watchdog
Internal for CPU and external for program execution
CANmaster Technical Data & Installation - User Manual
53
Chapter 7 | Electrical data - EXPANSION
Analog-IN, Analog-OUT, Frequency-IN
Data range
min.
Function
typical
max.
Unit
0
0.05
V
5.0
5.05
V
Comment
ANALOG IN (0-5V)
Low limit
High limit
4.95
Impedance, Analog IN 04-10
100
kΩ
Impedance, Analog IN 11-13
18
kΩ
Not for pot. joysticks
Signal resolution
5
mV
10-bit
Resistance range external potentiometers
1-5
kΩ
20
kHz
SERVOMOTOR OUT
PWM frequency
Current
2
Signal resolution
A
1024
Overload protected
bits
FREQUENCY-IN
Freq.- IN 00
Signal amplitude 1 V
3
1000
Hz
Signal amplitude 10 V
3
15000
Hz
Signal amplitude range
1
60
V
Input are adapted to
measure, for example,
the RPM of diesel
engines using inductive passive sensors.
Digital-IN, Digital-OUT
Data range
Function
min.
typical
max.
Unit
Comment
OFF with open input
DIGITAL IN (24V nom.)
Low limit
0
0.8
V
High limit
2.0
45
V
Impedance
18
kΩ
DIGITAL OUT high side (24V nom.)
Output activated
Output inactive
11
24
0
Max. load
Max. load total
30
Equals supply voltage
V
1.5
12
V
A
Load per output
A
Total, activated outputs
The outputs are short-circuit protected
54
CANmaster Technical Data & Installation - User Manual
Chapter 7 | Electrical data - EXPANSION
PWM-OUT
Data range
min.
Function
typical
max.
Unit
Comment
1600
mA
Accuracy +/- 2 mA
mA
10-bit
Less than set min. current value
PWM OUT +/- (0-1600 mA)
Current RMS (effective)
0
Resolution current value
1.6
Ripple current, amplitude
0
50
300
mA
Ripple frequency
80
100
350
Hz
Baseline frequency
5
20
20
kHz
Valve coil resistance, 24 V coils
20
22
30
Ω
Supply voltage 20-30 V
Valve coil resistance, 12 V coils
5
8
10
Ω
Supply voltage 11-15 V
A
Triggered after 150-200 ms
Short circuit protection
3.6
Note: PWM outputs may only be used for valve coils (inductive loads).
Environmental & Mechanical data
Function
Data
Comment
Temperature range
Operating temperature
min. -40 oC - max. +70oC
Storage temperature
min. -40 oC - max. +80 oC
EMC class
Radiated emission
95 / 54 / EC
Automotive
Radiated RF immunity
95 / 54 / EC
Automotive
Electrostatic discharge
ISO 10605
Transient immunity
ISO 7637-2
Mechanical environment
Vibrations
IEC 60068-2-64
Random broad-band
Shock
IEC 60068-2-27
Bump
IEC 60068-2-29
Enclosure class
IP65 acc. to IEC 60529 / SS EN 60529 / EN60529
Dust and waterproof
Weight
0.95 kg
Excl. connected contact
Housing material
Pressure die-cast aluminum, powder coating
Housing breather filter
GORE-TEX® membrane
Outer dimensions
223 x 152 x 47 (mm)
Housing & Dimensions
CANmaster Technical Data & Installation - User Manual
55
Chapter 7 | Electrical data - TERMINAL T2
TERMINAL T2
TERMINAL T2 - Part No: 5010 1000
Power supply
Data range
Function
min.
typical
max.
Unit
Comment
Supply voltage
11
24
30
V
Vbatt-SYS
A
@ 24V
Max. current
0.5
Ripple supply voltage
0.5
Vp-p
Data communication
Data range
Function
CAN port 1
min.
typical
500
CAN port 2
RS232
max.
1000
9600
Unit
Comment
kbps
Derivat of CANopen/CAN2.0B
Physical layer: ISO11898
kbps
CAN customer spec. / CAN2.0B
Physical layer: ISO11898
bps
8 bit, 1 stop bit, no parity check
Microprocessor and built-in functions
56
Function
Comment
Processor
ST Microelectronics 16- bit microprocessor
System SW and Font/Meny data
Flash memory
Primary memory
RAM
Error log
EEPROM
CAN controller
2 FULL CAN controller /CAN 2.0B
External communication
1 UART-RS232
Watchdog
Internal for CPU
CANmaster Technical Data & Installation - User Manual
Chapter 7 | Electrical data - TERMINAL T2
DIGITAL-IN, DIGITAL-OUT
Data range
Function
min.
typical
max.
Unit
Comment
V
OFF with open input
DIGITAL IN (max. 24 V )
Low limit
0.8
High limit
2
Impedance
18
24
V
kΩ
DIGITAL OUT high side (24 V)
Output activated
11
24
Output inactive
0
Max. load
200
30
V
Equals supply voltage
V
250
mA
Limited with PTC-resistor
The outputs are short-ciruit protected
Environmental & Mechanical data
Function
Data
Comment
Temperature range
Operating temperature
min. -20 oC - max. +60oC
Storage temperature
min. -30 oC - max. +80 oC
Alarm limits internal temp.
< -30 oC - and >+65 oC
EMC class
Radiated emission
95 / 54 / EC
Automotive
Radiated RF immunity
95 / 54 / EC
Automotive
Electrostatic discharge
ISO 10605
Transient immunity
ISO 7637-2
Display
Type
Graphic LCD, white-LED lit
Resolution
240 x 128 pixels
Control buttons
Illuminated membrane buttons
Mechanical environment
Vibrations
IEC 60068-2-64
Shock
IEC 60068-2-27
Bump
IEC 60068-2-29
Enclosure class
IP40 acc. to IEC 60529 / SS EN 60529 / EN60529
Random broad-band
Dust protected
Housing & Dimensions
Weight
0.50 kg
Housing material
Aluminum / end pieces ABS-PC plastic
Outer dimensions (mm)
204 x120 x 38
CANmaster Technical Data & Installation - User Manual
57
Chapter 7 | Electrical data - JOYSTICK H5-S50
JOYSTICK H5-S50
JOYSTICK H5-S50 - Part No: 5010 2500
Power supply
Data range
Function
min.
typical
max.
Unit
Comment
Supply voltage
11
24
30
V
Vbatt Power
Max. current
0.5
A
Ripple supply voltage
0.5
Vref-DIGITAL-IN +5V
Vref-ANALOG-IN +5V
5
4.95
5.00
5.05
Vp-p
V
Power output for DIGITAL-IN
V
Power output for ANALOG-IN
Data communication
Data range
Function
min.
typical
max.
Unit
Comment
CAN port 1
500
kbps
Derivat of CANopen/CAN2.0B
Physical layer: ISO11898
RS232
9600
bps
8 bit, 1 stop bit, no parity check
Microprocessor & built-in functions
58
Function
Comment
Processor
ATMEL 8-bit microprocessor
System SW
Flash memory
Primary memory
RAM
Error log
EEPROM
CAN controller
1 FULL CAN controller enl. 2.0B
External communication
1 UART-RS232
A/D converter
10-bit
Watchdog
Internal for CPU
CANmaster Technical Data & Installation - User Manual
Chapter 7 | Electrical data - JOYSTICK H5-S50
Analog-IN
Data range
min.
Function
typical
max.
Unit
Comment
ANALOG IN internal X/Y/Z-axis
Signal resolution
10-bit
ANALOG IN external inputs (0- 5V)
Low limit
High limit
4.95
0
0.05
V
5.00
5.05
V
Impedance
100
kΩ
Signal resolution
5
mV
Resistance range, external potentiometers
1-5
kΩ
10-bit
DIGITAL-IN, DIGITAL-OUT
Data range
Function
min.
typical
max.
Unit
Comment
OFF with open input
DIGITAL IN (max. 5 V)
Low limit
0
V
High limit
5
V
Impedance
22
kΩ
DIGITAL OUT (24 V nom.)
Output activated
11
24
Output inactive
30
V
0
Max. load
Equals supply voltage
V
200
mA
Load per output
The outputs are short-circuit protected
PWM-OUT
Data range
Function
min.
typical
max.
Unit
Comment
30
V
Supply voltage
PWM OUT (0-200 mA) non current feed back outputs
Output voltage
11
Resolution current value
24
255
Max. output current
Baseline frequency
CANmaster Technical Data & Installation - User Manual
28
30
steps
200
mA
32
Hz
59
Chapter 7 | Electrical data - JOYSTICK H5-S50
Environmental & Mechnical data
Function
Data
Comment
Temperature range
Operation temperature
min. -30 oC - max. +50oC
Storage temperature
min. -40 oC - max. +85 oC
EMC klass
Radiated emission
95 / 54 / EC
Automotive
Radiated RF immunity
95 / 54 / EC
Automotive
Electrostatic discharge
ISO 10605
Transient immunity
ISO 7637-2
Mechanical environment
Vibrations
IEC 60068-2-64
Random broad-band
Shock
IEC 60068-2-27
Bump
IEC 60068-2-29
Enclosure class
IP52 acc. to IEC 60529 / SS EN 60529 / EN60529
Dust protected
Housing & Dimensions
60
Weight
0.55 kg
Housing material
Deep drawn aluminum
Housing breather filter
-
Outer dimensions (mm)
157 x 92
CANmaster Technical Data & Installation - User Manual
Chapter 8
Dimensions & Mounting
General
This chapter describes dimensions and installation principles for each control unit in the CANmaster system.
MASTER, CRANE & EXPANSION
The Master, Crane and Expansion control units have identical dimensions and the same location options
in the machine.
The units must be protected against mechanical knocks, impacts, powerful high-frequency vibrations and
direct soaking with water, but otherwise they can be placed anywhere on the outside of the machine. The
underside should never face upwards as this could allow water and contaminants to collect on the GoreTex membrane that is intended to provide ventilation to the enclosure. The units are classified as dustproof and watertight with protection class IP65, though they must not be exposed to continuous soaking
with water and they should not be washed using a high-pressure washer.
The mounting surface beneath the control unit must be flat to avoid the risk of the enclosure becoming
deformed when tightening the mounting screws. An O-ring provides a seal between the bottom cover and
the upper part of the enclosure.
Make sure that the cabling to the connectors is fitted in such a way that water cannot run along the cables
and accumulate in the connectors. Each wire in the outer contact is sealed with a rubber membrane,
though accumulations of standing water must be avoided to prevent water getting into the contact housing, as this could otherwise cause corrosion and oxide formation. When fitting the wires to the contact,
holes are pierced in the membrane for each individual wire. If a wire is removed from the contact, a sealing plug must be put in its place in order to prevent water getting into the contact housing. See also the
chapter 'Connectors & Cables'.
CANmaster Technical Data & Installation - User Manual
61
Chapter 8 | Dimensions & Mounting - MASTER, CRANE & EXPANSION
Dimensions
13
47
140
Gore-Tex® membrane
Chassis grounding
terminal
152
142
21
16
39
CAN
CPU
213
A
30
223
Bottom view
197
45
Æ 5.5 (4x)
Washer Æ10 mm
(mm)
View - A
62
CANmaster Technical Data & Installation - User Manual
Chapter 8 | Dimensions & Mounting - MASTER, CRANE & EXPANSION
Mounting
1. STANDARD VERTICAL MOUNTING POSITION WITH THE CONNECTORS FACING DOWN
Use vibration dampeners when there is
high frequency vibrations in the machine
Protection cover,
outddoor mounting
UP
Flat
mounting surface
Cables pointed downwards
in order to prevent water from
running into the connectors.
min. 90 mm
Clearance required to engage/disengage connectors.
Space for cables to be added.
Flat surface min. 165 x 240 mm
2. HORIZONTAL MOUNTING POSITION
3. MOUNTING POSITION WITH BOTTOM SIDE UP
Flat covering plate
Protection cover,
outdoor mounting
UP
UP
NOT RECOMMENDED MOUNTING POSITION
UP
Flat mounting surface
Gore-Tex® membrane
Free space
Min. 10 mm
Free area under the unit
for air-circulation/cooling
The control unit should be installed such a way that it is
protected from mechanical damage and must not be exposed
to direct contact with water continously.
Do not use high pressure cleaning.
CANmaster Technical Data & Installation - User Manual
63
Chapter 8 | Dimensions & Mounting - TERMINAL T2
TERMINAL T2
Dimensions
38
9
29
204
187
Groove for M4
hex bolt head
79
120
114
17
Light sensor
CAN status
CPU status
Display b/w 240 x 128 pixles
Connector
(mm)
Rear view
64
CANmaster Technical Data & Installation - User Manual
Chapter 8 | Dimensions & Mounting - TERMINAL T2
Panel mounting
Viewing angles
Panel cut-out
Plate thickness: t=1-1.5 mm
114.5
Up/Down +/-45°
(mm)
187.5
Left/Right +/-30°
Shield against
direct sunlight
Grooves for M4 hex bolt head (2x)
1
2
3
4
Fastening kit for panel mounting, compl., part no: 5010 1500
Included parts:
Pos no.
Part no.
Qty
Designation
Description
1
5010 1501
1
Clamp
2
5010 1502
2
Hex bolt
M4x20
3
5010 9003
2
Lock washer
DIN6798A, 4.3 fzb
4
5010 1503
2
Knob
M4
CANmaster Technical Data & Installation - User Manual
65
Chapter 8 | Dimensions & Mounting - JOYSTICK H5-S50
JOYSTICK H5-S50
Dimensions
± 20°
Æ30
Z-
85
65
Z+
Y+
74
X+
Y-
X-
Connector
Æ92
(mm)
Connector
Mounting
Recommended mounting: Bracket with clamp around joystick housing.
During transport, the lever should be
secured with an elastic band to avoid
damages to the built-in potentiometers.
Adjustable arm support
Clamp
66
CANmaster Technical Data & Installation - User Manual
Chapter 9
External system LED indicators
LEDs for indication of the system’s operational status
All units in the CANmaster system are equipped with 2 LEDs to indicate operational status, a YELLOW
LED for CAN-bus status and a GREEN LED for CPU status. The Master unit indicates when errors occur
in any of the units in the system. When the CAN-bus communication and all parts in the system works as
intended, both LEDs on the Master unit glow steadily.
MASTER, CRANE & EXPANSION
JOYSTICK H5-S50
LED status
TERMINAL T2
CAN STATUS (Yellow)
OFF
Unit lacks power or will not start.
Slow flash
No communication via CAN-bus.
Rapid flash
Fault in CAN-bus communication in the unit.
For the Master-unit: Fault in Master unit’s CAN-bus communication or in another part of the system.
Steady glow
CAN-bus communication works normally for the unit.
For the Master-unit: CAN-bus communication works normally for the entire system.
LED status
CPU STATUS (Green)
OFF
Unit lacks power or will not start.
Slow flash
Standby position or configuration position.
Rapid flash
Internal fault in the unit.
For the Master-unit: Fault in the Master unit or in other units connected to the system.
Steady glow
Unit works normally.
For the Master-unit: The entire system works normally
CANmaster Technical Data & Installation - User Manual
67
Chapter 9 | External system LED indicators - LEDs for indication of the system’s operational status
LED flash frequency
Flashing frequency for LEDs
Rapid flashing
Slow flashing
ON
OFF
1 sec
1 sec
1 sec
Example of fault indication
A fault in the CRANE-unit with faults in both the CPU and the CAN-bus for the unit
CAN-bus
CRANE
MASTER
Both LEDs flash with rapid flash
CPU LED off
CAN-bus LED off
CRANE-unit not functioning
JOYSTICK
Both LEDs glow steadily:
The unit and CAN-bus communication
works normally.
For advanced trouble shooting, see CANmaster PC-Tool User Manual- Developer.
68
CANmaster Technical Data & Installation - User Manual
Chapter 10
Test units
General description
This chapter describes the separate test units used in CANmaster system to facilitate testing of the control system's program functions without the control units needing to be connected to the machine's various operating levers, valves and sensors.
For every type of control unit - MASTER, CRANE, EXPANSION, JOYSTICK and TERMINAL there is a
corresponding unique test unit with the same I/O configuration as the control unit. The test units are connected to the relevant control unit via the unit's normal connector with a complete pin-to-pin cabling for
I/O signals, power supply and CAN-bus communication.
The input signals to the control system are regulated with the aid of the test units' built-in potentiometers,
on/off switches and frequency generators. The outputs are connected to indicating lights for on/off outputs and built-in solenoids for PWM outputs.
The test units can also be used as an easy way of downloading the various software programs that are
to be stored in the control units, with the possibility of standardised test procedures run immediately after
the download to verify that the downloaded program functions in accordance with the set specifications.
To log signal values of inputs and outputs as a function of time, the separate logging program that forms
a part of the CANmaster PC-Tool (see separate manual) is used. In these instances the system computer
with its pre installed CANmaster PC-Tool is connected to the test unit's RS232 port on the front panel.
The logging program is started up and run in parallel with manual regulation of input signals. Logging of
I/O signals is necessary for complex programs where the output signals are dependent on many simultaneously activated input signals, and also constitutes an important component when documenting a specific program sequence.
The test unit for JOYSTICK includes a facility for testing two three axis joysticks in the same unit.
To facilitate testing and troubleshooting of the components (valves and sensors) that are used in the machine applications, there are also a limited number of I/Os on each control unit for connection of external
PWM-controlled valves, on/off switches, potentiometers, operating levers and sensors. For each internal
frequency input on the test units there is also the possibility of connecting an external frequency signal to
the input.
Potentiometers and sensors of the voltage type must always be provided with +5V from the control system's built-in voltage source corresponding to the connections 'Vref sensor +5V' and 'Vref sensor GND'.
Sockets for this purpose are included in the test units and must be used for tests using externally connected components. Conversion to a voltage signal is required for tests using a current-based sensor.
See circuit diagrams Chapter 4, on page 13, which describes how this should be carried out.
Communication between control units uses the normal ports for CANopen and is available on the test
units' rear panel. (I/O designation CAN_1). For the MASTER test unit there is also the system's communication port for external systems that communicate with CANbus in accordance with the SAE J1939 protocol standard. (I/O designation: CAN_2).
CANmaster Technical Data & Installation - User Manual
69
Chapter 10 | Test units - General description
General design and connection to system
The test units have the same basic design with on/off switches for control of digital inputs and adjusting knobs for
analog inputs and frequency inputs. What mutually differentiates the test units is the number and type of I/Os in accordance with the configuration for the corresponding control unit. All test units are equipped with two connecting
ports for the CAN bus CANopen (I/O designation CAN_1) for easy connection of the test units to the CAN bus. Prepared cabling is available for this connection.
Page 71 shows a connection diagram for a complete system in which all test units are included. The maximum number of connectable test units of the same type corresponds to the maximum number of control units, i.e. 4 units of
the Crane and Expansion type and two units of the double test unit for Joysticks. Addressing of the units (address
00, 01, 02 or 03) is performed using the dip switches on the rear panel.
I/O with alternative function
For the I/Os that can be configured as an alternative type of I/O, there is a marking in the form of a bidirectional arrow
symbol
on the front panel of the test units. In these cases the relevant 3-position on/off switch has a double
function and regulates the status of the digital input in question (ON or OFF) and selection of the alternative I/O positioned right above the switch. With the switch set to the upper position, the function to be found right above the
switch applies. With the switch set to the central position the digital input is active with status = OFF, and in the lower
position, active with status = ON.
Selection between various types of I/O is defined in the application program, and all relevant switches on the test
units must be set to the correct position in accordance with the program so that testing can be performed correctly.
Test of external components
The connection diagrams for the test unit show how external components of various types can be connected to the
test units by breaking the internal circuit for an I/O with a removable connecting bridge. When a bridge is removed
the blue I/O-socket on the testunit is connected directly to the corresponding contact pin (I/O pin) on the control unit
and is galvanically insulated from the test unit. The standard configuration for the test units is with all connecting
bridges installed, and it is only for testing of external components that the bridges need to be removed. Note that
the yellow socket on the test unit, which is open when a bridge is removed, must not be connected to a component,
but must be left open.
Standard cabling that has been specially adapted for the test equipment can be ordered using the Article No. in accordance with the specification on page 78.
70
CANmaster Technical Data & Installation - User Manual
Chapter 10 | Test units - General description
Test units - Connection diagram overview
External components
with CANbus SAE J1939
MACHINE APPLICATION I/O
CAN bus SAE J1939
CONTROL UNITS
MASTER
Terminating resistor
TEST UNITS
System computer incl.
CANmaster PC-TOOL
PIN-to-PIN
Master
CRANE
PIN-to-PIN
EXPANSION
PIN-to-PIN
Expansion
JOYSTICK (2x)
CAN bus CANopen
Crane
PIN-to-PIN
Joystick
TERMINAL T2
Terminating resistor
PIN-to-PIN
Terminal
Note: The test units can be connected to the CAN-bus network where desired.
CANmaster Technical Data & Installation - User Manual
71
Chapter 10 | Test units - General description
Test unit MASTER - Front panel
The appropriate parts of the description below also apply to the front panel of the test units Crane and Expansion.
Analog-IN 14 or Digital-IN 00:
Adjusting knob for Analog-IN 14 (potentiometer).
A-in
Symbol stipulating that the switch regulates an alternative I/O.
Analog-IN 10 or
Analog-OUT 00
Sockets for Analog OUT,
see rear panel.
14
OFF
D-in
00
ON
3- position switch for Digital-IN 00 and selector Digital-IN 00 /
Analog-IN 14:
- position UP = Analog-IN 14 active / Digital-IN 00 inactive
- position CENTER = Digital-IN 00, status=OFF / Analog-IN 14 inactive
- position DOWN = Digital-IN 00, status=ON / Analog-IN 14 inactive
Indicating light for Digital-IN 00 (light ON = input status ON).
*2)
Proportional lights for
PWM OUT 00-03:
(+) = control current in (+) direction
(-) = control current in (-) direction
Master Test
HYDRATRONICS
CANmaster
®
Indicating lights for
Digital OUT 00-07
(8 outputs)
RS232
3-position switch for Digital-IN 06 or Digital-OUT 04:
- positon UP: Digital-OUT 04 active / Digital-IN 06 inactive
- position CENTER: Digital IN 06, status=OFF / Digital OUT 04 inactive
- position DOWN: Digital IN 06, status=ON / Digital OUT 04 inactive
1
RS232 PC communication port.
9 pin D-sub female connector.
*1) Frequency input Freq.-IN 00 or Digital-IN 10:
Connection for external
frequency signal, Freq.-IN 00.
Built-in frequency generator for Freq. IN 00
F-in
3-position switch for Digital-IN 10 or Freq-IN 00:
- position UP: Freq.-IN 00 active / Digital-IN 10 inactive
- position CENTER: Digital IN 10, status=OFF / Freq-IN 00 inactive
- position DOWN: Digital IN 10, status=ON / Freq-IN 00 inactive
00
Max
Hi
Ext
Lo
Int
Off
D-in
2-position selector switch external / internal
frequency signal, Freq.-IN 00:
- position EXT: external frequency signal
- position INT: internal frequency signal
10
Indicating light for Digital-IN 10.
On
*1) Note:
The description above for Freq.-IN 00 applies to all frequency inputs for
test unit Master (Freq. IN 00-03) and Freq-IN 00 for test unit Expansion.
2-position switch for frequency range,
internal frequency signal, Freq.-IN 00: *3)
- position LOW: approx. 10 Hz - 5 kHz (± 1%)
- position HIGH: approx. 30 Hz - 15 kHz (± 1%)
*3) Note:
A high resolution frequency signal may require
an external frequency generator.
*2) Note:
The test unit have built-in valve solenoids for all double acting PWM-outputs.
This also applies to the test units Crane and Expansion.
Solenoid control current capacity: 0 - 1600 mA.
72
CANmaster Technical Data & Installation - User Manual
CANmaster Technical Data & Installation - User Manual
CAN_H
5 4 3 2 1
9 8 7 6
3
PIN-to-PIN
2
PIN-to-PIN
CAN_1 (CANopen)
CAN_1 (CANopen)
CAN_2 (SAE J1939)
B
Sockets for lab plugs:
Power supply; Pwr, SYS, GND: Æ4 mm
All other sockets: Æ2 mm
Customer supplied external
test components
Note: Do not connect anything to the yellow
socket when a connecting bridge is removed.
Digital-IN 06
(+)
Digital-IN 06-09 or
Note: Connecting bridge, Pos. 4:
Digital-OUT 04-07
Pos. 4 mounted = Internally controlled I/O (Standard config.)
Pos. 4 removed = Externally controlled I/O
When a connecting bridge is removed, the blue socket is
connected to the corresponding I/O-pin on the control unit and is
galvanically insulated from the test unit.
Control unit - MASTER
CAN-bus connector
(RS232 connector)
CAN_L
GND
(+)
A
8
EXT
INT
EXT
INT
CANopen
J 1939
08/06 09/07
06/04 07/05
D-IN/OUT
Digital-OUT 07
4
CANopen
8
R
R
+
(-)
(+)
PWM-OUT 03
-
+
R
PWM-OUT 03
PWM-OUT 00
-
0-5V
+
A-OUT 00
(-) 0-5V (+)
V
4.98
04
05
A-IN
15 A
S+
+5V
Fuses:
Pwr - 15A
SYS- 2 A
Analog-IN 05
1 - 5 kW
-
+
Vref 5V
OUT
0V
06
2A
GND
Vbatt Power OUT 11-30 V
SYS
Pwr OUT
Power supply +24 V DC (range min. 11V -max. 30V).
Separate supply for power outputs and system electronics
for both Test unit and connected Master unit.
The figure below shows an example where four connecting
Pwr OUT = power supply for power outputs. Fuse 15 A
bridges (pos. 4) is removed for test of external components:
SYS = power supply for system electronics. Fuse 2A
- PWM OUT 03 - Double acting proportional valve
GND = main ground / (-) connection.
- Digital IN 04 - On/Off switch
- Digital OUT 07 - On/Off valve
0 V (GND)
+24 V
+24 V
- Analog IN 05 - Potentiometer
Volt meter
Test unit MASTER - rear panel
Connection diagram
Chapter 10 | Test units - General description
Test unit MASTER - Rear panel - Connection diagram
73
74
3
PIN-to-PIN
2
PIN-to-PIN
CAN_1 (CANopen)
CAN_1 (CANopen)
CANmaster Technical Data & Installation - User Manual
Sockets for lab plugs:
Power supply; Pwr(+), GND: Æ4 mm
All other sockets: Æ2 mm
Customer supplied external
test components
Note: Do not connect anything to the yellow
socket when a connecting bridge is removed.
Note: Connecting bridge, Pos. 4:
Pos. 4 mounted = Internally controlled I/O (Standard config.)
Pos. 4 removed = Externally controlled I/O.
When a connecting bridge is removed, the blue socket is
connected to the corresponding I/O-pin on the control unit and is
galvanically insulated from the test unit.
CAN_H
5 4 3 2 1
9 8 7 6
Control unit - CRANE
CAN-bus connector
(RS232 connector)
CAN_L
(+)
A
GND
B
8
CANopen
4
EXT
INT
CANopen
Digital-OUT 00
8
00
01
D-OUT
Test unit - CRANE - rear panel
Connection diagram
R
R
+
(-)
(+)
PWM-OUT 07
-
+
R
PWM-OUT 03
PWM-OUT 00
UNIT ADDRESS
1 2
ON
08
09
A-IN
1 - 5 kW
S+
+5V
Analog-IN 09
0V
10
Vref 5V
OUT
15 A
GND
Vbatt Power
11-30 V DC
POWER SUPPLY +24 V DC
(range 11-30 V DC)
On
+ 24 V 0 V (GND)
Off
Dip switch settings - Unit addess:
Address Dip switch 1 Dip switch 2
00
OFF
OFF
01
ON
OFF
02
OFF
ON
03
ON
ON
Chapter 10 | Test units - General description
Test unit CRANE - Rear panel - Connection diagram
On
Off
CANmaster Technical Data & Installation - User Manual
CAN_H
5 4 3 2 1
9 8 7 6
CAN_L
3
PIN-to-PIN
2
PIN-to-PIN
CAN_1 (CANopen)
CAN_1 (CANopen)
CAN_2 (custom spec.)
Customer supplied
external test components
Sockets for lab plugs:
Power supply; Pwr, SYS, GND: Æ4 mm
All other sockets: Æ2 mm
Note: Do not connect anything to the yellow
socket when a connecting bridge is removed.
8
B
A
8
CANopen
(+)
GND
(+)
EXT
INT
EXT
INT
CANopen
07/06 08/07
05/04 06/05
D-IN/OUT
CAN 2
R
R
+
(-)
(+)
PWM-OUT 03
-
+
R
PWM-OUT 03
PWM-OUT 00
UNIT ADDRESS
-
+
SERVO
Servo-OUT B
Servo-OUT A
5
2
5
6
M
7 1
3
4
Servomotor
VDO p/n 408 403 002 001
4
04
05
A-IN
15 A
S+
+5V
Analog-IN 05
1 - 5 kW
Vref 5V
OUT
0V
06
2A
GND
Vbatt Power OUT 11-30 V
SYS
Pwr OUT
POWER SUPPLY +24 V DC (range min. 11V - max. 30V)
+ 24 V 0 V (GND)
+ 24 V
5 4 3 2 1
9 8 7 6
Vref (+)
Servo R
Vref (-)
Activation of servo motor output, see
selector switch on front panel, selector:
Servo / Analog-IN 04.
(RS232
connector)
Digital-OUT 07
Digital-IN 05-08 /
Digital-OUT 04-07
Digital-IN 05
Note: Connecting bridge, Pos. 4:
Pos. 4 mounted = Internally controlled I/O (Standard config.).
Pos. 4 removed = Externally controlled I/O.
When a connecting bridge is removed, the blue socket is
connected to the corresponding I/O-pin on the control unit and is
galvanically insulated from the test unit.
Control unit - EXPANSION
CAN-bus connector
(RS232 connector)
1 2
ON
Dip switch settings - Unit addess:
Address Dip switch 1 Dip switch 2
00
OFF
OFF
01
ON
OFF
OFF
ON
02
03
ON
ON
Test unit EXPANSION - rear panel
Connection diagram
Chapter 10 | Test units - General description
Test unit EXPANSION - Rear panel- Connection diagram
75
76
5 4 3 2 1
9 8 7 6
CAN_1
8
5 4 3 2 1
9 8 7 6
CAN_1
Alternative connector including
terminating resistor
9
Sockets for lab plugs:
Power supply; (+) and GND: Æ4 mm
*1) Note:
An internal connection is used for
the CAN bus connection between
Joystick No. 1 and 2.
8
CANmaster test units
When Test unit-JOYSTICK is the last unit
in the CAN bus line, a terminating resistor
should be mounted to one of the CAN_1 ports.
(See spare part list for standard cable including
terminating resistor).
Joystick 2
A
6
7
B
PIN-to-PIN
PIN-to-PIN
2
ON
05
Address
00
01
02
03
01
07
D-out
08 09
D-in
D-out
09 08
01
07
00
06
ON
05
ON
D-in
ON
04
00 01 02 03 04
03
A-in
2
CAN
RS232
On
Off
CAN
RS232
1
Joystick 1
Dip switch 3 Dip switch 4
OFF
OFF
OFF
ON
ON
OFF
ON
ON
JOYSTCK No. 1
A
B
*1)
CAN_1 (CANopen)
REAR PANEL
Address
00
01
02
03
1 2 3 4
ON
UNIT ADRESS
POWER
11-30V
-
+
POWER SUPPLY +24V DC
range min. 11 V- max. 30 V DC
(-) GND
+ 24 V
00
06
®
CANmaster
HYDRATRONICS
Joystick
Test
Dip switch 1 Dip switch 2
OFF
OFF
OFF
ON
ON
OFF
ON
ON
JOYSTCK No. 2
Dip switch settings - Unit addess:
CAN_H
5 4 3 2 1
9 8 7 6
*1)
CAN_1 (CANopen)
ON
1 D-in
03
04 03 02 01 00
04
ON
A-in
JOYSTICK unit 2
FRONT PANEL
JOYSTICK unit 1
RS232 PC communication port.
9 pin D-sub female connector.
CAN_L
1
Indicator lights for Digital OUT 00-01 (2 outputs)
Indicator lights for Digital IN 00-09
2 position selector switches for activation
of Digital-IN 00-09 ( 10 inputs):
- position UP: status ON
- position DOWN: status OFF
Built-in potentiometers for
Analog IN 03 -04 (2 inputs).
Test unit - JOYSTICK (2x)
Chapter 10 | Test units - General description
Test unit JOYSTICK- Frontpanel, Rearpanel - Connection diagram
CANmaster Technical Data & Installation - User Manual
CANmaster Technical Data & Installation - User Manual
5 4 3 2 1
9 8 7 6
CAN_1
5 4 3 2 1
9 8 7 6
CAN_1
8
9
CAN_L
CAN_H
5 4 3 2 1
9 8 7 6
Alternative connector including
terminating resistor
Sockets for lab plugs:
Power supply; (+) and GND: Æ4 mm
8
CANmaster test units
When Test unit-TERMINAL is the last unit
in the CAN bus line, a terminating resistor
should be mounted to one of the CAN_1 ports.
(See spare part list for standard cable including
terminating resistor).
ON
OFF
ON
00
CANopen
CANopen
Terminal T2
CAN_1 (CANopen)
02
HYDRATRONICS
®
RS232
I/O
CAN 2
PIN-to-PIN
POWER
11-30V
-
+
1
6
CAN_H
5 4 3 2 1
9 8 7 6
CAN_L
*1) Note:
CAN_2 - CAN custom spec.
*1)
CAN_2
RS232 PC communication port.
9 pin D-sub female connector.
CANmaster
Terminal
Test
POWER SUPPLY +24V DC
range min. 11 V- max. 30 V DC
(-) GND
+ 24 V
D-out
01
D-in
FRONT PANEL
REAR PANEL
CAN_1 (CANopen)
Indicator lights for Digital OUT 00-02
3-position switches for Digital-IN 00-02 or Digital-OUT 00-02:
- position UP: Digital-IN, status=ON / Digital-OUT inactive
- position center: Digital-IN, status=OFF / Digital-OUT inactive
- position DOWN: Digital-OUT active / Digital-IN inactive
Indicator lights for Digital IN 00-02
Test unit - TERMINAL
Chapter 10 | Test units - General description
Test unit TERMINAL - Front panel, Rear panel - Connection diagram
77
Chapter 10 | Test units - Spare parts
Spare parts
Ref. No., see connection diagrams for Test units.
Ref. No.
Component
Part No.
Comment
1
Connection cable
5010 3057
System PC - Test unit. RS232 communication cable
2
Connection cable
5015 1020
Test unit Master/Expansion/Crane, B connector, 14-pin
3
Connection cable
5015 1025
Test unit Master/Expansion/Crane, A connector, 35-pin
4
Connecting bridge
5010 3059
Test unit rear panel. Bridge, external I/O socket.
5
Connection cable
5010 4055
Test unit Expansion, Servo-OUT *1)
6
Connection cable
5015 1030
Test unit Joystick/Terminal, A connector, 12-pin
7
Connection cable
5015 1035
Test unit Joystick, B connector, 16-pin
8
Connection cable
5010 3055
CAN-bus
9
Terminating resistor
5010 3058
Connector including CAN-bus terminating resistor
10
11
12
*1) Cable adapted for VDO servo motor p/n: 408 403 002 001
Dimensions
Test unit MASTER, CRANE and EXPANSION:
135
240
260
Test unit JOYSTICK and TERMINAL
80
180
125
(mm)
78
CANmaster Technical Data & Installation - User Manual
Chapter 11
Sensors
Calibration values for analog sensors
For detailed instructions how to calibrate sensors, see the CANmaster PC-Tool User Manual. The information in this chapter is indended as general information showing actual average values for some of the
sensors often used in combination with CANmaster control system.
Pressure sensors
Pressure sensors, 0-60, 0-250 and 0-600 BAR. Voltage signal, ratiometric 10-90%. Supply voltage, 5 Volt.
Hydratronics, Part No.: 0-60 bar:
5010 90 16
0-250 bar: 5010 90 20
0-600 bar: 5010 9030
Note: Diagram shows typical values:
Internal pressure value
Digital value
BAR
1023
MAX
35
922
MIN
0
102
0
Output signal sensor (Volt)
5.00
0.00
0
CANmaster Technical Data & Installation - User Manual
Physical value
60
250
600
Pressure
BAR
79
Chapter 11 | Sensors - Calibration values for analog sensors
Electric accelerator pedal (speed pedal) with VDO-potentiometer
Electric accelerator pedal with VDO potentiometer nominal 1 kΩ .
Hydratronics, Part No: 8104 1600
Note: Diagram shows typical values:
Internal pedal value
%
MAX 100%
MIN
0%
Digital value
Output signal sensor (Volt)
1023
5.00
650
10
0
0.00
0%
Physical value
100%
Mechanical
pedal position %
Electric accelerator pedal (speed pedal) with Hall-effect sensor
Electric accelerator pedal with Hall-effect sensor and voltage output 0- 5 Volt .
Hydratronics, Part No.: 5010 9010
Note: Diagram shows typical values:
Internal pedal value
%
Digital value
Output signal (Volt)
1023
5.00
MAX 100%
880
MIN 0%
130
0
80
0.00
0%
Physical value
100%
Mechanical
pedal position %
CANmaster Technical Data & Installation - User Manual
Chapter 11 | Sensors - Calibration values for analog sensors
Temperature sensor
Temperature sensor, ST-20M (KTY19-6M).
Hydratronics, Part No.: 8104 4010
Note: Diagram shows typical values:
Internal
temperature value
ºC
Digital value
1023
MAX +150
497
-50
182
MIN
0
Output signal sensor (Volt)
5.00
0.00
-50
CANmaster Technical Data & Installation - User Manual
Physical value
+150
Temperature
ºC
81
Chapter 11 | Sensors - Calibration values for analog sensors
Non-linear sensors
In the CANmaster PC-TOOL, there is a function that allows you to store values for non-linear sensors.
The sensor range is split into a minimum of 2 and a max. of 8 equal divisions. Measured signal values
contra digital values are specified in a chart. The program uses chart data to calculate actual physical
values from recorded digital values. For detailed information, see the on-line Function reference, within
CANmaster PC-TOOL program.
Internal value
BAR
Digital value
1024
MAX
35
Output signal sensor (Volt)
5.00
922
The signal range
can be divided into
2, up to max. 8 divisions.
MIN 0
106
0
0.00
0 1
2
3
4
5
6
7
8
Pressure
BAR
35
Physical value
82
CANmaster Technical Data & Installation - User Manual
Chapter 12
Application examples
This chapter gives a number of examples of different types of machines with CANmaster control systems
in order to give some idea as to which CANmaster control units are used for various applications and how
these can best be used to build up a control system to meet the functional requirements. The examples
should only be seen as a number of ways of providing a control system for a particular type of machine.
There might be considerable variations depending on make, machine equipment and area of application.
Forwarder - All-terrain timber transporter
Description of the machine type
The Forwarder is used to transport timber from the logging zone to navigable roads for further transport
by lorry. The machine’s articulated chassis is constructed in two parts on forward and rear bogie axles
with outputs for four drive wheels per axle. Diesel engine, main hydraulics, pumps etc. and cab are
mounted on the forward bogie axle. The rear bogie axle comprises the load-bearing part of the vehicle
chassis. The bogie axles are driven via a hydrostatic driven gearbox with two main drive outputs, one for
rear bogie axle and one for the front bogie axle. The machines’ max. speed is about 25 km/h, usually
divided between two speed ranges (terrain/transport operation) via a 2 or 3-speed powershift gearbox or
a simple 2-speed gearbox where the machine must be stationary when changing gears. Typical machine
weight is in the range of 9-17 tons with a load capacity and maximum tractive effort equal to its own
weight. The machine is equipped with a swivel driver seat with two tripple-axis joysticks assembled in the
armrests and dual pedal arrays for controlling the transmission and braking.
CANmaster Technical Data & Installation - User Manual
83
Chapter 12 | Application examples - Forwarder - All-terrain timber transporter
CANmaster control units
The following CANmaster units are used for the application:
MASTER
CRANE
EXPANSION
3-axis JOYSTICKS
H5-S50
H5-S50
TERMINAL T2
1-axis analog
control lever
In addition to these primary components, there are a large number of sensors and controls of various
types, electric pedals, buttons, potentiometers and indicator lamps.
For electronically-controlled diesel engines, the diesel engine’s speed and power output are controlled
via the Master unit’s extra CAN-port using CAN-bus acc. to SAEJ1939. For conventional diesel engines
with mechanically controlled fuel pumps, the servomotor output on the Expansion unit is used in combination with external engine rpm measurement with a sensor mounted to the flywheel housing. The sensor
is connected to one of the frequency inputs on the Master-unit.
These machines come in a range of different designs, depending on manufacturer and application area.
Below, is an example of outputs that can be required for a conventionally equipped forwarder, incl. optional equipment.
84
CANmaster Technical Data & Installation - User Manual
Chapter 12 | Application examples - Forwarder - All-terrain timber transporter
Output list - main functions
Function
Output
Comment
Hydrostatic transmission - Pumpcontrol
PWM-OUT (+) / (-)
Transmission & chassis system
Gear box - low/high gear
Digital-OUT
Differential locks front & rear bogie axles
Digital-OUT (2x)
Articulated steering
PWM-OUT(+) / (-)
Parking brake / Cabin ladder
Digital-OUT
Automatic brake - loading
Digital-OUT
Center pivot lock
Digital-OUT
Clutch, rear axle drive input
Digital-OUT
Cooler fan motor - proportional pressure
PWM-OUT(+)
Boom lift
PWM-OUT(+) / (-)
Boom swing
PWM-OUT(+) / (-)
Outer boom dump
PWM-OUT(+) / (-)
Outer boom telescope
PWM-OUT(+) / (-)
Grapple
PWM-OUT(+) / (-)
Grapple rotator
PWM-OUT(+) / (-)
Bunk gate
PWM-OUT(+) / (-)
Bogie lift front bogie axle- left & right side
PWM-OUT(+) / (-) (2x)
Frame extension, load carriage
Digital-OUT (2x)
Dozer blade
PWM-OUT(+) / (-)
Winch
PWM-OUT(+) / (-)
CANmaster Technical Data & Installation - User Manual
Crane & carrier functions
Optional equipment
85
Chapter 12 | Application examples - Forwarder - All-terrain timber transporter
Control unit placement
Distribution of the I/Os on each control unit is dependent upon the opportunity to place the units on the
machine and the distance to the sensors and valves for optimised cabling.
In those cases where the outputs rely on analogue sensors as a primary function of regulation with a high
sample frequency for the sensor signal, the output and accompanying sensor inputs should be connected
to the same control unit so as not to burden the CAN-bus and cause delays in regulation. When the controls rely on slow processes such as oil or water temperatures or on/off signals, the placement of the sensor inputs and corresponding outputs is not important. Functions where safety requirements are high,
such as brakes, should be connected to the MASTER unit, which functions even if CAN-bus communication with all other units in the system ceases to function, due to cable breakage, for example.
The crane’s hydraulic valves are placed on the boom pillar to reduce the length of the hydraulic hoses
between the valves and the hydraulic cylinders. In order to minimize the electric cabling required for these
functions, the CRANE unit is placed close to the valves on the boom. From the forward part of the carriage, only one cable for the CAN-bus, power supply +24V and ground connection is required.
The Master unit and Expansion unit are placed in a suitable location close to the cab for connection to
the machine’s other valves and sensors, which are concentrated in the forward part of the carriage.
In the cab, all the controls with analogue and digital output signals connected to the joysticks’ inputs for
forwarding control signals from the driver’s seat, are relayed to the Master unit via the CAN-bus cable.
The terminal can, dependent upon placement, be connected to the CAN-bus cable by the driver’s seat or
to the Master unit.
One example of distribution of the I/Os on the various control units is shown on the following pages (excluding I/Os for system communication and power supply):
86
CANmaster Technical Data & Installation - User Manual
Chapter 12 | Application examples - Forwarder - All-terrain timber transporter
Distribution of I/Os
MASTER & EXPANSION unit
MASTER unit
Connector A
Function
EXPANSION unit
Connector A
Function
Analog-IN 04
01
Accelerator Pedal 1
Analog-IN 04/Servo return
01
-
Analog-IN 05
02
Accelerator Pedal 2
Analog-IN 05 (0-5V)
02
Fuel level
Analog-IN 06
03
Charge pump pressure
Analog-IN 06 (0-5V)
03
Oil level transmission tank
Analog-IN 14/Digital-IN 00
04
Lub. oil press. Engine
Analog-IN 13/Digital-IN 00
04
Oil level oper. hydraulic tank
Analog-IN 13/Digital-IN 01
05
Pressure brakesystem
Servo OUT A - PWM 04
05
-
Freq. 00/Digital-IN 10
06
RPM hydraulic motor
Freq. 00/ Digital-IN 09
06
-
Digital-OUT 00
07
Auto-brake loading
Digital-OUT 00
07
Bogie-lift float-valve 1
Digital-OUT 01
08
Center pivot lock
Digital-OUT 01
08
Bogie-lift float-valve 2
PWM-OUT 00(+)
09
Transm. pump (+) solenoid
PWM-OUT 00(+)
9
Bogie-lift left side (+)
PWM-OUT 01(+)
10
Fan motor press. (+)
PWM-OUT 01(+)
10
Bogie-lift right side (+)
PWM-OUT 02(+)
11
-
PWM-OUT 02(+)
11
Dozer blade (+)
PWM-OUT 03(+)
12
-
PWM-OUT 03(+)
12
Winch motor (+)
Analog-IN 07
13
Temp. gearbox
Analog-IN 07 (0-5V)
13
-
Analog-IN 08
14
Temp. watercooler Engine
Analog-IN 08 (0-5V)
14
-
Analog-IN 12/Digital-IN 02
15
Temp. transmission
Analog-IN 12/Digital-IN 01
15
-
Analog-IN 11/Digital-IN 03
16
Temp. operating hydraulics
Analog-IN 11/Digital-IN 02
16
-
Freq. 01/Digital-IN 11
17
Park brake switch
Servo OUT B - PWM 04
17
-
Digital-OUT 02
18
Park brake/ Cabin ladder
Digital-OUT 02
18
Diff. lock rear bogie axle
Digital-OUT 03
19
Central alarm
Digital-OUT 03
19
Diff. lock front bogie axle
PWM-OUT 00 RETURN
20
Transm. pump-Return
PWM-OUT 00 RETURN
20
Bogie-lift left side - Return
PWM-OUT 01 RETURN
21
Fan motor press.-Return
PWM-OUT 01 RETURN
21
Bogie-lift right side - Return
PWM-OUT 02 RETURN
22
-
PWM-OUT 02 RETURN
22
Dozer blade - Return
PWM-OUT 03 RETURN
23
-
PWM-OUT 03 RETURN
23
Winch motor - Return
Analog-IN 09
24
-
Analog-IN 09
24
-
Analog-IN 10/Analog-OUT 00
25
-
Analog-IN 10
25
-
Freq. 02/Digital-IN 04
26
Safety switch Pedal 1
Digital-IN 03
26
-
Freq. 03/Digital-IN 05
27
Safety switch Pedal 2
Digital-IN 04
27
Coupling -rear axle drive
Digital-OUT 04/Digital-IN 06
28
Gearbox - high gear
Digital-OUT04/Digital-IN05
28
Terrain steering indic. lamp
Digital-OUT 05/Digital-IN 07
29
Terrain steering - on/off
Digital-OUT05/Digital-IN06
29
Carrier frame extension (+)
Digital-OUT 06/Digital-IN 08
30
Sensor drivers seat forward
Digital-OUT06/Digital-IN07
30
Carrier frame extension (-)
Digital-OUT 07/Digital-IN 09
31
Sensor drivers seat reverse
Digital-OUT07/Digital-IN08
31
Rear axle drive-coupling
PWM-OUT 00(-)
32
Transm. pump (-) solenoid
PWM-OUT 00(-)
32
Bogie-lift left side (-)
PWM-OUT 01(-)
33
-
PWM-OUT 01(-)
33
Bogie-lift right side (-)
PWM-OUT 02(-)
34
-
PWM-OUT 02(-)
34
Dozer blade (-)
PWM-OUT 03(-)
35
-
PWM-OUT 03(-)
35
Winch motor (-)
CANmaster Technical Data & Installation - User Manual
87
Chapter 12 | Application examples - Forwarder - All-terrain timber transporter
CRANE unit
CRANE unit
Connector A
88
Function
Analog-IN 08 (0-5V)
01
-
Analog-IN 09 (0-5V)
02
-
Digital-IN 00
03
-
Digital-IN 01
04
-
PWM-OUT 00(+)
05
Dump (+)
PWM-OUT 01(+)
06
Swing(+)
PWM-OUT 02(+)
07
Telescope (+)
PWM-OUT 03(+)
08
Lift(+)
PWM-OUT 04(+)
09
Rotator (+)
PWM-OUT 05(+)
10
Grapple (+)
PWM-OUT 06(+)
11
Articulated steering (+)
PWM-OUT 07(+)
12
Gate (+)
Analog-IN 10 (0-5V)
13
-
Digital-IN 02
14
-
Digital-IN 03
15
-
PWM-OUT 00 RETURN
16
Dump -Return
PWM-OUT 01 RETURN
17
Swing-Return
PWM-OUT 02 RETURN
18
Telescope-Return
PWM-OUT 03 RETURN
19
Lift-Return
PWM-OUT 04 RETURN
20
Rotator-Return
PWM-OUT 05 RETURN
21
Grapple-Return
PWM-OUT 06 RETURN
22
Articulated steering-Return
PWM-OUT 07 RETURN
23
Gate-Return
Analog-IN 11 (0-5V)
24
-
Analog-IN 12 (0-5V)
25
-
Digital-OUT 00
26
-
Digital-OUT 01
27
-
PWM-OUT 00(-)
28
Dump (-)
PWM-OUT 01(-)
29
Swing (-)
PWM-OUT 02(-)
30
Telescope (-)
PWM-OUT 03(-)
31
Lift (-)
PWM-OUT 04(-)
32
Rotator (-)
PWM-OUT 05(-)
33
Grapple (-)
PWM-OUT 06(-)
34
Articulated steering (-)
PWM-OUT 07(-)
35
Gate (-)
CANmaster Technical Data & Installation - User Manual
Chapter 12 | Application examples - Forwarder - All-terrain timber transporter
JOYSTICK H5-S50 units (2x) & Terminal T2
Joystick 3 axis definitions
A
B
Z+
Z-
Potentiometers for
work mode rpm &
max. vehicle speed
X+
Analog 1-axis control lever
- articulated steering
Y-
Y+
X-
JOYSTICK H5-S50 address No. 0 (A)
Connector A
Function
JOYSTICK H5-S50 address No. 1 (B)
Connector A
Function
Internal Analog-IN 00, X-axis
*) Dump (+)/(-)
Internal Analog-IN 00, X-axis
Lift(+)/(-)
Internal Analog-IN 01, Y-axis
Swing (+)/(-)
Internal Analog-IN 01, Y-axis
Rotator (+)/(-)
Internal Analog-IN 02, Z-axis
Telescope (+)/(-)
Internal Analog-IN 02, Z-axis
Grapple (+)/(-)
Analog-IN 03 (0-5V)
01
Work mode engine rpm
Analog-IN 03 (0-5V)
01
Steering (+/-), 1-axis lever
Analog-IN 04 (0-5V)
02
Max. vehicle speed
Analog-IN 04 (0-5V)
02
-
Digital-IN 06
Digital-OUT 00
PWM-OUT 00
03
Driving direction-forward
Digital-IN 06
Digital-OUT 00
PWM-OUT 00
03
Gearbox - High gear
Digital-IN 07
Digital-OUT 01
PWM-OUT 01
04
Driving direction-reverse
Digital-IN 07
Digital-OUT 01
PWM-OUT 01
04
Rear axle coupling indicator
lamp
Digital-IN 08
05
Bogie-lift left side-Up
Digital-IN 08
05
Rear axel coupling
Digital-IN 09
06
Bogie-lift left side - Down
Digital-IN 09
06
Second function lever A
Digital-IN 05
07
Bogie-lift right side - Up
Digital-IN 05
07
Cruise control -Transport
Digital-IN 04
08
Bogie-lift right side - Down
Digital-IN 04
08
Auto float bogie-lift - Off
Digital-IN 03
09
Carrier gate - Up
Digital-IN 03
09
Frame extension (+)
Digital-IN 02
10
Carrier gate - Down
Digital-IN 02
10
Frame extension (-)
Digital-IN 01
11
Diff. lock rear axle-on/off
Digital-IN 01
11
Winch (+), wind
Digital-IN 00
12
Diff. lock front axle-on/ff
Digital-IN 00
12
Winch (-), rewind
*) second function: Dozer blade up/down
TERMINAL T2
Connector
Function
Digital-IN00/Digital-OUT00
03
-
Digital-IN01/Digital-OUT01
04
-
Digital-IN02/Digital-OUT02
05
-
CANmaster Technical Data & Installation - User Manual
89
SE 191 81 Sollentuna
Sweden
www.hydratronics.com
5011 0003 GB, Edition 04/ Nov. 2006
Hydratronics AB