1
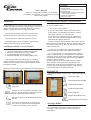
Contents
®
User’s Manual
This user’s manual is for the Quilter’s Cruise Control
and will help you install your unit on your short-arm quilting
frame system properly.
1 X Quilter’s Cruise Control® Brain
1 X Wiring Harness
1 X Quilter’s Cruise Control® Remote Switch
2 X Optical Encoder
1 X Hardware Pack - specific to quilting frame
- frame specific instructions
1 X 6VDC Power Transformer
1 X Connector Cord
Cruising with your Quilter’s Cruise Control®
Introduction
®
Congratulations on your purchase of the Quilter’s Cruise Control .
In a few short steps we’ll have you up and running. There are two
steps in connecting the Cruise Control “brain” to your sewing
machine. But first, here are a few safety instructions:
Be sure to follow all Safety Instructions included in the
Instruction Manual that came with your sewing machine.
Only use the power supply that comes with the unit.
Keep fingers away from all moving parts. Special care is
required around the sewing machine needle.
Installing the Quilter’s Cruise Control®
The Quilter’s Cruise Control® consists of the following:
1. The Cruise Control Brain and Remote Hand Switch
2. Connector Cord to connect to sewing machine
3. The Optical Encoders with wiring harness
4. Hardware applicable to your specific quilting frame
First, set up your short-arm quilting frame in accordance
with the manufacturer’s instructions. Next, install the optical
encoders onto your quilting frame using the hardware kit and
instructions provided.
Now that your Quilter’s Cruise Control® system is properly set
up, you are ready to cruise!
I. Turn on your sewing machine.
II. Set your stitch length using the dial on the Quilter’s
Cruise Control. The white dot on the dial is a ‘medium’
stitch length, about 0.1”, or 10 stitches/inch.
III. Flip the ‘Cruise’ switch located on the remote hand
switch. The sewing machine will begin to idle when the
white dot on the switch is depressed.
IV. Start moving the sewing machine and the Cruise Control
Brain regulates the stitch length. Move the machine slowly, and
the machine stitches slowly. Move the machine fast, and the
machine stitches fast.
V. When you are ready to stop, simply stop moving the
machine and flip the switch on the Remote Hand Switch.
VI. As a general rule, it is very important when using the
Quilter’s Cruise Control® to not abruptly start and stop when
moving the sewing machine. The red LED under the symbol
will illuminate when the carriage speed is too high. A slight
flickering is normal, however.
For best results, as with an automobile, start out and slow
down smoothly. You may experience long stitches if you
accelerate too quickly and very short stitches if you stop too
abruptly. This will not damage the Quilter’s Cruise Control®
unit, but the quality of your quilting will suffer.
Connect the cords to the Cruise Control brain in the following order:
FINISHING UP
®
The top of the Quilter’s Cruise Control brain has the following
markings:
Power (green LED)
Max Speed Reached (red LED)
Stitch Length Adjustment
Connect the wiring harness from the optical encoders
to this port.
Remote Hand Switch Port
Connect one end of the machine connector cord to
this port. Connect the other end of the cord to the
sewing machine foot pedal control port.
Power Supply Port
Encoder Wiring Harness Port
Connect the plug from the Remote Hand Switch to
this port.
Connect the cord from the power supply to this
port. Be sure to use only the power supply that
comes with your Quilter’s Cruise Control® .
Sewing Machine Connector Port
Winding A Bobbin
If you are not using prewound bobbins, simply disconnect
the unit and follow your sewing machine manufacturer’s
instructions. Upon completion, re-connect your Cruise
Control Brain.
Serial No./Model No.
TROUBLESHOOTING
Date of Purchase
If you experience unsatisfactory results, you can perform a
few simple procedures to test the functionality of the unit prior
to sewing.
WARRANTY
12 Months Parts/12 Months Labor
1. Verify that the green light under the
illuminated.
symbol is
LiT
en Up, Inc. warrants this product (the Quilter’s Cruise
LiTen
Control®) to be free of defects in material and workmanship for a
period of 12 months covering parts and labor from the date of original
purchase.
2. Set the stitch length dial
in the middle of its
range. You will feel a small detent position as you rotate the
dial. See the white dot for proper placement.
To obtain repair or replacement within the terms of this warranty,
please return the product with proof of warranty coverage (this card),
proof of purchase, description of defect, and funds for return shipping
prepaid (request shipping cost information at time of return), to:
3. Now move the quilt frame carriages. The red light under
the
symbol should illuminate or flicker during this process.
If the light does not illuminate, move the carriages a bit faster.
LiT
en Up, Inc.
LiTen
Quilter’s Cruise Control
27850 Irma Lee Circle Suite 105
Lake Forest, IL 60045
Note: While quilting, if the red light is consistently illuminated,
you are moving too fast, overriding the Stitch Regulator function.
www.quilterscruisecontrol.com
[email protected]
This warranty does not apply to any product that has been damaged
through electrical power surges, alteration, mishandling, misuse or
en Up, Inc.
neglect. The extent of LiT
LiTen
Inc.’s liability under this warranty is
limited to the repair or replacement provided above and in no event
shall the company’s liability exceed the purchase price paid by the
purchaser for the product.
This Warranty gives you specific legal rights, and you may also have
other rights, which vary from state to state.
®
Keep this sheet for
warranty purposes
Contents of this Quilter’s Cruise Control box:
QCC Brain
Juki TL-98E
Juki TL-98Q
Babylock QCP/Brother 1300/1500
Janome 6500/Elna 7200
Remote Switch
Connector Cord
Wiring Harness
(2) Encoders
Power Transformer
Installation Hardware & Instructions
QC
B-Line Frame (w/out QCC inserts)
B-Line Frame (w/QCC inserts)
Grace Frame/Little Gracie Frame (old/new)
HandiQuilter Frame
Hinterberg Frame w/freeway
Inspira Frame
John Watts Frame
NewJoy Frame
Pennywinkle Frame
Superquilter Frame
Superquilter Proflex
Suzy Q Quilter Frame
UltraQuilter
Packer