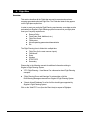
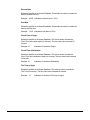
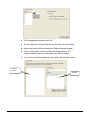
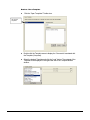
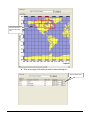
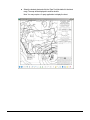
1
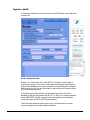
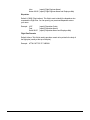
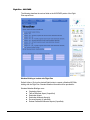
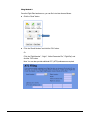
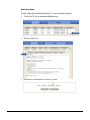
WebCTO User Manual Skyplan Services Ltd. Suite 104 7777 10th Street N.E. Calgary, Alberta, Canada T2E 8X2 Phone +403-275-2520 Fax +403-275-3877 Sita YYCSKXH Arinc YQFSKXH Aftn CYYCXXSK 1. Table of Content 1. Table of Content .................................................................................... i 2. Introduction ........................................................................................ 2-1 Overview ................................................................................................... 2-1 System Maintenance ............................................................................... 2-2 3. Installation.......................................................................................... 3-1 Overview ................................................................................................... 3-1 Sign-in to WebCTO .................................................................................. 3-1 Client Area ................................................................................................ 3-2 4. Operations Board.............................................................................. 4-3 Overview ................................................................................................... 4-3 Board Layout ............................................................................................ 4-3 Adjusting the viewing time ................................................................ 4-4 Controls.............................................................................................. 4-4 Flight Strips ............................................................................................... 4-5 Creating a new Flight Strip ............................................................... 4-5 Manipulating Existing Strips.............................................................. 4-7 Legend ............................................................................................... 4-8 Flight Planning & Filing ............................................................................ 4-9 Running Flight Plans ......................................................................... 4-9 Viewing Previously Generated Flight Plans..................................... 4-9 Filing Flight Plans ............................................................................ 4-10 5. Aircraft Schedules ........................................................................... 5-11 Overview ................................................................................................. 5-11 Managing Schedule Groups .................................................................. 5-11 Creating a new group:..................................................................... 5-11 Deleting a group: ............................................................................. 5-12 Managing Schedules ............................................................................. 5-12 New Schedule: ................................................................................ 5-12 Editing Schedules: .......................................................................... 5-12 Deleting Schedules: ........................................................................ 5-13 Assigning Schedules to Aircraft ............................................................. 5-13 6. Flight Plan........................................................................................ 6-16 Overview ................................................................................................. 6-16 WEBCTO – USER MANUAL I . . . Flight Plan - STANDARD ....................................................................... 6-17 . Flight Plan - FUEL / AIRCRAFT ............................................................ 6-23 . . Flight Plan – ROUTE ............................................................................. 6-28 . Flight Plan – WEATHER . ........................................................................ 6-33 . Flight Plan – ETP / ETOPS.................................................................... 6-35 Flight Plan – SECONDARY FLIGHT PLAN ......................................... 6-38 Automatic Secondary...................................................................... 6-39 User Defined Secondary ................................................................ 6-40 Flight Plan – ATC FILING ...................................................................... 6-41 Filing Method 1 ................................................................................ 6-41 Filing Method 2 ................................................................................ 6-42 ATC Filing Message........................................................................ 6-43 ATC Filing – Delay .......................................................................... 6-44 ATC Filing – Cancel ........................................................................ 6-45 Flight Plan – AFIS Delivery .................................................................... 6-46 Upload Method 1 (GDC / ARINC) .................................................. 6-46 Upload Method 2 (GDC / ARINC) .................................................. 6-48 Upload Method 3 (Satcom Direct).................................................. 6-49 Flight Plan – FORWARDING TO RECIPIENTS .................................. 6-51 Flight Plan - Templates .......................................................................... 6-53 7. Tabular Weather ............................................................................. 7-56 Overview ................................................................................................. 7-56 Weather - ADHOC REQUEST .............................................................. 7-57 Weather - MACRO REQUEST ............................................................. 7-58 Weather - TEMPLATE REQUEST ....................................................... 7-59 Create a Template .......................................................................... 7-59 Retrieve / Run a Template.............................................................. 7-61 8. Graphical Weather ............................................................................ 8-1 Overview ................................................................................................... 8-1 Retrieve a Map ......................................................................................... 8-1 II 2. Introduction Overview Welcome to the WebCTO System managed by Skyplan Services. Skyplan is a world leader in providing a full range of Flight Operations services. The WebCTO System has been developed to provide any aircraft operator with state of the art Flight Tracking, Reporting, and Flight Plan and Weather access. The WebCTO System represents the latest design technology available in the aviation industry. It has been developed around the most advanced computer programming tools and the most efficient and cost effective hardware systems available in the market. Just as important, the WebCTO System has been designed, developed and is maintained by a staff with extensive aviation Operations experience. Therefore, it has been designed to operate efficiently in a day-to-day operations environment as a support tool and not as a distraction to the operations staff. It has also been designed to be as user friendly as possible and requires minimal training to use. This manual is designed to assist in the day-to-day use of the WebCTO System. Any problems or service requirements should be directed to: Skyplan Operations Suite 104, 7777 10th Street N.E. Calgary, Alberta, Canada T2E 8X2 Telephone: SITA: ARINC: AFTN: E-MAIL: Website: (403) 275-2511 (Direct) (800) 661-9189 (US Toll Free) (403) 275-3911 (Fax) YYCSKXH YQFSKXH CYYCXXSK [email protected] www.skyplan.com No part of this manual may be reproduced, transmitted, transcribed, stored in a retrieval system or translated into any language in any form by any means without the written permission of Skyplan International Inc. WEBCTO – USER MANUAL PAGE 2-1 . . . System Maintenance. . times during the day, the response time of the system may be At designated . for Weather/NOTAMs database maintenance. slightly slowed . . Every 28 days, the Navigational Database (waypoints, airways, etc) is updated to . reflect the latest changes. The CTO Flight Planning system may be unavailable for a short period while these changes are applied. WEBCTO – USER MANUAL PAGE 2-2 3. Installation Overview WebCTO is a web based application which can be accessed from Skyplan’s Client Area (http://www.skyplan.com – Client Area). WebCTO operates on any available Web Browser. Sign-in to WebCTO In order to use WebCTO, you must 1st Logon into Skyplan’s Client Area using an assigned Userid/Password combination. The following describes the steps to start and login to WebCTO: a) Start your Web Browser and access Skyplan’s Website (URL: http://www.skyplan.com/) b) Click the “Client Area” link (left hand side). The Client Login page will appear: c) Enter your Username and Password. d) Click the Login button. This will connect you to the Client Area. WEBCTO – USER MANUAL PAGE 3-1 . . . Client Area . . signed into Skyplan’s Client Area, you will be presented with the Once you have . following Icons: . . . The Icons on the Client Area page are as follows: WebCTO: Flight Planning Operations Board Weather: Alpha Numeric Weather Weather Maps: Graphical Weather Charts Logout: WEBCTO – USER MANUAL Exit the Client Area (and return to the Public area) PAGE 3-2 . . . 4. Operations.Board . . Overview . . The Operations . Board is designed to allow the airline to group logical flights, aircrafts or regions (or any other logical breakdown desired) to be managed together. For reasons of consistency between the WebCTO Operations Board and the Skyplan’s Flight Planning System, Skyplan presently controls the following: The assignment of an Operations Room for the Airline. The assignment of Operations Board(s) to the Airline’s Operations Room. The assignment of Aircraft(s) to the Airline’s Operations Board(s). For any inquiries about adding new boards and/or aircrafts, please contact Skyplan Services Limited support staff. To access the Operations Board feature of WebCTO, you must: From the Client Area, click on the “WebCTO” icon. Next, click the “Ops Board” tab to open the “Operations Board” application (which will be opened in a new window). Notice that the operations board does not appear until you select a board to view. Board Layout The Operations Board is viewed in a separate window, which fits to the size of your browser. Select the board from the dropdown menu and then press “Change Board”. If the contents of the board are larger or smaller than your current window size (Or you resize your browser window) press the “fit to screen” button. After you select the board you will see a graph-like display, listing the available aircraft on the left-hand side, the GMT time on the top bar and a red vertical line depicting the current time. Current flights are seen in the graph area, represented by colored blocks/strips. Board controls are located just above the graph. WEBCTO – USER MANUAL PAGE 4-3 . . . . . . . . . Adjusting the viewing time Navigating the graph view can be achieved by setting a date using the dropdown menus just below the “New Flight Strip” button and clicking view. To move around in small increments you can use the two arrow buttons located to the left (to move time back) and right (forward) of the control area. To move the view back to the current time, press the “Home” icon in the control area to reset the view. Controls 1) Nudge graph view in the past 2) Zoom out 3) Reset the graph view back to current time and default zoom 4) Refresh the operations board 5) Zoom in 6) Toggle strip shadow (Shows the original flight time under the strip) 7) Change aircraft name from registration to tail number and back 8) Nudge graph view in the future WEBCTO – USER MANUAL PAGE 4-4 . . . Flight Strips . . Flight Strip Creating a new . . strip on the board, press the “New Flight Strip” button in the main To plot a new . window. This will launch a new window where you are required operations board . to provide information of the strip. The following fields are required: Flight Number: Enter the flight number for this flight strip Flight Day: Enter the day the flight is scheduled to run -- default selection is the current day Origin: Enter the airport code of the origin location Destination: Enter the airport code of the destination location Scheduled Departure: Enter the 4-digit time representing the departure time in GMT/Zulu 24-hour format (HHMM) ex: 0510 Scheduled Arrival: Enter the 4-digit time representing the arrival time in GMT/Zulu 24-hour format (HHMM) Aircraft: Select an available aircraft from the drop-down menu for which this flight strip is destined Flight Plan based on: Select either Departure or Arrival. This field is used when running a flight plan, indicating to the system to calculate the route using the selection as the preferred target time to reach. Once you fill out the flight information, press the submit button. If all the entered information appears OK and there are no conflicting strips in the time span set, you should now see the strip on the operations board. You can further modify the information of the flight strip by placing your mouse over the icon on the strip and selecting “View/Edit Strip”. WEBCTO – USER MANUAL PAGE 4-5 . . . Note: Plotting or adjusting strips that collide with existing strips will not get placed, . and an error message will be displayed. Ensure that the space is available when . setting the strip times. . . . . WEBCTO – USER MANUAL PAGE 4-6 . . . Manipulating Existing Strips . . When making changes or adding information to a strip select the “View/Edit Strip” . option from the menu while moving your mouse over the strip’s flight icon. The . following window will open: . . Fill in the following Optional fields as required: Estimated Times (Out, Off, On, In): The estimated times are used for flights that have not yet completed and represent the strip’s location on the operations board. These values are automatically adjusted when running flight plans from the strip. Actual Times (Out, Off, On, In): Actual times are always entered manually after a flight is finished, and will supersede the estimated times when positioned on the operations board. Completed flights will be visibly noticeable on the operations board to easily differentiate between flights that are not yet completed. Crew Information: There are four fields to enter the crew information for the flight; Captain, Flight Engineer, First Officer and Dispatcher. If these values are added after the flight plan has been run, a new flight plan must be ran to include them on the flight plan details. WEBCTO – USER MANUAL PAGE 4-7 . . . Delays: If for whatever reason there is a delay on the flight and the . estimated/actual times are greater than 5 minutes the strip will turn red and a . message displayed indicating the total delay in the flight strip details. To add a . to acknowledge the delay, press the delay flight button and enter delay code or . either: . . – Enter the new departure time of the flight and provide a delay New Departure code and/or reason for the delay -or- Delay by ___ Minutes – Delay the flight by x number of minutes and provide a delay code and/or reason for the delay. Flight Notes: This area is used for dispatchers and operators and has no effect on the flight itself. Enter a note in the text area and click “update flight notes” to update the notes. Legend Strips are differentiated by their color. Each color represents a state of the strip and can be reviewed in the following chart: Operations Board Legend Represents a strip that has no currently detected errors and does not yet have a flight plan associated Strip which has a valid flight plan and has no detected errors associated with it Strip which has detected a delay of 5 minutes or greater than that of the scheduled times Strip that was created in the past Completed flights which have their “Actual” times entered and treated as finished Indicates that the flight should be completed but does not have any “Actual” times present WEBCTO – USER MANUAL PAGE 4-8 . . . Flight Planning & Filing . . within the operations board uses the WebCTO architecture; this Flight planning . how to use these functions from the operations board only. manual will explain . information regarding WebCTO flight planning and filing can be More detailed . found in Skyplan’s WebCTO User Manual. . Running Flight Plans Running new flight plans can be achieved by selecting the “New Flight Plan” option from within the strip’s menu viewed in the main operations board window. This takes you to the Flight Plan tab and populates the values contained in the strip. The minimum required information to run a flight plan will be set, allowing you to request the flight plan with no further modifications (if not required). Upon completion of the required flight plan parameters, press the “Generate” button located on the right-hand side of the page. If the system returns a successful flight plan, you will see the text contents displayed in the window, along with options to file the flight plan. To go back to the operations board, click on the “Go back” button and then the “Ops Board” tab. You should now see the strip representing the values from the generated flight plan. Viewing Previously Generated Flight Plans All of the flight plans that have been run from the operations board are stored and can be reviewed at any time. From the strip’s menu, select “View Flight Plan(s)”. The most recently generated flight plan is loaded by default, and all associated flight plans are listed in a table above the document. WEBCTO – USER MANUAL PAGE 4-9 . . . To review another flight plan, click the corresponding recall number. . Click on the .appropriate Action button to do the following: . Load Flight.Plan: Select this button to load the currently selected flight plan . flight planning screen of WebCTO. You can make additional details into the adjustments.and request a new flight plan (if required). Save As: Saves the flight plan as a text document. Email: Send the text flight plan to an email address. Print: Print the text flight plan to a local/networked attached printer. Filing Flight Plans Filing flight plans from the operations board can be done either at the time of flight plan generation, or at a later time in the “View Flight Plan(s)” page. Select the appropriate center you wish to file the flight plan with, and confirm your selection. Once the filing is complete, you should see the text representation of the filing which can be viewed under the “Filing” column in the table of the Flight Plan view. WEBCTO – USER MANUAL PAGE 4-10 . . . . 5. Aircraft Schedules . . Overview . . The “Schedules” . function allows you to build short or long-term schedules and apply them to your daily Operations (used in the Operations Board). The system is based on two components: Managing Schedules Assigning Schedules The “Managing Schedules” function allows you to build schedules using a Userfriendly Graphical Interface. The process involves: Creating one or more Schedule Groups (programs). Add one or more Schedules to a Schedule Group (Aircraft rotation). Once your schedules have been built, the “Assigning Schedules” function is used to activate them for use in the Operations Board. The Scheduling functions for the operations board is only available to authorized schedulers or operators and can be accessed by clicking on the “Schedules” buttons from the WebCTO tabs. Managing Schedule Groups Schedule groups are used to organize related flights, categorizing regular flights to be applied to specified aircraft. Each operations board comes with a default group which cannot be modified or deleted. To access the schedule groups, select “Manage Groups” from within the schedules page. Creating a new group: Enter a unique name for the group, and select the Room (If applicable) for the group and click “Add Group”. The newly created group should now appear in the Scheduled Groups portion. Similarly, to modify the group name and/or room WEBCTO – USER MANUAL PAGE 5-11 . . . assignment, click the respective “edit” button beside the group listing and update . the information and select “Update”. . . Deleting a group: . . simply press the “delete” button located next to the group To delete a group, . listing. Managing Schedules Once satisfied with the schedule groups you can begin adding the actual flight schedules and assign it to your groups. New Schedule: In the Schedules tab, select “New Schedule”. This opens a new window with the schedule creator where you can begin adding the flight information as if you were creating a new strip. Select the Group you wish to categorize the schedule under. For Scheduled Days, select the days in which the flight will be operating, or leave all of the boxes unchecked which defaults to use all the days of the week. Note: Schedule times and days are based on GMT/Zulu time and must be taken into consideration while building the schedules. Once all the information is entered, click “Create Schedule” and check for the confirmation that the schedule has been updated. The previously entered information will remain in the schedule editor to allow you to make slight adjustments for a new flight if necessary. All of the schedules are displayed in the main Schedules tab. Ensure all information is correct to limit potential errors. Editing Schedules: To edit a schedule, from the main Schedules window click on the corresponding flight number which will open the schedule editor where you can then make any changes. WEBCTO – USER MANUAL PAGE 5-12 . . . . . . . . . Click to Expand the Schedule Group Click on the FlightNo to edit the Flight Schedule Press “Update” to save changes to the schedule. Deleting Schedules: To delete a schedule or schedules, select the checkbox under the “Option” heading for the schedules you wish to delete, then select the radio button “Delete Schedule” in the bottom pane (“With Selected”) and press “Submit”. Assigning Schedules to Aircraft To apply schedules to a specific aircraft, select the appropriate schedules (or to select an entire group, check the box listed in the group heading), select the radio button “Apply to aircraft” and the appropriate aircraft from the dropdown menu and specify the range of days you wish to apply the schedule for and click “Submit”. Notes: Flight strips will not get plotted on days that are not listed in the “Scheduled Days” field of the schedule You can apply schedules up to a month in advanced WEBCTO – USER MANUAL PAGE 5-13 . . . If you specify the first day which is lower than the current day, the system . assumes. to plot them the next month If you specify . the second day number lower than the first in the range, the system assumes to apply it up to the specified date of the next month . . If there are any conflicts while plotting the strips, the system will not plot them . to plot all the strips that are valid but will attempt Applying schedules will attempt to populate the operations board with all the flights associated with the selected schedules. Check the Operations Board to ensure the Schedule(s) are appearing in the right dates and times. WEBCTO – USER MANUAL PAGE 5-14 . . . . . . . . . WEBCTO – USER MANUAL PAGE 5-15 . . . 6. Flight Plan . . . Overview . . This section.describes all the Fields that are used to request and produce a computer generated optimized Flight Plan. The Fields are listed as they appear on the Flight plan request form. In order to meet your particular Flight Planning requirements, some data must be pre-loaded into Skyplan’s Flight Planning system to ensure that your flight plans meet your Company requirements: Reserve Policy Fixed Fuels (Hold, Additional, etc.) Flight Plan format Fixed routes Aircraft operating parameters/characteristics Etc. The Flight Planning form is divided into multiple tabs: Flight Plan (for the most common inputs) Fuel/Aircraft Route Weather ETP/ETOPS Secondary Please refer to the following manuals for additional information relating to Skyplan’s Flight Planning System: “CTO Flight Planning – User Manual “for a discussion about Flight Planning concepts. “Flight Planning Errors and Warnings” for a description of all the Error/Warning Messages returned from Skyplan’s Flight Planning System. “Generic Aircraft Database” for a list of all the aircraft types supported by Skyplan’s Flight Planning System. Click on the “WebCTO” icon (from the Client Area) to request a Flightplan. WEBCTO – USER MANUAL PAGE 6-16 . . . Flight Plan - STANDARD . . describes the various fields on the STANDARD portion of the Flight The following . Plan request. form: . . WEATHER/NOTAMs displayed here Flight Number This field contains the Flight Number (prefixed by the Airline Code) to be used for the Flight Plan. Entering "TEST" will request a short plan (i.e.: for testing only ICAO Flight Plan is not generated). Flight Number is used in conjunction with the Airline Code to produce the Flight Number on the ICAO Flight Plan (i.e.: XYZ0001). Example: XYZ0001 XYZTEST (specifies Flight Number) (TEST Flight Plan request) Origin This field contains the designator in ICAO/IATA or FAA format for the Originating Airport. After you input the airport identification, the current Weather, Forecast, and NOTAMs will appear in the box at the bottom of the form. WEBCTO – USER MANUAL PAGE 6-17 . . . Example: YYC (specify Origin Airport in IATA format) . EGKK (specify Origin Airport in ICAO format) . Destination. . . the designator in ICAO/IATA or FAA format for the Destination This field contains Airport. After. you input the airport identification, the current Weather, Forecast, and NOTAMs will appear in the box at the bottom of the form. Example: YYZ (specify Destination Airport in IATA format) CYYZ (specify Destination Airport in ICAO format) Estimated Departure This field contains the Estimated Time of Departure for the flight in GMT. When requesting from a Flight Strip, the time will be automatically loaded from the Flight Strip ETD. Example: 22:00 Flight Day Default is the Current Date. This field is used to override the Default Flight Day with the Actual Flight Date. The Flight Day cannot be less than 2 days or more than 4 days from the Current Date Example: 12 Parameter File Default is your 3-letter ICAO Airline code. This field is used to specify what Airline Specific Parameters are to be used when computing the Flight Plan. These Parameters are: Flight Plan Format Domestic US ATC Code En-route Lookdown Capability NAT Track Step Climb Capability Print EET for ATC Waypoints Print Compulsory Waypoints Default Additional Fuel Domestic Reserve Policy International Reserve Policy Payload Default is "0". This field is used to specify the actual payload. Total payload cannot exceed the Empty Zero Fuel Weight (EZFW) of the aircraft. Click the “MAX” checkbox to let the system calculate the Maximum Payload to be carried. Example: 80000 Blank or 0 WEBCTO – USER MANUAL (set payload to 80000 Lbs.) (set payload to 0) PAGE 6-18 . . . Route / Analysis Number . . or Minimum Time Track (MTTA). This field is used to select a Default is "01" . structure. This route must be defined in Skyplan’s Flight Planning specific route . Database. The system will perform a Route Analysis on all the presystem Route . the City Pair and sorts them in order of flying time (Analysis Route built routes for . flying time). 01 is the shortest To explicitly request the pre-built or company preferred route in the Route Database, prefix the route number with an "R" (i.e.: R03). If no routes are defined for the ORIG-DEST City Pair, the system will automatically create a Random Route and save it as RTE 01 (MTTA route structure). This functionality allows the User to build, store, and retrieve their own route structures using a User-friendly Graphical interface. By selecting the “Man” checkbox, you can build, store, and retrieve your own route structures using a User-friendly Graphical interface. Refer to the “Flight Plan – MANUAL ROUTING” section for detail information. Example: 02 A02 R02 R99 MTT DCT (use 2nd best route) (same as RTE 02) (use pre-built route 02) (Manual Route) (use Minimum Time Track route) (use Direct route) Aircraft ID / Reg# This field contains either the Aircraft’s FIN Identification Number (normally the last 3 or 4 Digits of the Aircraft Registration) or the Aircraft’s Registration Number for the actual Airframe to be used for the Flight. Click the “Generic A/C List” link to select a predefined Generic Aircraft. Example: 3GA N823GA (use FIN number) (use Registration number) Cruise Mode Default as defined in the Aircraft Database. This field is used to override to default cruise mode of the aircraft (LRC-Long Range Cruise, a fixed Mach value, or a customized cruise mode). Example: LRC HSC 82 (select Long Range Cruise mode) (select High Speed Cruise mode) (select Mach .82 Cruise speed) Destination Alternate 1 Default is the closest Airport as defined in the Airport Alternates Database. This field is used to specify the designator in ICAO/IATA or FAA format for the desired Destination Alternate Airport. This airport must be defined in the Airport Alternates WEBCTO – USER MANUAL PAGE 6-19 . . . Database. After you input the airport identification, the current Weather, Forecast, . and NOTAMs will appear in the box at the bottom of the form. . . invoke the Island Fuel Reserve Policy. Use "NONE" to suppress Use "ISLD" to the Alternate. Calculation (i.e.: no alternate to be used). . . (specify Alternate Airport in IATA format) Example: YUL EGDD Blank ISLD NONE (specify Alternate Airport in ICAO format) (use closest Alternate Airport) (use Island Reserve Policy) (no Alternate Calculation) Alternate Maximum FL Default as defined in the Airport Alternates Database. This field is used to cap the flight at a particular altitude. Example: 150 (capped at 15000 feet) Blank (no restriction on Flight Level) UNL (no restriction on Flight Level) Destination Alternate 2 Default is None. This field is used to specify the designator in ICAO/IATA or FAA format for a secondary Destination Alternate Airport. After you input the airport identification, the current Weather, Forecast, and NOTAMs will appear in the box at the bottom of the form. Note: This airport must be defined in the Airport Alternates Database and be closer to the Destination Airport than the primary Destination Alternate Example: YMX (specify Alternate Airport in IATA format) EGDE (specify Alternate Airport in ICAO format) Blank (do Not use a Secondary Alternate) Maximum Flight Level Default is None. This field is used to cap the flight at a particular altitude. Example: 150 (capped at 15000 feet) Blank (no restriction on Flight Level) Take-off Alternate Default is None. This field is used to specify the designator in ICAO/IATA or FAA format for the appropriate Take-Off Alternate Airport. This airport cannot be more than 500 nautical miles (for 2 engine aircraft) or 1000 nautical miles (for 3 or more engine aircraft). Example: YVR (specify Take-Off Alternate Airport) Blank (do not use a Take-Off Alternate) WEBCTO – USER MANUAL PAGE 6-20 . . . Estimated Arrival . . This value contains the Estimated Time of Arrival for the flight in GMT. . . Example: 1425 . Flight Plan .Format Number Default as specified in the Aircraft Database record (if defined) or selected Airline Parameter File. This field is used to override the default Flight Plan format to be used. Example: 03 Flight Rules Default is "I" (IFR). This field is used to specify the flight rule for Air Traffic Control (ATC) purposes. The following types are available: "I" for Instrument Flight Rule (IFR) "V" for Visual Flight Rule (VFR) "Y" for IFR to VFR "Z" for VFR to IFR Flight Type Default is "S" (Scheduled). This field is used to specify the type of flight for Air Traffic Control (ATC) purposes. Select from the following Flight Types: Scheduled ("S") Non-Scheduled ("N") General Aviation ("G") Military Airlift Command ("M") Other/Special Flight ("X") Use Aircraft Reg. as ATC Flight No. (Y/N) Enter “Y” to instruct the system to use the aircraft's Registration Number as the Flight Number for Air Traffic Control Purposes. The system default is Airline Code/Flight Number. ATC Remarks Default is None. This field is used to provide a remark in the ATC flight plan (ICAO item 18). This must be used when requesting the Flight Plan, not when filing the Flight Plan with ATC. Example: Medivac Flight WEBCTO – USER MANUAL PAGE 6-21 . . . ATC Status . . This keyword is used to provide the reason for special handling Default is None. . 18 of the ATC ICAO flight plan. This keyword must be used when by ATS in Item . Flight Plan, not when filing the Flight Plan with ATC. requesting the . . Example: MEDEVAC (Life critical medical emergency evacuation) Wind Component Default is Current Wind Forecast. This value is required if the ISA Deviation is provided. This field is used to specify the Wind Component to be used in calculating the Flight Plan. Note: This option can only be used when requesting a Test Plan (FltNo=TEST). Example: –5 (specifies a 5kt Headwind) 15 (specifies a 15kt Tailwind) Blank (use Current Wind Forecast) ISA Deviation This value is required if the Wind Component is provided. This field is used to specify the ISA Deviation to be used in calculating the Flight Plan. Note: This option can only be used when requesting a Test Plan (FltNo=TEST). Example: -3 5 (3 degrees colder than std dev) (5 degrees warmer than std dev) Wind Source Default is Current Wind Model. This field is used to specify the Wind Model to be use when computing the Flightplan. Note: Historical (or Average) Wind Models can only be used when requesting a Test Plan (FltNo=TEST). Example: AVN M03 WEBCTO – USER MANUAL (use the AVN model) (use the March Wind Model) PAGE 6-22 . . . Flight Plan - FUEL / AIRCRAFT . . describes the various fields on the FUEL / AIRCRAFT portion of the The following . form: Flight Plan request . . . Additional Fuel Default as defined in the Airline Parameter File. This field is used to specify the Additional Fuel required to allow for air traffic congestion, poor weather conditions, etc. The flight plan will be computed to ensure that the amount requested will be on board overhead destination. Example: 5000 Blank or 0 (set Addition Fuel to 5,000) (set to 0) Ramp Fuel This field is used to specify to the Flight Planning system the Total Fuel on Board (FOB) before engine start-up. Not specifying this field will force the system to calculate the required Total Fuel based other values provided (such as: Payload, Additional Fuel etc.). WEBCTO – USER MANUAL PAGE 6-23 . . . Example: 30000 (set Fuel on Board to 30,000) . Blank (let system calculate FOB) . . Minimum Landing Fuel . . in the Aircraft Database. This field is used to override the Default as defined . Fuel in required at destination. Minimum Landing Note: For safety reasons, this value cannot be less than the amount stored in the aircraft database. Example: 14500 (set MLF to 14,500) Tankerage/Extra Fuel Default is "0". This field is used to specify the amount of fuel to be tankered. Click the “MAX” checkbox to instruct the system to calculate the maximum amount of Fuel that can be Tankered. Note: Tankered fuel is generally shown as optional fuel. Example: 10000 (set Tankerage to 10,000) Hold Time Default is 30 minutes. This field is used to override the default Hold Time (Fuel) over the Destination Airport. Example: 45 (indicates 45 minutes of Hold fuel at Destination) Hold Level Default is 1,500 feet. This keyword is used to override the default Hold Flight Level over the Destination Airport. Example: 20 (indicates hold at FL020 over Destination) Reserve Policy This field is used to override the default Reserve Policy, if defined, for the Aircraft (ACFT), or for the Airline (APF). Click the “Policy List” link to select a predefined Reserve/Hold policy. Example: 45 (45 Minutes at TOD Fuel Flow, No Hold) Reserve Fuel This keyword is used to specify a Fixed Reserve Fuel. Example: 1000 WEBCTO – USER MANUAL (set Reserve Fuel to 1,000) PAGE 6-24 . . . Estimated Take-Off Weight . Default is "0". (system will calculate). This value is used to specify the actual takeoff weight to.ensure the flight plan is computed correctly (i.e.: more fuel is on . the destination was changed after the aircraft was fuelled). board because . . Example: 145000 (set ETOW to 145000) Empty Operating Weight Default is the Empty Operating Weight as selected (see Empty Operating Weight Configuration) from the Aircraft Database. This value is used to override the Empty Operating Weight (in 100s) of the aircraft for this flight plan only. It cannot be less than the minimum operating weight of the aircraft. Example: 85000 (set EOW to 85,000) Zero Fuel Weight Default is "0". This field is used to specify the Zero Fuel Weight of the aircraft including payload (in 100s). The system will calculate the Payload from the Aircraft's Empty Operating Weight. Use the "MAX" option to let the system calculate the Maximum Payload to be carried. Total payload cannot exceed the Empty Zero Fuel Weight (EZFW) of the aircraft. Example: 80000 MAX Blank (set ZFW to 80,000) (request Max Payload) (set Payload to 0) Maximum Take-off Weight Default is the Maximum Take-Off weight from the Aircraft Database. This value is used to override Maximum Take-Off Weight (in 100s) of the aircraft for this flight plan only (i.e.: maximum take-off weight limited due to runway length, temperature, altitude, etc). Example: 140000 (set MTOW to 140,000) Maximum Landing Weight Default is the Maximum Structural/Tankerage Landing weight from the Aircraft Database. This field is used to override Maximum Landing Weight (in 100s) of the aircraft for this flight plan only. It cannot be more than the maximum Structural/Tankerage Landing weight of the aircraft. Example: 130000 (set MLW to 130,000) EOW Configuration Default is "0". This field is used to select a different Empty Operating Weight Configurations available as they pertain to your aircraft database (i.e.: Passenger, Cargo, or Combi). Input must be 0, 1, or 2. WEBCTO – USER MANUAL PAGE 6-25 . . . Cargo Weight . . This field is used to specify the cargo weight. This field is used in Default is None. conjunction .with the Passenger (PAX) field. . . the Payload (PYLD) field as an alternative way of specifying Note: Use . Payload. Example: 130000 (set MLW to 130,000) Payload Default is "0". This field is used to specify the actual payload. Total payload cannot exceed the Empty Zero Fuel Weight (EZFW) of the aircraft. Click the “MAX” checkbox to let the system calculate the Maximum Payload to be carried. Example: 80000 Blank or 0 (set payload to 80000 Lbs.) (set payload to 0) Passengers Default is "0". This keyword specifies the number of passengers. Example: 50 (set passenger load to 50) Passenger Weight This field specifies the average weight to use for each passenger. If not specified, the system uses a default weight of 200 Lbs for Imperial aircraft and 91 Kgs for Metric aircraft. Example: 190 (Use average weight of 190 Lbs) Climb Bias Default as specified in the Aircraft Database. These fields are used to override the bias for Climb fuel burn. Example: 1.100 (indicates climb bias of +10%) Cruise Bias Default as specified in the Aircraft Database. This field is used to override the bias for Cruise fuel burn. Example: 1.050 (indicates cruise bias of +5%) WEBCTO – USER MANUAL PAGE 6-26 . . . Descent Bias . . Default as specified the Aircraft Database. These fields are used to override the . fuelinburn. bias for Descent . . (indicates a descent bias of -10%) Example: 0.900 . Hold Bias Default as specified in the Aircraft Database. These fields are used to override the bias for Hold fuel burn. Example: 1.250 (indicates a hold bias of +25%) Circuit Time at Origin Default as specified in the Airport Database. This field is used to override the Circuit Time at the origin airport (in minutes). The time value cannot exceed 20 minutes. Example: 10 (indicates 10 minutes at Origin) Circuit Time at Destination Default as specified in the Airport Database. This field is used to override the Circuit Time at the destination airport (in minutes). The time value cannot exceed 20 minutes. Example: 10 (indicates 10 minutes at Destination) Taxi Time at Origin Default as specified in the Airport Database. This value is used to override the Taxi Time (in minutes). The time value cannot exceed 60 minutes. Example: 10 WEBCTO – USER MANUAL (indicates 10 minutes of Taxi time at Origin). PAGE 6-27 . . . Flight Plan – ROUTE . . describes the various fields on the ROUTE portion of the Flight Plan The following . request form: . . . Route / Analysis Number Default is "01" or Minimum Time Track (MTTA). This field is used to select a specific route structure. This route must be defined in Skyplan’s Flight Planning system Route Database. The system will perform a Route Analysis on all the prebuilt routes for the City Pair and sorts them in order of flying time (Analysis Route 01 is the shortest flying time). To explicitly request the pre-built or company preferred route in the Route Database, prefix the route number with an "R" (i.e.: R03). If no routes are defined for the ORIG-DEST City Pair, the system will automatically create a Random Route and save it as RTE 01 (MTTA route structure). This functionality allows the User to build, store, and retrieve their own route structures using a User-friendly Graphical interface. WEBCTO – USER MANUAL PAGE 6-28 . . . By selecting the “Man” checkbox, you can build, store, and retrieve your own . route structures using a User-friendly Graphical interface. Refer to the “Flight Plan . – MANUAL ROUTING” section for detail information. . . (use 2nd best route) Example: 02 . (same as RTE 02) A02 . (use pre-built route 02) R02 R99 MTT DCT (Manual Route) (use Minimum Time Track route) (use Direct route) Route Analysis Cruise Speed This field specifies a fixed Mach value to be used during the Route Analysis. If omitted, the Route Analysis will assume the fixed Mach specified by the Cruise Mode (CRZ) field. If this cruise setting is not a fixed speed, the Route Analysis will use the default fixed Mach setting for the aircraft type. Example: 80 (Mach .80) Flight Plan Only Click this Radial button to return only the Flightplan (the Default behavior). Route Analysis Only Click this Radial button to request a Route Analysis Listing of all the pre-stored routes for the city pair you are flight planning. The Route Analysis will sort the routes in order of flight time for the forecast wind and temperature conditions for your ETD. No Flight Plan will be generated. Flight Plan with Route Analysis Click this Radial button if you want to have the system generate the Flight Plan along with the Route Analysis Listing. Include Track Routes Click this checkbox if you want to have the system include a list of Track routes for a selected Track Structure (i.e.: North Atlantic Tracks – NAT). Specify Track Structure Select the desire Track structure (i.e.: North Atlantic Tracks – NAT). Altitude Compliance Check Default is “N” (No check). This field is used to enable the Altitude Compliance Check feature. Input must be “Y” to check using MEA, “R” to check using MORA, or “C” to check using MOCA. WEBCTO – USER MANUAL PAGE 6-29 . . . FIR Avoidance . . This field is used to request a Route which avoids a list of FIRs Default is "None". (max 3). If a.Fixed Route is requested (ie: RTE R01), the system will perform a compliance .check and report any FIRs which the route overflies. If a Random . (MTTA), the system will attempt to generate a route which Route is requested . avoids the requested FIRs. Note: FIR avoidance will make a best effort to route around the specified FIR(s), but complete avoidance of the FIR(s) is not guaranteed. Route VIA Waypoints This field is used to request a Random Route via one or more waypoints. The route between each specified waypoint will be a Random Route computed by the system. If the waypoint you wish to use is not a unique waypoint, you must provide the country code and possibly the type of waypoint when specifying the waypoint name. This occurs if a waypoint of the same name appears in more than one country, or there is a VOR and an NDB waypoint by the same name. Valid Waypoint Types are: V: VOR Waypoint N: NDB Waypoint E: En-route Waypoint Note: Each Flight Plan request which uses the VIA keyword causes the system to re-compute the Random Route with the requested VIA waypoints. If you have a requirement to use the same VIA waypoint(s) for a given Citypair routing in future flights, we recommend this routing be added to your Route Database. This will speed up the processing of subsequent flight plan requests for this City-pair. Example: DAGTY YBR-CY LAO-RP-V 33N110W (Unique Waypoint) (Waypoint in Country CY) (VOR Waypoint in Country RP) (Use a Lat/Long Coordinate) Manual Route This field is used to request a user specified Route via on ore more waypoints/airways. Please refer to the RTEMAN keyword in the “CTO Flight Planning - User Manual” for information on how to use this feature. Example: HUSAR.J504.YDR..VBI.J500.SSM-CY.MTTA.YMS-CY Reclear Point Default is None. This field is used to specify the en-route waypoint from which a re-clearance is to be computed. The specific waypoint used MUST be on the actual route of flight. Example: ABR WEBCTO – USER MANUAL (specify Reclear Waypoint) PAGE 6-30 . . . Reclear Dest . . This field is required if you specify a “Reclear Point”. It specifies the Reclear or . airport En-route diversion (in IATA or ICAO format). . . (specify Reclear Destination) Example: YWG . Reclear Altn This field specifies the Reclear Alternate airport (in IATA or ICAO format). Example: YPG (specify Reclear Alternate) Blank (use closest Alternate Airport) Altitude Profile Default is None. This field is used to provide a desired flight level for the flight plan between specific waypoints along the planned route. Use "OPT" to let the system determine the optimum altitude. Example: GTK 280 (Attempt to achieve altitude of FL280 from waypoint GTK to Destination) GTK 310 COSMO (Attempt to achieve altitude of FL310 from waypoints GTK to COSMO) GTK 310 COSMO OPT BARTS 290 (Attempt to achieve altitude of FL310 from waypoints GTK to COSMO, optimal altitude from waypoints COSMO to BARTS, FL290 from waypoints BARTS to Destination) Captain Default is None. This value is used to identify the Captain of the Flight. Example: 1024 Fred Smith 00124 (specify Captain Code) (specify Captain Name) (specify Captain Name and Employee Number) First Officer Default is None. This field is used to identify the First Officer of the Flight. Example: 1025 Tom Lefty 00125 (specify First Officer Code) (specify First Officer Name) (specify First Officer Name and Employee Nbr) Flight Engineer Default is None. This value is used to identify the Flight Engineer of the Flight. Example: 1026 WEBCTO – USER MANUAL (specify Flight Engineer Code) PAGE 6-31 . . . John Flight Engineer Name) .Norton 00126 (specify (specify Flight Engineer Name and Employee Nbr) . Dispatcher . . . (Sita Interface). This field is used to identify the dispatcher who Default is "9999" . Flight Plan. You can specify your pre-stored dispatcher code or requested the your name. Example: 1027 Fred Smith 00127 (specify Dispatcher Code) (specify Dispatcher Name) (specify Dispatcher Name and Employee Nbr) Flight Plan Remarks Default is None. This field is used to provide a remark to be printed in the body of the flight plan (usually at the top of the plan). Example: ATTN CAPT OF FLT ABC001 WEBCTO – USER MANUAL PAGE 6-32 . . . Flight Plan – WEATHER . . describes the various fields on the WEATHER portion of the Flight The following . Plan request. form: . . Weather Briefing to Include with Flight Plan Default is None. Click on the desired Radio button to request a Weather/NOTAMs briefing with the Flight Plan. Standard Weather information will be provided for: Standard Weather Briefings cover: WEBCTO – USER MANUAL Originating Airport Take-off Alternate Airport (if specified) Destination Airport Destination Alternate Airport(s) En-route Airport(s) (if specified) Reclear Destination/Alternate Airports (if specified) PAGE 6-33 . . . The following standard WX Briefings are available: . . 1) SA/FT for all stations . . 2) SA/FT for all stations . for Orig/Dest/Altn/Enrt/Reclear Dest-Altn NOTAMs . 3) SA/FT/FD for all stations 4) SA/FT/FD for all stations NOTAMs for Orig/Dest/Altn/Enrt/Reclear Dest-Altn 5) SA/FT for all stations NOTAMs for Dest/Altn/Enroute/Reclear Dest-Altn 6) SA/FT for all stations NOTAMs for Orig/Altn/Enroute/Reclear Dest-Altn 7) SA/FC/FT for all stations 8) SA/FC/FT for all stations NOTAMs for Orig/Dest/Altn/Enrt/Reclear Dest-Altn Use The Following Customer Weather Briefing If “Use Customer Weather Briefing” is checked, enter one or more standard and custom weather briefings (to a maximum of 6 briefings) to be included with the Flight Plan. Contact Skyplan to have your custom weather briefing created and saved. Example: BRIEF1 1 BRIEF2 (use customer WX Briefing) (use both standard and customer WX Briefings) En-route Weather These fields are used to specify En-route WX Airports. WEBCTO – USER MANUAL PAGE 6-34 . . . Flight Plan – ETP / ETOPS . . Equal Time .Points can be requested in the Flight Plan that takes into consideration . either the Fuel requirements for a "Loss of Engine/Driftdown" scenario, or .for a "Decompression/Emergency Descent to 10,000ft" scenario. . The following describes the various fields on the ETP / ETOPS portion of the Flight Plan request form: En-Route WX/ETP Airports These fields are used to: WEBCTO – USER MANUAL Request 1-3 ETP Airport pairs (when “Calculate ETP” is checked). Specify 1-6 Airports for on-route Weather (when “Calculate ETP” is un-checked). PAGE 6-35 . . . Calculate ETP . . Click this checkbox instruct the system to perform an Equal Time Point . thetoETP calculation using Airports specified above. The system will use the Customer’s .default ETP Policy. . . Policy (ETP) This field is used to instruct the system to use a specific Equal Time Point calculation using the ETP Airports specified above. Contact Skyplan before using this feature. Calculate 3-ETP Click this checkbox to instruct the system to generate a Flight Plan with 3 Equal Time Point scenarios using the ETP Airports specified above. Please refer to the ETOP keyword in the “CTO Flight Planning - User Manual” for information on how to use this feature. Type (3-ETP) This field is used to instruct the system to use a specific 3-ETP scenario using the ETP Airports specified above. Please refer to the ETOP keyword in the “CTO Flight Planning - User Manual” for information on how to use this feature. Calculate O2 Scenario Click this checkbox to instruct the system to perform an Oxygen Depressurization Equal Time Point calculation using the ETP Airports specified above. Cruise Mode (O2 Scenario) Default is LRC. This field is used to specify the Cruise Speed to be used for the Oxygen Depressurization ETP / 3-ETP calculations. O2 Altitude (O2 Scenario) Default is FL230. This field is used to specify the Initial Level-Off Altitude to use for the Oxygen Depressurization ETP / 3-ETP calculations. O2 Duration (O2 Scenario) Default is 30 minutes. This field is used to specify the Oxygen Duration (in minutes) to use for the Oxygen Depressurization ETP / 3-ETP calculations. Final Altitude (O2 Scenario) Default is FL100. This field is used to specify the Final Level-Off Altitude to use for the Oxygen Depressurization ETP / 3-ETP calculations. ETP / 3-ETP (O2 Scenario) Click the appropriate Radial button to select the type of Oxygen Depressurization calculation. WEBCTO – USER MANUAL PAGE 6-36 . . . ETOPS Route Compliance Stations . These fields.are used to specify up to 12 airports along the selected route. . . Compliance Time ETOPS Route . . to override the aircraft's default ETOPS time (in minutes). The This field is used value cannot be greater than the ETOPS time defined for the aircraft in the Aircraft Database. WEBCTO – USER MANUAL PAGE 6-37 . . . FLIGHT PLAN Flight Plan – SECONDARY . . describes the various fields on the SECONDARY FLIGHT PLAN The following . Flight Plan request form: portion of the . . . WEBCTO – USER MANUAL PAGE 6-38 . . . Automatic Secondary . . . . . . Automatic Secondary Click this Radial button to instruct the system to calculate Automatic Secondary Flight Plans. When requested, the default Secondary Flight Plans are: Secondary 1 – Use Next Lowest Flight Level Secondary 2 – Use Initial Flight Level Automatic Secondary Type Use this field to instruct the system to calculate a specific set of Automatic Secondary Flight Plans. Please refer to the AUTOSEC keyword in the “CTO Flight Planning - User Manual” for information on how to use this feature. WEBCTO – USER MANUAL PAGE 6-39 . . . User Defined Secondary . . . . . . User Defined Secondary Click this Radial button to instruct the system to calculate one (1) User defined Secondary Flight Plan. Secondary Flight Plans You can specify any of the following values: Cruise Mode Destination Alternates Maximum Flight Level Specify Payload Calculate Max Payload Route / Analysis Number Route Via Waypoints Manual Routing Altitude Profile Click the “Add Another” link to request more than one (1) User Defined Secondary. WEBCTO – USER MANUAL PAGE 6-40 . . . Flight Plan – ATC FILING . . 1 Filing Method . . Plan has been run and returned to you, you can file it as follows: Once the Flight . . Click the “ATC” button. Click the “OK” button to file the Flightplan with ATC. WEBCTO – USER MANUAL PAGE 6-41 . . . Filing Method 2 . . Once the Flight Plan has been run, you can file it at a later time as follows: . . Click the “Send” button. . . Fill in the “Recall Number” and click the “File” button. Or Fill in the “Flight Number”, “Origin”, “Airline Parameter File”, “Flight Day” and click the “File” button. Note: You can also provide additional ATC (AFTN) addresses as required. WEBCTO – USER MANUAL PAGE 6-42 . . . ATC Filing Message . . Once the Flight Plan has been filed, it can be displayed as follows: . Click the.“Load Previous” icon . . WEBCTO – USER MANUAL Click the “ATC” link on the desired flightplan (row). PAGE 6-43 . . . ATC Filing – Delay . . Once the Flight Plan has been filed with ATC, it can be delayed as follows: . . “ATC” link on the desired flightplan (row). Click the . . Click the “Delay” link. Revise the ETD and click the “File w/ATC” button. WEBCTO – USER MANUAL PAGE 6-44 . . . ATC Filing – Cancel . . Once the Flight Plan has been filed with ATC, it can be cancelled as follows: . . “ATC” link on the desired flightplan (row). Click the . . Click the “Cancel” link. Click the “File w/ATC” button. WEBCTO – USER MANUAL PAGE 6-45 . . . Flight Plan – AFIS Delivery . . 1 (GDC / ARINC) Upload Method . . Plan has been run and returned to you, you can upload an AFIS Once the Flight . plan as follows: . Click the “GDC” or “ARINC” button. Or WEBCTO – USER MANUAL PAGE 6-46 . . . . . . . . . WEBCTO – USER MANUAL Click the “OK” button to upload the Flightplan. PAGE 6-47 . . . Upload Method 2 (GDC / ARINC) . . Once the Flight Plan has been run, you can file it at a later time as follows: . . Click the “Send” button. . . Select the “AFIS Flight Plan” provider (GDC, ARINC). Fill in the “Recall Number” and click the “File” button. Or Fill in the “Flight Number”, “Origin”, “Airline Parameter File”, “Flight Day” and click the “File” button. WEBCTO – USER MANUAL PAGE 6-48 . . . Upload Method 3 (Satcom Direct) . . Once the Flight Plan has been run and returned to you, you can upload an AFIS . plan via “Satcom Direct” as follows: . Click the.“Load Previous” icon . Click the “FP” link on the desired flightplan (row). Click the “Uplink” button. WEBCTO – USER MANUAL PAGE 6-49 WEBCTO – USER MANUAL . . . Click the “Yes, Uplink” button to upload the flightplan via “Satcom Direct”. . . . . . . PAGE 6-50 . . . Flight Plan – FORWARDING TO RECIPIENTS . . Plan has been generated, it will be returned to the user: Once the Flight . . . . WEBCTO – USER MANUAL Click the “Save” button to save the Flight Plan to Disk PAGE 6-51 WEBCTO – USER MANUAL . . . Forward the Flight Plan via E-Mail . . . . . . Print the Flight Plan PAGE 6-52 . . . Flight Plan - Templates . . Flightplan application allows you to save a flightplan request as a The “WebCTO” . template for.later use. . Saving a Template . Fill in all the Flightplan fields that you wish to save in a template. Then click the “Save As Template” icon Then click the “Save As Template” icon Type in the “Template Name” then click the “Save Template” button. You can also overwrite an existing Template. WEBCTO – USER MANUAL PAGE 6-53 . . . Using a Template . Click the.“Load Template” icon . . . . WEBCTO – USER MANUAL Click the desired template (row). The Flightplan fields will be loaded from the template. PAGE 6-54 . . . Rerunning a Previous Flightplan . Click the.“Load Previous” icon . . . . WEBCTO – USER MANUAL Click the desired flightplan (row). The Flightplan fields will be recalled. PAGE 6-55 . . . . 7. Tabular Weather . . Overview . . This section.describes the various methods to request Weather/NOTAM information from Skyplan’s Weather Query system: ADHOC Weather using “Quick Weather” queries Centrally stored Weather Macros Pre-stored Weather Templates (WebCTO only) Please refer to the “CTO Weather Query – User Manual” document for information on all the available Weather Query commands. Click on the “Weather” icon (from the Client Area) to request textual Weather/NOTAM information. WEBCTO – USER MANUAL PAGE 7-56 . . . Weather - ADHOC REQUEST . . describes how to retrieve ADHOC Weather/NOTAM information: The following . . . Weather Query . Command Results of the Weather Query Quick Weather Type in a valid Weather Query command in the “Quick Weather” field and click the “Go” button (or hit the “Enter” key). The requested weather information is displayed in the “Results” window. Click the “Clear” button to flush (reset) the “Results” window. WEBCTO – USER MANUAL PAGE 7-57 . . . Weather - MACRO REQUEST . . describes how to retrieve Weather/NOTAM information using a The following . weather macro. These macros can also be retrieved using centrally stored . access via SITA/ARINC/E-MAIL: . . Weather Query Macro Results of the Weather Query Quick Weather Type in a valid Weather Macro name in the “Quick Weather” field and click the “Go” button (or hit the “Enter” key). The requested weather information is displayed in the “Results” window. Click the “Clear” button to flush (reset) the “Results” window. WEBCTO – USER MANUAL PAGE 7-58 . . . Weather - TEMPLATE. REQUEST . describes how to build, store, and retrieve Weather/NOTAM The following . WebCTO weather templates: information using . . Save as Template . Open Template Weather Command Strip Weather Type Create a Template Double Click the Weather Type from the list in the “Template Builder” window. This will place a Command Strip in the right-hand box. For example if you were to select “Terminal Forecast”, a “FT” command strip is displayed. Click on the new Command Strip. This will display the appropriate Window to input the parameters to the command: WEBCTO – USER MANUAL PAGE 7-59 . . . . . . . . . Fill in the appropriate boxes and click “OK”. This will update the Command Strip with the information you just provided. Repeat until you have finished creating your Weather Request template. Click the “Get Weather” button to generate the Weather briefing. The requested weather information is displayed in the “Results” window. If you wish to re-used the template you just created, click the “Save “button: List of stored Templates Description WEBCTO – USER MANUAL PAGE 7-60 List of stored Templates . . . Retrieve / Run a Template . . Click the “Open Templates” Toolbar icon: . . . . Double-click the Template name to display the “Comments” associated with the Template (if required). Select the desired Template and click the “Load” button. The contents of the Template will be displayed in the right-hand side of the Template Builder window.. WEBCTO – USER MANUAL PAGE 7-61 Forward Briefing to Recipient . . . Click the “Get Weather” button to generate the Weather briefing. The . requested weather information is displayed in the “Results” window”: . . . . . Print Briefing Click on the “E-Mail Weather Results” Toolbar icon to Send the Weather Briefing via E-Mail. You will be prompted for e-mail addresses: Click on the “Print Weather Results” Toolbar icon to Print the Weather Briefing. WEBCTO – USER MANUAL PAGE 7-62 8. Graphical Weather Overview WebCTO has over 250 worldwide Graphic Weather products available for download: Wind Chart Radar Summary Canadian Area Forecast Turbulence and Freezing Levels Significant Weather Satellite Images Retrieve a Map The following describes the procedure to request a Graphical Weather chart from WebCTO: Click on the “Weather Maps” icon (from the Client Area). You will be presented with the “Select Map” form: Select the type of Graphic Weather Map you require WEBCTO – USER MANUAL Select the Map Type. PAGE 8-1 . . . . . . . . . Select an area that you want to choose charts from. Click on the region of the world you wish to retrieve the Map for. Select the desired Chart WEBCTO – USER MANUAL PAGE 8-2 . . . Select the desired chart and click the “Open” link (the default is the latest . map). The map will be displayed in another window. . . may require a 3 party application to display the chart. Note: You . . . rd WEBCTO – USER MANUAL PAGE 8-3