1
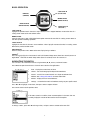
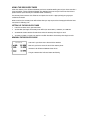
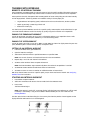
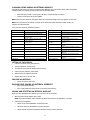
TABLE OF CONTENTS Introduction.................................................................................................................................... 4 Features .......................................................................................................................................... 4 Charging the Run Trainer™ 2.0 GPS ............................................................................................... 5 Basic Operation ............................................................................................................................... 6 Icon Descriptions ............................................................................................................................. 7 First-Time Setup .............................................................................................................................. 7 Setting up the Optional Heart Rate Sensor ....................................................................................... 8 Setting up the Optional Foot Pod ..................................................................................................... 9 Timing Workouts ......................................................................................................................... 10 Starting a Workout ......................................................................................................................... 10 Pausing and Saving a Workout ...................................................................................................... 11 Taking Laps/Splits ......................................................................................................................... 11 Configuring Hands-free Settings .................................................................................................... 12 Using Nutrition Alerts ..................................................................................................................... 12 Using the Recovery Timer .............................................................................................................. 13 Training with Intervals ................................................................................................................. 14 Benefits of Interval Training............................................................................................................ 14 Starting an Interval Workout ........................................................................................................... 14 Pausing and Saving an Interval Workout ........................................................................................ 15 Reviewing Workouts.................................................................................................................... 16 Reviewing the Workout Summary .................................................................................................. 16 Reviewing Individual Laps or Intervals............................................................................................ 17 Deleting Workouts ......................................................................................................................... 17 Configuring Settings ................................................................................................................... 18 Setting the Time and Date ............................................................................................................. 18 Setting Units .................................................................................................................................. 18 Setting User Info ............................................................................................................................ 18 2 Configuring Workout Zones............................................................................................................ 19 Setting Watch Preferences............................................................................................................. 21 Changing Display Language .......................................................................................................... 21 INDIGLO® Night-Light .................................................................................................................. 22 Resetting the Watch .................................................................................................................... 22 Troubleshooting .......................................................................................................................... 23 Problems Connecting to the GPS................................................................................................... 23 Problems Connecting to the Heart Rate Sensor ............................................................................. 23 Problems Connecting to the Foot Pod ............................................................................................ 23 Problems Connecting to a Computer.............................................................................................. 23 Water Resistance ......................................................................................................................... 23 Warranty and Service .................................................................................................................. 24 Declaration of Conformity ........................................................................................................... 26 3 INTRODUCTION ® ® Congratulations on your purchase of the Timex Ironman Run Trainer™ 2.0 GPS. For the latest instructions, please refer to the User Guide listing for Run Trainer 2.0™ at http://www.Timex.com/Manuals. For first use, please follow these six easy steps: 1. Charge the watch 2. Load the latest firmware 3. Configure the settings 4. Acquire the GPS signal 5. Record your workout 6. Review your performance ® ® For your convenience, we have posted the TImex Ironman Run Trainer™ 2.0 Quick Start guide at: http://www.Timex.com/Manuals Detailed instructional videos are posted at: http://www.YouTube.com/TimexUSA FEATURES • Easy to use ― Automated first-time setup collects the user data the watch needs to help you train. Intuitive menus simplify navigation and operation. • Alerts – Audible tones and vibration alerts let you know about important workout events such as automatic splits and out-of-zone warnings. • GPS – SiRFstarIV™ technology tracks pace, speed, distance, and altitude. • ANT+™ Radio – Wireless capability enables the watch to connect to a Heart Rate and/or Foot Pod sensor. • Heart Rate Sensor – When connected to a heart rate sensor, monitor your heart rate to maintain a level of activity that matches your personalized workout requirements. • Foot Pod Sensor – When connected to a foot pod sensor, track multiple values in your workout including pace, speed, distance, and cadence, or cadence only. • The INDIGLO night-light – Illuminates the display with the press of the INDIGLO button. The Night® Mode feature illuminates the display with any button press. When Constant On is active, the display ® remains illuminated until the INDIGLO button is pressed again. ® ® 4 GETTING STARTED CHARGING THE RUN TRAINER™ 2.0 GPS Before you use the watch for the first time, charge the battery for at least 4 hours to insure complete charging. This is confirmed by a flashing battery icon. In order to maximize the rechargeable battery life: • Deplete the battery until the last battery indicator segment disappears and the empty indicator begins to flash. If the watch display goes blank, you can still proceed as long as it has been in that state for no more than 1-2 days. • Fully charge the watch battery for at least 4 hours until all four segments in the battery level indicator are no longer blinking. • Repeat this discharge/recharge procedure two more times. NOTE: You should repeat this procedure every two months if the watch is not used or recharged regularly. Charge within a temperature range of 32°F - 113°F (0°C - 45°C). The charging cable has a clip on one end and a standard USB connector on the other end. 1. Attach the clip to the watch so the four pins on the clip align with the four metal contacts on the back of the watch. The clip has two black pins that align the clip into the watch case back. 2. Insert the other end of the cable into a powered USB port on your computer. The blinking battery level icon confirms that the watch is charging. The battery icon flashes during charging. The four segments in the icon indicate the charge of the battery; more solid segments mean a higher charge. 5 BASIC OPERATION STOP/SAVE/ (/STP/SAV) ® INDIGLO (INDIGLO) MENU/SELECT (MENU/SELECT) BACK/DISPLAY (BACK/DISPLAY) START/SPLIT/ (/ST/SPL.) STOP/SAVE/ Highlight the previous item in the menu. Stop a workout. Save a stopped workout. Increase the value in a setting screen. Move to the next review screen. MENU/SELECT Open the main menu. Open a highlighted menu option. Move to the next field in a setting screen. Move to the next lap when reviewing lap details. START/SPLIT/ Highlight the next item in the menu. Start a workout. Take a lap/split. Decrease the value in a setting screen. Move to the previous review screen. BACK/DISPLAY Return to the previous menu. Move to the next display during a workout. ® INDIGLO Press to use night-light for a few seconds. Hold until the watch beeps once (about four seconds) to turn on ® Night-Mode . Hold until the watch beeps twice (about six seconds) to turn on Constant On. NAVIGATING THE WATCH You can access all of the watch features using the MENU, , , SELECT, and BACK buttons. Press MENU to open the main menu. The main menu contains five applications: • Time ― Display the current date and time. • Chrono ― Use the chronograph for elapsed time workouts. • Interval ― Use this for custom intervals or a simple countdown timer workout. See Training with Intervals for more information. • Review ― Display the list of saved workouts. • Settings ― Customize the watch and workout settings to your specific needs. Press or to highlight a menu item, then press SELECT to open the item. Press BACK to return to the previous menu. If the menu contains a scrollbar, there are more options in the menu than are currently displayed. Press or to see the rest of the options. In settings screens, press or to change values, and press SELECT to move to the next field. 6 ICON DESCRIPTIONS These icons can appear in the watch screens. GPS status Solid: A GPS fix has been obtained. Flashing: Watch is searching for a GPS fix. Heart rate sensor status Solid: Heart rate sensor is active and transmitting data. Flashing: Watch is searching for a heart rate sensor. Foot pod status Solid: Foot pod is active and transmitting data. Flashing: Watch is searching for a foot pod. Workout summary In Review screen, indicates a summary entry available for review. Workout details In Review screen, indicates that specific lap or interval data is available for review. Chrono In Review screen, indicates a Chrono workout. Interval timer In Review screen, indicates an Interval workout. PC connecting Indicates the watch is connecting to a computer. PC disconnecting Indicates the watch is disconnecting from the computer. Alarm Indicates the alarm is active and will sound at the programmed time. FIRST-TIME SETUP The first-time setup feature walks you through configuration of the settings the watch needs to collect from you in order to report accurate workout data. Press , , and SELECT to enter your choices. ® First-time setup begins when you press any button (except INDIGLO ) after you take the watch out of the box. If first-time setup does not begin, reset the watch as described in Resetting the Watch. After the reset is ® complete, first-time setup will commence when you press any button except INDIGLO . In addition to first-time setup, you may want to change the Text Color of the reversible, high-resolution display. See Setting Watch Preferences for more information. SETTINGS CONFIGURED DURING FIRST-TIME SETUP • Display language ― Choose the language in which watch menus and messages will display. • Display units ― Choose whether workout data will display in English units (feet, miles, pounds, etc.) or Metric units (meters, kilometers, kilograms, etc.). • Gender ― Choose whether you are male or female. • Time of day ― Set the time at your location in hours, minutes, and seconds. NOTE: Press when you are at 11 am to continue to set afternoon hours. • Date ― Set the current year, month, and day. • Weight ― Set your weight to assist in calculations of calories burned. • Height ― Set your height to assist in calculations of calories burned. • Birthday ― Set your birthday to assist in calculations of calories burned. • Time format ― Choose 12- or 24-hour format. • Date format ― Choose MM-DD-YY or DD.MM.YY format. 7 CONNECTING TO A COMPUTER You can connect the watch to a computer to update watch firmware, change watch settings from the computer, and download workout data (see Downloading Workout Data and Reviewing on your Computer) into an online account. Before you connect to a computer, create a free TrainingPeaks™ account and download the Device Agent software for the watch. GET THE LATEST FIRMWARE While you can use the watch right out of the box, the online firmware will have the latest enhancements and improvements. Use the Device Agent to connect the watch to your computer and get the latest updates. 1. Download the Timex Device Agent for USB Devices at: http://TimexIronman.com/DeviceAgent 2. Connect the charging clip to the watch, then plug the USB cable into the computer. A picture of a connected computer appears on the watch display. 3. Open the Device Agent on your computer, click File, then click Update Device. 4. Follow the onscreen instructions to download the latest watch firmware. Keep the watch connected to the computer until the update is complete (as indicated by this symbol on the watch display) and the watch resets. CONFIGURING SETTINGS FROM YOUR COMPUTER Make changes to watch settings from the Device Agent, and then download those settings to the device. 1. Connect the charging clip to the watch, then plug the USB cable into the computer. A picture of a connected computer appears on the watch display. 2. Open the Device Agent on your computer. 3. Select the Run Trainer 2.0 from the Device field. 4. Click Settings. 5. Change settings, then click Save. When the settings transfer is complete, close the Device Agent and unplug the watch from the computer. SETTING UP THE OPTIONAL HEART RATE SENSOR WEARING THE SENSOR STRAP 1. Adjust the strap so it fits snug to your chest, just below your sternum. 2. Attach the heart rate sensor to the strap. 3. Wet the heart rate sensor pads on the back of the strap, then put on the strap against your skin. PAIRING THE HEART RATE SENSOR Prompt the watch to search for the heart rate sensor and begin receiving data. 1. Make sure you are at least 30 feet away from other heart rate sensors. 2. Wear the heart rate sensor as described above. 3. From the SETTINGS menu, open SENSORS. 4. Make sure HEART RATE is set to YES. 5. Select SEARCH and select HEART RATE. The watch searches for the sensor. A message displays when the sensor is found and paired to the watch. 8 SETTING UP THE OPTIONAL FOOT POD POSITIONING THE FOOT POD • Position the foot pod as described in the instructions that came with the foot pod. PAIRING THE FOOT POD 1. Make sure you are at least 30 feet away from other foot pods. 2. Turn on the foot pod. 3. From the SETTINGS menu, open SENSORS. 4. Set FOOT POD to YES or CADENCE. NOTE: If you set FOOT POD to YES, the foot pod collects all speed, distance, and cadence data. If you set FOOT POD to CADENCE, the foot pod collects cadence data only (the GPS collects speed and distance data). 5. Open SEARCH and select FOOT POD. The watch searches for the foot pod. A message displays when the foot pod is found and paired to the watch. CALIBRATING THE FOOT POD Calibrate the foot pod before you use it for the most accurate measurements. There are two ways to calibrate the foot pod. In automatic calibration, you run a known distance and the foot pod tracks the distance. At the end of the run, you input the actual distance, and the watch calculates the calibration factor based on the difference between the two values. You can also enter the calibration factor manually. The automatic calibration method is preferred because it is generally more accurate. 1. From the SETTINGS menu, open SENSORS. 2. From the CALIBRATE menu, select FOOT POD. 3. Once the foot pod is connected, run a known distance along a track or over a premeasured route. NOTE: You must run at least 300 m for calibration. 4. When you have reached the desired distance, select STOP. 5. Enter the actual distance you ran. The calibration factor (the ratio applied to foot pod measurements to ensure accurate calculations) is automatically calculated. SETTING CALIBRATION FACTOR MANUALLY You can also set the calibration factor by hand. Only do this if you have previously calibrated this foot pod and know the calibration factor that gives accurate distance measurements. 1. From the SETTINGS menu, open SENSORS. 2. From the CALIBRATE menu, select CAL FACTOR. 3. Enter the calibration factor. NOTE: The calibration factor is determined by taking the KNOWN distance and dividing it by the distance REPORTED by the foot pod. 9 TIMING WORKOUTS Use the chronograph to time workouts, to display real-time data about a workout in progress, and to save workout data for review. Workouts can also be recorded through the interval Timer ― see Training with Intervals. STARTING A WORKOUT 1. Press MENU and open CHRONO. 2. Select YES to connect to all sensors that are indicated ― those are marked YES in the SENSORS menu. 3. Press START. The chronograph begins timing. NOTE: If the memory is nearly full, a message displays indicating how many workouts can still be saved in memory. If the memory is full, you must delete a workout before you can save a new one. See Deleting Workouts. CHANGING VIEWS DURING A WORKOUT The chronograph has three screens to show real-time workout data. Each screen shows two or three fields. Configure what data displays on each screen from the SETTINGS menu. • While a workout is running, press DISPLAY to cycle through the screens. • To return to the main menu, press MENU. NOTE: When you press DISPLAY, the watch shows the name of the workout data that appears in each field. If lap time is displayed, the lap number is also shown. NOTE: Pressing DISPLAY also initiates a search for the Heart Rate and/or Foot Pod if those sensors are selected, but not connected. These data can display in the chronograph screens: Data Description Data Description SPLIT TIME total elapsed time of the workout LAP HR average heart rate of the current lap LAP TIME elapsed time for the current lap PREV LAP HR average heart rate of the previous lap PREV LAP TIME elapsed time for the previous lap CADENCE PACE current minutes per mile/km AVG CADENCE current footfalls per minute average footfalls per minute over the entire workout average footfalls per minute of the current lap average footfalls per minute of the previous lap total distance traveled during the workout distance traveled during the current lap distance traveled during the previous lap current altitude total altitude increase during entire workout total altitude decrease during entire workout SPEED average minutes per mile/km over the entire workout average minutes per mile/km of the current lap average minutes per mile/km of the previous lap current speed AVG SPEED average speed over the entire workout PREV LAP DISTANCE LAP SPEED average speed of the current lap ALTITUDE PREV LAP SPEED average speed of the previous lap TOTAL ASCENT HEART RATE current heart rate TOTAL DESCENT AVG HR average heart rate over the entire workout AVG PACE LAP PACE PREV LAP PACE LAP CADENCE PREV LAP CADENCE DISTANCE LAP DISTANCE SETTING UP THE DISPLAY 1. From the SETTINGS menu, open DISPLAY. 2. Open the CHRONO display to edit. 3. Set LINES for the number of workout data to display. 4. Open a line (TOP, MIDDLE, or BOTTOM). 5. Select the data to display on that line. 6. Repeat steps 4 and 5 for each line. 10 PAUSING AND SAVING A WORKOUT PAUSING AND RESTARTING • Press STOP to pause timing. • Press START when the chronograph is stopped to resume timing. SAVING AND RESETTING A WORKOUT When you have completed your workout, you can save it for future review. 1. With the chronograph stopped, press SAVE. 2. Choose one of the options: • Select YES to save the workout and clear the chronograph. • Select NO to discard the workout and clear the chronograph. • Select CANCEL to go back to CHRONO without saving or clearing the chronograph. TAKING LAPS/SPLITS WHAT ARE LAP AND SPLIT TIMES? Lap time is the length of an individual segment of your workout. Split time is the time elapsed from the beginning of your workout through the current segment. When you “take a split”, you have completed timing one segment (such as one lap) of the workout and are now timing the next segment. This graph represents the lap and split times for a workout in which 4 laps/splits were taken. TAKING A LAP/SPLIT • When the chronograph is running, press SPLIT to record a lap/split. The time of the lap you just completed and the split time are displayed, and the watch begins timing a new lap in the background. Once you stop and save the workout, you can review summary data for the entire workout, as well as data about each individual lap. 11 CONFIGURING HANDS-FREE SETTINGS You can set the chronograph to take a lap/split automatically when you reach a certain lap distance or time. You can also set the chronograph to start or stop timing automatically when you reach a certain speed. SETTING AUTO SPLIT Turn on auto split to automatically take a lap/split when you reach a certain lap distance or time. 1. From the SETTINGS menu, open HANDS FREE. 2. Set AUTO SPLIT to DIST to take a lap/split based on distance, or set to TIME to take a lap/split based on lap time. 3. Set the data that triggers auto split: • If you set AUTO SPLIT to DIST, set the DIST field to the distance at which you want to take a lap/split. • If you set AUTO SPLIT to TIME, set the TIME field to the time at which you want to take a lap/split. To use auto split once it is set up, open the CHRONO, connect to the sensors, and start timing the workout. Every time you reach the specified distance or time, the chronograph takes a lap/split. SETTING AUTO START AND STOP Turn on auto start and auto stop, and set the threshold (the speed that activates auto start and auto stop). 1. From the SETTINGS menu, open HANDS FREE. 2. Toggle AUTO START or AUTO STOP to ON. 3. Select THRESHOLD. 4. Set the speed at which AUTO START and AUTO STOP will activate. To use auto start or auto stop once they are set up, open the CHRONO, connect to the sensors, and begin running. When you move faster than the threshold, the chronograph begins timing. When you move slower than the threshold, the chronograph stops timing. USING NUTRITION ALERTS Staying hydrated and eating right will help your workouts be more successful. If you get dehydrated or hungry, your performance will suffer and you are more susceptible to injury. The nutrition timers remind you when to drink and eat. SETTING THE DRINK TIMER 1. From the SETTINGS menu, open NUTRITION. 2. Set DRINK ALERT to ON. 3. Set DRINK TIME to the interval at which you want to receive drink alerts. 4. Set VIBRATE to ON to receive vibration alerts when the DRINK TIME is reached. 5. Set ALERT to TONE 1 or TONE 2 to receive an audible alert when the DRINK TIME is reached. When you are timing a workout with the chronograph, the vibration and audible alert will sound when you have reached the DRINK TIME, and a popup will display reminding you to drink. SETTING THE EAT TIMER 1. From the SETTINGS menu, open NUTRITION. 2. Set EAT ALERT to ON. 3. Set EAT TIME to the interval at which you want to receive eat alerts. 4. Set VIBRATE to ON to receive vibration alerts when the EAT TIME is reached. 5. Set ALERT to TONE 1 or TONE 2 to receive an audible alert when the EAT TIME is reached. When you are timing a workout with the chronograph, the vibration and audible alert will sound when you have reached the EAT TIME, and a popup will display reminding you to eat. 12 USING THE RECOVERY TIMER Heart rate recovery is the difference between your heart rate when working out and your heart rate after a short rest period. A larger difference between your workout heart rate and your heart rate after the rest period indicates quick recovery and therefore better conditioning. The recovery timer measures this difference and reports the result in a popup to help you gauge your cardiovascular health. When turned on, the recovery timer will activate when you stop or pause the chronograph while the heart rate sensor is collecting data. SETTING UP THE RECOVERY TIMER 1. From the SETTINGS menu, open RECOVERY. 2. Set the TIME (the length the recovery timer will last) to 30 SECONDS, 1 MINUTE, or 2 MINUTES. 3. Set VIBRATE to ON to receive vibration alerts when the recovery timer begins or ends. 4. Set ALERT to TONE 1 or TONE 2 to receive an audible alert when the recovery timer begins or ends. READING THE RECOVERY POPUP START HR is your heart rate at the end of the workout. END HR is your heart rate at the end of the recovery timer. CHANGE is the difference between these values. A larger CHANGE value indicates better conditioning. 13 TRAINING WITH INTERVALS BENEFITS OF INTERVAL TRAINING Interval workouts are powerful tools that let you target and train for specific qualities (like speed, endurance, or threshold). Interval mode helps keep track of times or distances for up to six intervals and 99 repetitions. Intense periods of activity interspersed with recovery periods of lesser activity help you train more intensely and for longer periods. Combining aerobic and anaerobic activity in this way helps you: • Target workouts for improving speed, cardiovascular and muscular endurance, or other qualities • Speed up your body’s processing of lactic acid • Reduce the risk of injury You should set up interval workouts to train for a specific quality. Two examples are described here, but you can create interval workouts to train for virtually any quality using the six intervals and 99 repetitions. EXAMPLE OF ENDURANCE WORKOUT To train for endurance, you might set up a classic 1-mile repeat workout: 3 to 6 repetitions of one 1-mile interval at about half-marathon pace, followed by a 1-minute recovery period. EXAMPLE OF SPEED WORKOUT To train for speed, you might run sets of 4 x 400m: run one 400m fast interval at slightly more than your race pace, followed by one 2-minute recovery period, and repeat 4 times. SETTING UP AN INTERVAL WORKOUT 1. From the SETTINGS menu, open INTERVALS. 2. Open the interval to configure. 3. Select to end the interval after a specified DISTANCE or a specified TIME. NOTE: You can mix distance- and time-based intervals in the same workout. 4. Repeat steps 2 and 3 for each interval in the workout. 5. Set REPS to the number of times to repeat the intervals. NOTE: The interval workout stops automatically when the number of set repetitions is reached. 6. Set VIBRATE to ON to receive vibration alerts when an interval ends. 7. Set ALERT to TYPE 1 or TYPE 2 to receive an audible alert when an interval ends. TIP: Set up interval zones to train for a specific speed, pace, or heart rate for each interval. See Configuring Workout Zones for instructions. STARTING AN INTERVAL WORKOUT 1. Press MENU and open INTERVAL. 2. Select YES to connect to all sensors that are marked ON in the SENSORS menu. 3. Press START. The interval timer begins. NOTE: If the memory is nearly full, a message displays indicating how many workouts can still be saved in memory. If the memory is full, you must delete a workout before you can save a new one. See Deleting Workouts. The alert sounds when a new interval begins. The summary data from the previous interval appears on the display while the new interval runs in the background. 14 CHANGING VIEWS DURING AN INTERVAL WORKOUT The interval timer has three screens to show real-time workout data. Each screen shows two or three fields. Configure what data displays on each screen from the SETTINGS menu. • While the interval timer is running, press DISPLAY to cycle through the screens. • To return to the main menu, press MENU. NOTE: When you press DISPLAY, the watch shows the name of the workout data that appears in each field. NOTE: Pressing DISPLAY also initiates a search for the Heart Rate and/or Foot Pod if those sensors are selected, but not connected. These data can display in the interval screens: Data Description Data Description PACE current minutes per mile/km average minutes per mile/km over the entire workout average minutes per mile/km of the current interval average minutes per mile/km of the previous interval CADENCE SPEED current speed DISTANCE AVG SPEED average speed over the entire workout INT DISTANCE INT SPEED average speed of the current interval PREV INT DISTANCE PREV INT SPEED average speed of the previous interval ALTITUDE HEART RATE current heart rate TOTAL ASCENT AVG HR average heart rate over the entire workout TOTAL DESCENT INT HR average heart rate of the current interval INT TIME/DIST PREV INT HR average heart rate of the previous interval PREV INT TIME/DIST current footfalls per minute average footfalls per minute over the entire workout average footfalls per minute of the current interval average footfalls per minute of the previous interval total distance traveled during the workout distance traveled during the current interval distance traveled during the previous interval current altitude total altitude increase during entire workout total altitude decrease during entire workout the time or distance left in the current interval length of the previous interval AVG PACE INT PACE PREV INT PACE AVG CADENCE INT CADENCE PREV INT CADENCE SETTING UP THE DISPLAY 1. From the SETTINGS menu, open DISPLAY. 2. Open the INTERVAL display to edit. 3. Set LINES for the number of workout data to display. 4. Open a line (TOP, MIDDLE, or BOTTOM). 5. Select the data to display on that line. 6. Repeat steps 4 and 5 for each line. SKIPPING AN INTERVAL • To skip an interval, hold SPLIT. PAUSING AND SAVING AN INTERVAL WORKOUT • Press STOP to pause timing. • Press START when the interval timer is paused to resume timing. SAVING AND RESETTING AN INTERVAL WORKOUT When you have completed your workout, you can save it for future review. 1. With the interval timer stopped, press SAVE. NOTE: The interval workout stops automatically when the number of set repetitions is reached. 2. Choose one of the options: • Select YES to save the workout and clear the timer. • Select NO to discard the workout and clear the timer. • Select CANCEL to go back to INTERVAL without saving or clearing the timer. 15 REVIEWING WORKOUTS When you reset the chronograph or interval timer, the workout data is saved. You can view it from the REVIEW screens. Compare these saved workouts against one another to track your progress. REVIEWING THE WORKOUT SUMMARY The workout summary contains data about the workout as a whole. OPENING THE WORKOUT 1. Press MENU and open REVIEW. The most recent workout is at the top of the list and the oldest workout is at the bottom. Workouts saved from CHRONO are indicated by . Workouts saved from INTERVAL are indicated by . 2. Open the workout to review. 3. Select 4. Press and (as indicated in the watch display) to scroll through the available data for the workout. SUMMARY. DATA DISPLAYED IN SUMMARY Data Description Data Description TOTAL TIME duration of the workout MAX HR DISTANCE distance run during the workout ZONE TIME – HR AVG PACE average minutes per mile/km RECOVERY BEST PACE least minutes per mile/km AVG CADENCE peak heart rate reached during the workout amount of time you spent in your heart rate zone difference between your ending HR and recovery HR average number of footfalls per minute AVG SPEED average speed of the workout MAX CADENCE MAX SPEED fastest speed achieved during the workout ZONE TIME – CAD ZONE TIME – PACE amount of time you spent in your pace zone TTL ASCENT maximum number of footfalls per minute amount of time you spent in your cadence zone total ft/m increase in altitude ZONE TIME – SPD amount of time you spent in your speed zone TTL DESCENT total ft/m decrease in altitude AVG HR average heart rate for the workout CALORIES total calories burned NOTE: If a heart rate sensor is not connected, no heart rate data displays. If a foot pod is not connected, no cadence data displays. 16 REVIEWING INDIVIDUAL LAPS OR INTERVALS You can view data specific to each lap or interval to compare segments of your workout to each other. VIEWING LAP/INTERVAL DETAILS 1. Press MENU and open REVIEW. 2. Open the workout to review. 3. Select LAP DETAIL. For CHRONO workouts, the first screen shows the average lap time and the best lap time, and the total workout time appears in the upper-right. For INTERVAL workouts, the interval number and repetition number appear in the upper-right. 4. Press and to scroll through the data collected for the lap or interval, or press SELECT to quickly cycle through laps or intervals. DATA DISPLAYED IN DETAILS SCREENS Data Description average time of all laps in the workout (Chrono only) the number and time of the fastest lap (Chrono only) Data LAP duration of the lap (Chrono only) AVG CADENCE AVG HR average heart rate for the workout MAX CADENCE MAX HR peak heart rate reached during the lap/interval ZONE TIME – HR DISTANCE distance covered during the lap/interval ZONE TIME – CAD AVG PACE average minutes per mile/km for the lap/interval TTL ASCENT BEST PACE least minutes per mile/km for the lap/interval TTL DESCENT AVG SPD average speed of the lap/interval CALORIES Description amount of time you spent in your pace zone during the lap/interval amount of time you spent in your speed zone during the lap/interval average number of footfalls per minute during the lap/interval maximum number of footfalls per minute during the lap/interval amount of time you spent in your heart rate zone during the lap/interval amount of time you spent in your cadence zone during the lap/interval total ft/m increase in altitude during the lap/interval total ft/m decrease in altitude during the lap/interval total calories burned during the lap/interval MAX SPD highest speed achieved during the lap/interval INT the duration of the interval (Interval only) AVG LAP BEST ZONE TIME – PACE ZONE TIME – SPD NOTE: If a heart rate sensor is not connected, no heart rate data displays. If a foot pod is not connected, no cadence data displays. DELETING WORKOUTS You can store a maximum of 15 workouts. If you don’t need a workout for review anymore, you can delete it from memory to free up space. You can also delete all of your workouts at once. DELETING ONE WORKOUT 1. Press MENU and open REVIEW. 2. Open a workout. 3. Select DELETE WORKOUT. 4. Select YES. DELETING ALL WORKOUTS 1. Press MENU and open REVIEW. 2. Select DELETE ALL. 3. Select YES. 17 CONFIGURING SETTINGS Make changes to the watch settings to enhance your workouts and customize your experience. SETTING THE TIME AND DATE The time and date are set during first-time setup, but you can reset it later. SETTING THE TIME AND TIME FORMAT 1. From the SETTINGS menu, open TIME. 2. Select SET TIME, and set the new time. NOTE: Press when you are at 11 am to continue to set afternoon hours. 3. Toggle the TIME field between 12-hour and 24-hour format. SETTING THE DATE AND DATE FORMAT 1. Select SET DATE, and set the new date. 2. Toggle the DATE field between MM-DD-YY and DD.MM.YY format. GPS TIME • Turn GPS TIME ON to allow the GPS to automatically update the time during GPS sync. The watch will maintain any offsets to hours and minutes you made in the SET TIME menu. SETTING UNITS During first-time setup, you selected the system of measurement in which your data displays. You can change this later, or choose specific data to display in different units. • From the SETTINGS menu, open UNITS. GENERAL Select the units for User height and weight. • ENGLISH: Units appear in feet, inches, and pounds. • METRIC: Units appear in centimeters, and kilograms. DISTANCE Distance data can be measured in MI (miles) or KM (kilometers). PACE Pace can be measured in MIN/MI (minutes per mile) or MIN/KM (minutes per kilometer). SPEED Speed can be measured in MPH (miles per hour) or KPH (kilometers per hour). HEART RATE Heart rate can be measured in BPM (beats per minute) or % OF MAX (percentage of your maximum heart rate). ALTITUDE Altitude can be measured in FEET or METERS. SELECTING SENSORS After you have paired a heart rate sensor and paired and calibrated a foot pod sensor, use this setting to select the active sensors for your workouts — GPS, Heart Rate, and/or Foot Pod. SETTING USER INFO Your personal data is configured during first-time setup, but you can change it later. 1. From the SETTINGS menu, open USER INFO. 2. Set the values as precisely as possible to enjoy accurate workout data calculations. MAX HR is automatically calculated from your age by the watch, but you can set it manually to a different value. 18 CONFIGURING WORKOUT ZONES You can set up zones for heart rate, speed, pace, and cadence. To do this, input upper and lower limits for these workout data, and the watch will sound an alert when you are outside of this range to prompt you to change your workout behavior to get back in zone. Zones help you train at a specific intensity, which can help you target your workouts for a particular physical quality. You can set up one set of heart rate, speed, pace, and cadence zones for the chronograph, and one set of zones for each of the six intervals. By combining multiple zone settings with the interval timer, you can design workouts to help you get precisely the results you want. THE BENEFITS OF KNOWING YOUR PACE Pace is the number of minutes it takes you to run one mile or kilometer. It is important to know your pace both when you are training and during a race. While training, you can set a pace slightly higher than your race pace to build speed. When you are racing, you can adjust your pace to make up for slow miles or avoid burnout resulting from starting out too fast. This chart shows the pace to set to achieve your desired race time. Target Pace Event Finish Time MIN/MI MIN/KM 5K 10K 20K Half Marathon 25K 30K Marathon 5:00 3:06 0:15:32 0:31:04 1:02:08 1:05:33 1:17:40 1:33:12 2:11:05 5:30 3:25 0:17:05 0:34:10 1:08:20 1:12:06 1:25:25 1:42:30 2:24:11 6:00 3:43 0:18:38 0:37:17 1:14:32 1:18:39 1:33:10 1:51:48 2:37:17 6:30 4:02 0:20:11 0:40:24 1:20:44 1:25:12 1:40:55 2:01:06 2:50:23 7:00 4:20 0:21:44 0:43:30 1:26:56 1:31:45 1:48:40 2:10:24 3:03:29 7:30 4:39 0:23:17 0:46:36 1:33:08 1:38:18 1:56:25 2:19:42 3:16:35 8:00 4:58 0:24:50 0:49:42 1:39:20 1:44:51 2:04:10 2:29:00 3:29:41 8:30 5:16 0:26:23 0:52:48 1:45:32 1:51:24 2:11:55 2:38:18 3:42:47 9:00 5:35 0:27:56 0:55:54 1:51:44 1:57:57 2:19:40 2:47:36 3:55:53 9:30 5:54 0:29:29 0:59:00 1:57:56 2:04:30 2:27:25 2:56:54 4:08:59 10:00 6:12 0:31:02 1:02:06 2:04:08 2:11:03 2:35:10 3:06:12 4:22:05 10:30 6:31 0:32:35 1:05:12 2:10:20 2:17:36 2:42:55 3:15:30 4:35:11 11:00 6:50 0:34:08 1:08:18 2:16:32 2:24:09 2:50:40 3:24:48 4:48:17 11:30 7:08 0:35:41 1:11:24 2:22:44 2:30:42 2:58:25 3:34:06 5:01:23 12:00 7:27 0:37:14 1:14:30 2:28:56 2:37:15 3:06:10 3:43:24 5:14:29 12:30 7:46 0:38:47 1:17:36 2:35:08 2:43:48 3:13:55 3:52:42 5:27:35 13:00 8:04 0:40:20 1:20:42 2:41:20 2:50:21 3:21:40 4:02:00 5:40:41 13:30 8:23 0:41:53 1:23:48 2:47:32 2:56:54 3:29:25 4:11:18 5:53:47 14:00 8:41 0:43:26 1:26:54 2:53:44 3:03:27 3:37:10 4:20:36 6:06:53 WHAT IS YOUR OPTIMAL HEART RATE ZONE? Your fitness goals determine what your optimal heart rate zone should be; the heart rate zone you want to target for burning fat is different from the zone you should target for endurance training. Use the charts below to estimate your optimal heart rate zone based on your gender, age, and goals. Working out at the Aerobic Base level of intensity (in the middle of the charts) will help you burn fat and build aerobic endurance. However, you can also use the watch to tailor your target heart rate zone for more specific values appropriate to your current fitness level and your fitness goals. NOTE: Values on these charts are based on a percentage of your maximum heart rate (MHR). Consult your doctor before beginning an exercise program and to confirm the heart rate zone that is right for you. 19 MEN Age Light Exercise Weight Management Aerobic Base Optimal Conditioning Elite Athletic Training Maintain a healthy heart and get fit 50-60% MHR Lose weight and burn fat 60-70% MHR Increase stamina and aerobic endurance 70-80% MHR Sustain excellent fitness condition 80-90% MHR Achieve superb athletic condition 90-100% MHR 15 103 123 123 144 144 164 164 185 185 205 20 100 120 120 140 140 160 160 180 180 200 25 98 117 117 137 137 156 156 176 176 195 30 95 114 114 133 133 152 152 171 171 190 35 93 111 111 130 130 148 148 167 167 185 40 90 108 108 126 126 144 144 162 162 180 45 88 105 105 123 123 140 140 158 158 175 50 85 102 102 119 119 136 136 153 153 170 55 83 99 99 116 116 132 132 149 149 165 60 80 96 96 112 112 128 128 144 144 160 65 78 93 93 109 109 124 124 140 140 155 70 75 90 90 105 105 120 120 135 135 150 75 73 87 87 102 102 116 116 131 131 145 80 70 84 84 98 98 112 112 126 126 140 NOTE: MHR is calculated as (220 – Age), in Beats per Minute (BPM), for men. WOMEN Age Light Exercise Weight Management Aerobic Base Optimal Conditioning Elite Athletic Training Maintain a healthy heart and get fit 50-60% MHR Lose weight and burn fat 60-70% MHR Increase stamina and aerobic endurance 70-80% MHR Sustain excellent fitness condition 80-90% MHR Achieve superb athletic condition 90-100% MHR 15 106 127 127 148 148 169 169 190 190 211 20 103 124 124 144 144 165 165 185 185 206 25 101 121 121 141 141 161 161 181 181 201 30 98 118 118 137 137 157 157 176 176 196 35 96 115 115 134 134 153 153 172 172 191 40 93 112 112 130 130 149 149 167 167 186 45 91 109 109 127 127 145 145 163 163 181 50 88 106 106 123 123 141 141 158 158 176 55 86 103 103 120 120 137 137 154 154 171 60 83 100 100 116 116 133 133 149 149 166 65 81 97 97 113 113 129 129 145 145 161 70 78 94 94 109 109 125 125 140 140 156 75 76 91 91 106 106 121 121 136 136 151 80 73 88 88 102 102 117 117 131 131 146 NOTE: MHR is calculated as (226 – Age), in Beats per Minute (BPM), for women. 20 THE BENEFITS OF KNOWING YOUR CADENCE Cadence is the number of revolutions your legs make in one minute. Another way to think of cadence is to divide the number of steps you take in one minute in half. A faster cadence is preferred over a slower one because it improves speed, uses less energy to cover a given distance, and helps prevent injury, all because your feet spend less time in contact with the road. Champion runners have an average cadence of 90-94 (180-188 steps per minute). To help to achieve this, you can take shorter steps, wear lighter running shoes, and make sure that with each step you are landing with your foot underneath your knee instead of out in front of it. SETTING UP ZONES 1. From the SETTINGS menu, open ZONES. 2. Open CHRONO to set up zones for the chronograph, or INTERVAL to set up zones for the interval timer. 3. If you selected INTERVAL, open an interval. 4. Open the zone to set (HR, PACE, SPEED, or CADENCE) and toggle the ACTIVE field to YES. 5. Open SET and set the LOW (bottom limit) and HIGH (upper limit) of the selected zone. SETTING UP ZONE ALERT 1. From the CHRONO ZONES or INT ZONES menu, open ALERT. 2. Select the zone that will trigger the alert in the TYPE field. 3. Turn VIBRATE ON or OFF. 4. Select the audible ALERT to sound when you are out of zone. SETTING THE ALARM Set the alarm to receive an alert (audible or vibration) at a specific time as often as you designate. 1. From the SETTINGS menu, open ALARM. 2. Open TIME and set the time the alarm will sound. 3. Set ARMED to YES. 4. Set the FREQUENCY. You can set the alarm to sound just once, every day, on a specific day of the week, only on weekdays, or only on weekends. 5. Set the VIBRATE to ON or OFF. 6. Select the audible ALERT that will sound. When the alarm is on, the time and frequency. icon displays on the TIME screen, and the alarm will sound at the specified SETTING WATCH PREFERENCES Watch preferences are general behaviors of the watch, including chimes, beeps, and text color. 1. From the SETTINGS menu, open WATCH. 2. Turn HOURLY CHIME ON to hear a beep at the top of each hour. 3. Turn BUTTON BEEP ON to hear a beep every time you press a button. 4. Set TEXT COLOR to WHITE or BLACK to change the color of the background and onscreen text. CHANGING DISPLAY LANGUAGE The display language is set during first-time setup, but you can change it later. 1. From the SETTINGS menu, open LANGUAGE. 2. Change the SETTING field to the language in which you want watch screens to display. 21 INDIGLO® NIGHT-LIGHT ® • Press the INDIGLO button to activate the night-light for a few seconds. • Hold the INDIGLO button until the watch beeps once (about four seconds) to activate Night-Mode™ for about eight hours. While Night-Mode™ is active, press any button to activate the night-light for a few seconds. • Hold the INDIGLO button until the watch beeps twice (about six seconds) to activate Constant On. ® The night-light stays on for seven to eight hours. Press INDIGLO again to turn off the night-light. ® ® RESETTING THE WATCH SETTING/ABOUT MENU You can reset the watch back to the default state. The watch settings will all revert back to the default settings for the firmware version indicated on your watch. All saved workouts are deleted. 1. From the SETTINGS menu, open ABOUT. 2. Select FACTORY RESET. 3. Select YES. The next time you press a button after resetting the watch, first-time setup will begin. DOWNLOADING WORKOUT DATA AND REVIEWING ON YOUR COMPUTER Download workout data to the free online log powered by TrainingPeaks™ to help you analyze and plan your training regimen. 1. Create a TrainingPeaks™ account at: http://TimexIronman.com/DeviceAgent 2. Connect the charging clip to the watch, then plug the USB cable into the computer. 3. Open the Device Agent on your computer. 4. Select the Run Trainer™ 2.0 from the Device field, and make sure your account is selected in the Username field. NOTE: Add your new account to the Device Agent by clicking File, then Edit Login Accounts. Click on the “+” in the Manage User Accounts window to add your new account information. 5. Click Download to display the workouts in the watch memory. 6. Leave the boxes checked for those workouts you want sent to your online account and click Save. 7. When the workout transfer is complete, click Login to enter the online log, or close the Device Agent and unplug the watch from the computer. 22 TROUBLESHOOTING PROBLEMS CONNECTING TO THE GPS If you can’t get a GPS fix, try these steps: • Make sure that you are outside. It can be very difficult to acquire a fix indoors. • Move away from buildings and tall trees. Large structures can block the satellite signals. • Stand still. Movement can increase the time it takes for the GPS to acquire a satellite signal. NOTE: While the first GPS fix can take some time to acquire, obtaining subsequent fixes is usually faster as the GPS searches for recently acquired satellites first. PROBLEMS CONNECTING TO THE HEART RATE SENSOR If you can’t get heart rate data from the sensor, try these steps: • Make sure heart rate sensor is on and is fitted correctly. Poor placement can keep the heart rate sensor from obtaining a reading. See Setting up the Optional Heart Rate Sensor. • Use the SENSORS menu to search for the heart rate sensor. There may have been a problem with the previous pairing operation. See Setting up the Optional Heart Rate Sensor. • Install a fresh battery in the heart rate sensor. A low battery can make the heart rate sensor signal weak or nonexistent. PROBLEMS CONNECTING TO THE FOOT POD • Use the SENSORS menu to search for the foot pod. There may have been a problem with the previous pairing operation. See Setting up the Optional Foot Pod. • Install a fresh battery in the foot pod. A low battery can make the foot pod signal weak or nonexistent. PROBLEMS CONNECTING TO A COMPUTER • Make sure the metal teeth on the charging clip line up with the metal discs on the back of the watch, and that the charging cable is plugged in to the USB port on the computer. Firm connections are essential to communication between the watch and the computer. • Make sure the Device Agent is open in the computer. All communication between the watch and the computer is managed by the Device Agent. • Make sure you have selected the Run Trainer™ 2.0 in the Device Agent. The Device Agent must be set to establish a connection with a specific device type. WATER RESISTANCE The Run Trainer™ 2.0 GPS is water resistant to 50 meters. Water-Resistance Depth 50m/164ft *pounds per square inch absolute p.s.i.a. *Water Pressure Below Surface 86 WARNING: To maintain water resistance, do not press any buttons under water. • Watch is water-resistant only as long as lens, push buttons, and case remain intact. • Watch is not a dive watch and should not be used for diving. • Rinse watch with fresh water after exposure to salt water. 23 WARRANTY AND SERVICE Timex International Warranty (U.S. Limited Warranty) ® Your Timex Device is warranted against manufacturing defects by Timex for a period of ONE YEAR from the original purchase date. Timex Group USA, Inc. and its worldwide affiliates will honor this International Warranty. Please note that Timex may, at its option, repair your Device by installing new or thoroughly reconditioned and inspected components or replace it with an identical or similar model. IMPORTANT: PLEASE NOTE THAT THIS WARRANTY DOES NOT COVER DEFECTS OR DAMAGES TO YOUR DEVICE: 1. after the warranty period expires; 2. if the Device was not originally purchased from an authorized Timex retailer; 3. from repair services not performed by Timex; 4. from accidents, tampering or abuse; and 5. lens or crystal, strap or band, Device case, attachments or battery. Timex may charge you for replacing any of these parts. THIS WARRANTY AND THE REMEDIES CONTAINED HEREIN ARE EXCLUSIVE AND IN LIEU OF ALL OTHER WARRANTIES, EXPRESS OR IMPLIED, INCLUDING ANY IMPLIED WARRANTY OF MERCHANTABILITY OR FITNESS FOR PARTICULAR PURPOSE. TIMEX IS NOT LIABLE FOR ANY SPECIAL, INCIDENTAL OR CONSEQUENTIAL DAMAGES. Some countries and states do not allow limitations on implied warranties and do not allow exclusions or limitations on damages, so these limitations may not apply to you. This warranty gives you specific legal rights and you may also have other rights which vary from country to country and state to state. To obtain warranty service, please return your Device to Timex, one of its affiliates or the Timex retailer where the Device was purchased, together with a completed original Repair Coupon or, in the U.S. and Canada only, the completed original Repair Coupon or a written statement identifying your name, address, telephone number and date and place of purchase. Please include the following with your Device to cover postage and handling (this is not a repair charge): a US$ 8.00 check or money order in the U.S.; a CAN$7.00 cheque or money order in Canada; and a UK£3.50 cheque or money order in the U.K. In other countries, Timex will charge you for postage and handling. NEVER INCLUDE ANY ARTICLE OF PERSONAL VALUE IN YOUR SHIPMENT. For the U.S., please call 1-800-328-2677 for additional warranty information. For Canada, call 1-800-2630981. For Brazil, call +55 (11) 5572 9733. For Mexico, call 01-800-01-060-00. For Central America, the Caribbean, Bermuda and the Bahamas, call (501) 370-5775 (U.S.). For Asia, call 852-2815-0091. For the U.K., call 44 208 687 9620. For Portugal, call 351 212 946 017. For France, call 33 3 81 63 42 00. For Germany/Austria: call +43 662 88921 30. For the Middle East and Africa, call 971-4-310850. For other areas, please contact your local Timex retailer or Timex distributor for warranty information. In Canada, the U.S. and in certain other locations, participating Timex retailers can provide you with a postage-paid, pre-addressed Repair Mailer for your convenience in obtaining factory service. Service ® If your Timex Device should ever need servicing, send it to Timex as set forth in the Timex International Warranty or addressed to: TG SERVICE CENTER, P.O. Box 2740, Little Rock, AR 72203 For service questions, call 1-800-328-2677 For your convenience in obtaining factory service, participating Timex retailers can provide you with a preaddressed Mailer. ® See the Timex International Warranty for specific instructions on the care and service of your Timex Device: Should you need a replacement strap or band, call 1-800-328-2677. 24 THIS IS YOUR REPAIR COUPON. KEEP IT IN A SAFE PLACE. TIMEX INTERNATIONAL WARRANTY REPAIR COUPON Original Purchase Date:____________________________________________________ (attach a copy of sales receipt, if available) Purchased by:_____________________________________________________________ (name, address, telephone number) Place of Purchase:_________________________________________________________ (name and address) Reason for Return:________________________________________________________ __________________________________________________________________________ FCC Notice (U.S.) / IC Notice (Canada): This device complies with Part 15 of the FCC Rules. Operation is subject to the following two conditions: (1) this device may not cause harmful interference, and (2) this device must accept any interference received, including interference that may cause undesired operation. Warning: Changes or modifications to this unit not expressly approved by the party responsible for compliance could void the user’s authority to operate the equipment. NOTE: This equipment has been tested and found to comply with the limits for a Class B digital device, pursuant to Part 15 of the FCC Rules. These limits are designed to provide reasonable protection against harmful interference in a residential installation. This equipment generates, uses, and can radiate radio frequency energy and, if not installed and used in accordance with the instructions, may cause harmful interference to radio communications. However, there is no guarantee that interference will not occur in a particular installation. If this equipment does cause harmful interference to radio or television reception, which can be determined by turning the equipment off and on, the user is encouraged to try to correct the interference by one or more of the following measures: – Reorient or relocate the receiving antenna. – Increase the separation between the equipment and receiver. – Connect the equipment into an outlet on a circuit different from that to which the receiver is connected. Consult the dealer or an experienced radio TV technician for help. – This Class [B] digital apparatus complies with Canadian ICES-003. Cetappareil numérique de la classe [B] est conforme à la norme NMB-003 du Canada. This device complies with Industry Canada license-exempt RSS standard(s). Operation is subject to the following two conditions: (1) This device may not cause interference, and (2) This device must accept any interference, including interference that may cause undesired operation of the device. 25 DECLARATION OF CONFORMITY Manufacturers Name: Timex Group USA, Inc. Manufacturers Address: 555 Christian Road Middlebury, CT 06762 United States of America declares that the product: ® Product Name: Timex Run Trainer™ 2.0 Model Number: M503/M255/M012 conforms to the following specifications: R&TTE: 1999/05/EC Standards: CENELEC EN 55024: Issue:2010/11/01 (M255) CENELEC EN 55022: Issue:2010/12/01 (M255) ETSI EN 301 489-1: Issued:2008/04/01 V1.8.1 (M012/M503) ETSI EN 301 489-3: Issued:2002/08/01 V1.4.1 (M012/M503) ETSI EN 301 489-17 (M255) EN 61000-3-2: 2009 (M012) EN 61000-3-3: 2008 (M012) EN 61000-4-2: 2008 (M012) EN 61000-4-3: 2010 (M012) EN 61000-4-4: 2010 (M012) EN 61000-4-5: 2005 (M012) EN 61000-4-6: 2008 (M012) EN 61000-4-8: 2009 (M012) EN 61000-4-11: 2004 (M012) ETSI EN 300 440-1 - V1.4.1 :2008 (M503) ETSI EN 300 440-2 - V1.2.1:2008 /V1.4.1 :2002 (M012/M503) ETSI EN 300 328 (M255) LVD: 2006/95/EC Standards: EN 60601-1-2: 2007 (EN 55011/A2: 2007) (M012) IEC/EN 60950-1: Issue:2005/12/08 Ed:2 (M255/M503) Digital Device Emissions Standards: FCC 47CFR 15C: Issued:2007/10/01 (M012/M255/M503) IC RSS 210: Issued:2010/12/01 Issue:8 (M012/M255/M503) SAI AS/NZS 4268: Issue: 2008/09/26 (M012/M503) SAI AS/NZS Cispr 22:2009 (M012/M255) IC ICES-003 Issued:2020/08/01 Issue:5 (M255) Agent: Sam Everett Quality Regulatory Engineer Date: 18 October, 2012, Middlebury, Connecticut, U.S.A. 26 ©2013 Timex Group USA, Inc. TIMEX, TRIATHLON, INDIGLO, RUN TRAINER, and NIGHT-MODE are trademarks of Timex Group B.V. and its subsidiaries. IRONMAN and MDOT are registered trademarks of World Triathlon Corporation. Used here by permission. SiRF and the SiRF logo are registered trademarks of CSR. SiRFstarIV is a trademark of CSR. ANT+ and the ANT+ Logo are trademarks of Dynastream Innovations, Inc. 27