1
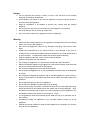
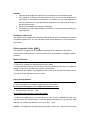
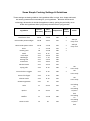
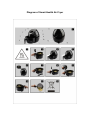
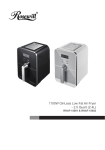
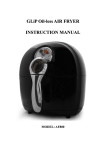
Smart Health Air Fryer VSLAF15TS Introduction The Smart Health Air Fryer provides an easy and healthy way of preparing your favorite foods by using hot rapid air circulation. Using our Advanced Smart Air Technology, our air fryer is able to make numerous dishes by heating food from all different directions giving thorough, even and delicious results without the excess oil! General description(Fig.1) 1. 2. 3. 4. 5. 6. 7. Pan Basket Basket release button Basket handle Power-on Button/Pause Button LCD with Touch Screen ( Liquid Crystal Display ) Cancel Button 8. Timer (0-30min.) 9. Temperature Control Button 10. 11. 12. 13. Cooking Menu – Press “M” to Toggle Cooking Methods Air inlet Air outlet openings Main cord Important Read the user manual carefully before use and save for future reference. Versonel | New Holland, PA www.versonel.com Danger Do not immerse the housing in water or rinse in the sink due to the multiple electrical and heating components. Avoid allowing any liquid to get into the appliance to prevent electric shock or short-circuiting the appliance. Keep all ingredients in the basket to prevent any contact with the heating elements. Do not cover the air inlet or the air outlet when the appliance is turned on. Do not fill the pan with oil as it may cause a fire. Do not touch the inside of the appliance while it is operating. Warning Check that the voltage indicated on the appliance corresponds to the local voltage before you connect the appliance. Do not use the appliance if there is any damage to the plug, main cord or other parts. Contact the manufacturer if you find that there is any damage to the cord or anywhere else on the product before having it repaired by an unauthorized person or service center. Unauthorized repairs will void the product warranty. Keep the appliance and the cord out of the reach of children Keep the cord away from hot surfaces. Do not plug the appliance in or operate the control panel with wet hands. Make sure that the appliance is plugged into a wall socket. Always make sure that the plug is inserted into the wall socket properly. Do not connect appliance to an external timer switch. Do not place the appliance on or near combustible materials such as a tablecloth or curtain. Do not place the appliance against a wall or another appliance. Leave at least 4 inches of free space on the back and sides and 4 inches free space above the appliance. Do not place anything on top of the appliance. Do not leave the appliance unattended while operating. During hot air frying, hot steam is released through the air outlet openings. Keep hands and face at a safe distance from the steam and air outlet openings. Also, be careful of hot steam and air when you remove the pan from the appliance. Any accessible surfaces may become hot during use.(Fig.2) It is suggested to wear heat resistant gloves when air fryer is in operation due to hot surfaces Immediately unplug the appliance if you see dark smoke coming out of the appliance. Wait for the smoke emission to stop and the appliance to cool before you remove the pan from the appliance. Caution Ensure that the appliance is placed on a horizontal, even and stable surface. This appliance is designed for household use only. It may not be suitable to be used safely in commercial environments. The warranty is void if the appliance is used for professional or semi-professional purposes, or it is not used according to the instruction manual. Never use the appliance if the plug is damaged. The appliance needs approximately 30 minutes to cool down before handling or cleaning safely. Automatic switch-off The appliance has a built-in timer that will automatically shut down the appliance when the countdown reaches zero. You can manually switch off the appliance by turning down the timer button. Electromagnetic fields(EMF) The appliance complies with all standards regarding Electro-Magnetic fields (EMF). Under proper handling there is no harm for the human body based on available scientific evidence. Before First Use 1. Remove all packaging materials and stickers or labels. 2. Clean the basket and pan with hot water, with some washing liquid and a non-abrasive sponge. These parts are safe to be cleaned in dishwasher. 3. Wipe inside and outside of the appliance with a clean cloth. Do NOT fill the pan with oil or frying fat as the appliance works on hot air. Using the Appliance 1. Place the appliance on a stable, horizontal and even surface. Do not place the appliance on a NON-heat-resistant surface. 2.Put the basket in the pan.(fig3) Do not fill the pan with oil or any other liquid. 3. Preheat the appliance for 3 minutes when it is cold. Press the WARM-UP button first, and then press the START button to start the appliance and warm it up gradually. After warming-up, carefully pull the pan out of the air fryer.(fig.4) Caution:The appliance will stop heating when pan is pulled out,the air blower will stop blowing in 5 seconds. 4. Place the ingredients in the basket, and then put the basket into the appliance.(fig. 5) 5. Select proper function and temperature for the ingredients. See section 'settings' in this chapter to determine the right temperature. Notes:7 functions are provided: CHIP, CHICKEN, STEAK, SHRIMP, MEAT, CAKE, and FISH. Press the function button to select the proper function according to the ingredients. If more flexible time setting and temperature are needed, adjustment can be made directly by pressing corresponding buttons. There are two buttons (TIME '+' & '-') in the control panel which can adjust time setting - Increase/Decrease 1 minute per a press or increase/decrease rapidly in the unit of 1 minute by long pressing. There are two buttons (TEMP '+' & '-') in the control panel which can adjust temperature setting Increase/Decrease 5 degrees per a press or increase/decrease rapidly in the unit of 5 degrees by long pressing. 6. Select the proper function and temperature for the ingredients you are using. There are 7 functions provided: CHIP, CHICKEN, STEAK, SHRIMP, MEAT, CAKE, and FISH. Press the function button to select the proper function according to your ingredients and then press START button, the appliance will run and heat the ingredients. Press “M” to scroll through cooking options. 1. CHIP: 392°F for 20 minutes 2. DRUMSTICK: 356°F for 25 minutes 3. BEEFSTEAK:356°F for 15 minutes 4. SHRIMP: 320°F for 20 minutes 5. RIBS: 356°F for 20 minutes 6. CAKE: 320°F for 30 minutes 7. FISH: 392°F for 20 minutes Notes: If more flexible time setting and temperature are needed, adjustment can be made directly by pressing corresponding buttons. There are two buttons (TIME '+' & '-') in the control panel which can adjust time setting - Increase/Decrease 1 minute per a press or increase/decrease rapidly in the unit of 1 minute by long pressing. There are two button (TEMP '+' &'-') in the control panel which can adjust temperature setting Increase/Decrease 5 degrees per a press or increase/decrease rapidly in the unit of 5 degrees by long pressing. 7. The heating-up and blower icon will blink while the current setting is running. (Fig. 6) Caution:During the hot air frying process, the heating-up icon blinks and goes out from time to time. This indicates that the heating element is switched on (temperature reaches the setting)and off (temperature drops below the setting) to maintain the set temperature. 8. To switch on the appliance: turn the timer button to the required preparation time and the timer begins to run. 9. Oil from the ingredients will gather in the bottom of the pan. 10. Some ingredients require shaking halfway through the preparation time(see section 'settings' in this chapter). If directions require shaking the ingredients, pull the pan out of the appliance by the handle and shake it. Then slide the pan back into the air fryer.(Fig. 7) Caution:Do not press the button of the handle during shaking(fig. 8) Tip:You can remove the basket from the pan and shake the basket only to reduce the weight. To do this, pull the pan out of the appliance, place it on a heat-resistant holder and press the button of the handle.(fig. 9) 11. When you hear the timer ring 5 times, the set preparation time has elapsed. Pull the pan out of the appliance and place it on a heat-resistant holder. Note:After the timer rings 5 times, the air blower will stop in 20 seconds. 12. Check to see if the ingredients are ready. If the ingredients are not ready yet, simply slide the pan back into the appliance. Press the temperature control button to adjust Temperature setting, and press the Timer control button to adjust time setting then press the Start button to run the appliance. 13. To remove ingredients, press the basket release button and lift the basket out of the pan(fig.10) Note:Do not turn the pan over,the oil collected on the bottom of the pan will leak onto the ingredients. 14. Empty the basket into a bowl or onto a plate. (fig.11) Tip: To remove large or fragile ingredients, lift the ingredients out of the basket with a pair of tongs. 15. When a batch of ingredients is ready, the air fryer is instantly ready to prepare another batch. Air Frying Tips Cooking with fewer ingredients usually requires a slightly shorter preparation time than having more ingredients. Shaking smaller ingredients halfway during the preparation time optimizes the end result and can help prevent unevenly fried ingredients. You may wish to add some oil to fresh potatoes and fry your ingredients for another few minutes then for a more crispy result. Do not prepare overly greasy ingredients (sausage, etc.) in the air fryer. Most snacks that can be prepared in an oven can also be prepared in the air fryer. The optimal amount of potato to prepare crispy fries is around 1 lb. Use pre-made dough to easily and quickly prepare snacks. Pre-made dough cooks quicker and requires a shorter preparation time than home-made dough. Place a baking tin or oven dish in the fryer basket if you want to bake a cake or quiche or if you want to fry more “fragile” ingredients or filled ingredients. You can also use the air fryer to simply heat or warm ingredients. To heat ingredients, set the temperature to 150°F for up to 10 minutes A simple start…Making home-made French Fries To make home-made fries, follow the steps below: Peel and slice the potatoes. Wash the potato wedges thoroughly and dry them with paper towels. Pour 1/2 tablespoon of olive oil in a bowl, put the wedges on top and mix until the wedges are coated with oil. Remove the wedges from the bowl so that excess oil stays behind in the bowl. Put the wedges in the basket. Fry the potatoes according to the guidelines shown in the table on the next page There are literally 1,000s of recipes specifically made for air fryers online, search the internet and you can find a variety of very unique and healthy options for meals for years to come! On the following page you can see some guidelines to experiment on your own as well. These are just a quick look at some of the basics and to help you get started on your new Smarter & Healthier cooking! Some Simple Cooking Settings & Guidelines These settings are basic guidelines. As ingredients differ in origin, size, shape and brand, we cannot guarantee the best setting for your ingredients. Because the Smart Air technology reheats the air inside the appliance instantly, pulling the pan briefly out to shake the ingredients while frying barely disturbs the air frying process. Ingredients Ounces Time Shake Temperature (Min-Max) (Minutes) Needed Thin frozen fries Thick frozen fries 10-25 10-25 9-16 11-20 390 390 Y Y Home-made potato wedges 10-28 18-22 355 Y Home-made potato cubes 10-26 12-18 355 Y Rosti Potato gratin Steak Pork chops Hamburger Sausage roll Drumsticks Chicken breast 9 18 4-17 4-17 4-17 4-17 4-17 4-17 15-18 15-18 8-12 10-14 7-14 13-15 18-22 10-15 355 390 355 355 355 390 355 355 Y Y Spring rolls 4-14 8-10 390 Y Frozen chicken nuggets 4-17 6-10 390 Y Frozen fish fingers 4-14 6-10 390 Cheese snacks 4-14 8-10 355 Stuffed vegetables 4-15 10 320 Cake 11 20-25 320 Quiche 14 20-22 355 Muffins 11 15-18 390 Sweet snacks 14 20 320 Notes Add 1/2 tbsp. of oil Add 1/2 tbsp. of oil Use oven-ready Use oven-ready Use oven-ready Use baking tin Use baking tin/oven dish Use baking tin Use baking tin/oven dish Cleaning Clean the appliance after every use. Do not clean the pan, basket and the inside of the appliance with metal kitchen utensils or abrasive cleaning materials, as this may damage the non-stick coating. Note: Remove the pan to let the fryer cool down more quickly. Wipe the outside of the appliance with a moist cloth. Clean the pan and basket with hot water, some liquid soap and a non-abrasive sponge. Note: The pan and basket are dishwasher safe. If dirt is stuck to the basket or the bottom of the pan, fill the pan with hot water with some liquid soap. Put the basket in the pan and let the pan and the basket soak for about 10 minutes. Clean the inside of the appliance with hot water and non-abrasive sponge. Clean the heating element with a cleaning brush to remove any food residue after the unit is completely cool to the touch. Storage Unplug the appliance and let it cool down thoroughly. dry before you put your unit away to store. Make sure all parts are clean and Warranty and Service If you have any questions or problems with your unit, please see the troubleshooting section on the next page or feel free to visit us at www.versonel.com. Troubleshooting Problem The Fryer does not work The ingredients are not fully cooked Possible Cause(s) The appliance is not plugged in or plus is loose Turn the timer button to the required preparation time to switch on unit Check amount of ingredients cooked at one time Using smaller amounts of ingredients in the basket will fry foods more evenly The ingredients are frying unevenly Certain ingredients need to be shaken during frying process Fried snacks are not crispy Some snacks can only be cooked in a traditional deep fryer The pan is not sliding into unit properly Basket is too full The basket is not in totally French fries fried unevenly Fresh fries are not crispy Make sure plug is firmly in wall socket The timer has not been set The set temperature is too low White smoke emitting from unit while frying Solution Ingredients are more "greasy" The pan still contains grease residue from previous use You did not use the correct potato type Potatoes not rinsed properly before frying Crispiness will depend on the amount of oil and water in the fries Adjust temperature control to recommended settings Shake ingredients halfway through cooking time to make sure all parts cooked Use oven snacks or lightly brush some oil onto the snacks for a crispier result Do not fill basket fryer beyond the MAXIMUM level indicator Push basket down till you hear a click Greasier ingredients will produce larger amounts of oil which will leak into the pan. The oil produces white smoke and the pan may heat more than normal. Make sure to clean your fryer properly after each use. Use fresh potatoes and make sure they stay firm before frying Rinse potato wedges properly to remove starch from outside of wedge Make sure wedges are dried thoroughly before you add any oil Diagram of Smart Health Air Fryer