1
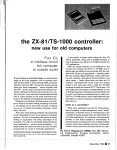
LOW-RESISTANCE METER MMR-630 OPERATING MANUAL SONEL S. A. ul. Wokulskiego 11 58-100 Świdnica Revision 1.5 September 03, 2014 We appreciate your having purchased our low-resistance meter. The MMR-630 meter is a modern, high-quality measuring device, which is easy and safe to use. Please acquaint yourself with the present manual in order to avoid measuring errors and prevent possible problems related to operation of the meter. 2 OPERATING MANUAL MMR-630 Revision 1.5 TABLE OF CONTENTS 1 SAFETY ....................................................................................................................5 2 MENU........................................................................................................................6 2.1 2.2 2.2.1 2.2.2 2.3 2.4 2.5 2.6 2.7 2.8 2.8.1 2.8.2 2.8.3 2.8.4 2.9 3 LCD CONTRAST .....................................................................................................7 TRANSMISSION OF DATA (RS-232) ..........................................................................7 Computer connection accessories .................................................................7 Connection of the meter to a computer ..........................................................7 MEASUREMENT MODE ............................................................................................7 DISPLAY SETTINGS..................................................................................................7 RESULT DISPLAY CONFIGURATION ..........................................................................8 DEFAULT SETTINGS ..............................................................................................10 SELECTION OF THE LANGUAGE .............................................................................11 ADVANCED FUNCTIONS ........................................................................................11 Manual calibration ......................................................................................11 Auto-calibration...........................................................................................12 Return to the default calibration ..................................................................12 Programme upgrade ....................................................................................12 INFORMATION ON THE MANUFACTURER AND THE PROGRAMME..............................13 MEASUREMENTS ................................................................................................14 3.1 CONFIGURATION OF THE MEASUREMENT OPTIONS ................................................14 3.1.1 Selection of the type of object ......................................................................14 3.1.2 Flow of current ............................................................................................15 3.1.3 Measurement triggering ..............................................................................15 3.1.4 Saving to memory ........................................................................................16 3.1.5 Measurement range selection ......................................................................16 3.2 CONNECTION OF THE METER AND START OF MEASUREMENTS.................................17 4 MEMORY OF THE MEASUREMENT RESULTS ...........................................22 4.1 4.2 4.3 4.4 5 POWER SUPPLY ..................................................................................................26 5.1 5.2 5.3 5.4 6 MANUAL SAVING OF MEASUREMENT RESULTS IN THE MEMORY ...............................22 AUTOMATIC SAVING OF MEASUREMENT RESULTS IN THE MEMORY ..........................23 MEMORY BROWSING .............................................................................................24 MEMORY ERASING ................................................................................................24 MONITORING OF THE POWER SUPPLY VOLTAGE .....................................................26 REPLACEMENT OF ACCUMULATORS ......................................................................26 CHARGING OF ACCUMULATORS ............................................................................27 GENERAL PRINCIPLES REGARDING USING NI-MH ACCUMULATORS ........................29 CLEANING AND MAINTENANCE....................................................................31 OPERATING MANUAL MMR-630 Revision 1.5 3 7 STORAGE ..............................................................................................................31 8 DISMANTLING AND UTILIZATION ................................................................31 9 ATTACHMENTS ...................................................................................................32 9.1 9.2 9.3 9.4 4 TECHNICAL DATA .................................................................................................32 STANDARD ACCESSORIES ......................................................................................33 ADDITIONAL ACCESSORIES ...................................................................................33 MANUFACTURER ..................................................................................................34 OPERATING MANUAL MMR-630 Revision 1.5 1 Safety The MMR-630 meter has been designed to realise measurements of resistance of different kinds of connections (welded, soldered, contact connections) in electric installations. The results of the measurements determine the safety conditions of the installation. Therefore, in order to provide conditions for correct operation and the correctness of the obtained results, the following recommendations must be observed: Before you proceed to operate the meter, acquaint yourself thoroughly with the present manual and observe the safety regulations and specifications determined by the producer. The MMR-630 meter has been designed for the purpose of low-resistance measurements. Any other application than those specified in the present manual may result in a damage to the device and constitute a source of danger for the user. In case of measurements of installations, sub-assemblies and devices under a dangerous voltage, the MMR-630 meters may solely be operated by qualified personnel who are properly authorised to work on electric installations. Operation of the meter realised by unauthorised personnel may result in damage to the device and constitute a source of danger for the user. Using this manual does not exclude the need to comply with occupational health and safety regulations and with other relevant fire regulations required during the performance of a particular type of work. Before starting the work with the device in special environments, e.g. potentially firerisk/explosive environment, it is necessary to consult it with the person responsible for health and safety. It is unacceptable to operate the following: A damaged meter which is completely or partially out of order, A meter with damaged cable insulation, A meter stored for an excessive period of time in disadvantageous conditions (e.g. excessive humidity). If the meter has been transferred from a cool to a warm environment of a high level of relative humidity, do not realise measurements until the meter has been warmed up to the ambient temperature (approximately 30 minutes). Before measurements may commence, make sure the cables are connected to the appropriate measurement sockets. Do not operate a meter with an open or incorrectly closed battery (accumulator) compartment or power it from other sources than those specified in the present manual. The meter’s inputs are electronically protected from power surge, as a result for example, of accidental connection to the power supply source: - for all input combinations – up to 440VAC for 10 seconds. Repairs may be realised solely by an authorised service point. The device complies with the following norm: EN 61010-1 Note: The manufacturer reserves the right to modify the appearance, accessories and technical data of the meter. Note: An attempt to install drivers in 64-bit Windows 8 may result in displaying "Installation failed" message. Cause: Windows 8 by default blocks drivers without a digital signature. Solution: Disable the driver signature enforcement in Windows. OPERATING MANUAL MMR-630 Revision 1.5 5 2 Menu The menu is available at any position of the knob but MEM. 6 OPERATING MANUAL MMR-630 Revision 1.5 2.1 LCD contrast Using the buttons 2.2 and set the contrast value and press to confirm the setting. Transmission of data (RS-232) Remarks: - Data transmission is not possible during the charging of accumulators. 2.2.1 Computer connection accessories What is necessary in order to operate the meter with a computer is a RS-232 cable and appropriate software. If the required accessories such have not been purchased along with the meter, then they are available from the manufacturer or an authorised distributor. The accessories may be used in case of many devices manufactured by SONEL S.A. which are equipped with the RS-232 interface. Detailed information regarding software is available from the manufacturer or an authorised distributor. 2.2.2 Connection of the meter to a computer 1. Connect the cable to the serial port (RS-232) of the computer and to the RS-232 socket of the meter. 2. Activate the data transmission mode in the MENU. 3. Start the appropriate programme in the computer and follow the instructions. 2.3 Measurement mode The MENU-Measurement mode option is described in Chapter 3.1 2.4 Display settings The MMR-630 meter permits selection of two modes of presentation of measurement results: OPERATING MANUAL MMR-630 Revision 1.5 7 2.5 Result display configuration This option permits to establish the upper and lower limits, between which the average result of measurement must be contained. Results beyond this range will be signalled by two long sound signals and the symbol R>Rmax or R<Rmin displayed instead of the result. In the mode of manual saving of the result in the memory, the limits are displayed in place of the bank and cell number. In the mode of automatic saving of the result in the memory, it is possible to view for three seconds the set limits pressing the ESC button. The limits of the acceptable range of the measurement results is set in MENU: 8 OPERATING MANUAL MMR-630 Revision 1.5 OPERATING MANUAL MMR-630 Revision 1.5 9 Note: - Should the option NO be selected and the established. 2.6 button pressed, the previous settings will be re- Default settings The default settings are the following: Type of the object – resistance object, selection of the measurement range – automatic, flow of current – bidirectional, trigering mode – normal, memory entry – manual, limits in the window mode: upper limit – 1999,9Ω, lower limit – 0 Ω, window mode off, result display – all results. 10 OPERATING MANUAL MMR-630 Revision 1.5 2.7 Selection of the language 2.8 Advanced functions 2.8.1 Manual calibration The user may perform manual calibration of the meter, provided they have standard resistors, minimum grade 0.05%, of the following nominal values: 0,2m, 2m, 20m, 200m, 2, 20, 200 and 2k. Calibration is performed separately for each range. OPERATING MANUAL MMR-630 Revision 1.5 11 Note: The guarantee does not include faulty operation of the device which is caused by erroneous application of this function. 2.8.2 Auto-calibration The user may perform manual auto-calibration of the meter offset. Auto-calibration is realised separately for each range. Once Auto-calibration has been selected in the MENU follow the information displayed in the screen, as in the case of manual calibration. Notes: - To perform auto-calibration use the measurement leads applied for the purpose of measurements: connect the U1 and U2 leads as well as I1 and I2. The guarantee does not include faulty operation of the device which is caused by erroneous application of this function. 2.8.3 Return to the default calibration In order to return to the default calibration, enter this option in the MENU and select YES and confirm pressing . This option erases the results of manual calibration and auto-calibration realised by the user. The factors calculated in the calibration process realised by the manufacturer are re-established. 2.8.4 Programme upgrade It is possible to upgrade the control programme without having the meter serviced. Should upgrading be necessary, the following actions will be realised: 12 Download the meter programming software from the manufacturer’s web site (www.sonel.pl), Connect the meter to a computer, In the MENU enter the option Advanced and then Programme upgrade and confirm the displayed information has been read, Install and start the meter programming software in the computer, In the programme select the port, activate the „Test connections” function, and then start the Programming function, Proceed ion accordance with the instructions displayed by the programme. OPERATING MANUAL MMR-630 Revision 1.5 Notes: The function is designed to be used solely by those users who are familiar with computer equipment. The guarantee does not cover faults caused by incorrect application of this function. Before you proceed to programming, charge the accumulators. During programming do not turn the meter off or disconnect the transmission cable. - During programming the only active button is . - In the case of this function the meter does not turn off automatically. 2.9 Information on the manufacturer and the programme In order to obtain basic information on the manufacturer of the meter and the version of the programme, perform the following actions: in MENU select About producer & programme, press the button . OPERATING MANUAL MMR-630 Revision 1.5 13 3 3.1 Measurements Configuration of the measurement options Before you proceed to measurements, adjust the parameters of the measurement process to the properties of the measured object. This is done by selection of the appropriate options in MENU – Measurement mode. 3.1.1 Selection of the type of object The MMR-630 meter permits selection of one of the three types of objects: The measurement marked with the symbol is the shortest measurement (3s) and its purpose is to test objects of purely resistance-related character. The symbol means the measurement mode for inductive objects. This mode is based upon special object charging procedures, which are indispensable to perform correct measurements of resistance of highly inductive objects. In this mode the duration of the measurement depends upon the inductance of the object, since the meter automatically selects the maximum possible measurement current and it waits until the current has stabilised. In the second measurement mode for inductive objects ( ) measurements are performed before the current stabilises completely. This solution permits to significantly reduce the duration of measurements of inductive objects, but it must be held in mind that the accuracy of the measurement may be impaired. If an approximate value of the resistance of the inductive object is known, then it is possible to reduce the duration of the measurement selecting manual adjustment of the measurement range (Chapter 3.1.5) and to set the appropriate range (measurement current ) using the rotary knob. The declared precision of measurements is then maintained. 14 OPERATING MANUAL MMR-630 Revision 1.5 3.1.2 Flow of current Measurements may be performed with a single-direction current or bidirectional current flowing in opposite directions. In the latter case, the principal result which is displayed is the average resistance value. Measurements with single-direction current are faster in the case of objects without internal tension and electrothermal forces. On the other hand, measurements by means of bidirectional current eliminates errors resulting from the presence of such tensions and forces in the measured object. If the single-direction flow of current is selected the resistance value RR is not displayed. 3.1.3 Measurement triggering The MMR-630 meter has three modes of measurement triggering: normal, automatic and continuous. In the normal mode one measurement of resistance is performed. In the automatic mode the device waits for all the four test leads to be connected to the object, and then the measurement is automatically started. In the continuous mode for resistance objects the meter performs subsequent measurement cycles: measurement of resistance and display of the result for approximately three seconds. In the continuous mode for inductive objects the meter performs one measurement cycle with a single-direction current (RF). During the cycle the result is gradually stabilised, and it is displayed approximately each half a second. OPERATING MANUAL MMR-630 Revision 1.5 15 Notes: Continuous triggering for inductive object may be used solely when the meter is permanently connected to the power grid. It is unacceptable to disconnect the meter from the object during measurements. This is dangerous for the user and may cause damage to the device. - In the case of measurements of inductive objects the automatic measurement triggering mode is not active. 3.1.4 Saving to memory Automatic saving of the measurement results to memory may be particularly useful in the automatic and continuous measurement triggering modes. Saving is performed directly after the result has been displayed in the screen. 3.1.5 Measurement range selection For the purpose of measurement of the resistance of the object the MMR-630 meter applies measurement currents within the range between 0.1mA and10A. The measurement range and thus the measurement current may be selected automatically or manually. 16 OPERATING MANUAL MMR-630 Revision 1.5 It is a standard that the meter functions with automatic selection of the measurement range. In this mode the rotary knob is a limiter of the maximum measurement current flowing through the measured object. Manual selection of the measurement is useful in the case of measurements of the resistance of inductive objects. It permits to reduce the duration of such measurements. In this mode the setting of the rotary knob determined the selected measurement current. Notes: - If resistance-type object is selected, solely the automatic range selection is active. - Manual selection of measurement range is possible solely in the case of inductive objects. It is signalled as follows: The information is displayed when the meter is switched on, once the welcome screen is turned off. Press button 3.2 to go to the measurement mode. Connection of the meter and start of measurements NOTE! Connection of a voltage exceeding 440VAC between any two measurement terminals may cause damage to the meter. OPERATING MANUAL MMR-630 Revision 1.5 17 The appearance of the screen may differ depending on the configuration of MENU – Measurement mode. 18 OPERATING MANUAL MMR-630 Revision 1.5 During the measurement a moving horizontal line is displayed. The measurement may be interrupted pressing button ESC. Depending on the measured object, the measurement may last between 3s ( ) to a couple of minutes ( ). OPERATING MANUAL MMR-630 Revision 1.5 19 Notes: - In the automatic mode, the measurement is triggered once all the test leads have been connected to the object. In order to start another measurement, it is sufficient to disconnect and then connect one of the leads anew. - Pay attention to the appropriate selection of the measurement terminals, since the precision of the performed measurements depends upon the quality of the realised connections. They must provide good contact and permit uninterrupted flow of the measurement current. It is unacceptable, for example, to connect a crocodile clip on tarnished or rusty elements – they must be previously cleaned or a test prod must be used for measurements. - In the case of measurements of inductive objects, select an inductive object. Should a resistancetype object, the result may be burdened with significant errors or the measurement may be precluded. - The declared value is valid for measurements of objects whose inductivity is up to 40H. It is also possible to perform measurements for objects of a higher inductivity, but the result might be overstated. - During measurements of objects of a high resistance and a very high inductivity at the current range of 0.1mA it may not be possible to stabilise the result. In such a case the meter will display the result with a one-grade-down resolution. - If the value of the measured resistance is within the limit of subranges, it may happen that the value measured for single-direction current is within the lower subrange (for resistance), and the value measured for the opposite direction current is within the higher subrange. Then the principal result is displayed with resolution that corresponds to the higher subrange (for resistance) and the value corresponding to that subrange is displayed as the measurement current. - In the case of manual selection of the measurement range the message „Unstable conditions!” may mean the selected measurement current is too high. This is also signalled by the symbol „OFL”, which is displayed once the measurement has concluded. NOTE! Measurement leads must not be disconnected from the object during its discharging. Additional information displayed by the meter Information Comment The maximum acceptable temperature inside the meter has been exceeded. The thermal protection blocks measurements. Additionally the following is displayed: Overheated! T>Tmax and there are two long sound signals after the START button is pushed. Indication of the charge of accumulators. Accumulators are low, they must be charged. Accumulators completely discharged, the measurement is blocked. Symbols of a resistance-type object. Symbols of an inductive object (normal measurement time for this type). Symbols of (reduced measurement time). Swapped measurement leads. 20 OPERATING MANUAL MMR-630 Revision 1.5 Information of a 50Hz noise whose value is within the range between 100 and 500mV. It is possible to perform measurements, but the measurement error may be increased (to 1%). Voltage of the 50Hz noise exceeds 0.5V for R≥0,2mΩ or 100mV Impossible measure! for R<0,2mΩ. Measurements are blocked. Message and two long sound signals after the START button is pushed. Information regarding a limitation of the measurement current which is a result of the limit setting realised by means of the rotary knob, excessive resistance of the measurement leads or excessive inductivity of the measured object. Information regarding charging of an inductive object. Information regarding a discharged inductive object. Information regarding overflow of the measurement range. Information displayed at the right side of the screen during a measurement regarding a temporary overflow of the measurement range during charging an inductive object. A message with a long sound signal means the voltage at the terminals U1-U2 or U1-I1 or U1-I2 or U2-I1 or U2-I2 of the meter exVoltage on the object! ceeds 50Vrms or the voltage at the terminals I 1-I2 of the meter exceeds 6Vrms. Disconnect the meter from the tested object immediately! A message with a long sound signal means the voltage at the Voltage on the object! U1-U2 terminals of the meter exceeds 6Vrms, but it is lower than 50Vrms. Disconnect the meter from the tested object! Lack of continuity of the voltage circuit. A message and two long No continuity sound signals after the START button is pushed. in U circuit! Lack of continuity of the current or the current and voltage cirNo continuity cuit. A message and two long sound signals after the START in I circuit! button is pushed. Unstable conditions due to incorrect contact of the measurement Unstable conditions! leads or excessive inductivity of the object, which preclude measurements. OPERATING MANUAL MMR-630 Revision 1.5 21 4 Memory of the measurement results MMR-630 meters are equipped with a memory of 990 resistance measurement results. The location within the memory where a single result is saved is called a memory cell. The whole memory is divided into 10 banks comprising 99 cells. Each result may be saved in a cell of a selected number and in the selected bank, and therefore the user of the meter may, at their own discretion, assign cell numbers to specific measurement points and numbers of the banks to specific objects, as well as perform measurements in any order and repeat them not loosing the other data. The memory of the measurement results is not erased when the meter is turned off, and thus they may be read later on or sent to a computer. Neither is the number of the current cell and bank changed. It is recommended to erase the memory once the data have been read or before a new series of measurements is performed; the new measurement results may be saved in the same cells as the previous ones. 4.1 22 Manual saving of measurement results in the memory OPERATING MANUAL MMR-630 Revision 1.5 Notes: - What is saved in the memory is the principal result and additional results, as well as the following information: noise present in the object during the measurement and limitation of the measurement current or, in the same location, too low a voltage of accumulators during the measurement (this is priority information). - In the case the user attempts to save information in an occupied cell the following warning is displayed in place of the principal result: Cell used! Overwrite? If the button is pressed, the new result of the measurement will be saved and the previous one deleted. - Saving in the memory is signalled by means of the symbol which is displayed on the screen and three short sound signals. - After information is saved in the last cell in the given bank, the following message is displayed: Last cell in bank! 4.2 Automatic saving of measurement results in the memory In MENU set the automatic mode of saving results in the memory (see Chapter 3.1.4). Before the first measurement commences, select the initial cell for saving a series of results in the memory (see Chapter 3.2): using buttons and select the number of the bank and using buttons and select the number of the cell. Notes: - Automatic saving of the result of measurement to the memory takes place directly after it has been displayed and it is realised in accordance with the procedure described in Chapter 4.1. - In the automatic mode of measurement release after a modification of the number of the bank or cell, exit the setting mode using the button ton START. or ESC, or start the first measurement using the but- OPERATING MANUAL MMR-630 Revision 1.5 23 4.3 Memory browsing 4.4 Memory erasing 24 OPERATING MANUAL MMR-630 Revision 1.5 OPERATING MANUAL MMR-630 Revision 1.5 25 5 5.1 Power supply Monitoring of the power supply voltage The level of the charge of the batteries or accumulators is currently indicated by the symbol in the right upper corner of the display: Notes: Bear in mind: The BAT message displayed in the right upper corner of the screen (instead of the battery symbol) means insufficient power supply voltage and the need to charge the accumulators, Measurements realised with an insufficient meter power supply voltage are distorted with additional errors which are impossible to ascertain by the user and thus they cannot constitute a basis for a conclusion of correctness of the tested resistance values. 5.2 Replacement of accumulators The MMR-630 meter is equipped with a package of NiMH accumulators and a charger. Those accumulators have a series of advantages, such as lack of harmful substances, no memory effect, higher capacity as compared to NiCd accumulators at the same size. The package of accumulators is placed in a compartment. The charger is installed inside the meter casing and it may be used solely to charge the original accumulators. WARNING: If the test leads are left in the sockets during replacement of the accumulators, there is a risk of electric shock with a dangerous voltage. In order to replace the package of accumulators it is necessary to do the following: Remove all the leads from the terminals and turn the meter off, Remove the four screws of the accumulators/batteries compartment (in the lower part of the casing), Remove the package of accumulators and the package connection, Remove the package connection plug, Connect the power supply plug of the new package of accumulators, Place the connection in the bend of the rubber profile, Insert the package in the accumulator compartment, Place and screw the cover of the compartment. 26 OPERATING MANUAL MMR-630 Revision 1.5 NOTE! Do not use the meter when the accumulator compartment is removed or open or power it from other sources than those mentioned in the present manual. 5.3 Charging of accumulators Note: The process of charging of accumulators may commence solely when the meter is off. When it is turned on using the button the charging function is blocked. The AUTO-OFF function in the charging mode is deactivated. When the charger power supply cable is plugged into a socket one of the following screens is displayed. If the charge of the accumulators does not exceed 50%, then the a) screen is displayed. If the charge of the accumulators exceeds 50%, then the b) screen is displayed. OPERATING MANUAL MMR-630 Revision 1.5 27 After approximately 5 seconds (the time is roughly indicated by the progress bar) the meter automatically passes to the charging mode indicated with a frame. In order to change the charging mode, proceed as follows: Charging the package of accumulators after a complete discharge is recommended if less than the normal number of measurements is possible to realise per charged package or in case of other doubts regarding the correctness of the displayed charge of the accumulators. During the process of charging the screen is as in the illustration below. Discharge, which lasts up to four hours depending on the level of discharge of the package, is signalled with the following message: Accumulators discharging on. The accumulators are charged in accordance with the algorithm of „quick charge” – this process permits to reduce the duration of charging to approximately two and a half hours. The end of the process of charging is signalled by: Charging completed. In order to turn the device off, remove the power supply plug of the charger. 28 OPERATING MANUAL MMR-630 Revision 1.5 Notes: - As a result of interferences in the network it is possible that the process of charging of accumulators will finish too fast. In the case too short a time of charging is detected it is necessary to remove the plug of the charger and start charging anew. Additional information displayed by the meter Message Cause Proceeding Excessive voltage at Check the contacts of the acBad contact on the accumu- the accumulator pack- cumulator package. Should age during charging. the problem persist, replace lator package terminal! the package. Accumulators have not The accumulator package is been charged within damaged; replace. Charging time exceeded! the maximum time. The charger is damaged – send the meter for repair. No communication Check the contacts of the acwith the accumulator cumulator package. Should No accumulator! controller. the problem persist, replace the package. The ambient tempera- It is not possible to charge the ture is lower than 10C accumulators correctly in such a temperature. Place the meter in a warm place and commence the charging Too low temperature of acmode anew. The present message may be cumulator package! displayed also in the case of deep discharging of the accumulators. It is then recommended to try to turn the charger repeatedly. A damaged or deeply Start the charging mode Initial charge failed! discharged accumula- anew. Should the problem tor package persist, replace the package. 5.4 General principles regarding using Ni-MH accumulators - If you do not use the device for a prolonged period of time, then it is recommended to remove the accumulators and store them separately. - Store the accumulators in a dry, cool and well ventilated place and protect them from direct sunlight. The temperature of the environment in the case of prolonged storage should not exceed 30°C. If the accumulators are stored for a long time in a high temperature, then the occurring chemical processes may reduce their lifetime. - Accumulators NiMH resist normally 500-1000 charging cycles. The accumulators reach their maximum capacity after being formatted (2-3 charge and discharge cycles). The most important factor which influences the lifetime of an accumulator is the depth of discharge. The deeper the discharge of the accumulator, the shorter its lifetime. OPERATING MANUAL MMR-630 Revision 1.5 29 - The memory effect is limited in the case of NiMH accumulator. These accumulators may be charged at any point with no serious consequences. However, it is recommended to discharge them completely every few cycles. - During storage of Ni-MH accumulators they are discharged at the rate of approximately 30% per month. Keeping accumulators at high temperatures may accelerate this process even 100%. In order to prevent excessive discharge of accumulators, after which it would be necessary to format them, it is recommended to charge the accumulators from time to time (even if not in use). - Modern fast chargers detect both too low and too high a temperature of accumulators and react to the situation adequately. Too low a temperature should prevent the start of the process of charging, which might damage the accumulator irreparably. An increase of the temperature of the accumulator is a signal to stop charging and is a typical phenomenon. However charging at a high temperature of the environment apart from reducing the lifetime causes an accelerated increase of the temperature of the accumulator, which will be not charged to its full capacity. - Remember that in the case of quick charging accumulators are charged to approximately 80% of their capacity; better results may be obtained if the process of charging is continued: the charger goes then to the phase of charging with a low current and after next couple of hours the accumulators are charged to their full capacity. - Do not charge or use accumulators in extreme temperatures. Extreme temperatures reduce the lifetime of batteries and accumulators. Avoid placing devices powered from accumulators in very hot environments. The nominal working temperature must be absolutely observed. 30 OPERATING MANUAL MMR-630 Revision 1.5 6 Cleaning and maintenance NOTE! Apply solely the maintenance methods specified by the manufacturer within the present manual. The casing of the meter may be cleaned with a soft, damp cloth using all-purpose detergents. Do not use any solvents or cleaning agents which might scratch the casing (powders, pastes, etc.). The electronic system of the meter does not require maintenance. 7 Storage In the case of storage of the device, the following recommendations must be observed: Disconnect all the cables from the meter Make sure the meter and the accessories are dry, In the case the meter is to be stored for a prolonged period of time, the accumulators must be removed from the device, The acceptable storage temperatures are those indicated in the technical specifications, In order to prevent a total discharge of the accumulators in the case of a prolonged storage, charge them from time to time. 8 Dismantling and utilization Worn-out electric and electronic equipment should be gathered selectively, i.e. it must not be placed with waste of another kind. Worn-out electronic equipment should be sent to a collection point in accordance with the law of worn-out electric and electronic equipment. Before the equipment is sent to a collection point, do not dismantle any elements. Observe the local regulations concerning disposal of packages, worn-out batteries and accumulators OPERATING MANUAL MMR-630 Revision 1.5 31 9 9.1 Attachments Technical data The abbreviation „m.v.” in the basic error definition means the measured value The errors specified in the table refer to measurements realised by means of bidirectional current and they are related to the average value of two measurements, in accordance with the following formula: R RF RR 2 , where RF – resistance at the conventional „forward” current, and RR – resistance at the conventional „backward” current. In the case of measurements with single-direction current and F for measurements of inductive objects at a reduced measurement time (symbol ) the specified precision is not guaranteed. Measurement of resistance Range 0...999,9 1,0000...1,9999m 2,000...19,999m 20,00...199,99m 200,0...999,9m 1,0000...1,9999 2,000...19,999 20,00...199,99 200,0... 1999,9 Input voltmeter impedance: Resolution 0,1 0,0001m 0,001m 0,01m 0,1m 0,0001 0,001 0,01 0,1 200k Measurement resistance at a 50Hz noise Measured Noise level resistance 15...100mV <0,2mΩ >100mV <0,2mΩ 100mV...0,5V ≥0,2mΩ >0,5V ≥0,2mΩ Basic uncertainty Current 10A 1A (0,25% m.v. + 2 digits) 0,1A 10mA 1mA 0,1mA Additional uncertainty ≤1% ≤1% - Measurement blocked YES YES Other technical data: a) Kind of insulation: ...................................................... double, in accordance with EN 61010-1:2004 b) Measurement category .................................................................................................................... ..... III 300V (< 2000m above sea level), III 260V (< 3000m above sea level) EN 61010-1 compliant c) Protection grade of the casing in accordance with EN 60529 ................................................... IP54 d) Protection from external voltage ......................................................................up to 440Vac for 10s e) Power supply of the meter ......................... package of ACCUMULATORS SONEL/NiMH 4,8V 3Ah f) Power supply of the charger ................................................................ 100..250V/50..60Hz, 200mA g) Charging time ..............................................................................................approximately 2,5hours h) Number of measurements with 10A current ............................................................................... 300 i) Maximum resistance of leads for 10A current .......................................................................... 0,1 j) Maximum inductivity of the tested object ................................................................................... 40H k) Exactitude of the measurement current ................................................................................. 10% l) Duration of measurements of resistance: in case of resistance-type objects and bidirectional current ........................................................ 3 s 32 OPERATING MANUAL MMR-630 Revision 1.5 m) n) o) p) q) r) s) t) u) v) w) x) y) z) in case of inductive objects, depends on resistance and inductivity of the object .............................................................................................................couple of minutes (max. 10) Dimensions ....................................................................................................... 295 x 222 x 95 mm Mass of the meter............................................................................................ approximately 1,7 kg Working temperature ........................................................................................................ 0...+40C Charger working temperature ....................................................................................... +10…+35°C Storage temperature..................................................................................................... –20...+60C Humidity ............................................................................................................................ 20...80% Reference temperature .................................................................................................... +23 ± 2C Reference humidity............................................................................................................ 40...60% Temperature coefficient ........................................................................................... 0,01% i.v. / C Time before auto-off .................................................................................................... 120 seconds Display ...................................................................................................................... 192x64 points Interface standard ............................................................................................................. RS-232C Quality standard .............................. design, project and manufacture in accordance with ISO 9001 the product meets EMC requirements according to the following standards .................................... ...................................................................................... EN 61326-1:2006 and EN 61326-2-2:2006 9.2 Standard accessories The standard accessories package supplied by the manufacturer contains the following: meter MMR-630 – WMPLMMR630, set of measurement leads: 3m two-conductor lead U1I1 – WAPRZ003DZBBU1I1, 3m two-conductor lead U2I2 – WAPRZ003DZBBU2I2, Charger cable – WAPRZLAD230, Black crocodile clip K03 (4 pieces) – WAKROBL30K03, Kelvin crocodile clip (2 pieces) – WAKROKELK06, Case L1 – WAFUTL1, Accumulator NiMH 4,8V 3Ah – WAAKU03, Serial transmission cable – WAPRZRS232, Harness to carry the device – WAPOZSZE1, Operating manual, Calibration certificate – LSWPLMMR600. 9.3 Additional accessories Furthermore, the manufacturer and authorised distributors offer the following elements which are not included in the basic accessories package: WAZACKEL1 WAADAUSBRS232 Kelvin clamp with a double cable USB/RS232 adapter OPERATING MANUAL MMR-630 Revision 1.5 33 WAPROSONPE4 WAPROSCHEM Software SONEL Electric Measurements – for SONEL Schematic software to create drafts, the purpose of development of complete documentation of measurements and electric installations diagrams WAPROKALK SONEL PE Kalkulacje software to create measurement calculations Note The software is supported by the following systems: Windows XP (Service Pack 2), Windows Vista, Windows 7. 9.4 Manufacturer The manufacturer of the device who provides guarantee and post-guarantee service is: SONEL S.A. ul. Wokulskiego 11 58-100 Świdnica Poland tel. +48 74 858 38 60 fax +48 74 858 38 09 E-mail: [email protected] Web page: www.sonel.pl Note: Solely the manufacturer is entitled to provide guarantee service. 34 OPERATING MANUAL MMR-630 Revision 1.5 OPERATING MANUAL MMR-630 Revision 1.5 35