1
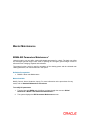
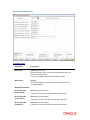
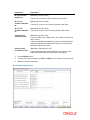
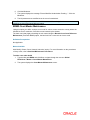
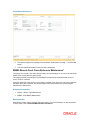
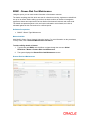
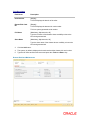
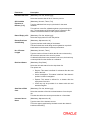
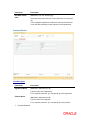
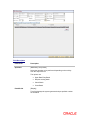
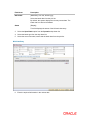
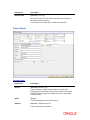
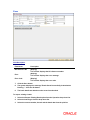
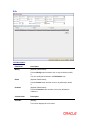
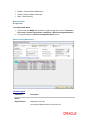
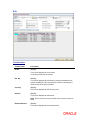
Oracle FLEXCUBE Core Banking Bills User Manual Release 11.6.0.0.0 Part No. E65544-01 October 2015 Bills User Manual October 2015 Oracle Financial Services Software Limited Oracle Park Off Western Express Highway Goregaon (East) Mumbai, Maharashtra 400 063 India Worldwide Inquiries: Phone: +91 22 6718 3000 Fax: +91 22 6718 3001 www.oracle.com/financialservices/ Copyright © 2015, Oracle and/or its affiliates. All rights reserved. Oracle and Java are registered trademarks of Oracle and/or its affiliates. Other names may be trademarks of their respective owners. U.S. GOVERNMENT END USERS: Oracle programs, including any operating system, integrated software, any programs installed on the hardware, and/or documentation, delivered to U.S. Government end users are “commercial computer software” pursuant to the applicable Federal Acquisition Regulation and agencyspecific supplemental regulations. As such, use, duplication, disclosure, modification, and adaptation of the programs, including any operating system, integrated software, any programs installed on the hardware, and/or documentation, shall be subject to license terms and license restrictions applicable to the programs. No other rights are granted to the U.S. Government. This software or hardware is developed for general use in a variety of information management applications. It is not developed or intended for use in any inherently dangerous applications, including applications that may create a risk of personal injury. If you use this software or hardware in dangerous applications, then you shall be responsible to take all appropriate failsafe, backup, redundancy, and other measures to ensure its safe use. Oracle Corporation and its affiliates disclaim any liability for any damages caused by use of this software or hardware in dangerous applications. This software and related documentation are provided under a license agreement containing restrictions on use and disclosure and are protected by intellectual property laws. Except as expressly permitted in your license agreement or allowed by law, you may not use, copy, reproduce, translate, broadcast, modify, license, transmit, distribute, exhibit, perform, publish or display any part, in any form, or by any means. Reverse engineering, disassembly, or decompilation of this software, unless required by law for interoperability, is prohibited. The information contained herein is subject to change without notice and is not warranted to be error-free. If you find any errors, please report them to us in writing. This software or hardware and documentation may provide access to or information on content, products and services from third parties. Oracle Corporation and its affiliates are not responsible for and expressly disclaim all warranties of any kind with respect to third-party content, products, and services. Oracle Corporation and its affiliates will not be responsible for any loss, costs, or damages incurred due to your access to or use of third-party content, products, or services. Table of Contents Master Maintenance ...................................................................................................................... 4 1.1. BIM04-Bill Parameters Maintenance* .................................................................................. 4 1.2. BIM02-Court Master Maintenance ....................................................................................... 7 1.3. BIM03-Branch-Court Cross Reference Maintenance* ....................................................... 10 1.4. BIM01 - Drawee Risk Card Maintenance ........................................................................... 13 Other Transactions ...................................................................................................................... 19 1.5. BI001 - Bills Data Entry* ..................................................................................................... 19 1.6. BIM05 - Bills Processing Maintenance* ............................................................................. 32 Master Maintenance BIM04-Bill Parameters Maintenance* Using this option you can define various bill-related parameters for a bank. The bank can define the contingent general ledger codes used for passing the contingent general ledger entries for bills at the time of lodging, dispatch and realization. The system function, which is used for calculation of the drawing power and the collateral term validity parameters, can also be defined in this option. Definition Prerequisites BAM20 - Bank code Maintenance Modes Available Modify, Cancel, Amend, Authorize, Inquiry. For more information on the procedures of every mode, refer to Standard Maintenance Procedures. To modify bill parameters 1. Type the fast path BIM04 and click Go or navigate through the menus to Global Definitions > Master > Bill Parameters Maintenance. 2. The system displays the Bill Parameters Maintenance screen. Bill Parameters Maintenance Field Description Field Name Description Bank Code [Mandatory, Pick List] Select the branch code, for which the bill parameters are to be defined, from the pick list. The pick list displays only the authorised bank codes. Bank Name [Display] This field displays the name of the bank code selected in the corresponding field. Bill Bank Parameters GL for bills held under vault Dr [Mandatory, Numeric, Nine] GL for bills held under vault Cr [Mandatory, Numeric, Nine] GL for Customer Portfolio Dr [Mandatory, Numeric, Nine] Type the GL code of the bills held under the debit vault. Type the GL code of the bills held under the credit vault. Type the GL code of the customer portfolio under debit. Field Name Description GL for Customer Portfolio Cr [Mandatory, Numeric, Nine] GL for nonCustomer Portfolio Dr [Mandatory, Numeric, Nine] GL for nonCustomer Portfolio Cr [Mandatory, Numeric, Nine] Collateral term validity (In Days) [Mandatory, Numeric, Five] Type the GL code of the customer portfolio under credit. Type the GL code of a non-customer portfolio under debit. Type the GL code for a non-customer portfolio under credit. Type the validity of the collateral term. The validity is measured in terms of days. A bill can be pledged as collateral to a bank if the period between lodging the bills and its maturity date is equal to or less than the specified collateral term value. Drawing power calculation routine [Mandatory, Alphanumeric, 120] Type the drawing power function defined in the system, on the basis of which the bank will calculate the drawing power. 3. Click the Modify button. 4. Type the bank code and press the <Tab> or <Enter> key or select it from the pick list. 5. Modify the relevant information. Bill Parameters Maintenance 6. Click the Ok button. 7. The system displays the message "Record Modified..Authorisation Pending...". Click the Ok button. 8. The bill parameters are modified once the record is authorised. Note: The customer portfolio GL’s are used if the outward bills are lodged and non-customer portfolios are used if the inward bills are lodged. BIM02-Court Master Maintenance Using this option,you define a unique court code for various courts across the country where the bills will be sent for resolution ,if the bills are not honored by the drawee The bank can initiate legal proceedings in such cases.Using the Branch-Court Cross Reference Maintenance (Fast Path: BIM03) option, the bank can link a court code to a brace code. Definition Prerequisites Not Applicable Modes Available Add, Modify, Delete, Cancel, Amend, Authorize, Inquiry. For more information on the procedures of every mode, refer to Standard Maintenance Procedures. To add a court code details 1. Type the fast path BIM02 and click Go or navigate through the menus to Global Definitions > Master > Court Master Maintenance. 2. The system displays the Court Master Maintenance screen. Court Master Maintenance Field Description Field Name Description Court Code [Mandatory, Numeric, Three] Type the court code. It is a unique number, which represents the court to which the bills are sent for collection. Once added, this field cannot be modified or amended. Court Literal [Mandatory, Alphanumeric, Three] Type the short name to identify the court. Court Name [Mandatory, Alphanumeric, 40] Type the name of the court to which the bills will be sent for collection. Address 1/2/3 [Mandatory, Alphanumeric, 35] Type the address of the bank to which the bills will be sent for collection. The address can be entered in three lines. Field Name Description City [Mandatory, Alphanumeric, 35] Type the name of the town or city, where the bank is located. This field is part of the bank address. State [Mandatory, Pick List] Select the name of the state where the bank is located from the pick list. This field is part of the bank address. Zip [Mandatory, Alphanumeric 35] Type the zip code. This field is part of the bank address. Country [Mandatory, Pick List] Select the name of the country where the bank is located from the pick list. This field is part of the bank address. Governarate Code [Mandatory, Alphanumeric, 18] Type the governarate code. It is a unique code issued by the central governing body to all courts. GL Codes Bills Sent For Collection Cr GL [Mandatory, Numeric, Nine] Type the credit GL code. Entries are passed to this GL at the time of realisation or dishonored after lodging a protest. Bills Sent For Collection Dr GL [Mandatory, Numeric, Nine] Type the debit GL code. Entries are passed to this GL at the time of realisation after lodging a protest. 3. Click the Add button. 4. Enter the court code, court literal, court name and the address details. 5. Enter the GL codes. Court Master Maintenance 6. The system displays the message "Record Added..Authorisation Pending...". Click the Ok button. 7. The court details are added once the record is authorised. BIM03-Branch-Court Cross Reference Maintenance* The payee can decide if the bank should initiate court proceedings to recover a bill, which the drawer does not pay after the grace period. The lodging of these proceedings is Protest.Branch can specify the unpaid bills that are to be sent to court for collection. Using this option,the bank can link a court code to a branch code. Only one court can be linked to a branch. At the time of protest, the general ledger entries are passed to the general ledgers defined for the linked court. Definition Prerequisites BAM17 - Branch Type Maintenance BIM02 - Court Master Maintenance Modes Available Add, Modify, Delete, Cancel, Amend, Authorize, Inquiry. For more information on the procedures of every mode, refer to Standard Maintenance Procedures. To modify account restriction 1. Type the fast path BIM03 and click Go or navigate through the menus to Global Definitions > Master > Branch-Court Cross Reference Maintenance. 2. The system displays the Branch-Court Cross Reference Maintenance screen. Branch-Court Cross Reference Maintenance Field Description Field Name Description Branch Code [Mandatory, Pick List] Select the branch code from the pick list. The pick list lists only the authorised bank codes. Branch Name [Display] This field displays the name of the branch code selected in the corresponding field. Field Name Description Court Code [Mandatory, Pick List] Select the court code from the pick list. This court will be linked to the selected branch. All the bills from the branch will be sent to this court for collection in case of a protest. For more information on adding court codes, refer to the Court Master Maintenance (Fast Path: BIM02) option. Court Name [Display] This field displays the name of the court selected in the Court Code field. 3. Click the Add button. 4. Type the branch code and press the <Tab> or <Enter> key or select it from the pick list. 5. Type the court code and press the <Tab> or <Enter> key or select it from the pick list. Branch-Court Cross Reference Maintenance 6. Click the Ok button. 7. The system displays the message "Record Added..Authorisation Pending..". Click the OK button. 8. The branch court cross details are added once the record is authorised. BIM01 - Drawee Risk Card Maintenance Using this option you can track certain information of the drawee customer. The banks can pledge the bills, which are sent for collection as security, against an overdraft limit set up for its drawee. Before setting up the limit, the bank conducts an intensive investigation against the drawee and captures the various details of the drawee’s business and credit worth. The details are captured against a risk card number allocated to each drawee,and a limit is allocated against the risk card number for a defined period. Definition Prerequisites BAM17 - Branch Type Maintenance Modes Available Add, Modify, Delete, Cancel, Amend, Authorize, Inquiry. For more information on the procedures of every mode, refer to Standard Maintenance Procedures. To add credibility details of drawee 1. Type the fast path BIM01 and click Go or navigate through the menus to Global Definitions > Master > Drawee Risk Card Maintenance. 2. The system displays the Drawee Risk Card Maintenance screen. Drawee Risk Card Maintenance Field Description Field Name Description Home Branch [Display] This field displays the branch of the teller. Drawee Risk Card No [Display] This field displays the drawee risk card number. This is a system generated serial number. Full Name [Mandatory, Alphanumeric, 40] Type the full name of the drawee whose credibility to honor the bill is being ascertained. Short Name [Mandatory, Alphanumeric, 20] Type the short name of the drawee whose credibility to honor the bill is being ascertained. 3. Click the Add button. 4. The system, by default, displays the home branch and the drawee risk card number. 5. Type the full name and the short name and press the <Tab> or <Enter> key. Drawee Risk Card Maintenance 6. Enter the relevant information in various tab screens. Billing Details Field Description Field Name Description Share Capital (in lcy) [Mandatory, Numeric, 13, Two] Type the working capital of the drawee. This amount is calculated in the local currency of the bank. The share capital is the primary factor used to calculate the overdraft limit for a payee, who is pledging the bills against the given drawee. Bill Used Value [Display] This field displays the value used for the bill. Bank's Max Exposure to Drawee: [in %] [Mandatory, Numeric, Three, Five] Type the maximum exposure percentage. This limit is calculated as a percentage of the share capital and is set up by the bank based on the drawee’s creditworthiness. The limit is validated against the overdraft facility given to the payee. Field Name Description Issuance Date of IC [Mandatory, Pick List, dd/mm/yyyy] Select the issuance date of the IC from the pick list. OD Limit Max Exposure to Drawee: [in %] [Mandatory, Numeric, Three, Five] Type the additional limit set up by the bank for the same customer. This sub limit is used for validation against a payee at the given time. The percentage of OD limit that can be exposed for this drawee is named as Drawee’s total exposure allowed. Date of Expiry of IC [Mandatory, Pick List, dd/mm/yyyy] Select the expiry date of IC from the pick list. Drawee Business Credit Rating [Mandatory, Alphanumeric, 14] Type the business credit rating of the drawee. The bank’s business credit rating can be updated on a periodic basis based on the drawee’s business performance. No. of Protest Lodged [Mandatory, Numeric, Three] Type the number of times for which the bill was not honored by the customer and sent to the court for protest. If a drawee’s bills have been protested in the court, the bank may not accept bills from the drawee as a collateral. Risk Card Status [Mandatory, Drop-Down] Select the risk card status from the drop-down list. The options are: Start Date of Risk Card Regular- This status is defined for a drawee after the start date of the limit. Under Investigation- This status is defined if the drawee’s portfolio is under investigation. Expired- This status is defined for a drawee after the expiry date of the limit. Limits can only be provided for a drawee with risk card status as Regular. [Mandatory, Pick List, dd/mm/yyyy] Select the start date of the risk card maintenance from the pick list. This date should be the current process date or a future date. Issuance Source Name [Mandatory, Alphanumeric, 40] Type the name of the issuance source. This is the agency appointed by the bank to track the drawee’s business credit rating. Field Name Description End Date of Risk Card [Mandatory, Pick List, dd/mm/yyyy] Select the expiry date of the risk card maintenance from the pick list. The investigation department conducts a review for an extension of the end date depending on the customer’s credit worthiness. Customer Details Field Description Field Name Description Signatories Name [Mandatory, Alphanumeric, 40] Type the name of the signatories. For a corporate customer, you can specify up to five signatories. Partners Name [Mandatory, Alphanumeric, 40] Type the name of the partners. For a corporate customer, you can specify up to five partners. 7. Click the Ok button. 8. The system displays the message "Record Added..Authorisation Pending..". Click the Ok button. 9. The drawee screen card details are added once the record is authorised. Other Transactions BI001 - Bills Data Entry* Using this option you can execute the batch data entry for the bills under a single payee to be sent for collection. You can enter bill details like bill reference number, date, amount and drawee details like account number and address etc. Definition Prerequisites BAM17 - Branch Type Maintenance BAM20 - Bank Codes Maintenance BAM97 - Currency Codes Cross Reference BAM14 - Rewards and Service Charges definition Modes Available Not Applicable To open a batch 1. Type the fast path BI001 and click Go or navigate through the menus to Transaction Processing > Internal Transactions > Data Entry > Bills Data Entry. 2. The system displays the Bills Data Entry screen. Bills Data Entry Field Description Field Name Description Operation [Mandatory, Drop-Down] Select the operation to be performed depending on the activity from the drop-down list. The options are: Portfolio No Open Data Entry Batch Reopen existing batch Check Batch Close Batch [Display] This field displays the system generated unique portfolio number for the batch. Field Name Description Batch Type [Mandatory, Drop-Down] Select the batch type for the bills to be sent for collection from the drop-down list. The options are: A/C Type Inward Bills: For inward clearing bills. Outward Bills: For outward clearing bills and inward bills for collection. [Conditional, Drop-Down] Select the account type, from the drop-down list. The options are: CASA GL This field is enabled if the Outward Bills option is selected in the Batch Type field. A/C No. [Mandatory, Numeric, 14] Type the CASA or GL account number. This field depends up on options selected in A/C Type field A/C Name [Display] This field displays the account holders name based on the account number. In case the account type is GL then the GL description is populated. Bank Code [Mandatory, Pick List] Select the bank code if the bill is an inward bill for collection, from the pick list. Branch [Mandatory, Pick List] Select the branch code if bill is an inward bill for collection from the pick list. Benef Name [Mandatory, Alphanumeric, 40] Type the beneficiary name, if applicable. A/C Ccy [Mandatory, Drop-Down] Select the account currency from the drop-down list. If the beneficiary is a CASA account the account currency is defaulted. If the beneficiary is a GL account, you need to select the GL account currency. Note: The CASA or the GL account currency should be the same as the bill currency. Field Name Description Batch Date [Mandatory, Pick List, dd/mm/yyyy] Select the batch date from the pick list. By default, the system displays the current process date. The batch date can also be backdated. Status [Display] This field displays the status of the bill batch data entry. 3. Select the Open Batch option from the Operation drop-down list. 4. Select the batch type from the drop-down list. 5. Select the account number, branch and the batch date from the pick list. Bills Data Entry 6. Enter the required information in the various tabs. Bill Details Field Description Field Name Description Bill Details Srl No [Display] This field displays the running serial number as generated by the system. This number indicates the chronology of the bill within a batch. Ref No. [Mandatory, Numeric, 16] This field displays the bill reference number as generated by the system. This is the portfolio number followed by the serial number of the bill in the batch. Field Name Description Type [Mandatory, Drop-Down] Select the type of the bill from the drop-down list. The options are: Local PDC – Post Dated Cheque which is drawn in local clearing Outstation PDC Trade Bills Note: All types of bills can be clubbed into a single batch for Outward Bill collection. But in case of an Inward Bill collection only trade bills will be accepted. Amount [Mandatory, Numeric, 20] Type the amount of the bill. Note: The bill amount currency and the account currency must be same. Doc No. [Mandatory, Numeric, 12] Type the bill number as displayed on the physical instrument. Usage [Mandatory, Drop-Down] Select the purpose of the bill from the drop-down list. The options are: Bill Date Collection Collateral [Mandatory, Pick List, dd/mm/yyyy] Select the bill date from the pick list. In case of post dated cheques, this will be the date on the instrument. Maturity Date [Mandatory, Pick List, dd/mm/yyyy] Select the maturity date of the bill from the pick list. In case of local post dated cheques, date will be calculated by the system based on the clearing type and float days set up for the clearing type. Field Name Description Payment Type [Mandatory, Drop-Down] Select the option in which the payee would like to accept the payment for the bill from the drop-down list. The options are: Protest Cash Savings Account Bankers Cheque Demand Draft [Optional, Check Box] Select the Protest checkbox if the bill should be protested if it is not honored. If the bill is unpaid, whether it should be protested in the court of law is specified here. Note: By default the check box is selected for collateral type bills. Grace Type [Mandatory, Drop-Down] Select the grace days after which protest should be lodged from the drop-down list. The options are: Grace Period Maturity: Bill will be protested after the specified grace period days from the maturity date. Dispatch: Bill will be protested after the specified grace period days from the dispatched date. Lodging: Bill will be protested after the specified grace period days from the bill lodging date. [Mandatory, Numeric, Three] Type the number of grace period days after which the bill will be protested, if not honored. Routing No [Mandatory, Numeric, Nine] Type the routing number of the destination bank. In case of outstation PDC and Trade bills, this bank and branch should be set up as a correspondent bank. In case of local PDC it should be a valid branch set up in routing branch master. Bank [Display] This field displays the bank code which is populated on entering the routing number. Branch [Display] This field displays the branch code which is populated on entering the routing number. Field Name Description Sector [Display] This field displays the sector code which is populated on entering the routing number. Instructions [Optional, Alphanumeric, 240] Type the bill specific instructions, if any. Nominee [Optional, Alphanumeric, 40] Type the name of the bill nominee, if any. Cheque Details Clearing Type [Conditional, Drop-Down] Select the cheque clearing type from the drop-down list. This field is enabled only if the bill is a local post dated cheque and its purpose is clearing. Cheque Literal [Conditional, Drop-Down] Select the cheque literal from the drop-down list. This field is enabled only if the bill is a local post-dated cheque and its purpose is clearing. Collateral Details Type [Conditional, Drop-Down] Select the type of bill from the drop-down list. This field in enabled if the bill is collateral. The options are: Code Regular: The bill is in a regular status and can be pledged as collateral. Waiting: The bill cannot be used as collateral presently but can be used at a later date. Investigation: The bill’s drawer is under investigation so it cannot be accepted as collateral. Non Collateral: The bill cannot be accepted as collateral for some specific reason. [Mandatory, Pick List] Select the collateral code from the pick list. The list contains the applicable collaterals for the product of beneficiary account in case the bill is a regular type collateral. A/C Limit No [Mandatory, Pick List] Select the limit number of the beneficiary account to which the bill collateral has to be linked from the pick list. Field Name Description Risk Card No [Mandatory, Pick List] Select the drawee risk card number maintained by the bank for the drawee from the pick list. The drawee of the bill should be a valid risk card holder. Drawee Details Field Description Field Name Description A/C No. [Mandatory, Numeric, 14] Type the drawee’s CASA account number in case the bill payment type is selected as Transfer from CASA. If the bill is an inward bill then the system will validate this to be a valid CASA account number. Name [Display] This field displays the name of the drawee. Address [Mandatory, Alphanumeric, 35] Type the address of the drawee. Field Name Description City [Mandatory, Alphanumeric, 35] Type the drawee’s city of residence. State [Mandatory, Alphanumeric, 35] Type the drawee’s state of residence. Zip [Mandatory, Alphanumeric, 35] Type the zip code. Name Drawer [Mandatory, Alphanumeric, 35] Type the name of the drawer. Bank Code [Mandatory, Pick List] Select the drawer bank code provided in case the bill is an inward bill for collection from the pick list. Branch [Display] This field displays the drawer branch code provided in case the bill is an inward bill for collection. SC Details Field Description Column Name Description Sr. No. [Display] This column displays the row number. It is auto-generated by the system. SC Code [Display] This column displays the unique code of the levied service charge. Description [Display] This column displays the description of the service charge. SC Ccy [Display] This column displays the currency in which the service change will be charged. SC Amount [Display] This column displays the amount levied as service charge. Amount (ACY) [Display] This column displays the service charge amount in account currency. Amount (TCY) [Display] This column displays the service charge amount in transaction currency. Amount (LCY) [Display] This column displays the service charge amount in the local bank currency. The service charge amount is converted as per the rate of conversion to the local bank currency. Close Field Description Field Name Description Bill Reference No [Display] This column displays the bill reference number. Error [Display] This column displays the error message. Error Code [Display] This column displays the error code. 7. Click the Save button. 8. The system displays the message "Batch Saved Successfully. Authorisation Pending...". Click the Ok button. 9. The batch details are added once the record is authorised. To reopen existing a batch 1. Select the Reopen Existing Batch option from the Operation drop-down list. 2. Select the batch type from the drop-down list. 3. Select the account number, branch and the batch date from the pick list. Bills Field Description Field Name Description Modify [Optional, Radio Button] Click the Modify button and then click on any bill detail to modify it. You can modify the bill details in the Bill Details view. Delete [Optional, Radio Button] Click the Delete button and then click on any bill detail to delete it. Undelete [Optional, Radio Button] Click the Undelete button and then click on any bill detail to undelete it. Column Name Description Serial No. [Display] This column displays the row number. Column Name Description Bill Reference No [Display] This column displays the bill reference number generated by the system is displayed. This will be the portfolio number, followed by the serial number of the bill in the batch. Instrument No [Display] This column displays the cheque or trade bill number. Instrument Type [Display] This column displays the bill type. It can be a Local Post dated Cheque or an Outstation Post dated cheque or a trade bill for collection. Instrument Amount [Display] This column displays the bill amount. Note: The bill amount currency and the account currency must be same. Instrument Date [Display] This column displays the bill date. Bill Status [Display] This column displays the status of the bill. 4. Modify the relevant information. 5. Click the Ok button. 6. The system displays the message "Batch Modified Successfully. Authorisation Pending...". BIM05 - Bills Processing Maintenance* Using this option you can track and update the bill status throughout its life cycle. The option facilitates the bill inquiry and enables you to modify the bill details after the bills are deposited into the system. The system provides details on the following: Bills Collaterals Drawee particulars Cheque & Service charge. Definition Prerequisites BAM17 - Branch Type Maintenance BAM20 - Bank Codes Maintenance BAM97 - Currency Codes Cross Reference BAM14 - Rewards and Service Charge definition BIM01 - Drawee Risk Card Maintenance BAM39 - Collateral Codes Maintenance STM59 - Settlement Bank Parameters BI001 - Bills Data Entry Modes Available Not Applicable To modify the bill details 1. Type the fast path BIM05 and click Go or navigate through the menus to Transaction Processing > Internal Transactions > Data Entry > Bills Processing Maintenance. 2. The system displays the Bills Processing Maintenance screen. Bills Processing Maintenance Field Description Field Name Description Option Deposit Branch [Mandatory, Pick List] Select the bill deposit branch from the pick list. Field Name Description Collection Option [Mandatory, Drop-Down] Select the bill collection from the drop-down list. The options are: None Reverse Dispatch: The bills correspondent bank are reversed. Realization: All bills booked to the correspondent bank/branch can be marked realised on receiving the realisation advice sent by the correspondent bank once the payment is received. This can only be done on Bills Marked as Dispatch Advice Received by correspondent. Dishonor: All outward bills booked to a correspondent bank/branch can be marked as Dishonored on notification from the correspondent bank. This can only be done on Bills Marked as Dispatch Advice Received by correspondent. Protest: Outward bills can be marked as Protested. Inward bills protest marking is automatically done by the system. Stop Protest: A protest against a dishonored bill is stopped. Modification: Certain bill details are modified by the bank. Bill Status Inquiry: This is an inquiry option used to view the bill status. Risk Card Inquiry: When the bank wants to change the collateral subtype of the bill from regular to non collateral or from waiting to collateral the bank can perform the risk card inquiry. dispatched to the Field Name Description Inquiry Option [Mandatory, Drop-Down] Select the search for inquiring on the bills from the drop-down list. The Inquiry Option menu is enabled only when the Bill Status Inquiry option is chosen in the Collection Option field. The options are: All Collected Dispatched Reverse Dispatched Realised Dishonored Protested Stop Protest Due Held in Branch Due Returned to Customer Parameter Bill Reference No [Mandatory, Alphanumeric, 12] Type the reference number of the bill. Portfolio No [Mandatory, Pick List] Type the portfolio number of the bill. Bill Document No [Mandatory, Alphanumeric, 12] Type the bill document number. Bill Lodging Date [Mandatory, Pick List, dd/mm/yyyy] Select the bill lodging date from the pick list. Payee Account No [Mandatory, Numeric, 14] Type the beneficiary or account number to locate a bill/s drawn in favour of a certain payee account. Drawee Account No [Optional, Numeric, 14] Risk Card No [Conditional, Alphanumeric, 10] Type the drawee account number. Type the risk card number. This field is enabled only if the Risk Card Inquiry option is selected in the Collection Option field. Field Name Description Corr Bank Code [Mandatory, Pick List] Select the corresponding bank code from the pick list. 3. Select the deposit branch from the pick list. 4. Select the Modification option from the Collection Option drop-down list. 5. Enter the details in parameter grid. Bills Processing Maintenance 6. The system displays the Bills tab. Bills Field Description Column Name Description Srl No. [Display] This column displays the row number. It is auto-generated by the system. Ref. No. [Display] This column displays the bill reference number generated by the system is displayed. This is the portfolio number, followed by the serial number of the bill in the batch. Currency [Display] This column displays the bill currency code. Amount [Display] This column displays the bill amount. Note: The bill amount currency and the account currency must be same. Realized Amount [Display] This column displays the recovered amount. Column Name Description Type [Display] This column displays the bill type. The options are: Status Local Post Dated Cheque Outstation Post Dated Cheque Trade Bill [Display] This column displays the status of the bill. The options are: Modified Realised Part-Realised Dispatched Dishonored [Display] This field displays if the details for the record is modified. 7. Double-click the appropriate column to view the bill details. 8. The system displays the Bill Details tab. 9. Enter the relevant information and click the Save button. Bill Details Field Description Field Name Description Collection Details Bill Document No [Display] This field displays the bill number as it will appear on the physical instrument. Bill Status [Display] This field displays the current status or position of the bill. The options can be Realised, Part Realised, Dishonored, Protested, etc. You can modify the bill status when you inquire for a bill by choosing the Modification option in the Collection Option field. Bill Usage [Display] This field displays the purpose of the bill, i.e., whether it is a collection or to be pledged as collateral. You can modify the bill usage when you inquire for a bill by choosing the Modification option in the Collection Option field. Field Name Description Routing No [Display] This field displays the routing number against which the cheque has been drawn. The routing number is a combination of the bank code and the branch code. The combination can be obtained from the Routing Branch Maintenance (Fast Path: STM54) option. 1 Routing Number = Sector Code / Bank Code + Branch Code For a deposited cheque, this routing number is used by the system to determine the float days and thus the value date of the instrument. For an inward clearing cheque, this routing number should belong to the bank. The order, in which the codes in the routing number are to be entered, is determined by the set up using the Settlement Bank Parameters option. The system may not allow a bank's own cheques to be deposited, thus encouraging the internal bank transactions to be done through transfer of funds. This feature is bank configurable You can modify the routing number when you inquire for a bill by choosing the Modification option in the Collection Option field. Bill Date [Display] This field displays the bill date as it will appear on the physical instrument. Maturity Date [Display] This field displays the maturity date of the bill. You can modify the bill maturity date when you inquire for a bill by choosing the Modification option in the Collection Option field. Bill Currency [Display] This field displays the bill currency. Bill Amount [Display] This field displays the bill amount. Note: The bill amount currency and the account currency must be same. 1 (It is the number printed on the cheque, also called MICR number (Magnetic Ink Character Recognition). This number facilitates faster clearance of the instrument. It can be configured to have the following information: Bank code, Sector, Branch Code.) Field Name Description Payment Type [Display] This field displays the payment mode in which the payee has chosen to accept the bill payment. The options are: Cash DD BC Transfer to CASA You can modify the bill payment mode when you inquire for a bill by choosing the Modification option in the Collection Option field. Realized Amount [Display] This field displays the recovered amount, if the bill is partially realised. Realization Date [Display] This field displays the date on which the bill is realised (could be part or full). Realization GL [Display] This field displays the GL account number where the real accounting entries are passed after the realisation of the bill. Payment Instr. No [Display] This field displays the instrument number, if the bill payment is accepted by the mode of BC or DD. Payment Instr. Date [Display] Collection Type [Display] This field displays the instrument date, if the bill payment is accepted by the mode of BC or DD. This field displays the collection type. Reject Reason [Display] This field displays the reject reason. Customer Instructions [Display] This field displays the bill specific instructions, if any. You can modify the customer instructions when you inquire for a bill by choosing the Modification option in the Collection Option field. Field Name Description Nominee Name [Display] This field displays the name of the bill nominee, if any. You can modify the nominee name when you inquire for a bill by choosing the Modification option in the Collection Option field. Protest Flag [Display] This field displays whether the bill should be protested if not honored. You can modify the customer instructions when you inquire for a bill by choosing the Modification option in the Collection Option field. Protest Date [Display] This field displays the grace period type and the grace period specified during the bill batch data entry maintenance. The system will calculate and display the protest date. Grace Days From [Display] This field displays the grace period type. The options are: Days after Maturity: Bill will be protested after the specified grace period days from the maturity date Days after Dispatch: Bill will be protested after the specified grace period days from the dispatched date Days after Lodging: Bill will be protested after the specified grace period days from the bill lodging date. You can modify the grace type option when you inquire for a bill by choosing the Modification option in the Collection Option field. Grace Days [Display] This field displays the number of grace period days after which the bill will be protested, if not honored. You can modify the grace period days when you inquire for a bill by choosing the Modification option in the Collection Option field. Note: On editing/modifying the bill details click the Save button to save and update the data. Click the Cancel button to cancel the changes. 10. Click the Other Details tab. 11. Enter the relevant information and click the Save button. Other Details Field Description Field Name Description These fields are editable if you select the Modification option in the Collection Type field. Collateral Details Type of Collateral [Conditional, Drop-Down] Select the bill status for collateral type bills from the drop-down list. Regular: The bill is in regular status and can be pledged as collateral. Waiting: The bill cannot be used as collateral presently but can be used at a later date. Investigation: The bill’s drawer is under investigation so it cannot be accepted as collateral. Non Collateral: The bill cannot be accepted as collateral for some specific reason. If a bill collateral sub-type type needs to be changed, it can be done by choosing the Risk Card Inquiry option in the Collection Option field. Field Name Description Collateral Code [Conditional, Pick List] Select the collateral code for the product of beneficiary account from the pick list. Account Limit No [Conditional, Pick List] Select the limit number of the beneficiary account to which the bill collateral has to be linked from the pick list. Utilized Amount [Conditional, Numeric, 13, Two] Type the bill collateral utilised amount. Risk Card No [Conditional, Pick List] Select the drawee risk card number as maintained by the bank for the drawee from the pick list. Drawee Details Drawee Account No [Conditional, Numeric, 14] Drawee Name [Conditional, Alphanumeric, 40] Type the drawee’s account number. Type the drawee name. Corr. Bank Code [Conditional, Pick List] Select the drawer correspondent bank code from the pick list. Corr. Branch Code [Conditional, Numeric, Three] Type the drawer correspondent branch code. Drawer Name [Conditional, Alphanumeric, 40] Type the name of the drawer. Drawee Address 1 [Conditional, Alphanumeric, 35] Type the line one of the drawee’s address. Drawee Address 2 [Conditional, Alphanumeric, 35] Type the line two of the drawee’s address. Drawee Address 3 [Conditional, Alphanumeric, 35] Type the line three of the drawee’s address. Drawee City [Conditional, Alphanumeric, 40] Type the drawee’s city of residence. Drawee State [Conditional, Alphanumeric, 40] Type the drawee’s state of residence. Field Name Description Drawee Zip [Conditional, Alphanumeric, 10] Type the zip code. Cheque Details Clearing Type [Conditional, Drop-Down] Select the cheque clearing type from the drop-down list. Cheque Literal [Conditional, Drop-Down] Select the cheque literal from the drop-down list. Note: : On editing/modifying bill details click the Save button to save and update the data. Click the Cancel button to cancel the changes. 12. Click the Service Charges tab. 13. Enter the relevant information and click the Save button. 14. Click the Fetch button. Service Charges Field Description Column Name Description Sr. No [Display] This column displays the row number. SC Code [Display] This column displays the unique code of levied service charge. Description [Display] This column displays the description of the service charge. SC Ccy [Display] This column displays the currency in which the service charge will be charged. SC Amount [Display] This column displays the amount levied as service charge. Amount(ACY) [Display] This column displays the service charge amount in account currency. Amount(TCY) [Display] This column displays the service charge amount in transaction currency. Amount(LCY) [Display] This column displays the SC amount is converted as per the rate of conversion to the local bank currency and displayed in the local bank currency. Note: On editing/modifying the bill details click the Save button to save and update the data. Click the Cancel button to cancel the changes. 15. System displays the service charge details. Click the Close button.