1
Intelligent Autonomous Robotics
User Manual
Version 1.1
September 21, 2005
Contents
1 Robotics Hardware
1.1 Brain Brick . . . .
1.2 Interface Board . .
1.3 Power Board . . .
1.4 LDR Board . . . .
1.5 IR Board . . . . .
1.6 Compass Board . .
1.7 How it all connects
.
.
.
.
.
.
.
.
.
.
.
.
.
.
.
.
.
.
.
.
.
.
.
.
.
.
.
.
.
.
.
.
.
.
.
.
.
.
.
.
.
.
.
.
.
.
.
.
.
.
.
.
.
.
.
.
.
.
.
.
.
.
.
.
.
.
.
.
.
.
.
.
.
.
.
.
.
.
.
.
.
.
.
.
.
.
.
.
.
.
.
.
.
.
.
.
.
.
.
.
.
.
.
.
.
.
.
.
.
.
.
.
.
.
.
.
.
.
.
.
.
.
.
.
.
.
.
.
.
.
.
.
.
.
.
.
.
.
.
.
.
.
.
.
.
.
.
.
.
.
.
.
.
.
.
.
.
.
.
.
.
2
2
3
4
4
5
5
6
2 How to use the robot hardware
2.1 Physical configuration . . . . . . . . . . . . . . . .
2.2 Software configuration . . . . . . . . . . . . . . . .
2.3 Connecting to the Brain Brick by ethernet . . . . .
2.4 Connecting to the BrainBrick by the serial cable .
2.5 Compiling a program for the BrainBrick . . . . . .
2.6 Loading and running a program on the BrainBrick
.
.
.
.
.
.
.
.
.
.
.
.
.
.
.
.
.
.
.
.
.
.
.
.
.
.
.
.
.
.
.
.
.
.
.
.
.
.
.
.
.
.
.
.
.
.
.
.
.
.
.
.
.
.
.
.
.
.
.
.
.
.
.
.
.
.
.
.
.
.
.
.
.
.
.
.
.
.
.
.
.
.
.
.
.
.
.
.
.
.
.
.
.
.
.
.
.
.
.
.
.
.
.
.
.
.
.
.
.
.
.
.
.
.
.
.
.
.
.
.
.
.
.
.
.
.
.
.
.
.
.
.
7
7
7
7
7
8
8
3 C Programming
3.1 Example program . . . . . . . . . . . . . . . . . . . . . . . . . . . . . . . . . . . . . . . . .
3.2 Example of MultiThreading . . . . . . . . . . . . . . . . . . . . . . . . . . . . . . . . . . .
3.3 IAR Sensor Library . . . . . . . . . . . . . . . . . . . . . . . . . . . . . . . . . . . . . . . .
9
9
11
12
.
.
.
.
.
.
.
.
.
.
.
.
.
.
.
.
.
.
.
.
.
.
.
.
.
.
.
.
.
.
.
.
.
.
.
.
.
.
.
.
.
.
.
.
.
.
.
.
.
.
.
.
.
.
.
.
.
.
.
.
.
.
.
.
.
.
.
.
.
.
.
.
.
.
.
.
.
.
.
.
.
.
.
.
.
.
.
.
.
.
.
.
.
.
.
.
.
.
1
.
.
.
.
.
.
.
.
.
.
.
.
.
.
.
.
.
.
.
.
.
1
Robotics Hardware
The computer/electronic hardware for the Intelligent Autonomous Robotics (IAR) consists of:
• The Brain Brick, a single board computer (SBC) with an ARM XScale compatible processor running
at 400 MHz.
• The Interface Board which connects motors and sensors to the BrainBrick.
• The Power Board, to which the battery is connected, and which supplies the BrainBrick and all
the other boards with power.
• Additional sensor boards (currently the LDR board, the IR board, and the Compass board) which
can be daisy-chained over an I2C bus to the power board, to share data with the Interface board,
and power from the battery.
You should start by identifying each board and its connections. Note that most connections are designed
to fit one way only: this is the correct way! Never force a connection, and disconnect by pulling on the
connector, not the wires.
WARNING: The battery must always be disconnected before you change any
connections between the boards. Plugging things in and out while the system is powered could cause significant damage to the boards. The motor
on/off switch does not disconnect power to the rest of the system. You must
disconnect the battery.
1.1
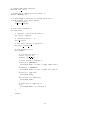
Brain Brick
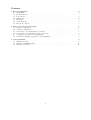
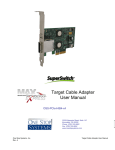
The core module is a single board computer (SBC) consisting of of a 400 MHz Intel XScale (ARM)
processor module and a PC/104+ compatible base module. It has been enclosed in a black box that
gives you access to the ethernet and serial ports, as shown shown in figure 1. It is powered and transfers
data to the other boards via a direct connection to the Power Board.
BRAIN BRICK
Serial
Ethernet
I2C Link to
Power Board
Figure 1: Brain Brick
2
1.2
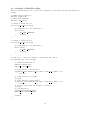
Interface Board
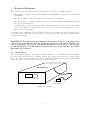
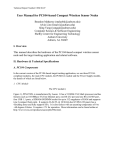
The interface board (figure 2) is mounted on top of the black box. It provides connection points for
4 motors. The motors can be set to forward, stop, or reverse; motors 1 and 2 can also be set to slow
forward or slow reverse. It also provides connection points for 6 microswitches (or whiskers or conduction
sensors) and 1 Hall-effect sensor. It has 8 user-programmable LEDS. It is powered and transfers data to
the other boards via a direct connection to the Power Board.
unused
I2C link to Power Board
light8
light7
light6
light5
light4
light3
light2
light1
switch1
switch2
switch3
switch4
switch5
switch6
h_e_sense
INTERFACE BOARD
motor1
motor2
motor3
Figure 2: Interface Board
3
motor4
1.3
Power Board
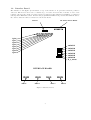
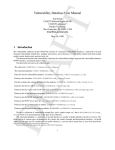
The Power Board (figure 3) is where the Battery is connected. It supplies the other boards with power,
and transfers data, via the I2C links. The motor on/off switch will turn off the motors only (e.g. if your
robot is out of control and you want to stop it moving). It does not disconnect any other power. To
power off, you must disconnect the battery. To power cycle (e.g. to reboot the BrainBrick) you must
disconnect and reconnect the battery.
POWER BOARD
off
on
I2C link to
brain brick
I2C link to Interface Board
I2C link to sensor boards
motor on/off switch
power lead connector
Figure 3: Power Board
1.4
LDR Board
The LDR Board (figure 4) connects up to 4 Light Dependent Resistors. It can be daisy-chained with
other sensor boards to the Power Board via the I2C connectors.
ldr1 and ldr2
LIGHT DEPENDENT RESISTOR
INTERFACE BOARD
ldr3 and ldr4
I2C Links
Figure 4: LDR Board
4
1.5
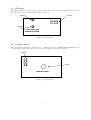
IR Board
The IR Board (figure 5) connects up to 2 Active Infra Red sensors. It can be daisy-chained with other
sensor boards to the Power Board via the I2C connectors.
infra1
I2C Links
infra2
ACTIVE INFRA RED
INTERFACE BOARD
Figure 5: Infrared Board
1.6
Compass Board
The Compass Board (figure 6) measures up to 8 different directions (N,NE,E,SE,S,SW,W,NW). It can
be daisy-chained with other sensor boards to the Power Board via the I2C connectors.
I2C Links
compass
COMPASS BOARD
Figure 6: Compass Board
5
1.7
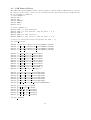
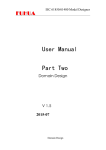
How it all connects
Please be careful and check you have the right configurations! Make all connections before plugging in the
battery. Note that you do not need to have any of the sensor boards (LDR, IR or Compass) connected,
or any motors or switches, for the system to run, i.e. the minimal testing configuration requires only the
Brain Brick, Interface Board, and Power Board.
I2C Link To Brain Brick
Ethernet
Brain Brick
POWER BOARD
Serial
I2C LINK TO BOARDS
BATTERY
LDR
LDR
I2C Link To Interface Board
BULB
LIGHT DEPENDENT RESISTOR
INTERFACE BOARD
COMPASS
BOARD
INTERFACE BOARD
ACTIVE INFRA RED
INTERFACE BOARD
SWITCH
MOTOR
MOTOR
IR
SWITCH
IR
Figure 7: Connecting Hardware
REPEAT WARNING: The battery must always be disconnected before you
change any connections between the boards. Plugging things in and out while
the system is powered could cause significant damage to the boards. The
motor on/off switch does not disconnect power to the rest of the system. You
must disconnect the battery.
6
2
2.1
How to use the robot hardware
Physical configuration
The minimal configuration needed to test the basic functions, and download and run programs, is to
connect the power board, brain brick and interface board. You can add or remove switches and motors
from the interface board, or connect or disconnect other sensor boards and sensors as required. See
section 1.7.
Once you have made (and checked) the connections, power up the system by connecting the battery.
An empty battery will be indicated by a red light on the power board.
2.2
Software configuration
Your course demonstrator will provide you with a tar ball (e.g. Name.tar.bz2) containing all the files
necessary for this course. Note that this is specific to the (named) Brain Brick you were issued. While
in your home directory type e.g.:
tar xvfj Name.tar.bz2
which will create a folder ∼/iar. This folder includes a bin/ directory containing scripts for automatic login (∼/iar/bin/iarlogin) to the Brain Brick and for uploading a new program (∼/iar/bin/iarupload).
To avoid having to reference the location of these tools every time, include (PATH=$PATH:∼/iar/bin)
in your ∼/.brc file.
The other directory the folder includes is the ∼/iar/template directory which includes example
programs and corresponding Makefiles (see below)
2.3
Connecting to the Brain Brick by ethernet
The Brain Brick runs an embedded Linux system (Linux-2.6.7) based on BusyBox which is a collection
of (tiny) standard Unix tools. It should behave more or less other Linux based systems, but has only a
very limited number of system tools installed.
Most interaction with the Brain Brick is done over an Ethernet connection. Use any of the free cables
available in the teaching lab to connect to the network, via the port on the black box. To login into your
Brain Brick, use:
iarlogin
It will automatically log you in as user without the need to provide a password. Once logged in, you can
use the terminal (shell) to navigate through any files on system.
Login can also be done using the provided ∼/iar/.ssh rsa keys using ssh
ssh -i ∼/iar/.ssh/rsa user
And you can copy files to or from the BrainBrick using scp e.g.
scp -i $RSAKEY user@$Name:$PathToYourData $Destination
This is most likely to be used if you have saved data on the module while running a program and want
to retrieve it for analysis.
2.4
Connecting to the BrainBrick by the serial cable
You can also connect to the BrainBrick via a serial cable, and will need to do so for several functions (see
below). With the system off, plug the serial cable from the Dice machine you are using into the port on
the black box. Start a terminal emulation program, e.g. minicom.
A simple test function for the BrainBrick hardware has been provided: iartest. To use it, connect
the serial cable and start the terminal emulation program. Then switch on the system and login via the
ethernet, and run the command:
iartest
You can then check various functions, including the lights, switches, and motors as well as the LDR and
AIR boards, through the terminal emulator interface.
7
2.5
Compiling a program for the BrainBrick
In order to generate a binary that can be run on the BrainBrick, a cross-compiler is needed (assuming a
Host with Intel x86 architecture). The cross-compiler toolchain is based on the GNU compiler collection
(gcc-3.4.3)and should therefore be very similar to usual compiler setups. It includes a few additional
features, in particular it includes header files for the IAR library for robot control program development.
The ∼/iar/template directory includes four files :
• Makefile
• functions.c
• functions.h
• controller.c
The Makefile includes all necessary compiler and linker commands to generate a single binary from the C
source files. The file functions.c includes all lower level function implementations used in controller.c. The
control program controller.c represents the actual robot control program; it makes use of the functions
defined in functions.h.
To compile, simply type make. This will generate an executable called controller that you can upload
to the BrainBrick (see below).
To compile your own program, make a copy of the ∼/iar/template directory. Make any changes you
wish to the program. If you change the filenames or create more files, you may need to make appropriate
changes to the Makefile, e.g. to change the specified name for the output binary. To compile your program
simply type make in this directory. This will create a binary with the name you specified in the Makefile
(e.g. controller01).
Example:
cp -r ∼/iar/template/ ∼/iar/controller01
cd ∼/iar/controller01
Make any desired changes to the controller.c file and the Makefile.
make
new executable : controller01
2.6
Loading and running a program on the BrainBrick
To upload you program onto the BrainBrick, make sure the BrainBrick is connected to the network (e.g.
try ping $Name). Type
iarupload $PathToYourExecutable
E.g. if you are in the template directory, use
iarupload controller
This will upload the program onto your BrainBrick as /iar/upload/autostart. To start the program
you need to type:
/iar/upload/autostart
You can then disconnect from the ethernet and watch it go.
Note it is a good idea in general for your program to not do anything (in particular, not to start the
motors) until it detects that you have hit a ‘start’ microswitch. This gives you time to put the robot on
the floor, and avoid it leaping off the desk.
To stop a running program you can either power-cycle/reboot the system or login over ethernet and
use the Linux kill command. Or more tidily, you could include a stop switch that ends the program.
If you want to run the same program again, you do not need to download it again but simply to type
/iar/upload/autostart as before.
8
3
C Programming
The BrainBrick is programmed in C. C is a very simple and powerful programming language but it is
very easy to make mistakes. Explaining the basics of C does not take long but would exceed the scope of
this manual. In this section we aim to give you pointers for getting started, and some example programs
that you can modify. Note that it is not a principal aim of this course to teach you C; in general, you only
need to know enough to be able to write and debug programs for this specific task, i.e. robot control; so
we will be trying to support you with direct examples for any of the kinds of things you will need to do.
There are many good reference books for C. The most frequently recommended is “The C Programming Language” by Brian W. Kernighan and Dennis M. Ritchie.
There are also many websites providing an introduction to C programming, e.g.:
http://www.le.ac.uk/cc/tutorials/c/
http://www.eskimo.com/ scs/cclass/notes/top.html
http://www.eskimo.com/ scs/C-faq/top.htm
You might find it particularly useful to look at some of these “Introduction to C for Java programmers” sites: http://www.comp.lancs.ac.uk/computing/users/ss/java2c/
http://www.cs.vu.nl/ jason/college/dictaat.pdf
Basic things you need to know:
• Arithmetic, relational and logical operators are the same as Java
• The loop and conditional syntax is the same as Java
• The basic data types are int (can be long or short, signed or unsigned), char, float, double
and void.
• There is no boolean type: test conditions are integer expressions that if evaluating to 0 are false,
non-zero are true. Logical operators will evaluate to 0 or 1.
• You can also define a struct; similar to a Java class but it can only have data elements.
• Variables can be global (declared outside a function) or local (declared inside a function - all
declarations must occur at the start of the function).
• Statements beginning # are preprocessed before compilation, and used either to #include other
files (including standard library files) or to #define constants or macros. These appear at the start
of the file.
• The remainder of the file consists of functions, including one main function. Functions need to be
defined (or declared) before they are invoked.
• There is no function overloading (no two functions can have the same name).
• C has no exceptions so it is important to do explicit error checking.
More complex issues you may need to read up on are arrays and pointers, passing arguments to and
returning values from functions, I/O, characters and strings, dynamic memory handling, and threading.
But we will try to provide examples to help you with these.
3.1
Example program
This program demonstrates, how to use two IR sensors to make a robot avoid obstacles. The variables
lefteye and righteye get periodically updated with the latest IR sensor readings. The program compares
these values against a defined threshold and reacts by making the robot move away from the side of the
sensor with the highest reading.
9
/* Include IAR sensor library*/
#include <iar ctrl.h>
/* definition of threshold for IR sensors */
#define THRESHOLD 150
/* a short wrapper functions for driving the motors */
void drive(short left, short right){
set motor 1(left);
set motor 2(right);
}
/* main control program */
int main(void){
/* variables to hold the IR values */
int lefteye, righteye;
/* initialise motors !
reset motors();
*/
/* wait until switch 1 is pressed */
while(!get switch 1());
/* main program loop */
while(true){
/* read the IR sensors */
lefteye = get ir 1();
righteye = get ir 2();
/* react to sensor readings */
if(lefteye > THRESHOLD)
drive(FFWD,SFWD); /* make a slight right turn */
if(righteye > THRESHOLD)
drive(SFWD,FFWD); /* make a slight left turn */
if(lefteye < righteye){
drive(FFWD,SFWD);
}
else if(lefteye > righteye){
drive(SFWD,FFWD);
}
/* if(lefteye == righteye) */
else{
drive(SFWD,SFWD); /* slow down */
}
}
return 0;
}
10
3.2
Example of MultiThreading
This program demonstrates how to use threads to implement robotic functions (behaviours) that run in
parallel.
/* POSIX thread library */
#include <pthread.h>
/* IAR sensor library*/
#include <iar ctrl.h>
/* thread to flash led 1 */
void *flash led 1(void *arg){
/* flash LED1 in 1 sec intervals */
while (true){
set light 1(TOGGLE);
sleep(1);
}
}
/* thread to flash led 8 */
void *flash led 8(void *arg){
/* flash LED8 in 1 sec intervals */
while (true){
set light 8(TOGGLE);
sleep(1);
}
}
/* main loop : start two threads to flash led1 and led8 */
int main(int argc, char **argv){
/* thread declarations */
pthread t thread led1;
pthread t thread led8;
/* start thread to flash led1 */
if(pthread create(&thread led1, NULL, flash led 1, NULL) != 0)
exit(1);
/* flash led1 for 3 seconds*/
sleep(3);
/* start thread to flash led8 */
if(pthread create(&thread led8, NULL, flash led 8, NULL) != 0)
exit(1);
/* let both leds flash for another 7 seconds */
sleep(7);
/* stop threads */
pthread cancel(thread led1);
pthread cancel(thread led8);
return 0;
}
11
3.3
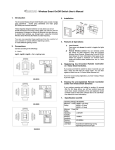
IAR Sensor Library
The IAR sensor library (libiar) enables control programs to interface with the IAR interface board and
the variety of add-on sensor boards. For your convenient reference, here is the library header file with all
the relevant function definitions.
/* led commands */
#define OFF 0
#define ON 1
#define TOGGLE 2
#define NONE 3
#define ALL 4
/* motor commands
#define FFWD 0 /*
#define SFWD 1 /*
#define STOP 2
#define FREV 3 /*
#define SREV 4 /*
*/
fast forward */
slow forward - only for motor 1, 2 */
fast reverse */
slow reverse - only for motor 1, 2 */
/* has to be called once before any motors are used !
int reset motors();
#define
#define
#define
#define
set
set
set
set
motor
motor
motor
motor
1(command)
2(command)
3(command)
4(command)
set
set
set
set
motors(MOTOR1,command)
motors(MOTOR2,command)
motors(MOTOR3,command)
motors(MOTOR4,command)
#define
#define
#define
#define
#define
#define
#define
#define
#define
#define
set
set
set
set
set
set
set
set
set
set
light 1(sw) set leds(sw,LED1)
light 2(sw) set leds(sw,LED2)
light 3(sw) set leds(sw,LED3)
light 4(sw) set leds(sw,LED4)
light 5(sw) set leds(sw,LED5)
light 6(sw) set leds(sw,LED6)
light 7(sw) set leds(sw,LED7)
light 8(sw) set leds(sw,LED8)
lights off() set leds(NONE,0)
lights on() set leds(ALL,0)
#define
#define
#define
#define
#define
#define
#define
get
get
get
get
get
get
get
switch 1() get switches(SWITCH1)
switch 2() get switches(SWITCH2)
switch 3() get switches(SWITCH3)
switch 4() get switches(SWITCH4)
switch 5() get switches(SWITCH5)
switch 6() get switches(SWITCH6)
hall effect() get switches(HALLEFFECT)
#define
#define
#define
#define
#define
#define
get
get
get
get
get
get
ir 1() get irs(AIR1)
ir 2() get irs(AIR2)
ldr 1() get ldrs(LDR1)
ldr 2() get ldrs(LDR2)
ldr 3() get ldrs(LDR3)
ldr 4() get ldrs(LDR4)
int get compass();
12
*/