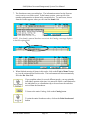
1
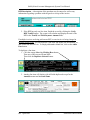
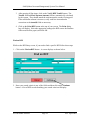
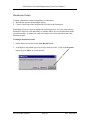
(School Account Management System) USER MANUAL Published by Office of Business & Financial Affairs Saint Paul Public Schools SAM (School Account Management) System User Manual TABLE OF CONTENTS SYSTEM OVERVIEW ......................................................................................................................... 4 SYSTEM CONFIGURATION............................................................................................................. 4 SYSTEM CONFIGURATION............................................................................................................. 5 SIMPLE CONFIGURATION ..................................................................................................................... 5 COMPLEX CONFIGURATION ................................................................................................................. 5 Redistributing Funds Within a School/Program............................................................................ 6 NAVIGATING THE SYSTEM............................................................................................................ 9 ENTERING TRANSACTIONS IN THE REGISTER..................................................................... 11 ALLOCATIONS ................................................................................................................................... 11 Creating an Allocation Record................................................................................................................ 11 EXPENSES .......................................................................................................................................... 13 General Expenses......................................................................................................................... 13 Creating a General Expense Record........................................................................................................ 13 Request for Payment (RFP) ......................................................................................................... 15 Entering an RFP ...................................................................................................................................... 15 Find an RFP ............................................................................................................................................ 18 Request for Payment List ........................................................................................................................ 19 Storehouse Orders ....................................................................................................................... 20 Creating a Storehouse Order ................................................................................................................... 20 Adjusting Storehouse Order Dollar Amounts ......................................................................................... 23 VENDOR INFORMATION ............................................................................................................... 24 ADDING A VENDOR WHILE ENTERING AN EXPENSE RECORD............................................................ 24 ADDING A VENDOR WHILE ENTERING AN RFP ................................................................................. 25 ADDING A VENDOR DIRECTLY TO THE VENDOR DATABASE ............................................................. 26 EDITING VENDOR INFORMATION ....................................................................................................... 27 RECONCILIATION........................................................................................................................... 29 VIEWING RECORDS........................................................................................................................ 30 VIEW LIST ......................................................................................................................................... 30 USING THE “FIND” SCREEN ......................................................................................................... 31 ADVANCED FINDS ........................................................................................................................... 32 Find With More Than One Criterion ........................................................................................... 32 Find With More Than One Criterion Using Omit........................................................................ 32 REPORTS ............................................................................................................................................ 33 CREATING A REPORT ......................................................................................................................... 33 Excluding Records from a Report................................................................................................ 35 Expenses for an Account.............................................................................................................. 36 Expenses for a Month................................................................................................................... 36 Expenses for a Group................................................................................................................... 36 St. Paul Public Schools Page 2 Rev. April 2005 SAM (School Account Management) System User Manual Allocations for an Account ...........................................................................................................37 Allocations for a Month ................................................................................................................37 Group Allocations by Month ........................................................................................................38 Storehouse Total ...........................................................................................................................38 Current Balance by Account Name ..............................................................................................38 Current Balance by Object Code..................................................................................................39 Transaction Report .......................................................................................................................39 Current Balance by Budget Number.............................................................................................40 Category Summary Report ...........................................................................................................40 Group Balance..............................................................................................................................41 Reconcile an Account ...................................................................................................................41 Petty Cash List..............................................................................................................................42 Petty Cash Budget Summary ........................................................................................................42 Petty Cash Budget Detail..............................................................................................................43 Petty Cash Outstanding ................................................................................................................43 EXPORTING RECORDS ...................................................................................................................44 PETTY CASH ......................................................................................................................................46 ORDERING PETTY CASH CHECK FORMS .............................................................................................46 STARTING PETTY CASH AT THE BEGINNING OF THE YEAR .................................................................46 ENTERING A BEGINNING PETTY CASH BALANCE ...............................................................................46 ENTERING OUTSTANDING PETTY CASH CHECKS................................................................................48 ENTERING PETTY CASH CHECKS ........................................................................................................50 PRINTING PETTY CASH CHECKS .........................................................................................................51 ENTERING BANK CHARGES FROM YOUR BANK STATEMENT ..............................................................52 VERIFYING THE PETTY CASH ACCOUNT BALANCE ............................................................................53 REIMBURSING YOUR PETTY CASH ACCOUNT ....................................................................................55 Creating the Request for Payment to Reimburse Petty Cash........................................................56 Receipt of Petty Cash Reimbursement ..........................................................................................58 RECONCILING TO BANK STATEMENT .................................................................................................59 Out of Balance Troubleshooting...................................................................................................60 VOIDING PETTY CASH CHECKS ..........................................................................................................60 Rev. April 2005 Page 3 Saint Paul Public Schools SAM (School Account Management) System User Manual System Overview The School Account Management (SAM) system is a budget management tool that can be used for a variety of purposes such as: • Recording allocations and expenses for the budget accounts you want to track. • Creating Request for Payments. • Recording Petty Cash transactions and printing petty cash checks. • Creating Storehouse orders. • Producing reports on a variety of budget information. The system is composed of 5 databases as explained below: Primary database used for entry of all transactions. A catalog of items available from the Storehouse. Contains Storehouse order records. Contains vendor information entered by the user. Contains Request For Payment records. St. Paul Public Schools Page 4 Rev. April 2005 SAM (School Account Management) System User Manual System Configuration SAM has the capability to track allocations and expenses simply by budget account code, or in a more complex manner by department, teacher, grade level or any other specific grouping. The system starts out as a “blank slate”, so you can choose the configuration that best meets your needs. Simple Configuration FIELD Account Name Group Category SUGGESTIONS FOR WHAT TO ENTER • Any types of allocations or expenses you can’t track by budget code. (Your monthly FMS Reports will show budgeted dollars and expenditures by budget code.) Example #1: Printing & duplicating jobs done by Graphic Services may be charged to various budget codes. An Account Name of “Graphic Services” would allow you to track expenditures for all Graphic Services requests. Example #2: Gifts given to a school/program may be charged to multiple budget codes. To track the expenditure of gift funds create an Account Name for each one. Leave blank. “Storehouse” (required for Storehouse orders). Complex Configuration FIELD Account Name Group Category Rev. April 2005 SUGGESTIONS FOR WHAT TO ENTER • Grade level (if money is allocated by grade level). • Program (such as Athletics, Science, Math, English, etc.). • Individual names (if money is allocated to individuals for purchasing classroom or other types of supplies). • Budget Administrator’s name, if tracking budgets for multiple programs. • Program name, if tracking budgets for multiple programs. • Any other specific grouping not already set up as an Account Name. “Storehouse” (required for Storehouse orders) Page 5 Saint Paul Public Schools SAM (School Account Management) System User Manual Redistributing Funds Within a School/Program The district allocates funds by budget code. If your school/program redistributes funds to individuals, departments, grade levels, or any other method, you can track the allocation and expense records at that detailed level. Follow the examples below for entry of allocation and expense records to ensure your account balances are correct and detailed reports can be produced. Example In this example, Monroe school has a total of $6,000 budgeted for classroom supplies. Each teacher will be allocated $500 to purchase supplies for their classroom. Enter the allocation records as follows: 1. The initial allocation record is the total amount for that budget code. 2. The individual allocation records are entered with the Account Name as the teacher’s name, $500 as an Individual Allocation, and zeroes for the budget code. St. Paul Public Schools Page 6 Rev. April 2005 SAM (School Account Management) System User Manual 3. When the teachers spend the money, record the expense with the teacher’s name as the Account Name and enter the actual budget code. 4. You can track both the allocation and expenditures using the “Current Balance by Budget Number” report (shown below). Rev. April 2005 Page 7 Saint Paul Public Schools SAM (School Account Management) System User Manual 5. You can also track individual teacher expenditures by using the “Current Balance by Account Name” report (shown below). St. Paul Public Schools Page 8 Rev. April 2005 SAM (School Account Management) System User Manual Navigating the System These are the common buttons used to navigate the SAM System: Starts the process of entering a new allocation or expense transaction. Copies information from an existing record to a new record. The new record can then be modified as needed. Brings up a “find” screen that is used for searching for a record or group of records. Finds ALL records in the system. Displays a list of records based on the criteria the user entered in the Find screen. Rev. April 2005 Page 9 Saint Paul Public Schools SAM (School Account Management) System User Manual Navigating the System (continued) Displays a menu of all available reports. Displays a screen for entry of system default information. Displays the Petty Cash screen where check information is verified before printing. The petty cash check number must be entered before clicking on this button. Prompts you to view a list of existing RFPs or enter a new RFP. This button shows you the number of the record you are viewing within the group of records you have selected, and allows you to display other records by clicking on the arrows. St. Paul Public Schools Page 10 Rev. April 2005 SAM (School Account Management) System User Manual Entering Transactions in the Register Allocations At the beginning of each fiscal year, an allocation record needs to be created for each budget account that will be tracked. Creating an Allocation Record 1. On the Entry screen click on the New Record button. 2. A dialog box asks which type of record you want to create. Click on the Allocation button. Rev. April 2005 Page 11 Saint Paul Public Schools SAM (School Account Management) System User Manual 3. The Allocation screen displays. Complete the fields as shown in the example below. Note: There are three different ways to allocate money: • Individual Allocation – money allocated directly to an individual, such as a Teacher. • General Allocation – money allocated to a budget code. • Roll Over Allocation – money allocated to a budget code that is left over from the previous fiscal year. This field is primarily used for Intraschool budgets. Intraschool allocation records are always entered under budget code 19-XXX-000-000-5099-0000 (XXX would be your organization number). Note: When entering the object code, always select the number from the drop-down list. Typing the number in the field will not enter it in the system correctly. 4. When finished entering information, click the New Record button to enter another allocation record. St. Paul Public Schools Page 12 Rev. April 2005 SAM (School Account Management) System User Manual Expenses There are five types of expense records. The following sections describe how to enter each type of record. General Expenses General expense records are typically used to record expenses for internal district services such as Graphic Services, Food Service, or Transportation. Those expenses are automatically charged to your budget in FMS, so you don’t need to pay those departments with a check or RFP. The estimated cost of a Purchase Requisition also should be entered as a general expense. Creating a General Expense Record 1. On the Entry screen click on the New Record button. 2. A dialog box asks which type of record you want to create. Click on the Expense button. Rev. April 2005 Page 13 Saint Paul Public Schools SAM (School Account Management) System User Manual 3. The Expense screen displays. Complete the fields as shown in the example below. Note: An expense can be entered two different ways: • Estimated Cost – Use this field if you want to record the expense before the actual cost is known. This is typically used for Purchase Requisitions and Storehouse orders. You could also use this field to estimate for the entire year the cost of copier and fax machine rentals, or other “fixed” expenses that occur each month. When you know the actual cost, you will need to edit this record and add the actual cost to the Invoiced Cost field. • Invoiced Cost – Use this field if you know the actual cost, such as petty cash checks, Graphic Services, Food Service and Transportation expenses. Note: When entering the object code, always select the number from the drop-down list. Typing the number in the field will not enter it in the system correctly. 4. When finished entering information, click the New Record button to enter another expense record. St. Paul Public Schools Page 14 Rev. April 2005 SAM (School Account Management) System User Manual Request for Payment (RFP) A Request for Payment (RFP) form is required when an invoice meets the criteria to be paid through the district’s Business Office. Entering an RFP 1. Go to any Expense Entry screen and click on the Request for Payment button. 2. A dialog box offers you the option to view a list or create a new RFP. Click on the New button. Rev. April 2005 Page 15 Saint Paul Public Schools SAM (School Account Management) System User Manual 3. The Request for Payment screen displays. The RFP Date and RFP# are automatically filled in by the system. Need By Date: When the payment is needed. Special Payment Instructions: Enter information the Business Office needs to know to process this request appropriately. Date Goods/Services Received: Date the goods/services were received by your school or department. Received By: The person who can confirm the goods/services were received. Vendor: Select the vendor from the drop down box. The Address field will automatically fill in. If this is a new vendor, click the Click here to add a Vendor button and add the vendor. 4. Click on the Add a Line button to display fields for entering budget and invoice information. Fund/Org/Prog/Fin/Obj/Crs: The budget code to be charged for this line item. Amnt$$: Amount to be charged to this budget code. Invoice#: Invoice number. If no invoice number, enter the order number, confirmation number or any reference number listed on the vendor’s invoice. Invoice Date: Date of the vendor’s invoice. If there is no date, enter the date of service, order date, or current date. Group, Category, Account Name: Select the appropriate names from the drop down boxes. Vendor: The vendor is automatically filled in by the system. Description: This field is optional. It will not print on the RFP form. St. Paul Public Schools Page 16 Rev. April 2005 SAM (School Account Management) System User Manual RFP Description: A description of the purchase may be entered as well as any information regarding a problem with the goods or receipt of the invoice. 5. If the RFP has only one line item, finish the record by clicking the Verify RFP Total$$ button. The system will calculate and display the total of the RFP in the Total$$ and Final Payment Amount fields. If multiple invoices are being paid on one RFP, or one invoice is being charged to multiple budget codes, you can duplicate a line item and modify the information, or add a blank line and fill it in. To simply add another blank line, click on the Add a Line button. To duplicate a line item: 1. Click the orange Select by Clicking Here button. That area of the screen will turn black. Then click the Duplicate Selected button. 2. Another line item will display with all fields duplicated except for the Amnt$$ amount and Account Name. Rev. April 2005 Page 17 Saint Paul Public Schools SAM (School Account Management) System User Manual 3. After entering all line items, click on the Verify RFP Total$$ button. The Total$$ field and Final Payment Amount field are automatically calculated by the system. They should match the total amount the vendor is being paid. If the total dollar amount is incorrect, verify each line item and make corrections to the Amnt$$ fields as necessary. 4. Click on the Print RFP button at the top of your screen. The Print dialog box will display. Select the appropriate settings (the RFP sent to the Business Office must be blue paper) and click OK. Find an RFP While on the RFP Entry screen, if you need to find a specific RFP follow these steps. 1. Click on the Find an RFP button. A screen displays as shown below. 2. Enter your search criteria in any of the fields and then click on the Continue button. A list of RFP records matching your search criteria will display. St. Paul Public Schools Page 18 Rev. April 2005 SAM (School Account Management) System User Manual Request for Payment List While on the RFP Entry screen, the View List button can be used to view all the RFP records in the database (see example below) To return to the RFP entry screen, click the View Entry button. Rev. April 2005 Page 19 Saint Paul Public Schools SAM (School Account Management) System User Manual Storehouse Orders Creating a Storehouse Order accomplishes two functions: • Records the expense in the budget register. • Creates a hard copy order form that can be faxed to the Storehouse. Depending on how you want to manage the ordering process, you can create separate Storehouse orders for each individual, or combine orders for several individuals under one order number. In either case, only one budget code can be entered for the entire Storehouse order. Creating a Storehouse Order 1. On the Entry screen click on the New Record button. 2. A dialog box asks which type of record you want to create. Click on the Expense button or press Enter on your keyboard. St. Paul Public Schools Page 20 Rev. April 2005 SAM (School Account Management) System User Manual 3. The Expense screen displays. Fill in the fields as shown below: Account Name and Group: Select names from the drop-down boxes. Category: You MUST enter “Storehouse”. Storehouse Order #: A drop-down box will display listing your USED storehouse order numbers. Add 1 to the last number used (at the bottom of the list) and type the new number in the field Vendor: Select “Storehouse”. Budget Codes: enter the budget code the order will be charged to. Remember, only one budget code can be entered for the entire order. 5. Click on the Switch to Storehouse button at the bottom of your screen. Rev. April 2005 Page 21 Saint Paul Public Schools SAM (School Account Management) System User Manual 7. The Storehouse entry screen displays. The information entered on the Expense screen carries over to this screen. In the bottom section , enter specific item numbers and quantities as shown in the example below. To enter items, choose from the list that appears when you click into the Item# field. NOTE: If an Item# is entered that does not exist in the Catalog, a message displays in the Description field. 6. When finished entering all items in this order, click on the Total of Items? button to view the estimated total for this order. The total amount will also automatically fill in the Est. Cost field. If you combine orders for several different people, you may print the individual's portion at the time it is entered as either a confirmation for the individual or as a distribution slip to be used once the order has arrived from the Storehouse. To browse the entire Catalog, click on the Catalog button. To print the entire Storehouse order, click on the Print Storehouse# button. St. Paul Public Schools Page 22 Rev. April 2005 SAM (School Account Management) System User Manual Adjusting Storehouse Order Dollar Amounts Prices in the Catalog are updated only periodically, so they may not be accurate at the time you create the order. The Storehouse also adds an “overhead charge” when the order is processed. When you receive the Storehouse pick slip with your order, edit the original storehouse record and type the sub-total amount that shows on the Storehouse pick slip in the Invoiced Cost field. Rev. April 2005 Page 23 Saint Paul Public Schools SAM (School Account Management) System User Manual Vendor Information Vendor information can be carried over from year to year by importing records into the new vendor database. The easiest way to add new vendor information is to enter it as you record the expense transactions. New vendors can be added three ways: • While entering an Expense record in the Register. • While entering a Request For Payment record. • Adding it directly to the Vendor database. Adding a Vendor While Entering an Expense Record 1. On the Expense screen, click the Vendor button. 2. A dialog box displays asking if you want to add a vendor. Click the Yes button. 3. The Vendor entry screen displays (see next page). St. Paul Public Schools Page 24 Rev. April 2005 SAM (School Account Management) System User Manual 4. Complete the fields on the Vendor entry screen as shown below. 5. When finished, click the Done button. You will be returned to the Expense screen. Adding a Vendor While Entering an RFP 1. In the middle of the Request For Payment screen, click on the Click here to add a Vendor button. 2. The Vendor entry screen displays (as shown in the previous example). Enter the vendor information and click the Done button to return to the RFP screen. Rev. April 2005 Page 25 Saint Paul Public Schools SAM (School Account Management) System User Manual Adding a Vendor Directly to the Vendor Database 1. Double click on the DstVendr database to open it. 2. A dialog box displays requiring you to enter a password. Enter the password and click the OK button. 3. The Vendor Entry screen displays. Fill in the fields, and when finished click the Done button. The screen will minimize. If you are entering more than one vendor, maximize the screen, click the New Vendor button, and continue entry. 4. Close the DstVendr database when finished. St. Paul Public Schools Page 26 Rev. April 2005 SAM (School Account Management) System User Manual Editing Vendor Information Once vendor information has been entered in the system, it can be changed at any time. To edit vendor information: 1. Double click on the DstVendr database to open it. 2. Enter your password and click the OK button. 3. The vendor entry screen displays. Click on the List button. Rev. April 2005 Page 27 Saint Paul Public Schools SAM (School Account Management) System User Manual 4. A list of vendors displays in alphabetical order. Use the scroll bar to find the vendor you want to edit, then click on the vendor name. 5. The vendor entry screen displays with the selected vendor’s information. 6. Edit the information in any of the fields, and when finished click the Done button. St. Paul Public Schools Page 28 Rev. April 2005 SAM (School Account Management) System User Manual Reconciliation Regular comparisons should be done between your SAM data and the monthly FMS Activity Report. The data on the FMS system is the “official” financial record of the district. However, errors can occur in processing and the only way to catch them is to reconcile the two sets of data. Record Check-off Both the entry screens and View List screen have fields for Record Check-off. This feature allows you to mark the record as having been matched against a bank statement or FMS Activity Report. Entry screen check-off boxes View List screen check-off boxes Changes to the dollar amount, budget code, check number or check date on a reconciled record will trigger a warning message (see below). You have the choice to leave the record as is, or go ahead and make the change. Rev. April 2005 Page 29 Saint Paul Public Schools SAM (School Account Management) System User Manual Viewing Records View List The View List provides an easy method for viewing all records or groups of records in the Register. Column headings that are asterisked(*) may be clicked on to sort the list. The FIND? button takes you to a find screen where you can search for a specific record or groups of records. The FIND ALL! button brings all Register records into the View List, in date order. The Quick Report button prints the current group of records as shown, and allows you to add a title to the report. St. Paul Public Schools Page 30 Rev. April 2005 SAM (School Account Management) System User Manual Using the “Find” Screen It is better to enter as little information as possible to make sure that a request is not overly complicated. Using just the beginning part of a word often eliminates the possibility of misspelling that word. If a match isn’t found, a message indicating that "No Records were found" will be displayed. After the search criteria are entered, click on the Continue button. You are returned to the Entry screen if only one record matches the criteria, and to the View List if there are multiple records. Rev. April 2005 Page 31 Saint Paul Public Schools SAM (School Account Management) System User Manual Advanced Finds Find With More Than One Criterion This type of “find” is typically used to produce petty cash reports where one or more checks are outside the range of check numbers. Follow this example to include a check that is outside a range of check numbers. 1. While in the find screen, enter the first search criterion. (Example: Petty Cash # 2201…2254) 2. Go to the Mode menu and choose New Request. 3. Enter the second search criterion. (Example: Petty Cash # 2175) 4. Click the Continue button at the bottom of the screen. The result would be a petty cash report that includes check 2175 and checks 22012254. Find With More Than One Criterion Using Omit This type of “find” is typically used to produce petty cash reports where one or more checks need to be excluded from the range of check numbers. This type of “find” can also be used to omit petty cash checks that were charged to last year’s budget from standard reports. Follow this example to exclude a check within a range of check numbers. 1. While in the find screen, enter the first search criterion. (Example: Petty Cash # 2201…2254) 2. Go to the Mode menu and choose New Request. 3. Enter the second search criterion which you want omitted. (Example: Petty Cash # 2250) 4. Click on the status area control button between the Zoom Out button and the word “Find” at the bottom of the screen. This gives you access to the status area. 5. Click the Omit check box in the status area. 6. Click the Continue button at the bottom of the screen. The result would be a petty cash report that includes checks 2201-2249 and 22512254. St. Paul Public Schools Page 32 Rev. April 2005 SAM (School Account Management) System User Manual Reports Creating a Report 1. On the Expense or Allocation entry screen click on the Reports button. 2. The Reports Menu displays. Double-click on the report you want to generate. 3. The Find screen displays. Enter the appropriate information for the report you are generating, then click on the Continue button. NOTE: To get accurate expense reports, remember to exclude outstanding petty cash checks that were charged to last year’s budget. Rev. April 2005 Page 33 Saint Paul Public Schools SAM (School Account Management) System User Manual 4. Enter a title for your report. Your school name and other specific information is especially helpful if the report will be distributed to others. When finished, click the Continue button. 5. A dialog box displays giving you the option to Preview or Print the report. Note: Always Preview the report to make sure it includes the data you expected and it’s in the proper format (portrait or landscape). 6. In the Preview mode you can change the format from Portrait to Landscape by going to File > Page Setup. If you don’t want to print the report, click the Cancel button to return to the Reports screen. If you want to print the report, click the Continue button, then the OK button. After printing is complete you will be returned to the Reports menu. St. Paul Public Schools Page 34 Rev. April 2005 SAM (School Account Management) System User Manual Excluding Records from a Report 1. 2. 3. 4. Select the report you want to produce, and enter the criteria on the FIND screen. Go to the Mode menu and choose New Request. Enter the criteria for the records you want to exclude. Click on the status area control button between the Zoom Out button and the word “Find” at the bottom of the screen. This gives you access to the status area. 5. Click the Omit check box in the status area. 6. Click the Continue button at the bottom of the screen. Rev. April 2005 Page 35 Saint Paul Public Schools SAM (School Account Management) System User Manual Expenses for an Account On the FIND screen, select Record Type = Expense and make a selection from the Account Name pop up list. If you want all Account Names to appear, leave that field blank. Expenses for a Month On the FIND screen, select Record Type = Expense and make a selection from the Month pop up list. Expenses for a Group Not working correctly. St. Paul Public Schools Page 36 Rev. April 2005 SAM (School Account Management) System User Manual Allocations for an Account On the FIND screen, select Record Type = Allocation and make a selection from the Account Name pop up list. Allocations for a Month On the FIND screen, select Record Type = Allocation and make a selection from the Month pop up list. Rev. April 2005 Page 37 Saint Paul Public Schools SAM (School Account Management) System User Manual Group Allocations by Month On the FIND screen, make a selection from the Group pop up list. You don’t need to select a Month. All months that have allocation records will print Storehouse Total Not working correctly. Current Balance by Account Name On the FIND screen, make a selection from the Account Name field. St. Paul Public Schools Page 38 Rev. April 2005 SAM (School Account Management) System User Manual Current Balance by Object Code On the FIND screen, make a selection from the Object field. Transaction Report On the FIND screen, make a selection from one field. The report will list any records that match that criteria. Rev. April 2005 Page 39 Saint Paul Public Schools SAM (School Account Management) System User Manual Current Balance by Budget Number On the FIND screen, type the budget number. If you want to see all budget numbers leave the fields blank. Category Summary Report On the FIND screen, make a selection from the Category field. St. Paul Public Schools Page 40 Rev. April 2005 SAM (School Account Management) System User Manual Group Balance On the FIND screen, make a selection from the Group field. Reconcile an Account On the FIND screen, make a selection from the Account field. Rev. April 2005 Page 41 Saint Paul Public Schools SAM (School Account Management) System User Manual Petty Cash List On the FIND screen, click twice in the Petty Cash# field and type the range of check numbers (example: 1111…3333). Petty Cash Budget Summary On the FIND screen, click twice in the Petty Cash# field and type the range of check numbers (example: 1111…3333). You don’t need to enter a report title. The system automatically shows the check range and your school/program name (from the Settings screen). St. Paul Public Schools Page 42 Rev. April 2005 SAM (School Account Management) System User Manual Petty Cash Budget Detail On the FIND screen, click twice in the Petty Cash# field and type the range of check numbers (example: 1111…3333). Petty Cash Outstanding No selections need to be made. The report automatically identifies outstanding petty cash records by the empty “Bank” check box. Rev. April 2005 Page 43 Saint Paul Public Schools SAM (School Account Management) System User Manual Exporting Records Any information in the Register may be exported to be used in word processing documents, spreadsheets, mail merges or other databases. To export records perform the following steps. 1. Open the Register file. 2. Perform a find to locate the records you wish to export. !!IMPORTANT!! A specific group of records must be found or ALL of the records in the system will be exported. 3. From the File Menu choose Import/Export, and then Export Records. 4. Name your export file and save it to a location on your hard drive or desktop. St. Paul Public Schools Page 44 Rev. April 2005 SAM (School Account Management) System User Manual Choose the fields that you wish to export. The left side lists the fields available for export. Select a field then click the >Move> button to add it to the right side. 5. 6. When all fields have been selected, click the Export button. 7. After the export file is created you will be able to use any application capable of reading a text file. Microsoft Excel is probably the most common application used to work with exported files. Open the application first, then open the text file. Rev. April 2005 Page 45 Saint Paul Public Schools SAM (School Account Management) System User Manual Petty Cash You can use SAM to record your petty cash expenditures, create reports for reimbursement requests, and balance your records to the bank statement. You have the option of using pre-printed check forms or a manual checkbook. Ordering Petty Cash Check Forms In order to use the petty cash check-printing feature, you will need to order checks from Deluxe Business Forms and Supplies at 1-800-328-0304. The checks you need to order are Form 080931 and the window envelopes that are compatible are 091500. The checks are one to a page with two check stubs. The stub at the top is sent to the vendor with the check, and the school keeps the lower stub. Do not include the lower stub with your backup documentation when you reimburse the account. It’s meant to be kept on file in your building. Starting Petty Cash at the Beginning of the Year Assuming that your petty cash account was reimbursed at the end of the previous school year and that you reconciled your bank statements for June and July, you will enter a beginning balance for your petty cash bank account and any outstanding checks that have not cleared your bank account. Entering a Beginning Petty Cash Balance 1. On the Entry screen click on the New Record button. 2. A dialog box asks which type of record you want to create. Click on the Allocation button. St. Paul Public Schools Page 46 Rev. April 2005 SAM (School Account Management) System User Manual 3. The Allocation screen displays. Complete the fields as shown in the example below: • • • • • Account Name - Petty Cash. PC# - 1. (When you click on the next field the Petty Cash Record field will automatically fill in the word “Yes”.) General Allocation - Enter the ending balance from the bank statement. Description – (Optional-see example). Budget Code – Leave as zeroes. 4. You are done entering this record. This is one of the few records you will ever create in SAM without a budget code. Rev. April 2005 Page 47 Saint Paul Public Schools SAM (School Account Management) System User Manual Entering Outstanding Petty Cash Checks There are two types of outstanding checks: 9 Checks that have already been reimbursed and were charged to last year’s budget. 9 Checks that have not been reimbursed and will be charged to the new fiscal year’s budget. Follow the steps below for the type of outstanding checks you need to enter. Checks Already Reimbursed and Charged to Last Year’s Budget 1. On the Entry screen click on the New Record button. 2. A dialog box asks which type of record you want to create. Click on the Expense button. St. Paul Public Schools Page 48 Rev. April 2005 SAM (School Account Management) System User Manual 3. The Expense screen displays. Complete the fields as shown in the example below: • Account Name – “Outstanding Check XXX-XX”. • Vendor – Select the vendor who was the payee on the check. • Invoiced Cost - Amount of the check. • Petty Cash# - Check number. • Petty Cash Paid Date -Check date. 4. You are done entering this record. A budget code is not necessary because this check was already reimbursed and charged to last year’s budget, so it should not be included in any reports. Check Not Reimbursed and Charged to New Fiscal Year’s Budget This type of outstanding check can be entered using the standard procedure on the next page. Rev. April 2005 Page 49 Saint Paul Public Schools SAM (School Account Management) System User Manual Entering Petty Cash Checks 1. On the Entry screen click on the New Record button. 2. A dialog box asks which type of record you want to create. Click on the Expense button or press the Enter key on your keyboard. 3. The Expense screen displays. Complete the fields as shown in the example below: • Account Name, Group, Category – Make selections from the pop-up lists or enter new values. • Vendor - The payee. If the payee is not listed as a vendor, click on the Vendor button and enter it in the Vendor database. • Description - Description of the expense. • Invoiced Cost - Amount of the check. • Budget Number - The appropriate budget code for the expense. • Petty Cash# - Check number. • Petty Cash Paid Date - Check date. If a check is being charged to multiple budget codes, duplicate the original record, make the necessary modifications, and enter an extension on the check number (for example, the second record for check 1555 would be 1555.1, the third would be 1555.2, etc.). St. Paul Public Schools Page 50 Rev. April 2005 SAM (School Account Management) System User Manual Printing Petty Cash Checks 1. After entering the petty cash check record on the Expense screen, click on the Petty Cash button at the bottom of the screen 2. The Petty Cash Check screen displays. Enter information as shown in the example below. You have the option to make the check payable to the Vendor or Account Name. The default is Vendor. To select Account Name, click on the box and a drop-down list displays where you can select Account Name. If check is payable to the Account Name, enter the address here. Click this button to return to the Register. Verify the information in this box before clicking the print button. 3. When ready to print the check, click the Print Petty Cash Check button. Rev. April 2005 Page 51 Saint Paul Public Schools SAM (School Account Management) System User Manual 4. A dialog box displays reminding you to load the check forms in the printer. When ready to print, click the OK button. Entering Bank Charges from your Bank Statement If you are charged a bank service charge, enter an expense record with the following information: Account Name - “Petty Cash”. Description - description of the bank service charge. Invoiced Cost - amount of the service charge. Budget Code - the budget code this expense is charged to. Petty Cash # - the number of the last petty cash check listed on that bank statement. Insert a decimal point and “1” at the end of the check number to make it unique. (Example: 2457.1) This charge will be included when you prepare your next reimbursement. Petty Cash Paid Date - date of bank service charge. St. Paul Public Schools Page 52 Rev. April 2005 SAM (School Account Management) System User Manual Verifying the Petty Cash Account Balance Verify your petty cash balance each day before you start processing checks so that you know how much money is in your account. 1. Click on the Find button at the bottom of the screen. 2. Click in the Petty Cash? field and select YES from the drop-down list. 3. Click the Continue button at the bottom of the screen. Rev. April 2005 Page 53 Saint Paul Public Schools SAM (School Account Management) System User Manual 4. The View List screen displays all Petty Cash transactions that have been entered in the Register. 5. Scroll down to the bottom of the list to see the balance of your account. St. Paul Public Schools Page 54 Rev. April 2005 SAM (School Account Management) System User Manual Reimbursing Your Petty Cash Account Reimburse your petty cash account when you have spent approximately 50% of your balance. The steps included in this process are: 1. Reconcile all bank statements. 2. Determine the range of checks that you want to have reimbursed. 3. Print the following reports: • Petty Cash List • Petty Cash Budget Summary • Petty Cash Budget Detail 4. Create a Request for Payment and have it signed by the Principal/Budget Administrator. 5. Make copies of the backup documentation, most recent bank statement, reports and RFP before they are sent to the Business Office. Keep the photocopies for yourself, and the send the originals to the Business Office. 6. Assemble the paperwork in the following order: • Signed Request for Payment (on blue paper). • “Petty Cash Budget Summary” report. • “Petty Cash List” report. • “Petty Cash Budget Detail” report. • Petty Cash backup (original invoices and receipts). Each invoice/receipt should have the check number written on it. Small slips should be taped to an 8 ½” x 11” piece of paper. Try and fit as many slips on one page as you can. Don’t tape slips to both sides of the paper. Include adding machine tapes if there are multiple receipts for one check, or only part of the items on the receipt were reimbursed. This helps the Business Office determine how you arrived at the check amount and saves time re-adding the items. • Copy of Current Reconciled Bank Statement (the back of the statement should be filled in to show that you reconciled the account). Rev. April 2005 Page 55 Saint Paul Public Schools SAM (School Account Management) System User Manual Creating the Request for Payment to Reimburse Petty Cash 1. On the Entry screen click on the New Record button. 2. A dialog box asks which type of record you want to create. Click on the Expense button. 1. On the bottom right corner of the Entry screen, click on the Request for Payment button 2. A dialog box offers you the option to view a list or create a new RFP. Click on the New button. St. Paul Public Schools Page 56 Rev. April 2005 SAM (School Account Management) System User Manual 3. The Request for Payment screen displays. Fill in the fields as shown in the example below. Need By Date – The date you want the money deposited in your account. Received by – The person to contact if the Business Office has questions while processing the reimbursement request. Vendor – Your school/program petty cash account. If you have not already created your petty cash account as a “vendor”, click the Click here to add a Vendor button. Enter the vendor record as shown below with your own checking account number. RFP Description – Indicate the check range on this reimbursement request. Payment Override - the total of the reimbursement request. 4. Click the Print RFP button. 5. Click the OK button. Rev. April 2005 Page 57 Saint Paul Public Schools SAM (School Account Management) System User Manual Receipt of Petty Cash Reimbursement After you receive confirmation from the Business Office that the reimbursement amount has been wired to your checking account, enter the amount into the Register. 1. Click on the New Record button at the bottom of the Entry screen. 2. Click on the Allocation button when asked, “Which type of record do you wish to create?” 3. Fill in the fields as shown in the example below: Account Name – “Petty Cash” PC# - The next number in the series of petty cash allocation records. General Alloc. – amount wired to the bank. Description – range of check numbers reimbursed. St. Paul Public Schools Page 58 Rev. April 2005 SAM (School Account Management) System User Manual Reconciling to Bank Statement When you receive your monthly bank statement, follow these steps to reconcile your petty cash records in SAM to the statement. 1. In the View List mode, do a FIND to bring up a list of all your petty cash records (see “Verifying Balance of Petty Cash Account” section for detailed instructions). 2. For every deposit or check that has cleared on the bank statement, click in the Bank check off box on the far right of the View List screen. If there are bank service charges, enter them in the register and mark them as cleared (see the “Entering Bank Charges from your Bank Statement” section). 3. When everything has been checked off, scroll to the bottom of the list and write down the balance of your petty cash account. 4. Print a Petty Cash Outstanding report (see “Reports” for detailed instructions). 5. Turn the bank statement over and fill in the fields as shown below: The ending balance on this statement. $ CLOSING BALANCE Amount from other side ADD: Deposits made since ending date on statement ________ ________ _ _ SUBTOTAL Checks not listed on this or prior statements NO. AMOUNT $ Enter the total amount from the “Petty Cash Outstanding” report. $ TOTAL CHECKS NOT LISTED ==Î $ BALANCE Rev. April 2005 If account was reimbursed after the statement ending date, enter amount here. This amount should match the balance on SAM. Page 59 Saint Paul Public Schools SAM (School Account Management) System User Manual Out of Balance Troubleshooting If you are unable to reconcile, ask yourself these questions: • Did you forget to enter expense records for bank fees, such as overdraft fees or stop payments? • Are there items on the Petty Cash Outstanding report that should have been marked as cleared? • Are there voided checks that have a dollar amount other than $0.0? • Did you forget to enter an allocation record for a reimbursement? • Is there an allocation record for the initial balance of the checking account at the beginning of the fiscal year? Voiding Petty Cash Checks Voiding a Check Immediately If you made an error while printing a petty cash check or manually writing a check, follow these steps: 1. Select New Record, click the Expense button, and enter the fields as follows: Account Name – “Voided Check”. Description – “Void”, and the reason for the void. Invoiced Cost – “0”. Petty Cash # - check number. Petty Cash Paid Date – the date you voided the check. Voiding a Check That Has Not Been Reimbursed The most common reason a check that has been sent to a vendor or given to a staff member is voided is because it’s been lost. If all efforts to find the check have failed and it’s been determined that the check should be voided, and the check has not been included in a reimbursement request, follow these steps: 1. Do a FIND for the check number to be voided. 2. Click on the record to display the entry screen. 3. On the entry screen, go to the Comments field first and enter the check amount so you have a record of it in case the check is found later and returned to you or cashed. 4. Then change the remaining fields as follows: Account Name – “Voided Check”. Description – “Void”, and the reason for the void. Invoiced Cost – “0”. St. Paul Public Schools Page 60 Rev. April 2005 SAM (School Account Management) System User Manual Voiding a Check That Has Been Reimbursed In the Current Fiscal Year If a check that has already been reimbursed needs to be voided, follow these steps: 1. Do a FIND for the check number to be voided. 2. Click on the record to display the entry screen. In the COMMENTS field record the Invoiced Cost amount. 3. Click the Duplicate Record button. 4. On the duplicate record, change the fields as follows: Account Name - “Voided Check”. Invoiced Cost - enter a minus sign and the dollar amount that you recorded in the COMMENTS field. Description – “Void” and the reason for the void. Petty Cash# - enter a period and a “1” after the check number. 5. Make a hard copy of this record by choosing Print from the File menu. Keep this hard copy with the rest of your pending petty cash backup until the next time you reimburse. 6. When you prepare your next reimbursement request, include the voided check on the reports by following the “Advanced Finds” instructions in the SAM User Manual. Voiding a Check That Was Reimbursed In the Previous Fiscal Year 1. Create a new expense record, and enter the fields as follows: Account Name - “Voided Check”. Invoiced Cost - enter a minus sign and the check amount. Description – “Void” and the reason for the void. Budget Number – enter the budget code the check was originally charged to. Petty Cash# - enter the check number that is being voided. Petty Cash Paid Date – enter the date the check was written. 2. Make a hard copy of this record by choosing Print from the File menu. Keep this hard copy with the rest of your pending petty cash backup until the next time you reimburse. 3. When you prepare your next reimbursement request, include the voided check on the reports by following the “Advanced Finds” instructions in the SAM User Manual. Rev. April 2005 Page 61 Saint Paul Public Schools SAM (School Account Management) System User Manual St. Paul Public Schools Page 62 Rev. April 2005