1
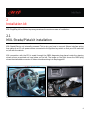
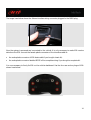
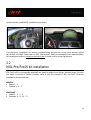
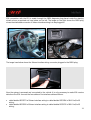
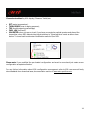
AiM Infotech
Plug&Play kit
MXL Strada/Pista/Pro/Pro05
for Subaru Impreza
1999-2012
Release 1.04
INDEX
INDEX
1
PRE-REQUISITES
2
INTRODUCTION
3
1 – Standard kit, optional and part numbers
1.1 – MXL Strada basic kit
1.2 – MXL Strada complete kit
1.3 – MXL Pista basic kit
1.4 – MXL Pista complete kit
1.5 – MXL Strada/Pista universal kit (if you already have an MXL Strada/Pista)
1.6 – MXL Pro/Pro05 universal kit (if you already have an MXL Pro/Pro05)
1.7 – Upgrading kit (if you already have a basic kit and want to upgrade to complete)
1.8 – Optional
4
5
5
6
6
7
7
7
8
2 – Kit installation
2.1 – Installation of MXL Strada/Pista kit
2.2 – Installation of MXL Pro/Pro05 kit
9
9
11
3 – Configuration with Race Studio 2
3.1 – Configuration of MXL Strada/Pista
3.2 – Configuration of MXL Pro/Pro05
13
14
19
4 – Gear calibration
24
5 – Sampled Channels
5.1 – Channels sampled by MXL with 1999-2007 protocol
5.2 – Channels sampled by MXL with 2008-2011 protocol
25
25
26
6 – Data download
27
1
PRE-REQUISITES
This kit supports Subaru Impreza vehicles from 1999 up to 2012.
MXL Strada/Pista/Pro/Pro05 can only be configured in a Windows™ environment under Microsoft
Windows 7™, Vista™ and XP™ operative systems.
Please refer to Race Studio Configuration user manual – freely downloadable from area download
software section of www.aim-sportline.com – to know how to install software and drivers and to MXL
user manual for further information concerning MXL working mode.
2
INTRODUCTION
MXL Plug&Play kit for Subaru Impreza is a dash – with data logging feature in Pista version – designed
for a quick and easy installation. With a minimum effort you can connect it to the car engine control
unit or ECU (from here onward ECU) and visualize, with no need of additional sensors installation and
according to the car model:
•
•
•
•
•
•
•
•
•
•
•
•
•
•
•
RPM
speed
throttle position
engine temperature
turbo compressor pressure
right bank injection advance
left bank injection advance
ignition advance
detonation sensor correction
fuel level
neutral sensor
disengaged clutch signal
brake starting sensor
engine load
air flow
Please note: sampled channels can change according to the car registration year and all analog
additional channels are disabled in MXL Strada/Pista versions as explained in paragraph 3.1.
Thanks to the infrared receiver and transmitter – included in MXL Pista kits and optional to MXL Strada
ones – you can visualize and, with MXL Pista/Pro/Pro05, record lap times.
3
1
Standard kit, optional and part numbers
MXL Plug&Play kit for Subaru Impreza is available in different versions, each including only some of
the items shown here above. Refer to the numbers to know which items are included in each kit.
Please note: before installing the kit check that it includes all specified items.
4
1.1
MXL Strada basic kit
MXL Strada basic kit (part number X16MXLSKBS) includes:
•
•
•
•
•
•
•
MXL Strada (1)
MXL Strada basic wiring(2)
Subaru interface wiring (3)
USB cable for PC connection (4)
Race Studio 2 software installation CD (5)
MXL Subaru Plug&Play kit user manual (6)
AiM sticker (7)
Please note: MXL Strada basic kit gets ECU channels only.
1.2
MXL Strada complete kit
MXL Strada complete kit (part number X16MXLSKCS) includes:
•
•
•
•
•
•
•
MXL Strada (1)
MXL Strada complete wiring (8)
Subaru interface wiring (3)
USB cable for PC connection (4)
Race Studio 2 software installation CD (5)
MXL Subaru Plug&Play kit user manual (6)
AiM sticker (7)
Please note: MXL Strada complete kit can support additional analog channels. See paragraph 3.1 for
further information.
5
1.3
MXL Pista basic kit
MXL Pista basic kit (part number X16MXLCKBS) includes:
•
•
•
•
•
•
•
•
•
MXL Pista (1)
MXL Pista basic wiring (2)
Subaru interface wiring (3)
infrared lap receiver (9) and transmitter (10)
lap transmitter power cable (11)
USB cable for PC connection (4)
Race Studio 2 software installation CD (5)
MXL Subaru Plug&Play kit user manual(6)
AiM sticker (7)
Please note: MXL Pista basic kit gets ECU channels only.
1.4
MXL Pista complete kit
MXL Pista complete kit (part number X16MXLCKCS) includes:
•
•
•
•
•
•
•
•
•
MXL Pista (1)
MXL Pista complete wiring (8)
Subaru interface wiring (3)
infrared lap receiver (9) and transmitter (10)
transmitter power cable (11)
USB cable for PC connection (4)
Race Studio 2 software installation CD (5)
MXL Subaru Plug&Play kit user manual (6)
AiM sticker (7)
Please note: MXL Pista complete kit supports additional analog channels. See paragraph 3.1 for
further information.
6
1.5
MXL Strada/Pista universal kit
(if you already have an MXL Strada/Pista)
MXL Strada/Pista universal kit for Subaru (part number V02554530) is dedicated to those customers
that already have an MXL Strada/Pista. It includes:
•
•
universal MXL Strada/Pista interface wiring for Subaru (3)
Race Studio 2 software installation CD (5)
1.6
MXL Pro/Pro05 universal kit
(if you already have an MXL Pro/Pro05)
MXL Pro/Pro05 universal kit for Subaru (part number V02554600) is dedicated to those customers
that already have an MXL Pro/Pro05. It includes:
•
•
universal MXL Pro/Pro05 interface wiring for Subaru
Race Studio 2 software installation kit
1.7
Upgrading kit (if you already have a basic kit and
want to upgrade to complete)
Upgrading kit (part number V02554520) is dedicated to those customers that already have a Subaru
basic kit and want to upgrade it to complete. It includes:
•
•
MXL Strada/Pista complete wiring for Subaru (8)
Race Studio 2 software installation CD (5)
7
1.8
Optional
Optional items are only available for MXL Strada kits and are:
•
•
•
infrared lap receiver (9) – part number: X41RX19090
infrared lap transmitter (10) – part number: X02TXKMA01
lap receiver power cable (11) – part number: V02POWTX0
8
2
Installation kit
MXL Plug&Play kit for Subaru Impreza guarantees the maximum ease of installation.
2.1
MXL Strada/Pista kit installation
MXL Strada/Pista is not internally powered. This is why you have to connect Subaru interface wiring
free cables to a +12 volt power source connected to the ignition key switch so that your MXL switches
on/off with the vehicle.
MXL connection with the ECU is made through the OBDII diagnosis plug placed under the steering
wheel column as pointed out here below on the left. The image on the right shows the OBDII plug
where the dedicated connector of Subaru interface wiring is to be plugged in.
9
The image here below shows the Subaru interface wiring connector plugged in the OBDII plug.
Now the system is powered and connected to the vehicle. It is only necessary to make MXL receive
data from the ECU: connect the female plastic connector of the interface cable to:
•
•
the male plastic connector of MXL basic cable if you bought a basic kit;
the male plastic connector labelled RS232 of the complete wiring if you bought a complete kit.
It is now necessary to firmly fix MXL on the vehicle dashboard. Use the four rear anchor plugs of MXL
shown here below.
10
Here below two possible MXL installations are shown.
If you bought a complete kit you have a complete wiring and you can connect other sensors, optical
lap receiver included. Please refer to MXL user manual, freely downloadable from area download,
documentation section of www.aim-sportline.com, to know how to connect all sensors.
2.2
MXL Pro/Pro05 kit installation
MXL Pro/Pro05 is not internally powered and takes its power from Subaru interface board. Connect
the plastic connector of Subaru interface cable to any free channel of MXL Pro/Pro05. Channels
available for this purpose are:
MXL Pro:
• Speed 1 – 2
• Channel 5 – 6 – 7
MXL Pro05:
• Speed 1 – 2 – 3 – 4
• Channels 8 – 9 – 10 – 11
11
MXL connection with the ECU is made through the OBDII diagnosis plug placed under the steering
wheel column as pointed out here below on the left. The image on the right shows the OBDII plug
where the dedicated connector of Subaru interface wiring is to be plugged in.
The image here below shows the Subaru interface wiring connector plugged in the OBDII plug.
Now the system is powered and connected to the vehicle. It is only necessary to make MXL receive
data from the ECU: connect the free cables of the interface cable as follows:
•
•
cable labelled RS232TX of Subaru interface wiring to cable labelled RS232RX of MXL Pro/Pro05
wiring;
cable labelled RS232RX of Subaru interface wiring to cable labelled RS232TX of MXL Pro/Pro05
wiring;
12
Here below is the connection scheme.
For further information about MXL Pro/Pro05 pinout refer to MXL user manual freely downloadable
from area download documentation of www.aim-sportline.com.
3
Configuration with Race Studio 2
When the device has been installed and connected you have to configure it using Race Studio 2
software, included in the kit. Please perform this procedure with MXL switched on and connected to
the PC.
For further information about software and driver installation refer to Race Studio Configuration user
manual freely downloadable from area download software section of www.aim-sportline.com.
13
3.1
Configuration of MXL Strada/Pista
Run Race Studio 2 software and follow this path:
• press “Device configuration –> MXL” on the software left keyboard;
• MXL configuration page opens on “Select configuration” layer;
• press “New” and “New configuration panel”, shown here below, appears;
• fill in configuration and vehicle name;
• select data logger type choosing between: MXL Strada Subaru 99-11 e MXL Pista Subaru 99-111.
1
Both data logger types fit a 2012 Subaru Impreza too.
14
•
•
“ECU Manufacturer” sets automatically on “SUBARU”;
select “ECU Model” according to your vehicle registration year as shown here below2;
•
•
•
set speed, temperature and pressures measure units;
press “OK” and the configuration has been created;
now press “Transmit”: the configuration will be transmitted to MXL.
2
Both data logger types fit a 2012 Subaru Impreza too.
15
Please note: as anticipated, Plug&Play kit has no additional sensors so all MXL analog channels as well
as Speed_1 are disabled by default. This can be verified activating “Channels” layer shown here below.
These channels would activate only if physically adding some sensors, connecting and configuring
them.
16
Your MXL display is already configured and the image here below shows the default values.
Set channels of the default configuration are:
•
•
•
RPM: set on ECU with Max value 8.000 RPM;
Gear sensor: set on “Calculated”; it needs to be calibrated as explained in chapter 4;
Shift lights: set expecting a speed limiter at 6900 RPM. If your engine has a limiter set on higher
values modify these values so that they switch on shortly before the limiter intervention. Here
follow limiter value of some Subaru models.
o STI spec C 2000 cc 280cv limiter is set at 7.900 RPM;
o STI 2000 cc 265 cv limiter is set at 7.500 RPM.
Alarm thresholds set for these channels (“Channel for alarm”) are:
•
•
•
ECT (water temperature): threshold value at 105°C
TURBO PRESS (over charging pressure): threshold fixed at 1.3 bar;
FUEL_LEV (fuel level): threshold value set at 15% of the left fuel.
17
Channels visualized by MXL display (“Measure” fields) are:
•
•
•
•
•
ECT (water temperature);
TURBO PRESS (over charging pressure);
TPS (throttle opening percentage)
FUEL_LEV (fuel level);
ODOMETER: when you are on track, if you have connected an optical receiver and placed the
transmitter, when MXL detects a lap signal switches to “Show lap time” mode as shown here
below. To come back to odometer visualization switch off/on MXL.
Please note: if you modified the pre-loaded configuration and want to come back just create a new
configuration as explained before.
For any further information about MXL configuration management refer to MXL user manual freely
downloadable from download area, documentation section of www.aim-sportline.com.
18
3.2
MXL Pro/Pro05 configuration
Run Race Studio 2 software and follow this path:
• press “Device configuration –> MXL” on the software left keyboard;
• MXL configuration page opens on “Select configuration” layer;
• press “New”: “New configuration panel”, shown here below, appears;
• fill in configuration and vehicle name;
• select data logger type choosing between: MXL Pro and MXL Pro05.
19
•
•
select ECU Manufacturer “Subaru”;
select ECU Model corresponding to your vehicle as shown here below3;
•
•
•
set speed, temperature and pressure measure units;
press “OK” and the configuration has been created;
press “Transmission” and the configuration is transmitted to MXL.
3
If you have a Subaru Impreza registered in 2012 select “SSM 2008/2011”.
20
Please note: Plug&Play kit comes with no additional sensors but analog channels and one of the four
speeds are enabled by default. This can be verified activating “Channels” layer.
To enable the remaining three speeds and make the analog channels transmitting data you have to
physically connect and configure the related sensors. This is beyond a Plug&Play philosophy.
21
The MXL display you bought is to be configured: the image here below shows the values
recommended by AiM.
Channels to set are:
•
•
•
RPM: set on ECU with Max value 8.000 RPM;
Gear sensor: set on “Calculated”; it needs to be calibrated as explained in chapter 4;
Shift lights: your vehicle has a speed limiter; set these values so that the shift lights switch on
shortly before the limiter intervention. Here follow limiter value of some Subaru models.
o STI spec C 2000 cc 280cv limiter is set on 7.900 RPM;
o STI 2000 cc 265 cv limiter is set on 7.500 RPM.
Alarm thresholds set for these channels (“Channel for alarm”) are:
•
•
•
ECT (water temperature): threshold value at 105°C
TURBO PRESS (over charging pressure): threshold fixed at 1.3 bar;
FUEL_LEV (fuel level): threshold value set at 15% of the left fuel.
22
Channels visualized by MXL display (“Measure” fields) are:
•
•
•
•
•
ECT (water temperature);
TURBO PRESS (over charging pressure);
TPS (throttle opening percentage)
FUEL_LEV (fuel level);
ODOMETER: when you are on track, if you have connected an optical receiver and placed the
transmitter, when MXL detects a lap signal it switches to “Show lap time” mode as shown here
below. To come back to odometer visualization switch off/on MXL.
Please note: for any further information about MXL configuration management refer to MXL user
manual freely downloadable from download area, documentation section of www.aim-sportline.com.
23
4
Gear calibration
Gear calibration is the last step of MXL configuration. The procedure is as follows:
•
•
•
•
•
•
•
press “MENU” on MXL keyboard until it shows “START GEAR CALIB”;
press “OK”;
it shows “PRESS OK TO CLEAR”;
press again “OK”: the logger is ready to start calibration;
leave, avoiding disengaging the clutch; you have to run an “apprentice lap”: engage all gears and
keep each gear engaged for some seconds;
stop the car and switch it off but do not disengage the clutch or pull it;
switch MXL on again: the display shows “CALIBRATION OK”; in case the procedure has been
unsuccessful the display shows “ERROR GEAR CALC” and the device automatically re-starts the
procedure: repeat the apprentice lap. It may occur that MXL shows “CALIBRATION OK” but stored
values are incorrect. In this case repeat the calibration.
24
5
Sampled channels
Channels sampled by MXL depend on the car registration year and on the protocol selected when
configuring MXL but not on MXL model.
Moreover buying a complete kit you can connect additional sensors and receive the related channels.
These channels management is beyond a Plug&Play kit philosophy and you can find explanation of
how to do this in MXL user manual, freely downloadable form download area, documentation section
of www.aim-sportline.com.
5.1
Channels sampled by MXL with 1999-2007 protocol
ID
CHANNEL NAME
FUNCTION
ECU_1
RPM
RPM
ECU_2
SPEED
Vehicle Speed
ECU_3
TPS
Throttle Position sensor
ECU_4
ECT
Engine cooling temperature
ECU_5
TURBO_PRESS
Turbo pressure
ECU_6
IN_VVT_R
Right bank inlet timing
ECU_7
IN_VVT_L
Left bank inlet timing
ECU_8
IGN_ADV
Ignition advance
ECU_9
KNOCK_CORR
Advances correction depending on detonation sensor
ECU_10
FUEL_LEV
Fuel level
ECU_11
NEUTRAL
Neutral sensor
ECU_12
CLUTCH
Clutch disengaged signal
ECU_13
BRAKE
Brake switch
ECU_14
ENG_LOAD
Instant engine load
ECU_15
AIR_FLOW
Air flow in the air pipes
25
5.2
Channels sampled by MXL with 2008-2011 protocol
ID
CHANNEL NAME
FUNCTION
ECU_1
SSM_RPM
RPM
ECU_2
SSM_SPEED
Vehicle Speed
ECU_3
SSM_TPS
Throttle Position sensor
ECU_4
SSM_ECT
Engine cooling temperature
ECU_5
SSM_TURBO_PRES
Turbo pressure
ECU_6
SSM_IN_VVT_R
Right bank inlet timing
ECU_7
SSM_IN_VVT_L
Left bank inlet timing
ECU_8
SSM_IGN_ADV
Ignition advance
ECU_9
SSM_KNOCK_CORR
Advances correction depending on detonation sensor
ECU_10
SSM_FUEL_LEV
Fuel level
ECU_11
SSM_NEUTRAL
Neutral sensor
ECU_12
SSM_CLUTCH
Clutch disengaged signal
ECU_13
SSM_BRAKE
Brake switch
ECU_14
SSM_ENG_LOAD
Instant engine load
ECU_15
SSM_AIR_FLOW
Air flow in the air pipes
ECU_16
SSM_EX_VVT_R
Right bank exhaust timing
ECU_17
SSM_EX_VVT_L
Left bank exhaust timing
ECU_18
SSM_SEL_MAP
Selected Map
ECU_19
SSM_GEAR
Engaged gear
26
6
Data download
When a test session is finished, if you bought an MXL Pista/Pro/Pro05 you can download the recorded
data on a PC using the proper cable that comes with the kit and save them using the database built in
Race Studio 2.
27