1
SET ACTEON/ AQUA /
ACTEWIN
DATE :
JANUARY/09/11
INDEX : 2
PONSEL Mesure
Zone de Bellevue – 35 Rue Michel MARION
56850 CAUDAN
Phone : +33 (0)2 97 89 25 30 – Fax : +33 (0)2 97 76 55 72
REF. : PONKITAQUA
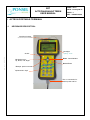
SET
ACTEON/AQUA/ACTEWIN
MULTI-PARAMETER 6 SENSORS
For water quality monitoring
D 2005 NEOTEK.
USER MANUAL
AQUA PROBE
AQUA10 PROBE
AQUA50 PROBE
ACTEON 3000
SET
ACTEON/AQUA/ACTEWIN
USER MANUAL
PAGE : 2/2
DATE : January/09/11
INDEX : 1
REF. : PONKITAQUA
SET
ACTEON 3000/ AQUA/ ACTEWIN
USER MANUAL
D 2005 NEOTEK.
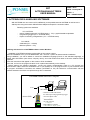
WARNINGS
→ This material is scientific handheld instrument, it is important to support it with a minimum of
maintenance. After each use, before storage in its case, you must clean the sensors : pH/Redox (cleaning
solution : PON SOL NET), Conductivity/Temperature with a brush. Cleaning the level sensor but without
introducing a needle or any pointed object into the holes and without using a powerful jet.
→ To store the AQUA probe, don’t introduce water (and especially not purified water), into the
conservation/calibration case but use some drops of conservation solution (ref : PON SOL CSV) on a wad.
The use of a too important volume of water in the conservation case causes a pressurization reflecting itself on the
entry of the reference of the pH sensor when the stopper is tight. The pH reference is prematurely emptied of its
KCl involving the fast deterioration of the sensor.
→ We point out that the AQUA probe should not be used in effluents being able to contain hydrocarbons,
colloids, concentrated acids. Avoid too aggressive solvents.
→ Temperature of sensors for prolonged use : 50°C max.
→ If you don’t use all sensors, put a Waterproof obturating plug in their place (PONAQUA-CAP1).
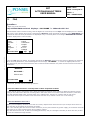
DATA TRANSFER :
→Stop the data recording on the ACTEON 3000 before transferring the data.
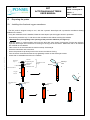
SENSORS :
→ Installation of a new pH sensor : place the sensor in water during 1 hour then transfer it in a standard
solution during 30 minutes in order to activate the reference. Then carry out its calibration in
« Calibration » mode and check the quality of its calibration in " Measure" mode placing the electrode in 2
different buffers.
S.GOULETTE
Ponsel Mesure
F. BELLOUARD
Ponsel Mesure
Name
Stamp
Dept / Service
Firm
Written by
Upgrade
Name
Name
Stamp
Stamp
Dept / Service
Dept / Service
Firm
Firm
Checked by
Approved by
01/09/11
1
Date
Ind.
Version
SET
ACTEON/AQUA/ACTEWIN
USER MANUAL
PAGE : 3/3
DATE : January/09/11
INDEX : 1
REF. : PONKITAQUA
→ Installation of a new conductivity sensor : if the value read in "measure " mode presents a significant
drift, pass a very fine abrasive paper on the 2 faces of the notch.
D 2005 NEOTEK.
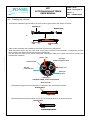
→ Concerning the calibration of conductivity, during the calibration using standard of 84µS/cm, it is
strongly advised to first disconnect PODs sensors pH/Redox and Dissolved Oxygen, and insert the two
obturating plugs tight in their place on the 2 released base plates. Indeed these two sensors are likely to
throw out a significant quantity of KCl salt in the standard of very low conductivity, especially the Ag/AgCl
reference by the means of its PlastogelR polymer gorged with saturated KCL (communication through the
1/10 mm side hole in the blue body cylindrical of pH/ORP POD). The pollution of the standard 84 µS/cm is
rather fast, especially if you await the perfect thermal stabilization of the sensor, which takes several
minutes. It is even advised to proceed the same way for the standard 1413 µS/cm if one wishes a
calibration of laboratory precision on this measurement range, with better than +/- 0,5 %.
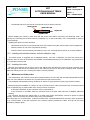
Check that in "parameters" the mention AUTO is apparent (automatic adjustement to appropriate range).
To validate pass on another sensor and make "Esc" (otherwise, you desactivate the AUTO mode for a
precise range).
Carry out the calibration and check out the quality of its calibration in " Measure" mode.
PAGE : 4/4
SET
ACTEON/AQUA/ACTEWIN
USER MANUAL
DATE : January/09/11
INDEX : 1
REF. : PONKITAQUA
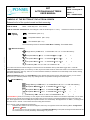
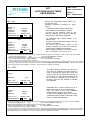
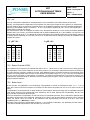
SYMBOLS AT THE BOTTOM OF THE ACTEON SCREEN
Exhaustive list of the symbols used and their meaning:
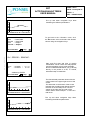
10-20-03 09:06
Date : Month-Day-Year hour : minute
10-26-03 12:31:45 000357/000714 Recording file : Date of measure (M-D-Y H:m:s)
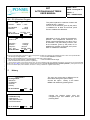
Battery
capacity
measure N°/ Number of measures
New batteries (Bat ≥ 6 V)
Acceptable batteries (Bat = 5,5V)
Worn batteries (Bat < 5 V)
The exact battery tension is obtained in Main Menu
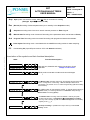
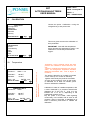
History
ACTEON 3000S
Watershed memory
Empty Memory or OM< 25 % or created files < 25 % or < 4 with 1Mo memory
D 2005 NEOTEK.
Occupation Memory ≥ 25 % or created files ≥ 25 % or ≥ 4
//
//
Occupation Memory ≥ 50 %
or created files ≥ 50 % or ≥ 8
//
//
Occupation Memory ≥ 75 %
or created files ≥ 75 % or ≥ 12
//
//
Full Memory OM = 100 % or 100 % of created file = 16
//
//
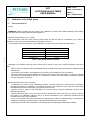
The 16 files can share 32 768 recordings of 6 values each for the standard memory flash Data Logger 1Mo = 1024 KB.
In Watershed Memory mode, for a memory of 1 Mo, beyond recorded 16 files in Actéon the creation of a new file crushes the
first created file (first in, first out), and so on. It is thus advised if needed, to download on PC the totality of the 16 files, starting
with oldest (SAFEGUARD).
In Watershed Memory mode or in Fixed Memory mode, with the 8 Mo of flash memory data logger option, you can create
and record up to 128 files (instead of only 16), sharing the 262 144 possible recordings of 6 values each
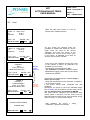
Fixed Memory
Empty Memory or OM< 25 % or created files < 25 % or. < 4 with 1Mo memory
Occupation Memory ≥ 25 % or created files ≥ 25 % or ≥ 4
//
//
Occupation Memory ≥ 50 %
or created files ≥ 50 % or ≥ 8
//
//
Occupation Memory ≥ 75 %
or created files ≥ 75 % or≥ 12
Full Memory OM = 100 % or 100 % of created files = 16
//
//
//
//
In Fixed Memory mode, for a memory of 1 Mo, beyond 16 recorded files the creation of a new file is impossible: you can enter
the name of the 17th file and configure its recording mode, but any manual or programmed attempt to launch recording will
fail : Short appearance of the icon Rec (Record) then emission of a double beep
disappearance of « Rec », no saving of the
file name in the « Results » menu which lists all recording files of Actéon.
If you want to create an additional recording file :
- Download the 16 files on the PC for safeguard, then carry out a general reset of the memory (Menu: Configuration
Mémory
Reset)
Or, if you accept to lose old recordings, switch to the Watershed Memory mode (while knowing that the oldest file will
be crushed and lost, unless preliminary downloading it on your PC).
SET
ACTEON/AQUA/ACTEWIN
USER MANUAL
PAGE : 5/5
DATE : January/09/11
INDEX : 1
REF. : PONKITAQUA
Aqu Aqua probe connected to Actéon 3000 and SDI-12 connection is working
(dialogue Aqua
Rec
Acteon is OK)
(Record) Recording of selected parameters (Or on standby in the Snapshot mode).
Snapshot recording mode "One-shot" at each manual pressure on Enter keypad.
A↓
Manual Start Recording mode: Automatic Recording of the parameters after manual start on Enter).
Aut
Program Time Recording mode: Automatic Recording with programmed start and end dates.
Pulse Option Recording mode : Associated with the 2 AUTO recording modes for water sampling .
PC
Downloading PC (Import/Export Actéon
PC with Actewin software)
D 2005 NEOTEK.
Associations of the symbols and their functional description :
State :
Functional description :
11-13-03 20 : 03
Date and hour, batteries and memory (revolving or fixed)
capacities.
Always on the screen
11-13-03 20 : 03
11-13-03 20 : 03
qu
The Manual start recording mode Auto "was trigged" throught the Actéon
menu : Configuration Recording Manual start (But AQUA is not
connected) or by Actewin on PC Actéon Programming (AQUA inevitably
disconnected)
11-13-03 09 : 10
↓
11-14-03 09 : 12
↓
qu
11-14-03 10 : 30
↓
qu Rec
11-14-03 16 : 30
AQUA probe connected to Actéon and correct dialogue
t
qu
The AQUA probe is connected to Actéon, on standby before starting in
Measure mode ( no recording started if not in Measure mode) through
Manual start of recording (Enter).
The Manual start recording mode was started. It will only stop with
another manual action : Configuration recording stop recording
The only case it will stop by itself is in fixed memory mode if the memory
capacity is full.
After Stop recording or possible auto-stop if memory is full in Fixed
memory mode
SET
ACTEON/AQUA/ACTEWIN
USER MANUAL
11-17-03 18 : 17
PAGE : 6/6
DATE : January/09/11
INDEX : 1
REF. : PONKITAQUA
The recording mode Manual Start + Pulse option "was trigged" by Actéon
menu : Configuration Recording
Manual Start then
Pulse Option
(Aqua probe connected or not) or by Actewin on PC Programming Actéon
(Aqua probe inevitably disconnected).
↓
The Aqua probe is connected to Actéon, on standby before starting in
11-18-03 08 : 25
18-11-03 08 : 00
↓
Rec
qu
qu
Measure mode ( no recording started if not in Measure mode) through
Manual start of recording (Enter).
The Manual Start mode recording was started. It will stop only on
another manual action. However, possible to auto-stop in Fixed memory if
the occupancy rate of the memory reaches 100 %
Pulse: with each batch of recorded measurements, values of one or two
parameters will be compared with high and low threshold, and according
to their positions compared to these thresholds and the logical condition
binding the parameters (and, or), the Pulse exit (free contact of potential
with opto transistor) will be generated to start a water sampling.
D 2005 NEOTEK.
20-11-03 08 : 00
qu
Stop recording : Manual validation in menu Configuration
Recording Stop recording or possible auto-stop in Fixed memory .
The Program Time mode was validate by Actéon menu : Configuration
Recording.
Progran Time (Aqua probe connected or not) or by Actewin
software on PC Programming Actéon (Aqua probe inevitably
disconnected)
14-11-03 09 : 10
ut
14-11-03 09 : 12
ut
qu
14-11-03 10 : 30
ut
qu Rec
The Aqua probe is connected to Actéon, on standby waiting for the starting
time of Program Time mode to start recording (It is not necessary to be in
Measure mode at the time of starting).
Automatic recording started at the programmed starting time and is
running
Stop recording:
17-11-03 16 : 30
qu
-
-
Normally at the programmed end date ,
Or possible manual interruption before this date: Manual
validation in menu Configuration Recording Stop
Recording.
Or possible Auto-stop in Fixed memory if memory saturated
SET
ACTEON/AQUA/ACTEWIN
USER MANUAL
PAGE : 7/7
DATE : January/09/11
INDEX : 1
REF. : PONKITAQUA
TABLE OF CONTENTS
D 2005 NEOTEK.
1.
2.
CASE CONTENTS ............................................................................................................................................9
ACTEON PORTABLE TERMINAL ..................................................................................................................10
2.1
KEYBOARD DESCRIPTION :...................................................................................................................................10
2.2
POWERING UP THE DEVICE...................................................................................................................................11
2.3
CONFIGURATION : ...................................................................................................................................................11
2.3.1
LANGUAGES :.....................................................................................................................................................11
2.3.2
DATE/ HOUR : ....................................................................................................................................................12
2.3.3
UNITS : ................................................................................................................................................................13
2.3.4
PARAMETERS : ...................................................................................................................................................14
2.3.5
MEMORY: ...........................................................................................................................................................14
2.3.6
RECORDING : .....................................................................................................................................................15
2.4
MEASURE (PERPETUAL MEASURING): ...............................................................................................................18
2.4.1
SNAPCHOT RECORDING MODE: (One shot)...................................................................................................19
2.4.2
FAST ADJUSTMENT OF THE ZERO FOR THE LEVEL SENSOR ....................................................................19
2.5
RESULTS : ..................................................................................................................................................................20
2.5.1
FILE – DATA TABLE:..........................................................................................................................................21
2.5.2
PERIOD – DATA TABLE :...................................................................................................................................22
2.5.3
FILE – GRAPHIC : .............................................................................................................................................22
2.5.4
PERIOD – GRAPHIC : ........................................................................................................................................23
2.6
CALIBRATION...........................................................................................................................................................24
2.6.1
Temperature .........................................................................................................................................................24
2.6.2
Level .....................................................................................................................................................................26
2.6.3
Conductivity..........................................................................................................................................................27
2.6.4
pH .........................................................................................................................................................................29
2.6.5
ORP .....................................................................................................................................................................29
2.6.6
DO (Dissolved Oxygen)........................................................................................................................................30
2.7
HISTORY .......................................................................................................................................................................30
2.7.1
Calibration Log ....................................................................................................................................................31
2.7.2
Maintenance .........................................................................................................................................................32
2.7.3
AFTER SALES SERVICE .....................................................................................................................................32
2.7.4
ACTEON 3000S....................................................................................................................................................32
3.
PUTTING INTO SERVICE...............................................................................................................................33
3.1
CONNECTIONS..........................................................................................................................................................33
3.1.1
AQUA PROBE......................................................................................................................................................33
3.1.2
TERMINAL ACTEON...........................................................................................................................................33
3.2
STARTING UP ............................................................................................................................................................33
4.
ACTEWIN DATA-HANDLING SOFTWARE ....................................................................................................35
5.
AQUA PROBE .................................................................................................................................................36
5.1
STARTING UP THE PROBE ..............................................................................................................................................36
5.2
CONNECTING THE PROBE...............................................................................................................................................36
5.3
PREPARING THE PROBE ..................................................................................................................................................38
5.3.1
Installing the dissolved oxygen membrane. ..........................................................................................................38
5.3.2
Installing the sensors............................................................................................................................................39
5.3.3
Installing the ballasted strainer and the calibration cap......................................................................................40
5.3.4
Installing the cable. ..............................................................................................................................................40
5.4
MAINTENANCE OF THE PROBE .......................................................................................................................................40
5.5
MAINTENANCE OF THE SENSORS. ..................................................................................................................................41
5.5.1
Dissolved Oxygen sensor......................................................................................................................................41
5.5.2
Conductivity/pH/ORP sensor. ..............................................................................................................................41
5.5.3
Temperature sensor. .............................................................................................................................................41
5.6
STORAGE CONDITIONS FOR AQUA PROBE. ...................................................................................................................42
5.6.1
Short term storage. ...............................................................................................................................................42
5.6.2
Long term storage.................................................................................................................................................42
5.7
CALIBRATION OF THE AQUA PROBE. ...........................................................................................................................43
5.7.1
Recommendations.................................................................................................................................................43
5.8
CALIBRATION PROCEDURES. .........................................................................................................................................44
D 2005 NEOTEK.
SET
ACTEON/AQUA/ACTEWIN
USER MANUAL
PAGE : 8/8
DATE : January/09/11
INDEX : 1
REF. : PONKITAQUA
5.8.1
General schedule. .................................................................................................................................................44
5.8.2
Calibration procedures of AQUA probe...............................................................................................................45
5.8.3
What to do in case of a suspicious calibration? ...................................................................................................50
6.
CALIBRATION FREQUENCY .........................................................................................................................51
7.
SENSORS PRINCIPLES AND TEMPERATURE COMPENSATION – METROLOGICAL STANDARDS. ....51
7.1
PARAMETERS: ..........................................................................................................................................................51
7.1.1
Temperature parameter (sensor integrated in the conductivity probe) :..............................................................51
7.1.2
Conductivity parameter :......................................................................................................................................51
7.1.3
Dissolved Oxygen parameter : .............................................................................................................................52
7.1.4
pH parameter : .....................................................................................................................................................52
7.1.5
Redox Potential parameter (ORP) : .....................................................................................................................52
7.1.6
Level parameter : .................................................................................................................................................52
7.2 TEMPERATURE RECOMMANDATIONS FOR LABORATORY CALIBRATIONS. .............................52
7.2.1
Temperature : .......................................................................................................................................................52
7.2.2
Conductivity : .......................................................................................................................................................53
7.2.3
Dissolved Oxygen (D.O.) : ...............................................................................................................................53
7.2.4
pH :.......................................................................................................................................................................55
7.2.5
Redox Potential (ORP) :.......................................................................................................................................55
7.2.6
Water Level : .......................................................................................................................................................55
8.
DESIGN FEATURES .......................................................................................................................................56
8.1
ACTEON 3000 TERMINAL .......................................................................................................................................56
8.2
AQUA PROBE.............................................................................................................................................................56
8.2.1
SENSOR FEATURES ...........................................................................................................................................56
8.2.2
MECHANICAL FEATURES.................................................................................................................................57
8.3
ACTEWIN SOFTWARE .............................................................................................................................................57
9.
PONSEL AQUA PROBE connexion to ISCO 6712/6712FR and AVALANCHE .............................................58
10.
SECURITY-SAFETY SHEETS ........................................................................................................................60
10.1 PH STANDARDS ........................................................................................................................................................60
10.2 BUFFER STANDARD ORP 470 MV :...............................................................................................................................61
10.3 BUFFER SOLUTION ORP 240 MV: .................................................................................................................................62
10.4 CONDUCTIVITY STANDARD SOLUTIONS:........................................................................................................................63
11.
PARTS REFERENCES ...................................................................................................................................64
12.
FAQ..................................................................................................................................................................65
PAGE : 9/9
SET
ACTEON/AQUA/ACTEWIN
USER MANUAL
DATE : January/09/11
INDEX : 1
REF. : PONKITAQUA
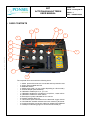
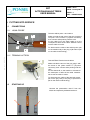
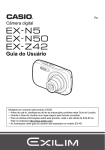
1. CASE CONTENTS
1
12
9
10
14
3
6
7
8
2
D 2005 NEOTEK.
11
5
4
13
The complete case comes with the following items:
-
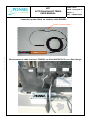
1. AQUA probe with its sensors connected and its protection case
2. Acteon 3000 portable terminal
3. Ballasted strainer
4. AQUA probe cable (15, 20 or 30m depending on client’s order)
5. Actewin adapter (SDI12/RS232)
6. Calibration standard pH 4,01 ; pH 7,01
7. Calibration standard for conductivity 1413µS/cm ; 12,88 mS/cm
8. Calibration standard for ORP 240mV
9. Electrolyte oxymetric standard for D.O. sensor
10. Sodium sulphite (Zero O2)
11. Case with 2 spare membranes for the dissolved oxygen sensor
12. CD ROM with ActeWin software and user manual in pdf-format
13. Acteon and AQUA connection cables for adapter SDI12/RS232
14. Waterproof obturating plugs for sensors disconnected (2)
SET
ACTEON/AQUA/ACTEWIN
USER MANUAL
PAGE : 10/10
DATE : January/09/11
INDEX : 1
REF. : PONKITAQUA
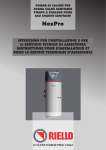
2. ACTEON PORTABLE TERMINAL
2.1
KEYBOARD DESCRIPTION :
Impulsional output
Opto-insulated potential free switch
Backlight
D 2005 NEOTEK.
On/Off
Navigation keys :
Up, Down, Left, Right
Lighting : 15 sec
Enter : Save/Validate
Delete/Erase
Escape: previous screen
Touches
alpha numériques
Alphanumeric
keys
SDI 12 connection for
AQUA probe and PC
SET
ACTEON/AQUA/ACTEWIN
USER MANUAL
2.2
PAGE : 11/11
DATE : January/09/11
INDEX : 1
REF. : PONKITAQUA
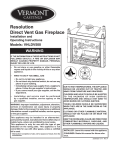
POWERING UP THE DEVICE
Push button
in the upper left corner of the keyboard.
A homepage will show for 10 seconds before the Main Menu appears.
To push on any key to interrupt the homepage.
ACTEON
A4.03
3000
D 2005 NEOTEK.
PONSEL
Important : when the Acteon is running, an energy economizer
releases automatically after 20 minutes and turns off the LCD. Just push
on any key so as to relight the screen. You come back on the last screen
of the menu in progress, no data is lost. If a recording has been
launched with the on-line AQUA, it carries on without interruption.
On the other hand, in perpetual measure mode, no launched recording,
measures stop during the screen lights out . The Actéon + Aqua probe
only consume 20 μA in this sleeping mode.
The up and down navigation keys allow choosing a section; the ENTER-key
allows confirming your choice.
A status bar at the bottom of the screen indicates the date and time, battery
capacity
and the 4 levels of memory occupation :
MAIN-MENU
>Configuration
>Measure
>Calibration
>Results
>History
:Empty or <25%
Battery capacity :
:
New batteries
Acceptable batteries :
:
Worn batteries
02-20-05 14:00
:≥25 %
:≥50%
(Bat ≥ 6 V)
(From 6,5 to 4,5 V)
(Bat< 4,5 V) Change the 4 batteries
Three other symbols will appear according to the actions taken.
2.3
CONFIGURATION :
CONFIGURATION
>Languages
>Date/Hour
>Units
>Parameters
>Memory
>Recording
02-20-05 14:01
2.3.1 LANGUAGES :
LANGUAGES
>Français
>English
>Deutch
>Espanol
>Italiano
02-20-05 14:03
y
Language can be chosen with the up and
down arrow keys ; the ENTER-key allows
confirming your choice.
Next press Esc
:≥75%
:=100% Full
SET
ACTEON/AQUA/ACTEWIN
USER MANUAL
PAGE : 12/12
DATE : January/09/11
INDEX : 1
REF. : PONKITAQUA
2.3.2 DATE/ HOUR :
DATE-HOUR
>Time set up
>Date Format
Press ENTER key for time set up.
02-20-05 14:05
DATE-HOUR
Date
Hour
The cursor is initially placed on the month ;
enter date and time and confirm by pressing
the ENTER key.
: 02/21/05
: 16 : 22
D 2005 NEOTEK.
Month/Day/Year
Validate by ENTER
02-20-05 14:05
CONFIGURATION
>Languages
>Date/Hour
>Units
>Parameters
>Memory
>Recording
02-21-05 16:22
Check date and time modifications on the
bottom of the « CONFIGURATION » menu.
DATE-HOUR
>Time set up
>Date format
If you wish to change the date format, go
down with the navigator's key Down.
Press ENTER key for date format.
02-21-05 16:22
DATE FORMAT
>Day/Month/Year
>Month/Day/Year
>Year/Month/Day
02-21-05 16:22
y
You can choose the format:
- European,
- American
- International ISO 8601 standard
Navigate until the date format wished:
Press ENTER key for date format selected
Then press Esc
y
If you select for ex. the International ISO 8601 standard, the date displayed down on the status bar will become :
PAGE : 13/13
SET
ACTEON/AQUA/ACTEWIN
USER MANUAL
DATE : January/09/11
INDEX : 1
REF. : PONKITAQUA
2.3.3 UNITS :
UNITS
>SI
: m, °C
>Anglo-saxon
: ft, °F
y
Navigate until the units wished:
Press ENTER key for units selected
Then press Esc
02-21-05 16:23
D 2005 NEOTEK.
You can choose the units for measures :
- SI (meters and Centigrade-Celsius degrees)
- Anglo-saxon (Feet and Fahrenheit degrees)
y
MEASURE
Level
:
11.22 ft
Conduct.
:
9.41mS/cm
:
6.63pH
pH
ORP
:
185mV
Tempera.
:
72.77 °F
DO
:
8.29mg/l
02-21-05 16:24
Aqu
If you chose and validated the Anglo-Saxon units :
(Feet and Fahrenheit degrees) :
MEASURE
Level
:
3.42 m
Conduct.
:
9.41mS/cm
:
6.63pH
pH
ORP
:
185mV
22.65 °C
Tempera.
:
DO
:
8.29mg/l
02-21-05 16:24
Aqu
If you chose and validated the SI units :
(Meters and Celsius degrees) :
All Depth and Level values will be displayed and
recorded in ft, all temperature values in ° F, for
calibrations and calibration history.
In Measures mode you will see displayed the
following values on the screen.
All Depth and Level values will be displayed and
recorded in m, all temperature values in ° C, too for
calibrations and calibration history as well.
In Measures mode you will see displayed the
following values on the screen.
Nota :
1 ft =0,3048 m
1 m =1/ 0,3048 ft
°F =°Cx1,8 +32
°C = (°F - 32) / 1,8
SET
ACTEON/AQUA/ACTEWIN
USER MANUAL
PAGE : 14/14
DATE : January/09/11
INDEX : 1
REF. : PONKITAQUA
2.3.4 PARAMETERS :
PARAMETERS
γ
>Level
>Conduct.
>pH
>ORP
>Temperature
>DO
02-21-05 16:25
Auto
γ
γ
γ
γ
PARAMETERS
D 2005 NEOTEK.
>Level
>Conduct.
>pH
>ORP
>Temperature
>DO
02-21-05 16:26
γ
200µS/cm
PARAMETERS
>Level
>Conduct.
>pH
>ORP
>Temperature
>DO
02-21-05 16:26
2.3.5
MEMORY:
MEMORY
>Watershed
>Fixed
>Reset
γ
γ
γ
γ
γ
γ
With the up and down arrows you can move
through the menu and choose the parameter to
confirm in measure and recording.
Use the right arrow or ENTER-key to « confirm »
or « cancel » the parameter chosen.
This function is realized by the γ sign on the right
side of the parameter.
When all parameters are confirmed/canceled,
press Esc
Different options are available for the conductivity sensor :
- Automatic range (0-200 000µS /cm) :maximal accuracy
- [None]
and optimal linearity.
- 200µS /cm
- 2000µS/cm
- 20mS/cm
- 200mS/cm
Select the range with right arrow or ENTER-key.
Then, press Esc (Or up/down arrows for another parameter)
Important warning:
Select of preference the automatic range (0-200 000µS/cm) in recording
see chapter 2.6.3. « Conductivity » page 22.
Check always beforehand :
menu Configuration => Parameters =>
>Conduct.
Auto
, then Esc
In this example the parameters pH, Temperature and
Oxygen are " confirmed ", the others " canceled "
Alone these 3 parameters will be measured,
displayed and recorded.
γ
There are three memory-possibilities :
Watershed memory : Once the memory is full, the first data will be
erased to create memory space for writing current data (according to
the « first in, first out » method). When choosing this option, the
symbol
will appear on the lower right side of the screen.
Fixed memory : Once the memory is full, recording will stop. When
02-21-05 16:30
choosing this option, the symbol
side of the screen.
will appear on the lower right
Nota : filling up by 1/4 slices ( see chapter 2.2 page 6)
MEMORY
>Watershed
>Fixed
>Reset
02-21-05 16:30
Reset : Allows complete erasing of the memory.( All data-recording
files are irreversibly destroyed at the same time : the register
RESULTS becomes empty !).Validate this option by the ENTER-key.
For the option «Reset» a user confirmation is required :
« Are you sure ? »
-No
-Yes
No : The « MEMORY » menu screen comes back
Yes : The message « Erasing Flash » appears for 4 seconds on the
screen, then goes back to « MEMORY »
SET
ACTEON/AQUA/ACTEWIN
USER MANUAL
PAGE : 15/15
DATE : January/09/11
INDEX : 1
REF. : PONKITAQUA
2.3.6 RECORDING :
RECORDING
>Stop recording
>Manual start
and
>Program time
>Pulse Option
>Snapshot
2 AUTOMATIC RECORDING MODES FOR PARAMETERS:
♦Manual start : automatic recording mode, with manual start and stop.
♦Program time: automatic recording mode, with departure and stopping
dates programmed in advance.
♦Pulse Option : is only an optional complement for Manual start and
Program time modes (for waters samples).
02-21-05 16:35
♦Snapshot: is not an automatic mode, but measures logging bit by bit,
purely manual , which is not configured in advance.see 2.4.1
(If you validate Snapshot in this menu, a simple information appears : « Press ENTER in measure mode)
a
MANUAL START :
MANUAL START
D 2005 NEOTEK.
Interval : 00h00m05s
Name : STATION 02
Validate by ENTER
Type an interval time between a minimum of
5 seconds and a maximum of 23h59m59s ,
then type a file name of 14 alphanumeric
characters.
02-21-05 16:37
RECORDING
>Stop recording
>Manual start
>Program time
>Pulse Option
>Snapshot
02-21-05 16:37
A↓
MAIN-MENU
>Configuration
>Measure
>Calibration
>Results
>History
02-21-05 16:38
A↓ Aqu
MEASURE
Level
:
10.22 ft
Conduct.
:
5.41mS/cm
:
7.63pH
pH
ORP
:
282mV
Tempera.
:
70.74 °F
DO
:
9.23mg/l
A↓ Aqu Rec
02-21-05 16:39
After programming, the symbol A↓ appears on
the bottom of the screen.
A↓ is the abbreviation of Automatic + Manual
start (↓)
The recording will be well automatic to every
interval of time selected, but the start is
launched by hand.
To record values :
Plug the AQUA probe on the Acteon: the Aqu icon (AQUA)
appears on the bottom of the screen, after a while of some
seconds, meaning that the dialog is in progress. As long as the
probe is connected, this symbol stays displayed. Next, go to the
main menu and press the down arrow to choose the mode
« Measure » (perpetual measuring)
Press ENTER : after the message « Measure in process » the values
of the 6 parameters appear and are refreshed all 5 s.
You can remain the time that you want in measure, without recording.
To launch recording : press once again ENTER which starts
recording.
The Rec icon (Record) appears in bottom and will remain as long as
the recording is not stopped .The abbreviation A↓ remain on the
bottom of the screen (to indicate that the Automatic recording of values
having started in manual (↓) mode. The recording cannot be stopped
from this screen .
To put an end to this recording :
Esc
Configuration Recording
Valid Stop recording. A↓ and Rec disappear.
SET
ACTEON/AQUA/ACTEWIN
USER MANUAL
b
PAGE : 16/16
DATE : January/09/11
INDEX : 1
REF. : PONKITAQUA
PROGRAM TIME :
PROGRAM TIME
From : 02/22/05 à 19h00
To : 02/25/05 à 23h35
Interval : 00h00m10s
Name : STATION 03
Validate by ENTER
Fill in the fields start date/time, end date/time,
time interval as well as the 14 character
alphanumeric filename.
02-21-05 16:42
RECORDING
>Stop recording
>Manual start
>Program time
>Pulse Option
>Snapshot
D 2005 NEOTEK.
02-21-05 16:42
Aut
MAIN-MENU
>Configuration
>Measure
>Calibration
>Results
>History
02-22-05 18:30
Aut Aqu
MAIN-MENU
>Configuration
>Measure
>Calibration
>Results
>History
02-22-05 19:00
After programming, the symbol Aut
(abbreviation of Automatic) appears at the
bottom of the screen.
The recording will be automatic to every
interval of time selected, and will start / stop
at the programmed times.
Aut Aqu Rec
MEASURE
Level
:
3.22 ft
Conduct.
:
15.80mS/cm
:
9.03pH
pH
ORP
:
72mV
Tempera.
:
59.71 °F
DO
:
7.25mg/l
Aut Aqu Rec
02-22-05 19:00
To record values :
A sufficient time before the programmed starting,
plug the AQUA probe on the Acteon: the Aqu icon
(AQUA) appears on the bottom of the screen, after a
while of some seconds, meaning that the dialog is in
progress. As long as the probe is connected, this
symbol stays displayed. Next, go to the main menu.
Either :
You stay in the Main Menu and at the programmed
hour, the recording starts. The Rec icon appears then
on the right bottom of the screen.
The registration will only stop at the date of end
programmed, but it is possible to stop it before:
Configuration Recording
Valid Stop recording.
Or :
Choose the mode « Measure » (perpetual measuring)
and at the programmed hour, the recording releases.
It is the recommended* mode, because you can
visualize that measures are correct, even when
recording has been launched.
* In fact, in Program time mode, the recording will start by itself on any page of menus, and even when the Acteon
is switched off (red key On/Off in top on the left); Idem for the stop recording. Only matters that the AQUA probe is
connected.
In Manual start mode, it is imperative to start the recording by hand in Measure mode, therefore Acteon
switched on, and to stop it by Stop recording in the menu Configuration. But during the recording you can come off
the Measure mode, and even to switch off the Acteon with the red On/Off : measures and their recording continue.
SET
ACTEON/AQUA/ACTEWIN
USER MANUAL
c
PAGE : 17/17
DATE : January/09/11
INDEX : 1
REF. : PONKITAQUA
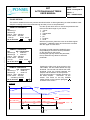
PULSE OPTION :
This mode is additional to the two previous described modes. It allows generating an order besides a water
sampler according to the limits (tresholds high and low) of one or two parameters.
Use the up and down arrow to choose the parameter that
refers to the value range of your choice :
--NoneDO
Temperature
ORP
pH
Conduct.
Level
With the right arrow, place the cursor in the field «logical
operation » (AND/OR, None) and choose this condition
with the upper or lower arrow.
SAMPLE TRESHOLD
DO
0000.0mg /l
0000.0mg/l
Sampl. Inter. : 00h05m
Pulse Durat. : 000.03s
Use Up
Down arrow
02-21-05 16:45
Choosing a logical operation (AND/OR) gives
the possibility to choose a second parameter
on the right side on the screen.
Pressing the right key selects the parameter ;
the up and down keys allow to select the
parameter.
D 2005 NEOTEK.
SAMPLE TRESHOLD
DO
OR Temperature
0000.0mg/l t 0000.0°F
0000.0mg/l u 0000.0°F
Sampl. Inter. : 00h05m
Pulse Durat. : 000.00s
Use Up
Down arrow
02-21-05 16:45
Pressing the right arrow gives access to the
value fields. The first values define the high
threshold. The second line defines the lower
threshold. Enter the interval between the
sample, and the duration of the impulsion.
This last information is variable according to
the water sampler
connected on the
Acteon. The action on the key ENTER
makes appear on the right the pictogram
in bottom of the screen
SAMPLE TRESHOLD
DO
OR Temperature
0020.0mg /l t 0090.0°F
0005.0mg/l u 0045.0°F
Sampl. Inter. : 00h05m
Pulse Durat. : 000.10s
Validate by ENTER
02-21-05 16:47
Example:
20mg/l
Dissolved Oxygen
5mg/l
90°F
Temperature
45°F
5mn
17mn
14mn
0,10s
SET
ACTEON/AQUA/ACTEWIN
USER MANUAL
d
PAGE : 18/18
DATE : January/09/11
INDEX : 1
REF. : PONKITAQUA
Stop recording:
To stop one of the recording modes choose section « Stop recording »
using the navigation keys and press Enter. The symbol Rec on the
status bar will disappear, as well as all icons associated with recordings:
RECORDING
>Stop recording
>Manual start
>Program time
>Pulse Option
>Snapshot
02-21-05 18:19
A↓ Aqu Rec
A↓ , Aut,
The manual « Stop recording » is recommended systematicaly before
connecting the Acteon on the PC, either to transfer recording files on
the hard disk, or to reprogram the Acteon by PC.
Indeed, if it subsists the Rec icon associated to A↓ ou Aut ou
,
a no connection message will appear on the PC (ActeWin software) :
« Acteon Connection impossible. Check connections » : There is
absolute refusal of link SDI-12 because all recording in progress by the
Acteon has priority.
Press Esc two times to get back to the main menu.
D 2005 NEOTEK.
CONFIGURATION
>Languages
>Date/Hour
>Units
>Parameters
>Memory
>Recording
02-21-05 18:20
Aqu
2.4
Very important: disconnecting the AQUA from the Acteon during a
recording in progress is not equivalent to a « Stop recording ». Aqu
and Rec remain displayed. If you try then to connect the Acteon on the
PC, impossible to establish a dialog: beforehand, it is necessary to
validate a " Stop recording "
Nota : You can disconnect and reconnect the AQUA probe on Acteon in
the process of recording: there will only be a dead gap in the recording,
corresponding to the disconnection period.
MEASURE (PERPETUAL MEASURING):
Before choosing the mode «Measure» or perpetual measuring , connect the AQUA probe to the female 12-point
connector located at the bottom of the case . An arrow indicates the connecting correspondence between the plug
and the female connector. The symbol Aqu, meaning the recognition of the probe by the Acteon terminal, will
appear under the screen.
Press the down arrow to choose the mode
« Measure » (perpetual measuring)
MAIN-MENU
>Configuration
>Measure
>Calibration
>Results
>History
02-21-05 18:21
Aqu
Press ENTER : the message « measure in
process » shows for 5 seconds, the
measuring time.
MEASURE
MEASURE IN PROCESS
02-21-05 18:22
Aqu
SET
ACTEON/AQUA/ACTEWIN
USER MANUAL
MEASURE
Level
:
11.22 ft
Conduct.
:
9.41mS/cm
:
6.63pH
pH
ORP
:
185mV
Tempera.
:
72.77 °F
DO
:
8.29mg/l
02-21-05 18:22
Aqu
PAGE : 19/19
DATE : January/09/11
INDEX : 1
REF. : PONKITAQUA
Display of the measuring results of the 6
parameters are shown on the screen. Every
5 seconds, the results are updated.
2.4.1 SNAPCHOT RECORDING MODE: (One shot)
SNAPCHOT RECORDING
Aqu
SNAPCHOT RECORDING
Level
:
11.22 ft
Conduct.
:
9.41mS/cm
:
6.63pH
pH
:
185mV
ORP
Tempera.
:
72.77 °F
DO
:
8.29mg/l
Aqu Rec
02-21-05 18:23
when the Manual start and Program time modes
have been programmed, as well as recording in
progress under one of these modes.
Data are updated every 5 seconds. To enter a
new value batch, press ENTER.
For recording in the same file, press ENTER
successively two times (preserving thus the same
file name). Recording is confirmed by an audible
beep. The indications and Rec are displayed at
the bottom of the screen. To leave this mode and
get back to the Main Menu, press Esc.
Icons and Rec disappear then.
To get back to the Main Menu, press Esc.
2.4.2 FAST ADJUSTMENT OF THE ZERO FOR THE LEVEL SENSOR
MEASURE
Level
:
Conduct.
:
:
pH
ORP
:
Tempera.
:
DO
:
02-21-05 18:25
0.05 ft
9.41mS/cm
6.63pH
185mV
72.77 °F
8.29mg/l
Aqu
In the continuous measuring mode the zero
value of the level-sensor can be fixed before
putting the probe in the water.
For this purpose, sensor in air, press
successively Del
0
then Zero :
Warning : A zero-adjustment is impossible in
the recording mode.
[
D 2005 NEOTEK.
Name: STATION01
Validate by Enter
02-21-05 18:23
In Measure, pressing ENTER allows using
the « SNAPCHOT RECORDING» mode. With
this option, any time a value batch can be
manually recorded in a file named by the user
after confirmation by the ENTER key. An audible
tone is heard when entering.
It is the only recording mode purely manual,
others are automatic after starting.
Attention : This recording mode cannot be used
SET
ACTEON/AQUA/ACTEWIN
USER MANUAL
MEASURE
D 2005 NEOTEK.
INDEX : 1
REF. : PONKITAQUA
Aqu
MEASURE
:
0.00 ft
Level
9.41mS/cm
:
Conduct.
:
6.63pH
pH
:
ORP
185mV
:
Tempera.
72.77 °F
:
8.29mg/l
DO
02-21-05 18:26
Aqu
2.5
DATE : January/09/11
During calibration, this screen remains in
operation for 5 to 10 seconds, according to
the measuring cycle. The 6 parameters are
displayed after calibration.
Warning :A zero adjustment is forbidden in
recording mode.
Level offset
Calibration
in process
02-21-05 18:25
PAGE : 20/20
The level sensor now indicates 0 feet.
RESULTS :
(Recording measures files)
MAIN-MENU
>Configuration
>Measure
>Calibration
>Results
>History
02-21-05 18:27
>File
>Period
>File
>Périod
Choose menu « Results » using the
navigation keys and press Enter.
Aqu
RESULTS
– Data Table
– Data Table
– Graphic
– Graphic
02-21-05 18:28
Choose section « File – Data Table» using
the navigation keys and press Enter.
Aqu
SET
ACTEON/AQUA/ACTEWIN
USER MANUAL
PAGE : 21/21
DATE : January/09/11
INDEX : 1
REF. : PONKITAQUA
2.5.1 FILE – DATA TABLE:
D 2005 NEOTEK.
FILES
>STATION 01
>SCORFF 02
>LAITA 01
>ELLA 01
>ISOLA 02
> EVEL 01
02-21-05 18:26
FILES
>STATION 01
>SCORFF 02
>LAITA 01
>ELLA 01
>ISOLA02
>EVEL01
02-21-05 18:26
Choose section « File – Data Table » using
the navigation keys and press Enter.
Aqu
Choose the file to show using the navigation keys and press Enter.
Attention: You cannot create and therefore find in this register more
than 16 recording files with the standard memory of 1MB.
An optional Flash memory of 8 MB is available, which allows you to
create 128 files (very usefull in snapshots)
Aqu
DATA TABLE READING
Level
:
0.49 ft
Conduct.
:
250.0μS/cm
pH
:
7.84pH
ORP
:
264mV
Tempera.
:
55.10°F
DO
:
2.06mg/l
02-19-05 12:10:04 000001/000714
RESULTS
>File – Data Table
>Period – Data Table
>File – Graphic
>Périod – Graphic
02-21-05 18:28
Aqu
The status bar on the bottom of the screen
indicates the precise recording starting date,
hour,minute and second. The 2 values in the
lower right corner indicate the rank of the
values on the screen. In the example this
means the first value of 714. The navigation
keys allow you to move through the memory
field. To get back to the Menu RESULTS,
press twice Esc.
SET
ACTEON/AQUA/ACTEWIN
USER MANUAL
PAGE : 22/22
DATE : January/09/11
INDEX : 1
REF. : PONKITAQUA
2.5.2 PERIOD – DATA TABLE :
PERIOD
From
To
: 02/18/05
: 02/18/05
–
–
12 : 10
12 : 26
Validate by ENTER
02-21-05 18:29
Aqu
D 2005 NEOTEK.
DATA TABLE READING
Level
:
0.49 ft
Conduct.
:
210.0μS/cm
pH
:
7.84pH
ORP
:
264mV
Tempera.
:
55.10°F
DO
:
2.06mg/l
02-18-05 12:10:04 000001/000096
Starting and finishing date and time of events
display can be chosen. Use the navigation
keys to enter the dates.
No file is selected beforehand: you go directly
in the period of a file, if it exists, otherwise
beep of interdiction.
Using the right key allows you to display
every measuring lot, from the beginning up to
the finishing date.
2.5.3 FILE – GRAPHIC :
FILES
>STATION 01
>SCORFF 02
>LAITA 01
>ELLA 01
>ISOLA 02
> EVEL 01
02-21-05 18:35
Level
Aqu
0.50ft
02-18-05 12:01:04
Level
Choose the file to show using the navigation
keys and press Enter.
000001/000714
0.95ft
02-18-05 12:31:44
000357/000714
The first selected parameter shows with the
current value in the upper right corner of the
screen.
The status bar on the bottom of the screen
indicates the precise recording starting date
and time. The 2 values on the right give the
rank of the shown values. In the exemple first
value of 714.
The right and left navigation keys allow
moving through the memory field. The
crossed dot indicates the position of the
current measure on the curve. Date and time
of this measure is shown on the bottom of the
screen. The counter on the right side gives
the position of the memorized value.
SET
ACTEON/AQUA/ACTEWIN
USER MANUAL
Conduct.
276,8μS /cm
02-18-05 12:31:44
>File
>Period
>File
>Périod
DATE : January/09/11
INDEX : 1
REF. : PONKITAQUA
The up and down navigation keys allow
visualising the different parameters.
000357/000714
To get back to the « Results » menu, click
the Esc button twice and select the desired
column using the navigation keys .
RESULTS
– Data Table
– Data Table
– Graphic
– Graphic
02-21-05 18:37
D 2005 NEOTEK.
PAGE : 23/23
Aqu
2.5.4 PERIOD – GRAPHIC :
PERIOD
From
To
: 02/18/05
: 02/18/05
–
–
12 : 10
12 : 26
Validate by ENTER
02-21-05 18:38
Aqu
Level
0.54ft
02-18-05 12:10:04
Conduct.
02-18-05 12:25:04
000001/000096
252.4μS /cm
000075/000096
Start and End date and time of graphic
visualisation can be chosen For that purpose,
use the navigation keys to enter the dates.
No file is selected beforehand: you go directly
directly in the period of a file, if it exists,
otherwise beep of interdiction.
The first selected parameter shows with the
current value in the upper right corner of the
screen.
The status bar on the bottom of the screen
indicates the recording start date as well as
the time on the second precise. The two
values on the right give the order of the
shown values. In the example : 1st value of a
total of 96.
The up and down navigation keys allow
visualising the different parameters.
SET
ACTEON/AQUA/ACTEWIN
USER MANUAL
2.6
DATE : January/09/11
INDEX : 1
REF. : PONKITAQUA
CALIBRATION
Choose the option « Calibration » using the
navigation keys, and press enter.
MAIN-MENU
>Configuration
>Measure
>Calibration
>Results
>History
02-21-05 18:40
Aqu
This menu gives access to the calibration of
each parameter.
CALIBRATION
>Temperature
>Level
>Conductivity
>pH
>ORP
>DO
02-21-05 18:40
Aqu
IMPORTANT : Start with the temperature
sensor because this parameter is used in the
calibration of conductivity and dissolved
oxygen.
2.6.1 Temperature
TEMPERATURE 1
Solution 1 : Water + Ice
Standard :
Measure :
32.00°F
31.65°F
ESC : exit
02-21-05 18:45
ENTER : next
Aqu
TEMPERATURE 2
Solution 2 : Water
Standard :
Measure :
68.00°F
68.21°F
ESC : exit
ENTER : valid
26-02-03 18:55
Aqu
Water must be constantly stirred because of
temperature gradients.
D 2005 NEOTEK.
PAGE : 24/24
Temperature : factory calibrated original with higth
précision. This calbration is valid for more than one
year.
Therefore: recalibrate the temperature only with very
stable and homogeneous temperature standards.
(Reference thermometer with 1/100 of degree °C
résolution).
The probe is placed in an ice-bath to simulate
a 32°F value (or 0°C if units SI selected).
Agitate continuously the probe in the middle.
As soon as the measure, given by the probe,
is stabilised for at least 10 minutes, press
Enter to validate the calibration .
Calibration in water of a stable temperature, with
a value measured by a precision thermometer
(between 68 °F and 104 °F , that it to say
between 20 °C et 40 °C, depending of the
preferential measure zone) .
Dip the probe in the water, while agitating
continuously in the middle, and as soon as the
measure, given by the probe, is stabilised for at
least 10 minutes, press Enter to validate the
calibration
SET
ACTEON/AQUA/ACTEWIN
USER MANUAL
TEMPERATURE 2
Calibration
- OK –
Enter you name :
J. BURTON
ESC : cancel
02-21-05 19:00
Message:
correct
calibration
ENTER : valid
Aqu
Or
TEMPERATURE 2
Calibration
! Out of margin !
Enter your name :
J. BURTON
ESC : cancel
02-21-05 19:07
ENTER : valid
Aqu
Message:
incorrect
calibration
PAGE : 25/25
DATE : January/09/11
INDEX : 1
REF. : PONKITAQUA
At the end of the calibration process the name
of the operator is asked. 20 characters are
available to enter a name.
The following message appears: -OK –
The calibration is correct; validate to AQUA
EEPROM the logging of the new zero and slope
coefficients by ENTER.
The following message appears: ! Out of margin !
Values are out range:
– Either the standard is incorrect (inversion or pollution).
– Or the sensor is faulty.
If the sensor seems good, recalibrate with new
standards.
Sometimes, the sensor is just at the tolerated margin
limit (+/-5%), and the measure is all the same correct.
You can disregard then and validate by ENTER .
The sensor will be calibrated, and will deliver some
correct values in Measure, but this sensor must be
watched because maybe at end of life (example: strong
shift on the pH 7 or too low Nernst slope).
D 2005 NEOTEK.
TEMPERATURE 2
SAVING COEFFICIENTS
PLEASE WAIT
02-21-05 19:07
After validation, the screen «
coefficients » appears momentarily.
saving
Aqu
Very important note, which relates to all measured and posted parameters in calibration mode :
Temperature, Level, Conductivity, pH, Redox (ORP), dissolved Oxygen (DO) :
In this « Calibration » mode, the values delivered by the sensors and posted on the right of Measurement are always
automatically calibrated with theoretical coefficients of zeros and slope, which are beforehand recorded ex-works in AQUA,
and cannot be changed or erased by end-users. Each type of sensor has specific theoretical coefficients. The real calibration
coefficients with physicochemical standards (liquid or air) are always calculated with these theoretical coefficients and with the
buffer values, which avoids risking to divide by zero or uncontrolled divergence (especially when proceding with previous
erroneous calibrations because of pollution or buffers inversions).
After zero and slope calibrations, it is necessary to return in "Measure" mode to check the calibration quality : the value you
read a few seconds later in "Measure" mode must coincide (with better than +-0,5%) with the value of the standard or the buffer
in which the sensor soaks. Then the sensor is correctly calibrated with the real coefficients of zero and slope.
Now if you return again in « Calibration » mode for this parameter, do not be surprised to still find in the
standards the same initial values, as if the sensor had not been calibrated, because again calibration in
this mode is done with the theoretical coefficients, which never change.
These theoretical coefficients were statistically calculated by average of the characteristics of an important batch of
representative sensors of a normal production. Calibrated with these theoretical coefficients, the sensors should
ideally deliver correct values, but the variability of their initial characteristics (shift of the zero and sensitivity), like
their ageing, clogging and poisoning, cause more or less important variation of the reading on the same standard
between the measurement in "Calibration" mode (theoretical calibration) and the standard value. This variation
makes it possible for the user to check the state of the sensor and the possible drift of its response in time. During
their calculation, these real sensor coefficients are compared with the theoretical coefficients, and a message of
suspicion can appear if the variation exceeds a certain predetermined percentage :
! Out of margin!. (tolerated spread from 5 to 50% according to the parameter).
SET
ACTEON/AQUA/ACTEWIN
USER MANUAL
2.6.2
PAGE : 26/26
DATE : January/09/11
INDEX : 1
REF. : PONKITAQUA
Level
Water at
of
Measure
LEVEL 1
depth level
: 0.00 ft
: 0.05 ft
While the water level sensor is in the air,
press Enter to validate the Zero.
ESC : exit
ENTER : next
02-21-05 19:03
Aqu
D 2005 NEOTEK.
Water at
of
Measure
LEVEL 2
depth level
: 32.81 ft
: 31.67 ft
On this screen the software gives the
possibility to calibrate the sensor in a known
depth. Enter the value of the second
calibration and place the sensor at the
indicated level. As soon as the value, given
by the sensor, is stabilised for at least 30
seconds, press Enter to validate.
ESC : prev
ENTER : valid
02-21-05 19:07
Aqu
LEVEL 2
Calibration
- OK –
Enter your name :
J. BURTON DEPT W04
ESC : cancel
02-21-05 19:07
Message:
correct
calibration
ENTER : valid
Aqu
Or
LEVEL 2
Calibration
! Out of margin !
Enter your name :
J. BURTON DEPT W04
ESC : cancel
02-21-05 19:07
ENTER : valid
Aqu
LEVEL 2
SAVING COEFFICIENTS
PLEASE WAIT
02-21-05 19:07
Aqu
Message:
incorrect
calibration
At the end of the calibration process the name
of the operator is asked. 20 characters are
available to enter a name.
The following message appears: -OK –
The calibration is correct; validate to AQUA
EEPROM the logging of the new zero and slope
coefficients by ENTER.
The following message appears: ! Out of margin !
Values are out range:
– Either the standard is incorrect (inversion or pollution).
– Or the sensor is faulty.
If the sensor seems good, recalibrate with new
standards.
Sometimes, the sensor is just at the tolerated margin
limit (+/-10%), and the measure is all the same correct.
You can disregard then and validate by ENTER .
The sensor will be calibrated, and will deliver some
correct values in Measure, but this sensor must be
watched because maybe at end of life (example: strong
shift on the pH 7 or too low Nernst slope).
After validation, the screen «
coefficients » appears momentarily.
saving
SET
ACTEON/AQUA/ACTEWIN
USER MANUAL
PAGE : 27/27
DATE : January/09/11
INDEX : 1
REF. : PONKITAQUA
2.6.3 Conductivity
Choose the measuring range in which you
are going to work.
CONDUCTIVITY SCALE
>0—200.0µS /cm
>0—2 000µS/cm
>0—20.00mS/cm
>0—200.0mS/cm
02-21-05 19:10
(Identical calibration procedure for every
range)
Aqu
The AQUA-sensor is placed in the air in order
to reproduce the 0 µS (or mS) value.
As soon as the measure, given by the
sensor, is stabilised for at least 30 seconds ,
press Enter to validate the 0µS calibration.
D 2005 NEOTEK.
CONDUCTIVITY 1
Range 0—200.0µS/cm
Probe in air
Standard :
0µS/cm
Measure :
-0.2µS/cm
Tempera.
74.12 °F
ESC : exit
ENTER : next
02-21-05 19:11
Aqu
Choose the adapted conductivity calibration solution
in accordance with the desired calibration range:
0-200µS/cm
84µS
0-2000µS/cm 1 413µS
0-20mS/cm
12,880mS
0-200mS/cm 112,800mS
Dip the sensor in this solution. As soon as the
measure, given by the sensor, is stabilised for at
least 30 seconds, press Enter to validate the
calibration value (ex. 84.0 µS/cm).
CONDUCTIVITY 2
Range 0—200.0µS/cm
Probe in solut.
Standard :
84.0µS/cm
Measure :
82.8µS/cm
Tempera.
74.14 °F
ESC : préc
ENTER : valid
02-21-05 19:13
Aqu
CONDUCTIVITY 2
Calibration
- OK –
Enter your name :
J. BURTON DEPT W04
ESC : cancel
02-21-05 19:14
Message:
correct
calibration
ENTER : valid
Aqu
Or
CONDUCTIVITY 2
Calibration
! Out of margin !
Enter your name :
J. BURTON DEPT W04
ESC : cancel
02-21-05 19:14
ENTER : valid
Aqu
CONDUCTIVITY 2
SAVING COEFFICIENTS
PLEASE WAIT
02-21-05 19:14
Aqu
Message:
incorrect
calibration
At the end of the calibration process the name
of the operator is asked. 20 characters are
available to enter a name. Then press ENTER :
The following message appears: -OK –
The calibration is correct; validate to AQUA
EEPROM the logging of the new zero and slope
coefficients by ENTER.
The following message appears: ! Out of margin !
Values are out range:
– Either the standard is incorrect (inversion or pollution).
– Or the sensor is faulty.
If the sensor seems good, recalibrate with new
standards.
Sometimes, the sensor is just at the tolerated margin limit
(-50,+100%), and the measure is all the same correct.
You can disregard then and validate by ENTER .
The sensor will be calibrated, and will deliver some
correct values in Measure, but this sensor must be
watched because maybe at end of life (example: strong
shift on the pH 7 or too low Nernst slope).
After validation, the screen « saving
coefficients » appears momentarily.
SET
ACTEON/AQUA/ACTEWIN
USER MANUAL
PAGE : 28/28
DATE : January/09/11
INDEX : 1
REF. : PONKITAQUA
IMPORTANT REMARK: If in the fields Measure shows off ++++++ µS/cm or ++++++ mS/cm, it means that
the conductivity standard solution has a too elevated value for the selected range ( signal saturated).
Choose a weaker value standard appropriated to the range under calibration.
CONDUCTIVITY 2
Range 0—2000µS/cm
Probe in solut.
Standard :
1413µS/cm
Measure :
++++++µS/cm
Tempera.
75.39 °F
ESC : préc
ENTER : valid
02-23-05 8:32
Aqu
In this overflow case the standard is for example 12
880µS/cm, too strong a value for this range.
ATTENTION : This indication of range overtaking doesn't exist in perpetual Measures and Recording, and is
noticeable only by the presence of a steady enough signal :
values : 200 µS/cm ± 10 %, ou 2000 µS/cm ± 10 %, ou 20mS/cm ± 10 %, ou 200mS/cm ± 10 %.
D 2005 NEOTEK.
These values risking to be mistaken as measures, it is strongly recommended to work, during the
recordings, with the automatic range, in order to avoid a possible saturation on a no automatic range .
SET
ACTEON/AQUA/ACTEWIN
USER MANUAL
2.6.4
pH
7.01pH
6.97pH
73.89 °F
ENTER : next
Aqu
PH2
D 2005 NEOTEK.
Probe in
Buffer 2 :
Measure :
Tempera.
ESC : exit
02-21-05 19:16
DATE : January/09/11
INDEX : 1
REF. : PONKITAQUA
Choose the measuring range in which you
are going to work.
(Identical calibration procedure for every
Calibration of pH is done in two steps :
range)
PH1
Probe in
Buffer 1 :
Measure :
Tempera.
ESC : exit
02-21-05 19:15
PAGE : 29/29
4.01pH
4.08pH
73.82 °F
ENTER : next
Aqu
1°) Calibration with a buffer solution pH7
Dip the probe in the calibration solution.
As soon as the measure, given by the
probe,is stabilised for at least 30 seconds,
press Enter to validate the calibration.
2°) Calibration with a buffer solution pH4,
pH9 ou pH10.
Enter the value of the used solution. Dip the
probe in this solution.
As soon as the measure, given by the
probe,is stabilised for at least 30 seconds,
press Enter to validate the calibration.
Nota: standard solutions are worth precisely
pH 7. 01 and pH 4. 01 at 25 °C/ 77 °F
At the end of the calibration process the name of the operator is asked. 20 characters are available to enter a name. Then press ENTER :
The following message appears:
-OK –
In that case the calibration is correct :
Validate to AQUA EEPROM the logging of the new zero and slope coefs by ENTER.
The following message appears: ! Out of margin !
In that case values are out range:
– Either the standard is incorrect (inversion or pollution).
– Or the sensor is faulty. If the sensor seems good, to redo a calibration with new standards. Sometimes, the sensor is just at the tolerated
margin limit (+/-35%), and the measure is all the same correct. You can disregard then and validate by ENTER . ( Strong shift on the pH 7
or too low Nernst slope). After validation, the screen « saving coefficients » appears momentarily.
2.6.5
ORP
ORP 1
Auto 0
Measure :
3mV
ESC : exit
02-21-05 19:17
ENTER : next
Aqu
REDOX 2
Probe in
buffer :
Measure :
ESC : prev.
02-21-05 19:17
240mV
245mV
ENTER : valid
Aqu
The AQUA probe is placed in the air and a
short-circuit is applied to the ORP sensor in
order to simulate the value 0mV. Place the
probe at free air and follow the evolution of
the measure. As soon as the measure given
by the probe is stabilized since at least 30
seconds, press the key ENTER to validate
the calibration.
Calibration with a buffer solution of 240 or
470mV according to the zone of measure.
Enter the value of the used calibration
solution. Dip the probe in this solution.
As soon as the measure, given by the probe,
is stabilized since at least 30 seconds, press
Enter to validate the calibration.
At the end of the calibration process the name of the operator is asked. 20 characters are available to enter a name. Then press ENTER :
The following message appears:
-OK –
In that case the calibration is correct :
Validate to AQUA EEPROM the logging of the new zero and slope coefs by ENTER.
The following message appears: ! Out of margin !
In that case values are out range:
– Either the standard is incorrect (inversion or pollution).
– Or the sensor is faulty. If the sensor seems good, to redo a calibration with new standards. Sometimes, the sensor is just at the tolerated
margin limit (+/-25%), and the measure is all the same correct. You can disregard then and validate by ENTER . ( Strong shift on the pH 7
or too low Nernst slope). After validation, the screen « saving coefficients » appears momentarily.
SET
ACTEON/AQUA/ACTEWIN
USER MANUAL
PAGE : 30/30
DATE : January/09/11
INDEX : 1
REF. : PONKITAQUA
2.6.6 DO (Dissolved Oxygen)
Solution :
DO
1
Water + sulfite
DO standard :
Measure :
0mg/l
0.02mg/l
ESC : exit
02-21-05 19:19
ENTER : next
Aqu
DO
Probe in air
D 2005 NEOTEK.
Saturation :
Measure :
Tempera. :
ESC : prev
02-21-05 19:21
2
9.60mg/l
0.02mg/l
68.00°F
ENTER : Valid
Aqu
The probe is placed in a solution of water and
sulphite at DO = 0,00mg/l .
As soon as the measure, given by the probe,
is stabilised for at least 30 seconds, press
Enter to validate the calibration .
Calibration in the air: Using the atmospheric
pression and temperature measures, the
Acteon terminal determines the value of the
air saturation. The probe being in the air, wait
for the measure, given by the probe, to be
stabilised for at least 30 seconds, then press
Enter to validate the calibration.
At the end of the calibration process the name of the operator is asked. 20 characters are available to enter a name. Then press ENTER :
The following message appears:
-OK –
In that case the calibration is correct :
Validate to AQUA EEPROM the logging of the new zero and slope coefs by ENTER.
The following message appears: ! Out of margin !
In that case values are out range:
– Either the standard is incorrect (inversion or pollution).
– Or the sensor is faulty. If the sensor seems good, to redo a calibration with new standards. Sometimes, the sensor is just at the tolerated
margin limit (-25, +35%), and the measure is all the same correct. You can disregard then and validate by ENTER . ( Strong shift on the pH
7 or too low Nernst slope). After validation, the screen « saving coefficients » appears momentarily.
2.7
History
The user can get access to different kind of
information through the option History
Choose the option History in the MAIN
MENU and validate by pressing Enter.
MAIN-MENU
>Configuration
>Measure
>Calibration
>Results
>History
02-21-05 20:02
Aqu
HISTORY
>Calibration log
>Maintenance
>After Sales Service
>ACTEON 3000S
02-21-05 20:03
Choose the desired option using the
navigation keys and validate your choice
pressing Enter.
Aqu
SET
ACTEON/AQUA/ACTEWIN
USER MANUAL
PAGE : 31/31
DATE : January/09/11
INDEX : 1
REF. : PONKITAQUA
2.7.1 Calibration Log
CALIBRATION LOG
Level
Date : 01-14-05 15:17
Std 1 :
0.00ft
Std 2 : 20.00ft
Calibration OK
J. BURTON DEPT W04
02-21-05 20:03
Aqu
D 2005 NEOTEK.
CALIBRATION LOG
pH
Date : 01-14-05 15:30
Std 1 : 7.01pH
Std 2 : 4.01pH
Calibration OK
J. BURTON DEPT W04
02-21-05 20:03
Aqu
The calibration log gives you the following
informations :
- Name of the calibrated parameter
- Date of the last calibration
- Standard 1 and Standard 2
- Operator name
- Calibration status :
Calibration OK
! Out of margin !
! ! No calibration ! !
The navigation keys allow to visualise the
different parameters.
CALIBRATION LOG
Tempera.
In this example, temperature
calibration needs to be done.
sensor
! ! No calibration ! !
02-21-05 20:04
Aqu
CALIBRATION LOG
DO
Date : 01-14-05 15:40
Std 1 : 0.00mg/l
Std 2 : 9.21mg/l
! Out of margin !
J. BURTON DEPT W04
02-21-05 20:04
Aqu
CALIBRATION LOG
Conduct. 0—200.0µS/cm
! ! No calibration ! !
02-21-05 20:05
Aqu
In this example, Dissolved Oxygen sensor
calibration is soiled of suspicion and needs
to be redone (standard mistake or sensor in
question).
In this example,
conductivity sensor
calibration on the range 0—200.0µS/cm
needs to be done.
SET
ACTEON/AQUA/ACTEWIN
USER MANUAL
PAGE : 32/32
DATE : January/09/11
INDEX : 1
REF. : PONKITAQUA
2.7.2 Maintenance
MAINTENANCE
ELECTROLYTE CHANGE
DO SENSOR 01-14-05
02-21-05 20:07
In this history the user can make notes
concerning maintenance performed. 126
alphanumeric characters are available for a
description of the actions taken.
Aqu
2.7.3 AFTER SALES SERVICE
D 2005 NEOTEK.
INFORMATION AFT. SALES
FAULTY CONNECTOR
REPLACEMENT 01-02-05
02-21-05 20:08
The after sales informations reserved for
factory interventions. Only one access code
gives access to the information registered in
this history.
Aqu
2.7.4 ACTEON 3000S
ACTEON 3000S
Hard V2.0
Soft A4.03
Flash : 1024k
0-10m
Bat : 6.1V
02-21-05 20:09
a
Bar :1012hP
Aqu
This screen gives information concerning
hardware characteristics and Acteon software
version. It shows installed memory capacity
(1024kB until 8MB ), the variant of the depth
sensor (0-10m ; 0-50 m),as well value of
battery voltage, values of the internal
barometric pressure sensor.
CONTRAST-BRIGHTNESS CONTROL
In this last page, the contrast of the LCD screen can be adjusted using the keys number 7 and 9.
- Key 7 : less contrast
- Key 9 : more contrast
SET
ACTEON/AQUA/ACTEWIN
USER MANUAL
PAGE : 33/33
DATE : January/09/11
INDEX : 1
REF. : PONKITAQUA
3. PUTTING INTO SERVICE
3.1
CONNECTIONS
3.1.1
AQUA PROBE
.
Take the AQUA probe 1 and cable 4
2
S
4
1
B
Make coincide the red point of the plug A with the
red point of the socket S (4-points connector),
then connect while pushing until the click.
Fix the clasp B on the steel handle 2 for the
resumption of effort of the cable. Attention: Not to
use the cable as carrier.
To disconnect the cable of the AQUA probe, pull
on the metallic body of the plug A (all effort to pull
on the cable is self-locking ).
A
D 2005 NEOTEK.
3.1.2 TERMINAL ACTEON
Take ACTEON Terminal 2 and cable 4
S’
C
D
4
3.2
Make coincide the arrow of the grey plug C with
the arrow of the yellow socket S’ (12-points
connector), then connect while pushing until the
click.
Fix the shackle D on the handle in VelcroG for
the resumption of effort of the cable. Attention:
Not to use the cable in carrier.
To disconnect the cable of the terminal Acteon,
pull on the grey body of the plug C (all effort to
pull on the cable is self-locking ).
STARTING UP
Unscrew the preservation case E from the
AQUA and replace by ballasted strainer 3.
E
3
SET
ACTEON/AQUA/ACTEWIN
USER MANUAL
PAGE : 34/34
DATE : January/09/11
INDEX : 1
REF. : PONKITAQUA
To check the functioning of the set, carry out a test by plunging the AQUA probe in a bowl of tap water.
-
Press key I in the left upper corner of the keyboard for powering up.
In the configuration menu, adjust date and time if necessary and check the chosen parameters
(p.5)
Reset to zero the memory and choose fixed or rotating memory ( p.14)
Go back to the general menu and choose the option «MEASURE » perpetual measuring (p
18)
MEASURE
Level
:
0.39 ft
Conduct.
:
567.4μS/cm
:
7.93pH
pH
ORP
:
175mV
Tempera.
:
60.07 °F
DO
:
8.23mg/l
A↓ Aqu
02-22-05 08:03
D 2005 NEOTEK.
-
Check the coherence between the
different parameters.
If necessary, carry out a calibration
of the sensors ( see p. 24 to 28)
Before carrying out measurements, choose the recording mode Manual start and file name
(pages14 to 16)
Once in the field, proceed to perpetual measuring (p 18)
Make zero of the level sensor before plunging the probe (p19)
Pressing ENTER in this option will start the recording of data (A↓).
Go back to Configuration option at the end of the measuring session, then Recording and
confirm « Stop recording » (p.18)
SET
ACTEON/AQUA/ACTEWIN
USER MANUAL
PAGE : 35/35
DATE : January/09/11
INDEX : 1
REF. : PONKITAQUA
4. ACTEWIN DATA-HANDLING SOFTWARE
With ACTEWIN one can connect a PC indifferently to the portable terminal ACTEON as well as to the
AQUA probe using the Actewin SDI12/RS232 adapter and specific connection cables.
Following options are available:
-
PC⇔ACTEON
Import of data [measures] ( ACTEON 3000 ⇒ PC) + graphic/statistic exploitation
Programming logger (PC ⇒ ACTEON 3000)
Export of recording configurations ( PC ⇒ ACTEON 3000)
-
PC⇔AQUA
Calibration (PC ⇒ AQUA)
Measure (AQUA ⇒ PC)
D 2005 NEOTEK.
Installing and execution of ACTEWIN software under Windows.
Installation of ACTEWIN software requires 2MO of free memory space.
Insert the installation CD in your CD-ROM reader; the « Autorun » option will start automatic installation.
During installation, you will be asked to choose an installation language (French is the standard language), to
register client information (user name, company name), and a file location and name to save the software will be
proposed.
Follow the instructions that appear on the screen to finish installation.
At the end, an icon for the program Actewin V2.X is placed automatically on the desktop.
Before starting the software application, connect the AQUA multiparameter probe to a PC through the
communication cable. Select the ACTEWIN icon on your desktop or in the program menu of your hard disk. Once
the program ACTEWIN is launched, the software (ACTEWIN on PC) will initiate its communication with the
software situated in the AQUA 100 probe through SDI-12 standard.
Acteon 3000 terminal connected to a computer
Cable
SDI-12/RS232 Adapter
- Software ActeWin Windows
for data import and programming logger
Acteon 3000
- Acteon-Adapter cable
- Acteon 3000
-
PC with comport
or USB port
- SDI-12/RS232 Adapter
+ USB2.0 RS232 Adapter (option)
SET
ACTEON/AQUA/ACTEWIN
USER MANUAL
PAGE : 36/36
DATE : January/09/11
INDEX : 1
REF. : PONKITAQUA
5. AQUA PROBE
5.1
Starting up the probe
The AQUA multiparameter probe can be connected to 3 sensors, enabling measuring up to 6 parameters:
- Dissolved Oxygen (Red sensor).
- pH
- ORP
(Blue sensor)
- Temperature
- Conductivity (Grey sensor)
- Pressure (situated in the sleeve of the AQUA10/ AQUA 50).
5.2
Connecting the probe
The AQUA probe can be connected to PC and data collection devices as well as to the ACTEON 3000
display/recording terminal (SDI-12 BUS via RS 232).
Probe connected to a computer
SDI12/RS232 Adapter
PONAQC AB7
Cable PONAQC AB6
- AQUA Probe
Probe
AQUA
D 2005 NEOTEK.
The following figures show various configurations with its necessary equipment.
- Cable
- Computer with COM port
- SDI12/RS232 adapter
- Software A CTEWIN
Windows (for calibration
probe)
SET
ACTEON/AQUA/ACTEWIN
USER MANUAL
Probe connected to a laptop computer
SDI12/RS232 Adapter
PONAQC AB7
Cable PONAQC AB6
- AQUA Probe
AQUA
- Cable
- Computer with a COM port
- SDI12/RS232 Adapter
- Software A CTEWIN (for probe
calibration)
Probe connected to ACTEON 3000 terminal
Cable PONAQC AB1-5
- AQUA
- Cable
- Acteon 3000
Probe
AQUA
D 2005 NEOTEK.
AQUA
Probe
PAGE : 37/37
DATE : January/09/11
INDEX : 1
REF. : PONKITAQUA
SET
ACTEON/AQUA/ACTEWIN
USER MANUAL
5.3
PAGE : 38/38
DATE : January/09/11
INDEX : 1
REF. : PONKITAQUA
Preparing the probe
5.3.1 Installing the dissolved oxygen membrane.
The DO probe is shipped ‘ready to use’, with the oxymetric electrolyte and a protective membrane already
installed on the sensor.
If only the membrane rack is installed, follow the next steps to put the oxygen sensor in operation:
1- Unscrew the protective cap ‘c’ and remove the membrane rack without touching the cathode.
Warning: Don’t put anything in the opening of the pressure stabiliser (see Figure 1).
D 2005 NEOTEK.
2- Keep the sensor in vertical position and rinse the tank with some drops of electrolyte. Fill the tank with the
oxymetric electrolyte until a meniscus is forming on the top part of the sensor. Make sure that no air bubbles
are retained on the cathode.
3- Take out the air of the membrane rack with one drop of electrolyte.
4- Place the membrane rack in the tank.
5- Screw the protective cap slowly back on the sensor end without forcing.
6- Turn the sensor around and screw the cap gradually to take out the electrolyte excess.
7- Check that no airbubbles are left on the cathode.
Metallic
Tightening disc
Protective
Cap “c”
Membrane
Hole of
Membrane-rack
Cathode
Membrane-rack
«p»
Electrolyte
Tank
Meniscus
2
Pressure balance
1
Oxygen
Sensor
3
Air
Membrane-rack
«p»
Electrolyte
drop
4
Protective
cap
5
6
SET
ACTEON/AQUA/ACTEWIN
USER MANUAL
5.3.2
PAGE : 39/39
DATE : January/09/11
INDEX : 1
REF. : PONKITAQUA
Installing the sensors.
A- Unscrew the calibration cap and take it off of the probe to get access to the sensor connector.
Calibration cup
Ballasted strainer
AQUA
A
AQUA
Probe connector
(3)
+ cap
Connector (cable)
+ cap
B- Take off the protective caps installed to the probe connectors by pulling them.
Hold the sensors by the ring and ‘click’ them to the probe connector. Coloured drops, corresponding to those
on the sensors, are placed on the AQUA probe compartment.
The red reference marks on the sensor and probe compartment help you to place the sensors correctly (see
compartment schedule).
D 2005 NEOTEK.
C-
Connector 5 pins
Grey drop for
Conductivity/temperature sensor
Red reference mark
Blue drop
For pH, ORP sensor
Connector 7 pins
Red drop for
Oxygen sensor
Connector 4 pins
Schedule AQUA probe compartment.
Sensor-Pods :
-
The dissolved oxygen sensor is red and is connected to the 4-pin-probe connector.
Protection sleeve
Oxygen sensor
-
The temperature/conductivity sensor is grey and is connected to the 7-pin-probe connector.
Protection sleeve
Sensor
Conductivity/Temperature
SET
ACTEON/AQUA/ACTEWIN
USER MANUAL
-
PAGE : 40/40
DATE : January/09/11
INDEX : 1
REF. : PONKITAQUA
The pH/ORP sensor is blue and is connected to the 5-pin-probe connector.
Sleeve protection
Platinium disc ORP
pH glass bulb
pH ORP sensor
Before installing the sensors, make sure that the sensor and AQUA connectors are absolutely clean. The
openings for connecting the sensors must be completely dry. In case of humidity, use a compressed air spray to
dry the openings.
Installing the sensors is done as follows:
-
Hold the sensor by the ring and locate the place of the sensor using the coloured drop of the compartment.
-
Place the sensor on top of the compartment opening.
-
Insert the sensor into the opening until hearing a soft ‘click’, meaning that the sensor is correctly installed.
D 2005 NEOTEK.
5.3.3 Installing the ballasted strainer and the calibration cap.
The AQUA probe is equipped with a ballasted strainer and with a calibration cup that also serves as a
protection case. As soon as the sensors are installed, screw ballasted strainer (or the calibration cup) clockwise on
the compartment of the probe.
5.3.4 Installing the cable.
Remove the protective cap on the top end of the AQUA probe and place the cable connector opposite of the
probe opening so that the two red marks (one on the cable ring and one on the probe connector) touch. Insert the
cable until hearing a soft ‘click’, meaning the cable is correctly installed.
5.4
Maintenance of the probe
The maintenance of the sensor, which will increase its lifetime on one hand and will reduce preparation time for
future use of the AQUA on the other hand, is presented in this part of the manual.
This paragraph also explains storing conditions for shorter or longer periods of time (up to several months).
Before starting the installation of a sensor or cap on the sensor port, make sure that the two connectors that will
touch are perfectly dry to prevent water from coming in these connectors.
If humidity is detected, dry the connector using compressed air.
If the connector is corroded, send the connector back to the after sales services of ‘Ponsel’ (NEOTEK
division).
The connector that links the AQUA probe to a cable must remain permanently covered to protect it against
humidity. Traces of humidity can be taken away using compressed air.
When the probe is in communication, a cable must have been connected beforehand. Likewise, when the probe is
not in communication, a cap that is placed in the connector opening replaces the cable. This cap can be easily
removed by pulling it lightly.
SET
ACTEON/AQUA/ACTEWIN
USER MANUAL
5.5
PAGE : 41/41
DATE : January/09/11
INDEX : 1
REF. : PONKITAQUA
Maintenance of the sensors.
5.5.1 Dissolved Oxygen sensor.
When the sensor is used for a longer period of time, change the oxymetric electrolyte and the membrane at
least once a month.
Furthermore, the electrolyte and membrane must be replaced in the following cases:
- Presence of bubbles under the membrane,
- Presence of electrolyte sediment (white) on the membrane,
- The sensor shows unstable measurements, a doubtful 0 calibration.
D 2005 NEOTEK.
5.5.2
Conductivity/pH/ORP sensor.
Cleaning of the sensor becomes essential as soon as sediments or pollution appear on the glass surfaces, on
the platinum point, on the conductivity cell, or when the response of one of those elements slows down.
1) Disconnect the sensor from the AQUA-probe (by holding the probe by its ring while pulling) and proceed
cleaning the glass bulb, the platinum point and the conductivity cell with clear water and a soft cloth or a
cotton-bud. After that, check the measuring of every parameter before starting measuring again.
2) If the results of one of the sensors pH, ORP or conductivity are not satisfactory, carry out the following
procedures :
a- Soak the sensor for 15 minutes in a solution of water with a detergent; Bleach 10% or Mercryl.
b- Clean with precaution the glass bulb, the platinum point and the conductivity cell with a cotton-bud, soaked
beforehand in a solution of water with some drops of dishwasher liquid.
c- Rinse the sensor with clean water, clean it with a wet cotton-bud, and rinse again in a bowl of clean water.
d- Check the functioning of the sensor and carry out calibration of the pH, ORP and conductivity parameters.
Before placing back the sensor on the AQUA probe, make sure that the connectors are perfectly dry. If
necessary, take off humidity traces using compressed air.
3) Sand the ORP sensor (platinium disc) with a 500 abrasive, wetted with a measuring standard.
5.5.3 Temperature sensor.
This sensor doesn’t need any specific maintenance and can be simply cleaned with a solution of water with
some drops of dishwasher liquid as soon as sediment traces appear.
SET
ACTEON/AQUA/ACTEWIN
USER MANUAL
5.6
PAGE : 42/42
DATE : January/09/11
INDEX : 1
REF. : PONKITAQUA
Storage conditions for AQUA probe.
5.6.1 Short term storage.
For short-term storage, leave the sensors connected to the AQUA probe under a humid atmosphere according
to one of the following methods:
1
1) Put approximately 5 mm of initial preservation orangey liquid in the preservation cap and place it on the
probe head. The sensors should not be submerged.
2) Place a humid sponge or cotton disc (thickness 5 mm ) impregnated with preservation orangey liquid to the
bottom of the preservation cap and screw it on the probe head.
In both cases, make sure that the preservation cap is hermetically closed to avoid any evaporation.
Noted : If you no longer have preservation orangey liquid (Ref. : PON-SOL-CSV), use the oxymetric liquid
(electrolyte KCL Ref. : PON-02-EL). Especially : no distiled or pure water, or then 5 drops to the bottom of the cap,
only to maintain a climate of humidity on sensor heads .
D 2005 NEOTEK.
The communication cable of the probe must be removed and replaced by a small protection cap (delivered with
probe) to avoid humidity from entering the connector opening.
Storage rules are thus as follows:
Use a quantity of liquid that is enough to provide humidity but not so much that it reaches the sensor
surfaces, especially if the liquid is pure water in this case, premature salt depletion of the Plastogel
reférence Ag/AgCl on the Pod sensor pH/ORP).
Check that the conservation cap is hermetically closed to reduce the risk of evaporation.
Check regularly that humidity is maintained in the cap.
5.6.2 Long term storage.
a
Dissolved Oxygen sensor.
-
-
b
Disconnect the dissolved oxygen sensor, take off the membrane and empty the oxymetric electrolyte.
Rinse the electrolyte tank with distilled water and dry with compressed air. Keep the sensor dry and without
the membrane or with a membrane in order to protect the cathode.
Place a small protection cap on the opening of the probe connector that is meant to receive the oxygen
sensor to avoid humidity from coming in.
Conductivity/pH/ ORP and temperature sensors.
Disconnect the conductivity sensor, rinse it with water and dry with compressed air. Keep the sensor dry.
pH/ORP sensor may remain connected to the AQUA-probe. Follow the same instructions as for short term
storage using the preservation orange liquid. Attention ! : before, push in the waterproof obturating plugs of
sensor-Pods oxygen and temperature /conductivity.
Screw the preservation cup completely to avoid any evaporation.
Preservation liquid :Ref. : PON-SOL-CSV
-
1
The preservation orangey liquid is provided with the probe AQUA in the preservation cap. Not to
throw it : keep this liquid preciously in a hermetic bottle. Otherwise available on order: Ref : PON-SOL-CSV .
This liquid contains KCL saturated at 0 °C, products fongicide, anti biofouling, anti evaporation, does not
freeze over -50 °C, and is a pH buffer, value between pH4 and 5, salinity >200mS/cm. No toxic, it regenerate
partially in some days the reference Plastogel Ag/AgCl pH/ORP in case of salt exhaustion.
SET
ACTEON/AQUA/ACTEWIN
USER MANUAL
5.7
PAGE : 43/43
DATE : January/09/11
INDEX : 1
REF. : PONKITAQUA
Calibration of the AQUA probe.
5.7.1 Recommendations.
• Security.
WARNING: Certain reagents that are used for the calibration of sensors are health threatening and handling
them requires specific safety measures (see Appendix 1).
• Calibration with calibration cup or vessel.
D 2005 NEOTEK.
The preservation case that comes with the AQUA probe can also be used as a calibration cup in order to
optimise the volumes of the used standards, protecting the sensors…
The optimised volumes that allow a correct calibration for each sensor are noted in the table below:
Sensor to calibrate
pH/ ORP
D.Oxygen
Temperature
Conductivity
Vertical position
50 ml
50 ml
50 ml
50 ml
Table 1: Optimised standard volumes.
Calibration of the AQUA probe can also be done with a vessel. In that case, several precautions need to be
taken:
- Carry out all the calibrations with the ballasted strainer to protect the sensors and take off the stainless steel
ballested tip.
- Fix the body of the probe to avoid falling for the majority of the vessels have convex bottoms.
- Numerous calibrations integrate different factors from other sensors (like temperature), so make sure that all
the sensors are submerged at the time of a calibration procedure. Also, see that the calibration standard
volume reaches the connectors.
• Optimise the effectiveness of a calibration.
-
-
-
To optimise the accuracy of the calibration procedure, rinse the probe with a small volume of calibration
standard, planned for the calibration, and collect this volume in the calibration cap to rinse. Don’t throw away
old calibration solutions because they can be used for this rinsing.
Prepare a bowl of water at room temperature to rinse the sensors and the calibration cup after every
calibration procedure.
Prepare absorbent paper to dry the sensors and the preservation case every time you rinse the sensors
with water or the calibration standard. This is to avoid contamination of the calibration standard and will
increase the accuracy of the calibration.
If one or more sensors are disconnected from the AQUA probe, make sure that the electric connections are
watertight by placing the small protection caps that were designed for this purpose.
Submerge the sensor head completely in the standard before validating the calibration procedure.
SET
ACTEON/AQUA/ACTEWIN
USER MANUAL
5.8
PAGE : 44/44
DATE : January/09/11
INDEX : 1
REF. : PONKITAQUA
Calibration procedures.
5.8.1 General schedule.
The following calibration procedures concern the sensors connected to the AQUA probe, corresponding to the
following parameters:
-
Temperature (°C or °F).
Conductivity (µS or mS).
pH (pH unit).
ORP (mV).
Pressure(depth/Level) (measuring of depth in cm, m, in or ft).
Dissolved Oxygen (mg/l).
⇒ To increase the accuracy of the calibration procedure, rinse the calibration cap with water followed by a small
amount of ‘calibration solution’ corresponding to the sensor that is to be calibrated. Throw away this rinsing
volume and pour in the calibration cup the optimised calibration solution (see Table 1).
⇒ Submerge the sensors with precaution in this standard and screw the calibration cap on the AQUA 100 probe
head. Don’t forget to tighten the probe body to avoid it from falling.
D 2005 NEOTEK.
⇒ Once the sensor is submerged, shake the probe in an up-down movement (or left-right) to take out eventual
sensor bubbles.
⇒ Start the ACTEWIN-software (see chapter 1) and select the option "AQUA" followed by "Calibration". The
screen will show the list of sensors connected to the AQUA that can be calibrated.
⇒ Select the sensor to calibrate and follow the instructions on the screen:
Screen 1: Presents the different calibration steps (2 for each sensor) and indicates which standard to use.
Navigation keys:
"Next" To pass to the next screen and to carry out the first calibration.
"Cancel" To quit the calibration procedure.
Screen 2: First calibration step.
-
Select the parameter unit (fixed unit or initialised; could be modified by following menu instructions).
-
Enter the value of Standard 1 (fixed or initialised value that can be modified).
-
The measure given by AQUA is shown in real time ("Measure" box). When this measure is stabilised for at
least 30 seconds, confirm the first calibration procedure with the « Validation » symbol.
-
In the « Report » box a message will appear indicating if the calibration procedure is confirmed or suspect.
Navigation keys:
"Previous" To get back to the first screen.
"Next" This option can only be chosen if the first calibration step is confirmed and allows passing on to the
next screen to carry out the second calibration.
"Cancel" To leave the calibration procedure.
Unscrew the calibration cap and take the sensors out of the first calibration standard. Rinse the sensors and the
calibration cup with water followed by a small quantity of the second calibration standard.
Screen 3: Second calibration step.
-
Select the parameter unit (fixed or initialised; could be modified by following menu instructions).
SET
ACTEON/AQUA/ACTEWIN
USER MANUAL
PAGE : 45/45
DATE : January/09/11
INDEX : 1
REF. : PONKITAQUA
-
Enter the value of Standard 2 (fixed or initialised value that can be modified).
-
Submerge the sensors in this second standard and follow the development of the measure given by AQUA
100. When this measure is stabilised for at least 30 seconds, confirm the second calibration procedure with
the « Validation » symbol.
-
The "Report" box indicates if the calibration procedure is confirmed or suspect.
Navigation keys:
"Previous" To go back to the second screen.
"Next" This option can only be chosen if the second calibration step is confirmed and allows passing to the
next screen to see the final report.
"Cancel" To quit the calibration procedure.
Screen 4: Gives a summary of the taken actions during the calibration steps indicating if the calibration of the
sensor has functioned well or if one of the procedures needs to be repeated (indicates which standard to repeat).
Navigation keys:
D 2005 NEOTEK.
"Previous" To go back to the third screen.
"End" To confirm the calibration of the sensor and to bring you back to the screen showing the list of
sensors. Note: Calibration can be confirmed even if the report indicates that it is suspect.
"Cancel" To quit the calibration procedure.
The sensor calibration procedure is only confirmed if the two steps have been carried out and are confirmed.
Sensor display screen
Every sensor that needs to be calibrated is represented by a symbol and its calibration status is indicated as
follows:
→ : The sensor has not been calibrated.
4: Calibration of the sensor was successful.
5: Calibration of the sensor is suspect. Note: A calibration procedure can be confirmed even if it is suspect.
5.8.2 Calibration procedures of AQUA probe
a
Calibration of the pH sensor
The first procedure is carried out with a standard buffer of pH 7 and 20 °C.
-
Screen 1: Gives a summary of the two calibration procedures with a description of the actions to be taken
during calibration of the pH sensor.
Screen 2: The parameter unit being fixed (pH), enter the value of the first buffer initialised at 7.01.
Pour the necessary volume for buffer pH7 (see table 1) in the clean, dry or pre-rinsed calibration cup, and
submerge the pH sensor tip in this liquid.
Follow the development of the measure given by the AQUA probe. When this measure is stabilised for at least 30
seconds, confirm the calibration procedure with the « Validation » symbol. The report indicates if the first
calibration has worked or if it is suspect.
To pass to the second calibration press "Next".
SET
ACTEON/AQUA/ACTEWIN
USER MANUAL
PAGE : 46/46
DATE : January/09/11
INDEX : 1
REF. : PONKITAQUA
The second calibration is carried out with a buffer standard pH 4, pH 9 or pH 10.
-
Screen 3: The parameter unit being fixed (pH), enter the value of the second initialised buffer: 4.01, 9.00 or
10.01.
Pour the necessary volume for buffer standard (see Table 1) in a clean, dry or pre-rinsed calibration cup, and
submerge the pH sensor tip in this liquid.
Follow the development of the measure given by the AQUA probe. When this measure is stabilised for at least 30
seconds, confirm the calibration procedure with the « Validation » symbol. The report indicates if the second
calibration has worked or if it is suspect.
To pass to the second calibration press "Next".
Rinse the probe with water and dry it. Rinse abundantly and dry the calibration cap for the next calibration.
Screen 4: Gives a summary of the taken actions during the two calibration procedures and indicates if the
calibration has functioned well or if one or both calibrations are suspect.
If one of the calibrations didn’t function well, this screen indicates also which buffer standard to use again. To
repeat a calibration procedure, go back to the corresponding screen pressing "Previous".
D 2005 NEOTEK.
Confirm calibration of the pH sensor pressing « End » A calibration procedure can be validated even if one of
the procedures is declared suspect.
Rinse the probe and the calibration cup with water and dry it for future use.
b
Calibration of the oxygen sensor.
The first procedure is carried out with a mix of water and sulphite to simulate a 0.00 mg/l value.
-
Screen 1: Gives a summary of the two calibration procedures and a description of the action to take during
calibration of the oxygen sensor.
Screen 2: The parameter unit is fixed in mg/l and the value of the fist measure at 0.00.
Pour the necessary quantity of the sulphite-water mixture in the clean, dry or pre-rinsed calibration cup (see
Table 1) and plunge the AQUA 100 probe tip in this solution. The end of the temperature and oxygen sensors must
be submerged.
Follow the measure-development given by the AQUA probe. When this measure is stabilised for at least 30
seconds, confirm the calibration procedure with the « Validation » symbol. The report indicates if the first
calibration has worked or if it is suspect.
To pass on to the second calibration press "Next".
Rinse and dry the probe and calibration cup.
For the second calibration two methods are proposed:
• Calibration by air.
• Calibration with a standard.
-
Screen 3: Gives the two calibration options by air and by standard. The first method is based on calibration
of the sensor in water-saturated air, the second implies that the concentration of a standard in dissolved oxygen
is known.
Choose one of the methods by clicking on the corresponding symbol.
SET
ACTEON/AQUA/ACTEWIN
USER MANUAL
-
PAGE : 47/47
DATE : January/09/11
INDEX : 1
REF. : PONKITAQUA
Screen 4: Calibration by air.
Enter the value of the atmospherical pressure in hectopascal (hPa) initialised by normal atmospheric pressure
1013.
Pour 5 mm of water on the bottom of the calibration cap and place the tip of the probe sensor in the cup. Make
sure that the oxygen and temperature sensors are not submerged in the water. Screw the calibration cup lightly (1
or 2 threads) so that the O2 sensor is in contact with the atmospheric pressure. Wait ten minutes for the air in the
cap to become saturated with water and for the temperature to stabilise.
Follow the measure development given by the AQUA probe. When this measure is stabilised for at least 30
seconds, confirm the calibration procedure with the « Validation » symbol. The report indicates if the second
calibration has worked or if it is suspect.
To pass on to the next screen press "Next".
-
Screen 4 bis: Calibration with calibration standard.
Enter the concentration in dissolved oxygen of the used standard (mg/l).
D 2005 NEOTEK.
Pour the appropriate standard volume (see Table 1) in the calibration cap and submerge the tip of the AQUA
100 probe sensors in this solution. The tip of the oxygen and temperature sensors must be submerged.
Follow the measure development given by the AQUA probe. When this measure is stabilised for at least 30
seconds, confirm the calibration procedure with the « Validation » icon. The report indicates if the second
calibration has worked or if it is suspect.
To pass to the final screen press "Next".
-
Screen 5: Gives a summary of the taken actions during the two calibration procedures and indicates if
calibration of the oxygen sensor has worked or if one or both of the steps are suspect.
In case one of the calibrations would not have worked, the screen also indicates which standard to use again.
To repeat a calibration step, go back to the corresponding screen pressing "Previous».
Confirm the calibration of the O2 sensor pressing "End». It is possible to confirm this calibration even if one of
the procedures was declared suspect.
Rinse and dry the sensors and the calibration cap for future use.
c
Calibration of the temperature sensor.
The first procedure is carried out in an ice-bath of 0.00 °C.
-
Screen 1: Gives a summary and description of the actions to be taken during the 2 calibration procedures of
the temperature sensor.
-
Screen 2: Select the parameter unit initialised in °C (or °F) and enter the value of the first Standard fixed at
0.00 °C (32.00 °F).
Pour the necessary volume of a mixture of water with ice (see Table 1) in the clean, dry or pre-rinsed calibration
cap and plunge the temperature sensor tip in this liquid. Wait for some minutes for the temperature sensor to reach
the temperature of the iced bath.
When the measure given by AQUA probe is stabilised for at least 30 seconds, confirm the calibration procedure
with the "Validation" symbol. The report will indicate if the first calibration is accepted or suspect.
To pas to the second calibration press "Next".
SET
ACTEON/AQUA/ACTEWIN
USER MANUAL
PAGE : 48/48
DATE : January/09/11
INDEX : 1
REF. : PONKITAQUA
The second calibration is carried out with a solution of a known temperature.
-
Screen 3: Read the temperature of the second Standard with a thermometer of which the functioning has
been checked beforehand.
Select the unit initialised in °C and enter the temperature of Standard 2.
Pour an appropriate volume of Standard 2 (see Table 1) in the clean, dry or pre-rinsed calibration cup, and
submerge the temperature sensor tip in this liquid.
Wait some minutes for the sensor to reach the temperature of Standard 2. When the measure given by the
AQUA probe is stabilised for at least 30 seconds, confirm the second calibration by pressing the "Validation"
symbol. The report will indicate if the second calibration has worked or if it is suspect.
Pass to the next screen pressing "Next".
-
Screen 4: Displays the taken actions during the two calibration procedures and indicates if they were
accepted or if a suspicion was detected during one or both procedures.
This screen indicates also which Standard needs to be used for the suspect calibrations. To repeat a calibration
procedure, go back to the corresponding screen pressing "Previous».
D 2005 NEOTEK.
Confirm calibration of the temperature sensor pressing "End". It is possible to confirm the calibration even if one
of the procedures is declared suspect.
Rinse and dry the probe and the calibration cup for future use.
d
Calibration of the ORP sensor.
The first procedure is carried out while exposing the AQUA probe to air. A short-circuit is applied to the ORP
sensor to simulate a 0 mV value.
-
Screen 1: Summary of the two calibration procedures and description of the actions to take during
calibration of the ORP sensor.
-
Screen 2: The parameter unit fixed in mV, enter the value of the first Standard fixed at 0 mV.
Place the AQUA probe in the air and follow its measure developments.
When the measure is stabilised for at least 30 seconds, confirm the calibration procedure by pressing the
"Validation" symbol. The report will indicate if the first calibration is validated or suspect.
To pass to the second calibration press "Next".
The second calibration is carried out with an ORP buffer standard of 240 or 470 mV.
-
Screen 3: The parameter unit fixed at mV, enter the value of the second Standard initialised at 240 or 470
mV.
Pour the necessary volume of the selected buffer standard (see Table 1) in the clean, dry or pre-rinsed
calibration cap and submerge the ORP sensor tip in this solution.
Follow the measure development given by the AQUA 100 probe. When this measure is stabilised for at least 30
seconds, confirm the second calibration with the " Validation " symbol. The report will indicate if the second
calibration was successful or if it is suspect.
Pass to the next screen by pressing "Next".
SET
ACTEON/AQUA/ACTEWIN
USER MANUAL
-
PAGE : 49/49
DATE : January/09/11
INDEX : 1
REF. : PONKITAQUA
Screen 4: Displays the taken actions during the two calibration procedures and indicates if they were
accepted or if a suspicion was detected during one or both procedures.
This screen indicates also which Standard needs to be taken for the suspect calibrations. To repeat a calibration
procedure, go back to the corresponding screen pressing "Previous".
Confirm ORP sensor calibration pressing "End". It is possible to confirm the calibration even if one of the
procedures is declared suspect.
Rinse and dry the probe and the calibration cup for future use.
e
Calibration of the conductivity sensor.
The first procedure is carried out exposing the AQUA probe to air to simulate a 0 µS value.
-
Screen 1: Gives a summary of the two calibration procedures and a description of the actions to be taken
during calibration of the ORP sensor.
Screen 2: The parameter unit fixed in µS (mS), enter the value of the first Standard fixed at 0 µS.
Place the AQUA probe in the air and follow the development of the measure it gives.
D 2005 NEOTEK.
When the measure is stabilised for at least 30 seconds, confirm the calibration procedure by pressing the
"Validation" symbol. The report will indicate if the first calibration is confirmed or suspect.
To pass to the second calibration press "Next".
The second calibration is carried out with a conductivity buffer standard of 1413 µS or 12880 µS.
-
Screen 3: Select a parameter unit initialised in µS (mS) and enter the value of the second Standard at 1413
or 12880 µS.
Pour the necessary volume of the selected buffer standard (see Table 1) in the clean, dry or pre-rinsed
calibration cap and submerge the conductivity sensor tip in this solution.
Follow the measure development given by the AQUA probe. When this measure is stabilised for at least 30
seconds, confirm the second calibration with the "Validation" symbol. The report will indicate if the second
calibration was successful or if it is suspect.
Pass to the next screen pressing "Next".
-
Screen 4: Displays the taken actions during the two calibration procedures and indicates if they were
accepted or if a suspicion was detected during one or both procedures.
This screen indicates also which Standard needs to be used for the suspect calibrations. To repeat a calibration
procedure, go back to the corresponding screen pressing "Previous".
Confirm conductivity sensor calibration pressing "End". It is possible to confirm the calibration even if one of the
procedures is declared suspect.
Rinse abundantly and dry the probe and calibration cup for future use.
f
Calibration of the pressure sensor (Depth).
Placing the AQUA probe at a zero depth carries out the first procedure.
-
Screen 1: Gives a summary of the two calibration procedures as well as a description of the actions to be
taken during calibration of the pressure sensor.
SET
ACTEON/AQUA/ACTEWIN
USER MANUAL
-
PAGE : 50/50
DATE : January/09/11
INDEX : 1
REF. : PONKITAQUA
Screen 2: Select the parameter unit initialised in cm (m, in or ft), the value of the first Standard initialised at
0.
Place the AQUA probe at zero depth and follow its measure development.
When the measure is stabilised for at least 30 seconds, confirm the calibration procedure by pressing
the "Validation" symbol. The report will indicate if the first calibration is validated or suspect.
To pass to the second calibration press "Next".
The second calibration is carried out with a known depth, other than zero.
-
Screen 3: Select a parameter unit initialised in cm (m, in or ft) and enter the depth of Standard 2.
Place the AQUA probe in this depth and follow its measure development. When this measure is stabilised for at
least 30 seconds, confirm the second calibration with the "Validation" symbol. The report will indicate if the
second calibration was successful or if it is suspect.
Pass to the next screen pressing "Next".
-
Screen 4: Displays the taken actions during the two calibration procedures and indicates if they were
accepted or if a suspicion was detected during one or both procedures.
D 2005 NEOTEK.
This screen indicates also which Standard needs to be used for the suspect calibrations. To repeat a calibration
procedure, go back to the corresponding screen pressing "Previous".
Confirm the pressure sensor calibration pressing "End". It is possible to confirm the calibration even if one of the
procedures is declared suspect.
Rinse and dry the probe and the calibration cup for future use.
5.8.3 What to do in case of a suspicious calibration?
If there is suspicion of one of the calibration procedures, check on the following points:
-
Check that the Standard value entered by the user corresponds to the calibration procedure.
-
Check the Standard solution (cleanliness, calibration standard used in accordance with the procedure).
-
Check the general condition of the sensor.
-
Check the connections between the AQUA probe and the computer (cable ends, cleanliness of the
connectors, general condition of the connectors).
If everything has been checked and the problem persists, contact the after sales service department to
determine the origin of the disfunctioning (defect sensor, disfunctionning of the AQUA probe etc.).
SET
ACTEON/AQUA/ACTEWIN
USER MANUAL
PAGE : 51/51
DATE : January/09/11
INDEX : 1
REF. : PONKITAQUA
6. CALIBRATION FREQUENCY
Sensor
Temperature
Depth-Level
Conductivity
pH
Period
2 years
Zero and slope
Zero (Del 0) : 2 days
Slope: 2 years
6 months
Zero and slope
15 days
pH7 and pH4
Sensor
ORP (Redox)
D.O. (Oxygen)
Period
15 days
Zero and slope
Zero : 2 months
Slope : 15 days
7. SENSORS PRINCIPLES AND TEMPERATURE COMPENSATION –
METROLOGICAL STANDARDS.
D 2005 NEOTEK.
7.1
PARAMETERS:
Preliminary : measures are compensated according to ISO standards and AFNOR. The
compensations have a maximum of precision between +5 and +30 °C. Never exceed water
temperatures -5 °C, +50°C.
7.1.1 Temperature parameter (sensor integrated in the conductivity probe) :
-
Principle : Pt100 Ohms 1/3 DIN, 3 wires assembly.
Scale – 5 to + 64 °C (if D.O. and pH/Redox sensors disconnected) ;
If not – 5 to + 45 °C with all sensors connected.
Resolution 0,01 °C. Accuracy ± 0,1 °C.
Linearization by mathematical model according to answer Pt100 DIN IEC 751/ Scale ITS-90
This temperature sensor automatically compensates, in calibration (calibration with standard solutions) and
measurement modes, the pH and conductivity parameters and generates the saturation table of dissolved oxygen
(this last parameter is compensated in measuring mode by an incorporated thermistor in the head of cell DO2).
7.1.2 Conductivity parameter :
-
Sensor with a 4 slit electrodes cell without wall attachment effect: 2 current electrodes and 2 potential
electrodes.
4 measurement ranges: 0-200 µS/cm, 200-2000 uS/cm, 2-20 mS/cm, 20-200 mS/cm with the same relative
accuracy in each range (0,5 %). Resolutions 0,1 µS/cm, 1uS/cm, 0,01mS/cm and 0,1 mS/cm. (1 standard by
range). Fixed ranges in calibration mode (calibration on standards), strong recommendation to work in
automatic range in measurement mode for optimal accuracy.
Conductivity signal is compensated in temperature and brought back to the reference temperature of 25 °C.
The temperature variation coefficient used for the compensation, around 2 % at 25°C, is indexed on that of
KCl N/100 (1413 uS/cm at 25 °C), very close to natural water and sea water.
(Non linear function according to NF T 909-031 /EN 27888)
SET
ACTEON/AQUA/ACTEWIN
USER MANUAL
PAGE : 52/52
DATE : January/09/11
INDEX : 1
REF. : PONKITAQUA
7.1.3 Dissolved Oxygen parameter :
-
-
Clark polarographic probe (Platinum-Ag/AgCl) with a PTFE membrane ; unsaturated KCl electrolyte.
Calibration in the air : saturation table is automatically generated according to the temperature measured by
Pt100 ; this calibration value is automatically compensated in altitude by a barometric sensor incorporated in
the ACTEON 3000 (logger terminal/calibrator). Fast-reacting sensor requires stirring of the aqueous medium
under measurement.
Maximum scale 0-50 mg/l (if super saturation). Nominal : 0-20 mg/l
Resolution 0,01 mg/l. Accuracy ± 0,2 mg/l from 0 to 20 mg/l.
Resolution 0,01 mg/l. Accuracy ± 0,2 mg/l from 0 to 20 mg/l.
Signal compensated in temperature by separate thermistor built-in in the sensor. (Standard NF T90-106)
7.1.4 pH parameter :
-
Sensor with sensitive glass electrode. Combined reference saturated Ag/AgCl KCl.
Measuring range : from 0 to 14 pH unit.
Resolution 0,01 pH unit. Accuracy ± 0,2 pH unit.
Answer compensated in temperature according to the NERNST law.
(Standard NF T90-008)
D 2005 NEOTEK.
7.1.5 Redox Potential parameter (ORP) :
-
-
Electrode with a platinum disc. Combined with reference saturated Ag/AgCl KCl.
Nominal measurement range : ± 1000mV (in certain cases ± 1500 mV).
Resolution 1 mV. Accuracy ± 20 mV.
Intrinsic answer, non compensated in temperature, following ISO recommendations.
7.1.6 Level parameter :
-
Absolute piezo-resistive sensor scale 0-10m (or 0-50 m in option).
Simple water level gauge with ± 1 %. Resolution 1cm.
Not yet compensated in atmospheric pressure, will be with the next software release.
7.2
TEMPERATURE RECOMMANDATIONS FOR LABORATORY CALIBRATIONS.
(to follow with calibration of very high degree of accuracy or metrological checking of the
measures in standard and buffer solution).
Nota : If you want to perform a complete calibration (with hight precision) of your AQUA 100 with
the aid of the calibration menu of the ACTEON 3000 you must start with the temperature sensor.
7.2.1 Temperature :
If you want to calibrate your temperature sensor (at 0-50 °C for exemple), you need to disconnect the 2 other
sensors (pH/ORP and Oxygen sensors) and replace these 2 sensors by waterproof obturating plugs. The
combinated pH/ORP POD and the Oxygen POD could be damaged by the temperature variation 0 to 50 °C
(crack glass, pH shunt or floating measure).
It is preferable to limit the maximum temperature at 30°C. In this case, you need to start with the 0°C in an ice bath
(ice + water). Attention, if the probe is equipped with its 3 sensors, the temperature variation has to take place
progressively, in order to avoid the thermal shocks. During the calibration process, it is advised to immerse
completely the sensor heads in the calibration solution and to agitate the water to avoid heat gradients. Wait 30
minutes until the temperature is stabilized (+/- 2/100 of the °C).
In the following procedures, you must always await stabilization of the temperature before validating a calibration
or raise a measure to a standard.
SET
ACTEON/AQUA/ACTEWIN
USER MANUAL
PAGE : 53/53
DATE : January/09/11
INDEX : 1
REF. : PONKITAQUA
7.2.2 Conductivity :
You could calibrate the conductivity sensor in a KCl standard at all temperatures but it is preferable to proceed
between 20 and 25°C.
(Before and after immersion in a standard, rinse well the sensors and entirely with distilled water and dry
them, especially before calibration or checking the standard of 84 uS/cm, this one being very easily polluted).
Always begin with the calibration of the lower range 200 µS/cm and so on until 200 mS/cm.
The zeros for conductivity are done in the air, slit of measurement of the sensor preliminary rinsed then dried.
During the calibration using standard of 84µS/cm, it is strongly advised to first disconnect PODs sensors
pH/Redox and Dissolved Oxygen, and insert the two obturating plugs tight in their place on the 2 released
base plates. Indeed these two sensors are likely to throw out a significant quantity of KCl salt in the standard of
very low conductivity, especially the Ag/AgCl reference by the means of its PlastogelR polymer gorged with
saturated KCL (communication through the 1/10 mm side hole in the blue body cylindrical of pH/ORP POD). The
pollution of the standard 84 µS/cm is rather fast, especially if you await the perfect thermal stabilization of the
sensor, which takes several minutes. It is even advised to proceed the same way for the standard 1413 µS/cm
if one wishes a calibration of laboratory precision on this measurement range, with better than +/- 0,5 %..
D 2005 NEOTEK.
7.2.3 Dissolved Oxygen (D.O.) :
You can calibrate in the air at any temperature. However it is preferable to proceed at the temperature of water
measurement. Immerse the AQUA sensor in the measurement water so that Pt100 sheathed stainless at the end
of the conductivity POD is put at temperature, as well as the D.O. probe itself, then lift the probe out of the water,
drain the probe, but without drying the D.O. cell , then gauge swiftly without awaiting the temperature increase or
decrease in the air. The TEFLON membrane is still hydrated, which improves the precision of the operation.
Another procedure consists in placing some water drops in the protection case of the sensors heads of the AQUA
which is also used as calibration cup, and screw it without exceeding the O ring (not to put in pressure the oxygen
sensor), then immerse the end of the probe in the measurement water (without exceeding the top of the preserving
case), await a few minutes the temperature stabilization, then validate the value of measured saturation,
(calculated with the water temperature and the barometric air pressure).
Nota1: The preliminary calibration of zero O2 in water added with sodium sulphite is completely independent of
the temperature of this water.
Nota 2: With normal atmospheric pressure and null salinity, the PONSEL saturation table according to the
temperature (thus calibration) of the dissolved oxygen is shifted approximately 0,5 mg/l on average compared to
the saturation table of a not salted pure water. This to hold account of the difference state of the hydration of
PTFE membrane, between the air saturated with water and water saturated with oxygen in balance with this air.
According to this PTFE hydration state (naturally hydrophobic) the diffusion of oxygen through this membrane is
very slightly higher in the air, whereas the pO2 (partial pressures) are equal in the gas phase and the dissolved
phase, and that consequently the response of the manometric probe of Clark should not present a difference (in
theory...).
The table presented below holds account for this correction. Actéon and ActeWin have this table in memory, and
during the calibration, carry out the interpolation of temperature, then Actéon automatically applies the barometric
correction (built-in barometer), whereas it is introduced manually in hPa for ActeWin on PC. In all the cases
calculations providing the calibration value are automatic and the user does not need to know the table and the
function of correction, but they are given here for information purposes.
O2 Cal(t°C, Patm) =O2Cal(t°C, 1atm) Patm
1013
Patm en hPa
SET
ACTEON/AQUA/ACTEWIN
USER MANUAL
PAGE : 54/54
DATE : January/09/11
INDEX : 1
REF. : PONKITAQUA
D 2005 NEOTEK.
PONSEL saturation table : Calibration table to the humid air (mg/l), corresponding to the saturation table of
dissolved oxygen in fresh water : For Salinity = 0. Depth = 0. Altitude = 0 (1atm). Relative humidity = 100 %
t °C
O2Cal (tn ,1atm) mg/l
t °C
O2Cal(t ,1atm) mg/l
<0
15.14
30
8.06
0
15.14
31
7,93
1
14.72
32
7.80
2
14.32
33
7.68
3
13.94
34
7.57
4
13.59
35
7.46
5
13.24
36
7.34
6
12.92
37
7.23
7
12.61
38
7.13
8
12.31
39
7.03
9
12.03
40
6.93
10
11.76
41
6,83
11
11.51
42
6,73
12
11.27
43
6,63
13
11.03
44
6,54
14
10.80
45
6,45
15
10.58
46
6,35
16
10.36
47
6,26
17
10.16
48
6,17
18
9.96
49
6,08
19
9.77
50
5,99
20
9.58
51
5,91
21
9.40
52
5,83
22
9.23
53
5,75
23
9.05
54
5,67
24
8.91
55
5,59
25
8.75
56
5,51
26
8.61
57
5,43
27
8.46
58
5,35
28
8.32
59
5,28
29
8.19
60
5,21
NOTA : Altitude = 0
normal Atmospheric pressure = 1013 hPa (760 mm Hg)
e.g. of t°C interpolation and correction of barometric pressure : 998 hPa the real atmospheric pressure
O2Cal(20,76 °C, 1atm)) = [ O2Cal(21°C). (20,76 - 20) + O2Cal(20°C). (21 - 20,76) ]/(21 - 20) = 9,443 mg/l
O2 Cal(20,76 °C, 998 hPa) = O2Cal(20,76 °C) . 998 / 1013 = 9,303 mg/l (rounded with 9,30) (temperature 20,76°C)
SET
ACTEON/AQUA/ACTEWIN
USER MANUAL
PAGE : 55/55
DATE : January/09/11
INDEX : 1
REF. : PONKITAQUA
7.2.4 pH :
You can calibrate this parameter at all temperature but it is preferable to proceed between 20 and 25°C.
Warning : the temperature compensation of pH exploits only the intrinsic response of the probe in an unspecified
aqueous medium, which is delivering a potential known as of NERNST potential, where the absolute temperature
appears (on the NERNST slope : ln10.RT/nF ; at 20 °C, this slope is equal to 58,1641 mV/°C), and introduces a
compensation to deliver the real pH.
This compensation does not integrate the effect of the temperature variations on the various pH buffers (different
between them). As a result, you should calibrate with pH buffers stabilized at 25 °C and validate 7.01 and 4.01 pH
values (buffer values at 25°C), or calibrate at another temperature and manually define the corresponding values of
the buffers before validating; ex 7.03 and 4.00 at 20°C. These buffer values changes according to temperature are
precised here under :
D 2005 NEOTEK.
1) pH 7.01:
2 ) pH 4.01:
°C
°F
pH
°C
°F
pH
15
20
25
30
35
59
68
77
86
95
7.04
7.03
7.01
7.00
6.99
15
20
25
30
35
59
68
77
86
95
4.00
4.00
4.01
4.02
4.03
7.2.5 Redox Potential (ORP) :
It is imperative and compulsory to calibrate the ORP at 25 °C ; values such as 240 mV and 470 mV being given at
this temperature. The intrinsic response of the redox probe is not corrected in temperature because according to
the oxydo-reducers couples in presence in water, each NERNST slope of reversible reactions is proportional to the
numbers of exchanged electrons and thus to the variations of oxydation steps (1,2, 3, etc). Thus it is not possible to
carry out a multi-correction of temperature. Accordingly, one takes this measurement in its intrinsic meaning, the
oxydoreduction potential being by definition what the noble metal plunged in water compared to the electrode of
Ag/AgCl reference delivers.
7.2.6 Water Level :
At the moment, this parameter is not sufficiently compensated to provide a metrological value, i.e. +/- 1 cm of
water, but is used in fact as an indicator of immersion for the AQUA 100 probe from 0 to 10 m (or from 0 to 50 m in
option).
A compensation of this parameter for daily variations of atmospheric pressure through the incorporated barometer
of the Actéon 3000 is to be implemented in the sofware by end of 2005. Without this compensation, the zero can
vary by several cm between day and night.
There is a temperature compensation on the side sensor of hydrostatic pressure, but it is advised to calibrate at the
temperature of the water to be measured, especially for the zero in the air (atmospheric pressure). Thus, immerse
entirely the AQUA 100 in the water to be measured, wait approximately one minute, then lift it and action
immediately Del 0 in « Measures » mode.
The slope is less sensitive to temperature variations ; if you still want to calibrate it, use preferably a water column
or a pressure standard equivalent to the full scale (10 m or 50 m).
SET
ACTEON/AQUA/ACTEWIN
USER MANUAL
8.
DESIGN FEATURES
8.1
ACTEON 3000 TERMINAL
Data storage
Power
Capacity
Communication protocol
Dimensions (w x l x d)
Weight
Operating temperature
Degree of protection
D 2005 NEOTEK.
8.2
: 32 768 measures batches of 6 time-stamped parameters
( Standard version 1MB)
: 262 144 measures batches ( Version 8MB)
: 4 standard alkaline batteries 1,5 V AA LR6
: 2 000 hours
: SDI 12
: 145mm x 245mm x 110mm
: 600 g
: -5°C to +50°C
: IP 67
AQUA PROBE
8.2.1 SENSOR FEATURES
SENSORS
Temperature
Conductivity
pH
ORP
Dissolved Oxygen
Pressure (depth)
Sensor type
Range
Resolution
Accuracy
Sensor type
Range
Resolution
Accuracy
Sensor type
Range
Resolution
Accuracy
Sensor type
Range
Resolution
Accuracy
Sensor type
Range
Resolution
Accuracy
Sensor type
Range
Resolution
Accuracy
Platinum probe PT 100Ω
-5°C to + 50°C
0,01°C
± 0,1°C
4 slotted electrodes
0 to 200 mS/cm in 4 ranges
0,001mS /cm to 0,1mS/cm
± 0,5% of the reading
Combined glass electrode
0 to 14 units
0,01
± 0,05
Platinum probe
-999mV to +999mV
0,1mV
± 20mV
Polarographic monolithic
0 to 20mg/l
0,01mg/l
± 0,2mg/l
Piezoresistive sensor
0 to 10m
1cm
± 1% Full Scale
PAGE : 56/56
DATE : January/09/11
INDEX : 1
REF. : PONKITAQUA
SET
ACTEON/AQUA/ACTEWIN
USER MANUAL
PAGE : 57/57
DATE : January/09/11
INDEX : 1
REF. : PONKITAQUA
8.2.2 MECHANICAL FEATURES
Dimensions
Weight
Operating temperature
Degree of protection
Communication protocol
8.3
ACTEWIN SOFTWARE
Minimum hardware
requirements
Environment
Required memory
Format
Accessories
D 2005 NEOTEK.
: L=420mm ∅40mm
: 500 g
: -5°C to +40°C
: IP68 5 bars
: SDI 12
:PC III 400 MHz 64MO RAM
:Windows 98, NT 2000, XP
: 2MB
: CD ROM 800MB with user manual in .pdf file
: Actewin RS232/SDI 12 adapter with connection cables for AQUA probe
and Acteon 3000 terminal
SET
ACTEON/AQUA/ACTEWIN
USER MANUAL
PAGE : 58/58
DATE : January/09/11
INDEX : 1
REF. : PONKITAQUA
9. PONSEL AQUA PROBE connexion to ISCO 6712/6712FR and
AVALANCHE
1-Please connect the PONSEL AQUA probe with the special cable interface ref PONAQUCAB2 on the SDI12/rain
gauge connector of the 6712/AVALANCHE sampler.
2-You must be in Extended Programming to use the probe with the 6712 or Avalanche sampler ( code 6712.2).
The sampler can automatically scan for the presence of sensors, if no, you have to select "others functions" then
"Hardware" and select "SDI12 sondes". The screen will tell you "one sonde identified "
3-then you have to confirm the address of the sensor, the software tells you "0", you have to confirm going on 0
and press.
Please don't go on "done" if the setup of the probe is not made.
D 2005 NEOTEK.
4- Then the screen will tell you the number of 6 data sets . It's now very important to enter separately the
different parameters and units respecting strictly their order ( 1 to 6)
PARAMETER
UNITS
1 =LEVEL
meters
2 = CONDUCTIVITY
3 = pH
microSiemens
(μS/cm)
0 à 14
4 = ORP (Redox)
milliVolts
5 = TEMPERATURE
°C
6 = DISSOLVED OXYGENE
mg/l
5- Please tell if you want to store all the parameters or only selected parameters
6- Then the screen is going back on the probe address, if setup is correct please go on "done" and press
7-The screen will tell, you "new hardware, previous stored data will be erased"
please answer by YES for validation of the parameters…
8- You may run a calibration only for the probes mentionned ( pH, dissolved oxygen, ORP ) please follow the
instructions and press done afterwards.
9- You may also check the right value measured for a standard well known but you will not be able to modify this
value.
10-The setup is now finished and you may leave the hardware function
11- If you want to see the value of the different parameters on the screen, please go to "view report", then" data"
then "SDI12" , the readings of the different parameters appear on the screen,
An asterisk before the data value tells that the measurement is invalid and not working.
SET
ACTEON/AQUA/ACTEWIN
USER MANUAL
PAGE : 59/59
DATE : January/09/11
INDEX : 1
REF. : PONKITAQUA
Connection probe AQUA on interface cable PONSEL :
D 2005 NEOTEK.
Galvanic insulated adapter
Branchement du câble interface PONSEL sur AVALANCHE ISCO (entrée Rain Gauge) :
SET
ACTEON/AQUA/ACTEWIN
USER MANUAL
10.
SECURITY-SAFETY SHEETS
10.1
pH STANDARDS
-
-
D 2005 NEOTEK.
-
PAGE : 60/60
DATE : January/09/11
INDEX : 1
REF. : PONKITAQUA
pH 4 - Composition :
Potassium hydrogen phthalate < 2 %
Stabilisers < 0.01 %
Water.
pH 7 - Composition :
Phosphate compounds < 1 %
Stabilisers < 0.01 %
Water
pH 10 - Composition :
Carbonated compounds < 1 %
Water
• Physical and chemical properties:
Appearance: slightly soapy
Smell: Odourless
Physical condition: liquid.
Solubility: can be mixed with water.
Melting point: not applicable.
Boiling point: > 100 °C.
• Toxicological information:
Swallowing large amounts will cause nausea, vomiting and diarrhoea.
Contact with the skin can cause irritation and dermatitis in case of long-lasting exposure.
Contact with the eyes can cause irritation and conjunctivitis.
No mutagen or teratogen effects known.
• First aid:
Ingestion: Rinse the mouth carefully with water.
Drink a large amount of water.
In serious cases, see a specialist.
Skin contact: Wash abundantly with water and soap.
Eye contact: Wash abundantly with water. If the irritation persists, see a specialist
• Protection:
Carrying of protective glasses and rubber gloves is advised.
• Handling and storage:
Handling: Don’t eat or drink while handling the product.
Wash hands and face after using the product.
Storage: Store at room temperature (15 - 25 °C).
Protect from direct sunlight.
Keep out of reach from children.
Keep the container closed.
• Waste removal:
Chemical waste is often classified as ‘special waste’ and collection is often organised locally. Please contact
the local authorities for details.
SET
ACTEON/AQUA/ACTEWIN
USER MANUAL
10.2
-
PAGE : 61/61
DATE : January/09/11
INDEX : 1
REF. : PONKITAQUA
Buffer standard ORP 470 mV :
Composition :
Sulphuric acid < 5 %
Water.
• Physical and chemical properties:
Appearance: clear yellow liquid.
Smell: Odourless.
Solubility: can be mixed with water.
Melting point: not determined.
Boiling point: not determined.
• Toxicological information:
Swallowing will cause irritation of the mucous membranes in the mouth, of the pharynx and of the
œsophagus and can spread to gastro-intestinal irritations.
D 2005 NEOTEK.
Contact with the skin can cause irritation.
Contact with the eyes can cause severe irritation.
Inhalation can cause irritation of the mucous membranes together with coughing.
• First aid:
Ingestion: Rinse the mouth carefully with water. Drink a large amount of water.
In serious cases, see a specialist.
Contact with the skin: Wash abundantly with water.
Contact with the eyes: Wash abundantly with water. If irritation persists, see a specialist.
• Protection:
Carrying of protective glasses, rubber gloves and a mask (to avoid inhalation) is advised.
• Handling and storage:
Handling: Don’t eat or drink while handling the product.
Wash hands and face after using the product.
Storage: Store at room temperature (15 - 25 °C). Protect from sunlight.
Keep out of reach from children. Keep the container closed.
• Waste removal:
Chemical waste is often classified as ‘special waste’ and collection is often organised locally. Please contact
the local authorities for details.
SET
ACTEON/AQUA/ACTEWIN
USER MANUAL
10.3
PAGE : 62/62
DATE : January/09/11
INDEX : 1
REF. : PONKITAQUA
Buffer solution ORP 240 mV:
• Physical and chemical properties:
Appearance: yellow liquid.
Smell: Odourless.
Solubility: can be mixed with water.
Melting point: not determined.
Boiling point: not determined.
• Toxicological information:
Swallowing cause stomach problems.
Contact with water causes irritation.
• First aid:
Ingestion: Rinse the mouth carefully with water.
Contact with the skin: Wash abundantly with water.
Contact with the eyes: Wash abundantly with water. If irritation persists, see a specialist.
• Protection:
D 2005 NEOTEK.
Carrying of protective glasses and rubber gloves is advised.
• Handling and storage:
Handling: Don’t eat or drink while handling the product.
Wash hands and face after using the product.
Storage: Store at room temperature (15 - 25 °C).
Protect from sunlight.
Keep out of reach from children.
Keep the container closed.
• Waste removal:
Chemical waste is often classified as ‘special waste’ and collection is often organised locally. Please contact
the local authorities for details.
SET
ACTEON/AQUA/ACTEWIN
USER MANUAL
10.4
-
PAGE : 63/63
DATE : January/09/11
INDEX : 1
REF. : PONKITAQUA
Conductivity standard solutions:
Composition :
Potassium chloride < 5 %
Water.
• Physical and chemical properties:
Appearance: uncoloured liquid.
Smell: Odourless.
Solubility: can be mixed with water.
Melting point: not determined.
Boiling point: > 100 °C.
• Toxicological information:
Swallowing a large quantity causes nausea, vomiting or diarrhoea and can also lead to cardiovascular
problems.
No mutagen or teratogen effects known.
• First aid:
D 2005 NEOTEK.
Ingestion: Rinse the mouth carefully with water.
Contact with the skin: Wash abundantly with water and soap.
Contact with the eyes: Wash abundantly with water. If irritation persists, see a specialist.
• Protection:
Carrying of protective glasses and rubber gloves advised.
• Handling and storage:
Handling: Don’t eat or drink while handling the product.
Wash hands and face after using the product.
Storage: Store at room temperature (15 - 25 °C).
Protect from sunlight.
Keep out of reach from children.
Keep the container closed.
• Waste removal:
Chemical waste is often classified as ‘special waste’ and collection is often organised locally. Please contact
the local authorities for details.
SET
ACTEON/AQUA/ACTEWIN
USER MANUAL
11.
DATE : January/09/11
INDEX : 1
REF. : PONKITAQUA
PARTS REFERENCES
PART-REFERENCE
D 2005 NEOTEK.
PAGE : 64/64
DESCRIPTION
PONACTEON
PONAQUA
PONACTEWIN
ACTEON 3000 ; delivered in a bag
AQUA 100 multiparameter probe with 10m cable
ACTEWIN software with SDI12/RS232 adapter and cables
PONAQU-CAUSB
PONAQU-CAB2
USB
RS232 Adapter
AQUA 100 ⇔ ISCO interface cable
PONVM3
PONVM4
Travelling bag
Hard cover case
PONAQU-O2
PONAQU-C4/T
PONAQU-PH/RH
PONCABL -xx
Dissolved Oxygen sensor
Conductivity/Temperature sensor
pH/ORP sensor
AQUA 100 probe cable – xx m
PONAQU-LEST1
PONAQU-LEST2
PONAQU-CREP
PONAQU-ETUI
PONAQU-CAP1
PONAQU-CAP2
Stainless steel ballast (200g) for AQUA
Stainless steel ballast (500g) for AQUA
PVC cap for AQUA with LEST1
Protective watertight cylindrical case (for transport and also calibrations)
Cap of waterproofness for AQUA sensor plug
Connector-plug 12 contacts AQUA
PONACTW-ADPT
PONACTW-CAQU
PONACTW-CACT
PONACTW-LOG
PONACT-CIMP
Actewin SDI12/RS232 adapter
AQUA ⇔ Adapter SDI12/RS232 cable (1,50m)
Acteon ⇔ Adapter SDI12/RS232 cable (1,50m)
CD containing ActeWin software + user manual in pdf format
Cable for impulsional output (5,00m) (water sampler)
Consumables
PON-PH-AMP-4
PON-PH-AMP-7
PON-PH-AMP-10
Calibration standard pH 4,01 à 25°C (125ml)
Calibration standard pH 7,01 à 25°C (125ml)
Calibration standard pH 10,01 à 25°C (125ml)
PON-EH-SOL-470
PON-EH-SOL-240
Calibration standard ORP 470mV à 25°C (125ml)
Calibration standard ORP 240mV à 25°C (125ml)
PON-C-SOL 84
PON-C-SOL 1413
PON-C-SOL 12880
PON-C-SOL 112800
Conductivity calibration standard 84µS à 25°C (125ml)
Conductivity calibration standard 1413µS à 25°C (125ml)
Conductivity calibration standard 12880 µS à 25°C (125ml)
Conductivity calibration standard 112800 µS à 25°C (125ml)
PON-02-EL
PON-O2-ZR
PON-SOL-NET
PON-SOL-CSV
PON-O2-MBA6
Oxymetric electrolyte solution for D.O. sensor
PON-4LR6
PON-4NICD-AA
Set of 4 Alkaline batteries AA LR6
Set of 4 accumulators Ni-Cd AA
Cleaning solution for electrodes pH ( pepsine) (125ml)
Preservation solution for electrodes (125ml)
Set of 6 spare membranes for the Dissolved Oxygen sensor
SET
ACTEON/AQUA/ACTEWIN
USER MANUAL
12.
PAGE : 65/65
DATE : January/09/11
INDEX : 1
REF. : PONKITAQUA
FAQ
Question :
AQUA 100 probe connected,
My ACTEON 3000 terminal displays « NO PROBE ! ». What should I do?
With the Actéon 3000 terminal running, and the AQUA 100 connected, the icon Aqu must be displayed in the bottom
right corner of the Actéon 3000 screen. Activating the Measure mode (perpetual measuring) of the MAIN MENU, the
6 measured values of the 6 parameters are displayed every 5 seconds (after the message :MEASURE IN PROCESS
has been displayed for a few seconds):
D 2005 NEOTEK.
MEASURE
Level
:
11.22 ft
Conduct.
:
9.41mS/cm
:
6.63pH
pH
ORP
:
185mV
Tempera.
:
72.77 °F
DO
:
8.29mg/l
02-21-05 18:22
Aqu
If the icon Aqu does not appear, and if after activating the Measure mode the screen does not display the measured
values of the 6 parameters , and instead appears the message : NO PROBE ! , it means the AQUA probe has not
been detected by the terminal and that the SDI-12 communication between the probe and the terminal could not be
established :
MEASURE
NO PROBE !
ESC for exit
04-13-05 10:09
In that case, proceed with the following controls:
1-1 Are the cable connectors correctly fixed on their respective sockets?
In other words, are the connectors well in place and properly locked on their respective AQUA and Acteon sockets.
Pulling on the ends of the cable has a locking effect. Also check there is no water inside the connectors, otherwise,
rinse with demineralised water, specially after use in salted water, then dry for instance with an hair dryer.
At last check that no pin from either male connector has been torn, broken or bent over in its housing.
1-2 Are the batteries worn out ?
(Battery icon completely white for more than one week). Replace them with new ones (use a simple screw driver to
open the back of the handle of the Acteon terminal).
Note : the recording files are saved on Flash memories (for 20 years without any power supply) in the Acteon terminal
and there are no risks of loosing them during battery change.
Only date and time are lost, as well as recording parameters, easy to reconfigure manually or which are easy to save
on your PC hard disk through Actewin.
SET
ACTEON/AQUA/ACTEWIN
USER MANUAL
PAGE : 66/66
DATE : January/09/11
INDEX : 1
REF. : PONKITAQUA
1-3 Is the Acteon still in recording mode ? (most frequent case)
If Rec icon is still displayed on the screen (with or without other associated icons like Aut, A↓,
), the Actéon
terminal is still in automatic recording mode, whether the AQUA probe is connected or not, and whatever the starting
mode which has been initially chosen ( manual or programmed) .
Configuration Recording Stop recording . Check that the Aqu icon
In this case, go to MAIN-MENU
reappears with the probe connected, and that the 6 measured values are refreshed every 5 seconds.
1-4 The previous checks have not been successful, and the icon Aqu doesn’t appear on the screen, the
AQUA probe cannot be detected from the Acteon:
-
D 2005 NEOTEK.
-
Try to connect the AQUA to a PC using ACTEWIN and the SDI12/RS232 connexion to the RS232 port
(preferably COM1) using the appropriate cable which has been supplied :
If the probe is detected activating the AQUA 100 menu, it’s very likely that the first Acteon/AQUA cable
is defective, and the AQUA probe is not to blame. The Acteon terminal is usually not to blame : it can
also be tested connecting it to the PC and activating the Import or Recording Programming menu in
Actewin. If (very unusual), the ACTEON does not talk with the PC under Actewin, you should reset the
ACTEON opening the batteries housing ( even with new batteries) and disconnecting one battery for a few
seconds ; put it back in place, no recorded files have been erased (see 1-2).
If the probe has not been detected, and the following message is displayed for the AQUA : Can’t find SDI12 line. Check wires , and the ACTEON terminal has been detected, no formal conclusion can be drawn :
either the AQUA-ACTEON liaison cable or the AQUA are defective. In a last attempt, you can reset
the AQUA disconnecting it completely from the PC or the Acteon terminal. Without power supply, you have to
wait for a few hours until the total reset of the terminal is completed. During these few hours, leave the
probe at normal temperature (18 to 25 °C), it might by accident have gone through extreme temperatures
or thermic shocks.
If after that last AQUA reset the problem remains, it is advised, before calling your PONSEL after sales service,
to check the perfect state of the three detachable probes pods: sometimes, sensors in short circuit (broken pH
glass bulb, burst O2 membrane, ..), sensor connectors which have been in contact with salted water or not
properly clipped can result into brutal electrical over consumption and thus lead to the termination of the SDI12 communication (thus avoiding to communicate wrong measured values and helping to identify a defective
sensor).