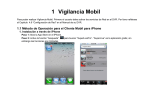
1
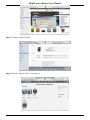
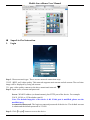
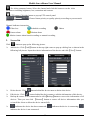
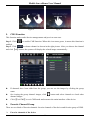
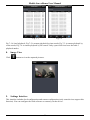
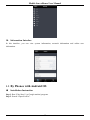
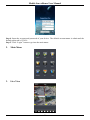
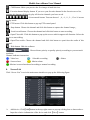
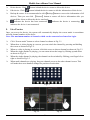
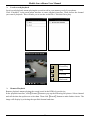
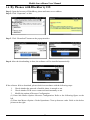
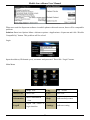
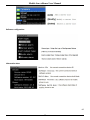
Mobile Surveillance User Manual Mobile Surveillance User Manual Contents 1.1 Network Configuration............................................................................................1 1.2 By Phones with iPhone OS......................................................................................1 1.3 By Phones with Android OS..................................................................................12 1.4 By Phones with Blackberry OS .............................................................................22 Mobile Surveillance User Manual Mobile Surveillance Here we mainly introduce mobile surveillance by phones with iPhone, Android & Blackberry OS. 1.1 Network Configuration Access device via WLAN Step 1: Connect device via wireless router. Then check DHCP both in router and device to automatically acquire IP address or enter the IP address manually. Step 2: Use WIFI function in your mobile phone to connect the wireless router. Note: Make sure your phone network and device network are in the same network segment on LAN. Step 3: Add the IP address and port in the mobile phone surveillance client. Access device via 3G network Step 1: Set the device network. Please enter Main MenuSetupNetwork tab. If you use PPPoE to connect device, please enable PPPoE and input username and password received from you ISP in network tab. Then click “Apply”. You can enter Main MenuInformationNetwork tab to see the IP address. If you want to utilize dynamic domain name, please apply for a domain name in a DNS server supported by the device. If you have a static WAN IP address, please enter Main MenuSetupNetwork tab to input your IP address, gateway and port. If you use LAN IP address, please enter Main MenuSetupNetwork tab to input your IP address, gateway and port and then forward IP address and port number in virtual server setup of the router or virtual server(If you has enabled the UPnP function in both the device and router, you can skip this step). Port forwarding setting may be different in different routers and servers. Please refer to the router’s manual for details. After you forward your LAN IP address and port, please check the WAN IP address in the router or server. Step 2: Add the WAN IP address or domain name in mobile phone surveillance client. 1.2 By Phones with iPhone OS Install software by iPhone/iPad Step 1: Open App Store software as shown in the figure on the left. Step 2: Search “SuperLive Pro” and click “Free” button as shown in the figure on the right. 1 Mobile Surveillance User Manual Step 3: Click “Install App” button. Step 4: Input iTunes Store password and then click “OK”. The software will be installed automatically. Install Software through PC Step 1: Install iTunes store in PC and then login. 2 Mobile Surveillance User Manual Step 2: Connect iPhone and PC. Step 3: Search “SuperLivePro” and select it. 3 Mobile Surveillance User Manual Step 4: Click “Download” button. Step 5: Input username and password. Step 6: Synchronously apply SuperLivePro software to iPhone/iPad. 4 Mobile Surveillance User Manual SuperLivePro Instruction 1. Login Step 1: Choose network type. There are two network connection ways: 3G/3G +WIFI, well video quality. This network supports main stream and sub stream. The real-time image will be displayed by using sub stream. 3G-, poor video quality contrast to the above mentioned network. Step 2: Input server, account and password. Server: WAN IP address (or domain name) plus HTTP port of the device. For example: 210.21.183:89 or 123.dvrdydns.com:89. Note: The default http port of the device is 80. If this port is modified, please use the modified port. Account and Password: The login account and password of the device. The default account is admin and the default password is 123456. Step 3: Click【Login】button to access the device. 5 Mobile Surveillance User Manual 2. Main Interface There are many buttons in the main interface, such as, screen mode, favorite channel, snap, record, open/close audio, talk, PTZ, etc. : Image view button. The pictures snapped in the live will be checked by clicking this button. : Playback button. Click this button to enter into playback interface. : Settings button. Click this button to set local configuration (Some can also support remote configuration). : Information button. Click this button to check lots of information including local information, device information, network information, etc. : Server list button. Click this button to add server list. : Help button. Help you know about the use of this software quickly. : CMS button. Make you preview the live image of multi-devices. : Log off button. Click this button to return to the login interface. : Screen mode button. You can choose 1,4,6,8,9,13 or 16 screen display mode. : Favorite channel display button. If you save your favorite channel in the favorite server list, clicking this button will directly play all favorite channels you have saved. : Snap button. Choose the channel and click this button to capture the channel image. : Local record button. Choose the channel and click this button to start recording. : Open/Close audio. Choose the channel and click this button to open/close the audio of this channel. : Open/Close talk. Click this button to pop up the servers which support talk function. Select the device to start talking. 6 Mobile Surveillance User Manual : Set video parameter button. Select the channel and click this button to set the video parameters including brightness, hue, saturation and contrast. : PTZ button. Click this button to pop up PTZ control panel. : Choose bitrate priority or quality priority according to your network condition. Channel indicator instruction: : Video loss : Schedule recording : Sensor alarm : Motion alarm : Others : Motion /sensor alarm based recording or manual recording 3. Server list Click button to pop up the following picture. Add device: Click【Add】button in the top right corner to pop up a dialog box as shown in the following left picture. Input the relative information of the device and click【Save】button. Delete device: Click Edit device: Click button behind the device name to edit the information of this device. Backup & restore: It is recommended to click【Backup】button to reserve the information of all button behind the device name to delete this device. devices. Then you can click 【Restore】button to restore all device information after you re-install the client or delete the device uncarefully. indicates the device has been connected; indicates the device is not connected. 7 indicates the device is connecting; Mobile Surveillance User Manual 4. Live Preview Once you access the device, the system will automatically display the screen mode in accordance with the channel number of the device Note: The maximum number of channels which can be connected are nine after login. Click “Screen mode” button to select channel as shown in Fig 4-1. When there is video playing in a screen, you can switch the channel by pressing and holding the screen as shown in Fig 4-2. When no video is playing in a screen, click this screen to choose channel as shown in Fig 4-3. When the single channel is playing, you can zoom in/out the image by flicking you finger up and down as shown in Fig 4-4. When the single channel is playing, the channel can be switched by flicking your finger left or right as shown in Fig 4-5. When multi channels are playing, drag one channel screen to the other channel screen. This will make these two channels change the position of each other. Fig 4-1 Fig 4-2 Fig 4-3 8 Mobile Surveillance User Manual Fig 4-4 5. Fig 4-5 CMS Function This function makes multi-device managements and preview come true. Step 1: Click to enable CMS function. When this icon turns green, it means this function is enabled. Step 2: Click to choose channel as shown in the right picture. After you choose the channel and click【ok】button, the system will display the related image automatically. If channels have been added into the group, you can see the images by clicking the group name. On viewing the group channel images, click button and select channels to check other channel images. Click【Exit CMS】to exit CMS mode and return to the main interface of the device. 6. Favorite Channel/Group There are two kinds of favorite channels: favorite channels of the device and favorite group of CMS. Favorite channels of the device 9 Mobile Surveillance User Manual Step 1: Click to enter into device management list. Click the device name to extend channel. Lighten the channels to save favorite channels as shown in Fig 6-1. Step 2: Return to the main interface and click button to play the favorite channels. Favorite groups of CMS Enable CMS function and lighten the group to save the favorite groups as shown in Fig 6-2. Then click button to play. Only one favorite group can be collected. Fig 6-1 Fig 6-2 :Color means the channel or group has been collected. Grey means the channel or group isn’t collected. 7. Playback Interface Fig 7-1 Fig 7- 2 10 Mobile Surveillance User Manual Fig 7- 3 Fig 7-4 Fig 7-1 is local playback; Fig 7-2 is remote playback by time search; Fig 7-3 is remote playback by event search; Fig 7-4 is remote playback by file search. Only a part of devices have the latter 3 playback modes. 8. Click 9. Image View button to view the captured pictures. Settings Interface This interface includes local configuration and remote configuration (only some devices support this function). You can configure the local software or remotely set the device. 11 Mobile Surveillance User Manual 10. Information Interface In this interface, you can view system information, network information and online user information. 1.3 By Phones with Android OS Installation Instruction Step 1: Run “Play Store” (or Google market) program. Step 2: Search “SuperLivePro”. 12 Mobile Surveillance User Manual Step 3: Press “Install” button. Step 4: Install the software subject to the notes. Once the downloading is done, the software will install automatically. Client Setting and Application 1. Login Step 1: Configure the network of your device and mobile phone. Step 2: Select network type. There are two network connection ways: 3G/3G +WIFI, well video quality. This network supports main stream and sub stream. The real-time image will be displayed by using sub stream. Step 3: Input the WAN IP address/domain name and port of your device in the sever column. The port should be HTTP port of your device. The default http port of the device is 80. If you have changed your http port, please enter the new port here. For example: 210.21.228.183:89 or 1.dvrdydns.com:93. 13 Mobile Surveillance User Manual Step 4: Input the account and password of your device. The default account name is admin and the default password is 123456. Step 5: Click “Login” button to go into the main menu. 2. Main Menu 3. Live View 14 Mobile Surveillance User Manual :CMS button. Make you preview the live image of multi-devices. :Favorite channel display button. If you save your favorite channel in the favorite server list, clicking this button will directly play all favorite channels you have saved. :Screen mode button. You can choose 1,4,6,8,9,13 or 16 screen display mode. :PTZ button. Click this button to pop up PTZ control panel. :Snap button. Choose the channel and click this button to capture the channel image.。 :Local record button. Choose the channel and click this button to start recording. :Open/Close talk. Click this button to pop up the servers which support talk function. Select the device to start talking. :Open/Close audio. Choose the channel and click this button to open/close the audio of this channel. :Hide button. Hide the software. :Choose bitrate priority or quality priority according to your network condition. Channel indicator instruction: :Video loss : Schedule recording :Sensor alarm :Others :Motion alarm :Motion /sensor alarm based recording or manual recording 4. Server List Click “Server List” icon in the main menu interface to pop up the following figure. Add device: Click【Add】button in the top right corner to pop up a dialog box as shown above . Input the relative information of the device and click【Save】button. 15 Mobile Surveillance User Manual Delete device: Click Edit device: Click button behind the device name to edit the information of this device. Backup & restore: It is recommended to click【Backup】button to reserve the information of all button behind the device name to delete this device. devices. Then you can click 【Restore】button to restore all device information after you re-install the client or delete the device carelessly. indicates the device has been connected; indicates the device is not connected. 5. Live Preview indicates the device is connecting; Once you access the device, the system will automatically display the screen mode in accordance with the channel number of the device Note: The maximum number of channels which can be connected are four after login. Click “Screen mode” button to select channel as shown in Fig 5-1. When there is video playing in a screen, you can switch the channel by pressing and holding the screen as shown in Fig 5-2. When no video is playing in a screen, click this screen to choose channel as shown in Fig 5-3. When the single channel is playing, you can zoom in/out the image by flicking up and down as shown in Fig 5-4. When the single channel is playing, the channel can be switched by flicking your finger left or right as shown in Fig 5-5. When multi channels are playing, drag one channel screen to the other channel screen. This will make these two channels change the position of each other. Fig 5-1 Fig 5-2 Fig 5-3 16 Mobile Surveillance User Manual Fig 5-4 6. Fig 5-5 CMS Function This function makes multi-device managements and preview come true. Step 1: Click to enable CMS function. When this icon turns green, it means this function is enabled. Step 2: Click to choose channel as shown in the following right picture. After you choose the channel and click【ok】button, the system will display the related image automatically. A maximum of 16 channels can be added into each of the group. If channels have been added into the group, you can see the images by clicking the group name. On viewing the group channel images, click button and select channels to check other channel images. Click【Exit CMS】to exit CMS mode and return to the main interface of the device. 7. Favorite Channel or Group There are two kinds of favorite channels: favorite channels of the device and favorite group of CMS. 17 Mobile Surveillance User Manual Favorite channels of the device Step 1: Click “Server List” to enter into device management list. Click the device name to unfold channel. Lighten the channels to save favorite channels as shown in Fig 7-1. Step 2: Return to the main interface and click button to play the favorite channels. Favorite groups of CMS Enable CMS function and lighten the group to save the favorite groups as shown in Fig 7-2. Then click button to play. Only one favorite group can be collected. Fig 7-1 Fig 7-2 :Color means the channel or group has been collected. Grey means the channel or group isn’t collected. 8. Image View The first picture The previous picture Next picture The last picture Zoom in Zoom out Delete 9. Record Playback 18 Mobile Surveillance User Manual Local record playback Local record playback means playing the record saved in your memory card of your phone. Click “Playback” in the main menu interface to enter playback interface. Then choose the channel you want to playback. This will take you to see the record file. Click this file to play. Pause/Play Stop Forward Backward Remote Playback Remote playback means playing the record saved in the HDD of your device. In the playback interface, click【Remote】button to pop up the following left picture. Select channel and roll the data bar up/down to select data. Then click【Search】button to make further choice. The image will display by selecting the specified channel and time. 19 Mobile Surveillance User Manual 10. Settings In the main menu interface, click “Settings” to enter the above interface where you can configure 20 Mobile Surveillance User Manual various items related to the device, such as, local, basic, live, record, alarm configuration and so on. Here we only introduce the local configuration. Other configurations are similar to the configuration of the device itself (See the user manual of the device for more details). Local Settings Click “Local” to enter local settings interface. In this interface, you can set storage and alarm. Storage: Set up the relevant parameters of mobile video. Only when the SD card is inserted do the storage settings take effect. Record recycle: If enabled, the system will automatically delete the old records and recycle the space if it is completely utilized. Alarm: If audio alarm is enabled, sound alarm will be triggered when video loss/sensor/motion alarm occurs. If shake alarm is enabled, shake alarm will be triggered when video loss/sensor/motion alarm occurs. Information View You can check the information of the system, network and online user in this interface. 21 Mobile Surveillance User Manual 1.4 By Phones with Blackberry OS Step 1: Open the browser of BlackBerry phone and enter server address. Step 2: Click “Supercam” to link. Step 3: Click “Download” button on the popup interface. Step 4. After the downloading is done, the software will be installed automatically. If the software fails to download, please check in accordance with the following steps: 1. Check whether the network of mobile phone is normal or not. 2. Check whether DVR server connect network normally or not. 3. Modify the option of Browser Configuration. (1) Enter into Menu->Option->Browser Configuration. Refer to the following figure on the left. (2) Enter into Menu->Option->Cache Operations. Clear up browser cache. Refer to the below picture on the right. 22 Mobile Surveillance User Manual When user used the Supercam software in mobile phone with touch screen, there will be compatible problem. Solution: Enter into Options Menu->Advance options->Applications->Supercam and click “Disable Compatibility” button. This problem will be solved. Login Input the address (IP/domain: port), username and password. Then click “Login” button. Main Menu Image image view Log log Server List device list Live live view Help software help center Settings software setting Information Logoff device information view logoff and return to login interface 23 record Mobile Surveillance User Manual Live view Note: User can click Mark 1 Current viewing channel Mark 2 Channel status Switch channels PTZ, click to switch to PTZ control panel Snap Full screen Background Preset Return button on the Blackberry phone to return the previous interface. alarm Stop rotating the PTZ Upward rotates the PTZ Downward rotates the PTZ Leftward rotates the PTZ Rightward rotates the PTZ Zoom In/Focus In/Iris Add Zoom Out/Focus Out/Iris Sub Select the preset point Group Server list 24 Set the cruise line Mobile Surveillance User Manual Software configuration Information view A2 25