1
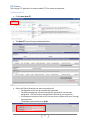
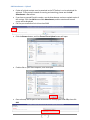
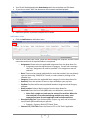
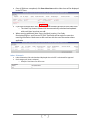
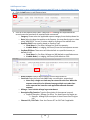
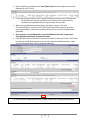
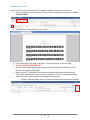
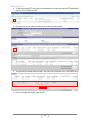
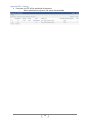
Cenergy International Web e-FST Reference Guide User Manual - Contractor CIS-WI-83B Rev 2 DOCUPEAK SYSTEM™ Provided By Webiplex, Inc. 1 Table of Contents Accessing the Cenergy FST System ........................................................................................................... 3 Logging In ........................................................................................................................................ 3 Locking your Account ....................................................................................................................... 4 Field Service Ticket (FST) Application ....................................................................................................... 5 Overview of the FST “Dashboard” .................................................................................................... 5 Creating a new FST .......................................................................................................................... 6 Editing a Draft FST ......................................................................................................................... 13 Notes Field – Additional Information ............................................................................................. 14 Submitting the FST for Approval .................................................................................................... 14 Worksite Supervisor Review .......................................................................................................... 15 Completed FSTs ............................................................................................................................. 16 FST Status Codes ................................................................................................................................... 17 Logging out ........................................................................................................................................... 18 2 Accessing the Cenergy FST System Logging In 1. Go to http://www.cenergyintl.com/ 2. Select the Web e-FST icon at the top of the home page 3. Select the Contractor Training Video for a tutorial of the same information in the online manual. 4. Go back to the web page and login 5. Enter your User Name and Password then click the “LOGIN” button ** Upon logging into the Cenergy FST system for the first time, you will be prompted to immediately change your password as described in the next section, Managing Your Profile. NOTE: Check your internet tools and make sure you have Compatibility View Settings checked for “Display all websites in Compatibility View”. This will allow you to select dates from the calendar display. 3 Managing your Profile To change User Details such as email address or password, click on your user name to the left of the “Logout” link. Click User Name to Manage Profile Update any user details that you wish to change. To change your password, enter your Current Password, and then enter your new password in both the “Change Password” and “Confirm New Password” fields. Click the “Change” button to save changes The message below will be displayed when your account changes were successful: Locking your Account If you enter your password incorrectly five times, your account will be locked and you will have to contact your Cenergy Representative to unlock your account or our Web eFST Technical Support Desk at 800-238-1567 4 Field Service Ticket (FST) Application Overview of the FST “Dashboard” The FST dashboard is displayed when you log into the application. From here you can add new FSTs, submit draft FSTs for approval, and view previously submitted FSTs. 1 2 3 1) Create New FST: Click this link to open the FST 2) Column Headers: Can be used to sort the list of FSTs. Click any header to sort based on that item. Click a second time to reverse the sort order. Start and End dates are display after you submit for review. 3) Indexing Icon: Click the icon to the left of the FST Submittal # to view and/or edit the FST. 5 FST Process The Cenergy FST application is used to submit FSTs for review and approval. Creating a new FST Click Create New FST The New FST form will open as displayed below Select Client / Job Select the Client/Job where the work was performed. o The Approver email will be automatically populated o The Alternate approver will be automatically populated if one has been designated. This field may be changed when advised by your supervisor. o If the approver emails are not for the correct person, please notify your Cenergy representative o The default status will be set to Draft 6 Add Attachments – Upload Copies of original receipts must be attached to the FST before it can be submitted for approval. To fax receipts instead of scanning and attaching, please see the Add Attachments – Fax section. If you have a scanned file with receipts, use the Attachments section to upload copies of the receipts. Click the Add button under Attachments, and the attachment browse screen will be displayed File Size per attachment limit is less than 3MB. File Size per attachment limit is less than 3MB. Click the Browse button, and the Choose File to Upload screen will open Find the file on your local computer, then click Open Once selected, the file path of the attachment will be displayed under File, then click Add 7 Your file will be displayed under Attachments with the create date and File Name. If you do not select “add” the document will not attach and be displayed. Repeat the process if you have multiple files to attach Add Labor Items Click the Add button to add Labor Items Enter all of the Labor Item Fields. Fields with RED headings are required, and the record cannot be saved until all required fields are completed. o Assignment: Please select the applicable assignment from the drop down list. Assignment must be selected prior to category. You will see a message that says “Assignment ID must be specified” if an assignment was not selected. o Date: Time must be entered individually for each date worked. You may directly type in a date using “MM/DD/YY” format, or select a date by clicking on the calendar icon. o Category: Please select the applicable labor category from the drop down list. o Quantity: Enter the number of hours or days worked per your pay rate. o Pay Rate: Pay Rate will be auto-populated based on Assignment and Category selected. o Work Location: Select a Work Location from the drop down list. o Cost Code: Enter the Cost Code (WBS code, cost allocation, network etc) Note: Only a single cost code may be entered for each line. When the time entered is to be allocated among multiple cost codes, enter separate line items for each applicable code and allocated time. o Description/Rig/Loc: Type the description (Project, rig, well, and or business area) of work performed and your job title. Example: Engineer /Well # 272 South Texas o Chevron D7i / OXY Task: Enter the Chevron D7i or OXY Task if applicable. 8 Once all fields are completed, click Save Labor Item and the labor item will be displayed in the FST form. If you have multiple labor items to enter, follow the above process for each labor item. o The Labor Pay Amount Subtotal will be automatically calculated and updated with each labor item that you add. When entering additional labor items, the Work Location, Cost Code, Description/Rig/Loc. and Chevron D7i/OXY Task fields will be copied to save time entering information. Make sure to edit each box with the new information where applicable Labor Subtotals Labor Subtotals will be calculated and displayed when the FST is submitted for Approval. Each category will show a subtotal. o Example: Total hours for office rate. 9 Add Expense Items Note: Pay rate is your reimbursable amount and bill rate is charged to the client. Click the Add button to add Expense Items Enter all of the Expense Item Fields. Fields with RED headings are required and the record cannot be saved until all required fields are entered. o Category: Please select the applicable expense category from the drop down list. o Date: Select the date that applies to the Expense. You may directly type in a date using “MM/DD/YY” format, or select a date by clicking on the calendar icon. o Quantity Field: Enter quantity based on Expense Type. Fixed Rates (i.e. Per Diem, Mileage etc) Enter the quantity. Variable Rates (i.e. Lodging, Airfare etc) Enter the total expense amount. o Pay Rate/Bill Rate: These rates will either default to a specified amount, or default to 1.00. Fixed Rates (i.e. Per Diem, Mileage etc) Will default to specified amount. Variable Rates (i.e. Lodging, Airfare etc) Will default to 1.00. o Work Location: Select a Work Location from the drop down list. o Cost Code: Enter the Cost Code (WBS Code, cost allocation, network etc) Note: Only a single cost code may be entered for each line. When the expense entered is to be allocated among multiple cost codes then enter separate line items for each applicable code and allocated expense. o Mileage – must include mileage log as attachment o Description/Rig/Location: Type the Description of the expense incurred. Expense Examples: Mileage, Per Diem, Tax, Hotel name # of nights etc. Example: Mileage to/from airport or Hotel Crown Plaza 5 nights LAX o Chevron D7i / OXY Task: Enter the Chevron D7i or OXY Task if applicable. 10 Once all fields are completed, click Save Expense Item and the expense item will be displayed in the FST form. If you have multiple Expense items, follow the above process for each expense item. o The Expense Pay Amount and Bill Amount Subtotal will be automatically calculated and updated with each expense item that you add. When entering additional expense items, the Work Location, Cost Code, Description/Rig/Loc. and Chevron D7i/OXY Task fields will be copied to save time entering information. Make sure to edit each box with the new information where applicable. If the expense is not reimbursable to you but billable to the client, contact your Cenergy Representative for a special rate code. Click the save button at the top or bottom of the form to save the record. The FST will be saved as a draft, allowing you to return and continue to add attachments, Labor Items and Expense items, until it has been submitted. ** If you do not see a labor/expense item, please contact your Cenergy Representative. 11 Add Attachments - Fax Once the FST has been saved and an FST number is assigned, receipts can be faxed in. Click the checkbox to the left of the FST that needs receipts submitted, then click Print FAX Cover Sheet A barcode cover page will open in a new tab Print the barcode cover page, and place on top of all receipts as the first page Fax the receipts to (713) 583-7273 The fax will be processed, and the receipts will be automatically attached to the FST based on the barcode cover page Return to the FST Dashboard to verify that the receipts were successfully received. Please allow 10 minutes for this process to complete. If you don’t see the attachment after 10 minutes, please contact your Cenergy representative o The # Att field will update from 0 to 1 once the receipts are successfully received 12 Editing a Draft FST To edit an existing FST, click on the icon between the check box and the FST Submittal # column. This will open the FST. Click the icon for the Labor or Expense item that you wish to edit. The previously entered data will open. Edit the record, and then click “Save Labor Item.” Once all changes are made, save the FST. 13 Notes Field – Additional Information Additional information can be added to the FST in the box below the expense items. The information will be viewed by the Approver. Submitting the FST for Approval Once all attachments, Labor Items and Expense Items have been added; select the checkbox to the left of the record and click Submit for Approval. This will update the status of the FST from Draft to Sent for Approval. An email notification will be sent to your Approver letting them know there is an FST pending their review. The Start Date and End Date fields will get set once the FST is Sent for Approval You may only edit FSTs in “Draft” status 14 Worksite Supervisor Review An email notification will be sent to the worksite supervisor (Approver) and an Alternate Approver (if designated by the Approver). The worksite supervisor will review the FST detail and any attachments. The worksite supervisor will respond to the email with either Approved or Rejected. Approved FSTs – Worksite Supervisor (Approver/Alt-Approver) If the FST was approved, no further action is necessary. The FST status will be updated from Sent for Approval to Approved. You will also receive an email notification letting you know the request was approved. Rejected FSTs – Worksite Supervisor (Approver/Alt-Approver) If the FST was rejected, the approver will provide a reason for the Rejected status. To view the reject reason, you can look at the Notes column on the FST list, or you can open the record and look in the Approver Response section. Fix the FST per the rejected notes, add additional notes if necessary and click Save. Follow the Submit for Approval process to start over. The status will be updated to Resubmitted. 15 Approved FSTs - Cenergy If accurate, the FST will be submitted for payment. o When submitted for payment, the status will show Post. 16 FST Status Codes Draft A draft FST is still in progress and has not been submitted for approval. Edits to the FST can be made in draft status. Cenergy Review The FST has been submitted to Cenergy Supervisor for hours and expense review. No changes can be made to the FST. Used for employee status users. Submit for Approval The FST has been submitted to the approver for review. No changes can be made to the FST. Approved The approver has reviewed and approved the FST. Rejected The approver has reviewed and rejected the FST. The approver will give a reason when rejecting the FST. Resubmitted The FST is pending Re-Approval after requested changes were made by the contractor. Resubmitted Cenergy Review The FST is pending Re-Review after requested changes were made by the contractor. Return to Consultant Cenergy has returned the FST for the contractor, and it must be resent through the entire approval process. Resubmit to Approver At the Cenergy final review, there was a minor change required on the FST. Cenergy staff made the adjustment, and returned the FST to the Approver for review and approval. Mismatch When the Approver and Alt Approver submit different responses I.e. Approver says Rejected, Alt Approver says Approved Post The FST has been approved by both the Approver and Cenergy, and has been submitted for payment. 17 Logging out To log out, click the button to the right of your user name. Logout Button You will be returned to the Login Screen. 18