1
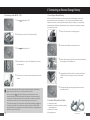
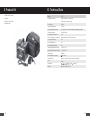
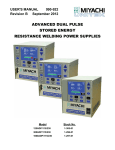
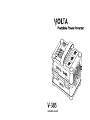
CONTENTS
P01
I. Safety Instruction
Warning!
1. Safety Precautions
2. Safety Instruction
P02
Battery Use
II. Product Introduction
1. Features
2. Automatic Protection
3.
P03
III. Product Description
1. Names of Parts
2. Function Description
P06
IV. Operation Instruction
1. Installation and Detachment of Battery Unit
2. Connecting to the Volta V-385
P08
V. Connecting an External Storage Battery
1. Connecting an External Battery
2. External Power Cables
P10
1. Normal Mode
FOREWORD
Thank you for purchasing
VI. Introduction to Function Modes
2. Flash Mode
VOLTA
Power Inverter.
VOLTA Power Inverter is designed in accordance with industr
standard . eatures excellent performance, powerful function, reliable
stability and a portable design
the ideal
solution
outdoor AC power supply and indoor emergency supply.
features a special circuit design for studio flashes to meet
demanding power requirements.
be able to user your studio flash in
studio, or on location. To
read
this user manual to
proper operation and
.
3. LED Lamp Alarm
P12
VII. Replacing Fuses
P12
VIII. Product Compatibility
P12
IX. Maintenance and Warranty
P13
X. Package Contents
P14
XI. Technical Specifications
I. Safety Instruction
II. Product Introduction
1. Features:
Warning!
Children under the age of 18
1.1 The inverter
professional demands.
inverter.
Be careful of electric shock caused by the high-voltage AC output from the inverter!
1.2 Dual working modes: flash mode
DO NOT use the inverter in fog, rain, or snow without any protection!
1.3
1.5 Optional
to
1. Safety Precautions
The rated power
V-385 is 750W (At 800W, V-385 can work for only 3 minutes continuously.) DO
NOT use the V-385 withany equipment with the rated power of over 750W.
●
DO NOT operate the nverter in fog, rain, snow, or dusty conditions. It should be used in a dry
and dustless environment.
●
●
DO NOT place flammable materials on or near the inverter. Never store the inverter or use it in
environments where flammable gases exist to prevent combustion in the rare case that the
Repairs of the inverter should
2. Safety Instruction
●
output power level.
1.8 Pure sine wave output. Output voltage is 110/60Hz or 220V/50Hz depending on model.
1.9 Continuous power up to 750W (At 800W, the V-385 can work for only 3 minutes
1.10 The inverter is equipped with the built-in self-adjustable cooling fan.
1.11 High-end microelectronics processing system
2.1 Low-voltage input protection
2.2 Overload protection
2.3 Short-circuit protection
2.4 Low-electricity alert
2.5 High-voltage input protection
2.6 Overheating protection
be performed by authorized service centers.
Battery Use
The LiFePO4 battery has a large capacity, high voltage and rapid discharge.
huge
DO NOT short circuit the
may result in injur battery damage, or even explosion.
current and high temperature
reliable performance.
2. Automatic Protection
The inverter uses a LiFePO4 battery. The acceptable ambient operating temperature is -10°C to
45°C. Other temperatures may degrade performance or cause product malfunction.
●
●
LED lamp
1.7
DO NOT cover or block the vents. DO NOT place the Inverter in a narrow or small space.
30 cm away from nearby objects.
Ensure that the inverter is no less than
do so
overheat and result in product malfunction.
Please close the socket covers of any unused AC sockets.
●
indicate the remaining battery level.
continuously.) The conversion efficiency is up to 91%.
●
●
.
LED lamp
1.6
●
●
non-flash mode.
attery unit is user replaceable and detachable from
also
inverter.
1.4 3 USB sockets are available for powering electronics with the USB interfaces.
iPhones, iPad
Please read the following safety precautions before installing or operating the inverter to avoid
the Inverter and to prevent personal injury.
●
,000 mAh LiFePO4 battery.
the control unit. The b
2.7 Positive and negative reverse connection protection of power supply
3. For Use With
●
●
Photographic equipment: Studio flashes, LED lamps, quartz lights, and other continuous
lights.
Household electrical entertainment products: TV sets, camcorder, cameras, video lights, radios,
mobile phones, etc.
Should battery acid come into contact with skin or clothes, rinse with soap and water
immediately. Should battery acid come into contact with eyes, rinse the eyes with cold water for
no less than 20 minutes and then get medical attention immediately.
●
DO NOT place any metal tool on the battery unit
●
Office supplies: Desktop computers, laptops, printers, fax machines and scanners, etc.
●
Electric tools: Electric saws, electric drills, grinders, sanders, etc.
●
Any other equipment with the rated power of no more than 750W (At 800W, the V-385 can
work for only 3 minutes continuously.)
DO NOT place metal objects such as a ring, a bracelet, a necklace, or a watch near and around
the
.
01
Household appliances: Dust collectors, fans, lamps, shavers, fridges, blenders, food
processors, etc.
02
III. Production Description
1. Name of Parts
Main body
Charger
Charger Power Cable
External Power Cable
Control Unit
01. Handle
02. AC Output Socket (110V/60Hz or
220V/50Hz)
03. Socket Cover
Switch
04.
ON (Power on)
OFF (Power off)
USB (USB charge)
05. Battery Indicator (displays battery level)
06. Power Indicator (displays power output
level)
07. Status Indicator (displays
status)
08. USB Socket (USB1, USB2, USB3)
09. USB Socket Cover
10. USB ON Indicator
11. Locking Clasp (Two on the left and two on
the right)
12. Air Inlet
13. Fuse
14. Air Outlet
15. Mode Selection
Flash (Flash mode)
Normal (Non-flash mode)
16. Power Input
03
Battery Unit
17. Charging Socket
18. Charging Socket Cover
19.
Input Socket for External Battery
20.
Input Socket for External Battery
21. Built-in Battery Output
22. External Power Output
Carrying Case
Charger
23. Charging Indicator
24. AC Input Socket
25. Charging Connection Cable
26. Fuse
Charger Power Cable
27. AC Input Plug
28. AC Output Plug
External Power Cable (sold separately)
29.
Cable
30.
Cable
Carrying Case
31. Warning Label
32.
Flap
2. Function Description
2.1 LED Indicators
(1) Battery Indicator (05) (displays battery level)
Battery LED
Battery Voltage
RED, blinking
<10.7or >15.4V
RED
10.7~11.2V
ORANGE
11.2~12.3V
GREEN
12.3~14.6V
ORANGE, blinking
14.6~15.4V
●
●
the LED light changes as the battery voltage goes down. The
higher the load power is, the more abruptly LED light changes.
operation, the
will shut down automatically if the Power Indicator (06)
blinks frequently and the buzzer alarms for over 5s. In this case, the remaining battery power is
too low
the current load.
.
04
IV. Operation Instruction
1. Installation and Detachment of Battery Unit
(2) Power Indicator (06) (displays power output level)
Power LED
Output Power (LP450x)
Output Power (V-385)
OFF
0~35W
0~35W
GREEN
35W~200W
35W~230W
ORANGE
200W~350W
230W~520W
RED
350W~460W
520W~670W
RED, blinking
>460W
>670W
(3) Status Indicator (07) (displays working status)
Status LED
Working Status
RED
No
GREEN
Yes
Installation
1. Place the control unit on the battery unit so that the control unit
power
the units together.
2.
● Detachment
1. Push the button on each locking clasp to open the four locking
clasps.
2. Remove the control unit from the battery unit.
1.1 Charging
.
The AC charger
●
1. Turn the inverter off before charging.
2.2 Mode Selection (15)
The inverter is designed with two operating modes: “Normal” (non-flash mode) and “Flash” (flash
mode). Users can choose either operating mode depending on the equipment being powered.
2. Insert the “Charging Connection Cable (25)” of the charger into
in this
The “Flash” (flash mode) is specially designed for the use with monolights.
power saving function is not available so the built-in battery can stand by for only 13
mode
hours.
the “Charging Socket (17)” on the inverter.
In “Normal” (non-flash mode), the use of
not available. In this mode
power saving function
the built-in battery stand by for 55 hours. Therefore,
non-flash electronics are recommended to use this mode.
3. Insert the “AC Output Plug (28)”of the Charger Power Cable into
For details, refer to Section VI “Introduction to Function Mode”.
the “AC Input Socket (24)”of the charger, and connect the “AC
Input Plug (27)” to any AC power for charging.
2.3 Power Switch (04)
“OFF”: The inverter is powered off.
“ON”: The inverter is powered on
“USB”: The inverter enters into USB charging mode. ortable electronics with USB interfaces
can be charged from the USB
such as iPhone iPad
sockets. In USB mode, no AC power output is available.
This battery unit can be charged using AC power supply (100-240V). However, an
adapter may be needed when charging the inverter in different countries.
USB1: Output 5V/2000mA
USB2: Output 5V/1000mA
USB3: Output 5V/500mA
2.4 AC Output Socket (02)
●
●
Three AC output sockets are in parallel connection, and each of them can output the maximum
power.
The
sockets are universal and accepts most foreign power cords. No adapter is required.
tandard voltage
●
120V/60Hz
depending on the model you purchase.
1.2 LED Lamps of the Charger
.
(1) The red lamp is blinking:
(2) The red lamp is lit continuously:
harging.
(3) The green lamp is lit: Charging is complete.
It takes about 6 hours to fully charge the inverter when the battery power is empty.
Ensure to pull out the “Charging Connection Cable” when the charging is complete. To
maintain the expected service life of the battery, ensure to fully charge the inverter in
the following circumstances:
● Each time after using the VOLTA Inverter.
●
05
Before using the inverter if it has not been used in more than 100 days.
06
V. Connecting an External Storage Battery
2. Connecting to the VOLTA V-385
1. Turn “
1. Connecting an External Battery
Switch (04)”to “OFF”.
2. Connect your device to the “AC Output Socket (02)”.
3. Turn “
Instead of using the built-in battery, an external power cable (sold separately) can be used to
power the inverter with an external battery (11-15V). As some external batteries have larger
capacities, the inverter can work longer than that in using the built-in battery. You can purchase
external batteries with different capacities based on your requirements to prolong the continuous
service time of the inverter.
1. Take the VOLTA Inverter out of the carrying case.
2. Check and ensure that the inverter is powered off.
Switch (04)”to “ON”.
4. Turn “Mode Selection (15)”to “Flash (flash mode)” or “Normal
3. Interlock the “Power Input (16)”of the control unit and the “External
Power Output (22)” on the battery unit.
(non-flash mode)”.
5. Turn your device on. Now your device will draw power from the
inverter.
4. Connect the “External Power Cable” to the battery unit. Ensure a
CORRECT positive and negative connection to the external
battery.
5. Verify that preceding steps are properly performed, and then
Power the modeling lamp off while using the inverter with monolights. Otherwise, the
battery unit of the inverter may run out of power within a short time.
Switch (04)” ON the inverter will beep and run a short
When you turn the “
automatic detection. During the detection the LED indicators on the control panel will
change colors. The detection will last a few seconds. When it is done the unit will beep
and the “Status Indicator (07)” will turn green signalling the unit is ready to use
For outdoor photography, the inverter can be used while placed inside the carrying case
to avoid any dust, sand, or water. Before use, make sure to open the “Air Vent Flap
(32)” on both sides of the carrying case and use the hook buckles to keep them opened.
DO NOT cover the “Air Inlet (12)”.
07
power the inverter on.
2. Standard of External Power Cables
2.1 external power cable
2.2 Standard of external power cables provided by
other manufacturers
(1) Allowing 100 A current
(2) No longer than 2m
External power cable
(Sold Separately)
08
VI. Introduction to Function Modes (Taking V-385
as an example)
Warning!
DO NOT REVERSE the
connection on the external battery.
fuses
and
even cause irreparable damage to the inverter.
covered by the warranty.
DO NOT use the inverter in or around explosive and flammable gases.
Ensure that the “Power Input (16)”of the control unit and the “External Power Output (22)”
on the battery unit are securely interlocked.
●
When the inverter uses an external battery, the built-in battery of the inverter will not be
charged.
●
The required voltage of an external battery is 11-15V.
●
The symbol [+] indicates anode (positive), and [-] indicates cathode (negative).
1. Normal Mode
In this mode, the use of flashes is not available but non-flash electrical appliances with the rated
power can use the normal mode. Taking as an example, the maximum power is 800W (At 800W,
can work for only 3 minutes continuously.) The power saving function is available in this mode.
When the operated power exceeds 800W, “Power Indicator (06)” turns red (blinking) and the
buzzer alarms. Meanwhile, the “Status Indicator (07)” turns red and the inverter will perform an auto
protective shutdown. The following circumstances are for your reference:
●
●
●
For the equipment with the power of about 800W, the inverter can work for 3 minutes
continuously. The inverter stops working after a buzzer alarm.
For the equipment with the power of 1000-1400W, the inverter can only work for 2-3 seconds.
The inverter stops working after a buzzer alarm.
For the equipment with the power of 1400-1800W, the system of the inverter starts but shuts
down within 3 seconds.
●
For the equipment with the power of more than 1800W, the system of the inverter CANNOT start.
●
As for the equipment with other power, it should be regulated based on the preceding values.
On non-flash device that has a rated power smaller than 45W, the Power Inverter should be
switched to Flash Mode for a normal operation. Otherwise, the Power Inverter will automatically
enable power saving function and cut off AC output.
2. Flash Mode
The “Flash” (flash mode) is specially designed for the use of flashes. It is also applicable to
electrical appliances with rated power. However, in this mode, power saving function is not
available. For the use of non-flash electrical appliances with rated power, see the preceding section
“Normal Mode”.
While using a flash:
2.1 Maximum service energy for the flash
(Using
with the VOLTA Inverter
V-385) Maximum service energy for the flash
(1) Will be 1500ws (cumulative, similarly hereinafter) if the flash recycles in 1 second.
(2) Will be 3000ws if the flash recycles in 2-3 seconds.
(3) Will be 5000ws if the flash recycles in 5 seconds.
(4) As for the flash recycling differently, refer to the preceding values.
09
10
2.2 Recycling time of the flash using
the VOLTA Inverter
VII. Replacing Fuses
(Using the V-385) Recycling time of the flash
(1) The recycling time does not change if the flash recycles in 1 second and does not exceed 800ws
similarly hereinafter).
The time will increase if the flash recycles in 1 second but exceeds 800W/S. The recycling will
become longer but will not exceed 5 seconds.
(2) If the flash recycles in 2-3 seconds and does not exceed 2400
.
The recycling time will increase if the flash recycles in 2-3 seconds but exceeds 2400W/S. The
time becomes longer but will not exceed 5 seconds.
The VOLTA V-385 is equipped with three 30A fuses.
Should the inverter fail to operate properly, check if the fuses are melted. If so, replace with
new fuses.
Ensure that the inverter is turned off before replacing any fuses. Unplug the bad fuses and insert
new ones.
(3) The time does not change if the flash recycles in 3 seconds and does not exceed 3000W/S.
ill increase if the flash recycles in 3 seconds but exceeds 3000W/S. The
recycling becomes longer but does not exceed 5s.
2.3 Amount of Full-Powered Flashes with a Fully Charged V-385
( ) Approximately
for one
s flash.
( ) Approximately 7
for one 7
s flash.
VIII. Product Compatibility
The inverter can be used with a wide range of electrical products such as studio lights and
non-flash electrical appliances. We have yet to find any incompatible products. If you find a
product that does not work with the inverter please contact us at [email protected].
(3) For the values of flashes with other power levels, refer to the preceding values.
IX. Maintenance and Warranty
3. LED Lamp Alarm
When a flash is first energized by the inverter, the transient current of the flash is no less than 3
times its full-load current. For example, a 100ws flash may have a transient current equal to the
full-load current of a 300ws lamp. Therefore, when the V-385 is used for specific flashes, the
“Power Indicator (06)” will blink with a short beep. This is normal when the transient current of the
flashes exceed 800W.
If the “Power Indicator (06)” blinks and beeps for over 5 seconds, the equipment will automatically
shut down.
Should this happen, turn “
Switch (04)” to power the inverter on for use.
To avoid performance degradation caused by accumulated dust, wipe the surface of the inverter
with a damp clean cloth. If the inverter has been stored for a long period of time, please charge
before using to obtain the best performance.
Each Volta V-385 Power Inverter goes through a detailed inspection and quality check before
leaving the factory.
A Limited One-Year Warranty is provided for the Volta Power Inverter. The warranty guarantees,
under normal use, that the product will be free from defects in workmanship and in materials for
the period of one year from the purchase date. Any accidental and user damage is not covered
under the warranty. Any signs of tampering, unauthorized service, or modifications will void the
warranty.
Should any issues occur, please email us at [email protected] or visit our website
www.studio-assets.com.
11
12
X. Product Kit
XI. Technical Data
1* V-385 VOLTA Inverter
Model
V-385
1* Charger
Continuous Output
750W (At 800W, it can work for
1* Charger Power Cable
1* Shoulder Bag
only 3 minutes continuously.)
Peak Power
1400W
Input Voltage Range
11-15.5V
Output Voltage/Frequency
AC 110V/60Hz or AC 220V/50Hz (depending on model)
Output Waveform
Pure Sine Wave
High Harmonic Distortion
< 3%
No-Load Current Consumption
Normal mode:0.25A Flash mode:0.9A
Conversion Efficiency
91%
Low-Voltage Alarm
Yes
Low-Voltage Shutdown
Yes
Storage Temperature Range
-30ºC to 70ºC
Operating Temperature Range
-10ºC to 45ºC
Battery Type
LiFePO4
Nominal Battery Capacity
Approx. 6 hours (used the included 5A charger)
Fuse
3*30A
Dimension
Weight
13
Ah (14.8V)
Charging Time
267
206
292 mm)
Approx. 16.4 lbs (7.4 kg)
14