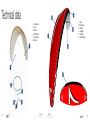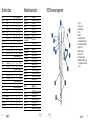
1
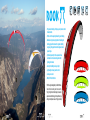
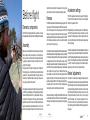
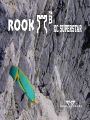
XC Superstar
ROOK
777 XC SUPERSTAR
USER MANUAL
Version 1.6.5, Date: 26.5.2013
Introduction
Welcome
Welcome to the Triple Seven Team! We are excited that
you have chosen to fly the ROOK, as we are confident
that this glider will be the next step in your piloting career.
We wish you exciting flying adventures!
Triple Seven Mission
Our company’s goal is to produce high quality products
and technologically innovative gliders of all types and
classes. We are striving to develop state of the art
paragliders, with the optimum compromise between
safety and performance, produced in Europe.
Your success is our inspiration; our goal is your success.
Manual
Summary
1.777 XC SUPERSTAR
II. Introduction
This document contains complete product information
and instructions to familiarize you with the main
characteristics of your new glider. It contains instructions
on how to use and maintain the wing, however, its
purpose is not to serve as learning material to pilot this
kind of wing. As such, this is not a flying manual. Flying
instructions can only be taught by flying schools and
specially certified instructors.
II.i.Welcome
II.ii. Triple Seven Mission
III.Manual
4.ROOK
It is important that you take time to read this manual
carefully before the first flight, as thorough knowledge of
your equipment enables you to fly safely and to maximize
your full potential. If you borrow or give your glider to
another pilot, please pass this manual on with it.
5.1.Elements, components
5.2.Assembly
5.3.Harness
5.4.Accelerator settings
5.5.Brakes’ adjustments
5.6.Weight range
5.7.Wing inflation
5.8.Modifications on the glider
5.9.Preflight safety
6.Flying ROOK
If any use of Triple Seven equipment remains unclear
after having read this manual, please contact: your local
paragliding instructor, your Triple Seven importer or Triple
Seven. This product manual is subject to changes without
prior notice. Please check www.777gliders.com for the
latest information regarding our products.
4.1.Designer’s thoughts
4.2.Who is this glider for?
4.3.Certification
5.Before flight
6.1.First Flight
6.2.Preflight check equipment
3
4
4
4
4
7
8
9
9
10
10
10
11
11
11
12
12
12
12
13
13
13
6.3.Final preflight check
6.4.Inflation, control, take-off
6.5.Line knots or tangles
6.6.Normal flight, best glide
6.7.Minimum sink
6.8.Accelerated flight
6.9.Active flying
6.10. Flying in turbulence
6.11. Fast decent techniques
6.12. Winch launch
6.13. Aerobatics
6.14. Primary controls failure
6.15. Landing
7.Maintenance
14
14
14
15
15
15
15
16
18
19
19
19
19
20
9.1.Technical data
9.2. Materials description
26
26
7.1.General advice
7.2.Packing instructions
7.3.Storage
7.4.Cleaning
7.5.Repair
7.6.Checks and control
VIII. Packing ROOK
9.Technical data
20
20
21
21
21
21
22
24
9.3.ROOK risers arrangement
9.4.Line plan ROOK
9.5.Line lengths ROOK L
9.6.Line lengths ROOK M
9.7.Line lengths ROOK S
9.8.Certification specimens
X. Safety and responsibility
XI.Guarantee
XII. Registration information
XIII. Get involved
XIV. Contact
XV.Top 5 XC tips
27
28
29
30
31
34
38
39
40
40
41
43
ROOK
rle
STE
lr
ldw
BPI
»Progressive
»
handling, offering easy and precise control
characteristics
»Profile
»
and trim speed optimized for good climbing
»Balanced
»
wing tension, together with leading and
trailing edge reinforcements for greater stability
and good gliding performance throughout a wide
speed range
»Optimized
»
geometry of the suspension lines
and materials for reduced drag and better
gliding performance
»Good
»
pitch stability and easy to pilot
»Light
»
weight and easy launch control
»A
» unique race look
»EN-B,
»
LTF-B certification
ROOK is a glider designed by the Valic Brothers,
made for local soaring and cross country
flying. The glider’s technical design is based on
experience and technology of competition wings,
with great emphasis on ease of flying and safety.
6
7
Our design goal from the beginning of this
project was to make an easy fun flying cross
country glider that would satisfy the needs of a
broad range of pilots. As always, we were trying
to make a better and higher performance glider
than available on the market. This glider is no
exception, as we took great care of both aspects
throughout the whole development process. So
while testing and improving the glider for safety
and ease of flying, we were always comparing it to other gliders
and we must say that we are really happy with the results.
Aljaž Valič
Who is this glider for?
This wing is a high performance EN-B, LTF-B certified glider
intended for intermediate to advanced pilots that want safety and
high performance in this class. Intermediate pilots may find this
glider great for the progression of their piloting XC skills for years,
whilst experienced pilots will enjoy the comfort of safety and
performance on long cross country flights; even in stronger air.
Intermediate
Advanced
FUN FLY
Designer’s thoughts
Beginner
The pilot of this wing should be comfortable with the basic active
flying techniques of controlling a glider in active air, naturally
preventing pitch or roll movements. As with any glider, we
recommend constantly improving your basic and advanced flying
skills.
Certification
The ROOK has passed the European EN-B certification for all
commercially available sizes. The homologation results are
enclosed at the end of this manual.
8
9
Before flight
Elements, components
The ROOK is delivered together with a rucksack, inner bag,
compression strap, Triple Seven T-shirt and USB key with this manual.
Assembly
Before you rush to the first take-off we recommend you take your
time to unpack and test your equipment on a training slope. In
this way you will have time and will not be distracted or rushed
to prepare your equipment, andyou will be able to do your first
pre-flight check properly.
The place should be flat, free of obstacles, and with light wind.
This will enable you to nicely inflate the wing and also familiarize
yourself with it while ground handling. Every glider has to be
checked by a Triple Seven dealer, however, as a pilot you want
to do a proper pre-flight check yourself.
Firstly, prepare and spread out the glider like you would normally
do. While you are spreading out and walking along the glider,
observe the fabric material for any abnormalities. When you
are done with the inspection of the canopy, grab the risers and
spread the lines, check if the risers and maillons (carabiners) are
properly closed. Identify and disentangle the A1, A2, B, C risers
and the lines including the brake lines. Connect the risers’ main
10
attachment points correctly to the harness, watch for any twists
and make sure that the main carabiners are properly closed.
Accelerator settings
The ROOK has passed EN-B certification testing using a GH - ABS
type harness. This certification allows the ROOK to be flown with
most of the harnesses on the market, but keep in mind that the
change of a harness greatly influences the feeling of the glider,
depending on the effectiveness of the harness weight shift. Check
with the harness manufacturer or with your instructor whether
your harness is of the proper type.
Before attaching the accelerator system to the ROOK risers,
check that the speed system inside your harness is correctly
routed and that all pulleys are set correctly. Make sure there are
no knots or other obstacles that might make the accelerator get
stuck during usage.
Harness
The length of the harness chest strap affects the distance between
the main carabiners and the wing’s handling as well as your stability
in the harness. Tightening the chest strap increases your stability,
but greatly increases the risk of twisting after a collapse. A tight
setting also increases the tendency to maintain a deep spiral. As a
rule of thumb, a more opened chest strap gives you more feedback
from the glider, which is good for your climbing efficiency and
increases safety in a flying incident. But we strongly recommend
adjusting the length of the harness chest strap according to the
lengths used during certification. This setting varies according to
the harness size from 42cm to 50cm. Check the settings used
during testing under the certification specimen section.
We recommend that your first flight with the ROOK is not also with
a new harness. Another rule of thumb is if you want to experience
the feeling of new equipment, change only one part of equipment
at a time.
The ROOK speed system increases the speed of the glider by
14km/h with the accelerator at full travel, from trim speed at
38km/h to full speed at 52km/h.
The length of the speed bar lines should be adjusted on the ground
so that your legs are fully extended at the point of full accelerator
travel. While setting the speed line lengths make sure they are long
enough, so that the speed system does not accelerate the glider
by itself. If in doubt how to properly set the accelerator system,
please consult your instructor or Triple Seven dealer.
Brakes’ adjustments
The length of the brake lines has already been adjusted by the
manufacturer and is the same as used during the certification test
flights. The length is set and fine-tuned during the development of
the glider, therefore generally there should be no need to adjust
them. We recommend flying this setting for a while, and you can
still change it afterwards if you wish to do so. If you change the
length of the brakes, do it in a step by step process of 2 cm at
a time. Bear in mind that if you make the brake lines too short,
they might be applied unintentionally while the speed system is
being used.
11
Weight range
Each size of the ROOK is certified for its own weight range. The
above mentioned weight includes the weight of the pilot and
complete paragliding equipment, together with the glider, harness,
all accessories and optional ballast. Every glider changes its
characteristics by changing the take-off weight. We recommend
that you always fly your glider in the specified weight range.
To measure your take-off weight, step on a scale with all your
equipment packed in the rucksack.
Lower half of the weight range
Flying the ROOK, as any other glider, in the lower part of the weight
range, causes the agility of the glider to decrease, and when flying
through turbulence its tendency for collapses relatively increases
as compared to flying it in the upper wing loading range. However,
reactions after a collapse are less dynamic and sink rate improves.
Therefore, if you mainly fly in weak conditions, you might prefer
this weight range.
Upper half of the weight range
Again, as with any other glider, flying the ROOK in the upper part
of the weight range increases the stability and agility of the glider.
Consequently, there is a slight increase in the glider’s speed and
also gliding performance, especially when flying against the wind.
If you normally fly in stronger conditions and you prefer relatively
more dynamic flying characteristics, you should set the take-off
weight in the higher weight range. Reactions after a collapse may
be more dynamic in the upper half of the weight range.
12
Wing inflation
Still being on the training slope and having prepared and checked
everything, inflate your wing and play with it to get a feel of your
new glider while ground handling. By doing this you are making a
final check of the canopy and lines, and that everything is in order.
You will find that the ROOK inflates very easily and smoothly
without excessive energy and with minimum pressure while moving
forwards. For inflation and lifting the glider you may use only the
A1 risers. Do not pull on the risers just with your hands, instead
use your whole harness. Your hands should only accompany the
rising movement of the wing. When the wing is above you, apply
correct pressure on the brake lines and the glider will stay above
you.
Modifications on the glider
Any modifications of the lines or risers’ speed system cause the
loss of the certification, similarly to flying the wing outside the
weight range.
Preflight safety
Before flying the ROOK, you should obtain all practical and
theoretical training and the certification for flying this kind of
wing. Pilots should be physically and mentally fit, using complete
paragliding equipment and flying only in conditions suitable for
their level of flying expertise.
Flying ROOK
First Flight
Now that you have already familiarized yourself with your new
glider while ground handling on a training slope, you are ready for
your first flight. For the first flight it is recommend that you choose
a familiar flying area and to fly your new glider in calm conditions.
Preflight check equipment
Before every flight you need to do a pre-flight check and the
inspection of other equipment. Learn to do this, as it takes no
extra time. This procedure may vary, depending on the instructor,
pilot or equipment settings. Some pilots have their wing always
connected to the harness. However you should have a consistent
method of checking and preparing your equipment and doing the
final pre-flight check.
1. After the arrival on take-off, assess the suitability of flying
conditions.
2. While walking around the canopy preparing and spreading
out the wing, you should at the same time inspect the canopy.
3. After you check the lines and connect the risers to the harness,
grab the lines and slide them through your fingers as you walk
towards the canopy. In this way you double check that the lines
are not tangled, stuck or damaged. If meanwhile the canopy
13
moves, walk around and correct it again.
4. Inspect the harness, reserve, speed system and all connections.
Final preflight check
1. Strap into the harness. The leg straps should be the first to
be connected on the take-off and the last ones to be released
after the flight. Make sure you are strapped in correctly and
wearing a helmet.
2. Check the risers for a twist and that the carabiners are properly
closed. Check if the speed system is not affecting your risers
– accelerating unintentionally.
3. Check the lines. The A riser lines should be on top, and all
lines untangled. Check if none of the lines are lying over or
below the canopy.
4. Check the canopy. The glider should be spread out in the
shape of an arch and all cells open.
5. Check the wind, take-off and airspace. The wind should
be favourable for take-off and the pilot’s level of expertise.
Airspace should be cleared, together with the take-off area.
Inflation, control, take-off
The ROOK has easy take-off behaviour and does not require any
additional advice regarding the forward or reverse launch. Try to
divide and practice the take-off procedure in three steps.
1. Inflating and raising the glider
2. Controlling the wing and wing check
3. Accelerating and take-off
14
It is always advisable to practice and improve proper launching
techniques as this reduces unnecessary additional stress before
the take-off.
Wind speeds up to 25 to 30km/h are considered strong and extra
care is required for the flight. If you are launching in strong winds
we recommend the reverse launch technique, with your brakes
in the right hands at all times. Launch the glider with a gentle pull
and then walk towards it if necessary to reduce the relative wind
force. When the glider is above you, gently control the wing and
take off.
Line knots or tangles
If you fail to observe a line knot or you find yourself flying with a
knot before being able to prevent the unintentional, uncontrolled
take-off, try to stay away from the ground or other pilots by flying
away from the mountain, before taking any corrective action on
the wing. This means that you weight shift and/or counter brake
the opposite side of the wing and control the flying direction with
the least amount of force needed for the wing to fly straight away
from the mountain.
Be careful not to apply too much brake or to fly too slowly to
avoid a stall or spin. When you are at a safe distance away from
the mountain and you have gained relative height by flying away,
you may want to gently and briefly pull the lines that are tangled
with the knot. If the knot is on the brake lines you might want to
gently and briefly “pump” the appropriate brake line.
Please note that by pulling the lines, the knot may get stuck in
a worse position and the situation may escalate also to a stall
or spin. Therefore, if you estimate that you can control the wing
relatively safely and that the knot is not released by gently and
briefly pulling the tangled lines, immediately fly to the landing
zone and land safely.
Normal flight, best glide
Without any brakes applied and without using the accelerator,
the wing flies at the so called “trim speed“. In calm air this is
theoretically the best glide speed. The best speed glide depends
on the glider’s polar and air mass, vertical and horizontal speed.
We recommend reading more about the theory of the best glide
and McCready theory.
Minimum sink
If you apply brakes on both sides for about 15 to 20cm you will
slow the glider to the theoretical minimum sink speed. But we
do not recommend using this speed even for thermalling, as you
achieve much better climbing and control by letting the glider fly
with its “trim speed” and natural energy. With a proper take-off
weight you will find that the glider has great climb, reactions and
agility.
Accelerated flight
After you get comfortable flying the ROOK, you can start practicing
using the speed system, which will provide better performance
while gliding against the wind and through a sinking air mass. The
ROOK was designed to be stable through its entire speed range,
but this requires the use of active flying techniques. Note that any
glider becomes less stable while flying accelerated and that the
risk of a collapse is higher in accelerated flight. Additionally, the
reaction of the glider to a collapse in accelerated flight is more
radical in comparison to the one which occurs at trim speed.
We recommend that you avoid accelerated flight near the ground
and to be very careful using the accelerator in turbulent conditions.
Use a soft speed bar, which enables you to accelerate the glider
by using only one leg. To control the direction use weight shift.
To control the pitch change the amount of the speed bar. Do not
use or pull the brakes while using the speed bar. Use the speed
bar progressively when accelerating and instantly release when
you feel a slight loss of tension, pressure or even a collapse. If you
encounter a collapse while using the accelerator, release the speed
bar immediately before taking any other corrective action. Always
keep more distance from the ground when using the speed bar.
Active flying
This is a basic flying technique for any intermediate and advanced
pilot. It implies permanent control and the correction of pitch and
roll movements together with the prevention of any deflations or
collapses. In a nutshell this means flying straight through active
or turbulent air, so that the pilot keeps the glider above his or
her head at all times, compensating and correcting any unwanted
movements of the wing.
15
Few examples:
• While entering a strong thermal, the wing will stay a little bit
behind relative to the pilot. The pilot should let the brake up
allowing the wing to fly faster and to catch up.
• If the wing surges in front of the pilot, the pilot should counter
brake until the surge is controlled and then release the glider
to let it fly normally.
• If the pilot feels a loss of tension on the wing or a loss of
pressure on the brakes on one side of the wing, he should
smoothly apply the brake on the side with loss of pressure and/
or weight shift to the opposite side until the pressure returns.
After that, again release the brake and/or weight shift to the
neutral position and let the glider fly normally.
The key in all cases is to avoid an over-correction and not to
maintain any correction longer than necessary. After each action
let the glider fly normally again. To re-establish its required flying
speed. You can train or get a feeling for most of these movements
safely on the ground while ground handling your glider. Good
coordination of your movements and coordination with the wing
on the ground will enable you a quick progression when actively
flying in the air. The next step is to attend SIV courses where you
should also get a better understanding of the full brake range and
the glider’s speeds.
Flying in turbulence
Wing deflations can occur in a strong turbulence. The ROOK is
designed and tested to recover without pilot’s input in almost all
16
situations by simply releasing the brakes and letting the glider
fly. To train and understand all the manoeuvres described, attend
SIV courses.
that asymmetric collapses are much more radical when flying
accelerated. This is due to the difference in weight and the inertia
of the canopy and the pilot hanging below.
•
Cascade of events
Many reserve deployments are the result of a cascade of
over-corrections by the pilot. Over-corrections are usually not
problematic because of the input itself or its intensity; but due to
the length of time the pilot continues to over-handle. After every
input you have to allow the wing to re-establish its normal flying
speed. Note that over-corrections are often worse than no input
at all.
Symmetric deflations
Symmetric or frontal deflations normally reopen immediately by
themselves without pilot’s input. The glider will then regain its
airspeed accompanied by a small surge forwards. To actively
control this event, apply both brakes slightly when the collapse
occurs and then instantly release the brakes to let the glider fly.
Be prepared to compensate for the glider’s slight surge forward
while returning to normal flying.
Negative spin
In normal flight you are far from negative spin. But, certain
circumstances may lead to it. Should this occur, just release the
brake lines progressively and let the wing regain its flying speed.
Be prepared for the glider to surge forward, compensating the
surge with brake input if necessary.
Asymmetric deflations
Strong turbulence may cause the wing to collapse asymmetrically.
Before this occurs the brake lines and the feeling of the harness
will transmit a loss of pressure to the pilot. This feedback is used
in active piloting to prevent a collapse. If the collapse does occur,
the ROOK will easily re-inflate without the pilot’s reaction, but the
wing will turn towards the collapsed side.
Wing tangle, cravat
A cravat is very unlikely to happen with the ROOK, but it may
occur after a severe deflation or in a cascading situation, when
the wing tip gets caught in the glider’s lines. A pilot should be
familiar with the procedure of handling this situation with any
glider. Familiarize yourself with the stabilizer’s main line (“stabilo”
line) already on the ground. If a cravat occurs, the first thing to
do is to try to keep the glider flying on a straight course. Do this
by weight shifting and counter braking the untangled side. After
that, grab the stabilizer’s main line on the tangled side and pull it
down until it becomes tight again. At this point the cravat normally
releases itself.
To prevent this from happening turn and actively recover the
asymmetric collapse by weight shifting and applying appropriate
brake input on the side that is still flying. Be careful not to overbrake your wing’s flying side. This is enough to maintain your
course and give the glider enough time to recover the collapsed
side by itself. To actively reopen the collapsed side after course
stabilization, pull the brake line on the collapsed side firmly
and release it. You can do this several times with a smooth
pumping motion. After the recovery, release the brake lines for
your glider to regain its trim speed. You must be aware of the fact
Possible solutions of the cravat situations (consult your SIV
instructor):
• Pulling the wing tip “stabilo” line
• Using a full stall, but it is essential to be very familiar with this
manoeuvre. You also want to have a lot of relative height.
If you are in a situation where you have a cravat and you are
low in rotation or even with twisted risers, then the only solution
is the reserve parachute.
Full stall
A full stall does not occur unintentionally on its own – it happens
if you pull both brakes for 100% and hold them. The wing then
performs a so called full stall. Releasing the brakes improperly
may lead to massive surge of the glider with danger of falling into
the canopy. This is a complex manoeuvre and as such outside
the scope of this manual. You should practice and learn this
manoeuvre only on a SIV course under professional supervision.
Deep stall
Generally when in deep stall, the wing has no forward motion and
at the same time high sink speed. When in deep stall the wing is
almost fully inflated. With the ROOK it is very unlikely to get into
this situation unintentionally. This could possibly happen if you
are flying at a very low speed in turbulent conditions. Also the
porosity of the material and line stretch on a very old glider can
increase the possibility of the deep stall tendency. If you trained
this manoeuvre on a SIV course you would realize that it is very
hard to keep the ROOK in deep stall. If you apply the brakes a
little bit too much you enter the full stall. If you release the brakes
17
just a little bit too much the wing returns to normal flight. If you
want to practice the deep stall on SIV courses, you need to master
the full stall first.
Fast decent techniques
Fast descent techniques should be well familiar to any pilot as they
are important resources to be used in certain situations. These
manoeuvres should be learned at your flying school as a part of
paragliding pilot training. Nevertheless, we recommend practicing
these manoeuvres on SIV courses under professional supervision.
Big ears
This is a safe method to moderately loose altitude while still
maintaining forward speed. To do big ears, release any brake line
loops around your wrist, set your leg on the speed bar, but do not
push it. Now pull the outer A lines (the A2 risers in the drawing)
on both sides. As long as you keep the A2 risers pulled, the wing
tips stay folded and the sink speed increases. To regain normal
flight, release the A2 risers, and if necessary apply the brakes with
short impulse movements. Release big ears at least 100 meters
above the ground. While using big ears, the wing speed decreases,
which is why we also recommend using the accelerator half way
in combination with big ears to maintain enough horizontal speed
and to also additionally increase vertical speed. Be careful not to
pull the brakes while making the ears! Steering is done by weight
shift only. Always do the big ears first and then accelerate; not
the other way around as you will risk getting a frontal collapse.
B line stall
While in the B-stall the glider has no horizontal speed and the
18
sink rate increases to about -8m/s. To enter the B-stall reach
for the B risers just below the maillons and pull both B line
risers symmetrically for about 20 cm. To exit the manoeuvre,
simultaneously release both risers quickly. On exit the ROOK
gently dives without deep stall tendencies.
Spiral dive
The spiral dive is the most demanding of all three manoeuvres
(Big ears, B-stall, Spiral) and should only be trained gradually and
always at high altitude. The spiral dive should be practiced and
learned on a SIV course under professional supervision.
To enter the spiral, weight shift to the desired side and gradually
apply the brake on the same side. Then let the wing accelerate
for two turns and you will enter the spiral dive. While in the spiral,
you can control your descent rate and bank angle by applying
more or less inner brake. Depending on how steep the spiral is
you may need to use also outer brake.
To exit the spiral dive we recommend that the pilot is in the neutral
weight shift position. If you release the inner brake, the wing exits
the spiral dive by itself. The ROOK has no tendency of a stable
spiral but you should be aware of the procedure for exiting a
stable spiral.
To exit a stable spiral dive, weight shift to the opposite side of
the turn and apply the outer brake until feeling the deceleration of
the wing rotation. Then release the outer brake and let the glider
decelerate for the next couple of turns. To avoid a big pendulum
movement after exiting the spiral, apply a short brake input on
the inner side before the glider exits the spiral.
Warnings (Spiral dive):
• There is a possibility of losing consciousness while in the
spiral dive. Never make a spiral with more than 16-18m/s
sinking speed.
• In fast spirals it may be necessary to apply the outer brake to
begin exiting the spiral dive.
• If practicing the spiral dive low, a pilot may not have enough
altitude or time to safely exit this manoeuvre.
Winch launch
The ROOK is easy to launch using a winch and has no special
characteristics considering this kind of launching. To practice this
launching technique special training is needed and you have to
be aware of the procedures and dangers, which are specific for
winching. We do not recommend using any special towing device
which accelerates the glider during the winch launch.
Aerobatics
The ROOK was not designed for aerobatics, therefore, these may
not be performed on this glider. In addition to this, any extreme
manoeuvres place unnecessary stress on the glider and shorten
its lifespan.
risers to control and steer the wing. Be careful not to over-handle
the glider by using the C riser technique when steering. By pulling
the C risers too strong you can cause a stall or a negative spin.
Land your glider at trim speed without using the C risers, to avoid
over-handling the glider low above ground. We recommend using
weight shift.
Landing
Similarly to the take-off, the ROOK’s landing characteristics are
easy. In turbulent conditions it is advisable to apply about 15%
of the brakes, to increase stability and the feeling of the glider.
Before landing, adopt the standing position as this is the most
effective and the safest way to compensate the touch down with
your legs. Again we recommend training the landing manoeuvre,
as it might be useful to be able to land in small places, especially
in an unknown cross country terrain. Learn to evaluate the wind
direction by observing the signs on the ground and also your drift
while making turns. This proves to be useful for cross country,
when landing outside of your usual landing field. Another advice
we suggest taking into account in stronger winds is to go higher
for the landing fields and thus assuring you reach them. Likewise,
always look for possible alternatives downwind.
Primary controls failure
If for any reason you cannot use the brake lines, you have to pilot
the wing to the landing place by using weight shift. Weight shift
should be enough to safely land the glider. You can also use the C
19
Maintenance
General advice
Careful maintenance of your glider and the following simple
guidelines will ensure a much longer airworthiness and performance
of your wing:
• Pack your glider after you land and do not unnecessarily
expose it to UV radiation by leaving it on the landing site
unpacked. The sun UV radiation degrades the cloth and lines
material.
• Fold your glider like recommended under the section of
packing instructions.
• If the glider is damp or wet when you pack it, partially unfold
it at home to allow it to dry. Do not dry it in direct sunlight.
• Avoid exposing the glider to violent shocks, such as the leading
edge hitting the ground.
• Avoid dragging the glider on the ground or through rocky
terrain as you might damage the lines or canopy.
• Avoid stepping on the lines or canopy, especially when they
are lying on a hard surface.
• Avoid exposing the glider to salt water, as it damages the lines
and the canopy material (wash with fresh water).
• Avoid bending your lines, especially in a small radius.
• Avoid opening your glider in strong winds without first
untangling the lines.
• In general, avoid exposing your glider to very hot or humid
environments, UV radiation or chemicals.
20
Packing instructions
It is important to correctly pack your glider as this prolongs its
lifespan. We recommend that you fold the glider like a harmonica,
neatly aligning the profiles with the leading edge reinforcements
side by side. The wing should then be folded in three parts or two
folds. The wing should be packed as loosely as possible. While
packing be careful not to trap any grasshoppers inside your canopy
as they will tear the canopy cloth. This technique will make your
glider last longer and ensure its best performance.
Storage
Correctly packed, store your glider in a dry place at room
temperature. The glider should not be stored damp, wet, sandy,
salty or with objects inside the cells of the glider. Keep your
equipment away from any chemicals.
Cleaning
If necessary always clean your glider with fresh water and a cloth
only, without using any cleaning chemicals. This includes also the
lines and canopy. More importantly, always remove any stones or
sand from the canopy as they will gradually damage the material
and reduce the glider’s lifespan.
Repair
Checks and control
To ensure the wing’s airworthiness the ROOK has to be periodically
serviced and checked to guarantee that the glider continues
to fulfil the EN certification results and to extend your glider’s
lifespan. We recommend a line check and trim inspection every
100 hours or 12 months depending what happens first. After
that, the glider needs to be fully checked after 150 hours or 24
months of usage, whichever comes earlier. This inspection includes
checking the suspension lines, line geometry, riser geometry and
the permeability of the canopy material. A certified inspector can
then define the check interval depending on the glider’s condition.
Please note that the condition of the glider can vary considerably
depending on the type of usage and environment. Salty coastal
air or dunes will considerably affect your wing’s material. For more
information please visit our website.
To repair small damages (less than 5cm) on the canopy cloth, you
can use the rip stop tape. Greater damages, including stitches
and lines must be repaired by a specialized repair shop. Damaged
lines should be replaced by a Triple Seven dealer. When replacing
a line it should always be compared with the counterpart for
adjusting the appropriate length. After the line was repaired, the
wing should be inflated before flying, to ensure that everything was
done correctly. Major repairs, such as replacing panels, should
only be carried out by a Triple Seven distributor or Triple Seven. If
you are unsure about the damage or in any doubt please contact
Triple Seven.
21
Packing ROOK
3. Fold leading edge back toward trailing edge and align the cels
1. Fold the glider like harmonica
4. Fold the glider in three parts
2. Align the cells
5. Finished
Check the video:
http://777gliders.com/content/packing-rook
22
23
Technical data
4.
3.
1.
2.
3.
4.
5.
6.
Suspension lines
Risers
Main lines
Middle cascades
Upper cascades
Brake lines
6.
5.
5.
1.
2.
3.
4.
5.
6.
Canopy
Bottom surface
Top surface
Leading edge
Trailing edge
Intake cell openings
2.
4.
1.
1.
3.
2.
24
6.
25
Technical data
SIZE
CELLS
FLAT
PROJECTED
ROOT CHORD
RISERS
ROOK S
ROOK S
NUMBER
AREA
SPAN
ASPECT RATIO
AREA
SPAN
ASPECT RATIO
Materials description
m2
m
m2
m
ROOK S
53
24.5
11.6
5.447
20.7
9.2
4.095
2.642
ROOK M
53
26.5
12.0
5.447
22.4
9.5
4.095
2.748
ROOK L
53
28.5
12.5
5.447
24.1
9.9
4.095
2.849
LENGTHS (mm)
LENGTHS (mm)
A
560
400
B
C
560
560
STANDARD
450
560
ACCELERATED
S-Distance between pulleys: 160
ROOK M
ROOK M
LENGTHS (mm)
LENGTHS (mm)
580
400
580
580
STANDARD
465
580
ACCELERATED
M-Distance between pulleys: 180
ROOK L
ROOK L
LENGTHS (mm)
LENGTHS (mm)
600
400
600
600
STANDARD
480
600
ACCELERATED
L-Distance between pulleys: 200
SIZE
TRIMS
IN FLIGHT WEIGHT MINIMUM
MAXIMUM
GLIDER WEIGHT
CERTIFICATION
26
kg
kg
kg
EN
ROOK S
NO
ROOK M ROOK L
NO
NO
70
85
4.8
B
80
105
5.5
B
100
120
6.0
B
CANOPY
FABRIC CODE
Upper surface
NCV 9092-E85A, NCV 9017-E77A
Bottom surface
NCV 9017-E68A
Profiles
NCV 9017 - E29A
Diagonals
NCV 9017 - E29A
Loops
COUSIN 608 10mm
Reinforcement loops
NCV F06391 - E45A
Internal construction D-Ribs,
NCV 9017 - E29A
H-Straps, Mini ribs
Thread
Serafil 40/2000, 60/2000
SUSPENSION LINES
FABRIC CODE
Upper cascades
Edelrid A-7000-120-000
Upper cascades
Edelrid A-7000-080-000
Upper cascades
Edelrid A-7000-065-000
Middle cascades
Edelrid A-7000-065-000
Main
Main
Brake lines
Brake lines
Main brake
Thread
RISERS
Material
Material
Color indicator
Thread
Brake Swivel
Maillons
Pulleys
ROOK risers arrangement
5.
11.
1.
2.
10.
3.
4.
9.
Edelrid A-7000-200-000
Edelrid A-7000-160-00
Cousin 12110/0.6 - Dyneema
Cousin 12250/0.9 - Dyneema
Cousin Red 260 / 2.1mm Dyneema
Serafil Amann 60/0415
FABRIC CODE
Webbing Cousin 3455-12mm,
Güth & Wolf 70 404/12,5mm Dyneema
Cousin 3455-12mm Kevlar
Omnitech 200/200PU
Serafil Amann 20/4000, 20/1078
Fob ningbo - china 6mm
Rapid Peguet MRNI03.0
4x Harken 467 16mm ball bearing pulley
12.
1. A1 riser
2. A2 riser, (Ears)
3. B riser, (B-Stall)
4. C riser
5. Maillons
6. Main attachment point
7. Speed bar attachment point
8. Speed bar pulleys (200mm)
9. Brake handle
10. Brake line pulley
11. Main brake line
12. Clip for brake handle
13. ROOK has no trimmers or any
other adjustable or removable
device
8.
7.
6.
27
Line plan ROOK
Line lengths ROOK L
Triple Seven ROOK L Lines Length (mm)
First gallery
Lines A
mm
Lines B
mm
Lines C
mm
Lines D
mm
BR lines
mm
a1
1921
b1
1765
c1
508
d1
652
br1
1643
a2
1881
b2
1732
c2
521
d2
655
br2
1253
a3
1792
b3
1634
c3
471
d3
606
br3
1033
d4
649
a4
1773
b4
1632
c4
537
a5
2188
b5
2143
c5
2066
1303
1220
a6
2051
b6
2022
c6
1929
br6
1321
a7
2066
b7
2024
c7
1908
br7
720
c8
981
br8
662
br9
637
br10
633
br11
585
br12
531
a8
1130
b8
1081
a9
894
b9
890
Second gallery
Lines A
Main Lines
Lines A
28
br4
br5
mm
mm
Lines B
Lines B
mm
mm
Lines C
mm
1c1
1014
Lines D
mm
BR lines
mm
1br1
1350
1c2
985
1br2
879
1c3
944
1br3
1661
1c4
869
1br4
1612
1br5
1653
BR lines
mm
Lines C
mm
Lines D
mm
Stabilo Lines
STB
mm
1a1
4885
1b1
4945
2c1
5301
2br1
1823
stab2
496
1a2
4961
1b2
5036
2c2
5382
2br2
1402
stab1
568
1a3
4521
1b3
4486
2c3
4653
3br1
1570
stab. main
4638
br main
1815 cut, 1607 mark
29
Line lengths ROOK M
Line lengths ROOK S
Triple Seven ROOK M Lines Length (mm)
Triple Seven ROOK S Lines Length (mm)
First gallery
Lines A
mm
Lines B
mm
Lines C
mm
Lines D
mm
BR lines
mm
a1
1852
b1
1702
c1
490
d1
626
br1
1584
First gallery
Lines A
mm
Lines B
mm
Lines C
mm
Lines D
mm
BR lines
mm
a1
1778
b1
1634
c1
470
d1
601
br1
1521
a2
1814
b2
1670
c2
502
d2
632
br2
1208
a2
1741
b2
1603
c2
482
d2
607
br2
1160
a3
1726
b3
1576
c3
454
d3
584
br3
996
a3
1657
b3
1513
c3
436
d3
561
br3
956
d4
626
d4
601
a4
1710
b4
1574
c4
518
a5
2110
b5
2066
c5
1992
br4
1256
a4
1642
b4
1511
c4
497
br5
1176
a5
2026
b5
1983
c5
1912
br4
1206
br5
1129
a6
1978
b6
1950
c6
1860
br6
1274
a6
1899
b6
1872
c6
1786
br6
1223
a7
1998
b7
1968
c7
1840
br7
694
a7
1912
b7
1874
c7
1766
br7
666
c8
946
br8
638
a8
1046
b8
1000
c8
908
br8
612
br9
614
a9
828
b9
824
br9
589
br10
610
br10
586
br11
564
br11
541
br12
512
br12
492
a8
1098
b8
1042
a9
862
b9
858
Second gallery
Lines A
Main Lines
Lines A
mm
mm
Lines B
Lines B
mm
mm
Second gallery
Lines C
mm
BR lines
mm
Lines C
mm
BR lines
mm
1c1
978
1br1
1302
1c1
939
1br1
1250
1c2
950
1br2
848
1c2
912
1br2
814
Lines D
mm
Lines A
mm
Lines B
mm
Lines D
mm
1c3
910
1br3
1602
1c3
874
1br3
1538
1c4
838
1br4
1554
1c4
804
1br4
1492
1br5
1594
1br5
1530
BR lines
mm
BR lines
mm
Lines C
mm
Lines D
mm
Stabilo Lines
STB
mm
Main Lines
Lines A
mm
Lines B
mm
Lines C
mm
Lines D
mm
Stabilo Lines
STB
mm
1a1
4710
1b1
4768
2c1
5112
2br1
1758
stab2
478
1a1
4522
1b1
4577
2c1
4914
2br1
1688
stab2
459
1a2
4784
1b2
4856
2c2
5194
2br2
1352
stab1
548
1a2
4593
1b2
4662
2c2
4969
2br2
1298
stab1
526
1a3
4359
1b3
4326
2c3
4487
3br1
1514
stab. main
4472
1a3
4185
1b3
4145
2c3
4288
3br1
1453
stab. main
4299
br main
1750 cut, 1550 mark
br main
1728 cut, 1536 mark
30
31
32
33
Certification specimens
Dive forward angle on exit / Change of course
Dive forward 0° to 30° / Keeping
course
Cascade occursN
Flight test report: EN
AD
oA
11. Exiting deep stall (parachutal stall)
A
Deep stall achieved
YesA
ive forward 0° to 30° / Entering a
turn of less than 90°
A
16. Trim speed spin tendency
No
A
17. Low speed spin tendency
YesA
pontaneous in less than 3 s
AS
pontaneous in less than 3 s
A
Dive forward angle on exitD
ive forward 0° to 30°
AD
ive forward 0° to 30°
A
AC
hanging course less than 45°
A
Changing course less than 45°
Cascade occursN
oA
No
A
12. High angle of attack recoveryA
Manufacturer
777 jadralna padala d.o.o.
Certification number
PG_0547.2012
RecoveryS
pontaneous in less than 3 s
Address
Ulica Ane Ziherlove 10
1000 Ljubljana
Slovenia
Date of flight test
28. 02. 2012
Cascade occursN
oA
RepresentativeA
Glider model
liaz Valic
Class:
B
Berruex Gilles
Harness Sup' Air - Altiplume M
777 jadralna padala d.o.o.
Rook M
105
1. Inflation/Take-offA
Rising behaviour
Smooth, easy and constant rising AS
Special take off technique requiredN
2. Landing
oA
mooth, easy and constant rising
No
A
oA
No
A
A
Trim speed more than 30 km/h
YesA
YesA
Speed range using the controls larger than 10 km/h
YesA
YesA
Configuration during flight tests
Minimum speed
Less than 25 km/h
4. Control movement
A
Paraglider
Symmetric control pressure / travel
Maximum weight in flight (kg)
105
Range of speed system (cm)
20
Minimum weight in flight (kg)
80
Speed range using brakes (km/h)
14
Glider's weight (kg)
4.8
Range of trimmers (cm)
0
Number of risers
3
Total speed range with accessories (km/h)
28
Harness used for testing (max weight)
not available0
Symmetric control pressure / travel
Increasing / greater than 60 cm
Symmetric control pressure / travel
not available0
5. Pitch stability exiting accelerated flight
A
not available0
A
Reducing
A
Tendency to return to straight flightS
8
9
10
11
12
13
14
15
16
17
18
19
20
21
22
23
24
A
A
A
A
A
A
A
A
B
B
A
A
B
B
A
A
A
A
A
B
A
A
A
0
Increasing / greater than 65 cm
AD
ive forward less than 30°
AR
pontaneous exitA
educing
A
Re-inflation behaviour
Spontaneous re-inflation
AS
Total change of course
Less than 360°
A
B
Sink rate after two turns
12 m/s to 14 m/sA
10. Symmetric front collapse
B
Entry
Rocking back less than 45°
AR
ocking back less than 45°
pontaneous in 3 s to 5 s
BS
pontaneous in less than 3 sA
RecoveryS
Dive forward angle on exit / Change of course
Dive forward 0° to 30° / Keeping
course
RecoveryS
Less than 90° / Dive or roll angle 0°
to 15°
pontaneous re-inflation
Less than 360°
AD
oA
Rocking back less than 45°
AR
pontaneous in 3 s to 5 s
BS
ocking back less than 45°
A
Dive forward angle on exitD
ive forward 0° to 30°
Cascade occursN
oA
Entry procedureD
edicated controls
AS
tandard technique
A
table flight
AS
table flight
A
RecoveryS
pontaneous in 3 s to 5 s
BS
pontaneous in less than 3 sA
Dive forward angle on exitD
ive forward 0° to 30°
AD
ive forward 0° to 30°
A
A
A
A
A
Entry procedureD
edicated controls
AS
tandard technique
A
Behaviour during big earsS
table flight
AS
table flight
A
RecoveryS
pontaneous in 3 s to 5 s
AS
pontaneous in less than 3 sA
Dive forward angle on exitD
ive forward 0° to 30°
AD
ive forward 0° to 30°
A
AS
table flight
A
Tendency to return to straight flight
Spontaneous exitA
B
Turn angle to recover normal flight
Less than 720°, spontaneous
recovery
A
Sink rate when evaluating spiral stability [m/s]1
Total change of course
Less than 360°
A
pontaneous re-inflation
Less than 360°
A
Stable flight
Spontaneous exitA
A
61
Less than 720°, spontaneous
recovery
23. Alternative means of directional controlA
Collapse on the opposite side occursN
oA
No
A
180° turn achievable in 20 sY
oA
No
A
Stall or spin occursN
Cascade occursN
oA
No
A
24. Any other flight procedure and/or configuration
described in the user's manual
0
Less than 90° / Dive or roll angle
15° to 45°
A
Procedure works as described
not available0
not available0
Procedure suitable for novice pilots
not available0
not available0
A
Cascade occurs
not available0
not available0
Less than 360°
A
25. Comments of test pilot
No
A
Comments
oA
Twist occursN
oA
No
A
Cascade occursN
oA
No
A
90° to 180° / Dive or roll angle 15°
to 45°
B
A
8
Twist occursN
pontaneous re-inflation
A
A
90° to 180° / Dive or roll angle 15°
to 45°
AS
ive forward 30° to 60°
NoA
20. Big earsB
22. Behaviour exiting a steep spiralA
Spontaneous re-inflation
AD
Behaviour during big earsS
A
Re-inflation behaviour
Spontaneous in less than 3 sA
A
No
A
A
pontaneous in less than 3 sA
oA
Less than 360°
A
A
RecoveryS
Cascade occursN
A
ive forward 0° to 30° / Entering a
turn of less than 90°
A
emains stable with straight span
Behaviour immediately after releasing the accelerator while
maintaining big ears
AS
No
hanging course less than 45°
AR
A
Spontaneous re-inflation
A
AC
Remains stable with straight
span
A
Less than 90° / Dive or roll angle
15° to 45°
More than 14 m/sB
Changing course less than 45°
No
B
A
Behaviour before release
No
90° to 180° / Dive or roll angle
15° to 45°
tops spinning in less than 90°
NoA
Change of course before release
oA
Change of course until re-inflation / Maximum dive forward or
roll angle
AS
oA
oA
Re-inflation behaviour
A
Stops spinning in less than 90°
Cascade occursN
Collapse on the opposite side occursN
Change of course until re-inflation / Maximum dive forward or
roll angle
With accelerator
Entry
ost lines tight
Spin rotation angle after release
A
oA
Less than 45°
NoA
19. B-line stallA
Twist occursN
A
Spontaneous exitA
9. Behaviour in a steeply banked turn
Cascade occursN
es
oA
AY
es
A
NoA
With 75% collapse and accelerator
Change of course until re-inflation / Maximum dive forward or
roll angle
90° to 180° / Dive or roll angle
15° to 45°
B
Re-inflation behaviour
Spontaneous re-inflation
AS
Total change of course
Less than 360°
A
pontaneous re-inflation
A
Less than 360°
A
Collapse on the opposite side occursN
oA
No
A
Twist occursN
oA
No
A
oA
No
A
Cascade occursN
15. Directional control with a maintained asymmetric
collapse
A
Able to keep course
YesA
180° turn away from the collapsed side possible in 10 sY
Amount of control range between turn and stall or spin
es
More than 50 % of the
symmetric control travel
YesA
AY
AM
es
ore than 50 % of the symmetric
control travel
A
A
pontaneous in less than 3 sA
Flight test report: PG_0547.2012 / page 1 of 3
34
Less than 90° / Dive or roll angle
15° to 45°
A
A
o collapse
B
NoA
oA
18. Recovery from a developed spinA
21. Big ears in accelerated flight
Change of course until re-inflation / Maximum dive forward or
roll angle
No
8. Stability in gentle spirals
7
B
oA
Oscillations
6
14. Asymmetric collapse
ive forward 30° to 60°
With 50% collapse and accelerator
not available0
A
7. Roll stability and damping
5
AM
Collapse on the opposite side occursN
Warning! Before use refer to user's manual
4
Most lines tight
A
Person or company having presented the
glider for testing: Aliaz Valic
3
Line tension
A
Access
2
A
No
Collapse occursN
1
AN
Less than 45°
ive forward less than 30°
Sup' Air
46
AN
No
oA
Harness model
49
No collapse
Rocking back
Collapse occursN
Harness brand
every 12 months or every 100 flying hours
AD
Cascade occurs (other than collapses)
Dive forward angle on exitD
6. Pitch stability operating controls during accelerated
flight
Inspections (whichever happens first)
ive forward 0° to 30°
Collapse
Total change of course
ABS
Distance between risers (cm)
A
Max. weight in flight greater than 100 kg
Harness type
Harness to risers distance (cm)
Less than 25 km/h
Max. weight in flight 80 kg to 100 kg
22.4
Projected area (m2)
A
Max. weight in flight up to 80 kg
Accessories
A
With 75% collapse
3. Speed in straight flight
Serial number:
A
A
Special landing technique requiredN
No
A
With 50% collapse
Sup' Air - Access
Total weight in flight (kg) 80
PG_0547.2012
09. 03. 2012
Date of issue (DMY):
Model:
Villeneuve
lassificationB
Test pilot Thurnheer Claude
In accordance with EN standards 926-2:2005 & 926-1:2006:
Manufacturer:
Place of test
o
pontaneous in less than 3 s
B
Dive forward angle on exitD
Rook MC
Trimmern
13. Recovery from a developed full stall
AS
oA
A
Spin occursN
RecoveryS
Change of course
A
Spin occursN
Flight test report: PG_0547.2012 / page 2 of 3
Flight test report: PG_0547.2012 / page 3 of 3
35
36
37
Safety and responsibility
Paragliding is a dangerous and high risk activity, where safety depends on the person
practicing it. By purchasing this equipment you are responsible to be a certified paragliding
pilot, and you accept all risks involved in paragliding activities, including serious injury and
death. Improper use or misuse of paragliding equipment considerably increases these risks.
Guarantee
Triple Seven WARRANTY:
All Triple Seven products are fully warranted for 24 months, against material defects that are
not the result of normal wear or accidental damage.
The designer, manufacturer, distributor, wholesaler and retailer cannot and will not guarantee
your safety when using this equipment or accept responsibility for any damage, injury or death
as a result of the use of this equipment. This equipment should only be used by qualified and
competent pilots or by pilots under supervision of qualified paragliding instructors. You must
not use this equipment if you are not trained.
You alone as a qualified and competent pilot must take full responsibility to ensure that you
understand the correct and safe use and maintenance of this paragliding equipment and to
use it only for the purpose that it was designed for and to practice all proper safety procedures
before and during its use.
38
39
Registration information
To fully use all Triple Seven maintenance and warranty services you need to register your glider
on our website. Wanting to provide good product support, we invite you to do so, even if you
bought your glider second-hand.
Triple Seven Warranty & Product registration:
http://www.777gliders.com/tripleseven/support
Get involved
As a new Triple Seven pilot we invite you to contact us in case of any technical or practical
issues regarding equipment or techniques. We also invite you to send us your flying photos,
videos or even postcards. We would like to hear from you and your exciting adventures with
your new ROOK! Finally, join our Facebook community and share the passion. Have fun!
40
Contact
Triple Seven Gliders
Company: 777 jadralna padala d.o.o.
Address: Ulica Ane Ziherlove 10
Postal Code / City: 1000 Ljubljana
Country: Slovenia
Tel.: +386 40 777 313
Email: [email protected]
Online resources
For complete help, the latest news, product
information and support go to:
Official website:
www.777gliders.com
Facebook:
www.facebook.com/TripleSevenParagliders
Newsletter register:
www.777gliders.com/newsletter/subscriptions
Ask questions, make suggestions
General questions:
[email protected]
41
Top 5 XC tips
1. Master your equipment and techniques. Climbing is the most important! Practice it, especially in
weak conditions and don’t be afraid to bomb out. Attend safety and XC courses and learn to fly your
glider safely along its full speed range.
2. When circling in a weak thermal, cruise and explore it for better lift. When you hit strong cores,
tighten up!
3. Know the theory and try it out! Imagine thermals and when you find them, look down and think...
Where is it coming from? What was the trigger? Look around, Look around, Look around! Use every
sign of luck and don’t hesitate to take it.
4. Plan your XC at home and let your imagination free. In this way, you will have a mission on the takeoff and you will not be taken by surprise at cloud base, not knowing what to do next.
5. Fly together with friends and have fun! Share exciting experiences, ask questions and don’t forget
the first rule of aviation - always have an alternative option or plan B.
“Primoz Susa”
42