1
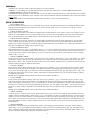
PRINCESS -V2, USER’S MANUAL
from software version 2.1
General
The Princess is a 12 channel memory lighting controldesk. The Princess has a
DMX512 output and a analogue output. You can store 110 presets in memory.
These presets can be fade-in manual or with a GO-button action in a programmable fade time. This GO-button can be on board
or external, hard wired or wireless. Memory preset 1,...,10 are also playable by ten submasters and can be add to the visible
lighting scene even with a (sub)GO-button action. Moreover you can define two loops of memory presets. So 13 autofades are
possible simultaneous in there own fade time. The Princess has several possibilities for remote control: external GO-button,
preset controller and MIDI.
The Princess has three users levels: so you can reduce the control possibilities and adjust the user interface to the experience of
the user (see under set up).
After power-on the latest actual scene automatically fades in. The Princess has eight modi described below.
User situations:
•
LIVE SCENE CONTROL:
With 12 faders you can make or modify a scene direct visible on stage.
•
NEXT SCENE CONTROL:
With 12 faders you can make a preset or modify a memory preset (not visible on stage). You can make this preset visible by
making a crossfade manual or by GO-button action. LED’s indicate the channel levels. This serves as a preview of the next
scene.
•
SUB-MASTER MODE:
In this mode the first ten faders serve as scene-masters for memory preset 1,...,10 (if they exist). Fader11&12 serve as loopmasters. If this mode is not necessary you can block it under set-up.
•
STORE SCENE / DEFINE LOOP:
In this mode you can store a preset (channel level setting) in memory under a particular number. It is also possible to change a
record made before. You can define a loop of existing scene records.
•
FADE TIME:
In this mode the fade time of a preset or scene can be set or looked at.
•
INSERT / DELETE SCENE:
In this mode it is possible to insert a memory preset. The inserted scene gets the selected number. All the earlier made scenes,
that follow the inserted scene get automatically a new number: the old number increased by 1. In the delete mode a existing
memory preset can be removed.
•
SOFT PATCH / SET-UP:
In this mode you can define the softpatch between 12 control channels and 512 DMX channels. The set-up possibilities are: to
block channel flashing, to block softpatch changing, to select a user level, to select a particular remote control and to set the
remote control channel.
User Concept
Twelve faders are available to set twelve channel levels. Depending on the selected mode you can set or change the levels on
stage (LIVE scene control) or a preset (NEXT scene control). Red LED’s indicate the current channel levels. Below each fader
there is a button and a yellow led. If you push this button you can see the actual channel level value in percents on the display.
Or if enabled the level will flash to 100% live on stage. The yellow led indicates if the fader is active or not. In case the led is
off, you have to move the fader until its position matches the actual channel level; the yellow led turns on. When you push a
mode button for a while you make that mode active. The button led starts flashing to indicate that the corresponding mode is
active.
Finally
By power-on the software version is displayed for 3 seconds. After that the Princess automatically goes to LIVE scene control
All channel levels are processed 40 times a second and send through the DMX exit. The DMX data-rate =40[1/s]. The Princess
can store 110 presets and the data-retention is more then 10 years.
The possible fade times are: 0,0 0,1 0,2 0,3 0,4 0,5 0,6 0,8 1,0 1,2 1,5 2,0 2,5 3,0 4,0 4,5 5,0 6,0 7,0.....20
22 24 ........60 63 68 71 78 82 86 91 96 100 110 120 130 140 150 170 180 210 230 270 330 410 550
820 seconds.
Legend
[.......] points to a button, <......> points to a led and “...” is a displayed text.
1
Definitions
A SCENE is the (on stage) visible result of the setting of 12 control channels.
A PRESET is a level setting of 12 control channels which result becomes visible after a crossfade; PRESET=NEXT SCENE.
A MEMORY PRESET is a preset stored in memory.
The FADER FUNCTION BUTTONS are that three buttons above the faders. With these buttons you select the function of the faders
and so the way you can handle the preset. Attention: under each possible fader function the leddisplay always shows the number
of next scene.
The FADERBUTTONS are the squared black buttons below each fader. They serve as pointing devices.
BASIC OPERATIONS
•
SET A FADER ACTIVE
In case the yellow led <fader active> is off, the fader does not work. The fader becomes active by matching the fader position
with the actual level indicated by the red led <level>. In that case led <fader active> is on. From now on the level can be
controlled with the fader.
•
CREATE & CHANGE A SCENE
Push on [LIVE scene control]. The faders are channel faders and determine the levels visible on stage. The red LED’s <level>
indicate the visible channel levels. If you push a fader button you can see the corresponding value in percents on the display
(only if channel flashing is not enabled). Adjust with the faders the levels, if desired. Set, if necessary, the faders active.
•
CREATE & CHANGE A PRESET
Push on [NEXT scene control]. The faders are channel faders and determine the levels of the loaded preset. The red LED’s
<level> indicate the levels of that preset. If you push a fader button you can see the corresponding value in percents on the
display (only if channel flashing is not enabled). Adjust with the faders the levels, if desired. Set, if necessary, the faders active.
Only after a crossfade this settings will be visible on stage.
•
CLEAR ALL PRESET LEVELS
Push simultaneously on [<<] & [>>]. The display shows “-0-”. In case of ‘NEXT scene control’ you can create a preset starting
with all zeros. After a crossfade the display keeps showing “-0-”; you can create a new preset that starts from the previous or
you can clear all levels again by pushing both [<<] & [>>]. If you want to play a memory preset you have to select a memory
number with [<<] or [>>].
•
CREATE A MEMORY (PRESET)
Create a preset or a scene. Push on [store scene]. Led <store scene> lights up. Select with [<<] or [>>] the number you wish for
that memory. Numbers with a decimal dot are already in use. Confirm your choice by pushing button [DO IT!] for 3[s]. The
display shows “REC.”. You can abort the action till led <store scene> flashes. After that the record mode will be left. You can
quit this mode by pushing any fader function button.
•
CHANGE A MEMORY
LIVE: Push on [LIVE channel control]. Select for ‘next scene’ by pushing [<<] or [>>] the memory preset you like to change.
Fade-in that preset by moving the crossfader to the lighting fader led or by pushing [GO]. Change the levels. Push on [store
scene]. Led <store scene> lights up. Confirm your choice by pushing button [DO IT!] for 3[s]. The display shows “Chg”. You
can abort the action till led <store scene> flashes. After that the record mode will be left. You can quit this mode by pushing
any fader function button.
BLIND: Push on [BLIND channel control]. The same as above without the fade-in.
•
COPY A MEMORY
LIVE: Push on [LIVE channel control]. Select for ‘next scene’ by pushing [<<] or [>>] the memory preset you like to copy.
Fade-in that preset by moving the crossfader to the lighting fader led or by pushing [GO]. Push on button [store scene]. Led
<store scene> lights up. Select with [<<] or [>>] the number you wish for that copied memory. Numbers with a decimal dot are
already in use. Confirm your choice by pushing button [DO IT!] for 3[s]. The display shows “REC.”. You can abort the action
till led <store scene> flashes. After that the record mode will be left. You can quit this mode by pushing any fader function
button.
BLIND: Push on [BLIND channel control]. The same as above without the fade-in.
•
INSERT A MEMORY
Create the preset or scene you want to insert. Push on [insert scene]. Led <insert scene> lights up. The led display shows the
number of the first existing memory. Select with [<<] or [>>] the number you like to give that new memory you want to insert.
Attention, you can only select numbers of existing memories. Confirm your choice by pushing [DO IT!] for 3[s]. The display
shows “INS.”.You can abort the action till led <store scene> flashes. After that the insert mode will be left; all memories with
succeeding numbers increase in number started with the one you have selected. You can quit this mode by pushing any fader
function button.
•
DELETE A MEMORY
Keep [delete scene] pushed till led <delete scene> flashes. The led display shows the number of the first existing memory.
Select with [<<] or [>>] the number you like to delete. Confirm your choice by pushing [DO IT!] for 3[s]. The display shows
“DEL.”. Keep the button pushed until “DEL” disappears. You can abort the action as long as the display shows “DEL”. You
can leave this mode anytime by pushing any fader function button.
2
• SET OR VIEW THE FADE TIME.
Select the preset you want to set the fade-time for by pushing [<<] or [>>]. Keep [fade time] pushed. The display shows the
current fade time. Change, while pushing [fade time], with [<<] or [>>] the displayed time. Release [fade time]. In case of a
memory preset the changed value will be stored. In case of a preset (“-0-”) the setting is only for the next fade-in.
•
FADE IN A PRESET.
Create a preset (see above) or select for ‘next scene’ a memory by pushing [<<] or [>>]. Manual fade-in: move the crossfader
in the direction of the lighting crossfader led. Automatically: push on [GO/stop]; alternately flashing display dots indicate the
going fade. The preset becomes visible (if the MASTER is set open).
•
GO-FADE: STOP/CANCEL/OVERRULE
To stop a going autofade push once again on [GO/stop]; with this button you can toggle between GO and stop. In case of ‘stop’
the last display dot keeps flashing. To cancel a fade push on [<<] or [>>]. ‘Overrule’ takes place as you move the crossfader to
the lighting crossfader led; overrule you can only shorten the crossfade time. By stopping the fade and generate a overrule the
auto fade is changed in a manual crossfade, so now you can complete or undo the fade-in.
SPECIAL ACTIONS
•
CHANGE THE SET-UP
Keep [set up] pushed till led <set up> flashes. This takes a while. By pushing once again on [set up] you can select an other setup-item which is shown on the display. You can change a setting by pushing button [<<] or [>>]. The possibilities are:
“P.=y/n”; block softpatch changes, yes or no.
“F.=y/n”; enables channel flashing, yes or no.
“L.=0/1/2”; select user level, 0, 1 or 2:
level 0: only LIVE scene control and the MASTER functions
level 1: subMASTER mode is disabled
level 2: all control options are available
“r=y/n”; you can set ‘remote in’ to use the 7 button remote preset controller: select ‘y’ (‘n’ means you can use MIDI).
“C.xx”; MIDI channel number setting, xx=[1,...,16] only if “r=n” (if MIDI is possible).
Attention, if “r=y”: the Princess is used in combination with a 7 button remote preset controller, “C.01” must be set.
Push any fader function button to leave the set-up mode.
•
DISPLAY A LEVEL IN %.
Under scene control the red LED’s <level> indicate the channel levels. Keep a fader-button pushed. The display shows now the
level value of the corresponding channel in percents. Attention: if <enable flash> flashes the fader buttons function as flash
buttons (see beneath).
•
MEMORY PREVIEW
Push on [NEXT scene control]. The faders are channel faders and determine the levels of the indicated memory. The red LED’s
<level> indicate the actual levels of that memory. Push a fader button to see the corresponding value in percents on the display.
To preview the levels of an other memory, push [<<] or [>>]. Attention: if <enable flash> flashes the fader buttons function as
flash buttons (see beneath).
•
ENABLE FLASH (if not blocked in set up)
Push on [enable flash]: the red led <enable flash> flashes. When in LIVE/NEXT scene control the fader button are now flash
buttons. In sub-MASTER MODE they are scene flash buttons.
•
SUBMASTERS (only level 2)
Push on button [subMASTERS]. Fader-1 till Fader-10 act as scene-masters for memory 1-10. Fader-11&12 are loop- masters
for loop1&2. In this mode you can add the memories-1 till -10 and two loops to the lighting scene on stage. Of course only if
these memories exist and loops are defined. The fader buttons acts like GO/stop-buttons to initiate an auto fade-in/out of the
corresponding memories and start/stop loops (if <flash enable> is not flashing). You can manual overrule an auto fade.
•
DEFINE A LOOP (only level 2).
You can define a loop by simply pointing the first and the last one of a group of succeeding memories.
Create the memories you need for your loop. Push a while on [define loop]. Led <define loop> flashes and the display shows
“d.L.E” (=define loop ends). Push fader button-11 or -12 to point out loop 1 or 2. The display shows “F.S.=“ (first step) for 2[s]
and after that a memory number. Choose with [<<] or [>>] the memory you want for your first step. Push [DO IT!] to confirm
your choice. The display shows “L.S.=”(last step) for 2[s] and after that a memory number. Choose with [<<] or [>>] the
memory you want for your last step. Push [DO IT!] to confirm your choice
•
VIEW THE SOFTPATCH
Push on button [soft patch]. The display shows “S.P.=“. To select the control channel (1,...,12) you keep pushing the
corresponding channel button. Now you can see in a chase the softpatches that are already made for the selected channel. These
are the numbers with the last decimal point on. Attention: “---” means ‘not patched’.
3
•
CHANGE THE SOFT PATCH (if not blocked under set-up)
Push on button [soft patch]. The display shows “S.P.=“. To select the control channel (1,...,12) keep pushing the corresponding
channel button. With [<<] or [>>] you can select now any DMX channel number from 1 till 512. A patched DMX channel
number is displayed with the last decimal dot on; scrolling stops automatically at a patched DMX channel number. You can
toggle between ‘patched’ and ‘not patched’ by pushing on button [DO IT!]. To leave the patch mode, push any fader function
button.
•
REMOTE PRESET CONTROLLER
Set with [set up] “r=y”. You can remotely fade-in memory 1 till 7 with a 7-button preset controller. You can connect these
preset controllers with each other to get more than 7 buttons or to control the same memories from different places. *
Attention, if the Princess is controlled by a preset controller, the remote channel number must be set on 1 (“C.01”).
•
MIDI CONTROL
Set with [set up] “r=n” and choose the desired MIDI channel number. The Princess can only act as a SLAVE device; it can only
accept commands. The Princess reacts on channel messages type ‘program change’. With these messages you can remotely
fade-in the existing memories of the Princess. The relation between the data byte value and the memories is simple: byte value
0 starts memory 1, value 1 starts memory 2, ......., value 109 starts memory 110. *
•
REMOTE-GO
The remote input accepts also a external GO-button. You have to connect it with a momentary switch between pin2 & pin3.
With a jumper setting on the PCB you can set the GO-button to react as a GO/stop or as a GO button. More info about
connecting an external GO-button is available on our website under ‘application guides’
• TO DELETE ALL MEMORIES
You can delete all memories at once. If you push [insert scene] at power-on while the software version is displayed. The display
starts showing the text “dEL”...”ALL” for 4[s]. If you push during this period on [DO IT!] all memories will be deleted. After
that the display shows the text “rST”...”SP. “ for 4[s] (see below ‘default softpatch’). Then the Princess jumps to ‘LIVE scene
control’ with the display showing “-0-”.
• SOFTPATCH RESET
You can set all patches to default at once. That means that control level of channel-1 is loaded in DMX data byte-1, 2 in DMX
data byte 2, etc. DMX data byte (channel) 13 till 512 will be loaded with zeros.
If you push [insert scene] at power-on while the software version is displayed the display starts showing the text
“dEL”...”ALL” for 4[s]. After that the display shows the text “rST”...”SP. “ for 4[s]. While the Princess displays the second text
you push [DO IT!]. After that a default softpatch is set and the Princess jumps to ‘LIVE scene control’.
*
For more information about the remote preset controller, MIDI, the Princess(software updates, application guides etc) you can visite our website:
www.theater-technisch-lab.nl
4