1
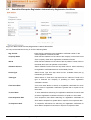
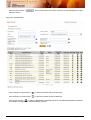
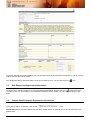
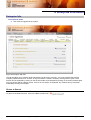
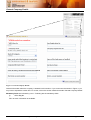
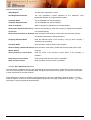
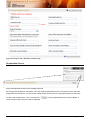
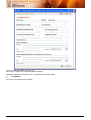
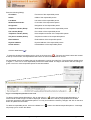
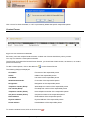
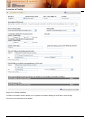
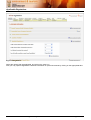
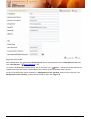
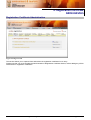
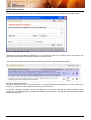
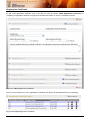
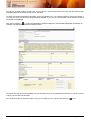
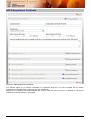
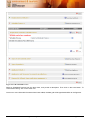
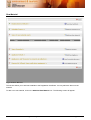
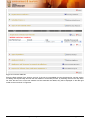
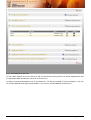
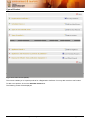
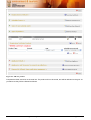
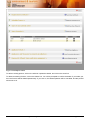
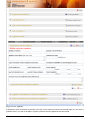
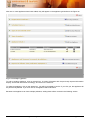
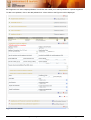
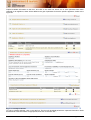
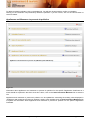
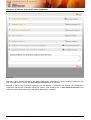
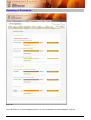
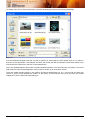
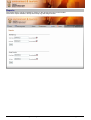
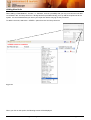
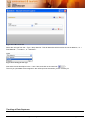
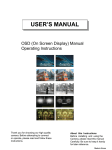
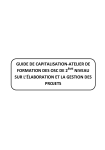
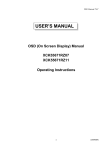
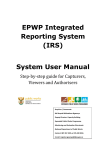
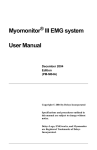
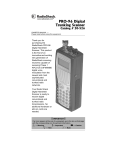
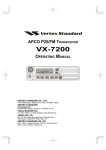
D.E.A.T APPA Certificate Registration System User Manual Version 1.6 Version Date Updated Contact Email : 1.6 : 30 June 2009 : Ugan Nair : [email protected] Table of Contents 1. Overview ..............................................................................................................................................................3 2. System Login .......................................................................................................................................................4 Login .............................................................................................................................................................................4 3. Search ..................................................................................................................................................................5 Basic Search.................................................................................................................................................................5 3.1 Search for Enterprise Registration Information by Enterprise Information..................................................5 3.2 Search for Enterprise Registration Information by Registration Certificate.................................................8 3.3. Edit Enterprise Registration Information ...................................................................................................10 3.4 Capture New Enterprise Registration Information.....................................................................................10 4. Enterprise Information........................................................................................................................................11 Enterprise Info.............................................................................................................................................................11 Return to Search ....................................................................................................................................................11 General Company Details ......................................................................................................................................12 Responsible Person ...............................................................................................................................................14 Contact Person.......................................................................................................................................................17 Location of Facility..................................................................................................................................................18 Applicable Regulations ...........................................................................................................................................20 QA/ QC ...................................................................................................................................................................21 5. Management of Hard Copy Files .......................................................................................................................22 5.1 Creation of a Hard Copy for an Enterprise................................................................................................22 5.2 Updating of a Hard Copy for an Enterprise ...............................................................................................23 5.3 Deletion of a Hard Copy for an Enterprise ................................................................................................23 Management of PaperWork Index..........................................................................................................................23 5.4 Addition of PaperWork to PaperWork Index .............................................................................................24 5.5 Viewing of Document Upload with PaperWork .........................................................................................25 5.6 Moving of PaperWork from One Hard Copy File to another Hard Copy File ............................................25 5.7 Updating of PaperWork .............................................................................................................................25 5.8 Deletion of a PaperWork form PaperWork Index ......................................................................................26 Management of File Tracking.................................................................................................................................27 5.9 Check OUT File .........................................................................................................................................27 5.10 Check IN File .............................................................................................................................................29 6. Registration Certificate Administration...............................................................................................................31 Registration Certificate Administration .......................................................................................................................31 Reg Cert Admin ......................................................................................................................................................32 APCO Observations ...............................................................................................................................................33 Registration Certificates .........................................................................................................................................34 APPA Registration Certificate.....................................................................................................................................36 Registration Certificate ...........................................................................................................................................37 Scheduled Process.................................................................................................................................................38 Raw Material...........................................................................................................................................................41 Type of Product ......................................................................................................................................................44 Appliance Details....................................................................................................................................................47 Appliance Pollutants ...............................................................................................................................................50 Appliances and Measures to prevent air pollution .................................................................................................53 Disposal of effluent form purification equipment ....................................................................................................54 Uploading of Documents ............................................................................................................................................55 Reports .......................................................................................................................................................................57 Activity Log .............................................................................................................................................................58 Usage Counter .......................................................................................................................................................58 Miscellaneous .............................................................................................................................................................59 Version Number......................................................................................................................................................59 Session Timeout.....................................................................................................................................................59 Text Box Limits .......................................................................................................................................................59 Adding New Units ...................................................................................................................................................60 Tracking of Data Capturers ....................................................................................................................................61 Location of Buttons.................................................................................................................................................62 Hide / Show Sections .............................................................................................................................................62 Conventions and Definitions .......................................................................................................................................63 User Manual – APPA Certificate Registration System Page 2 of 64 1. Overview The APPA Certificate Registration System will allow you to capture information on companies and their compliance with the air pollution prevention act. Please Note: There are sections in the applications which are not programmed viz. Atmospheric Emission License, Public Perception / Media Attention, Receiving Environment, Facility Air Quality Management Practices, Pollution Prevention Plan, Major Hazard Installation and Inspections as these sections are related to licensing and can only be programmed when the framework for licensing is in place and requirements are clear and business rules are defined. The procedure for capturing a company’s details is as follows. Login 1. 2. Login Search for Results Search for the entry you are about to capture, if found, click on the edit button or you may start a new capture. 3. 4. 5. 6. 7. 8. Enterprise Info Tab Enter, and save the “General Company Details” section under Enterprise Tab. View responsible person/s View Contact Person/s View Location Details Select applicable regulations Hard Copy 9. 10. Registration Certificate Tab Complete the “Administration of Registration Certificates” section. Add APCO Observations Adding Registration Certificate 11. Adding Registration Certificate 10.1 Complete the Registration Certificate section 10.2 Add schedule processes 10.3 Add types of raw materials 10.4 Add products 10.5 Add appliance 10.5.1 Add appliance pollutants 10.6 Add measures to prevent air pollution 10.7 Add disposal of effluent from purification equipment 12. 13. 14. Upload Supporting Documents Upload applicable files Add another application if necessary Logout User Manual – APPA Certificate Registration System Page 3 of 64 2. System Login Login This page allows the user to enter username and password in order to use the system. If the username or password is incorrect, it throws an error message to re-enter the correct username and password. Figure 1: Login Screen To get started, point your browser to the portal homepage, e.g. http://www.environment.gov.za/APPA/APPARegCertificate/Login.aspx The login screen will be presented to you. Enter your username and password, and click on submit. Note: For security reasons, the password field is masked. ** User name and password are not case sensitive. ** If your Login details are correct, you will be redirected to the Search Screen. If your login details are incorrect, you will be prompted to re-enter them. If you are having trouble logging in, please consult your super User Manual – APPA Certificate Registration System Page 4 of 64 3. Search Basic Search Prerequisite tasks User must be in logged into the system Figure 2: Basic Search Screen by Enterprise Information The search screen allows you to search for existing entries. Once the entry is found, you have options available for you to edit the entry, delete it, or get a printout. You are also able to start a new entry from this screen. There are two search types (i) Enterprise Info : Allows searching for enterprise registration information by Enterprise Details (ii) Registration Certificate: Allows searching for enterprise registration information by registration Certificate details 3.1 Search for Enterprise Registration Information by Enterprise Information An entry can be searched for any or all of the following fields: APPA Reg No Enter first few characters of the APPA registration number or the whole APPA registration number. New Reg No Enter first few characters of the New registration number or the whole New registration number Enterprise Name Enter first few characters of the name of the enterprise or the name of the enterprise. Company Reg No Enter first few characters of the Company registration number or the whole Company registration number Province Select the Province from the Province drop down list. By default “Select a Province” is selected in the drop down list Deeds Farm Town Enter first few characters of the Deeds farm town. District Municipality Select District Municipality from the District Municipality drop down list. Province must be selected from the Province drop down for district User Manual – APPA Certificate Registration System Page 5 of 64 municipalities belonging to selected Province to appear in District Municipality drop down list. Local Municipality Select Municipality from the Municipality drop down list. Province must be selected from the Province drop down for local municipalities belonging to selected Province to appear in Municipality drop down list Operational Enterprise Only Click the search button < below the search. Selecting this option will filter the enterprises which are operational only. >. If any entries match your search criteria, they will be displayed in a grid Figure 3: Search Results Click the Export to Word button < > to export the search results to MS Word. Click the Export to Excel button < > to export the search results to MS Excel. Click the Print button < > to view the Enterprise Standard Report for the selected Enterprise. An example of an Enterprise Standard Report is below: User Manual – APPA Certificate Registration System Page 6 of 64 The report will open up and immediately give you the option to print it by clicking the Print button. If you do not want to print, just click the Cancel button. You will then be able to review the report. Once you are ready to print, you can click the Print < User Manual – APPA Certificate Registration System > icon. Page 7 of 64 3.2 Search for Enterprise Registration Information by Registration Certificate Figure 4.1: Basic Search Screen by Registration Certificate Information An entry can be searched for any or all of the following fields: Reg Cert No Company Name Enter first few characters of the registration certificate number or the whole registration certificate number. Enter first few characters of the name of the company or the whole name of the company under which registration certificate is issued. APCO Enter first few characters of the name of the air pollution control officer or the whole name of the air pollution control officer. Schedule Process Select Schedule Process from the drop down list box. Allows searching for registration certificates based on a scheduled process. Permit Type Select Permit Type from drop down list box. Available values are (i) Permanent (ii) Provisional. Trade type Select Nature of Trade from drop down list box. Nature of Trade is the type of business the company is operating to whom registration certificate is issued. From Issue Date From issue date allows to search for registration certificates for which date of issue of registration certificate is greater than or equal to from Issue date. To Issue Date To issue date allows searching for registration certificates for which date of issue of registration certificate is less than or equal to to issue date. From Inspection Date From inspection date allows searching for registration certificates for which date of inspection is greater than or equal to from inspection date. To Inspection Date To inspection date allows for searching for registration certificates for which date of inspection is less than or equal to to inspection date. User Manual – APPA Certificate Registration System Page 8 of 64 Click the search button < below the search. >. If any entries match your search criteria, they will be displayed in a grid Figure 5.1: Search Results Click the Export to Word button < > to export the search results to MS Word. Click the Export to Excel button < > to export the search results to MS Excel. Click the Print button < > to view the Registration Certificate Report for the selected Registration Certificate. An example of a Registration Certificate Report is below: User Manual – APPA Certificate Registration System Page 9 of 64 The report will open up and immediately give you the option to print it by clicking the Print button. If you do not want to print, just click the Cancel button. You will then be able to review the report. Once you are ready to print, you can click the Print < 3.3. > icon. Edit Enterprise Registration Information > next to the entry To edit an entry, first do a search for it. Once the results are displayed, click the edit icon < you wish to edit. You will be taken to the enterprise information screen, where you may make alterations to the entry. 3.4 Capture New Enterprise Registration Information If you plan to capture a new entry, click on the < > link. Please Note: Before you start capture of a new entry, please search for the entry first, to ensure that it does not already exist. User Manual – APPA Certificate Registration System Page 10 of 64 4. Enterprise Information Enterprise Info Prerequisite tasks User must be logged into the system Figure 6: Enterprise Info Tab This tab will allow you to capture general enterprise info about the company. You must complete the General Company Details section first. As soon as any information is saved in a section, the flag will turn green. Each section can be expanded by clicking on the section header, and collapsed by clicking on the section header again. Only one section will be visible at a time. As soon as one section is expanded, any others that may have been expanded previously will collapse. Return to Search To return to the Search Screen, click on the Back to search link. < User Manual – APPA Certificate Registration System > Page 11 of 64 General Company Details Figure 7: General Company Details General Information about the company is entered into this section. If you cannot see the section in Figure 7, you may have to expand the section first. To do this, click on the section header that reads “General Company Details”. Mandatory fields are indicated by a red *. Following are the mandatory fields: (i) APPA Reg No Fill in as much information as available. User Manual – APPA Certificate Registration System Page 12 of 64 Enter the following field: APPA Reg No. The Old APPA registration number New Registration Number The new registration number allocated to the enterprise. New Registration Number is not generated by system. Company Name This is populated from Central Registry Company Registration No. This is populated from Central Registry State of Company State of Company is populated from Central Registry Name under which the business is Name of the company by which the company is registered is populated carried out from Central Registry Name of the land owner or landlord Enter the name of the landlord or land owner who owns the property from where the business is being carried out Company Alternate Name Enter the alternate name of the company, if any by which company / enterprise may be trading Secretary Name Enter the name of the secretary of the company Name of Safety, Health and Environ- Enter the name of the Safety, Health and Environmental Officer of the Mental Official Company Name of emission control officer Enter the name of the emission control officer of the company, if available Electricity account number Enter the electricity account number, if available Water account number Enter the Water account number, if available Click the Save Enterprise Info button The save button is located at the top, and duplicated at the end of the section to enable easy access to saving the info. Once the information is successfully saved, the flag for this section will turn green. You will now have access to save information for the other sections. Note: Attempting to save this information without entering any info in the mandatory fields will result in a screen similar to Figure 8. A list of the errors will be displayed at the top of the page, as well as an R symbol < >, along with steps to rectify alongside the affected field/s. User Manual – APPA Certificate Registration System Page 13 of 64 Figure 8: Enterprise Info - Mandatory fields missing Responsible Person Figure 9: Responsible Person Section (Nothing captured) Each Enterprise Registration Information can have multiple responsible persons. The first time you expand the Responsible Person Section, you should see a blank section as there are no responsible persons for that entry. To add a responsible person, click on the add link < screen similar to that in Figure 10 will be displayed. User Manual – APPA Certificate Registration System > on the Responsible Person Section Header. A Page 14 of 64 Figure 10: Add Responsible Person Screen You may now capture the responsible person’s details. Mandatory fields are indicated by a red *. Following are mandatory fields: (i) Designation. Fill in as much information as available. User Manual – APPA Certificate Registration System Page 15 of 64 Enter the following field(s): First Name First name of the responsible person Initials Initials of the responsible person Last Name Last name of the responsible person Identification Number I.D number of the responsible person Designation Designation of the responsible person Telephone number (Work) Work telephone number of the responsible person Fax number (Work) Fax number of the responsible person Telephone number (Home) Home telephone number of the responsible person Cell phone number (Home) Cell phone number of the responsible person Email address Email address of the responsible person Physical address Physical address of the responsible person Postal address Postal address of the responsible person Click the save icon < > >. The save and close buttons are located To close the window/cancel without saving, click on the close icon< at the top of the window, and duplicated at the bottom as well to facilitate ease of access. As responsible persons are added, they will be reflected in a grid on the main form. The grid will look similar to that in Figure 11, once one or more responsible persons have been added. The flag for this section will also change to green once one or more responsible persons have been added. Figure 11: Multiple Responsible Persons Grid > next to the desired responsible person. A To edit an existing responsible person, click on the edit icon < screen similar to that in Figure 10 will be displayed. However, this time it will be pre-populated with the data previously captured for that responsible person. You may now make the necessary changes, and click on the save button to update the information. To delete a responsible person, click on the delete icon < will prompt you to confirm the delete. User Manual – APPA Certificate Registration System > next to the desired responsible person. A message Page 16 of 64 Click “Cancel” to abort the delete, or “OK” to permanently delete that specific responsible person. Contact Person Figure 12: View Contact Person Details Each entry can have multiple Contact Persons. At least one of these should be a primary contact. You may now view the contact person’s details. The first time you expand the Contact Person Section, you should see a blank section, as there are, no contact persons for that entry. To add a contact person, click on the add link < > on the Contact Person The following field(s) are displayed: First Name First name of the responsible person Initials Initials of the responsible person Last Name Last name of the responsible person Identification Number I.D number of the responsible person Designation Designation of the responsible person Telephone number (Work) Work telephone number of the responsible person Fax number (Work) Fax telephone number of the responsible person Telephone number (Home) Home telephone number of the responsible person Cell phone number (Home) Cell phone number of the responsible person Email address Email address of the responsible person Physical address Physical address of the responsible person Postal address Postal address of the responsible person To close the window/ cancel, click on the close icon< User Manual – APPA Certificate Registration System >. Page 17 of 64 Location of Facility Figure 13: Location of Facility Location Information Section allows you to capture information relating to the location of the facility. Fill in as much information as available. User Manual – APPA Certificate Registration System Page 18 of 64 Enter the following field(s): Province Select the Province in which the facility is located from the Province drop down list Deeds Farm/Town Enter the Deeds Farm or Deeds Town name in which the facility is registered in deeds office ERF / Farm Allot. No. Enter the ERF number of the property in which the facility is registered in deeds office. ERF is applicable is property is located in Deeds Town and Farm Allotment Number is applicable if property is located in Deeds Farm Portion Enter the Portion number, if applicable of the property in which facility is registered in deeds office Description Enter the description of the property in which facility is registered in deeds office District Municipality Select the District Municipality in which the facility is located from the District Municipality drop down list Municipality Select the Municipality in which the facility is located from the Municipality drop down list Coordinates Enter the coordinates of the property where facility is located SG Code Enter the 21 digit SG Code of the property. SG Code is made from ERF / Farm Allotment Number, Portion and Deeds Farm / Town Extent of Site Enter the area of the site Land use zoning Enter the Land use zoning of the property where the facility is located Physical Address Enter the physical address of the property where facility is located Postal Address Enter the postal address of the facility Note: Certain information such as district municipality and municipality may not be known. You may leave these fields blank if you are unsure. The Deeds farm, ERF, and portion may not be available to you in a format that allows you to capture them to these fields, or there may be more than one ERF, etc. In this case, record the information as is in the description box. If images of the sites are available, they will be available for viewing here. See the section on Uploading of Documents for information on how to upload images / documents on page 48. User Manual – APPA Certificate Registration System Page 19 of 64 Applicable Regulations Figure 14: Regulations Select the options that are applicable, and click on the save icon. Now you may capture Registration Certificate information or upload documents by clicking on the appropriate tabs. User Manual – APPA Certificate Registration System Page 20 of 64 QA/ QC This section deals with the checking and verification of the APPA record. Administrators will be able to state when the file was checked and verified by supplying the date. The appropriate name (either Checked By or Verified By) will be loaded automatically when the user checks either the Mark File as Checked or Mark File as Verified checkboxes. User Manual – APPA Certificate Registration System Page 21 of 64 5. Management of Hard Copy Files Figure 17: Management of Hard Copy Files This section allows you to perform the following functionalities: (i) (ii) (iii) (iv) (v) 5.1 Creation of a Hard Copy file for an enterprise Deletion of a Hard Copy file from repository Addition of Paper Work to existing Hard Copy files Creation of an additional Hard Copy File for an existing enterprise Check In and Check Out facility for Hard Copy files from repository Creation of a Hard Copy for an Enterprise To create a Hard Copy File, click on the “Add New Hard Copy File” link < Add New Hard Copy File > on the Management of Hard Copy RC Files Section Header. A screen similar to that in Figure 18 will be displayed. Figure 18: Add New Hard Copy File To Create a Hard Copy File, Click the Create New Hard Copy File link. A new Hard Copy File will be created and list of Hard Copy Files will be refreshed. To cancel without saving, Click on the close link < Close > As Hard Copy Files are added, they will be reflected in Management of Hard Copy RC Files Section ref. Figure 17 User Manual – APPA Certificate Registration System Page 22 of 64 5.2 Updating of a Hard Copy for an Enterprise > A screen similar to the fig. 19 will appear. You may now To update a Hard Copy File, Click on the “Edit” Link < Save Hard Copy File> to save the amended information. make changes, and click on the save button < Figure 19: Add New Hard Copy File 5.3 Deletion of a Hard Copy for an Enterprise To Delete a Hard Copy File from repository, Click on the delete icon < A message will prompt you to confirm the delete. > next to the specific Hard Copy File. Figure 20: Deletion of a Hard Copy File Click “Cancel” to abort the delete, or “OK” to permanently delete the that specific Hard Copy File from repository Management of PaperWork Index To manage the PaperWork i.e. Documents in the Hard Copy File, Click on the Manage PaperWork Index < > next to the specific Hard Copy File. Screens similar to ref. Figure 21 for managing paperwork index will appear Figure 21: Management of PaperWork Index User Manual – APPA Certificate Registration System Page 23 of 64 5.4 Addition of PaperWork to PaperWork Index Add New To add PaperWork to PaperWork Index, click on the “Add New PaperWork to Index” link < Paperwork to Index > on the Management of Paperwork Index Section Header. A screen similar to that in ref. Figure 22 will be displayed. Note: By default, paperwork should be added to the most recent file (the latest tracking number). So if there are seven files, paperwork should be added to file tracking number 007 Figure 22: Addition of Paperwork to Paperwork Index Mandatory fields are indicated by a red *. Following are mandatory fields: (i) Document Title (ii) Category (iii) Date Received Fill in as much information as available. Enter the following field(s): Document Title Title of the PaperWork Category Select the Category from drop down list to which the paperwork belongs to Document Browse to the document that you want to add with the PaperWork Document Type Enter the type of document from drop down list Date Received Enter the date, PaperWork was received Click the Upload Document < Upload Document >icon Close>. The save and close buttons are To close the window/cancel without saving, click on the close icon < located at the top of the window, and duplicated at the bottom as well to facilitate ease of access. As Paperwork’s are added, they will be reflected in a “Management of PaperWork Index” section on the main form. The Management of PaperWork Index” section will look similar to that in ref. Figure 21 User Manual – APPA Certificate Registration System Page 24 of 64 5.5 Viewing of Document Upload with PaperWork To view the document Uploaded with the PaperWork, Click on the “View” link < PaperWork. Document will be displayed in new window. 5.6 > next to the specific Moving of PaperWork from One Hard Copy File to another Hard Copy File This section allows moving the PaperWork from One Hard Copy File to another Hard Copy File. To move the > next to Paperwork from one Hard Copy File to another Hard Copy file, Click on the “Move PaperWork” link < the specific PaperWork. A screen similar to that in ref. Figure 23 will be displayed. Figure 23: Moving of Paperwork Mandatory fields are indicated by a red *. Following are mandatory fields: (i) Move to Tracking Number Select the Tracking No. from the list of tracking numbers displayed in “Move to Tracking Number” drop down list which lists all the tracking numbers of hard copy files except the tracking no. to which the PaperWork belongs to. Click the Move Document < Move Document > icon Close>. The save and close buttons are To close the window/cancel without saving, click on the close icon < located at the top of the window, and duplicated at the bottom as well to facilitate ease of access. The PaperWork moved will be removed from the list of existing Hard Copy File and will be displayed under the list of Hard Copy File to which the PaperWork has been moved. 5.7 Updating of PaperWork This section allows updating the details of the PaperWork already added to the PaperWork Index. To update the details of the PaperWork, Click on the “Edit” link < > next to the specific PaperWork. A screen similar to that in ref. Figure 24 will be displayed. User Manual – APPA Certificate Registration System Page 25 of 64 Figure 23: Updating of PaperWork Mandatory fields are indicated by a red *. Following are mandatory fields: (i) Document Title (ii) Category (iii) Date Received Fill in as much information as available. Enter the following field(s): Category Select the Category from drop down list to which the paperwork belongs to Document Title Title of the PaperWork Document Type Select the type of document from drop down list Date Received Enter the date, PaperWork was received Date Placed in File Enter the date, PaperWork was placed in the File Click the Update Document < Update Document >icon Close>. The save and close buttons are To close the window/cancel without saving, click on the close icon < located at the top of the window, and duplicated at the bottom as well to facilitate ease of access. As Paperwork’s are updated, they will be reflected in a “Management of PaperWork Index” section on the main form. The Management of PaperWork Index” section will look similar to that in ref. Figure 21 5.8 Deletion of a PaperWork form PaperWork Index To Delete a PaperWork from PaperWork Index, Click on the delete icon < message will prompt you to confirm the deletion of paperwork. User Manual – APPA Certificate Registration System > next to the specific PaperWork. A Page 26 of 64 Figure 24: Deletion of PaperWork from PaperWork Index Click “Cancel” to abort the delete, or “OK” to permanently delete the specific PaperWork from PaperWork Index. Management of File Tracking To manage the File Tracking, Click on the Manage File Tracking < > next to the specific Hard Copy File. Screens similar to ref. Figure 25 for managing File Tracking will appear Figure 24: Management of File Tracking It will display the status whether IN or OUT based on whether the file is actually Checked Out or Checked IN. Option for Check IN or Check Out will be displayed based on the Status of the file. If the file is Checked IN, then option will be displayed to Check OUT the file and if file is Checked Out then option will be displayed to Check IN the file 5.9 Check OUT File This section allows to Check OUT the file. To Check OUT the file, Click on the “Check OUT File fro Repository” Check OUT File from Repository >. A screen similar to that in ref. Figure 25 will be displayed. link < User Manual – APPA Certificate Registration System Page 27 of 64 Figure 25: Check OUT File Mandatory fields are indicated by an *. Following are mandatory fields: (i) (ii) (iii) (iv) (v) (vi) Borrower First Name Borrower Last Name Designation Address Date Received Expected Date of Return Fill in as much information as available. User Manual – APPA Certificate Registration System Page 28 of 64 Enter the following field(s): Borrower First Name Enter the first name of the person who is borrowing the file Borrower Last Name Enter the last name of the person who is borrowing the file Designation Enter the designation of the person who is borrowing the file Email ID Enter the email address of the person to whom the file is being checked out Phone No Enter the contact phone no. of the person to whom the file is being Checked out Address Enter the address of the person to whom the file is being Checked out City Enter the City of the address. Postal Code Enter the Postal Code of the address Date Received Enter the date file is being checked out Expected Date Of Returb Enter the date file is expected to be returned by the borrower Click the Check OUT File< Check OUT File >icon Close>. The save and close buttons are To close the window/cancel without saving, click on the close icon < located at the top of the window, and duplicated at the bottom as well to facilitate ease of access. As file is Checked OUT or Checked IN, they will be reflected in a “Management of File Tracking” section on the main form. The Management of File Tracking” section will look similar to that in ref. Figure 25 5.10 Check IN File This section allows to Check IN the file. To Check IN the file, Click on the “Check IN File to Repository” link < Check IN File to Repository >. A screen similar to that in ref. Figure 26 will be displayed. User Manual – APPA Certificate Registration System Page 29 of 64 Figure 26: Check IN File All the details which are entered while Checking OUT the file are displayed. Enter the Date Returned field and click “Check IN File” < Check OUT File > link. Close>. The save and close buttons are To close the window/cancel without saving, click on the close icon < located at the top of the window, and duplicated at the bottom as well to facilitate ease of access. As file is Checked IN they will be reflected in a “Management of File Tracking” section on the main form. The Management of File Tracking” section will look similar to that in ref. Figure 25 User Manual – APPA Certificate Registration System Page 30 of 64 6. Registration Certificate Administration Registration Certificate Administration Figure 15: Reg Cert Tab This section allows you to capture information about the registration certificates for an entry. Please note that you must complete the Administration of Registration Certificate Section, before adding any APCO observations or registration certificates. User Manual – APPA Certificate Registration System Page 31 of 64 Reg Cert Admin Figure 16: Administration of Registration Certificate Complete as much information as possible, and click on the Save Admin icon. The flag will now change to green, and you will be allowed to add APCO observations, or registration certificates. User Manual – APPA Certificate Registration System Page 32 of 64 APCO Observations To add a new APCO observation, click on the Add APCO Observation Link. The following window will display. Figure 17: Add APCO Observation Complete as much information as available to you, and click on the save icon. To cancel, click on the cancel icons. These icons are repeated on the top and bottom for ease of access. Once one or more Observations have been recorded, a grid similar to the following will appear. Figure 18: APCO Observations To edit an existing Comment, click on the edit icon. The existing details will be displayed in a screen similar to the previous. You may now make amendments, and click on the save icon. To delete an existing observation, click on the delete icon. You will be prompted to confirm the delete. If you choose yes, the observation will be permanently deleted. If you choose no, the operation will be aborted, and the observation will remain. User Manual – APPA Certificate Registration System Page 33 of 64 Registration Certificates To add a new registration certificate, click on the add icon. See the section “APPA Registration Certificate” on completing a registration certificate on page 28 for detailed information on how to complete this section. Figure 19: Adding Registration Certificate Once you have saved one or more registration certificates, the grid will be populated similar to the following: Figure 20: Multiple Registration Certificate User Manual – APPA Certificate Registration System Page 34 of 64 To edit one of these existing records, click on the Edit icon, the previous window will open with the relevant data populated. Make amendments to this record, and save. To delete an existing Registration Certificate, click on the Delete icon. You will be prompted to confirm the delete. If you click yes, then the record will be permanently deleted. If you click no, the operation will be aborted, and the record will not be deleted. > to view the Registration Certificate Report for the selected Registration Certificate. An Click the Print button < example of a Registration Certificate Report is below: The report will open up and immediately give you the option to print it by clicking the Print button. If you do not want to print, just click the Cancel button. You will then be able to review the report. Once you are ready to print, you can click the Print < User Manual – APPA Certificate Registration System > icon. Page 35 of 64 APPA Registration Certificate Figure 21: Adding Registration Certificate This Window allows you to capture information of a particular Reg Cert. You must complete the top section (Registration Certificate) before capturing any other information. Clicking on the headings will expand/collapse the sections. Note that most of the form is disabled. It will only be enabled once the first section is completed. User Manual – APPA Certificate Registration System Page 36 of 64 Registration Certificate Figure 22: Adding Registration Certificate Complete as much information as possible. Note that there are no mandatory fields. When you are done, click on the Save Reg Cert icon. The flag will now turn green, the entire form will be enabled, and you will be able to capture other information. User Manual – APPA Certificate Registration System Page 37 of 64 Scheduled Process Figure 23 This section allows you to add a Scheduled Process for a Registration Certificate. You may add more than one Scheduled Process. To add a new Scheduled Process, click on the Add new Scheduled Process icon. The following screen will appear. User Manual – APPA Certificate Registration System Page 38 of 64 Figure 24: Add Scheduled Process Select a Scheduled Process from the drop down, and provide a description. Then click on the save button. To close without saving, click on the close icon. Once one or more Schedule Processes have been added, the data grid will be populated similar to the figure 26. User Manual – APPA Certificate Registration System Page 39 of 64 Figure 25: Multiple Scheduled Processes To edit an existing Scheduled Process, click on the edit icon, the previous screen will display with the information pre populated. To delete Scheduled Process, click on the delete icon. You will be prompted to confirm the deletion. If you click yes, the process will be deleted permanently. If you click no, then no action will be taken on the schedule. User Manual – APPA Certificate Registration System Page 40 of 64 Raw Material Figure 26: Raw Material This section allows you to add raw materials to the Registration Certificate. You may add more than one raw material. To add a new raw material, click on the Add New Raw Material Link. The following screen will appear: User Manual – APPA Certificate Registration System Page 41 of 64 Figure 27: New Raw Material Enter the Raw material Type, Amount, and unit. If the unit is not available from the drop down list, see the section on adding units dynamically. Also link the raw material to a schedule process, by selecting one from the drop down list. Click the save icon to save raw material. As Raw materials are added, they will be displayed on the data grid similar to the one shown in Figure 28. User Manual – APPA Certificate Registration System Page 42 of 64 Figure 28: Multiple Raw Materials To edit a Raw material, click on the edit icon, and a screen similar to the previous one will be displayed with data pre populated. Make amendments, and click on the save icon. To delete an existing Raw Material, click on the delete icon. You will be prompted to confirm the delete. If you click ok, the Raw Material will be permanently deleted. If you click no, the Raw Material will be left as is. User Manual – APPA Certificate Registration System Page 43 of 64 Type of Product Figure 29: Product Section (Blank) This screen enables you to capture products for a Registration Certificate. You may add more than one Product. To add a new product, click on the Add New Product link. The following screen will be displayed. User Manual – APPA Certificate Registration System Page 44 of 64 Figure 30: Add new product. Complete the fields, and click on the save link. The product will now be saved, and will be reflected on the grid. As you add more they will be reflected as follows: User Manual – APPA Certificate Registration System Page 45 of 64 Figure 31: Multiple Products To edit an existing product, click on the edit link. Update the details, and click on the save link. To delete an existing Product, click on the delete icon. You will be prompted to confirm the delete. If you select yes, then the Product will be deleted permanently. If you click no, the delete operation will be cancelled, and the product will remain as is. User Manual – APPA Certificate Registration System Page 46 of 64 Appliance Details Figure 32: Appliance Section This section will allow you to add an appliance to the Registration Certificate, as well as its associated pollutants. Before a pollutant can be added to an appliance, the appliance must be saved first. To capture a new appliance, click on the add New Appliance Link. The screen similar to Figure 34 will be displayed: User Manual – APPA Certificate Registration System Page 47 of 64 Figure 33: New Appliance Complete as much information as possible, and click on the Save link. Please note that although you can see the pollutant section, you will not be able to capture a pollutant until the appliance has been saved. User Manual – APPA Certificate Registration System Page 48 of 64 After one or more appliances have been added, they will appear on the appliance grid similar to the Figure 35. Figure 34: Multiple Appliances To edit an existing Appliance, click on the edit icon. A screen will appear with the previously captured information display. Amend the information accordingly, and click on the save link. To delete an appliance, click on the delete icon. You will be prompted to confirm. If you click yes, the appliance will be permanently deleted. If you click cancel, the appliance will be left alone. Because each appliance can have multiple pollutants, adding these will be covered in the following section. User Manual – APPA Certificate Registration System Page 49 of 64 Appliance Pollutants Figure 35: Pollutant section User Manual – APPA Certificate Registration System Page 50 of 64 Each appliance can have multiple pollutants. This section will enable you to add a pollutant for a specific appliance. To add a new pollutant, click on the add pollutant link. A form similar to the Figure 37 will be displayed. Figure 36: New Pollutant User Manual – APPA Certificate Registration System Page 51 of 64 Capture available information to the form, and click on the save link. When one or more pollutants have been captured for an appliance, these will be added to the grid of pollutants for that the specific appliance, similar to the Figure 38. Figure 37: Multiple Pollutants To edit an existing pollutant, click on the edit link. The form will be displayed with the captured information. Make amendments to this information as appropriate, and click on the save link. User Manual – APPA Certificate Registration System Page 52 of 64 To delete an existing pollutant, click on the delete link. You will then be prompted to confirm your deletion. Clicking on the Yes button will permanently delete the pollutant. If you are unsure, click on the Cancel button to cancel to delete. Appliances and Measures to prevent air pollution Figure 38 Information about appliances and measures to prevent air pollution for the specific Registration Certificate as a whole should be captured in this field. Once this is done, click on the Save Prevention Measures link to save the info. Appliances and measures to prevent air pollution can be updated be overwriting the existing value displayed in “Appliances and measures to prevent air pollution” textbox. After updating click on Save Prevention Measures link to update the Information about appliances and measures to prevent air pollution for the specific Registration Certificate. User Manual – APPA Certificate Registration System Page 53 of 64 Disposal of effluent form purification equipment Figure 39 Information about effluent disposal for the specific Registration Certificate as a whole should be captured in this field. Once this is done, click on the Save Effluent Disposal link to save the info. Disposal of effluent from purification equipment can be updated by overwriting the existing value displayed in “Disposal of effluent from purification equipment” textbox. After updating click on Save Effluent Disposal link to information about effluent disposal for the specific Registration Certificate. User Manual – APPA Certificate Registration System Page 54 of 64 Uploading of Documents Figure 40 This Tab allows you to upload supporting files for the entry. Examples may include diagrams, maps etc. User Manual – APPA Certificate Registration System Page 55 of 64 To upload a file, click on the browse button. A Choose file dialogue similar to the following will display: Figure 41 From this dialogue navigate to the file you wish to upload. To choose the file, either double click on it, or select it and click on the open button. The dialogue will close, and the file path will be reflected in the browse textbox. Now enter a title for the document, and click on the upload button. Note: The uploaded files are stored with a system generated filename. The document title you specify in the name field will be the name that the application uses to refer to the file, eg in the location section. There are several upload controls in this section. Choose the appropriate one. E.g., Use the site and area map section to upload a map detailing the location of the facility. The last section has a drop list which has further categories to which a document might belong to. User Manual – APPA Certificate Registration System Page 56 of 64 Reports The reports section can be accessed by clicking on the reports menu item on the header. There are 2 reports available, namely the Activity Log and Usage Counter. User Manual – APPA Certificate Registration System Page 57 of 64 Activity Log The activity log shows the activity carried out during the specified period. To display the report, select the period using the calendar picker controls, and click on the view button. A report similar to the following will be shown: The report will open up and immediately give you the option to print it by clicking the Print button. If you do not want to print, just click the Cancel button. You will then be able to review the report. Once you are ready to print, you can click the Print < > icon. Usage Counter The usage counter determines the number of new records per type created between specified periods. To retrieve this report, select the time period by utilizing the calendar controls, and click on the View button. You will then be presented with a report similar to the one below. The report will open up and immediately give you the option to print it by clicking the Print button. If you do not want to print, just click the Cancel button. You will then be able to review the report. Once you are ready to print, you can click the Print < User Manual – APPA Certificate Registration System > icon. Page 58 of 64 Miscellaneous Version Number The Version Number appears is on the Title Bar. This will be visible on every main screen. Figure 42: Version Number on Title Bar Session Timeout For security and resource reasons, there is a limit as to how long an application is left running without any activity performed on it. Hence after a certain period of inactivity, the session will timeout, and you will have to login again. The default session timeout has been set to 30 minutes. To avoid losing data, ensure that you save you data regularly. If you have extended amounts of data to capture in a textbox for example, you may want to save the data in a temporary text file first before pasting into the application and saving. This will prevent you from having to type the information out again, should the session timeout. Text Box Limits All information that is captured into the application is saved in a database that has a limited size. Hence textboxes have a limit on the number of characters you may enter into them. Once you’ve reached the limit, you will not be able to enter anymore characters into that textbox. Multiline textboxes will have an indication as to how many characters are acceptable. Figure 43: Max Length Indicator User Manual – APPA Certificate Registration System Page 59 of 64 Adding New Units When adding a “Raw Material”, “Product”, or “Pollutant”, there is a possibility that you may come across a unit that is not listed in the “unit” drop down list. A facility has been provided whereby you may add the required unit to the system. It is recommended that you inform your supervisor before carrying out this procedure. To add the new unit, select the < OTHER > option from the “Unit” drop down list. Figure 44 When you click on this option, the following screen will be displayed: User Manual – APPA Certificate Registration System Page 60 of 64 Figure 45: Add Unit Screen Select the unit type from the < Type > drop down list. This will determine which section the unit is added to, i.e. < Raw Material >, < Product >, or < Pollutant >. Figure 46: Selecting the unit type Now enter the unit description in the < Unit > field, and click on the save link < >. The unit you just added will now appear in the unit drop list of the section you are currently on. Tracking of Data Capturers User Manual – APPA Certificate Registration System Page 61 of 64 The application automatically keeps a record of the first person to capture a section, as well as the last person who edited a section. The date and time is stored as well. The application detects this from the user’s login details, hence it is recommended that you keep your password safe, and do not share it with anyone. Location of Buttons Certain sections in the application can be quite long, and may require the user to scroll down the window to complete. To facilitate ease of use, the < save > and < cancel > buttons are usually located at the top of the section and duplicated at the bottom as well. The functionality between the top and bottom set is identical. Figure 47 Hide / Show Sections Certain tabs contain more than one section. Viewing all of these sections at once can make data capturing confusing. To simplify the screen, individual sections can be hidden or shown. To show a collapsed section, click on the header of the collapsed section. Figure 48: Show Section To hide an expanded section, click on the header of the expanded section. User Manual – APPA Certificate Registration System Page 62 of 64 Figure 49: Collapse a Section Note: When a section is expanded, any other section that was previously expanded will automatically collapse. Conventions and Definitions The following conventions have been used throughout this document. < > denotes an actual element in the application that is being referred to. Tab Refers to the entire page belonging to a tab. Example: In the picture fragment below, the Upload Documents tab is currently selected, and refers to the entire contents of that tab. The current tab will always be indicted by having a silver background. Section Refers to the collapsible region of a tab. Example: the section expanded below refers to the Applicable Regulations Section User Manual – APPA Certificate Registration System Page 63 of 64 Figure 50 Operation Refers to an operation carried out by the application. Example: The delete operation refers to the operation carried out by the application to delete a record. Entry Refers to a complete entry captured for a company. Field Refers to an input area. You would typically select a value, or type in a value. User Manual – APPA Certificate Registration System Page 64 of 64