1
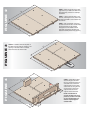
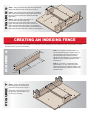
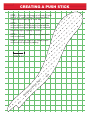
SAFETY INSTRUCTIONS
Woodworking projects can be fun and rewarding, however, your first concern must always be safety. Please read
and follow the safety instructions detailed below before commencing any woodworking project:
WARNING - Failure to obey these warnings could lead to serious bodily injury or death:
• Read and obey all warnings and instructions contained in the saw machine's user's manual and for any accessory that is from the manufacturer
before using the cutter. Be sure that this cutter is compatible with your saw machine. If you do not have the user's manual, obtain one from the
machine's manufacturer before using cutter.
• Only operate saw machine when proper saw guards and protections are in place and working properly.
• Always wear proper eye protection complying with current CSA standard Z94.1 or ANSI Standard Z87.1 and hearing protection.
• Disconnect saw from the power source when changing, removing or adjusting any blades, and use caution in handling the dado cutters during
installation.
• Carbide is a very hard and brittle material. Slight shocks can damage the carbide. Before each use, check that the cutter is sharp and free from
cracks, loose teeth, missing teeth, broken teeth or any other damage. Do not use if the cutter is dull or any damage is noticed or suspected.
• Use the cutter only for cutting wood. Do not use for cutting metal, masonry, or concrete.
• Never use cutter in the vicinity of small children.
• Be sure to keep hands and fingers a safe distance away from the blade while it is turning, and wait until the blade stops completely and the saw is
disconnected from the power before handling.
• Keep body, clothing and hair clear of spinning blade. Do not wear jewelry while operating cutter. Keep hands away from cutter and cutting area.
Never perform operations freehand.
• Mount cutter securely in proper rotational direction indicated on the face of the blade itself.
• Never use cutter in the saw machine that will exceed maximum recommended blade RPM indicated on the cutter.
• Make sure the saw is properly tuned, in good working order, and that the blade rotates freely within the saw before connecting the saw to the power
supply.
• Clean Well. Be sure all components are clean and free from dust and chips. Chips between components may affect performance and damage tools.
• Be sure to obtain the proper insert or “throat plate” for your saw for dado cutters.
• Allow saw to reach full speed before cutting.
• Always use both outside blades of the dado set. Never use the chippers by themselves or with only one outside blade. Not using both outside
blades can cause personal injury or damage to the tool.
• When making wide and or deep dado cuts always remove the material in several shallow cuts. Doing so will result in a cleaner cut and help reduce
the chance of kickbacks.
• Use caution when handling the dado cutters during installation or adjustments.
• If you ever have any questions regarding your blade, please call Freud Customer Service at 800-472-7307. In Canada call 800-263-7016.
• Keep these warnings and instructions in a safe place for future reference.
• Para obtener una copia de estas advertencias en español llame: 800-472-7307.
CREATING A DADO SLED
FIGURE 1
NOTE: This is just one of many different ways that woodworkers can create their own dado sled.
STEP 1 - Cut all parts to size
taking care to ensure that all
pieces are square and true. 1/2"
thick plywood is recommended
for the main base and hard
wood for the other parts.
The base dimensions
may need to be
increased or
decreased depending on
your saw. Make sure the
runners are a suitable size
for the miter gauge slots of
your table saw.
Main Fence (1)
3/4" x 4" x 26"
Polycarbonate Safety
Guard (1) .236" x 6" x 16"
Fence Supports (2)
3/4" x 2" x 4"
Support Block (1)
2" x 4" x 6"
Support Block (1)
2" x 2" x 6"
Main Base (1)
1/2" x 18" x 26"
Runners (2)
3/8" x 3/4" x 18"
FIGURE 2
FIGURE 3
FIGURE 4
STEP 2 - Place the runners in the miter
gage slots of your table saw. Make sure
they slide freely and have no sideways
movement.
"
26
STEP 3 - Lay the plywood base on the
runners, and using the fence, make sure
the base is parallel to and centered over
the runners.
STEP 4 - Drill, countersink, and screw
the base onto the runners. Use flat head
wood screws that do not protrude
through the runners. Make sure the
base fully contacts the saw table and
that the assembly slides freely (figure 2).
CL
18
"
STEP 5 - Install the dado throat plate on
the table saw and mark the location of its'
opening on the main base to indicate
where the dado cut will be made.
"
26
do
n
tio
ca
o
tL
Slo
Da
18
"
"
26
do
Slo
n
tio
ca
o
tL
90°
Da
3"
STEP 6 - Assemble the dado
sled ensuring that the main
fence is exactly 90 degrees to
saw table fence. Center the
support blocks over the path
of the dado cut. Use glue and
wood screws to secure the
support blocks and fence
supports to the main base.
NOTE: Countersink all
screws and take care not to
place any screws in the path
of your intended dado cut.
Screws may damage the
carbide teeth!
18
"
2"
3"
FIGURE 5
STEP 7 - Using pan head screws, attach the polycarbonate
safety guard above the dado slot as shown in figure 5.
STEP 8 - Disconnect the power from the saw and install the
dado cutter set to its maximum cutting width. (Always check
the saw's owner's manual for the maximum allowable
dado width.)
oW
STEP 9 - Adjust the dado cutter height to 1/4",
um
xim
place the sled in the miter gauge slots,
Ma
reconnect the power and make a dado cut the full
length of the sled. Disconnect the power, remove the
sled and raise the dado cutter another 1/4". Reinstall the
sled on the saw, reconnect the power and make another cut.
Repeat this procedure a third time to finalize your sled (figure 5).
h
idt
d
Da
90°
CREATING AN INDEXING FENCE
FIGURE 7
FIGURE 6
An indexing fence is a simple useful addition to a dado sled. Use an indexing fence to create joints such as box joints or to create
decorative effects such as dentil molding.
3/4
"
"
24
.1
2"
-1/
x
pro
4"
D
/4"
1
Approx. 1/4"
ia.
w
do
"D
el
ve
,e
les
o
.h
nly
ia
1/4
STEP 3 - Using 2 'G'-clamps, attach
the indexing fence to the main fence
of the dado sled as shown in figure 7.
The position of the indexing fence can
be adjusted to suit the project or cut
on which you're working.
ed
ac
sp
ap
.
art
ap
STEP 1 - Cut a piece of 3/4" thick wood to 4" x
24" and drill indexing holes as desired. Only one
1/4" hole near the center of the board and 1/4"
from the bottom edge is required, but evenly
spaced holes approximately 1-1/2" apart (figure 6)
will allow for more possible applications for the
indexing fence.
STEP 2 - Cut a piece of 1/4" diameter dowel
approximately 1-1/2" long. Check the fit of the
dowel in the hole(s) and adjust the diameter of the
dowel with light sanding if required so that it firmly
fits into the holes.
CREATING A PUSH STICK
STEP 1 - Photocopy this image at full scale OR print
the 8.5" x 11" copy from the Pdf document that is
located on the 'Dado Tips & Tricks' disc.
STEP 2 - Cut out the push stick pattern and paste
or trace it onto a 1/2" thick piece of wood with the
wood grain lined up as indicated. Do not use wood
that shows signs of splitting or checking.
STEP 3 - Cut out the shape using a jigsaw, band
saw, or scroll saw.
STEP 4 - Round the edges of the handle portion
and smooth all surfaces by sanding.
1"
SCALE 1:1
in
ra
od
o
W
f
i
on
Di
r
t
ec
o
G
POPULAR DADO CUTS
Below are some of the most popular joints and cuts that can be quickly and easily created using Freud dado sets.
p
g
Tenons
Corner-Lap Joints
Box Joints
To find out more about Freud products or to order a catalog visit:
www.freudtools.com
Freud America, Inc. 1-800-472-7307 (U.S.) 1-905-670-1025 (Canada)
©2005 Freud America, Inc. No portion of this piece may be reprinted without the written consent of Freud America, Inc.
The color Red on router bits and saw blades is a US Registered Trademark of Freud America, Inc.