1
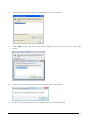
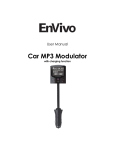
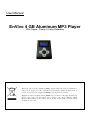
User Manual
EnVivo 4 GB Aluminum MP3 Player
With Clipper, Display & Voice Recording
Electrical and electronic equipment (EEE) contains materials, parts and substances,
which can be dangerous to the environment and harmful to human health if waste of
electrical and electronic equipment (WEEE) is not disposed of correctly.
Equipment, which is marked with the WEEE logo (as shown on the left), should not be
thrown away with your household waste. Contact your Local Authority Waste
Disposal Department, as they will be able to provide details of the recycling options
available in your area.
Contents
PREFACE ............................................................................................................................................................ 2
NOTICE .............................................................................................................................................................. 2
FEATURES ........................................................................................................................................................... 2
1. BUTTONS AND DISPLAY ................................................................................................................................ 3
1.1 The Function of Buttons .......................................................................................................................... 3
1.2 Display ..................................................................................................................................................... 3
2. OPERATING INSTRUCTIONS ......................................................................................................................... 4
2.1 Switch ON/Switch OFF ........................................................................................................................... 4
2.2 Main Menu .............................................................................................................................................. 4
2.3 Play Music ............................................................................................................................................... 4
2.4 Record Mode .......................................................................................................................................... 6
2.5 System Setting ........................................................................................................................................ 6
2.6 USB Connection ...................................................................................................................................... 7
2.7 Charging ................................................................................................................................................. 9
3. TROUBLE SHOOTING ................................................................................................................................... 10
4. PACKAGE CONTENTS ................................................................................................................................ 11
5. SPECIFICATION ........................................................................................................................................... 11
1
PREFACE
Thank you for choosing EnVivo 4GB Aluminum MP3 Player with Clipper, Display and Voice
Recording. Please read this user manual carefully before using.
All information on this booklet is subject to change without notice due to technical reasons.
NOTICE
1.
You must put the power bottom at “ON” position when you need to charge the player or
transfer data..
2.
Do not use the player in the extreme hot, cold, dusty or humid environments.
3.
Prevent friction with hard objects, or it may lead to surface abrasion, battery fall-off or
hardware damage.
4.
Avoid the player falling down from a high place, or it may damage the OLED screen or other
hardware.
5.
Do not wipe the surface of the player with alcohol, benzene or thinners.
6.
When the player is left pause state for a period of time, it will automatically power off.
7.
Please choose the suitable volume and avoid hurting your ear.
8.
Do not disconnect the device when formatting, uploading and downloading data. Doing this
can lead to loss of data.
9.
In order to avoid mis-operation, we strongly recommend you to manage your files in the player
via your computer/laptop.
FEATURES
.
2.
3.
4.
5.
6.
1
7
.
Mini OLED Display
Supported audio formats: MP3 & WMA & WAV
Work as a memory stick – plug and play for data back up.
Support voice recording function via built-in microphone.
Support 7 EQ modes: natural, rock, pop, classic, soft, jazz & dbb.
Support 7 playing modes: normal, repeat one, repeat all, random, folder, repeat folder and
intro.
Remembers the last music track when the player is powered off by pressing and holding the
‘PLAY’ button.
. Support multi-languages
9. Support playing files in three-layer directory.
10. Supports Windows 2000/XP and Vista
8
2
1. BUTTONS AND DISPLAY
1.1 The Function of Buttons:
•
•
•
•
•
•
•
•
POWER: turn on/off the player
PLAY: switch on/play/stop
MODE: enter the menu
VOL: enter the volume control interface
NEXT/VOL+: next song/option, faster forward, volume up
PRE/VOL-: previous song/option, faster backward, volume down
USB PORT: charging, data transfer with PC
HEADPHONE: connect with standard 3.5mm stereo headset
1.2 Display:
Playing Music:
Data Downloading from PC/Laptop:
Data Uploading to PC/Laptop:
Suspending Mode:
3
2. OPERATING INSTRUCTIONS
2.1 Switch ON/Switch OFF
1.
Slide the ‘POWER’ key to ON position to turn on the player and slide the ‘POWER’ key to OFF
position to turn off the player.
2.
When the player is on, press and hold the ‘PLAY’ key 3-5 seconds can turn off the player.
3.
When the player is off and the ‘POWER’ key is at ON position, press and hold the ‘PLAY’ key
can turn on the player.
4.
It is recommended to slide the ‘POWER’ key to OFF position, if the player is not to be used for a
while.
Note: The player will turn off automatically when the battery is low.
2.2 Main Menu
After turning on the player, you can use ‘NEXT’ or ‘PRE’ button to browse the main menu below:
•
Music
•
Record
•
Sys Set
Press ‘MODE’ button to enter each mode. Press and hold ‘MODE’ button to exit and return to the
main menu.
2.3 Play Music
1.
Turn on the player and plug in the headset. Press ‘NEXT’ button to choose Music Mode like
below and press ‘MODE’ button to enter Music Mode :
2.
Press ‘PLAY’ button to play music and press it again to pause.
3.
In PAUSE status, press ‘MODE’ button, you can enter the submenu for file management. You
can delete music files one by one or choose delete all to remove all the files. Please note that
it is very easy to mis-delete files so please operate your files via PC if possible. You can also
choose which song you would like to listen.
Note: “Delete all” will delete all files in the current folder of the current mode. For example, “Delete
all” will delete all music files in music mode and will not delete all recorded files.
4.
When you are playing the music, press ‘NEXT’ or ‘PRE’ to select the next or previous song.
5.
Press ‘VOL’ to enter the volume control interface and use the ‘VOL+’ or ‘VOL-‘ to adjust the
volume. Press ‘MODE’ button to exit volume control interface after finishing.
4
6.
Choose PLAY Mode
When you are playing the music, press ‘MODE’ button to enter the submenu. Use ‘NEXT’ or
‘PRE’ to select Play Mode. Press ‘MODE’ button again to enter the submenu, then you can
choose different play mode:
7.
•
Normal: play files in normal sequence in each folder
•
Repeat one: play the current song repeatedly
•
Folder: play all music files in the current folder and stop when finishing playing
•
Repeat Folder: play all music files in the current folder repeatedly
•
Repeat All: play all music files repeatedly
•
Random: shuffle play different music files in the current folder
•
Intro: play the first 10 seconds of each music file
Choose EQ Mode
When you are playing the music, press ‘MODE’ button to enter the submenu. Use ‘NEXT’ or
‘PRE’ to select Equalizer menu. Press ‘MODE’ button again to enter Equalizer menu. Then you
can use ‘NEXT’ or ‘PRE’ to choose different equalizer mode (natural, rock, pop, classic, soft,
jazz and dbb). Use ‘MODE’ to confirm your choice after finishing.
8.
Replay
When you are playing the music, press ‘MODE’ button to enter the submenu. Use ‘NEXT’ or
‘PRE’ to select ‘Replay’ menu. Press ‘MODE’ button to enter Replay menu. You can see the “A”
is blinking and press ‘NEXT’ to define the start point of the replay period. “B” will start to blink
and press ‘NEXT’ to define the end point of the replay period. Press ‘MODE’ button again to
enter the submenu and find the ‘Replay time’menu to set up the replay times from 1 to 10.
9.
Dir navigation
When you are playing the music, press ‘MODE’ button to enter the submenu. Use ‘NEXT’ or
‘PRE’ to select ‘Dir navigation’ menu. Press ‘MODE’ button again to enter the Dir navigation
menu. Then you can locate the music you would like to listen by using ‘NEXT’ or ‘PRE’ button.
Use ‘MODE’ to confirm your choice after finishing.
10. Lyric display
This player support ‘*.LRC’ files and the lyrics can be displayed simultaneously when playing
the music. Just save the lyric file as the same name as the related music file:
e.g. Music file name: My love-west life.mp3 and Lyric file name: My love-west life.lrc
will be displayed. Press and
When the lyric file name matches with the song, the lyric icon
hold ‘MODE’ button to enter the Lyric Interface when playing the music. The lyric will be
displayed.
Press ‘MODE’ button again shortly to exit lyric display.
5
2.4 Record Mode
1.
After turning on the player, make sure the battery is not low. Use ‘NEXT’ button to choose
Record Mode like below and press ‘MODE’ button to enter Record Mode:
2.
Press ‘PLAY’ button to start recording and press ‘PLAY’ button again to pause. Press and hold
‘MODE’ button to save and exit. The recorded file will be saved in the folder named
‘RECORD’. You can play your recorded files under ‘Music Mode’.
Note: User can select any directory as current record directory. The recorded file will be saved
at the directory you choose. When you listen to it in the Music Mode, please find the file at
that directory as well.
3.
If ‘Overflow’ is displayed on the screen, it means the memory of the player is full. Please
delete some files to make some space available.
4.
This player supports four recording types (Please choose higher bit rate for better sound
quality):.
5.
•
32K BPS
•
64K BPS
•
192K BPS
•
384K BPS
Choose recording type:
• In the Record Mode, press ‘MODE’ button to enter the submenu
• Press ‘NEXT’ button and select REC type. Press ‘MODE’ to enter
• Use ‘NEXT’ button to select the recording type and press ‘MODE’ to confirm the choice
• Press ‘PLAY’ to start recording
6.
Press and hold ‘MODE’ to exit.
2.5 System Setting
1.
When the player is on, use ‘NEXT’ button to select System Setting Mode like below:
2.
Press ‘MODE’ button to enter the submenu of System Setting
3.
Submenu
•
Record Time – mark the date and time when recording; it will be reset after power off
•
Backlight – set up the time of backlight on
•
Language – set up the operation language
•
Power off – set up the time of the player turning off automatically
•
Contrast – set up the contrast level of the screen
6
4.
•
Memory Info – show memory capacity and the percentage of used space
•
Firmware Version – display the firmware version
•
Firmware upgrade – for firmware update or reset your player (not recommended)
•
Exit – exit from the submenu
How to set up:
•
Use ‘MODE’ button to enter each submenu/confirm the choice
•
Use ‘PRE’/’NEXT’ to adjust or select different options
•
Choose Exit or press and hold ‘MODE’ button to quit the submenu
•
Use ‘VOL’ button to set up Record Time and press ‘PRE’/’NEXT’ to adjust the number
•
Please contact our hotline support for firmware upgrade
2.6 USB Connection
1.
Connect the player with the computer/laptop via the USB extension cable
Note: Please turn on your player when connecting it with your computer/laptop.
2.
There will be a Removable Disk appear when you double click “My Computer” on the
Desktop.
3.
Drag and drop files into the Removable Disk.
4.
Double click on “Removable Disk” then you can open it.
5.
You can also create folders in the Removable Disk.
6.
Please DO NOT disconnect or turn off the player when you are downloading or uploading
files.
7.
Please use ‘safe removal’ after finishing the file operation. For Windows OS, you should double
click on the “Safely Remove Hardware” icon like below:
7
8.
Then the below window will pop up and please select your device:
9.
Click “Stop” button and select your device again. Then click “OK” button to confirm like
below:
10.
Wait for a few seconds and you will see a window pop up like below:
11.
Now you can safely disconnect your player from your computer/laptop.
8
12.
For Mac OS, please close all programs, files and windows stored or running on the player.
Drag the icon of your player into “Trash” like below and then you can un-plug your player
from your computer/laptop:
2.7 Charging
1.
indicates battery low and the player needs to be charged.
2.
Turn on the player and connect it with your PC or charger via USB extension cable. The player
will start charging automatically.
3.
When you are charging your player via the charge enclosed, the indication light on the
charger will be red. The light will turn to green when finishing charging.
4.
indicates that the battery is full.
5.
Please use ‘safe removal’ after finishing charging via your computer.
6.
Normally it takes 3 to 4 hours to fully charge your player and it may take up to 10 hours during
the first two times of charging it.
Note: Make sure the player is on when charging it by computer/laptop or wall charger.
9
3. TROUBLE SHOOTING
No sound
1.
Verify that the volume is not at the minimum level.
2.
Check that the music files are supported by the player.
3.
Check if the headset is connected properly.
Music cluttered with noise
1.
The music file could be damage. Try to download it to the player again.
2.
Check is the headset is connected properly.
Cannot read or write data to the player
1.
Check that the player is properly connected to the PC.
2.
Check that the memory of the player is full.
3.
Check the USB cable for damages.
Cannot open the USB disk
1.
Check the removable drive for viruses.
Cannot record
1.
Check if the battery is low.
2.
Check if the memory of the player is full.
3.
Check if there are more than 99 recorded files within one folder.
Strange characters are displayed on the screen
1.
Check if the correct language is selected.
Cannot turn on the player
1.
Check if the battery is low. If yes, please charge your player.
10
4. PACKAGE CONTENTS
•
•
•
EnVivo 4GB Aluminum MP3 Player
Standard Headset
USB Cable
5. SPECIFICATION
Chipset
Action
Display
OLED
Resolution
128 x 64 pixels
Operating Languages
Danish, Dutch, English, French,
German, Greek, Italian, Korean,
Portuguese, Russian, Simplified
Chinese, Spanish, Swedish, etc.
Interface
USB 2.0
Support Format
MP3, WMA, WAV
Play Time
3.5 ~ 5 hours
Max. Output Power
(L) 10mW + (R) 10mW (320hm)
Built-in Memory
4GB
Battery
3.7V Li-polymer battery
Weight
20g
Operating Temperature -5 to 40
Operating System
℃
Windows 98SE/ME/2000/XP/Vista,
Mac OS 10 & above, Linux 2.4.2 &
above
11