1
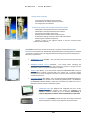
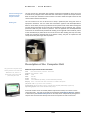
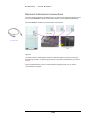
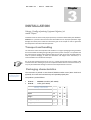
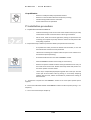
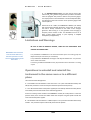
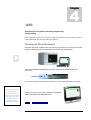
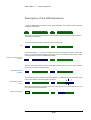
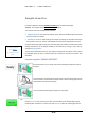
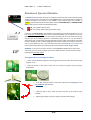
RO BOBACT
Module for growth and isolation of bacteria and yeast from biological samples
(Diagnostic Device EC - IVDD 98/79)
USER MANUAL
GUIDE TO THE SYSTEM
Robobact Manager for MS Windows® XP/Vista/7 operating systems
1/36
This manual is applicable to the following ROBOBACT instrument models:
Code
Description
94200
ROBOBACT
94210
ROBOBACT SPECIAL
LIST OF MANUAL REVISIONS
Rev.
VERSION
DATE
APPROVED
MODIFICATIONS
1 .00
Robobact Manager rel. 1.1.0.2
02/03/2009
New software for MS Windows®.XP/Vista/7 operating
systems
2 .00
USB
Robobact Manager rel. 1.4.4.x
20/01/2010
New software for Robobact Special Modules (94210)
2.01 USB
Robobact Manager rel. 1.4.4.x
23/07/2010
Some of the Technical Features have been changed
New Technical Support contact
Robobact Special declaration of Conformity has been added
Standards applied to this document:
UNI EN 591 II Edition (November 2001)
CEI EN 61010-1 II Edition Dossier 6290 (November 2001)
The information contained in this manual may be subject to modifications without prior notice. No page in this
manual may be reproduced in any form or by any means, electronic, mechanical or otherwise, for any use
whatsoever without prior written permission from DIESSE DIAGNOSTICA SENESE S.p.A
2/362
Robobact
DIESSE DIAGNOSTICA SENESE S.p.A.
Via delle Rose 10 • 53035 Monteriggioni • Siena •Italy
Tel. 0577 58.71.11 • Fax 0577 31.86.90
www.diesse.it
LEGAL REPRESENTATIVE
MANAGING DIRECTOR
REGISTERED AND ADMINISTRATIVE OFFICE
Via A. Solari 19, 20144 MILANO, Italy
Tel. ++39 02 4859121 Fax. ++39 02 48008530
DIESSE ASSISTANCE
CUSTOMER CARE
Via delle Rose 10, 53035 Monteriggioni (SI), Italy
Tel. ++39 0577 587154, ++39 0577 587121 Fax. ++39 0577 587151
e-mail: [email protected]
3/363
INTRODUCTION.......................................................................................................................................................6
THE ROBOBACT SYSTEM IN MICROBIOLOGY...................................................................................................................6
Description of system components:......................................................................................................................... 6
Manufacturer’s responsibility .................................................................................................................................. 8
Reference standards ................................................................................................................................................ 8
Warranty .................................................................................................................................................................. 8
Warranty conditions ............................................................................................................................................................... 8
Materials required for use of the instrument .......................................................................................................... 9
Particular warnings ................................................................................................................................................................. 9
SANITIZATION PROCEDURE .................................................................................................................................................... 9
TECHNICAL DATA...................................................................................................................................................11
INSTRUMENT COMPOSITION. TECHNICAL FEATURES. EXTERNAL CONNECTIONS AND UNIT OF MEASURE.....................................11
Technical description of the Robobact module ..................................................................................................... 11
Description of the Computer Unit ......................................................................................................................... 12
External instrument connections ........................................................................................................................... 13
Technical features .................................................................................................................................................. 14
ROBOBACT and ROBOBACT Special modules ....................................................................................................................... 14
Trolley ................................................................................................................................................................................... 14
Generator trolley .................................................................................................................................................................. 14
Unit of measure ...................................................................................................................................................... 14
INSTALLATION.......................................................................................................................................................15
PACKAGING. HANDLING AND POSITIONING. EQUIPMENT. OBLIGATIONS OF THE CUSTOMER. DISPOSAL....................................15
Transport and handling .......................................................................................................................................... 15
Packaging characteristics ....................................................................................................................................... 15
Materials provided ................................................................................................................................................. 16
Positioning .............................................................................................................................................................. 16
Obligations of the customer ................................................................................................................................... 16
It is prohibited to: ................................................................................................................................................................ 17
P Installation procedure ......................................................................................................................................... 17
Limitations and Warnings....................................................................................................................................... 18
Operations to uninstall and reinstall the instrument in the same room or in a different place ............................ 18
Instrument composition – Disposal........................................................................................................................ 19
USE.......................................................................................................................................................................20
INSTRUCTIONS FOR THE OPERATOR. INSTRUMENT PROGRAMMING. SAMPLE LOADING...........................................................20
Turning on the instrument ..................................................................................................................................... 20
Description of the LED indications ......................................................................................................................... 21
Description of the Robobact Manager menu ......................................................................................................... 22
Insertion using the “MANUAL METHOD” ............................................................................................................................ 29
Insertion using the “AUTOMATIC METHOD”....................................................................................................................... 30
Sample identification and processing ................................................................................................................................... 31
Emergency door opening procedure ................................................................................................................................... 32
Error list .................................................................................................................................................................. 33
APPENDIX A - DECLARATIONS OF CONFORMITY………..………………………………………….. ...........................................35
Rev 2.01 USB
4/36
SYMBOLS
Legend of symbols used in this document
WARNING: potential risk of
personal injury; all the conditions
indicated in the relative text must
be read and understood before
proceeding.
CAUTION: potential risk of damage to the
instrument; all the conditions indicated in
the relative text must be read and
understood before proceeding.
N.B. important information.
BIOHAZARD: risk of contamination with
potentially infected substances
Legend of electric and safety symbols used on the instrument.
Caution: risk of electric shock
Read the manual, observe the safetyrelated symbols
Preliminary notes:
Before installation and use of the instrument, it is advisable to carefully read the warnings and instructions
contained in this user manual in order to ensure proper and safe use.
It is important that this user manual be kept together with the instrument for future reference.
In case of sale or transfer, ensure that this manual accompanies the instrument to allow the new owner to be
informed about its functioning and the relative warnings.
It is recommended to allow only qualified and skilled personnel to use the instrument.
Rev 2.01 USB
5/36
R O B O B A C T
–
U S E R
M A N U A L
Chapter
1
INTRODUCTION
The Robobact system in microbiology
T
he
Robobact System
is a fully automatic modern processor that allows
seeding and bacterial development to achieve results comparable to the conventional
method on plates with the advantage of not having to open the biological sample
containers thus guaranteeing maximum safety for the operator and complete standardization
of seeding.
The ease of use and the time saved together with a vast range of culture media available make
this system unique of its kind.
Description of system components:
The Robobact System consists of containers to collect the samples, devices containing culture
media for seeding, and an automatic instrument.
Containers for sample collection and transport differentiated by type of biological
sample:
Coproset
Uriset
Rev. 2.01 USB
-
Faeces (Coproset)
-
Urine (Uriset)
-
Materials that can be swabbed (Swabset)
6/36
R O B O B A C T
–
U S E R
M A N U A L
Seeding device containing:
-
A housing for the biological sample container
Calibrated loops for seeding and colony isolation
A housing for Par Test execution
Automatic 35-position thermostated instrument that allows:
Coprobact
-
Uribact
Identification of the sample by means of a barcode label
Identification of the type of device/culture medium
Enrichment of the sample under mixing
Breaking open the bottom of the sample container
Simultaneous seeding on the two culture media of the device
Monitoring the incubation temperature
Sending a report on the negative samples to the host computer (upon
indication of the operator).
The ROBOBACT instrument must be connected to a computer on which the ROBOBACT
MANAGER control software for MS Windows XP/Vista/Windows7 operating systems is installed
. The system is modular and can be equipped with the following components according to the
laboratory’s requirements:
•
ROBOBACT Module (ref.94200) – This is the basic instrument and must be connected
to a computer.
•
ROBOBACT SPECIAL Module (ref.94210) - This module allows managing and
controlling the amount of oxygen in the instrument. It requires a nitrogen and CO2
distribution system. It must be connected to a computer.
•
TROLLEY (Ref. 94220) - This is the trolley to support the PROCESSING UNIT and up to
two ROBOBACT modules. Equipped with four wheels and a spacious storage
compartment it allows moving the instrument around and solves the space problem
on laboratory benches.
•
Generator TROLLEY (Ref. 94222) - This is the trolley housing the NITROGEN generator;
a CO2 bottle support can be fitted on the outside (CO2 Bottle Support – ref. 94200) for
the ROBOBACT SPECIAL Module It makes the instrument fully stand-alone even in
laboratories that do not have a distribution system.
Rev. 2.01USB
•
COMPUTER UNIT (ref. VPPENT) with integrated LCD touch screen
display. This is the computer that controls the ROBOBACT and
ROBOBACT SPECIAL modules (up to 12 modules). Alternatively, a
computer with features similar to those indicated above may be used.
•
Robobact Tray (ref.94005) made of steel with 18 housings to facilitate
device preparation, transport and arrangement in the thermostat.
7/36
R O B O B A C T
–
U S E R
M A N U A L
Manufacturer’s responsibility
DIESSE DIAGNOSTICA SENESE S.p.A. declines all responsibility for improper use of the
instrument or failing to use the instrument as specifically indicated in this manual. The
manufacturer’s responsibility is in any event limited exclusively to malfunctioning of the
instrument and solely during its intended use (Directive 1999/34/EC in amendment of
European Directive 85/374/EEC implemented in Italy with Pres. Decree 224 of 24 May [Law
Decree 25 of 02/02/2001]) and only if the power cables provided with the instrument are used.
Carefully read this manual before use.
It is assumed that only qualified and skilled persons will operate the instrument.
Reference standards
See APPENDIX A
EC Declaration of
Conformity
DIESSE DIAGNOSTICA SENESE S.p.A., an ISO 13485 and ISO 9001 certified company, declares to
have followed the Directives in the design and construction of the ROBOBACT instrument in
terms of safety as described in Appendix A to this manual.
DIESSE DIAGNOSTICA SENESE S.p.A. subjects all its products to strict quality controls. However,
should the instrument show signs of malfunctioning despite these controls, please contact the
authorised Technical Service Centre indicated to you at the time of delivery of the instrument.
Warranty
DIESSE DIAGNOSTICA SENESE S.p.A. guarantees the ROBOBACT instrument for a period of 12
months from the date of delivery (the date on the transport document shall be valid) for
material or manufacturing defects. Should the product prove to be defective during the
warranty period, the authorised Technical Service Centres will repair it free of charge debiting
only the transport costs where applicable.
Warranty conditions
For more details,
consult the sales
agreement stipulated
with the distributor
1.
This product shall not be considered defective in terms of materials and
manufacture if it has been adapted, modified or adjusted to comply with national
or local standards different from those for which the product was originally
designed and constructed.
2.
This warranty does not cover: - periodic inspections – maintenance and repair of
parts subject to normal wear – transport costs and risks directly or indirectly
related to the warranty of this product, including transport from the Technical
Service Centre to the domicile of the customer – damage caused by negligence or
improper use of the instrument – malfunctioning of the instrument caused by
modification or repairs made by unauthorised third parties – damage caused by
installation of parts not approved by the manufacturer.
Rev. 2.01USB
8/36
R O B O B A C T
–
U S E R
M A N U A L
Materials required for use of the instrument
Exclusively use the materials of the Robobact line manufactured by DIESSE DIAGNOSTICA
SENESE S.p.A. (always read the instructions for use that accompany each product before its
use); any other part or accessory used in the instrument may cause damage or incorrect results.
The manufacturer therefore declines all responsibility for damages deriving therefrom.
Particular warnings
Even though the Robobact system guarantees a good level of safety in handling biological
samples (faeces, urine or swabs), remember that you are still handling potentially infected
material. Therefore, take all the necessary precautions according to the law. Also the waste
material at the end of the cycle must be processed like any other hospital waste.
SANITIZATION PROCEDURE
The purpose of this protocol is to provide the technical laboratory operator with a procedure for
cleaning and decontaminating the entire ROBOBACT instrument to ensure hygiene and reduce
risks. Whatever the disinfectant or biocide used, apply the correct dosage for the minimum
required contact time.
In this connection, the instruments and the equipment must be cleaned before the disinfection
operation. This operation eliminates the biofilm and thus exposes the microorganisms to the
action of the disinfectant. It is therefore good practice to always keep the accessory instruments
and equipment clean.
MATERIALS
The product indicated in this protocol is UMONIUM 38 and acts as disinfectant and detergent.
Among the applications indicated is also cold disinfection of thermosensitive instruments and
medical devices.
Characteristics:
UMONIUM38 SPRAY: ready-to-use solution that acts on a wide variety of bacteria, mould and
viruses.
UMONIUM38: solution to be diluted with water.
Manufactured by Huckert’s International ; Chaussée de Namur, 60 ; B-1400 Nivelles; Belgium ;
www. huckerts.net
PROCEDURE:
ALL THE OPERATIONS DESCRIBED BELOW MUST BE CARRIED OUT WEARING THE APPROPRIATE
PERSONAL PROTECTION DEVICES (protective gloves, mask, goggles).
Routine cleaning (daily):
Rev. 2.01USB
9/36
R O B O B A C T
–
U S E R
M A N U A L
Turn on the Robobact instrument. Spray some Umonium38 on the first section of the sample
tray and wipe up to the 3rd-4th section with a paper towel. Spray again on the next section and
wipe onto the remaining sections and leave to dry.
Extraordinary cleaning
In case of contamination, considerable dirt, or an accident (for example: biological sample
spillage): spray some product on each section of the tray and leave to dry. If necessary in order
to remove debris or dirt from each single housing in the tray, unscrew the sections individually
and immerse them in an *0.5% aqueous solution of Umonium38. Leave the sections immersed
for 10 minutes, then rinse with distilled water and leave to dry or dry with a paper towel.
Note: The aqueous solution can be kept and reused within maximum 20 days; however, if it
becomes murky or residues appear a fresh solution must be used.
Umonium38 is also used to clean and decontaminate the outside of the Robobact instrument
including the LCD display (which must be turned off).
Rev. 2.01USB
10/36
R O B O B A C T
–
U S E R
M A N U A L
TECHNICAL DATA
Chapter
2
Instrument composition. Technical features. External
connections and unit of measure.
Technical description of the Robobact module
The ROBOBACT module consists of a single body containing all the operating functions
necessary for bacteriological isolation. The samples are introduced through the window on the
front. The power supply and serial/USB ports for connection to the computer are positioned on
the rear. Below follows a description of the functional units of the module.
Sample tray
The sample tray consists of a round rotary crown divided into seven sections, each of which
contains the housings for five samples for a total of 35 positions.
Thermostating unit
The operating temperature is preset for each method. During operation it is measured and
compared with the programmed temperature and if there are any variations (+/-0.5°C), heating
(by means of a heating element with fan positioned in the centre of the instrument) is
activated/deactivated. When the instrument is not running a cycle, a standby temperature of
18°C (+/-0.5°C) is maintained.
Unit for identification
of the type of
examination and its
status
This unit consists of a barcode reader which by reading the barcode on the exterior surface of
the device identifies the type of sample under examination, thus associating it with the
enrichment, breaking, seeding and incubation times and procedures programmed for that type
of examination. In addition, an optical sensor positioned at the height of the spherical end of
the seeding fork determines its status identifying whether or not a sample has already been
seeded.
Mixing unit
This unit is composed of four stations positioned underneath the sample tray, in each of which
there is a horseshoe-shaped magnet. The magnets are rotated by means of a belt driven by a
motor at 450 rpm. The rotating magnet moves the mixing rod housed in the sample containers
encouraging enrichment.
Rev. 2.01USB
11/36
R O B O B A C T
–
U S E R
M A N U A L
Unit for breaking open
the bottom of the
sample container
This unit consists of a metal block with up/down movement transmitted by means of a worm
screw driven by a stepper motor. When the block moves down it pushes the sample container
down to break open the bottom of the container and hence allow the liquid to flow into the
culture medium section of the device.
Seeding unit
This unit consists of an arm at whose end a clamp is positioned; the clamp jaws have an
open/close movement. The arm makes two movements: up/down and forward/backward.
When it moves down, the clamp is positioned on the spherical end of the device seeding fork
and the closing movement of the clamp jaws is activated to grip the spherical end. A sensor
positioned inside the jaws checks its presence. Then the up/down and forward/backward
movements are simultaneously activated for seeding on the agarized culture media by means
of the calibrated loops positioned at the end of the fork. After seeding the loops are firmly
locked thus preventing dropping back to the bottom. Finally, the jaws are opened and the
clamp moves away returning to the rest position.
Description of the Computer Unit
Any personal computer with
similar features and with MS
Windows® XP, Vista or 7
operating system and USB
ports may be used
Minimum requirements for the instrument:
CPU
Intel Atom N270 / 1.6 GHz - Dual Core
Chipset Intel 945GSE + ICH7
RAM
1 GB
HDD
100 GB
Audio ordinary
Video Intel GMA950 (ET1602) / RadeonHD3450 (ET1603)
Display 15.6” in 16:9 format with resolution of 1366 x 768 pixels
I/O ports USB 2.0, (one for each modules)
Connectivity Wireless 802.11 b/g/n, Gigabit LAN 10/100/1000 Mbps (optional)
Operating System Microsoft Windows XP/vista/7
A barcode reader can be connected (USB or keyboard emulation) for insertion of the
sample barcodes. The code can directly be managed by the Robobact Manager software,
or alternatively the Robobact ID-System can be used, which independently manages the
samples and communicates directly with the host computer for data transmission.
Rev. 2.01USB
12/36
R O B O B A C T
–
U S E R
M A N U A L
External instrument connections
The power supply (110/220 V) and USB ports for connection to the Computer Manager are on
the rear of the ROBOBACT module. For the USB connection use the dedicated USB cable (A).
Up to 24 ROBOBACT modules can be connected to the computer .
(A) USB cable
Figure 2.1
The power cable for the Robobact module (or Robobact Special module) must be type:
[Female Plug IEC 320 C-13; Male Plug Schuko EEC 7-VII; Rating: 10A/250VAC]. Less than 3
m long.
Various peripheral devices, such as a mouse, external keyboard, printer, etc. can also be
connected to the computer.
Rev. 2.01USB
13/36
R O B O B A C T
–
U S E R
M A N U A L
Technical features
ROBOBACT and ROBOBACT Special modules
POWER SUPPLY
110/220/240 V – 50/60 Hz
FUSES
2x T 5A Delayed
ELECTRICAL POWER ABSORBED
1000 W
DIMENSIONS
65 x 55 x 50 (cm)
WEIGHT
45 kg
OPERATING TEMPERATURE
+15°C to +40°C
RELATIVE HUMIDITY
20% - 80% without condensation
NOISE
below 80 decibel
Trolley
DIMENSIONS
65 x 55 x 70 (cm)
WEIGHT
30 kg
Generator trolley
POWER SUPPLY
110/220/240 V –50/60 Hz
ELECTRICAL POWER ABSORBED
750 VA
DIMENSIONS
65 x 55 x 70 (cm)
WEIGHT
90 kg
Unit of measure
The units of measure are expressed according to the INTERNATIONAL MEASURING SYSTEM as
indicated in the CNR-UNI-10-003 Technical Standards.
Rev. 2.01 USB
14/36
R O B O B A C T
–
U S E R
M A N U A L
Chapter
3
INSTALLATION
Packaging. Handling and positioning. Equipment. Obligations of the
customer. Disposal.
Installation must be carried out by expert personnel, trained and authorised by the distributor.
ROBOBACT is a precision instrument and must be handled as such. Improper operations might
damage the internal parts. Follow the instructions given in this chapter in order to guarantee
the safety of the instrument and of the operator.
Transport and handling
The instrument must be transported and handled in its original packaging which guarantees
that it will withstand handling during loading onto trucks, planes and ships. It is important that
the instrument be handled and transported with the top side up and not excessively tilted in
order to prevent damaging it. Given the dimensions and weight of the instrument, it is
recommended to use a lift truck for transport.
Do not let the instrument stand in the rain or in a damp environment even if packed. If the
instrument has been standing in a place at a temperature below 10°C for more than 24 hours, it
may only be installed after leaving it to stand at room temperature for one hour.
Packaging characteristics
Keep the original
packaging including
the internal parts.
The instrument is packed in two identical foldable wooden crates (6mm thick birch
plywood). The crates are lined with strips of expanded polyethylene.
The product is packed follows:
Crate A -- ROBOBACT module (Ref. 94200)
Crate B -- Trolley (Ref. 94220)
The two crates have the
following characteristics:
A
B
Width
cm
78
78
Depth
cm
65
65
Height
cm
84
91
Weight of empty crate
kg
25
25
Weight of packed crate
kg
90
60
Rev. 2.01 USB
15/36
R O B O B A C T
–
U S E R
M A N U A L
Materials provided
ROBOBACT is supplied with the following materials:
Instruction Manual
One power cable for each module according to IEC International Standard (Female
Plug IEC 320 C-13; Male Plug Schuko EEC 7-VII; Rating: 10A/250Vac )
USB cable
Handles to lift the ROBOBACT module by hand
Two spare delayed fuses T 5A (250V)
Software installation CD (Robobact Manager)
Document with the HARDWARE PARAMETERS of the module.
Packing list
Positioning
The intended working environment for this instrument is an analysis laboratory. For normal
safety requirements and given the type of examination it performs, the instrument must be
positioned away from heat sources, in areas unreachable by liquids and in a dustfree
environment. If the specific support trolley is not used, position the instrument on a solid
perfectly level bench not subject to shaking or vibrations. In order to allow immediately acting
on the power switch and the power cable in the event of danger, leave sufficient space
between the laboratory walls or other instruments and ROBOBACT. Do not place any object on
the instrument.
In addition, it is advisable to position the instrument away from devices that generate
electromagnetic waves (e.g. laboratory fridges, centrifuges) and instruments that do not
have the CE marking, as they might compromise proper functioning.
Obligations of the customer
The safety of the instrument and of the operator is not guaranteed if one or more of the
following conditions are violated:
Rev. 2.01 USB
-
The mains must be compatible with the voltage and current specifications
indicated on the metal plate affixed on the rear of the instrument.
-
The mains must be connected to earth according to the regulations in force.
-
The instrument is equipped with an internal stabilizer that withstands
voltage variations of 10%. If the electric line is strongly disturbed, use an
external stabilizer.
-
Before connecting external devices (printer, display, keyboard, etc.) check
their compatibility.
-
Before turning on the instrument, it is advisable to check that the sample
tray is free of foreign matter which might compromise its rotation.
16/36
R O B O B A C T
–
U S E R
M A N U A L
It is prohibited to:
-
Remove or modify the safety and protection devices.
Remove or insert the device when the sample tray is moving.
Introduce foreign bodies into the instrument.
Access internal areas not permitted.
P Installation procedure
1 – Unpack the instrument in CRATE A:
-
Undo the 4 retaining screws on the cover of the wooden crate (one per side)
and the other 4 screws on the base of the crate using a screwdriver.
-
Lift the cover, check the contents against the packing list (remove the box
containing the computer if present) and then remove the side panel of the
crate pulling it upwards.
2 – Unpack the trolley in CRATE B (as done for CRATE A) and position the instrument:
Exclusively use the
power cables provided
-
First position the trolley and lock the wheels with the brakes, or clear the
bench where the instrument is to be positioned.
-
Take the box containing the computer and find a space on the module or on
the bench for optimal positioning.
-
Screw the handles onto the cover of the ROBOBACT module.
-
Place the ROBOBACT module on the trolley (or on the bench)
-
Remove and put the handles inside the trolley (accessible from the rear). Fit
the 4 bolts to secure the cover. Release the trolley wheels and position it in
the chosen position. Lock the wheels.
-
Tie the strips of expanded polyethylene together with some tape. Fold the
central part of the wooden crate by pushing on it and keep everything
together with the cover, bottom and handles for possible future moving of
the instrument.
5 – Connect the computer and the ROBOBACT module to the mains (two separate power
supplies ).
6 – Connect the USB cable between the ROBOBACT module and the computer (see Fig. 2.1 in
Chapter 2).
7 – Turn on the instrument (see Chapter 4).
Rev. 2.01 USB
17/36
R O B O B A C T
–
U S E R
M A N U A L
8 - For Robobact Special (94210) you also need to connect the
external CO2 and N2 bottles using the tubes provided. The bottles
must be equipped with pressure reducers and pressure gauges.
The output pressure must be between 3 and 6 Atmospheres (Bar).
The diameter of the male connector at the pressure gauge outlet
must be 3/8 inch.
Instead of the N2 bottle, the GENERATOR TROLLEY (ref. 94222)
with incorporated “Nitrogen Generator” can be used. In this case,
the tube is directly connected to the outlet of the nitrogen
generator. After turning it on, the generator starts charging (1
bar/hour) until it reaches 6-7 bar. It is advisable to turn it on at
least 4 hours before starting a cycle requiring a modified
atmosphere (Campylobacter).
Limitations and Warnings
IN CASE OF FIRE OR GENERAL DANGER, TURN OFF THE INSTRUMENT AND
UNPLUG THE POWER CABLE
DISCONNECT the instrument
from the mains before any
technical operation or in the
event of malfunctioning of the
instrument.
It is prohibited to OPERATE on the instrument while parts are moving (only the
keyboard may be used to key in commands).
It is prohibited to INTRODUCE the fingers and objects between the tray and the
cover of the instrument.
It is strictly prohibited to MOVE the tray by hand when the instrument is running
a cycle.
Operations to uninstall and reinstall the
instrument in the same room or in a different
place
Two cases should be distinguished:
A – Uninstallation and reinstallation in the same room or in a place reachable with trolleys and
lifts (for this procedure it is not necessary for authorised personnel to be present).
1 – Turn off and disconnect the two power supplies (PC and module). Release the trolley wheels
and carefully move the instrument to the new working position.
If there is no trolley, fit the handles on the ROBOBACT module, lift it and position it in the new
position chosen, then remove the handles. Move the computer using the specific handle and
reconnect the two power supplies.
B – Uninstallation and reinstallation in a different place or in a place NOT reachable with trolleys
and lifts. This procedure requires authorised personnel to be present.
Rev. 2.01 USB
18/36
R O B O B A C T
–
U S E R
M A N U A L
Instrument composition – Disposal
The instrument is made up of the following materials expressed in percentage:
For DISPOSAL of the
instrument at the end
of its life cycle, refer to
the local waste disposal
regulations in force.
Material in %
IRON
COPPER
ALUMINIUM
PLASTIC MATERIALS (PVC, ABS, etc.)
SILICONE and GERMANIUM
Others
Rev. 2.01 USB
ROBOBACT
78
3
7
7
0.5
4.5
19/36
Trolley
95
/
/
4
/
1
Chapter
4
USE
Instructions for the operator. Instrument programming.
Sample loading.
Before reading this section of the manual it is important to read the previous chapters in order to
avoid problems with the instrument and for the operator.
Turning on the instrument
Check that the power supplies of the instrument are connected to the mains and that the
module and the computer are connected to each other with the USB cable.
Turn on the ROBOBACT module with the power switch on the left-hand side of the
instrument.
.
Turn on the computer and wait for the software to start and the instrument to connect.
WARNING:
The instrument runs the
SOFTWARE and
HARDWARE reset
functions and initialises
a test program to check
the efficiency of the
motors and all the
instrument functions.
Follow the on-screen instructions and observe the green
LEDs on the inside of the ROBOBACT door.
Rev. 2.01 USB
20/36
R O B O B A C T
–
U S E R
M A N U A L
Description of the LED indications
A series of GREEN LEDs are housed on the inside of the door at the bottom of the instrument
arranged as shown below.
1
2
3
4
5
6
When they are on, they are well visible from the outside through the transparent part of the door.
They indicate the following:
The first small LED on the left (1 ) indicates that the module is ON.
ON
The two large LEDs (2 and 3) come on simultaneously to form one single luminous bar. When they
come on it indicates that the software information shown on the display relates to that module
(useful information if using several Robobact models ).
MODULE SHOWN ON THE
DISPLAY
When the small central LED (4) comes on it indicates that the module is running a cycle or that the
instrument has started a working session.
WORKING SESSION
STARTED
The farthest right LED (6) indicates instrument agitation; it FLASHES during the enrichment phase
and comes on fixed or is off when agitation is inactive.
ENRICHMENT PHASE
ACTIVE
When the second last LED (5) (the second one from the right) is on it indicates that an error has
occurred during instrument operation.
ERROR SIGNALLING
Rev. 2.01 USB
21/36
R O B O B A C T
–
U S E R
M A N U A L
Description of the Robobact Manager menu
If all the motor reset tests are OK the main page of the Robobact Manager program is displayed.
A module management window will appear on the screen for each instrument connected
with a different number and colour:
The information relating to the module connected is summarised in each window.
List of information:
Status: Cycle, Running or Ready
Temperature:
No. of unoccupied positions:
No. of samples being processed:
No. of samples completed:
Firmware release version:
On the right-hand side of the page the following
commands for the common functions are available:
If using an external keyboard (if the “touch-screen” function is not
available) you can press the function keys indicated at the bottom
right of each key to activate the corresponding function.
Pressing the About key, the information on the
the “ Robobact Manager” software version is displayed.
Pressing the MULTIPLE START key, the cycles
on all the connected modules are simultaneously started.
When the modules are running a cycle, the key changes to MULTIPLE STOP.
Pressing the key all the modules that are running a cycle are stopped.
Pressing the OPTIONS key, a new window is opened containing 4 function keys:
LANGUAGES, CONNECTIONS, GENERAL, CLOSE.
Rev. 2.01 USB
22/36
R O B O B A C T
–
U S E R
M A N U A L
The LANGUAGES option allows selecting a language from those available.
The CONNECTIONS option allows changing the module numbering.
Select the module of which you want to change the
numbering,
move it with the Move up / Move down keys
until it is in the desired position.
You can display a name or serial number (settable
from the SERVICE menu) for each module next to the
module number.
The Robobact Manager software must be restarted to
make the changes effective.
The GENERAL option allows making other settings, such as the temperature and pressure
measurement scales.
Rev. 2.01 USB
23/36
R O B O B A C T
–
U S E R
M A N U A L
Among the options available, is the possibility of changing page display
from WIDE SCREEN to STANDARD.
If you have a display with 16/9 screen and select the WIDE SCREEN function, the dialog
windows will be arranged on the right-hand side of the screen when the module page is
displayed.
When selecting the CLOSE option you return to the main menu.
From the main menu:
Pressing the METHODS key, a new window is opened where you can view and change the
enrichment time and the incubation time (in hours) for each method.
A password must be entered to access the Methods
menu:
in this case, the password is:
ds
Type in the letters ds and then press Enter.
Rev. 2.01 USB
24/36
R O B O B A C T
–
U S E R
M A N U A L
On the left you will see the complete list of methods highlighted by type:
Stool,
Urine,
Swab
Selecting the method, you can view its characteristics:
Method description, Method type, Temperature, Enrichment time, Incubation time.
CAUTION:
It is advisable to change only
the enrichment and incubation
TIMES.
DO NOT change the other
characteristics of the method
without permission of DIESSE.
You can change each one of these characteristics by selecting the active window relating to
the parameter to be changed; a virtual keyboard will appear:
enter the new value and press ENTER; the value
will appear in the box selected, then press the
SAVE key.
Caution: pressing the DELETE key, the method
selected will be deleted.
Pressing the RESTORE key, all the method characteristics are reset to the default settings
(recommended by DIESSE Diagnostica Senese S.p.A.). All the changes made to the
enrichment time, incubation time, etc. will be lost.
Press the EXIT key to exit the Methods window and return to the Manager page.
When the EXIT key is pressed a second time, the Robobact Manager software closes and you
exit the Windows environment. If there are any modules connected, a warning window will
ask you for confirmation.
Press OK to close the program (if you close the program with some modules connected and
running a cycle, these will continue operating independently. When the Robobact Manager
software is restarted, the status of the samples will be updated to the actual status in the
modules; only the time recording of the temperature trend (and %O2)in each module will be
lost) or press CANCEL to return to the main page
of Robobact Manager.
Rev. 2.01 USB
25/36
R O B O B A C T
–
U S E R
M A N U A L
Touching the summary window of each instrument, a management page for the relative
module is opened showing all 35 positions of the instrument in detail:
Dialogue window position
in “Wide Screen” mode. In
normal display mode,
these windows are
positioned at the bottom.
Description of the information displayed in the dialogue windows.
Robobact module number
Firmware release
Module identification number assigned during
installation.
Indicates the module
firmware version
Function message window
Date and time
System date and time read
by the PC.
indicate the module
activity
Current and set temperature status
%O2 and pressure
status Only in the
the symbols:
OK
High
Low
indicate the status with respect to the
temperature set (shown in small font (in green).
In addition, proper functioning of the electrovalves that
allow NITROGEN (N2) and CARBON DIOXIDE (CO2) to
flow into the instrument is indicated as follows:
Robobact Special module
when samples requiring a
controlled atmosphere are
present.
CO2 not available. Bottle empty.
N2 not available. Bottle empty.
The Sample Table shows all the information relating to the 35 positions of the instrument
(each row represents a position). The empty rows represent unoccupied positions not containing
samples.
For each position occupied, the following are indicated in order:
Rev. 2.01 USB
26/36
R O B O B A C T
•
•
•
•
•
•
•
–
U S E R
M A N U A L
Sample code – shows the barcode of the sample if inserted (see the paragraph “Sample
insertion”).
Method description – shows the name of the test.
Start date and time – shows the start date and time of the first cycle for that sample.
Enrichment time progress - indicated in percentage and with
progressive colouring.
Sample seeding date and time – date and time for breaking and seeding the sample. The cell
turns green if already done.
Incubation time progress – indicated in percentage and with
progressive colouring.
Incubation end date and time. The background turns green if already terminated.
The Job print key allows printing the job list if the samples are loaded by matching the barcode. A
printer is required connected to the PC.
The Graphs key allows viewing the temperature trend recorded in the last 24/48 hours of
operation. Moving with the Previous / Next keys to the previous pages, you can also view the
trend in the last 5 days of module operation.
As the hours go by, a line is drawn for the temperature trend with the following
characteristics:
In the event of a power failure, you can estimate how long the instrument has been off from
the length of the line drawn.
The temperature range displayed is between 15°C and 50°C . Points outside this range are
not displayed.
The Robobact Special module allows you to view the % Oxygen and pressure trend in the
incubation chamber in the last 24/48 hours of operation. Moving with the Previous / Next keys to
Rev. 2.01 USB
27/36
R O B O B A C T
–
U S E R
M A N U A L
the previous pages, you can view the trend in the last 5 days of module operation.
As the hours go by, a line is drawn for the % Oxygen trend with the following characteristics:
The Sound off key disables the acoustic messages and alarms.
The Service key is exclusively used by Technical Service and requires a password.
Pressing the Manager key, you return to display of the Manager menu with the information on all
the modules connected.
The Start Cycle key starts the cycle.
The key is active (green) only when the door is closed. To stop the cycle, press the same key which
will have turned orange with the words Stop Cycle. If the instrument has already started a seeding
operation for a sample, you have to wait for it to be completed (see “Sample insertion”).
An acoustic signal will tell you that the door has been released and can be opened.
Rev. 2.01 USB
28/36
R O B O B A C T
–
U S E R
M A N U A L
Sample insertion
For sample preparation read the technical instructions that come with the package.
WARNING: The samples contain potentially infected material.
You can choose from two sample insertion methods.
MANUAL METHOD: the sample tray rotation motor needs to be disabled and the tray moved
by hand to insert the samples.
AUTOMATIC METHOD: allows inserting the samples by matching the barcode of the sample
and its position in the tray. The tray is automatically moved in groups of five positions at a time.
To proceed with inserting the samples, go to the main page of the module; the instrument must be
in READY state (shown in the dialogue window). If the instrument is running a cycle, stop it by
pressing the Stop Cycle key.
When the instrument
is running a cycle, the
door is locked.
The cycle can be interrupted at any time. Any samples already present are held in memory and will
be recognised when the cycle is restarted and their treatment will resume from where it was
interrupted.
To open it stop the
cycle.
Insertion using the “MANUAL METHOD”
If the instrument is in Ready state, open the door following the sequence shown in
the figure.
Insert the device in the accessible housings and move the tray forward by hand until
all the samples to be examined have been inserted or when reaching the maximum
capacity of the instrument (35 samples).
Then close the door following the sequence in reverse order.
Press the Start Cycle key. At this point, the door is locked and the cycle is started beginning with
the identification procedure. To stop the cycle press Stop Cycle. When the module goes back into
Rev. 2.01 USB
29/36
R O B O B A C T
–
U S E R
M A N U A L
Ready state, you can open the door and retrieve the samples for which the analysis has been
completed or insert new samples.
Insertion using the “AUTOMATIC METHOD”
This method is used when you want to insert the samples by matching the
barcode of the sample and its position in the tray.
If the instrument is in Ready state, open the door following the sequence shown in the
figure.
Press the Sector key at the top right of the Main menu (the key is activated only when the door is
opened). A new menu called Sample Insertion, similar to the one described above, will open
where the section keys appear in the first column on the right. Selecting a section, you can move
the 5 positions indicated on the key to in front of the door.
For example, pressing the Sect. 1 - 5 key, the instrument positions with the first 5 housings of the
tray in front of the door. While the tray is moving, an acoustic alarm is sounded and it will be
impossible to insert or remove samples as long as the tray is moving. Wait for the tray to stop
before continuing.
WARNING:
IT IS PROHIBITED TO REMOVE OR INSERT THE DEVICE WHEN THE TRAY IS MOVING.
When the tray stops, the 5 positions in front of the door are shown on
the display on a green background.
Before inserting the sample container in the device, read the barcode
(using a barcode reader connected to the PC).
Then insert the sample container in the device and insert this in the unoccupied position on the
sample tray positioned in front of the door.
The sample code is immediately shown on the
screen in the position on the tray where the device
was inserted.
If you do not have an external barcode reader, or if the code
label is damaged, you can enter the code by hand. Press the
Keyboard key, type in the code and press Enter, then insert
the device in the instrument.
Rev. 2.01 USB
30/36
R O B O B A C T
–
U S E R
M A N U A L
WARNING: DO NOT REMOVE OR MOVE THE DEVICE AFTER MATCHING IT WITH ITS POSITION.
Continue as above with insertion of other devices in the accessible housings.
Move on to the next 5 positions by pressing the key of the next section (e.g. Sect. 6 - 10) or any
other section until there are no more unoccupied housings.
WARNING: Each time you move by one section, the tray is moving. Wait for it to stop before
inserting the samples. DO NOT MOVE THE TRAY BY HAND!
Continue with insertion until all the samples to be examined have been inserted or when reaching
the maximum capacity of the instrument (35 samples).
WARNING:
The cycle starts
automatically after
closing the door
Then close the door.
The display returns to the main page and the cycle is AUTOMATICALLY started.
Sample identification and processing
Once the cycle has started, the instrument begins the sample identification phase.
In the main menu, the position being analysed at that moment is shown on a green background
and at the same, if a device is present, the description and the start date are shown.
When identification is complete, sample processing begins with the following priorities:
The urine samples have
priority over the others
and immediately go to
the seeding phase.
•
The urine samples have priority over the others and immediately go to the seeding phase.
•
Next, the instrument seeds the samples that do not require enrichment or those that
have already been enriched.
•
Finally, it waits for the enrichment phase of the remaining samples to be completed and
then processes these as well.
The cycle can be stopped at any time by pressing the Stop Cycle key.
Wait for the instrument to go into READY state before opening the door.
Remove the samples that have been completed or insert new samples and press Start Cycle again
to restart analysis.
Rev. 2.01 USB
31/36
R O B O B A C T
–
U S E R
M A N U A L
Robobact Special Module
The Robobact Special module allows you to modify the atmosphere in the instrument by injecting
nitrogen and CO2 and to control the amount of oxygen. During a cycle with samples that require a
modified atmosphere, the controls on the injection of the necessary gases are activated. In
addition, proper functioning of the electrovalves that allow NITROGEN (N2) and CARBON DIOXIDE
(CO2) to flow into the instrument is indicated as follows:
CO2 not available. Bottle empty.
N2 not available. Bottle empty or generator empty.
In this case, an acoustic alarm is also activated. You can silence the alarm by pressing the Sound off
key. The cycle is not interrupted. If you have a new bottle available, you can replace it at this time
without interrupting the cycle. You can also replace the bottle later at any time without having to
stop the cycle. If the nitrogen generator is momentarily empty, you can in any case decide to
continue the cycle. The generator will slowly be filled in 2-4 hours. After connecting the new bottle,
the alarm disappears, the red warning light goes off and the acoustic alarm stops. If you do not
have a reserve bottle, you can in any case silence the alarm by pressing the Sound off key and
continue with analysis of the cycle keeping an eye on the indication of the %Oxygen reached.
WARNING: In the event of a power failure or if the ROBOBACT SPECIAL door stays closed
and locked, you can use the emergency wrench to OPEN the door and retrieve the samples
following the procedure below:
Emergency door opening procedure
Loosen the two black bushings that secure the green plastic cover of the door and then open
the green cover.
Insert the wrench in the centre of the door and remove the plastic cap by turning it
anticlockwise.
Then again insert the wrench in the centre of the door and applying force turn
it CLOCKWISE to open the door.
When the door is open, screw the central cap back on by hand turning it
clockwise.
Rev. 2.01 USB
Refit the green plastic cover by screwing on the two black bushings.
32/36
R O B O B A C T
–
U S E R
M A N U A L
Error list
The error messages may regard a Robobact module in which case they are
displayed in the Message Box (function message window) of the module,
or an individual sample being
processed in which case they are
displayed in the status row of the
position occupied by the sample.
Errors displayed in the
function message window.
When the window is red the message points out a problem that locks normal functioning and stops the
cycle.
When one of these errors occur, try restarting the cycle (false error), otherwise if it reappears, refer to the
table below for the analysis of the problem and the procedure to follow to correct it. If the problem
persists after a new cycle start, notify the Authorised Technical Service.
Error Type
Description
Procedure
Tray error
Error during sample
tray movement.
Move the tray by hand: if the movement is obstructed, remove all the devices and
retry; if it moves smoothly, check for dirt or debris (plastic parts, etc.) in the
housings where the devices are positioned, remove and reinsert some devices and
retry.
Ball error
Error on sensor inside
the clamp.
The sensor does not “see” the emitter. 1) This may occur when during a reset, the
clamp is positioned on the device. The clamp closes with the ball on the inside.
Press START again. 2) There may be some dirt on the clamp sensor. 3) One of the
sensor cables is broken.
Door error
Error in locking or
unlocking the door
Only on the Special module. Notify the Authorised Technical Service.
Tray step error
Delay in sample tray
movement
Notify the Authorised Technical Service.
Clamp close error
Error in clamp closing.
Notify the Authorised Technical Service.
Clamp open error
Error in clamp
opening.
Notify the Authorised Technical Service.
Horizontal motor error
Error during horizontal
clamp reset.
Notify the Authorised Technical Service.
Vertical motor error
Error during vertical
clamp reset.
Notify the Authorised Technical Service.
Rev. 2.01 USB
33/36
R O B O B A C T
Errors displayed in the
status row of the position
occupied by the sample:
Example:
–
U S E R
M A N U A L
When the window is red the message points out a problem related to the device present in that position.
Normally, it does NOT lock module activity. The samples present in the other positions are processed
normally.
When one of these errors occur, refer to the table below for the analysis of the problem and the procedure
to follow to correct it.
Error Type
Description
Rescan
Problems in reading the
barcode of the device
Barcode error
Error in reading the
barcode of the device
Seeding error
Error during sample
seeding.
Ball up
The device ball was not
detected during
identification.
Test not found
The barcode of the
device is not in the
Methods list
Temp. incompatible
O2 incompatible
There are two methods
with different incubation
temperatures
There are two methods
with different
atmosphere control
Procedure
If after starting the cycle and during the device identification phase the barcode is
not read (label damaged, etc.), the instrument will at the end of the identification
phase automatically run a new scan on all 35 samples, rereading the label in a
slightly different position. If code reading fails again, the Barcode error is displayed
The instrument was unable to read the device label. The sample is not processed.
Stop the cycle, put the sample on a new device and restart.
If the problem occurs frequently even when the labels are in a good condition, it
may be a problem with the internal barcode reader. Notify the Authorised
Technical Service.
The sensor does not “see” the device ball at the moment of seeding. Check
whether or not seeding has taken place by looking at the sections of the loops on
the culture medium. If the problem occurs often, notify the Authorised Technical
Service.
If it is a new sample, check if the device loop is in the correct position (if it is slightly
up push it down and retry) or if it is defective. If otherwise, notify the Authorised
Technical Service.
In the Methods section, check if any methods have been deleted or modified, and if
so, press the RESTORE key. If it is a new method, enter the information on the new
code (Name, Type, Incubation Temperature, Enrichment Time and Incubation Time)
using the NEW key. Otherwise, notify the Authorised Technical Service.
The cycle is NOT started. Remove the incompatible device and retry.
Thee cycle is NOT started. Remove the incompatible device and retry.
WARNING: In the event that a USB connection is broken (connection of a Robobact module),
the Robobact Manager software automatically searches for and restores the connection.
During this time, the software may restart; in this case, the Windows desktop is displayed for a
second and immediately afterwards the Robobact Manager program window reappears with the
information on all the modules previously connected.
No data is lost during this phase and no operation on the modules and on the samples is
interrupted.
Rev. 2.01 USB
34/36
R O B O B A C T
–
U S E R
M A N U A L
Appendix A:
Rev. 2.01 USB
35/36
R O B O B A C T
Rev. 2.01 USB
–
U S E R
M A N U A L
36/36