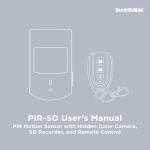
1
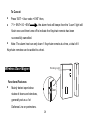
CONTENTS (User’s Manual) 1. 2. 3. 4. 5. Foreword & Main Features & Brief introduction of the Product Understanding of Alarm Host Specifications Type and definition of Defense Line Programming the alarm host To setup Alarm ID Number How to change User code operation 6. Understand and Configure Wireless Accessories Wireless Keychain Remote Wireless Door Magnet Wireless wide-angle PIR Sensor 2 7. LED wireless alarm manufacture default setting 8. Wireless default zone code chart: 9. Common Problems and Solution 10. Daily Maintenance and Care 1. Foreword Thank you for purchasing and using LED intelligent wireless home alarm system. This is a Hi-tech household security product. It will make your life safer and colorful. Please read the below information carefully before using for a proper usage. Brief introduction of the Product A. Product components: This product is composed of alarm host, basic accessories and optional accessories 3 Alarm Host Basic Acc essories Keychain remote wireles s door sensor wireless wide-angle PIR sensor wire less curtain PIR sensor wireles s indoor siren GSM auto dialer Optional Accessories gas alarm smoke alarm remote L ED Alarm Host B. Representative models 4 Wire less outdoor siren wi reless keypad M o d e l N o . A H 8 0 8 8 - E 0 D l a r m P N H 8 8 - E 0 D W P n e t w G S M S M - E - E 0 D O D e a y p h o C o m p o n e n t s n e N Y - T A W (h o rk i n g ) o m e p h o n e - T A l in e G o m W Y - T A l i n e 8 0 (h i n g - T A n e t w o rk i n g ) G S M G S M Main Features Easy-to-use and cost-effective D.I.Y. (do-it-yourself ) wireless intruder alarm system kit. Supports up to 60 wireless sensors (15 wireless defense zones and 4 wireless sensors per zone). Transmit at 430-433MHz frequency band, wireless transmitting distance up to 300 5 feet (Keychain remote, smoke sensor, & siren) and up to 450 feet (magnetic door/window sensor & PIR motion sensor) Can dial up to 5 phone numbers in sequence Arm/disarm the system by: Main Host (Keypad), Wireless Keypad, Keychain remotes, or even remotely by phone. Available in both AC\DC with low-voltage Indicators. Programmable silent alarm or audible alarm. Recordable alarm voice message (up to 9 seconds record time). Telephone line disconnection alarm sound every 5 seconds. Smart 3 defense lines configuration: 1st defense line is the perimeter, 2nd defense line for in-room, & 24-hour defense line). Internal rechargeable backup battery in alarm host last up to 8 hours. Battery (alkaline) included for keychain remotes, wireless door sensor, and wireless motion sensor last up to 2 years. Remembers programming settings when power is disconnected. Ademco CID compatible protocol 6 2. Understanding of Alarm Host 3. Specifications Operating power: 9-15VDC Static current: ≤ 60mA Alarm current: ≤ 380mA 7 Operating environment: Temperature: -10-50°; Humidity:<80% Maximum available quantity of keychain remotes: 8 PCS Maximum available quantity of wireless sensors: 60 PCS Dimensions: 180*120*38 (mm) Rechargeable battery: Ni-Mh(4.8v), 600mAh, up to 8hrs long Speaker siren 100dB (built-in) 4. Type and definition of Defense Line Types of Defense Line and what they mean: 1st Defense line: Indicates the first detecting defense areas or the perimeter zone (such as doors, and windows). This is the perimeter or areas where thieves initiate when attempt to break in. These zones are generally composed of wireless door magnet sensors and wireless curtain PIR sensors. 8 2nd Defense line: Indicates the second detecting defense areas, areas such as living room, aisles and bedrooms, hall ways, and etc. These zones are generally composed of the wireless wide-angle PIR sensors where it can detect movements in open spaces. 24-hour Defense line: Indicates the detecting defense areas in a 24-hour monitoring statue, commonly used in areas such as emergency distress, medical rescue, gas leakage and fire alarm, and etc. These zones are generally composed of panic button, wireless gas sensors and wireless smoke sensors. 5. Programming the alarm host Function: operation Operation Explanation Notes: 1. The alarm host will automatically exit from the programming status if inactive for 9 20 seconds. 2. Programming is effective after ‘Start to program’, use ESC button to go to previous step; 3. The alarm host will beep in series to indicate the operation is successful and beep twice to indicate operation failure. ‘set + User code + ent’ This command applies throughout whenever programming the alarm host, before attempting to change other programming features, such as Delay Time to Arm, Delay Time to Alarm, Emergency Alarm Voice, Adding and Cancelling wireless devices, and etc . For example: to change Delay Time to Arm below from default 40 seconds to 1 minute, press ‘SET + 888888 + ENT’, follow by ‘15 + ENT’. The default of user code is 888888 (6 digits long). Input Alarm telephone Number: ‘XX + ent + telephone Number + ent’ XX indicate telephone group number which can be of personal numbers or management center. See details groups below: 01: Group 1 (reserved for CID Protocol number for management center, not for 10 personal numbers) 02: Group 2 (personal telephone number) 03: Group 3 (personal telephone number) 04: Group 4 (personal telephone number) 05: Group 5 (personal telephone number) 06: Group 6 (personal telephone number) Delay time to Arm: ‘XX + ent’ Setup a dwell time in which the alarm will become activated or armed. Enter 10 for XX to setup Delay Time to Arm for 40 seconds, enter 15 to setup Delay Time to Arm for 1 minute and press the ENT button to confirm. The default setting is 10 or 40 seconds alarm dwell time. Delay time to Alarm: ‘XX + ent’ Setup a dwell time in which the alarm will sound or trigger. Enter 20 for XX to setup immediate alarm sound triggering, enter 21 to setup a 15 seconds Delay Time to Alarm. The default setting for Delay Time to Alarm is 20. Emergency Alarm Voice: ‘XX + ent’ Enter 30 for XX to disable Emergency Alarm Voice, enter 31 to setup audible alarm. The default is 31. 11 Alarm voice for 1st and 2nd defense line: ‘XX + ent’ Enter 40 for XX to disable alarm voice for 1st & 2nd defense line, enter 41 to enable Audible alarm, The default is 41. Telephone Disconnection Alarm: ‘XX + ent’ Enter 60 for XX to disable Telephone Disconnect Alarm, enter 61 to enable Telephone Disconnect Alarm. The default is 61. To upload arm/disarm to management center: ‘XX + ent’ Enter 50 to disable upload, enter 51 to enable upload to management center. The default setting is 50 or disable. Leave this disable if management center is not in service. Alarm ID Number: ‘80 + ent + XXXX + ent’ Enter an integers between 0000~9999 for XXXX to setup Alarm ID Number for management center. The default is set as random; apply to management center use only. To setup Alarm ID Number: ‘SET+ 999999 + ent + 80 + ent + enter Alarm ID Number + ent’ Press SET button the programming LED will light on, enter “999999”, press ENT, then input a 12 new Alarm ID Number, press ENT to complete the Alarm ID Number change. Notice the programming LED light will disappear after the final ENT is pressed. How to change User Code ‘SET + 999999 + ENT + six Digital New User Code + ENT + six Digital New User code + ent’ Press SET button the programming LED will light on, enter “999999”, press ENT, then input a new six-digital user code, press ENT, re-input the new six-digital user code, and then press ENT to complete the user code change. Notice the programming LED light will disappear after the final ENT is pressed. operation To record a voice message greeting: Slide the switch on the left side of the alarm host to the RECORD ON, press and hold the Microphone button, speak close into the rear side speaker of host, and then release the microphone when finish with voice message greeting. Voice message greeting can be anywhere between 0~9 seconds long. To Playback the recorded voice message greeting: Slide the switch on the left side of the alarm host to DC ON, press and hold the playback 13 button to playback the recorded voice message greeting. “One-key” Arm: By keychain remote: Press the AWAY (All Alarm) or the HOME (Part Alarm) button on the remote control to arm and the alarm host will beep once to confirm the operation is successful. See Wireless Remote Controller page for more detail. By Keyboard on alarm host: Press AWAY (All Alarm) or the HOME (Part Alarm), the alarm host will beep once to confirm the operation is successful. See ‘2. Understanding of alarm host’ page for more detail. “One-key” Disarm: By Keychain remote: Press the DISARM button on the remote control to disarm the alarm and the alarm host will beep twice to confirm the operation is successful. By Keyboard on alarm host: + Programming Password + ENT Press the button follow by the User code and then ENT to disable alarm siren using the alarm host. The host will beep twice to confirm the operation is successful. Emergency/Panic Distress: 14 By Keychain remote: Press the EMERGENCY button on the keychain remote at times of an emergency to immediately activate the sound siren on the alarm host and wireless sirens. By Keyboard on alarm host: Press the EMERGENCY button on the alarm host at times of an emergency to immediately activate the siren sound on the alarm host and wireless sirens. Telephone alarm: After receiving the phone call from the alarm host, the recorded voice message will repeatedly plays for 22 seconds. Before the 22 seconds expires, one of the following action must be take place: A) Press the number “8” on the phone pad to extend the time intervals for an additional 20 seconds to enter the listening state. In the listening state the built-in microphone on the alarm host will be active to pick up any sound that takes place near the alarm host. 15 B) Press the pound “#” button to immediately replay the recorded voice message. C) Press the star “*” button, the host will end the call and stop to dial the enlisted alarm telephone numbers. Note: the * is required to use in order to stop the alarm host from continuing to dial the next enlisted telephone numbers. D) Hang up the telephone without any command, the host will end the call and automatically continues to dial the next enlisted alarm telephone numbers. ARM remotely by phone: • 30 seconds after successfully dial the telephone number of alarm host, there will be: a beep >enter User code of host > beep > enter 1 > beep, and the host will then automatically hang up after the last beep to successfully complete the operation. Note: Arm remotely by phone requires the alarm host to be armed or in the “Away” mode. DISARM remotely by phone: 30 seconds after successfully dial the telephone number of alarm host, there will be: a beep> enter User code of host > beep > enter 0 > beep, and the host will then automatically hang up after last beep to 16 successfully complete the operation. Alarm dialing mode: • After the alarm host triggered or goes off, the alarm host will starts to dial the first enlisted telephone number, then the second, third, fourth and so on. Unless any of the enlisted telephone numbers answers otherwise this routine auto dial will continues for three times. Alarm priority: If the telephone line is busy when the alarm host goes off, the alarm host will take priority and it will automatically cut off the busy/used line to resume automatic dial to the enlisted alarm telephone numbers to convey the crime. Telephone line disconnection Alarm: Alarm Sounds if PhoneLine is Cut or comes off the hook, the host will beep every 5 seconds after the telephone line are cut off or disconnected. It will continue to beep until the phone line are fixed or reconnected. “AWAY” mode: • In this state, after any detection in the 1st, 2nd, or 24hrs defense line is triggered, the alarm host will immediately sound the sirens and at the same time automatically dial the enlisted alarm telephone numbers in sequence. 17 “Home” mode: • In this state, after any detection in the 1st or 24hrs defense line is triggered, the alarm host will immediately sound the sirens and at the same time automatically dial the enlisted alarm telephone numbers in sequence. In HOME mode the 2nd defense line will be disabled and cannot be triggered. 6. Understand and Configure Wireless Accessories Wireless Keychain Remote Functions/Features: Away Disarm Used to armed & disarmed alarm host. Emergency button for emergency or panic help. specifications: Operating power: 27A 12V alkaline battery Wireless Transmitting distance: ≥300ft (in open area) 18 Home Emergency Service life: ≤2 years installation and Usage: Ideal for keychain and to take it when the alarm host in set to AWAY mode. Press the “AWAY” button to arm before leaving home or in AWAY mode and press the “DISARM” button to disarm. Press the “HOME” button to part arm or 1st defense line enabling and protecting Please replace the batteries within 2 years of usage or any time when it becomes the perimeters of home at night time before going to sleep. less sensitive or shorter controlling distance. Adding & Cancelling Keychain Remote. To Add: Press ‘ set + User code + ent’_then, ‘70 + ent+ 00 + ent’ Press any button on Keychain remote twice consecutively, the alarm host will the “Learn” light will appear solid red. beeps in series and the “Learn” light will flash five times and then turns off to indicate the keychain remote has been successfully added. 19 To Cancel: Press ‘SET + User code + ENT’ then, ‘71 + ENT+ 00 + ENT’ the alarm host will beeps then the “Learn” light will flash once and then turns off to indicate the Keychain remote has been successfully cancelled. Note: The alarm host can only learn 1 Keychain remote at a time, a total of 8 Keychain remotes can be added to a host. Working Light Wireless Door Magnet Functions/Features: Mainly detect open/close Door states of doors and windows, generally set as a 1st Defense Line or perimeters. 20 If any doors or windows are opened, it will transmit the alarm signal to notify the alarm host. Specifications: Operating power: 23A 12V alkaline battery Wireless Transmitting distance: ≥450ft (in open area) Service life: ≤2 years Alarm Distance:>4cm installation and Usage Mount the magnet or smaller piece onto the door in a position of about 5~6ft above the ground to prevent any child(ren) from pampering with it. Use the included mounting bracket if the door and the door frame are not flush. Mount the emitting or larger piece onto the door frame, ensure the magnet piece and the emitting piece are flush or in parallel. The spaces between the two shall be less than 10mm in gap. Replace the batteries if the red LED light flashes frequently. 21 Adding and Cancelling Door/Window senor To Add: Press ‘set + User code + ent’_then, ‘7 0 +ent+00 + ent’ The “Learn” light will appear solid red. Note: The “XX” indicate group number of the 1st defense zones, including zone 06 through zone 10. Triggers the Door/Window magnet twice consecutively, the alarm host will beeps in series and the “Learn” light will flash five times and then turns off to indicate the remote control has been successfully added. To Cancel: Press ‘set + User code + ent’ then, ‘71 + ent+ 00 + ent’ The alarm host will beeps then the “Learn” light will flash once and then turns off to indicate the keychain remote has been successfully cancelled. Note: The alarm host can only learn 1 wireless device (Magnet Door/Window Sensor) at a time, a total of 4 wireless devices(magnetic sensors) to a zone/group 22 can be added. For example: for the 1st defense line, if 4 sensors were to be added to zone/group 06 through zone/group 10, it total 20 sensors in all. If 1 device is removed from the group of 4 devices, then all 4 devices in that same group will be automatically removed, and each device(s) will have to be added again to the alarm host. wide-angle PIR Functions/Features: 021 Working Light D0 On / Off Wireless Sensor D3 Low-Votage Light Power Switch Down/Off Up/On Lens Learning Emitting Switch Mainly monitor and control Jump Line indoor stereoscopic space, Fix the PIR by pushing it downwards Install the bracket generally set as a 2nd Wa ll Wa ll Keep the switch "on" Wa ll Defense Line. When human body enters the detection areas, the motion sensor will transmit the alarm signal to the alarm host. 23 It is immunity to pets; cats, dogs, etc that are less than 10KGS will not cause false alarm. specifications: Operating power: 9V alkaline battery Wireless Transmitting distance: ≥450m (in open area) Service life: ≤2 years Detection Area: 110° 10*10m installation and Usage Mount the bracket to a desired wall surface, location, or corner at a height of about 6ft to 7ft above the ground. Open the sensor cover and connect the 9VDC battery. Next, refers to the diagrams above to adjust and select the Jumper Line timer between 5S or 5MIN for the motion sensor to detect once every 5 seconds or the sensor to detect once every 5 minutes. Recommended to use “5S” for testing and default “5MIN” for normal use. Skip below to add motion sensor for newly added motion sensor before closing the sensor cover and proceed to the next step. 24 Match the grooves of the sensor to the bracket and slide the motion sensor down from top to bottom to secure. Adjust the sensor to a proper angle and then slide the power switch located on the side to the “ON” position. The motion sensor takes 30 seconds to become active for operation (normal working state) after switching “ON”. A red light will flashes for motion detection, a frequent green light flashes mean it is time to replace the battery. Adding and Cancelling PIR motion sensor To Add: Press ‘set + User code + ENT then, ‘70 + ENT+ XX + ENT’ The “Learn” light will appear solid red. Note: The “XX” indicate group number of the 2nd defense zones, including zone 11 through zone 15. Press the “Learning Emitting Switch” twice consecutively to trigger PIR sensor, the alarm host will beeps in series, and the “Learn” light will flash five times and then turns off to indicate the motion sensor 25 has been successfully added. To Cancel: Press ‘SET + User code +ENT’ then ‘7 1 + ENT+ XX + ENT’ The alarm host will beeps then the “Learn” light will flash once and then turns off to indicate the PIR motion sensor has been successfully cancelled. Note: The alarm host can only learn 1 wireless device (Wireless Wide-Angle PIR Motion Sensor) at a time, a total of 4 wireless devices (PIR Motion Sensors) to a zone/group can be added. For example; for the 2st defense line, if 4 sensors were to be added to zone/group 11 through zone/group 15, it total 20 sensors in all. If 1 device is removed from the group of 4 devices, then all 4 devices in that same group will be automatically removed, and each device(s) will have to be added again to the alarm host. 7. LED wireless alarm manufacture default setting 26 Defense Zone Code 00 to 01 Defense Zone Type —— Bypass Zone? No Delay Time to Alarm? No Compatible Accessories Wireless Keychain remote & Wireless Keypad Wireless Smoke Alarm, Wireless Gas Alarm, & Panic button. 01 to 05 24-hour Defense Line No No 06 to 10 1st Defense Line No No Wireless Door Magnet & Wireless Curtain PIR 11 to 15 2nd Defense Line No No Wireless WideAngle PIR Motion Sensor 27 Remark Support up to 4 sensors per zone Support up to 4 sensors per zone 8. Wireless default zone code chart: Wireless Sensor Type Keychain Remote Wireless Door/ Window Sensor Wireless Wide-Angle PIR Motion Sensor 00 06 11 The default Defense Zone Code Wireless Curtain PIR Sensor (N/A) 12 Wireless Gas Alarm (N/A) Wireless Smoke Alarm 02 01 9. Common Problems and Solutions Problems Possible Cause The alarm host sounded off immediately after connecting the power The telephone incoming line has not been connected, not well connected or short circuit. 28 solutions Double check, test and secure the incoming telephone line or use other standard phone to test the line to ensure working status. The alarm host cannot record or partially records Repeatedly receiving alarm telephone the The alarm host does not sound the alarm after the detector triggered the alarm in armed mode. The record switch is not turned on. The record buttons not presses down and hold while attempting to record, or not held down all the way. Failed to operate according to the operation instruction of the telephone alarm. 1. Caused by the functions of armed Away or Armed Home) 2. Have already setup time for Entry Delay or Exit Delay. 29 Slide the record switch to the “ON” position; Securely press and hold down the RECORD button during recording. Speak up close to the rear speaker of the host. After answering the alarm phone calls and hearing the recorded message: pls advanced to telephone Alarm page of this user’s manual as a reference to try to resolve this problem. 1. In “Armed Home” mode, make sure the sensor or wireless devices triggering is not in the 2nd Defense Line. 2. Ensure the sensor detectors are not active within the system setup Entry Delay Time or Exit Delay Time. The PIR motion sensor does not work Weak battery power, not switched on, or the PIR motion detector is in the power-down mode The detecting distance of The ambient temperature in PIR motion the detecting area is too sensor gets shorter high. Open the sensor shells to install the battery and slide the power switch to “On”. Power down mode may be in affect: “5S”: detect once every 5 seconds “5MIN”: detect once every 5 minutes, please refers to the user’s manual for PIR setup. When the ambient temperature in the detecting area exceeds the human body temperature, the detecting distance will 30 get shorter, it’s normal. The alarm host does not alarm after the new added wireless detector is triggered. The PIR motion sensor flashes frequently in green. The door/window sensor indicator flashes frequently in green after alarming. The distance of the keychain remote gets shorter. Failed to follow the operation instruction of “Adding and Cancelling” sensors/devices of newly added wireless sensor(s) Battery is drained or low. Battery is drained or low. Battery is drained or low. 10. Daily Maintenance and Care 31 Follow the operation instruction of “Adding and Cancelling” to activate the new wireless sensor(s) Replace with new battery of the same voltage specification. Replace with new battery of the same voltage specification. Replace with new batter of the same voltage specification. This alarm system is hi-tech with outstanding design and sophisticated product which should be used carefully. To make the alarm system operable in long terms and to stably prolong the service life; the follow are strongly recommended: 1. Installed alarm system and alarm host in the dry and well ventilated places. 2. Do not put the alarm host and any wireless sensors in cold, hot or dusty places to prevent it from shortening the life of electric parts, preventing the plastic shell from distorting and accelerating to age; 3. Do not install the wireless alarm system in low, easy to reach, and exposed places to prevent the children from pampering with or thieves easy access. 4. Regular scheduled testing is necessary to help prevent system failures and resolves problems in time. 5. Check batteries in all wireless sensors and replace them as needed to ensure normal operation. 6. Power off and remove all batteries from all wireless system before storing them on shelves. 32