1
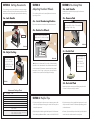
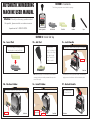
AUTOMATIC NUMBERING
MACHINE USER MANUAL
SECTION 1: Contents
The following components are included in the package.
Attention: Should you have any questions about
this product, please contact our customer service
department at 1-800-323-0253.
Numbering Machine
Ink Pad Holder
2 Ink Pads
Ink Bottle
Stylus
SECTION 2: Initial Set Up
2a - Insert Pad
2b - Ink Pad
If it is not already pre-installed, insert a
dry ink pad into metal pad holder.
2c - Lock Handle
Use ink bottle to
apply 5 or 6 drops of
ink across the surface
of the dry ink pad
(Allow 1 minute for
the ink to soak in).
Partially depress handle while pressing the lock button.
Lock Button
front view
Hint: Repeat inking step 1 or 2 more times to achieve sufficient
coverage (Ink does not need to penetrate all the way to the
bottom of the pad).
2d - Position Holder
2e - Install Holder
Rotate numberer to back view, & pinch clasp on pad holder.
Pad Holder
back view
2f - Unlock Handle
Slide pad holder into swing arm (pad side facing in).
Insert clasp into
swing arm slot.
Swing Arm
Partially depress numbering machine handle. At the same time,
apply pressure to lock button until it locks handle in place.
back view
Fully stamp numberer
to release the lock
front view
SECTION 3: Setting Movements
The numbering machine has 8 different movement settings.
Indicator numbers on the front plate correspond to the number
of times the machine will repeat the impression before advancing.
3a - Lock Handle
Partially depress handle while pressing the lock button.
SECTION 4:
Adjusting Number Wheels
The numbering wheels can be manually advanced to start on
any six digit number.
4a - Invert Numbering Machine
Flip number machine over so that number wheels are visible.
4b - Rotate the Wheels
Lock Button
SECTION 5: Re-Inking Pads
5a - Lock Handle
Partially depress handle while pressing the lock button as
shown in image 2c.
5b - Remove Pad
Remove the pad holder from the swing
arm located in the back of the numberer
by pinching holder clasp.
Use tip of stylus to rotate each
number wheel to the desired digit.
back view
front view
5c - Re-Ink Pad
3b - Adjust Setting
Pinch the handle of
the position needle
and slide left or right
to desired setting.
Hint: Digits can be deactivated. For example, if desired starting
impression is 100, rather than 000100, individual number wheels
can be deactivated. To deactivate, rotate the wheel to the position
between the 0 and 1 digit. In this position, the wheel will be
recessed and no impression will be display for that digit.
front view
5d - Re-Install Pad
Reinstall pad holder into swing arm following steps described
in Section 2e. Repeat re-inking as needed.
Movement Settings Chart
Indicator Position Number of Repeats
Before Advancing Example
0
Indefinite
000001, 000001, 000001, 000001, 000001...
1
1X’s
000001, 000002, 000003, 000004, 000005...
2
2X’s
000001, 000001, 000002, 000002, 000003, 000003...
3
2X’s
000001, 000001, 000001, 000002, 000002, 000002...
4
2X’s
000001, 000001, 000001, 000001, 000002, 000002...
5
2X’s
000001, 000001, 000001, 000001, 000001, 000002...
6
6X’s
000001, 000001, 000001, 000001, 000001, 000001
000002, 000002...
12
000001, 000001, 000001, 000001, 000001, 000001
12X’s
Add 5 or 6 drops of
ink to the surface of
the dry ink pad.
(Allow 1 minute for
the ink to soak in)
bottom view
000001, 000001, 000001, 000001, 000001, 000001
000002, 000002, 000002, 000002...
SECTION 6: Helpful Tips
• For best results, place the document you are stamping onto a softer
surface,like a pad of paper. Stamping on a hard surface can produce
incomplete impressions.
• If you notice excess ink being applied with impressions, the pad
may be over inked. Excess ink can be removed by dabbing pad with
an absorbent tissue.
• Only re-ink pads with the ink supplied with this product. For information
about obtaining additional refill ink, contact us at 1-800-323-0253.
• Over time, if you notice build-up on the wheels, they can be cleaned
with a cloth and a small amount of mineral spirits+