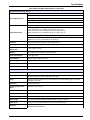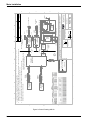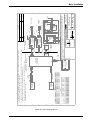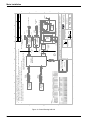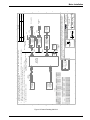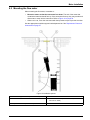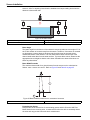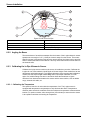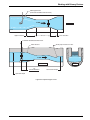
1
Catalog Number 4979
911/940 Intrinsically Safe Flow Meters
USER MANUAL
January 2010, Edition 12
© HACH LANGE Company, 2007–2010. All rights reserved. Printed in the U.S.A.
Table of Contents
Section 1 Specifications .........................................................................................................3
Section 2 General Information ...............................................................................................7
2.1 Safety Information ....................................................................................................................... 7
2.1.1 Use of Hazard Information ................................................................................................. 7
2.1.2 Precautionary Labels ......................................................................................................... 7
2.1.3 Hazardous Locations ......................................................................................................... 8
2.1.4 Intrinsically Safe Equipment ............................................................................................... 8
2.1.5 Confined Space Entry ...................................................................................................... 10
Section 3 Getting Started ..................................................................................................... 13
3.1 Installing the Flow Meter-Considerations .................................................................................. 13
3.1.1 Choosing the Proper Site ................................................................................................. 13
3.1.2 Dealing with Difficult Sites ................................................................................................ 13
3.1.3 Choosing the Appropriate Meter and Sensor Combination ............................................. 13
Section 4 Meter Installation .................................................................................................. 15
4.1 Approved 911 and 940 Installation Drawings ........................................................................... 15
4.3 Installing the Batteries ............................................................................................................... 30
4.3.1 Installing the Battery Pack in the 940 ............................................................................... 30
4.3.2 Installing the Battery Pack in the 911 ............................................................................... 31
4.3.3 Battery Compartment Desiccant ...................................................................................... 32
4.3.4 Estimating the Battery Life ............................................................................................... 32
4.3.5 Recharging the Lithium Ion Battery Pack for Model 940 .................................................. 33
4.3.6 Recharging the Battery Pack for Model 911 .................................................................... 34
4.4 Wiring the RS232 Interface ....................................................................................................... 35
4.4.1 RS232 Serial Port ............................................................................................................ 35
4.5 Wiring the Sampler Interface on Model 940 .............................................................................. 36
4.6 Sampler Receptacle (940 Only) ................................................................................................ 37
4.6.1 Connecting the Sampler Cable to a 940 Flow Meter ....................................................... 38
4.6.2 Connecting a Non-Sigma Sampler to a 940 Flow Meter .................................................. 38
Section 5 Software and Communications ........................................................................... 41
5.1 Required Software .................................................................................................................... 41
5.2 Programming and Analysis Options .......................................................................................... 41
Section 6 Sensor Installation ............................................................................................... 43
6.1 Downlook Ultrasonic Sensor ..................................................................................................... 43
6.1.1 Installing the Downlook Ultrasonic Sensor ....................................................................... 43
6.1.2 Troubleshooting the Downlook Ultrasonic Sensor Installation ........................................ 48
6.2 In-Pipe Ultrasonic Sensor ......................................................................................................... 49
6.2.1 Mounting the In-Pipe Sensor ........................................................................................... 49
6.2.2 Angling the Beam ............................................................................................................. 50
6.2.3 Calibrating the In-Pipe Ultrasonic Sensor ........................................................................ 50
6.2.4 Protecting the In-Pipe Ultrasonic Sensor ......................................................................... 51
6.2.5 Troubleshooting the In-Pipe Sensor ................................................................................ 52
6.3 Installing the Submerged Area/Velocity Sensor ........................................................................ 52
6.3.1 Zeroing the Submerged Area/Velocity Sensor ................................................................. 52
6.3.2 Important Installation Guidelines for Submerged Area/Velocity Sensor .......................... 52
6.3.3 Connecting the Submerged Area/Velocity Sensor to the Mounting Bands ...................... 53
6.3.4 Placing the Submerged Area/Velocity Sensor and the Mounting Band into the Pipe ...... 54
Section 7 Maintenance ..........................................................................................................57
7.1 Maintaining the Battery Compartment Desiccant ...................................................................... 57
1
Table of Contents
7.1.1 Replacing the Battery Compartment Desiccant ................................................................57
Maintaining the O-Ring Gasket on the End Cap .......................................................................57
Cleaning the Flow Meters ..........................................................................................................58
Storing the Flow Meters ............................................................................................................58
Cleaning the Connectors ...........................................................................................................58
Maintaining the Electronics Compartment .................................................................................58
7.6.1 Fuses ................................................................................................................................58
7.6.2 Memory Batteries .............................................................................................................58
7.7 Replacing the Batteries in the RS232 Interface ........................................................................59
7.8 Maintaining the Submerged Area/Velocity Sensor ....................................................................59
7.8.1 Cleaning the Transducer Port ...........................................................................................59
7.8.2 Cleaning the Submerged Area/Velocity Sensor (Oil-filled and Non-oil) ...........................60
7.8.3 Replenishing the Oil .........................................................................................................62
7.8.4 Changing the Submerged Area/Velocity Sensor Desiccant .............................................63
7.8.5 Replacing the Desiccant ...................................................................................................64
7.2
7.3
7.4
7.5
7.6
Section 8 Replacement Parts and Accessories .................................................................67
8.1
8.2
8.3
8.4
8.5
Flow Meter Replacement Parts .................................................................................................67
Sensors .....................................................................................................................................67
Sensor Mounting Rings and Bands ...........................................................................................67
Ultrasonic Sensor Mounting Hardware ......................................................................................68
Mounting Plate Hardware for Directly Mounting to Pipe Wall ....................................................69
Section 9 Contact Information .............................................................................................71
Section 10 Contact information for Europe ........................................................................72
Section 11 Limited Warranty ................................................................................................73
Appendix A Working with Primary Devices ........................................................................75
Appendix B Channel Installation Options ...........................................................................81
Appendix C Batteries and Chargers ....................................................................................87
Appendix D SCADA-Modbus® System Guidelines ............................................................91
2
Section 1
Specifications
Specifications are subject to change without notice.
Table 1 911 Flow Meter Specifications
General
Certification
cCSAus Approved for Class 1 and Division 1, and Group C
Dimensions
16.5 cm dia. x 57 cm L (6.5 in. x 22.5 in.) with 12 amp battery
Weight
8 kg (17.5 lb) with 12 amp hour battery pack
Enclosure Material
PVC
Enclosure Rating
NEMA, 6P (IP67)
Operating Temperature
–18 to 60 °C (0 to 140 °F)
Storage Temperature
–40 to 60 °C (–40 to 140 °F)
Power Source
12 amp hour battery pack
Battery Life
90 days typical with a 15 minute recording interval. Assumes data download once per week,
at 10 °C (50 °F), also affected by site conditions.
User Interface
Optically Isolated Interface to IBM compatible PC
Monitoring Intervals
1, 2, 3, 5, 6, 10, 12, 15, 20, 30, and 60 minutes
Program Memory
Non-volatile, programmable flash, can be updated via RS232 port
Time Based Accuracy
±1 second per day
Level: in., m, cm, ft
Unit Measurements
Flow: gps, gpm, lps, lpm, lph, mgd, afd, cfs, cfm, cfh, cfd, m3s, m3m, m3h, m3d
Totalized Flow: gal, ft3, acre-ft, L, m3
Data Storage
Capacity: 400 days of 1 level reading and 1 velocity reading at a 15 minute recording
interval.
Data Types: Level and Velocity
Storage Mode: Wrap or Slate
Communications
Serial connection via optically isolated interface to IBM compatible computer with Sigma
analysis software.
Submerged Area/Velocity Sensor
Method: Doppler Ultrasound Twin 1 MHz piezoelectric crystals
Typical Minimum Depth: 2 cm (0.8 in.)
Velocity Measurement
Zero Stability: 0.015 m/s (<0.05 ft/s)
Accuracy: ± 2% of reading
Recommended Range: –1.52 to 6.10 m/s (–5 to 20 ft/s)
Method: Pressure transducer with stainless steel diaphragm
Depth Measurement
Accuracy (static)1:
±0.16% full scale ±1.5% of reading at constant temp (± 2.5 °C)
±0.20% full scale ±1.75% of reading from 0 to 30 °C (32 to 86 °F)
±0.25% full scale ±2.1% of reading from 0 to 70 °C (32 to 158 °F)
Velocity-Induced Depth Error: Compensated based on pipe geometry and flow velocity.
Depth Range:
Standard: 0–3 m (0–10 ft); Extended: 0–9 m (0–30 ft)
Submerged Area/Velocity Sensor (continued)
Air Intake
Atmospheric pressure reference is desiccant protected.
Operating Temperature
0 to 70 °C (32 to 158 °F)
3
Specifications
Table 1 911 Flow Meter Specifications (continued)
Depth Compensated
Temperature
0 to 70 °C (32 to 158 °F)
Material
Noryl® plastic outer shell with epoxy potting within
Power Consumption
≤1.2 W @ 12 VDC
Cable Material
Urethane sensor cable with air vent
Cable Lengths Available
Standard: 9, 15, 23, and 30.5 m (30, 50, 75, and 100 ft)
Custom: 30.75-76 m (101-250 ft) maximum
Cable Diameter
0.91 cm (0.36 in.)
Dimensions
2.3 cm H x 3.8 cm W x 13.5 cm L (0.9 in. H x 1.5 in. W x 5.31 in. L)
1
For temperatures above 40 °C (104 °F) add ± 0.3 cm/°C (0.03 in./°F)
Table 2 940 Flow Meter Specifications
General
Certification
cCSAus Approved for Class 1 and Division 1
Dimensions
21.9 cm dia. x 60 cm L (8.625 in. x 18.25 in.)
Weight
8.16 kg (18 lb)
Enclosure Material
PVC
Enclosure Rating
NEMA 6P, IP 67
Operating Temperature
–18 to 60 °C (0 to 140 °F)
Storage Temperature
–40 to 60 °C (–40 to 140 °F)
Power Source
One (14 V) 16 amp hour lithium rechargeable battery pack
Battery Life
330 days typical with a 15 minute recording interval, 1 level and 1 velocity, data download once
per week, 10 °C (50 °F) (also affected by site conditions)
User Interface
Optically Isolated Interface to IBM compatible PC
Monitoring Intervals
1, 2, 3, 5, 6, 10, 12, 15, 20, 30, and 60 minutes
Program Memory
Non-volatile, programmable flash, can be updated via RS232 port
Time Based Accuracy
±1 second per day
Level: in., m, cm, ft
Unit Measurements
Flow: gps, gpm, lps, lpm, lph, mgd, afd, cfs, cfm, cfh, cfd, m3s, m3m, m3h, m3d
Totalized Flow: gal, ft3, acre-ft, L, m3
Data Storage
Capacity: 306 days of 2 level readings and 2 velocity readings at a 15 minute recording interval.
Data Types: Level and Velocity
Storage Mode: Wrap or Slate
Output Conditions
Set point on level, velocity, flow, or flow rate of change.
Sampler Output
6–12 V dc pulse, 100 mA max at 500 ms duration with approved interface.
Communications
Connection
Serial connection via optically isolated interface to IBM compatible computer with
analysis software.
Local Terminal
RS232 at 19.2 k baud
4
Specifications
Table 2 940 Flow Meter Specifications (continued)
Submerged Area/Velocity Sensor
Method: Doppler Ultrasound Twin 1 MHz piezoelectric crystals
Typical Minimum Depth: 2 cm (0.8 in.)
Velocity Measurement
Zero Stability: 0.015 m/s (<0.05 ft/s)
Accuracy: ± 2% of reading1
Recommended Range: –1.52 to 6.10 m/s (–5 to 20 ft/s)
Method: Pressure transducer with stainless steel diaphragm
Depth Measurement
Accuracy (static)2:
±0.16% full scale ±1.5% of reading at constant temp (± 2.5 °C)
±0.20% full scale ±1.75% of reading from 0 to 30 °C (32 to 86 °F)
±0.25% full scale ±2.1% of reading from 0 to 70 °C (32 to 158 °F)
Velocity-Induced Depth Error: Compensated based on pipe geometry and flow velocity.
Depth Range:
Standard: 0–3 m (0–10 ft); Extended: 0–9 m (0–30 ft)
Air Intake
Atmospheric pressure reference is desiccant protected.
Operating Temperature
0 to 70 °C (32 to 158 °F)
Depth Compensated
Temperature
0 to 70 °C (32 to 158 °F)
Material
Noryl® plastic outer shell with epoxy potting within
Power Consumption
≤1.2 W @ 12 VDC
Cable Material
Urethane sensor cable with air vent
Cable Lengths Available
Standard: 9, 15, 23, and 30.5 m (30, 50, 75, and 100 ft)
Cable Diameter
0.91 cm (0.36 in.)
Dimensions
2.3 cm H x 3.8 cm W x 13.5 cm L (0.9 in. H x 1.5 in. W x 5.31 in. L)
In-Pipe Ultrasonic Sensor
Operating Frequency
75 kHz
Accuracy
±0.027 ft for sensor to liquid distance between 2.5 inches and 5 ft at ±1 ft change in head from
calibration point, 20 °C still air, ideal target, 25 ft cable.
Range
Distance from sensor to liquid: 0.2 inches (minimum) to 5 feet (maximum), @ 20 °C still air,
ideal target, 25 ft cable.
Resolution
0.019 cm (0.0075 in.)
Operating Temperature
Range
–20 to 60 °C (–4 to 140 °F)
Storage Temperature
–20 to 60 °C (–4 to 140 °F)
Temperature Error
0.00005 meter/°C typical
Material
Stat-Kon A-E ABS Plastic
Cable Length
7.6 m (25 ft) standard, maximum custom length is 30.5 m (100 ft.)
Dimensions
4.44 cm (1.75 in.) maximum diameter, 31.435 cm (12.375 in.) long
Mounting
Dedicated Mounting Rings, Permanent Mounting Bracket (installs directly to pipe wall),
Adjustable Mounting Band Kit.
5
Specifications
Table 2 940 Flow Meter Specifications (continued)
Downlook Ultrasonic Sensor
Operating Frequency
75 kHz
Beam Angle
5°
Accuracy
±15.24 cm or 3.048 m ±0.003 m (±0.01 ft), at 22 °C (72 °F), still air, 40–70% relative humidity,
from 6 in. to 10 ft
Range
10 ft
Operating Temperature
–18 to 60 °C (0 to 140 °F)
Temperature Error
0.00005 m/°C (0.0001 ft/°F) (maximum error with compensated temperature range—per degree
of change.
Resolution
0.019 cm (0.0075 in.)
Material
ABS housing with ABS acoustical window
Cable Length
7.62 to 30.48 m (25 to 100 ft)
Dimensions
15.24 cm x 5.7 cm (6 in. x 2.25 in.)
1
When the sensor is out of the water, the system may report velocity readings of up to 0.76 m/s due to radio
frequency and interferences at frequencies of 140–170 MHz and 300 MHz with field strengths greater than 3 V/m.
2
For temperatures above 40 °C (104 °F) add ± 0.3 cm/°C (0.03 in./°F)
6
Section 2
General Information
2.1 Safety Information
Read the entire manual before unpacking, setting up, or operating this instrument. Pay
particular attention to all danger and caution statements. Failure to do so could result in
serious injury to the operator or damage to the equipment.
To ensure that the protection provided by this equipment is not impaired, do not use or
install this equipment in any manner other than what is specified in this manual.
2.1.1 Use of Hazard Information
DANGER
Indicates a potentially or imminently hazardous situation which, if not avoided,
could result in death or serious injury.
CAUTION
Indicates a potentially hazardous situation that may result in minor or moderate
injury.
Important Note: Information that requires special emphasis.
Note: Information that supplements points in the main text.
2.1.2 Precautionary Labels
Read all labels and tags attached to the instrument. Personal injury or damage to the
instrument could occur if not observed. A symbol, if noted on the instrument, will be
included with a danger or caution statement in the manual.
This symbol, if noted on the instrument, references the instruction manual for operation and/or safety information.
Electrical equipment marked with this symbol may not be disposed off in European public disposal systems after 12
August of 2005. In conformity with European local and national regulations (EU Directive 2002/96/EC), European
electrical equipment users must now return old or end-of life equipment to the producer for disposal at no charge to
the user.
Note: For return for recycling, please contact the equipment producer or supplier for instructions on how to return
end-of-life equipment, producer-supplied electrical accessories, and all auxiliary items for proper disposal.
This symbol, when noted on a product enclosure or barrier, indicates that a risk of electrical shock and/or
electrocution exists and indicates that only individuals qualified to work with hazardous voltages should open the
enclosure or remove the barrier.
This symbol, when noted on the product, identifies the location of a fuse or current limiting device.
This symbol, when noted on the product, indicates that the marked item can be hot and should not be touched
without care.
This symbol, when noted on the product, indicates the presence of devices sensitive to Electro-static Discharge and
indicates that care must be taken to prevent damage to them.
This symbol, if noted on the product, indicates the need for protective eye wear.
This symbol, when noted on the product, identifies the location of the connection for Protective Earth (ground).
7
General Information
2.1.3 Hazardous Locations
DANGER
Although some Sigma products are designed and certified for installation in
hazardous locations as defined by the National Electrical Code, many Sigma
products are not suitable for use in hazardous locations. It is the responsibility of
the individuals who are installing the products in hazardous locations to determine
the acceptability of the product for the environment. Additionally, to ensure safety,
the installation of instrumentation in hazardous locations must be as per the
manufacturer's control drawing specifications. Any modification to the
instrumentation or the installation is not recommended and may result in life
threatening injury and/or damage to facilities.
DANGER
Bien que certains produits Sigma soient conçus et certifiés pour être installés dans
des endroits dangereux tels que définis par le National Electric Code, de nombreux
produits Sigma ne conviennent pas pour de tels endroits. Il relève de la
responsabilité des personnes qui placent les produits dans des endroits dangereux
de déterminer s'ils sont adaptés à cet environnement. En outre, à des fins de
sécurité, le placement de machines dans des endroits dangereux doit s'effectuer
dans le respect des consignes des schémas de contrôle du fabricant. Toute
modification apportée aux machines ou tout déplacement de celles-ci est
déconseillé, car susceptible de provoquer des accidents matériels et/ou corporels.
2.1.4 Intrinsically Safe Equipment
The 911 and 940 Flow Meters are listed as “Intrisically Safe” for Class 1, Div.1, Groups C,
and D Hazardous Locations. This means that the circuits within these flow meters are
designed to be incapable of producing a spark or thermal effect that could ignite a mixture
of flammable or combustible gases when properly installed in a Class 1, Division 1, Group
C, or Group D Hazardous Location. It does not mean that these flow meters are
“Explosion Proof”. If proper safety precautions are not followed, or if the equipment is not
installed properly, there is a serious potential for explosion. Be sure to review all safety
precautions, installation, and wiring practices throughout this manual prior to installing a
911 or 940 Flow Meter.
2.1.4.1 Intrinsically Safe Installation Requirements
8
•
It is important that the installer of an Intrinsically Safe system reference the
requirements of the authority having jurisdiction at the installation site. In the United
States, reference should be made to Article 504 of the National Electric Code and
ANSI/ISA RP 12.6. The 911 and 940 Flow Meters should be installed in accordance to
these requirements and in accordance with the approved control drawings in the
manual (Refer to section 4.1 on page 15).
•
Wherever possible, associated apparatus should be mounted in a non-hazardous
location, closest to the hazardous location. This minimizes the length of the
intrinsically safe conductors within the non-hazardous location, thereby decreasing
the possibility of inadvertent connection to non-intrinsically safe energy to the
protected circuit. It is recommended that the associated apparatus be mounted and
installed in dust and moisture free enclosures. Dust and moisture are conductive
materials and may compromise the required minimum distance of 50 mm (2 in.)
between intrinsically safe and non-intrinsically safe conductors. The panel layout of
these enclosures should be constructed such that the separation of intrinsically safe
and non-intrinsically safe conductors is maximized.
General Information
2.1.4.2 Intrinsically Safe Wiring Practices
DANGER
Intrinsically safe wiring must be separated from non-intrinsically safe wiring to
prevent the transferring of unsafe levels of energy to the hazardous area.
DANGER
Le câblage à sécurité intrinsèque doit être séparé du câblage à sécurité non
intrinsèque afin d'empêcher tout transfert de niveaux d'énergie non sûrs vers la
zone dangereuse.
The following practices are meant to be used as guidelines or recommendations only. For
specific rules or more detailed practiced, refer to the National Electric Code, Canadian
Electric Code, or ANSI/ISA-RP 12.6-1987 or subsequent.
Intrinsically safe wiring must be installed, maintained, and repaired with considerations for
the following:
Connections
Do not connect non-intrinsically safe wiring to intrinsically safe terminations of any
associated apparatus, usually identified with light blue.
Routing
Intrinsically safe wiring must enter or leave the non-hazardous location by the shortest and
most direct route.
Clearances
A clearance distance of at least 50 mm (2 in.) must be maintained between any
non-intrinsically safe conductors and intrinsically safe wiring or terminations.
The only exceptions allowed for minimum clearances are:
•
All intrinsically safe circuit conductors are in Type MI or MC cables or
•
All non-intrinsically safe circuit conductors are in raceways or Type MI or MC cables
where the sheathing or cladding is capable of carrying fault current to the ground.
Raceways
Raceways should be used to keep intrinsically safe wire and non-intrinsically safe wire
separated. Wire lacing or ties are considered acceptable methods. All raceways for the
intrinsically safe system are identified with permanently affixed labels with the wording
Intrinsic Safety Wiring or equivalent.
Conductor Identification
Intrinsically safe conductors must be identified, either by color coding with light blue
jacketed cable or by tagging, at regular intervals of every 7.62 m (25 ft), as identified by
NEC (National Electric Code).
Voltage Limitations
The electrical equipment for non-hazardous location must not contain a source voltage
greater than 250 V unless sufficient means have been employed to prevent the shorting of
a source voltage greater than 250 V onto the non-intrinsically safe terminals of the
associated apparatus.
9
General Information
Multi-Conductor Cable
Conductors may be part of a multi-conductor cable provided that all conductors within the
cable are intrinsically safe. Each intrinsically safe conductor must have an insulation
thickness of 0.25 mm (0.010 in.) which is rated for the maximum temperature rating of the
approved device to which it is connected. The intrinsically safe wiring must be color coded
with light blue, if no other wiring is light blue or appropriately tagged.
Seals
A seal must be provided at the point the intrinsically safe wire passes between the
hazardous and non-hazardous locations to prevent the hazardous atmosphere from
entering the unprotected control room environment. The seal specification is that it must
not pass more than 198 cm3 (0.007 ft3) of air per hour at a pressure equivalent to 6 in.
(1493 Pa) of water. While this is the same specification for the sealing requirements of an
explosion proof system, it may not be necessary to employ those seals.
Grounding
The 911 and 940 Flow Meters and associated Opto-Isolated Interfaces do not require
grounding or bonding. Under no circumstances should any attempt be made to ground or
bond the 911 or 940 Flow Meters or Opto-Isolated Interfaces.
2.1.5 Confined Space Entry
Important Note: The following information is provided to guide users of 911 and 940 Flow
Meters on the dangers and risks associated with entry into confined spaces.
DANGER
Additional training in Pre-Entry Testing, Ventilation, Entry Procedures,
Evacuation/Rescue Procedures and Safety Work Practices is necessary to ensure
against the loss of life in confined spaces.
DANGER
Pour éviter les accidents mortels dans les espaces confinés, il faut organiser des
formations supplémentaires dans les matières suivantes: Contrôle avant entrée,
Ventilation, Procédures d'entrée, Procédures d'évacuation et de secours et
Méthodes de travail sûres.
On April 15, 1993, OSHA's final ruling on CFR 1910.146, Permit Required Confined
Spaces, became law. This standard directly affects more than 250,000 industrial sites in
the United States and was created to protect the health and safety of workers in
confined spaces.
2.1.5.1 Definition of Confined Space
Confined Space is any location or enclosure that presents or has the immediate potential
to present one or more of the following conditions:
•
An atmosphere with less than 19.5% or greater than 23.5% oxygen and/or more than
10 ppm Hydrogen Sulfide (H2S)
•
An atmosphere that may be flammable or explosive due to gases, vapors, mist, dust,
or fibers
•
Toxic materials which, upon contact or inhalation, could result in injury, impairment of
health, or death
Confined spaces are not designed for human occupancy. They have restricted entry and
contain known or potential hazards.
Examples of confined spaces include manholes, stacks, pipes, vats, switch vaults, and
other similar locations.
10
General Information
Important Note: Standard safety procedures must always be followed prior to entry into
confined spaces and/or locations where hazardous gases, vapors, mist, dust, or fibers
may be present.
Note: Before entering any confined space, check with the employer for procedures related to
confined space entry.
11
General Information
12
Section 3
Getting Started
3.1 Installing the Flow Meter-Considerations
3.1.1 Choosing the Proper Site
The accuracy of flow measurement depends on the suitability of individual monitoring
sites. Select sites that have normalized flow and minimal turbulence. Turbulence can
make it difficult to detect an average velocity in the flow stream. Obstructions, vertical
drops, pipe bends, and elbows can create turbulence. Table 3 contains suggestions for
preventing turbulence.
Table 3 Suggestions for Preventing Turbulence
Site Condition
Suggested Remedy
Outfalls
Attach the sensor at least ten times the maximum expected level upstream of the outfall.
Vertical drops in the
channel floor
Attach the sensor at least ten times the maximum expected level upstream of the vertical drop.
Elbows, sharp turns,
and “Y” connections
Locate the sensor at least ten times the maximum expected level upstream of the obstruction.
Attach the sensor at least ten times the maximum expected level downstream of the vertical drop.
Locate the sensor at least ten times the maximum expected level downstream of the obstruction.
3.1.2 Dealing with Difficult Sites
Some sites may be difficult to monitor due to poor site conditions. The direction and speed
of particles in the flow stream contribute to the signal received by the velocity sensor. If the
turbulence near the measurement point is excessive, it may be difficult for the sensor to
determine the average velocity of the stream. The flow meters provide several unique
features to help deal with these problem sites.
3.1.3 Choosing the Appropriate Meter and Sensor Combination
Use Table 4 to determine which sensor to use. See Section 6 on page 43 for sensor
installation instructions.
Table 4 Flow Meter and Sensor Configurations
Flow Meter Model
Level and Velocity Sensor Configurations
911
Meter plus one Submerged Area/Velocity Sensor or one Velocity-Only Sensor
940
Meter plus two Submerged Area/Velocity Sensors or
Meter plus one Submerged Area/Velocity Sensor and one In-Pipe/Downlook Ultrasonic Sensor.
13
Getting Started
14
Section 4
Meter Installation
DANGER
Only qualified personnel should conduct the tasks described in this section of the
manual.
DANGER
Seul un technicien qualifié peut effectuer les tâches d'installation décrites dans
cette section du manuel.
This section describes the ONLY approved installation instructions for the 911 and 940
Flow Meters. This section also describes battery installation and interface wiring for a
RS232, Modem, and Sampler connection.
4.1 Approved 911 and 940 Installation Drawings
DANGER
Any installation or flow meter configuration not specifically detailed on the
following control drawings is not allowed. In all cases, the local authority having
jurisdiction shall have a final say.
DANGER
Il est interdit de procéder à toute installation ou configuration d'un débitmètre qui
n'est pas explicitement détaillée dans les schémas de contrôle de l'installation
ci-dessous. Dans tous les cas, c'est l'autorité locale responsable qui aura le
dernier mot.
Figure 1 on page 16 through Figure 13 on page 28 are approved control drawings. These
certified drawings detail the ONLY approved method of installing the 911 and 940 Flow
Meters. Additionally, these drawings list both part number, description, and the only
certified sensors, probes, and associated equipment to be used with these meters. Any
substitutions automatically void the Intrinsically Safe certification of the flow meter and
could result in fire or explosion.
15
16
Figure 1 Control Drawing 911-V1
A
B
C
D
6
5
4
8
TABLE 2
TABLE 1
7
REF. TABLE 1
OR 2 FOR P/N
AREA VELOCITY
PROBE
6
25 FT - 100 FT MAX
7.6m - 30.5m
INTEGRAL
IN LINE VENT
ASSEMBLY
5
THIS DRAWING
PRIOR TO CHANGING
APPROVAL REQUIRED
REGULATORY AGENCY
P/N 5150
MODEL 911
FLOWMETER
L
REV
MAX LENGTH
150 FT.
MAX LENGTH
150 FT.
P/N 4274
SAMPLER
OPTO-ISOLATED
INTERFACE
RS-232
OPTO-ISOLATED
INTERFACE
P/N 5254200
-ORP/N 5254100
-OR-
RS-232
OPTO-ISOLATED
INTERFACE
P/N 4738
-ORP/N 4087
NONHAZARDOUS (CLASSIFIED)
LOCATION
3
10 FT
3.1 m
NONCLASSIFIED
SAMPLER
6.56 FT
2.0 m
3-5v DC
TO SIGMA
1000
TO COMPUTER
Jeff Archer
10 FT
3.1 m
3-5v DC
APPROVED
1
09-561
REVISION
DESCRIPTION
2
MATERIAL
4
3
DO NOT SCALE DRAWING
INTERPRET GEOMETRIC
TOLERANCING PER:
ANSI Y14.5M 1994
DIMENSIONS ARE IN INCHES
TOLERANCES:
.X
= .03
.XX
= .01
.XXX
= .005
ANGLES = .25
UNLESS OTHERWISE SPECIFIED:
S.D
S.D
ENGINEER
2
HACH COMPANY
SCALE: 1:2 WEIGHT:
1
911-V1
L
REV
SHEET 1 OF 1
DRAWING, CONTROL
911 BASE
5600 LINDBERGH DR.
LOVELAND, CO. 80539
SIZE DWG. NO.
B
THIRD ANGLE PROJECTION TITLE:
DATE
12/2/05
NAME
DRAWN
NOTICE--HACH COMPANY CLAIMS PROPIETARY RIGHTS IN THE INFORMATION DISCLOSED ON THIS DRAWING. IT IS ISSUED
IN CONFIDENCE FOR ENGINEERING INFORMATION ONLY AND MAY NOT, IN WHOLE OR IN PART, BE USED TO MANFACTURE
ANYTHING, WHETHER OR NOT SHOWN HEREON, REPRODUCED OR DISCLOSED TO ANYONE WITHOUT DIRECT PERMISSION
FROM HACH COMPANY.
HAZARDOUS (CLASSIFIED) LOCATION
CLASS 1, DIV. 1, GROUP C,D
WIRING METHODS MUST BE IN ACCORDANCE WITH THE NATIONAL ELECTRICAL CODE, ANSI/NFPA 70, ARTICLE 504,
CANADIAN ELECTRIC CODE, C22.1-94, SECTION 18 AND ANSI/ISA RP 12.6
7
2.
8
IF THE ELECTRICAL PARAMETERS OF THE CABLE ARE UNKNOWN, THE FOLLOWING DEFAULT VALUES MAY BE USED.
CAPACITANCE - .2nf/METER, INDUCTANCE - 1uh/METER
1.
A
B
C
D
Meter Installation
Meter Installation
REVISION
DESCRIPTION
REV
E
1.
APPROVED
REVISED PER R-3142-05
CONNECTION OF P/N 4080 FLASH CONVERTER TO 911 FLOW METER
MUST BE MADE IN A NON HAZARDOUS LOCATION.
NON HAZARDOUS (CLASSIFIED)
LOCATION
P/N 5150
911
FLOW METER
NOTICE-HACH COMPANY CLAIMS PROPRIETARY
RIGHTS IN THE INFORMATION DISCLOSED ON THE
DRAWING. IT IS ISSUED IN CONFIDENCE FOR ENGINEERING INFORMATION ONLY AND MAY NOT, IN
WHOLE OR IN PART, BE USED TO MANFACTURE
ANYTHING, WHETHER OR NOT SHOWN HEREON/
REPRODUCED OR DISCLOSED TO ANYONE WITHOUT
DIRECT PERMISSION FROM HACH COMPANY.
MATERIAL
10 FT/
3.1m
10 FT/
3.1m
P/N 4080
FLASH CONVERTER
UNLESS OTHERWISE SPECIFIED
DIMENSIONS ARE IN INCHES
TOLERANCES:
.X
= .03
.XX
= .01
.XXX
= .005
ANGLES = .25
NAME
DATE
DRAWN
S. DUKART
12/9/2005
ENGINEER
S. DUKART
THIRD ANGLE PROJECTION
INTERPRET GEOMETRIC
TOLERANCING PER: ANSI Y14.5 1994
DO NOT SCALE DRAWING
HACH COMPANY
5600 LINDBERGH DR.
LOVELAND, CO. 80539
TITLE:
DRAWING - CONTROL,
911 FLASH CONV
SIZE
A
DWG. NO.
SCALE:1:1
WEIGHT:
REV.
911-V2
E
SHEET 1 OF 1
Figure 2 Control Drawing 911-V2
17
18
Figure 3 Control Drawing 911-V3
A
B
C
D
8
8
P/N 4150-28
12Ah
RECHARGABLE
GEL CELL
P/N 4221-01
7
P/N 5159
P/N 5335
CPU MODULE
P/N 5150 911 FLOW METER
7
6
6
P/N 5339
AREA VELOCITY
MODULE
5
P/N 4226
P/N 4227
P/N 4228
5
3
THIS DRAWING
PRIOR TO CHANGING
APPROVAL REQUIRED
REGULATORY AGENCY
DESCRIPTION
REVISED PER R-3143-05
G
REVISION
REV
2
APPROVED
1
MATERIAL
4
3
DO NOT SCALE DRAWING
INTERPRET GEOMETRIC
TOLERANCING PER:
ANSI Y14.5M 1994
DIMENSIONS ARE IN INCHES
TOLERANCES:
.X
= .03
.XX
= .01
.XXX
= .005
ANGLES = .25
UNLESS OTHERWISE SPECIFIED:
2
HACH COMPANY
DIAGRAM,
911 BLOCK
SCALE: 1:1 WEIGHT:
1
911-V3
SHEET 1 OF 1
REV
G
5600 LINDBERGH DR.
LOVELAND, CO. 80539
SIZE DWG. NO.
B
THIRD ANGLE PROJECTION TITLE:
S. DUKART
ENGINEER
DATE
S. DUKART 12/8/2005
DRAWN
NAME
NOTICE--HACH COMPANY CLAIMS PROPIETARY RIGHTS IN THE INFORMATION DISCLOSED ON THIS DRAWING. IT IS ISSUED
IN CONFIDENCE FOR ENGINEERING INFORMATION ONLY AND MAY NOT, IN WHOLE OR IN PART, BE USED TO MANFACTURE
ANYTHING, WHETHER OR NOT SHOWN HEREON, REPRODUCED OR DISCLOSED TO ANYONE WITHOUT DIRECT PERMISSION
FROM HACH COMPANY.
SAMPLER
VELOCITY
RS-232
4
A
B
C
D
Meter Installation
A
B
C
D
7
6
5
4
TABLE 1
8
TABLE 2
7
REF. TABLE 1
OR 2 FOR P/N
AREA VELOCITY
PROBE
REF. TABLE 1
OR 2 FOR P/N
AREA VELOCITY
PROBE
6
25 FT - 100 FT MAX
7.6m - 30.5m
INTEGRAL
IN LINE VENT
ASSEMBLY
25 FT - 100 FT MAX
7.6m - 30.5m
INTEGRAL
IN LINE VENT
ASSEMBLY
5
THIS DRAWING
PRIOR TO CHANGING
APPROVAL REQUIRED
REGULATORY AGENCY
P/N 4413
F.O.
MODEM
INTERFACE
MAX LENGTH
150 FT.
CUSTOMER DEFINABLE LENGTH
P/N 4443
F.O. MODEM
P/N 4274
SAMPLER
OPTO-ISOLATED
INTERFACE
RS-232
OPTO-ISOLATED
INTERFACE
P/N 5254200
-ORP/N 5254100
-OR-
RS-232
OPTO-ISOLATED
INTERFACE
P/N 4738
-ORP/N 4087
10 FT
3.1m
NONCLASSISFIED
SAMPLER
6.56 FT
2.0 m
3-5v DC
10 FT
3.1m
TO SIGMA
1000
TO COMPUTER
Jeff Archer
09-561
L
3-5v DC
APPROVED
1
DESCRIPTION
REVISION
REV
2
MATERIAL
4
3
DO NOT SCALE DRAWING
INTERPRET GEOMETRIC
TOLERANCING PER:
ANSI Y14.5M 1994
DIMENSIONS ARE IN INCHES
TOLERANCES:
.X
= .03
.XX
= .01
.XXX
= .005
ANGLES = .25
UNLESS OTHERWISE SPECIFIED:
S.D
S.D
DATE
12/05/05
NAME
2
HACH COMPANY
SCALE: 1:2 WEIGHT:
1
940-V1
L
REV
SHEET 1 OF 1
DRAWING - CONTROL,
940, 2ND AV
5600 LINDBERGH DR.
LOVELAND, CO. 80539
SIZE DWG. NO.
B
THIRD ANGLE PROJECTION TITLE:
ENGINEER
DRAWN
NOTICE--HACH COMPANY CLAIMS PROPIETARY RIGHTS IN THE INFORMATION DISCLOSED ON THIS DRAWING. IT IS ISSUED
IN CONFIDENCE FOR ENGINEERING INFORMATION ONLY AND MAY NOT, IN WHOLE OR IN PART, BE USED TO MANFACTURE
ANYTHING, WHETHER OR NOT SHOWN HEREON, REPRODUCED OR DISCLOSED TO ANYONE WITHOUT DIRECT PERMISSION
FROM HACH COMPANY.
P/N 4840
MODEL 940
FLOW METER
3
NONHAZARDOUS (CLASSIFIED)
LOCATION
MAX LENGTH
150 FT.
1. IF THE ELECTRICAL PARAMETERS OF THE CABLE ARE UNKNOWN, THE FOLLOWING DEFAULT VALUES MAY BE USED:
CAPACITANCE - .2 nf/METER, INDUCTANCE - 1 uh/METER.
2. WIRING METHODS MUST BE IN ACCORDANCE WITH THE NATIONAL ELECTRICAL CODE, ANSI/NFPA 70, ARTICLE 504,
CANADIAN ELECTRIC CODE C22.1-94, SECTION 18 AND ANSI/ISA RP 12.6
3. FOR MODEM INSTALLATION IN CONDUIT, MINIMUM CONDUIT DIAMETER IS 1/2 IN./1.3 cm.,
MINIMUM BEND RADIUS IS 3 IN./7.6 cm.
HAZARDOUS (CLASSIFIED) LOCATION
CLASS 1, DIV. 1, GROUP C.D
8
A
B
C
D
Meter Installation
Figure 4 Control Drawing 940-V1
19
20
Figure 5 Control Drawing 940-V2
A
B
C
D
3.
2.
1.
7
6
5
4
3
8
TABLE 2
TABLE 1
7
P/N 4741
75KHz ZERO
DEADBAND
PROBE
REF. TABLE 1
OR 2 FOR P/N
AREA VELOCITY
PROBE
6
100 FT MAX
30.5m
25 FT - 100 FT MAX
7.6m - 30.5m
INTEGRAL
IN LINE VENT
ASSEMBLY
5
THIS DRAWING
PRIOR TO CHANGING
APPROVAL REQUIRED
REGULATORY AGENCY
P/N 4840
MODEL 940
FLOWMETER
CUSTOMER DEFINABLE LENGTH
P/N 4443
F.O. MODEM
P/N 4274
SAMPLER
OPTO-ISOLATED
INTERFACE
RS-232
OPTO-ISOLATED
INTERFACE
P/N 5254200
-ORP/N 5254100
-OR-
10 FT
3.1 m
NONCLASSIFIED
SAMPLER
6.56 FT
2.0 m
3-5v DC
TO SIGMA
1000
TO COMPUTER
Jeff Archer
10 FT
3.1 m
3-5v DC
APPROVED
1
09-561
REVISION
DESCRIPTION
2
MATERIAL
4
3
DO NOT SCALE DRAWING
INTERPRET GEOMETRIC
TOLERANCING PER:
ANSI Y14.5M 1994
DIMENSIONS ARE IN INCHES
TOLERANCES:
.X
= .03
.XX
= .01
.XXX
= .005
ANGLES = .25
UNLESS OTHERWISE SPECIFIED:
S.D
S.D
NAME
DATE
12/05/05
2
HACH COMPANY
SCALE: 1:2 WEIGHT:
1
940-V2
L
REV
SHEET 1 OF 1
DRAWING - CONTROL,
940 ULTRASONIC
5600 LINDBERGH DR.
LOVELAND, CO. 80539
SIZE DWG. NO.
B
THIRD ANGLE PROJECTION TITLE:
ENGINEER
DRAWN
NOTICE--HACH COMPANY CLAIMS PROPIETARY RIGHTS IN THE INFORMATION DISCLOSED ON THIS DRAWING. IT IS ISSUED
IN CONFIDENCE FOR ENGINEERING INFORMATION ONLY AND MAY NOT, IN WHOLE OR IN PART, BE USED TO MANFACTURE
ANYTHING, WHETHER OR NOT SHOWN HEREON, REPRODUCED OR DISCLOSED TO ANYONE WITHOUT DIRECT PERMISSION
FROM HACH COMPANY.
P/N 4413
F.O.
MODEM
INTERFACE
MAX LENGTH
150 FT.
MAX LENGTH
150 FT.
RS-232
OPTO-ISOLATED
INTERFACE
P/N 4738
-ORP/N 4087
REV
WIRING METHODS MUST BE IN ACCORDANCE WITH THE NATIONAL ELECTRICAL CODE, ANSI/NFPA 70, ARTICLE 504,
L
CANADIAN ELECTRIC CODE, C22.1-94, SECTION 18 AND ANSI/ISA RP 12.6
FOR MODEM INSTALLATION IN CONDUIT, MINIMUM CONDUIT DIAMETER IS 1/2 IN./1.3 cm.,
NONHAZARDOUS (CLASSIFIED)
MINIMUM BEND RADIUS IS 3 IN./7.6 cm.
LOCATION
HAZARDOUS (CLASSIFIED) LOCATION
CLASS 1, DIV. 1, GROUP C,D
8
IF THE ELECTRICAL PARAMETERS OF THE CABLE ARE UNKNOWN, THE FOLLOWING DEFAULT VALUES MAY BE USED.
CAPACITANCE - .2nf/METER, INDUCTANCE - 1uh/METER
A
B
C
D
Meter Installation
Meter Installation
REVISION
DESCRIPTION
REV
E
1.
APPROVED
REVISED PER R-3146-05
CONNECTION OF P/N 4080 FLASH CONVERTER TO 940 FLOW METER
MUST BE MADE IN A NON HAZARDOUS LOCATION.
NON HAZARDOUS (CLASSIFIED)
LOCATION
P/N 4840
940
FLOW METER
NOTICE-HACH COMPANY CLAIMS PROPRIETARY
RIGHTS IN THE INFORMATION DISCLOSED ON THE
DRAWING. IT IS ISSUED IN CONFIDENCE FOR ENGINEERING INFORMATION ONLY AND MAY NOT, IN
WHOLE OR IN PART, BE USED TO MANFACTURE
ANYTHING, WHETHER OR NOT SHOWN HEREON/
REPRODUCED OR DISCLOSED TO ANYONE WITHOUT
DIRECT PERMISSION FROM HACH COMPANY.
MATERIAL
10 FT/
3.1m
10 FT/
3.1m
P/N 4080
FLASH CONVERTER
UNLESS OTHERWISE SPECIFIED
DIMENSIONS ARE IN INCHES
TOLERANCES:
.X
= .03
.XX
= .01
.XXX
= .005
ANGLES = .25
NAME
DATE
DRAWN
S. DUKART
12/9/2005
ENGINEER
S. DUKART
THIRD ANGLE PROJECTION
INTERPRET GEOMETRIC
TOLERANCING PER: ANSI Y14.5 1994
DO NOT SCALE DRAWING
HACH COMPANY
5600 LINDBERGH DR.
LOVELAND, CO. 80539
TITLE:
DRAWING - CONTROL,
940 FLASH CONV
SIZE
A
DWG. NO.
SCALE:1:1
WEIGHT:
REV.
940-V3
E
SHEET 1 OF 1
Figure 6 Control Drawing 940-V3
21
22
Figure 7 Control Drawing 940-V4
A
B
C
D
8
8
7
6
P/N 6608500
RECHARGEABLE
LITHIUM
BATTERY MODULE
P/N 4150-26
LITHIUM 12V
BATTERY MODULE
P/N 5337
ULTRASONIC
LEVEL
MODULE
-V2 OPTION
P/N 4221-02
P/N 5339
AREA VELOCITY
MODULE
-V1 OPTION
P/N 4221-01
P/N 5339
AREA VELOCITY
MODULE
OPTIONAL
OR
P/N 4221-01
6
OPTIONAL
P/N 5159
P/N 5335
CPU MODULE
P/N 4840 940 FLOW METER
7
P/N 4251
P/N 4226
P/N 4143
P/N 4227
P/N 4227
P/N 4228
5
5
MODEM
SAMPLER
3
E
REV
REVISION
THIS DRAWING
PRIOR TO CHANGING
APPROVAL REQUIRED
REGULATORY AGENCY
08-11878
DESCRIPTION
2
APPROVED
1
MATERIAL
4
3
DO NOT SCALE DRAWING
INTERPRET GEOMETRIC
TOLERANCING PER:
ANSI Y14.5M 1994
DIMENSIONS ARE IN INCHES
TOLERANCES:
.X
= .03
.XX
= .01
.XXX
= .005
ANGLES = .25
UNLESS OTHERWISE SPECIFIED:
2
HACH COMPANY
DIAGRAM,
940, BLOCK
SCALE: 1:1 WEIGHT:
1
940-V4
E
SHEET 1 OF 1
REV
5600 LINDBERGH DR.
LOVELAND, CO. 80539
SIZE DWG. NO.
B
THIRD ANGLE PROJECTION TITLE:
S. DUKART
ENGINEER
DATE
S. DUKART04/17/2008
DRAWN
NAME
NOTICE--HACH COMPANY CLAIMS PROPIETARY RIGHTS IN THE INFORMATION DISCLOSED ON THIS DRAWING. IT IS ISSUED
IN CONFIDENCE FOR ENGINEERING INFORMATION ONLY AND MAY NOT, IN WHOLE OR IN PART, BE USED TO MANFACTURE
ANYTHING, WHETHER OR NOT SHOWN HEREON, REPRODUCED OR DISCLOSED TO ANYONE WITHOUT DIRECT PERMISSION
FROM HACH COMPANY.
ULTRASONIC A
VELOCITY B
VELOCITY A
RS-232
4
A
B
C
D
Meter Installation
A
B
C
D
8
TABLE 2
TABLE 1
7
P/N 4741
75KHz ZERO
DEADBAND
PROBE
REF. TABLE 1
OR 2 FOR P/N
AREA VELOCITY
PROBE
MINIMUM BEND RADIUS IS 3 IN./7.6 cm.
6
100 FT MAX
30.5m
25 FT - 100 FT MAX
7.6m - 30.5m
INTEGRAL
IN LINE VENT
ASSEMBLY
5
THIS DRAWING
PRIOR TO CHANGING
APPROVAL REQUIRED
REGULATORY AGENCY
P/N 4840
MODEL 940
FLOWMETER
MAX LENGTH
150 FT.
MAX LENGTH
150 FT.
L
REV
CUSTOMER DEFINABLE LENGTH
P/N 4443
F.O. MODEM
RS-232
OPTO-ISOLATED
INTERFACE
P/N 5254200
-ORP/N 5254100
-OR-
RS-232
OPTO-ISOLATED
INTERFACE
P/N 4738
-ORP/N 4087
6.56 FT
2.0 m
3-5v DC
10 FT
3.1 m
3-5v DC
TO SIGMA
1000
TO COMPUTER
Jeff Archer
09-561
1
APPROVED
REVISION
DESCRIPTION
2
MATERIAL
4
3
DO NOT SCALE DRAWING
INTERPRET GEOMETRIC
TOLERANCING PER:
ANSI Y14.5M 1994
DIMENSIONS ARE IN INCHES
TOLERANCES:
.X
= .03
.XX
= .01
.XXX
= .005
ANGLES = .25
UNLESS OTHERWISE SPECIFIED:
S.D
ENGINEER
DATE
12/05/05
2
HACH COMPANY
SCALE: 1:2 WEIGHT:
1
940-V5
L
REV
SHEET 1 OF 1
DRAWING, CONTROL
940, ULTRA
5600 LINDBERGH DR.
LOVELAND, CO. 80539
SIZE DWG. NO.
B
THIRD ANGLE PROJECTION TITLE:
S.D
DRAWN
NAME
NOTICE--HACH COMPANY CLAIMS PROPIETARY RIGHTS IN THE INFORMATION DISCLOSED ON THIS DRAWING. IT IS ISSUED
IN CONFIDENCE FOR ENGINEERING INFORMATION ONLY AND MAY NOT, IN WHOLE OR IN PART, BE USED TO MANFACTURE
ANYTHING, WHETHER OR NOT SHOWN HEREON, REPRODUCED OR DISCLOSED TO ANYONE WITHOUT DIRECT PERMISSION
FROM HACH COMPANY.
P/N 4413
F.O.
MODEM
INTERFACE
HAZARDOUS (CLASSIFIED) LOCATION
CLASS 1, DIV. 1, GROUP C,D
3
NONHAZARDOUS (CLASSIFIED)
LOCATION
FOR MODEM INSTALLATION IN CONDUIT, MINIMUM CONDUIT DIAMETER IS 1/2 IN./1.3 cm.,
3.
4
WIRING METHODS MUST BE IN ACCORDANCE WITH THE NATIONAL ELECTRICAL CODE, ANSI/NFPA 70, ARTICLE 504,
CANADIAN ELECTRIC CODE, C22.1-94, SECTION 18 AND ANSI/ISA RP 12.6
5
2.
6
IF THE ELECTRICAL PARAMETERS OF THE CABLE ARE UNKNOWN, THE FOLLOWING DEFAULT VALUES MAY BE USED.
CAPACITANCE - .2nf/METER, INDUCTANCE - 1uh/METER
7
1.
8
A
B
C
D
Meter Installation
Figure 8 Control Drawing 940-V5
23
24
Figure 9 Control Drawing 940-V8
A
B
C
D
6
5
4
3.
8
7
TABLE 2
TABLE 1
REF. TABLE 1
OR 2 FOR P/N
AREA VELOCITY
PROBE
REF. TABLE 1
OR 2 FOR P/N
AREA VELOCITY
PROBE
6
25 FT - 100 FT MAX
7.6m - 30.5m
INTEGRAL
IN LINE VENT
ASSEMBLY
25 FT - 100 FT MAX
7.6m - 30.5m
INTEGRAL
IN LINE VENT
ASSEMBLY
5
THIS DRAWING
PRIOR TO CHANGING
APPROVAL REQUIRED
REGULATORY AGENCY
MAX LENGTH
150 FT.
MAX LENGTH
150 FT.
MAX.
LENGTH
150 FT/
45.7 m
P/N 4413
F.O.
MODEM
INTERFACE
J
REV
IS
GROUND
CUSTOMER
DEFINABLE
LENGTH
P/N 4443
F.O. MODEM
2
REVISION
TO SIGMA
1000
TO 940 FLOW METER
P/N 5351
DC POWER
SUPPLY
P/N 4615
12 VDC
BATTERY
BACKUP
Jeff Archer
APPROVED
1
120 VAC
50/60 Hz
TO COMPUTER
POWER SUPPLY BARRIER P/N 1004
6.56 FT
2.0 m
09-561
DESCRIPTION
10 FT
3.1 m
3-5v DC
3-5v DC
P/N 100401
P/N 5331
IS ZENER
POWER
BARRIER
RS-232
OPTO-ISOLATED
INTERFACE
P/N 5254200
-ORP/N 5254100
-OR-
RS-232
OPTO-ISOLATED
INTERFACE
P/N 4738
-ORP/N 4087
NONHAZARDOUS (CLASSIFIED)
LOCATION
3
MATERIAL
4
3
DO NOT SCALE DRAWING
INTERPRET GEOMETRIC
TOLERANCING PER:
ANSI Y14.5M 1994
DIMENSIONS ARE IN INCHES
TOLERANCES:
.X
= .03
.XX
= .01
.XXX
= .005
ANGLES = .25
UNLESS OTHERWISE SPECIFIED:
S.D
ENGINEER
DATE
12/05/05
2
HACH COMPANY
SCALE: 1:2 WEIGHT:
1
940-V8
J
REV
SHEET 1 OF 1
DRAWING, CONTROL
940, 120 VAC
5600 LINDBERGH DR.
LOVELAND, CO. 80539
SIZE DWG. NO.
B
THIRD ANGLE PROJECTION TITLE:
S.D
DRAWN
NAME
NOTICE--HACH COMPANY CLAIMS PROPIETARY RIGHTS IN THE INFORMATION DISCLOSED ON THIS DRAWING. IT IS ISSUED
IN CONFIDENCE FOR ENGINEERING INFORMATION ONLY AND MAY NOT, IN WHOLE OR IN PART, BE USED TO MANFACTURE
ANYTHING, WHETHER OR NOT SHOWN HEREON, REPRODUCED OR DISCLOSED TO ANYONE WITHOUT DIRECT PERMISSION
FROM HACH COMPANY.
P/N 5232
MODEL 940
FLOW METER
FOR MODEM INSTALLATION IN CONDUIT, MINIMUM CONDUIT DIAMETER IS 1/2 IN./1.3 CM.,
MINIMUM BEND RADIUS IS 3 IN./7.6 cm.
HAZARDOUS (CLASSIFIED) LOCATION
CLASS 1, DIV. 1, GROUP C,D
WIRING METHODS MUST BE IN ACCORDANCE WITH THE NATIONAL ELECTRICAL CODE, ANSI/NFPA 70, ARTICLE 504,
CANADIAN ELECTRIC CODE, C22.1-94, SECTION 18 AND ANSI/ISA RP 12.6
7
2.
8
IF THE ELECTRICAL PARAMETERS OF THE CABLE ARE UNKNOWN, THE FOLLOWING DEFAULT VALUES MAY BE USED:
CAPACITANCE - .2 nf/METER, INDUCTANCE - 1 uh/METER.
1.
A
B
C
D
Meter Installation
A
B
C
D
8
TABLE 2
TABLE 1
7
P/N 5233-05
OR
P/N 4741
75 KHz ZERO
DEADBAND
PROBE
REF. TABLE 1
OR 2 FOR P/N
AREA VELOCITY
PROBE
6
4741 - 100 FT. MAX
5233-05 - 100 FT. MAX
25 FT - 100 FT MAX
7.6m - 30.5m
INTEGRAL
IN LINE VENT
ASSEMBLY
5
THIS DRAWING
PRIOR TO CHANGING
APPROVAL REQUIRED
REGULATORY AGENCY
P/N 5232
MODEL 940
FLOWMETER
MAX LENGTH
150 FT.
MAX LENGTH
150 FT.
G
REV
IS
GROUND
CUSTOMER
DEFINABLE
LENGTH
P/N 4443
F.O. MODEM
TO SIGMA
1000
TO 940 FLOW METER
P/N 4615
12 VDC
BATTERY
BACK-UP
P/N 5371
DC POWER
SUPPLY
POWER SUPPLY BARRIER P/N 4733
6.56 FT
2.0 m
240 VAC
50/60 Hz
TO COMPUTER
Jeff Archer
10 FT
3.1 m
3-5v DC
P/N 100401
P/N 5331
IS ZENER
POWER
BARRIER
RS-232
OPTO-ISOLATED
INTERFACE
P/N 5254200
-ORP/N 5254100
-OR-
RS-232
OPTO-ISOLATED
INTERFACE
P/N 4738
-ORP/N 4087
3-5v DC
APPROVED
1
09-561
REVISION
DESCRIPTION
2
MATERIAL
4
3
DO NOT SCALE DRAWING
INTERPRET GEOMETRIC
TOLERANCING PER:
ANSI Y14.5M 1994
DIMENSIONS ARE IN INCHES
TOLERANCES:
.X
= .03
.XX
= .01
.XXX
= .005
ANGLES = .25
UNLESS OTHERWISE SPECIFIED:
S.D
S.D
ENGINEER
2
HACH COMPANY
SCALE: 1:2 WEIGHT:
1
940-V9
REV
G
SHEET 1 OF 1
DRAWING, CONTROL
940, 240 VAC ULTRA
5600 LINDBERGH DR.
LOVELAND, CO. 80539
SIZE DWG. NO.
B
THIRD ANGLE PROJECTION TITLE:
DATE
12/05/05
NAME
DRAWN
NOTICE--HACH COMPANY CLAIMS PROPIETARY RIGHTS IN THE INFORMATION DISCLOSED ON THIS DRAWING. IT IS ISSUED
IN CONFIDENCE FOR ENGINEERING INFORMATION ONLY AND MAY NOT, IN WHOLE OR IN PART, BE USED TO MANFACTURE
ANYTHING, WHETHER OR NOT SHOWN HEREON, REPRODUCED OR DISCLOSED TO ANYONE WITHOUT DIRECT PERMISSION
FROM HACH COMPANY.
MAX.
LENGTH
150 FT/
45.7 m
P/N 4413
F.O.
MODEM
INTERFACE
3
NONHAZARDOUS (CLASSIFIED)
LOCATION
FOR MODEM INSTALLATION IN CONDUIT, MINIMUM CONDUIT DIAMETER IS 1/2 IN./1.3 cm.,
MINIMUM BEND RADIUS IS 3 IN./7.6 cm.
HAZARDOUS (CLASSIFIED) LOCATION
CLASS 1, DIV. 1, GROUP C,D
3.
4
WIRING METHODS MUST BE IN ACCORDANCE WITH THE NATIONAL ELECTRICAL CODE, ANSI/NFPA 70, ARTICLE 504,
CANADIAN ELECTRIC CODE, C22.1-94, SECTION 18 AND ANSI/ISA RP 12.6
5
2.
6
IF THE ELECTRICAL PARAMETERS OF THE CABLE ARE UNKNOWN, THE FOLLOWING DEFAULT VALUES MAY BE USED.
CAPACITANCE - .2nf/METER, INDUCTANCE - 1uh/METER
7
1.
8
A
B
C
D
Meter Installation
Figure 10 Control Drawing 940-V9
25
26
Figure 11 Control Drawing 940-V10
A
B
C
D
6
5
4
8
TABLE 2
7
REF. TABLE 1
OR 2 FOR P/N
AREA VELOCITY
PROBE
REF. TABLE 1
OR 2 FOR P/N
AREA VELOCITY
PROBE
6
25 FT - 100 FT MAX
7.6m - 30.5m
INTEGRAL
IN LINE VENT
ASSEMBLY
25 FT - 100 FT MAX
7.6m - 30.5m
INTEGRAL
IN LINE VENT
ASSEMBLY
5
THIS DRAWING
PRIOR TO CHANGING
APPROVAL REQUIRED
REGULATORY AGENCY
MAX LENGTH
150 FT.
MAX LENGTH
150 FT.
MAX.
LENGTH
150 FT/
45.7 m
P/N 4413
F.O.
MODEM
INTERFACE
G
REV
IS
GROUND
CUSTOMER
DEFINABLE
LENGTH
P/N 4443
F.O. MODEM
2
REVISION
TO SIGMA
1000
TO 940 FLOW METER
P/N 5371
DC POWER
SUPPLY
P/N 4615
12 VDC
BATTERY
BACKUP
Jeff Archer
APPROVED
1
240 VAC
50/60 Hz
TO COMPUTER
POWER SUPPLY BARRIER P/N 4733
6.56 FT
2.0 m
09-561
DESCRIPTION
10 FT
3.1 m
3-5v DC
3-5v DC
P/N 100401
P/N 5331
IS ZENER
POWER
BARRIER
RS-232
OPTO-ISOLATED
INTERFACE
P/N 5254200
-ORP/N 5254100
-OR-
RS-232
OPTO-ISOLATED
INTERFACE
P/N 4738
-ORP/N 4087
NONHAZARDOUS (CLASSIFIED)
LOCATION
3
MATERIAL
4
3
DO NOT SCALE DRAWING
INTERPRET GEOMETRIC
TOLERANCING PER:
ANSI Y14.5M 1994
DIMENSIONS ARE IN INCHES
TOLERANCES:
.X
= .03
.XX
= .01
.XXX
= .005
ANGLES = .25
UNLESS OTHERWISE SPECIFIED:
S.D
ENGINEER
DATE
12/05/05
2
HACH COMPANY
DRAWING, CONTROL
940, 240 VAC
SCALE: 1:2 WEIGHT:
1
REV
SHEET 1 OF 1
940-V10
G
5600 LINDBERGH DR.
LOVELAND, CO. 80539
SIZE DWG. NO.
B
THIRD ANGLE PROJECTION TITLE:
S.D
DRAWN
NAME
NOTICE--HACH COMPANY CLAIMS PROPIETARY RIGHTS IN THE INFORMATION DISCLOSED ON THIS DRAWING. IT IS ISSUED
IN CONFIDENCE FOR ENGINEERING INFORMATION ONLY AND MAY NOT, IN WHOLE OR IN PART, BE USED TO MANFACTURE
ANYTHING, WHETHER OR NOT SHOWN HEREON, REPRODUCED OR DISCLOSED TO ANYONE WITHOUT DIRECT PERMISSION
FROM HACH COMPANY.
P/N 5232
MODEL 940
FLOW METER
FOR MODEM INSTALLATION IN CONDUIT, MINIMUM CONDUIT DIAMETER IS 1/2 IN./1.3 CM.,
MINIMUM BEND RADIUS IS 3 IN./7.6 cm.
HAZARDOUS (CLASSIFIED) LOCATION
CLASS 1, DIV. 1, GROUP C,D
TABLE 1
3.
WIRING METHODS MUST BE IN ACCORDANCE WITH THE NATIONAL ELECTRICAL CODE, ANSI/NFPA 70, ARTICLE 504,
CANADIAN ELECTRIC CODE, C22.1-94, SECTION 18 AND ANSI/ISA RP 12.6
7
2.
8
IF THE ELECTRICAL PARAMETERS OF THE CABLE ARE UNKNOWN, THE FOLLOWING DEFAULT VALUES MAY BE USED:
CAPACITANCE - .2 nf/METER, INDUCTANCE - 1 uh/METER.
1.
A
B
C
D
Meter Installation
A
B
C
D
8
7
TABLE 2
TABLE 1
P/N 5233-05
OR
P/N 4741
75KHz ZERO
DEADBAND
PROBE
REF. TABLE 1
OR 2 FOR P/N
AREA VELOCITY
PROBE
6
4741 - 100 FT. MAX
5233-05 - 100 FT MAX
25 FT - 100 FT MAX
7.6m - 30.5m
INTEGRAL
IN LINE VENT
ASSEMBLY
5
THIS DRAWING
PRIOR TO CHANGING
APPROVAL REQUIRED
REGULATORY AGENCY
P/N 4840
MODEL 940
FLOWMETER
3
G
REV
MAX LENGTH
150 FT.
10 FT
3.1 m
NONCLASSIFIED
SAMPLER
6.56 FT
2.0 m
3-5v DC
TO SIGMA
1000
TO COMPUTER
Jeff Archer
10 FT
3.1 m
3-5v DC
APPROVED
1
09-561
REVISION
DESCRIPTION
2
MATERIAL
4
3
DO NOT SCALE DRAWING
INTERPRET GEOMETRIC
TOLERANCING PER:
ANSI Y14.5M 1994
DIMENSIONS ARE IN INCHES
TOLERANCES:
.X
= .03
.XX
= .01
.XXX
= .005
ANGLES = .25
UNLESS OTHERWISE SPECIFIED:
S.D
S.D
ENGINEER
2
HACH COMPANY
DRAWING, CONTROL
940, ULTRA
SCALE: 1:2 WEIGHT:
1
REV
SHEET 1 OF 1
940-V14
G
5600 LINDBERGH DR.
LOVELAND, CO. 80539
SIZE DWG. NO.
B
THIRD ANGLE PROJECTION TITLE:
DATE
12/07/05
NAME
DRAWN
NOTICE--HACH COMPANY CLAIMS PROPIETARY RIGHTS IN THE INFORMATION DISCLOSED ON THIS DRAWING. IT IS ISSUED
IN CONFIDENCE FOR ENGINEERING INFORMATION ONLY AND MAY NOT, IN WHOLE OR IN PART, BE USED TO MANFACTURE
ANYTHING, WHETHER OR NOT SHOWN HEREON, REPRODUCED OR DISCLOSED TO ANYONE WITHOUT DIRECT PERMISSION
FROM HACH COMPANY.
CUSTOMER
DEFINABLE
LENGTH
P/N 4443
F.O. MODEM
P/N 4274
SAMPLER
OPTO-ISOLATED
INTERFACE
RS-232
OPTO-ISOLATED
INTERFACE
P/N 5254200
-ORP/N 5254100
-OR-
RS-232
OPTO-ISOLATED
INTERFACE
P/N 4738
-ORP/N 4087
NONHAZARDOUS (CLASSIFIED)
LOCATION
MAX LENGTH
150 FT.
P/N 4413
F.O.
MODEM
INTERFACE
HAZARDOUS (CLASSIFIED) LOCATION
CLASS 1, DIV. 1, GROUP C,D
FOR MODEM INSTALLATION IN CONDUIT, MINIMUM CONDUIT DIAMETER IS 1/2 IN./1.3 cm.,
MINIMUM BEND RADIUS IS 3 IN./7.6 cm.
3.
4
WIRING METHODS MUST BE IN ACCORDANCE WITH THE NATIONAL ELECTRICAL CODE, ANSI/NFPA 70, ARTICLE 504,
CANADIAN ELECTRIC CODE, C22.1-94, SECTION 18 AND ANSI/ISA RP 12.6
5
2.
6
IF THE ELECTRICAL PARAMETERS OF THE CABLE ARE UNKNOWN, THE FOLLOWING DEFAULT VALUES MAY BE USED.
CAPACITANCE - .2nf/METER, INDUCTANCE - 1uh/METER
7
1.
8
A
B
C
D
Meter Installation
Figure 12 Control Drawing 940-V14
27
28
Figure 13 Control Drawing 940-V15
A
B
C
D
8
7
6
5
4
3
8
TABLE 2
7
REF. TABLE1
OR 2 FOR P/N
AREA VELOCITY
PROBE
REF. TABLE1
OR 2 FOR P/N
AREA VELOCITY
PROBE
6
25 FT - 100 FT MAX
7.6M - 30.5M
INTEGRAL
IN LINE VENT
ASSEMBLY
25 FT - 100 FT MAX
7.6M - 30.5M
INTEGRAL
IN LINE VENT
ASSEMBLY
5
THIS DRAWING
PRIOR TO CHANGING
APPROVAL REQUIRED
REGULATORY AGENCY
P/N 5232
MODEL 940
FLOW METER
-OR-
IS
GROUND
TO 940 FLOW METER
6.56 FT
2.0 m
3-5v DC
P/N 100401
P/N 5331
IS ZENER
POWER
BARRIER
RS-232
OPTO-ISOLATED
INTERFACE
P/N 5254200
-ORP/N 5254100
CUSTOMER SUPPLIED
DC INPUT
(12.00 TO 13.57 VDC)
TO SIGMA
1000
TO COMPUTER
Jeff Archer
10 FT
3.1 m
3-5v DC
APPROVED
1
09-561
REVISION
DESCRIPTION
2
MATERIAL
4
3
DO NOT SCALE DRAWING
INTERPRET GEOMETRIC
TOLERANCING PER:
ANSI Y14.5M 1994
DIMENSIONS ARE IN INCHES
TOLERANCES:
.X
= .03
.XX
= .01
.XXX
= .005
ANGLES = .25
UNLESS OTHERWISE SPECIFIED:
S.D
S.D
DATE
12/05/05
NAME
2
HACH COMPANY
DRAWING, CONTROL,
940 DC INPUT
SCALE: 1:2 WEIGHT:
1
F
SHEET 1 OF 1
940-V15
REV
5600 LINDBERGH DR.
LOVELAND, CO. 80539
SIZE DWG. NO.
B
THIRD ANGLE PROJECTION TITLE:
ENGINEER
DRAWN
NOTICE--HACH COMPANY CLAIMS PROPIETARY RIGHTS IN THE INFORMATION DISCLOSED ON THIS DRAWING. IT IS ISSUED
IN CONFIDENCE FOR ENGINEERING INFORMATION ONLY AND MAY NOT, IN WHOLE OR IN PART, BE USED TO MANFACTURE
ANYTHING, WHETHER OR NOT SHOWN HEREON, REPRODUCED OR DISCLOSED TO ANYONE WITHOUT DIRECT PERMISSION
FROM HACH COMPANY.
MAX.
LENGTH
150 FT./
45.7 m
MAX LENGTH
150 FT.
MAX LENGTH
150 FT.
RS-232
OPTO-ISOLATED
INTERFACE
P/N 4738
-ORP/N 4087
IF THE ELECTRICAL PARAMETERS OF THE CABLE ARE UNKNOWN, THE FOLLOWING DEFAULT VALUES MAY BE USED:
CAPACITANCE - .2 nf/METER, INDUCTANCE - 1 uh/METER.
REV
WIRING METHODS MUST BE IN ACCORDANCE WITH THE NATIONAL ELECTRICAL CODE, ANSI/NFPA 70, ARTICLE 504,
F
CANADIAN ELECTRIC CODE, C22.1-94, SECTION 18 AND ANSI/ISA RP 12.6
NONHAZARDOUS (CLASSIFIED)
LOCATION
HAZARDOUS (CLASSIFIED) LOCATION
CLASS 1, DIV. 1, GROUP C,D
TABLE 1
2.
1.
A
B
C
D
Meter Installation
Meter Installation
4.2 Mounting the flow meter
When mounting the flow meter, remember to:
•
Mount the meter so that the connectors face down. The end of the meter that
contains the batteries should face up. If the connectors face up, they may corrode and
allow water to seep into the instrument. Refer to Figure 14 on page 29.
•
When not in use, cover the connectors with their protective caps to prevent corrosion.
Use the appropriate manhole support bracket/spanner bar. See Replacement Parts and
Accessories on page 67.
Figure 14 Installation options
1
Instrument Support Bracket (Cat. No. 5713000)
4
911 flow meter
2
Manhole cover
5
Wall/Ladder Mount Suspension Bracket (Cat. No. 4874
and Cat. No. 4839)
3
Suspension harness (Cat. No. 4920)
6
940 flow meter
29
Meter Installation
4.3 Installing the Batteries
Never short circuit, puncture, deform, or incinerate any of the battery packs used in the
911 or 940 flow meters. Proper precautions must be observed in the handling, shipping,
and disposal of battery packs.
4.3.1 Installing the Battery Pack in the 940
DANGER
Never install, remove, or charge batteries in a hazardous location.
DANGER
Vous ne devez jamais installer, retirer ou recharger les batteries dans un
environnement dangereux.
The steps mentioned below give the installation procedure of the battery pack in the 940.
1. Loosen the 5/16” socket head cap screw in the center of the bottom end cap.
2. Lift the end cap off.
3. Remove the two thumbscrews securing the battery retaining plate and unlatch the two
rubber hold down straps.
4. Place the battery pack (Cat. No. 6608500) inside the battery compartment (Figure 15).
5. Place the two rubber hold down straps across the battery to secure the battery in
place.
6. Attach the battery power connector to the flow meter power connector.
7. Both connectors are physically polarized.
8. Try to pull the two connectors apart gently, after placing the two connectors together,
to ensure that they are latched together, . Do not use excessive force or permanent
damage to the connectors may occur.
9. Reattach the battery retaining plate and install the two thumbscrews.
10. Replace the flow meter end cap and retighten the 5/16” socket head cap screw.
1
Figure 15 940 Flow Meter Battery Pack
1
30
Battery Pack Location
Meter Installation
4.3.2 Installing the Battery Pack in the 911
DANGER
Use only exact replacement battery packs purchased directly from the factory or a
factory authorized outlet. Any unauthorized battery substitution will void the
intrinsically safe design and approval of the unit and could result in fire or
explosion.
DANGER
Utilisez exclusivement des batteries de rechange identiques que vous achetez
directement auprès de l'usine ou d'un point de vente agréé par celle-ci. Tout
remplacement non autorisé d'une batterie annule la conception à sécurité
intrinsèque et l'agréation de l'appareil, et peut provoquer un incendie ou une
explosion.
DANGER
Never install, remove, or charge batteries in a hazardous location.
DANGER
Vous ne devez jamais installer, retirer ou recharger les batteries dans un
environnement dangereux.
The entire battery assembly unscrews and separates to access the battery connector
(Cat. No. 5160-01). Follow the steps below to install the battery pack in the 911.
1. Hold the 911 Flow Meter by the handle on the end opposite of the interface connectors
and twist counter-clockwise to open.
2. Remove the rechargable battery pack. Recharge or dispose
of the battery.
3. Reinstall the rechargable battery. Attach the battery connector to the center mounted
connector at the bottom of the 911 case (Figure 16).
Note: Both connectors are physically polarized.
4. Place the two connectors together. Gently try to pull the two connectors apart to
ensure that the connectors are securely latched together. Do not use excessive force
or permanent damage to the connectors may occur.
5. Tighten the screw of the battery pack assembly onto the flow meter.
1
2
Figure 16 911 Flow Meter Case and Battery Packs
1
911 Flow Meter Case
2
12 Amp-hour rechargeable gell cell battery pack.
31
Meter Installation
4.3.3 Battery Compartment Desiccant
The battery compartment in both the 911 and 940 Flow Meters is kept dry with a small
desiccant cartridge to avoid moisture damage to the batteries and power circuitry
(Figure 17 and Figure 18).
When the beads are blue they can remove moisture from the enclosure. When they turn
pink, they cannot absorb any more
moisture. When the blue desiccant turns pink, replace the desiccant.
1
Figure 17 911 Case, Battery End with Inserted Desiccant
1
Desiccant
1
Figure 18 940 Case, Battery End with Inserted Desiccant
1
Desiccant
4.3.4 Estimating the Battery Life
When using the battery pack, battery life is based on:
32
•
Number of sensors installed (more sensors decrease battery life).
•
Recording intervals (longer intervals increase battery life).
•
Temperature (colder temperatures decrease battery life).
•
Site hydraulics (second order effect caused by excessive turbulence).
•
Interval between downloads.
Meter Installation
Table 5 provides typical expected battery life for 911 and 940 Flow Meters:
Table 5 Battery Life
Model
Battery Type
Battery Life in Days
911
12 Amp-hour gel cell (Cat. No. 5160-01)
90
940
Rechargeable lithium battery (Cat. No. 6608500)
Typically 330
Batteries for the 911 and 940 flow meters should last as listed above under the following
conditions:
•
15 minute logging intervals
•
1 level channel and 1 velocity channel logged
•
Data downloaded once per week
•
10 °C (50 °F) ambient temperature
•
Also affected by site conditions
4.3.5 Recharging the Lithium Ion Battery Pack for Model 940
DANGER
Use only exact replacement battery packs purchased directly from the factory or a
factory authorized outlet. Any unauthorized battery substitution will void the
intrinsically safe design and approval of the unit and could result in fire or
explosion.
DANGER
Utilisez exclusivement des batteries de rechange identiques que vous achetez
directement auprès de l'usine ou d'un point de vente agréé par celle-ci. Tout
remplacement non autorisé d'une batterie annule la conception à sécurité
intrinsèque et l'agréation de l'appareil, et peut provoquer un incendie ou une
explosion.
DANGER
Never install, remove or charge batteries in a hazardous location.
DANGER
Vous ne devez jamais installer, retirer ou recharger les batteries dans un
environnement dangereux.
To recharge the 940 Lithium Ion Battery Pack (6608500):
1. Move the 940 Flow Meter to a non-hazardous location.
2. Remove the battery pack from the 940 Flow Meter as described in section 4.3.1 on
page 30.
3. Inspect the battery pack and the battery connection for any damage. Do not attempt to
use or repair a damaged battery pack assembly.
4. Make sure that the charging voltage switch on the back of the charger is set to 16.4 V.
5. Plug the charger (6678000) into a standard 120 VAC wall outlet. The green power
LED will illuminate.
6. Connect the charger to the battery pack using the battery charger and battery pack
cables. The yellow charge LED indicator will illuminate. See Table 6 for the Lithium
Ion battery charging status. A completely discharged battery pack will charge in
approximately 8 to 12 hours.
33
Meter Installation
Table 6 Battery pack charging status
Charge LED Indicator
Battery Condition
Flashing
Deeply discharged or needs replacement1
Illuminated
Charging
Off
Charged
1 If
the charge indicator LED does not stop flashing within 1 hour the battery pack is shorted and
should be disposed of properly.
7. Install the battery pack in the 940 Flow Meter as described in section 4.3.1 on
page 30.
4.3.6 Recharging the Battery Pack for Model 911
DANGER
Use only exact replacement battery packs purchased directly from the factory or a
factory authorized outlet. Any unauthorized battery substitution will void the
intrinsically safe design and approval of the unit and could result in fire or
explosion.
DANGER
Utilisez exclusivement des batteries de rechange identiques que vous achetez
directement auprès de l'usine ou d'un point de vente agréé par celle-ci. Tout
remplacement non autorisé d'une batterie annule la conception à sécurité
intrinsèque et l'agréation de l'appareil, et peut provoquer un incendie ou une
explosion.
DANGER
Never install, remove or charge batteries in a hazardous location.
DANGER
Vous ne devez jamais installer, retirer ou recharger les batteries dans un
environnement dangereux.
To recharge the 911 Lithium Ion Battery Pack (5160-01):
1. Move the 911 Flow Meter to a non-hazardous location.
2. Remove the battery pack from the 911 Flow Meter as described in section 4.3.2 on
page 31.
3. Inspect the battery pack and the battery connection for any damage. Do not attempt to
use or repair a damaged battery pack assembly.
4. Plug the charger (913) into a standard 120 volt wall outlet.
5. Connect the charger to the battery pack using the battery charger and battery pack
cables. A completely discharged battery pack will charge in approximately 8 to 12
hours. Do not overcharge.
6. Install the battery pack in the 911 Flow Meter as described in section 4.3.2 on
page 31.
34
Meter Installation
4.4 Wiring the RS232 Interface
DANGER
All connections to the flow meter must be made in a non-hazardous location.
DANGER
Tous les raccordements au débitmètre doivent être effectués dans un
environnement qui ne présente aucun danger.
All RS232 interface wiring must follow the installation drawings in section 4.1 on page 15.
4.4.1 RS232 Serial Port
DANGER
The RS232 Opto-Isolated Interface must be located in a non-hazardous location.
DANGER
L'interface à isolation optique RS232 doit se trouver en un emplacement non
dangereux, conformément aux schémas de contrôle de l'installation.
Note: A PC or laptop must be used in a non-hazardous location.
The high speed RS232 serial port communicates with a PC via an optically isolated
interface (Figure 19 on page 35). The Opto-Isolated Interface (Cat. No. 4087) is used only
for data downloading and remote programming. This interface isolates the energy
potential in the PC from hazardous locations and from the 911 or 940 Flow Meters.
1
2
4
3
Figure 19 RS232 Communications Setup
1
Use “approved” seal to minimize passage of gases or
vapors from a hazardous location to a non-hazardous
location.
3
PC compatible laptop or desktop located in a
non-hazardous location for downloading data
2
RS232, Opto-Isolated Interface in a non-hazardous
location (Cat number 4087)
4
940 or 911 Flow Meter in a hazardous location
DANGER
Route the cable through an approved seal to prevent migration of dangerous fumes
or vapors from the hazardous location to the non-hazardous location.
DANGER
Acheminez le câble à travers un joint approuvé afin d'empêcher la migration de
35
Meter Installation
fumées ou vapeurs dangereuses de l'emplacement dangereux vers l'emplacement
non dangereux.
Follow the steps mentioned below to route the RS232 Serial Port
1. Attach the cable with the round connector from the Opto-Isolated Interface to the
connector on the 911/940 Flow Meter labelled RS232.
2. Attach the cable with a rectangular connector to the appropriate serial COM port on
the PC or laptop.
4.5 Wiring the Sampler Interface on Model 940
DANGER
All connections to the flow meter must be made in a non-hazardous location.
DANGER
Tous les raccordements au débitmètre doivent être effectués dans un
environnement qui ne présente aucun danger.
All sampler interface wiring must follow the installation drawings in section 4.1 on page 15.
Refer to Table 7 and Figure 20.
Table 7 Sampler Cable Connector Pin Assignments and Description
Pin Letter
Wire
Color
Description
Rating
A
(+12 V dc)
White
+12 V dc input
—
B
(Ground)
Blue
Provides the ground line that is used in conjunction with the other signals
on this connector.
—
Yellow
Used in conjunction with Pin B (ground) to signal a sampler that a
pre-determined amount of flow has accumulated.
+8 V dc. Output
current is 100 mA
dc (max) with a
duration of 500 ms.
D
Sampler
Start
Black
Used to “wake up” a wastewater sampler when a level and/or rainfall set-point
condition is met so that it can begin sampling. Used in conjunction with Pin B
(ground), this line is normally allowed to float and is switched to ground (by
transistor) once the set-point conditions are met.
+24 V dc (max)
E
Event Input
Red
Confirms that a sample has been collected. The time and date of each water
sample appears on the data printout when downloaded using a Data Transfer
Unit or Sigma Support Software.
+12 V dc (max)
minimum 3 second
pulse.
Green
Used in conjunction with the “Event Input” signal described above. It tells the flow
meter which bottle was used and when a sample was taken. This information
appears in the data printout (see “Sample Times and Dates”) when downloaded
using a Data Transfer Unit or Support Software.
Bottle Number signal description
If the Program Complete Output (Pin F of the auxiliary connector) is disabled on
the sampler, then it is used to transmit the bottle number to the connected
device.
Time A = 200 ms
Time B = 100 ms (50 ms HI 50 ms LO)
If a sample attempt fails, the first pulse width 'B' is 150 ms HI and
50 ms LO.
If Sample Distribution is programmed for multiple bottles per sample mode, only
the first bottle number of the set is transmitted via Pin F.
—
C
Flow Pulse
Output
F
Bottle
Number
Input
36
RED
ORANGE
YELLOW
GREEN
BLACK
BROWN
BLUE
WHITE
BLACK
YELLOW
GREEN
RED
TO SAMPLER
TO FLOW METER
Meter Installation
DO NOT TIN WIRES PRIOR TO TERMINATION
Figure 20 Sampler Interface Wiring
4.6 Sampler Receptacle (940 Only)
DANGER
Do not attempt to connect any sampler to the 940 Flow Meter without the use of the
Optically Isolated Sampler Interface (Cat. No. 4274). Failure to do so may result in
fire or explosion.
DANGER
Le raccordement d'un échantillonneur quelconque à un débitmètre 940 sans
utilisation de l'interface d'échantillonneur à isolation optique (No. Cat. 4274) annule
à la fois la garantie et l'agrément de sécurité intrinsèque du débitmètre, et peut
provoquer un incendie ou une explosion. Reportez-vous aux schémas de contrôle
de l'installation.
The optional “sampler” port lets the user to connect a 940 flow meter to a Sigma
wastewater sampler (Figure 21). The option provides several features:
•
Flow proportional sampling
•
Storm water trigger, based on level, useful for EPA NPDES permitting program.
37
Meter Installation
•
Sample history logging.
Figure 21 Sampler Communications
1
Use “approved” seal to minimize passage of gases or
vapors from hazardous location to non-hazardous
location.
3
Sampler located in a non-hazardous location
2
Optically Isolated Sampler Interface (Cat. No. 4274) in a
non-hazardous location
4
940 Flow Meter in a hazardous location
4.6.1 Connecting the Sampler Cable to a 940 Flow Meter
Note: The sampler must be located in a non-hazardous location.
1. Connect the Optically Isolated Sampler Interface (Cat. No. 4274) between the 940
sampler receptacle and the samplers auxiliary receptacle.
2. Program the sampler for Special Output/Sample Output.
4.6.2 Connecting a Non-Sigma Sampler to a 940 Flow Meter
DANGER
Do not attempt to connect any sampler to the 940 Flow Meter without the use of the
Optically Isolated Sampler Interface (Cat. No. 4274). Failure to do so may result in
fire or explosion.
DANGER
Le raccordement d'un échantillonneur quelconque à un débitmètre 940 sans
utilisation de l'interface d'échantillonneur à isolation optique (No. Cat. 4274) annule
à la fois la garantie et l'agrément de sécurité intrinsèque du débitmètre, et peut
provoquer un incendie ou une explosion. Reportez-vous aux schémas de contrôle
de l'installation.
The Optically Isolated Sampler Interface can also be used with samplers produced by
other manufacturers. In many cases a non-Sigma sampler may be connected to the
Optically Isolated
Sampler Interface without any modifications or alterations
If a non-Sigma sampler is not compatible with the connector on the end of the sampler
interface cable it may be necessary to remove the existing cable from the sampler
interface and use the other manufacturer’s sampler cable.
38
Meter Installation
Note: It is the installers responsibility to ensure compatibility and proper connection of a non-Sigma
sampler to the Optically Isolated Sampler Interface.
1. Remove the cover from the Optically Isolated Sampler Interface.
2. Disconnect all the wires from the terminals labeled J4 through J6. Do not remove the
wires from terminals labeled J1 through J3.
3. Loosen the compression nut on the sampler cable connector and remove the cable
from the interface.
4. Insert the other manufacturer’s sampler cable end into the cable connector of the
Optically Isolated Sampler Interface.
39
Meter Installation
40
Section 5
Software and Communications
5.1 Required Software
Programming and data retrieval are performed via an IBM compatible personal computer
(computer must have a serial port, USB is not supported) using an Optically Isolated
Interface with one of the following software packages:
•
InSight® Data Analysis Software is a program for small- to medium -sized flow
monitoring jobs.
•
Flo-Center Integrated Sewer System Management Software provides high-end,
automated data collection and automated batch report processing, using an unlimited
number of meters.
•
Modicon Modbus Protocol (940 Only)
•
Flo-Ware for Windows (911 Only)
5.2 Programming and Analysis Options
•
Built-in flow equations
•
Storage of 116,000 data points in battery backed RAM memory
•
Storm water sampling trigger option (940 only)
•
Flow proportional output option (940 only)
For details on programming the 911 or 940 Flow Meter, refer to the
software manual.
41
Software and Communications
42
Section 6
Sensor Installation
DANGER
Only qualified personnel should conduct the tasks described in this section of the
manual.
DANGER
Seul un technicien qualifié peut effectuer les tâches d'installation décrites dans
cette section du manuel.
DANGER
All connections to the flow meter must be made in a non-hazardous location.
DANGER
Tous les raccordements au débitmètre doivent être effectués dans un
environnement qui ne présente aucun danger.
6.1 Downlook Ultrasonic Sensor
The downlook ultrasonic sensor is mounted over the flow stream at the proper location for
level measurement for the primary device. See Appendix A on page 75 for more
information. The transducer emits a pulse of sound at a high frequency and awaits for the
echo to return from the surface of the water. The time it takes for this echo to return is
relative to the distance between the transducer and the surface water. As the level in the
flow stream increases, the time it takes for the echo to return to the transducer decreases
(distance is shorter).
By continuously transmitting these pulses and timing the returning echoes, the sensor
measures the level of the liquid on the flow stream. After measuring the level, the
microprocessor converts the level reading to a flow rate based on the user-defined
characteristics of the primary device.
6.1.1 Installing the Downlook Ultrasonic Sensor
Note: Do not suspend the sensor by the cable. Only use appropriate mounting hardware.
Site selection can greatly enhance system performance. Several important factors should
be considered when installing the downlook ultrasonic sensor at any primary device.
•
Locate the ultrasonic sensor at the proper head measurement point for that primary
device.
•
Determine the appropriate sensor height.
•
Suspend the ultrasonic sensor over the center of the flow stream where there is the
least surface turbulence.
•
Mount the sensor to a stable, secure location, isolated from vibration.
Invisible Range
The 940 Flow Meter is equipped with an invisible range (adjustable deadband feature) to
prevent false echoes from tops of channel walls, ladder rungs, shelves, etc. A user
selected range is defined which is invisible to the flow meter. Extend the invisible range to
where it meets or overlaps the highest expected level in the channel. Refer to Figure 22
on page 44. A gap of at least 5 cm (2 in.) should be left between the invisible range and
the highest expected level. The minimum distance must be at least 29 cm (11 in.) The
43
Sensor Installation
sensor is “blind” to anything closer than the deadband and stops reading level when the
distance is shorter than that.
1
4
2
3
Figure 22 Invisible Range
1
Maximum Range
3
Highest expected water level
2
Minimum Distance (must be at least 11 in. (29 cm)
4
Invisible Range (set to ignore tops of channel walls)
Beam Angle
The beam angle from the bottom of the ultrasonic sensor spreads out at an angle of 5° for
the 75 kHz sensor as it travels away from the sensor. Therefore, if the sensor is mounted
too high above a narrow channel, the beam may be wider than the channel when it
reaches the bottom of the channel. This can cause false echoes from the tops of the
channel walls rather than from the water surface. To prevent false echoes, determine the
appropriate sensor height so that the entire beam falls within the channel and does not
strike any obstructions.
Beam Width Formulas
The maximum beam width for a given distance from the sensor can be calculated as
follows: 0.087 × distance from sensor . Refer to Figure 23 and Table 8 on page 45.
1
2
Figure 23 Beam Width as Distance from Transducer Increases
1
Distance from Transducer
2
Beam Width
Protecting the Sensor
Keep the face of the sensor free of accumulating grease and dirt. Since the 940 Flow
Meter listens for the returning echo, a coated sensor will not be able to accurately detect
the echo and may provide inaccurate level measurement.
44
Sensor Installation
Table 8 Beam Angle Spread by Distance
Distance from Target (in.)
75 KHz Beam Width (in.) w/ Horn
11 (27.9 cm)
0.96 (2.4 cm)
12 (30.5 cm)
1.05 (2.67 cm)
13 (33.0 cm)
1.14 (2.9 cm)
14 (35.6 cm)
1.2 (3.1 cm)
15 (38.1 cm)
1.31 (3.3 cm)
16 (40.6 cm)
1.4 (3.6 cm)
17 (43.2 cm)
1.5 (3.8 cm)
18 (45.7 cm)
1.6 (4.0 cm)
19 (48.3 cm)
1.7 (4.2 cm)
20 (50.8 cm)
1.75 (4.5 cm)
21 (53.3 cm)
1.83 (4.6 cm)
22 (55.9 cm)
1.9 (4.9 cm)
23 (58.4 cm)
2.0 (5.1 cm)
24 (61.0 cm)
2.1 (5.3 cm)
36 (91.4 cm)
3.1 (8.0 cm)
48 (1.2 m)
4.2 (10.6 cm)
60 (1.5 m)
5.2 (13.3 cm)
72 (1.8 m)
6.3 (16.0 cm)
84 (2.1 m)
7.3 (18.6 cm)
96 (2.4 m)
8.4 (21.3 cm)
108 (2.7 m)
9.4 (24.0 cm)
6.1.1.1 Mounting the Ultrasonic Sensor
Note: To prevent mechanical vibration ensure that the supplied isolation washers are installed as
shown in Figure 24 on page 46.
Several brackets are available for mounting the sensor to a fixed location such as a wall or
floor. See Figure 24 on page 46 and Figure 25 on page 47. For mounting options see
Section 8 on page 67. Each bracket utilizes the 1.9 cm (¾ in.) NPT connector on the
sensor to secure the sensor to the bracket. Always level the sensor using a level. The
maximum water level must be below the deadband to ensure accurate readings.
45
Sensor Installation
1
4
2
3
This surface must be level.
Figure 24 Permanent Bracket and Isolation Washers
1
Wall/Rail Mount Bracket (Cat. No. 2974)
3
Downlook Ultrasonic Sensor
2
Isolation Washers (Cat. No. 6820)
4
1 inch x 0.25 Hex Nuts (Cat. No. 1429)
46
Sensor Installation
1
2
3
4
6
3
5
Figure 25 Adjustable Mounting Bracket (Cat. No. 2904)
1
14.75 inches (Cat. No. 3047)
4
Sensor Mounting Clamp1
2
15.25 inches (Cat. No. 3046)
5
14 cm (5.5 in.) tall (Cat. No. 3108)
3
16.625 inches (2) (Cat. No 3048)
6
Horizontal and vertical sections are fully adjustable2
1 Sensor
2 Loosen
Mounting Clamp (with built-in bubble level) Sensor adjusts to any required level.
the bolt, slide the section to the desired distance and re-tighten the bolt.
47
Sensor Installation
6.1.2 Troubleshooting the Downlook Ultrasonic Sensor Installation
Problem/Error Message
Solutions
Check the connection between the flow meter and the sensor.
Check the sensor cable for cuts or nicks.
Ultrasonic Failure
(No signal from sensor)
Recalibrate the sensor. Look for unusual temperatures or the inability for a new calibrated
level to be read.
Try a different sensor on the same flow meter to rule out instrument problems, and try a
different flow meter with the same sensor to rule out sensor problems.
Check for excessive foam on the water surface. Foam may cause sound waves to be
absorbed rather than reflected.
Check the sensor height. See Figure 22 on page 44.
Check the sensor cable for cuts or nicks.
Echo Loss
(Flow meter does not get a
return signal from the
sensor)
Check the connection between the flow meter and the sensor.
Make sure that the sensor is level. The sensor must be level for proper return of the signal.
Try shielding the transducer from convection currents.
Repeat the temperature calibration procedure. If the unit reads extreme high or low
temperatures, the sensor may have a bad temperature.
Try a different sensor on the same flow meter to rule out instrument problems, and try a
different flow meter with the same sensor to rule out sensor problems.
Convection Currents
Check to see if convection components between the sensor target are present. If these
components are present, install a shield around the sound beam to eliminate temperature
variation due to convection currents. The system is designed with averaging routines to help
mitigate this problem.
Check for excessive foam and oil. While the 940 Flow Meter is designed with an AGC
(Automatic Gain Control) scheme to reduce these factors, it is recommended that sites
without these anomalies be selected.
Obstructions
Use the invisible range to select targets beyond peripheral obstructions. Care must be taken
to set the range higher than the expected level.
Try moving the transducer farther from the liquid.
Transducer Ringing
(False return echoes mask
“real” echoes)
Check under the transducer for obstructions. This includes the front and sides
of the transducer.
Check the face of the transducer for a coating. This is rare, but cleaning the transducer face
may correct the problem. If this is a constant problem due to site conditions, coat the face of
the sensor with a thin film of silicone grease to keep debris from clinging.
Make sure that the proper rubber isolation washers are used on the mounting bracket. The
transducer can resonate against steel mounting rails. See section 6.1.1.1 on page 45.
If the CPU has trouble communicating with the ultrasonic board, RS485 time outs may occur.
Wait a few minutes and see if the trouble has stopped. If it continues, a problem with the
ultrasonic, velocity, or CPU board may exist.
RS485 Time Out
(Flow meter did not receive
data within the specified
time)
If the logging interval is 1 or 2 minutes, or if conditions are poor, or if the problem continues
indefinitely, try increasing the logging interval to capture more signals.
When using a combination of area velocity and ultrasonic sensors, this condition may occur
more frequently if site conditions are less than ideal. This is not necessarily an indication of a
defective sensor. This condition may occur occasionally.
Check to see if pins are shorted. Do not short pins on receptacle to avoid damage.
48
Sensor Installation
6.2 In-Pipe Ultrasonic Sensor
The in-pipe ultrasonic sensor is used in pipes where level measurement near the top of
the pipe is desired. The sensor reads the level until the liquid reaches the bottom of
the sensor housing. The in-pipe sensor is not recommended for weir or flume applications
due to limited range, but may be desirable in some applications.
Figure 26 Side View of In-Pipe
1
Pipe Ceiling
5
Internal Deadband (18.3 cm (7.2 inches))
2
Distance from Sensor (Range: 0.2 in. to 5 ft)
6
Pipe Floor
3
45° Deflector
7
Minimum distance to reflecting obstruction (46 cm
(18 in.))
4
Ultrasonic Sensor
8
Reflecting Obstruction
6.2.1 Mounting the In-Pipe Sensor
•
Mount the sensor over the center of the flow stream where the surface turbulence is
minimized (Figure 27 on page 50).
•
Mount the sensor 46 cm (18 in.) away from obstructions located in front of the in-pipe
sensor to prevent inaccurate liquid level readings (Figure 26).
•
Level the sensor using the built-in bubble level.
•
Ensure the isolation gasket is in place and the mounting bracket thumbscrews are
finger-tight to avoid sensor ringing.
•
Install the sensor within 1.5 m (5 ft) of the lowest expected level (the maximum range
of the sensor).
49
Sensor Installation
Figure 27 End View of In-Pipe
1
Sensor
5
Wastewater
2
Bracket Thumbscrew
6
Vibration Isolation Gasket
3
Bubble Level
7
Mounting Clip
4
Sound Waves
8
Pipe (size may vary)
6.2.2 Angling the Beam
The narrow beam of sound that emanates from the bottom of the in-pipe ultrasonic sensor
spreads out at an angle of ±12° (-10 dB) as it travels away from the sensor. This means
that if the sensor is mounted too high above a narrow channel, the beam may be too wide
when it reaches the bottom of the channel. This may cause false echoes from the sides on
the channel walls.
6.2.3 Calibrating the In-Pipe Ultrasonic Sensor
Calibrate the in-pipe sensor each time the sensor is installed at a new site. Calibrate the
in-pipe via one of two methods; Liquid Depth or Sensor Height. Each method has its own
advantages and disadvantages. Liquid Depth calibration is the recommended calibration
method; use the sensor height method only when Liquid Depth calibration is not an
option. An Invisible Range can also be set which allows the transducer to ignore
reflections from obstructions between the sensor and the water surface, such as ladder
rungs, channel side walls, etc.
6.2.3.1 Calibrating the Temperature
The speed of sound in air varies with the temperature of air. The in-pipe sensor is
equipped with temperature compensation to help eliminate the effect of temperature
variation under normal site conditions. Enter the ambient air temperature at the transducer
location. For optimum results, allow enough time (100 minutes) to ensure that the sensor
is at equilibrium with the surrounding air temperature.
50
Sensor Installation
6.2.3.2 Calibrating the Liquid Depth
Liquid depth calibration requires knowing the level or the depth of the liquid in the channel
that is contributing to the flow. Liquid depth calibration is the recommended calibration
method for the in-pipe sensor. Take a physical measurement of the liquid depth and enter
the value into the application software. For a dry channel enter 0 depth.
6.2.3.3 Calibrating the Sensor Height
Sensor height calibration is generally used when access to the primary device is difficult
(such as confined space entry in a manhole) or when there is no liquid flow during
installation of the flow meter. This calibration method requires knowing the distance
between the zero flow point and the bottom of the sensor. In a round pipe the zero flow
point is typically the invert or bottom of the pipe. Further, compensation is required for the
invisible range (internal deadband) in the sensor housing. Measurement uncertainty
increases to 1.28 cm (0.042 ft) for a ±30 cm (±1 ft) change in level from the calibration
point. Use this method ONLY if the Liquid Depth is not an option.
Measure the distance from the bottom of the sensor to the zero flow point. Add 18.3 cm
(7.2 in.) to the measured distance to obtain the total zero flow distance. Enter the total zero
flow distance value into the application software.
6.2.3.4 Invisible Range/Deadband
Note: When programming the invisible range, 18.3 cm (7.2 in.) must be added to the desired range
to compensate for the internal deadband distance between the sensor, the reflector, and the bottom
of the sensor housing.
The 940 flow meter is equipped with an invisible range feature to prevent false echoes
from top of channel walls, ladder rungs, shelves, etc. A user-selected range is defined that
is invisible to the flow meter. Do not extend the invisible range to where it meets or
overlaps the highest expected level in the channel.
Measure the distance between the bottom of the sensor housing and the object that is to
be excluded from the level measurement. Add 18.3 cm (7.2 in.) to the measured distance
to obtain the total invisible range (deadband) distance. Enter the total invisible range value
into the application software.
6.2.4 Protecting the In-Pipe Ultrasonic Sensor
Keep the sensor and the reflector free of grease and dirt. Since the logger “listens” for the
relatively faint sound of the returning echo, a heavily coated sensor will not be able to
detect the echo well and may not provide accurate level measurement.
51
Sensor Installation
6.2.5 Troubleshooting the In-Pipe Sensor
During surcharged conditions, the ultrasonic level gives random depth readings that need
to be edited in the application software.
Symptoms of this hydraulic condition occur when the level appears erratic within 5.7 cm
(2.25 in.) of the pipe diameter. The readings first appear to be flat-lined. Later, the erratic
readings (that in some cases exceed the pipe diameter) occur.
If the hydraulics are frequently in surcharge conditions, use a submerged level sensor
instead of an in-pipe ultrasonic sensor.
6.3 Installing the Submerged Area/Velocity Sensor
Read the instructions carefully before installing the sensor. Failure to do so could result in
serious injury to the operator or damage to the equipment.
6.3.1 Zeroing the Submerged Area/Velocity Sensor
The sensor has been factory-calibrated and compensated for temperature. The sensor
needs to be zeroed during each installation, but does not require calibration. The sensor
should be zeroed when moving it from one flow meter or sample to another.
6.3.2 Important Installation Guidelines for Submerged Area/Velocity Sensor
52
•
Do not install more than one sensor at a time in pipes less than 61 cm (24 inches).
Multiple sensors in smaller pipes can create turbulent or accelerated flows near the
sensors that may cause inaccurate measurements.
•
Mount the sensor as close as possible to the bottom of the pipe invert to accurately
measure low velocity levels.
•
Do not monitor flows in the invert of the manhole itself. The best sensor location is 3 to
5 times the sewer diameter/height upstream of the invert.
•
Locate monitoring sites as far as possible from inflow junctions to avoid interference
caused by combined flows.
•
Avoid sites that contain flow obstacles within 2 to 4 pipe diameters in front of the
sensor installation (rocks, stones, pipe joints, valve stems, etc.) as these contribute to
turbulence and generate high speed flows in the immediate vicinity of the obstruction.
•
Avoid any sites with slow moving flows that encourage the build-up of silt in the invert
or channel. Excessive silting around the sensor may inhibit the Doppler signal and
decrease sensor accuracy, and may affect depth measurement accuracy.
•
Avoid sites with deep, rapid flows that make it physically difficult or dangerous to
install the sensor.
•
Avoid sites with high velocity, low-depth flows. Splash-over and excessive turbulence
might be present around the sensor and data may be inaccurate.
Sensor Installation
6.3.2.1 Proper Strain Relief of Submerged Area/Velocity Sensor Cable
Attach the desiccant hub to the instrument handle to provide a strain relief for the sensor
cable and connector (Figure 28).
Figure 28 Proper Strain Relief
1
Flow Meter
3
Carabineer
2
Desiccant Hub
4
Lanyard
6.3.3 Connecting the Submerged Area/Velocity Sensor to the Mounting Bands
Important Note: If using an oil-filled sensor, replenish the oil prior to mounting the sensor
to a mounting band. Refer to section 7.8.3 on page 62 for oil replenishment instructions, if
applicable.
1. Attach the sensor to the mounting band. Mounting bands come with pre-drilled holes
for direct mounting of the sensor to the band.
2. Route the cable along the edge of the band and fasten the cable to the mounting band
with nylon wire ties (Figure 29 on page 54) to reduce the likelihood of debris collecting
on the cable and the mounting band. The cable should exit the tied area at, or near
the top of the pipe to keep it out of the flow stream.
Note: If there is a large amount of silt at the bottom of the pipe, rotate the band until the sensor is out
of the silt (Figure 30 on page 54), assuring that the sensor remains below the minimum expected
water level at all times. The silt should not be disturbed and must be measured frequently.
53
Sensor Installation
4
1
3
2
Figure 29 Attaching the Sensor to the Mounting Band
1
Nylon Wire Ties
3
Sensor
2
Screws (2)
4
Mounting band
1
4
2
3
Figure 30 Avoiding Silt when Mounting the Sensor
1
Pipe
2
Sensor
3
Silt
4
Water
6.3.4 Placing the Submerged Area/Velocity Sensor and the Mounting Band into the Pipe
Point the angle-face of the sensor into the flow. The manufacturer recommends placing
the sensor with the arrow pointing at the flow (Figure 31 on page 55). For other mounting
configurations, see the appropriate flow meter manual.
Slide the mounting band as far as possible into the pipe to eliminate drawdown effects
near the end of the pipe. Locate the sensor at the bottom-most point in the channel. If
excessive silt is present on the bottom of the pipe, rotate the band in the pipe until the
sensor is out of the silt.
54
Sensor Installation
Manhole
Velocity Sensor
Normal Upstream Position
Manhole
Velocity Sensor
Downstream Position
Figure 31 Placing the Sensor into the Flow
55
Sensor Installation
56
Section 7
Maintenance
DANGER
Only qualified personnel should conduct the tasks described in this section of the
manual.
DANGER
Seul un technicien qualifié peut effectuer les tâches d'installation décrites dans
cette section du manuel.
DANGER
All maintenance activities related to flow meter and flow meter accessories must be
performed in a non-hazardous location.
DANGER
Toutes les opérations de maintenance relatives au débitmètre et à ses accessoires
doivent être exécutées dans un environnement qui ne présente aucun danger.
7.1 Maintaining the Battery Compartment Desiccant
The desiccant material is a silica gel indicator. When the gel is saturated with moisture, the
beads turn from blue to pink. To rejuvenate the beads for reuse, remove them from the
assembly. Heat the beads in an oven at 100 to 180 °C (212 to 350 °F) until the beads turn
blue again. Discard and replace the beads if they do not turn blue after heating.
7.1.1 Replacing the Battery Compartment Desiccant
A small desiccant cartridge in the battery compartment (Figure 17 on page 32 and
Figure 18 on page 32) prevents moisture damage to the batteries and power circuitry.
Table 9 contains replacement part numbers.
If the normally blue desiccant beads turn pink, replace the cartridge or remove the
cartridge end cap and recharge or replace the desiccant material.
A small clip holds the desiccant cartridge in place. Pull the cartridge straight out of the clip
to remove it.
Table 9 Replacement Desiccant
Description
Part Number
Model 911 Battery Compartment Desiccant Cartridge
4933
Model 940 Battery Compartment Desiccant Cartridge
4967
Bulk Desiccant Refill (1.5 lb.)
3624
7.2 Maintaining the O-Ring Gasket on the End Cap
Note: Do not use petroleum jelly to lubricate the O-rings.
Two O-ring gaskets are installed in each flow meter end cap. The end caps maintain the
water tight seal on the flow meter. Use care when the end caps are removed—do not soil,
cut, or nick the gaskets. Replace them immediately if any physical damage is apparent.
Use a light coating of O-ring lubricant to help maintain a water-tight seal. Table 10 on page
57 lists replacement O-ring gaskets.
Table 10 Replacement O-rings
Description
Part Number
Model 911 End Cap O-ring (2 required)
4912
Model 940 End Cap O-ring (2 required)
4807
57
Maintenance
7.3 Cleaning the Flow Meters
Clean the outside of the logger case with warm water and mild detergent. Do not use
solvents or harsh cleaners to clean the logger. Do not use high pressure washing
equipment to clean the case.
7.4 Storing the Flow Meters
Remove all batteries from the logger when storing for long periods (more than 3 months).
Store the sensors in a dry area. Make sure that all desiccant materials in the probes are
kept fresh (blue) at all times.
7.5 Cleaning the Connectors
Coat connectors with lithium or di-electric grease to prevent corrosion.
7.6 Maintaining the Electronics Compartment
7.6.1 Fuses
All internal fuses are self-resetting and require no maintenance. There are no other
user-serviceable components inside the electronics compartment.
7.6.2 Memory Batteries
An internal battery is provided to power RAM memory as well as the real time clock and
associated circuitry. The memory battery keeps the programmed settings as well as the
logged data whenever the main power fails or is removed during transport, storage, or
replacement. The internal memory battery is located in the electronic compartment and is
not user replaceable.
The internal memory battery has a life expectancy in excess of five years with the main
battery installed. If the main battery is removed for an extended period of time, the life of
the internal memory
battery will be substantially shorter. The user can see a low memory battery indicator
using the appropriate application software. See the software manual for details.
58
Maintenance
7.7 Replacing the Batteries in the RS232 Interface
DANGER
Never replace batteries in a hazardous location.
DANGER
Ne jamais remplacer les piles dans une zone dangereuse.
The Opto-Isolated RS232 interface uses a quantity of industrial quality Alkaline “C” cells.
Under normal circumstances the batteries should last for more than 1,000 downloads
based on an average download time of 5 minutes. The batteries need to be changed once
a year due to the limited shelf life of any type of battery.
1. Remove the cover from the RS232 interface (Figure 32).
2. Remove the old batteries. Install fresh batteries into the RS232 interface, making
certain the polarity is correct.
Figure 32 Replacing RS232 Batteries
7.8 Maintaining the Submerged Area/Velocity Sensor
7.8.1 Cleaning the Transducer Port
Clean the transducer port when:
•
A drift in the readings is observed.
•
Level data are missing or incorrect but velocity data are valid.
•
Excessive silt has deposited between the transducer and its protective cover.
59
Maintenance
7.8.2 Cleaning the Submerged Area/Velocity Sensor (Oil-filled and Non-oil)
Important Note: DO NOT interchange an oil-filled protective cover plate with a non-oil
cover plate. This adversely affects level readings. It is possible to convert one type of
sensor to the other using the Oil Probe Conversion Kit (Cat. No. 7730000), refer to the Oil
Probe Conversion Kit Instruction Sheet, Cat. No. 7730089 for more information.
Important Note: When cleaning the transducer, use the most gentle technique possible.
Do not use sharp or pointed object to remove sediment from the face of the transducer. If
the transducer is nicked or dented, it breaks!
1. Soak the sensor in soapy water
Note: Do not soak the sensor in bleach. Bleach permanently damages the sensor. Refer to
Table 11 for acceptable cleaning solutions.
2. Remove the screws from the protective cover (Figure 33 and Figure 34 on page 61).
3. Remove the cover and gasket.
4. Swirl the sensor carefully in an appropriate cleaning solution to remove soil. Use a
spray or squeeze bottle to wash away heavier deposits.
5. Clean the gasket and the cover. Replace the gasket (Cat. No. 7722000) if it is torn or
damaged. Level readings are adversely affected if the gasket is damaged or not
installed.
6. Reattach the gasket and the cover (note orientation in Figure 34 on page 61). Tighten
the screws until the gasket starts to compress.
7. If using an oil-filled sensor, continue to follow the procedure mentioned in
section 7.8.3 on page 62.
Table 11 Cleaning Solutions
60
Acceptable
Unacceptable
Dish Detergent and Water
Concentrated Bleach
Window Cleaner
Kerosene
Isopropyl Alcohol
Gasoline
Dilute Acids
Aromatic Hydrocarbons
Maintenance
5
1
2
3
4
Figure 33 Removing the Protective Cover (Non-Oil Sensor)
1
Screws (#6–32 x
2
Protective Cover
3
Gasket
5/16)
4
Pressure Transducer
5
Sensor
1
6
2
3
4
5
Figure 34 Removing the Protective Cover (Oil-filled Sensor)
1
Screws (#6–32 x
5/16)
4
Gasket
2
Protective Cover
5
Pressure Transducer
3
Screw, set, #2-56
6
Sensor
61
Maintenance
7.8.3 Replenishing the Oil
The manufacturer recommends inspecting the oil in the sensor for large air bubbles during
the customer-scheduled service duty cycle, and prior to every installation. Small bubbles
(less than ¼-in. diameter) of air within the oil do not affect performance. Larger bubbles
may minimize the anti-fouling benefit of the oil.
1. Remove the yellow tape on the sensor, if the sensor is new.
2. Remove any debris from the sensor.
3. Load the oil cartridge into the dispensing gun (Figure 35).
4. Twist the feed tube onto the cartridge and attach the syringe tip to the feed tube
(Figure 36 on page 63).
5. Press the dispenser gun handle to purge any air bubbles from the syringe tip.
6. Remove the set screw in the transducer cover with the supplied 0.035 hex wrench.
Retain the set screw.
7. Insert the syringe tip slowly into the set screw hole and dispense the oil (Figure 37 on
page 63).
Note: While dispensing the oil, hold the probe at an angle to allow the air to be pushed out the
side port (Figure 37 on page 63).
Important Note: Slowly insert the syringe tip and do not dispense oil during insertion
or damage to the transducer may occur if too much pressure is applied. Continue to
dispense the oil until all the air bubbles are removed.
8. Continue to dispense the oil while removing the syringe from the set screw hole to
prevent air bubbles. Replace the set screw until it is flush with the transducer cover
and remove any excess oil around the screw hole or on the sensor.
9. Clean the entire probe and place a piece of electrical tape over the side port to
prevent oil from leaking out. Remove the tape from the sensor prior to zeroing and
installing the sensor.
2
1
Figure 35 Loading the Cartridge into the Dispensing Gun
1
62
Dispensing Gun
2
Silicone Oil Cartridge
Maintenance
Figure 36 Attaching the Feed Tube and Syringe
Figure 37 Oil Replenishment
1
Sensor
3
Side port
2
Set screw
4
Syringe
7.8.4 Changing the Submerged Area/Velocity Sensor Desiccant
The desiccant canister contains beads of silica gel which ensure proper orientation of the
pressure transducer. When the beads are blue, they can remove moisture from the air.
When they are pink, they are saturated and cannot absorb any more moisture from the air,
and they must be replaced immediately.
Important Note: When the beads begin to turn pink, replace or recondition the beads.
Permanent damage to the sensor may occur if the desiccant is not maintained. Never
operate the sensor without the proper desiccant. When rejuvenating beads, remove them
from the canister and heat at 100–180 °C (212–350 °F) until the beads turn blue. If the
beads do not turn blue, replace them with new beads. Do not heat the canister.
63
Maintenance
7.8.5 Replacing the Desiccant
Note: Replacing the desiccant does not require that the desiccant container be removed from the
desiccant box.
1. Twist the bottom end-cap using a slight twisting motion until its slots align with the
retaining clips (Figure 38).
2. Remove the end cap gently by grasping it and pulling it straight out.
3. Pour the desiccant beads out of the canister.
4. Hold the canister up to the light and inspect the hydrophobic filter.
•
If there is a small, dim light spot while looking through the hole, the filter is in good
condition. If there is a bright light spot, the filter is probably torn. Replace the filter.
•
If the desiccant beads are completely saturated with water or the filter has been
saturated with water or grease, replace the filter.
Note: If the filter needs to replaced, complete the Replacing the Hydrophobic Filter
(section 7.8.5.1 on page 65), then continue with step 5.
5. Refill the canister tube with blue desiccant beads (Cat. No. 3624). Inspect the O-ring
(Cat. No. 5252) on the bottom cap for cracks, pits, or evidences of leakage. Replace if
necessary.
Note: Applying O-ring grease to the new or dry O-rings improves the ease of insertion, sealing,
and life span of the O-ring.
6. Make sure that the O-ring is clean and free of dirt or debris before replacing the end
cap.
7. Reinstall the end cap.
Figure 38 Removing the Bottom End Cap
1
64
End Cap
2
Desiccant Container
Maintenance
7.8.5.1 Replacing the Hydrophobic Filter
A single Teflon® hydrophobic filter (Cat. No. 3390) is installed in the top of the canister to
prevent liquid from entering the vent tube.
For best performance and to avoid grease buildup on the filter during submergence or
surcharge conditions, hang the canister vertically so that the end facing the sensor points
downward.
1. Disconnect the tubing from the top of the desiccant canister.
2. Unscrew the hex-head tubing nipple from the top of the canister and discard the old
filter.
3. Discard any remnants of Teflon tape from the nipple’s threads. Reapply two turns of
Teflon tape (Cat. No. 10851-45) to the threads, pulling the tape into the threads until it
conforms to the shape of the threads.
4. Place a new filter over the hole. Make sure that the smooth side of the filter faces the
inside of the canister.
5. Place the threaded nipple on top of the filter.
6. With a slight pressure, press the filter into the hole with the nipple threads and begin
threading the nipple into the hole. The filter deflects upward and feed completely into
the thread until it disappears. The filter must rotate with the nipple as it is threaded into
the cap. If it does not, it is torn. Start over with a new filter.
7. Inspect the installation. A small, dim light spot should be visible in the upper cap when
held up to the light. A bright spot indicates a torn filter. Start over with a new filter.
1
3
2
Figure 39 Replacing the Hydrophobic Filter
1
Filter, smooth side down
2
Hex-head tubing nipple
3
Finished assembly
65
Maintenance
66
Section 8
Replacement Parts and Accessories
8.1 Flow Meter Replacement Parts
Description
Battery, 12 AH (Model 911 only), rechargeable
Charger, lead acid battery (Model 911 only)
Part Number
5160-01
913
RS232 Intrinsic Safety Barrier
4087
AC Power, 115 V with 2 AH battery backup and intrinsically safe barrier
1004
Battery pack, rechargeable, Lithium Ion (Model 940 only)
6608500
Charger, Lithium Ion battery pack (Model 940 only), 100-240 VAC, 50/60 Hz
6678000
Desiccant Cartridge for battery
4967
Ladder Mount, Ladder Rung-requires P/N 4839
4874
Ladder Mount, Mounting Bracket-requires P/N 4874
4839
Manhole Spanner Bars, 18-27 in., used with suspension cable
9542
Manhole Spanner Bars, 28-48 in., used with suspension cable
9557
Suspension cable for hanging flow meter
4920
User Manual
4979
8.2 Sensors
Description
In-Pipe/Ultrasonic Level Sensor
75 kHz Ultrasonic Sensor
Part Number
4741
5233-05
Submerged Area Velocity Sensors
I.S. Oil-Filled Submerged AV Sensor, 0–10 ft range, 30 ft cable, with connector
88064-030
I.S. Oil-Filled Submerged AV Sensor, 0–10 ft range, 50 ft cable, with connector
88064-050
I.S. Oil-Filled Submerged AV Sensor, 0–10 ft range, 75 ft cable, with connector
88064-075
I.S. Oil-Filled Submerged AV Sensor, 0–10 ft range, 100 ft cable, with connector
88064-100
I.S. Oil-Filled Submerged AV Sensor, 0–30 ft range, 30 ft cable, with connector
88074-030
I.S. Oil-Filled Submerged AV Sensor, 0–30 ft range, 50 ft cable, with connector
88074-050
I.S. Oil-Filled Submerged AV Sensor, 0–30 ft range, 75 ft cable, with connector
88074-075
I.S. Oil-Filled Submerged AV Sensor, 0–30 ft range, 100 ft cable, with connector
88074-100
I.S. Standard Submerged AV Sensor, 0–10 ft range, 30 ft cable, with connector
88065-030
I.S. Standard Submerged AV Sensor, 0–10 ft range, 50 ft cable, with connector
88065-050
I.S. Standard Submerged AV Sensor, 0–10 ft range, 75 ft cable, with connector
88065-075
I.S. Standard Submerged AV Sensor, 0–10 ft range, 100 ft cable, with connector
88065-100
I.S. Standard Submerged AV Sensor, 0–30 ft range, 30 ft cable, with connector
88075-030
I.S. Standard Submerged AV Sensor, 0–30 ft range, 50 ft cable, with connector
88075-050
I.S. Standard Submerged AV Sensor, 0–30 ft range, 75 ft cable, with connector
88075-075
I.S. Standard Submerged AV Sensor, 0–30 ft range, 100 ft cable, with connector
88075-100
8.3 Sensor Mounting Rings and Bands
Description
Part Number
Submerged Pressure/Velocity Mounting Rings for 6–24 in. Pipes
6 inches
1361
8 inches
1362
67
Replacement Parts and Accessories
8.3 Sensor Mounting Rings and Bands (continued)
Description
Part Number
10 inches
1363
12 inches
1364
15 inches
1365
18 inches
1366
21 inches
1353
24 inches
1370
Submerged Pressure/Velocity Mounting Bands for 15 to 42 in. Pipes
15 inches
9706100
18 inches
9706200
21 inches
9706300
24 inches
9706400
27 inches
9706500
30 inches
9706600
33 inches
9706700
36 inches
9706800
42 inches
9706900
15 to 42 inches
3766
In-Pipe Mounting Rings for 6 to 12 in. Pipes
6 inches
4021
8 inches
4022
10 inches
4023
12 inches
4024
In-Pipe Sensor Mounting Bands for 15 to 42 in. Pipes
15 inches
9706100
18 inches
9706200
21 inches
9706300
24 inches
9706400
24 inches
9706500
30 inches
9706600
33 inches
9706700
36 inches
9706800
42 inches
9706900
15 to 42 inches
3766
8.4 Ultrasonic Sensor Mounting Hardware
Description
Part Number
Permanent Wall Mount Bracket
2974
Adjustable for Floor or Wall
2904
Tripod w/ Mounting Bracket for Sensor
9538
Cable Straightener
2883
Cable Grip (Requires #2883)
3183
68
Replacement Parts and Accessories
8.5 Mounting Plate Hardware for Directly Mounting to Pipe Wall
Sensor Type
Part Number
Submerged Pressure
4939
In-Pipe
3875
69
Replacement Parts and Accessories
70
Section 9
Contact Information
Ordering information for the U.S.A.
By Telephone:
(800) 368-2723
By Fax:
301-874-8459
By Mail:
Hach Company
4539 Metropolitan Court
Frederick, MD 21704-9452, U.S.A
Ordering information by e-mail:
[email protected]
Information Required
•
Hach account number (if available)
•
Billing address
•
Your name and phone number
•
Shipping address
•
Purchase order number
•
Catalog number
•
Brief description or model number
•
Quantity
Ordering Information for Outside the U.S.A. and Europe
Hach maintains a worldwide network of dealers and distributors. To locate the representative nearest
you, send an e-mail to: [email protected] or visit ww.hachflow.com.
Technical Support
Technical and Customer Service Department personnel are eager to answer questions about our
products and their use. In the U.S.A., call 1-800-635-1230. Outside the U.S.A. and Europe, send E-mail
to [email protected] or call 1-301-874-5599.
Repair Service
Authorization must be obtained from Hach Company before sending any items for repair.
To send the monitor to the factory for repair:
1. Identify the serial number of the monitor unit.
2. Record the reason for return.
3. Call the Customer Service Department (1-800-368-2723) and get a Service Request Number (SRN) and
shipping label.
4. Use the shipping label provided and ship the equipment in the original packaging if possible.
Note: Do not ship manuals, computer cables, or other parts with the unit unless they are required for repair.
5. Make sure the equipment is free from foreign debris and is clean and dry before shipping. Sensors returned
without cleaning will be charged a fee.
6. Write the SRN number on the shipping box.
7. Make sure that all return shipments are insured.
8. Address all shipments to:
Hach Company
5600 Lindbergh Drive - North Dock
Loveland, Colorado, 80539-0389 U.S.A.
Attn: SRN#XXX
71
Section 10
Contact information for Europe
For technical support, repair service and ordering information please refer to the contact
information below.
For all countries except France, Spain and Great Britain:
Flow-Tronic
RUE J.H. COOL 19a
B-4840 Welkenraedt
Belgium
Ph: +-32-87-899797 or 899799
Fx: +-32-87-899790
Email: [email protected]
www.flow-tronic.com
For France, Spain and Great Britain:
France
HACH LANGE FRANCE S.A.S.33
Rue du Ballon 93165 Noisy-le-Grand
Telephone: ++33 (0)1 48 15 68 70
Fax.: ++33 (0)1 48 15 80 00
Email: [email protected]
www.hach-lange.fr
Spain
HACH LANGE, S.L.U
C/ Larrauri, 1C, 2ª Pl.
48160 Derio, Bizkaia
Telephone: 902 131441 94 6573388
Fax: 94 6573397
E-mail: [email protected]
www.hach-lange.es
Great Britain:
HACH LANGE LTD
Pacific Way
Salford
Manchester
M50 1DL
Telephone: 0 161 872 1487
Fax.: 0 161 872 7324
Email: [email protected]
www.hach-lange.co.uk
72
Section 11
Limited Warranty
Hach Company warrants its products to the original purchaser against any defects that are due to faulty
material or workmanship for a period of one year from date of shipment unless otherwise noted in the
product manual.
In the event that a defect is discovered during the warranty period, Hach Company agrees that, at its
option, it will repair or replace the defective product or refund the purchase price excluding original
shipping and handling charges. Any product repaired or replaced under this warranty will be warranted
only for the remainder of the original product warranty period.
This warranty does not apply to consumable products such as chemical reagents; or consumable
components of a product, such as, but not limited to, lamps and tubing.
Contact Hach Company or your distributor to initiate warranty support. Products may not be returned
without authorization from Hach Company.
Limitations
This warranty does not cover:
•
Damage caused by acts of God, natural disaster, labor unrest, acts of war (declared or undeclared),
terrorism, civil strife or acts of any governmental jurisdiction
•
Damage caused by misuse, neglect, accident or improper application or installation
•
Damage caused by any repair or attempted repair not authorized by Hach Company
•
Any product not used in accordance with the instructions furnished by Hach Company
•
Freight charges to return merchandise to Hach Company
•
Freight charges on expedited or express shipment of warranted parts or product
•
Travel fees associated with on-site warranty repair
This warranty contains the sole express warranty made by Hach Company in connection with its
products. All implied warranties, including without limitation, the warranties of merchantability and fitness
for a particular purpose, are expressly disclaimed.
Some states within the United States do not allow the disclaimer of implied warranties and if this is true in
your state the above limitation may not apply to you. This warranty gives you specific rights, and you
may also have other rights that vary from state to state.
This warranty constitutes the final, complete, and exclusive statement of warranty terms and no person
is authorized to make any other warranties or representations on behalf of Hach Company.
Limitation of Remedies
The remedies of repair, replacement or refund of purchase price as stated above are the exclusive
remedies for the breach of this warranty. On the basis of strict liability or under any other legal theory, in
no event shall Hach Company be liable for any incidental or consequential damages of any kind for
breach of warranty or negligence.
73
74
Appendix A Working with Primary Devices
A.1 Working with Primary Devices and Sensor Operation
Installing the sensor in any primary device requires familiarity with the proper location for
head measurement in that particular primary device. Just as the proper installation of the
primary device itself is critical to obtaining optimum flow measurement accuracy, the
appropriate location of the submerged or ultrasonic sensor also greatly affects flow
measurement accuracy.
Always consult the manufacturer of the primary device, whenever possible, for details
concerning the proper location of the sensor.
A.2 Setting an Offset (For Use in a Weir)
When installing a submerged sensor behind a weir, the user may need to “offset” the
actual reading from the submerged sensor to compensate for the difference in height
between the submerged sensor and the crest of the weir. This allows the user to place the
sensor at an arbitrary height in the weir, as long as it is located below the crest of the weir
(and at the proper distance upstream from the weir plate). See Figure 40 on page 76 for
details on head measurement locations in a weir.
In the text example below:
•
The distance between the crest of the weir (bottom of the ‘V’) and the submerged
sensor is 4 in. (10 cm).
•
The distance between the surface of the water and the submerged sensor is 6 in. (15
cm).
•
The level of water which is contributing to flow is 2 in. (5 cm) (water flowing over the
weir).
Entering 2 in. (5.1 cm) using the LEVEL ADJUST key provides the desired offset. As the
water level falls to the bottom of the ‘V” the flow meter reads zero level and zero flow. If the
level falls below the crest of the weir, due to evaporation or other reason, the level reads a
negative number and the flow remains at zero.
The key to proper level setting is to adjust the level (using the LEVEL ADJUST key) to the
level that is contributing to flow. In a round pipe the level contributing to flow is the distance
from the surface of the water to the invert (bottom) of the pipe. In a flume, the level
contributing to flow is the distance from the surface of the water to the floor of the flume.
A.3 Types of Primary Devices
Use the primary device illustrations that follow as general guides for proper head
measurement location in commonly used primary devices. Refer to Figure 41 on page 77
for Parshall Flume, Figure 42 on page 78 for Palmer-Bowlus Flume (with Integral
Approach), Figure 43 on page 79 for Leopold-Lagco Flume, Figure 44 on page 80 for
H-Flume and Figure 45 on page 80 for Round Pipes. Contact the primary device
manufacturer for more details.
75
Working with Primary Devices
Submerged
Probe
H
aaaaaaaaaaaaaaaaaaaaa
aaaaaaaaaaaaaaaaaaaaa
aaaaaaaaaaaaaaaaaaaaa
aaaaaaaaaaaaaaaaaaaaa
aaaaaaaaaaaaaaaaa
aaaaaaaaaaaaaaaaaaaaa
aaaaaaaaaaaaaaaaa
FLOW
aaaaaaaaaaaaaaaaaaaaa
aaaaaaaaaaaaaaaaa
aaaaaaaaaaaaaaaaaaaaa
aaaaaaaaaaaaaaaaa
aaaaaaaaaaaaaaaaaaaaa
aaaaaaaaaaaaaaaaa
aaaaaaaaaaaaaaaaaaaaa
aaaaaaaaaaaaaaaaa
aaaaaaaaaaaaaaaaaaaaa
aaaaaaaaaaaaaaaaa
aaaaaaaaaaaaaaaaaaaaa
aaaaaaaaaaaaaaaaa
aaaaaaaaaaaaaaaaaaaaa
aaaaaaaaaaaaaaaaa
aaaaaaaaaaaaaaaaaaaaa
aaaaaaaaaaaaaaaaa
aaaaaaaaaaaaaaaaaaaaa
aaaaaaaaaaaaaaaaa
aaaaaaaaaaaaaaaaaaaaa
aaaaaaaaaaaaaaaaa
aaaaaaaaaaaaaaaaaaaaa
aaaaaaaaaaaaaaaaaaaaa
2H
Minimum
Crest
Height
aaaaaaaaaaaaaaaaaaaaaaaaaaaa
aaaaaaaaaaaaaaaaaaaaaaaaaaaa
Crest
aaaaaaaaaaaaaaaaaaaaaaaaaaaa
FLOW
aaaaaaaaaaaaaaaaaaaaaaaaaaaa
aaaaaaaaaaaaaaaaaaaaaaaaaaaa
aaaaaaaaaaaaaaaaaaaaaaaaaaaa
aaaaaaaaaaaaaaaaaaaaaaaaaaaa
aaaaaaaaaaaaaaaaaaaaaaaaaaaa
aaaaaaaaaaaaaaaaaaaaaaaaaaaa
aaaaaaaaaaaaaaaaaaaaaaaaaaaa
aaaaaaaaaaaaaaaaaaaaaaaaaaaa
aaaaaaaaaaaaaaaaaaaaaaaaaaaa
aaaaaaaaaaaaaaaaaaaaaaaaaaaa
aaaaaaaaaaaaaaaaaaaaaaaaaaaa
aaaaaaaaaaaaaaaaaaaaaaaaaaaa
aaaaaaaaaaaaaaaaaaaaaaaaaaaa
aaaaaaaaaaaaaaaaaaaaaaaaaaaa
Submerged
Probe
Figure 40 Weir
76
Draw down
Head
Measurement
Point
Maximum
Head Height
4H
Minimum Distance from
Weir Plate
Weir Plate
Working with Primary Devices
Stilling Well
(Optional)
A
Length of Converging Section
2/3A
Length to Stilling Well
Submerged
Probe
TOP VIEW
FLOW
Head Measurement Point
Submerged
Probe
H
ELEVATION
Submerged Flow
Free Flow
Figure 41 Parshall Flume
77
Working with Primary Devices
Submerged Probe
(Preferred Head Measurement Point)
FLOW
Top View
Throat
Upper Transition
Lower
Transition
Preferred Head Measurement Point
Water Surface
Small jump should occur here.
FLOW
Elevation View
"D"
Conduit Diameter
Upstream Depth
2
Figure 42 Palmer-Bowlus Flume (with Integral Approach)
78
Downstream Depth
Working with Primary Devices
Submerged Probe
(Preferred Head Measurement Point)
FLOW
Upper Transition
Top View
Throat
Lower Transition
Preferred Head Measurement Point
Water Surface
Small jump should occur here.
FLOW
Elevation View
"D"
Conduit Diameter
End View
Downstream Depth
2
Upstream Depth
Figure 43 Leopold-Lagco Flume
79
Working with Primary Devices
FLOW
Top View
W
Inlet Bulkhead
Head Measurement Section
1
4
FLOW
2
3
H
Elevation View
T
Approach
Section
Pipe Stub
Figure 44 H-Flume
Top View
D
FLOW (Q)
A
d
FLOW (Q)
Elevation View
WP
ΔY
ΔX
Figure 45 Round Pipes
80
Appendix B Channel Installation Options
Figures 46 through 50 show how to install the 911 and 940 Flow Meters in various
applications.
Figure 46 shows Model 911 installed in a manhole with a single level/velocity sensor
stored in the small-diameter pipe.
Figure 46 Small-Diameter Pipes Down to Street or Building Collectors
81
Channel Installation Options
The 940 and the 911 Flow Meters do not require profiling to establish average velocity,
allowing setup in a dry channel (Figure 47). Rapid signal processing and temperature
compensation accurately record the change from dry to wet conditions.
Figure 47 Installation Setup in a Dry Channel
82
Channel Installation Options
Figure 48 shows a storm vault accepting flow from two locations. The 940 Flow Meter
monitors level, velocity, and flow in both pipes and sends data via modem to a central
location.
Figure 48 Installation for Multiple Source Monitoring at a Single Site
83
Channel Installation Options
When a Combined Sewer Overflow (CSO) is conducive to accurate flow measurement,
the 940 Flow Meter can measure depth and velocity in the primary channel and measure
discharge in the overflow channel. See Figure 49. In some instances, the overflow in
some CSO applications may be too turbulent for accurate measurement.
Figure 49 Installation for Combined Sewer Overflow (CSO) Applications
84
Channel Installation Options
Custody transfer or interagency billing demand redundant measurement for chain of
custody. In Figure 50, the 940 Flow Meter provides ultrasonic measurement of flow in a
Parshall flume while also measuring flow upstream using the Continuity Equation (Q=AV).
This ensures no loss of data in a submerged flow condition.
Figure 50 Installation for Custody Transfer or a Billing Arrangement
85
Channel Installation Options
86
Appendix C Batteries and Chargers
DANGER
Never install, remove or charge batteries in a hazardous location.
DANGER
Vous ne devez jamais installer, retirer ou recharger les batteries dans un
environnement dangereux.
C.1 Lead-Acid (Gel Cell) Batteries for 911 Flow Meter
The manufacturer’s lead-acid batteries are designed to prevent electrolyte leakage from
the terminals or case. The electrolyte is suspended in a gel, which ensures safe, efficient
operation in any position. Gel cells are classified as “Non-Spillable” and meet all
requirements of the International Air Transport Association.
Maintenance
The manufacturer’s lead-acid batteries are maintenance-free.
DANGER
The use of chargers other than those provided by the manufacturer for use with
these batteries is not recommended and may damage the battery or shorten its life.
DANGER
Il est déconseillé d'utiliser des chargeurs autres que ceux fournis par le fabricant
pour ces batteries, car ils risquent de les endommager et de réduire leur vie utile.
Charge
The manufacturer’s lead-acid cells are designed to be fully charged in 22 to 24 hours
using their lead-acid battery charger. Do not exceed 24 hours or life of the battery may be
damaged or shortened. The charge rate is 500 mA dc. The LED is lit, indicating the battery
is charging. The battery is fully charged when the LED indicator turns off.
Temperature
At higher temperatures, the electrical capacity that can be taken out of a battery increases.
At lower temperatures, the electrical capacity that can be taken out of a battery decreases.
However, excessive heat ruins batteries. Avoid placing batteries near heat sources of any
kind. To maximize battery life, operate the battery at an ambient temperature of 20 °C (70
°F). The permissible operating temperature range is -15 to 50 °C (5 to 120 °F), however,
use in the 5 to 35 °C (47 to 95 °F) temperature range is recommended.
Disposal
•
911 Flow Meter: The battery pack assembly for the 911 Flow Meters are
rechargeable/disposable. Follow local applicable disposal guidelines for
gel–electrolyte type batteries. The entire battery housing is meant to be disposed
of after the service life of the battery. Do not attempt to open the case to gain
access to the batteries, there are no user serviceable parts inside.
Storage
Store lead-acid batteries in a cool, dry place. Their low self-discharge rate and excellent
charging characteristics permit storage for up to one year without loss of efficiency or
appreciable deterioration of battery performance.
At room temperature the self-discharge rate of lead-acid batteries is approximately 3% of
rated capacity per month. The self-discharge rate varies as a function of ambient storage
temperature.
Figure 51 shows the storage self-discharge characteristics of lead-acid batteries at
various ambient temperatures. Table 12 shows recommended storage times for lead-acid
batteries.
87
Batteries and Chargers
Gel Cell Self Discharge Characteristics
Remaining Capacity
100%
80%
0 °C
10 °C
60%
20 °C
30 °C
40%
40 °C
20%
0%
0
3
6
9
15
12
18
Storage Time (months)
Figure 51 Battery Discharge Characteristics
Table 12 Lead-Acid Battery Storage Recommendations
Storage Temperature
Maximum Recommended Storage Time
0 to 20 °C
12 months
21 to 30 °C
9 months
31 to 40 °C
5 months
41 to 50 °C
2.5 months
C.2 Rechargeable Lithium Ion Battery for 940 Flow Meter
A Lithium Ion rechargeable battery pack (6608500) is available for the 940 Flow Meter
only. This is an alternative to the lead-acid and primary metallic Lithium
(non-rechargeable) battery offered as an option for the 940 Flow Meter.
The Lithium Ion rechargeable battery pack is designed to allow up to 500
charge/discharge cycles and is shipped with a charger designed specifically for this
battery pack. The Lithium Ion charger has specific plug wiring to prevent use with the
primary non-rechargeable metallic Lithium pack or the lead-acid pack.
Do not attempt to use the Lithium Ion battery pack charger with the primary
non-rechargeable metallic Lithium pack or the lead-acid pack. Do not attempt to use the
lead-acid pack charger with the Lithium Ion battery pack.
DANGER
The use of chargers other than those provided by the manufacturer for use with
these batteries is not recommended and may damage the battery or shorten battery
life.
DANGER
Il est déconseillé d'utiliser des chargeurs autres que ceux fournis par le fabricant
pour ces batteries, car ils risquent de les endommager et de réduire leur vie utile.
Maintenance
This battery pack requires no maintenance other than charging.
Charge
Inspect the Lithium Ion battery pack and the battery connection for damage before use or
charging. Do not attempt to use or repair a damaged battery pack assembly.
88
Batteries and Chargers
Use only the charger provided for the Lithium Ion pack (6678000). The pack can be
recharged at any time regardless of charge level. Total discharge will have a negative
impact on the number of charge/recharge cycles allowable and should be avoided. The
Lithium Ion battery can be fully charged in 8 to 12 hours using the charger provided. The
charger will terminate the charge automatically and float-charge the battery until it is
removed from the charger. The charge rate is 600 mA DC.
When the charger is plugged into a suitable AC voltage source the power LED will
illuminate. When the battery pack is connected the charge LED will illuminate yellow. A
flashing yellow charge LED indicates that the battery is deeply discharged but the charge
cycle is starting. If the flashing yellow charge LED does not stop flashing within 1 hour the
battery pack is shorted and should be disposed of properly. The battery is fully charged
when the yellow charge LED light goes off.
Temperature
Excessive heat ruins batteries. At higher temperatures, the electrical capacity that can be
taken out of a battery increases. At lower temperatures, the electrical capacity that can be
taken out of a battery decreases. Avoid placing batteries near heat sources of any kind. To
maximize battery life, operate the battery at an ambient temperature of 20 °C (70 °F). The
permissible operating temperature range is -15 to 50 °C (5 to 120 °F). Use in the 5 to 35
°C (47 to 95 °F) temperature range is recommended.
Disposal
The Lithium Ion battery pack assembly for the 940 Flow Meter is rechargeable. Follow
local applicable disposal guidelines for Lithium Ion type batteries. The entire battery
housing is meant to be disposed of after the service life of the battery. Do not attempt to
open the case to gain access to the batteries. There are no user serviceable parts inside.
Batteries and Chargers
The 940 Flow Meter may use two different types of Lithium-based battery. These batteries
require special disposal requirements and must be treated as hazardous material. Air
cargo is the only acceptable air shipment permitted. The batteries must be individually
wrapped and boxed separately. Do not puncture, incinerate or expose to water. If local
government does not allow for the disposal of these batteries contact the Hach Company
for proper disposal arrangements.
Storage
Store all battery types in a cool, dry place. A low self-discharge rate and excellent charging
characteristics permit storage of Lithium Ion batteries for up to one year without loss of
efficiency or appreciable deterioration of performance. At room temperature the
self-discharge rate of Lithium Ion batteries is approximately 1% of rated capacity per
month.
89
Batteries and Chargers
90
Appendix D SCADA-Modbus® System Guidelines
D.1 Introduction to SCADA - Modbus Communications
Use this section as a guide when using the Modbus ASCII protocol to communicate
directly with the 940 Flow Meter via an RS232 or modem connection.
This guide assumes that the user has a working knowledge of Supervisory Control and
Data Acquisition (SCADA), its components, and the different topologies used to construct
the communications network. Because a basic understanding of the Modbus ASCII
protocol is necessary, the key pieces of the protocol will be described.
This section guides the users through the setup process by describing key points that
need to be addressed for successful communication. This section will not outline specific
implementation details of any particular Man Machine Interface (MMI) or controller,
although examples may reference certain manufacturers for illustrative purposes. The
description of the Modbus ASCII protocol is provided for reference only and is not
intended as a tutorial. The scope of this section is limited to the description of Modbus
ASCII as it pertains to the 940 Flow Meter.
Modbus, an open protocol, determines how each instrument knows its device address,
recognize a message addressed to it, determine the type of action to be taken, and extract
any data or other information contained in the message. The flow meter and Man Machine
Interface (MMI) communicate using a master-slave technique in which only the master
can initiate queries to a slave (940). The 940 is always considered the slave, never a
master. The master can address individual 940 Flow Meters or can broadcast a message
to instruments within its scope. Responses are never returned to broadcast queries from
the master. The Modbus protocol establishes the format for the master’s query by placing
into it the device address, a function code defining the requested action, any data to be
sent, and an error-checking field. The flow meter’s response message is constructed
using the Modbus format which confirms the action to be taken, any data to be returned,
and an error checking field.
D.2 ASCII Transmission Mode
The 940 Flow Meter is designed to communicate on standard Modbus networks using
Modbus ASCII. In ASCII mode, messages start with a colon ‘:’, and end with a ‘carriage
return-line feed’ pair. The allowable characters transmitted for all fields are hexadecimal
0–9, and A–F. When a message is transmitted over a Modbus ASCII communication link,
each character or byte is sent in the order of Least Significant Bit to Most Significant Bit. A
typical message frame looks like the following:
START
ADDRESS
(HEX)
FUNCTION
(HEX)
DATA
(HEX)
LRC
(HEX)
END
(HEX)
1 Char ‘:’
2 Chars
2 Chars
n Chars
2 Chars
2 Chars ‘CRLF’
D.3 Address Field
The address field of an ASCII message frame, ranging from 0 to 247 decimals, consists of
two characters that represent the slave address. Individual slaves are assigned values
between 1 and 247. A master addresses a slave by putting the slave’s address in the
address field of the message frame. When the slave sends its response, it places its own
address in the address field of the message frame to let the master know which slave is
responding.
91
SCADA-Modbus® System Guidelines
D.4 Function Field
The function code field of an ASCII message frame, ranging from 1 to 255 decimals,
consists of two characters that represent the type of action the master is requesting from
the slave. Of these functions, the 940 Flow Meter currently supports function 3 (Read
Holding Registers). When a message is sent from the master to a slave device, the
function field tells the slave what kind of action to perform. For example, this may include
reading the channel values of Level and Velocity. When the slave responds to the master,
it echoes the function code field to indicate a normal response. In the event of an error,
such as parity error, LRC error, or a request that cannot be handled, the slave will not
respond and the master will eventually process a time-out condition.
D.5 Data Field
The data field of an ASCII message frame consists of n pairs of ASCII characters that
represent data sent to or from a slave device (flow meter). The data field contained in the
master request contains additional information that is required by the slave before any
action takes place. This may include channel register addresses, the number of registers
to read, and the actual byte count in the data field. For example, if a master requests that
the flow meter read the current status of a group of channels (function code 03), the data
field specifies the starting register and how many registers are to be read. If no error
occurs, the data field of the response from the meter to the master contains the data
requested.
D.6 LRC Field
The LRC field of an ASCII message frame consists of two ASCII characters that provide
an additional level of error checking to verify the integrity of the communication media.
The LRC field is one byte that contains an 8-bit binary value. The LRC value is calculated
by the transmitting device, which appends the LRC to the end of the message. The
receiving device recalculates the LRC and compares it against the LRC value of the
incoming message. If the two values are not equal, an error condition occurs. The LRC is
calculated by adding together successive 8-bit bytes of the message, discarding any
carries, and then complementing the result. The LRC is calculated by summing all values
in the ASCII message except for the leading ‘colon’ and ending <CR><LF>.
D.7 Communication Parameters
To successfully communicate with the 940 Flow Meter using Modbus ASCII, the
communication parameters of the master device must be set at 7 bits, Even Parity, and 1
Stop bit. The baud rate may be configured to any value offered by the 940 Flow Meter.
With the exception of baud rate, the communication parameters must not vary from this
format.
D.8 User Memory Customizing
The most familiar component of existing SCADA networks today is the Programmable
Logic Controller (PLC). Because the network integrator is most familiar with this type of
device, the flow meter emulation of an existing PLC simplifies the process of integrating
the manufacture’s instrumentation into the SCADA network. Modbus ASCII uses a
referencing system to identify the various types of memory inputs and outputs. Each
reference number has a leading digit that identifies its data type (discrete input, discrete
output, register input, register output) followed by a string of digits that indicates its
location in RAM (Table 13).
92
SCADA-Modbus® System Guidelines
Table 13 Modbus ASCII Memory Input/Output Referencing System
Reference Indicator
Reference Type
Meaning
0xxxx
Discrete Output or Coil
Binary
1xxxx
Discrete Input
Binary
3xxxx
Input Register
Real
4xxxx
Output Holding Register
Real
6xxxx
Extended Memory Register
Real
The memory data is stored in 16-bit words. Within the predefined function codes of the
Modbus ASCII protocol, the data fields are subject to interpretation by the device
manufacturer. For example, the 940 Flow Meter places temperature information in
registers 40001-40002.
D.9 Modbus ASCII Function Codes Supported
Currently, the 940 Flow Meter is capable of a read-only function to retrieve channel and
total flow information. All data addresses in the Modbus ASCII message are referenced to
zero. Therefore, a reference to holding register 40001 is addressed as register 0000. The
function code field specifies the type of register accessed; therefore, the 4XXXX is implicit.
Function 03: Read Holding Registers
Reads the register (4X reference) contents of the 940 Flow Meter as defined in the tables
that follow.
Table 14 Channels’ Read Holding Register Addresses
Name
Type
Size (bits)
# of Registers
Start Address
Hi
Start Address
Lo
Registers
Temperature
Float
32
2
00
00
40001-40002
Rainfall
Float
32
2
00
02
40003-40004
pH (or ORP)
Float
32
2
00
04
40005-40006
Level 1
Float
32
2
00
06
40007-40008
Velocity 1
Float
32
2
00
08
40009-40010
Channel 1
Float
32
2
00
0A
40011-40012
Channel 2
Float
32
2
00
0C
40013-40014
Channel 3
Float
32
2
00
0E
40015-40016
Channel 4 (D.O.)
Float
32
2
00
10
40017-40018
Channel 5 (D.O. Temp.)
Float
32
2
00
12
40019-40020
Channel 6 (Conductivity)
Float
32
2
00
14
40021-40022
Channel 7 (Cond. Temp.)
Float
32
2
00
16
40023-40024
Level 2
Float
32
2
00
18
40025-40026
Velocity 2
Float
32
2
00
1A
40027-40028
Flow 1
Float
32
2
00
20
40033-40034
Power
Float
32
2
00
26
40039-40040
93
SCADA-Modbus® System Guidelines
Table 15 Channels’ Units of Measure Read Holding Register Addresses1
Name
Type
Size (bits)
# of Registers
Start Address
Hi
Start Address
Lo
Registers
Temperature
Integer
16
1
00
31
40050
Rainfall
Integer
16
1
00
32
40051
pH (or ORP)
Integer
16
1
00
33
40052
Level 1
Integer
16
1
00
34
40053
Velocity 1
Integer
16
1
00
35
40054
Channel 1
Integer
16
1
00
36
40055
Channel 2
Integer
16
1
00
37
40056
Channel 3
Integer
16
1
00
38
40057
Channel 4 (D.O.)
Integer
16
1
00
39
40058
Channel 5 (D.O. Temp.)
Integer
16
1
00
3A
40059
Channel 6 (Conductivity)
Integer
16
1
00
3B
40060
Channel 7 (Cond. Temp.)
Integer
16
1
00
3C
40061
Level 2
Integer
16
1
00
3C
40061
Velocity 2
Integer
16
1
00
3E
40063
Flow 1
Integer
16
1
00
41
40066
Start Address
Hi
Start Address
Lo
Registers
1 The
addresses shown above return a code that represents the appropriate unit of measure.
Table 16 Flow Totalizer Read Holding Register Addresses
Name
Type
Total Flow 1
Total Flow Units
Total Flow Multiplier
Size (bits)
# of Registers
Float
32
2
00
4A
40075-40076
Integer
16
1
00
50
40081
Float
32
2
00
51
40083-40084
Table 17 SCADA-Modbus Units of Measure Codes
94
Unit
Code
Unit
Code
ML
1
GPH
26
AF
2
LPS
27
CF
3
LPM
28
GAL
4
LPH
29
L
5
MGD
30
M3
6
PH
31
IN
7
ORP
32
CM
8
PPM
33
FT
9
PPB
34
M
10
MGL
35
CM2
11
PCTSAT
36
FT2
12
MSIEMENS
37
IN2
13
MICROSIEMENS
38
M2
14
GRAMSPERKG
39
AFD
15
PCTPERDEGC
40
CFS
16
DEGREE_C
41
SCADA-Modbus® System Guidelines
Table 17 SCADA-Modbus Units of Measure Codes
Unit
Code
Unit
Code
CFM
17
DEGREE_F
42
CFH
18
MILS
43
CFD
19
VOLTS
44
CMS
20
FPS
45
CMM
21
MPS
46
CMH
22
PCT_O2
47
CMD
23
PCT_H2S
48
GPS
24
PCT_LEL
49
GPM
25
VDC
50
D.10 Query
The Modbus ASCII query must take the form shown below that specifies the starting
register and number of registers to be read:
Start
‘:’
Slave
Address
Function
(03)
Start
Address
High
Start
Address
Low
No. of Pts.
High
No. of.
Pts. Low
LRC
<CR>
<LF>
For example, to read the level channel of the 940 Flow Meter, the query must be as
indicated in Table 18.
Table 18 Channel Query to Read Level (Example)
Start
‘:’
Slave Address
01
Function
03
Starting Address High
00
Starting Address Low
06
No. of Registers High
00
No. of Registers Low
02
LRC
F4
Stop
<CR><LF>
The master queries the flow meter using a Read Holding Registers request, which implies
a 4XXXX register reference, to slave device address 01. The message requests data from
holding registers 40007–40008 to obtain the level information, which requires two
registers to store the floating point value. Note that registers are referenced from zero in
the data field.
95
SCADA-Modbus® System Guidelines
D.11 Response
The 940 Flow Meter responds with the following transmission reflecting a level reading of
15.0 inches:
Table 19 Transmission Response that Reflects a 15 in. Level Reading
Start
‘:’
Slave Address
01
Function
03
Byte Count
04
Data High
00
Data Low
00
Data High
41
Data Low
70
LRC
47
Stop
<CR><LF>
The flow meter response echoes the address and function code, which indicates that no
problems exist in the communication between the master and 940. The ‘Byte Count’ field
specifies how many 8-bit data items are being returned in the data field. With Modbus
ASCII, this is one-half the actual count of ASCII characters transmitted in the data portion
of the response. The contents of 40007 are shown as two byte values of 00 00 hex, and
the contents of register 40008 are shown as two byte values 41 70 hex. Together, these
values represent the floating point IEEE representation of the level status.
D.12 940 Flow Meter Response Time
As a result of time lags associated with data acquisition, instrumentation could
conceivably take up to 12 seconds to respond to a SCADA RS232 request. Therefore, the
SCADA system must be designed to accommodate this potential communication lag. For
example, in a Wonderware® application running a Modbus ASCII DDE server, the COM
port reply time-out must be set to 12 seconds. This is the amount of time that the meter is
given to reply to Modbus queries via this serial port.
Communication Handshaking
The 940 Flow Meter contains minimal communication handshaking. For the meter to
identify an RS232 connection from an outside source, and to keep the RS232 hardware
active once communicating, the Data Terminal Equipment (DTE) must assert and hold
high the DTR line of the DB9 connector (DSR of meter). The 940 Flow Meter does not
support RTS/CTS hardware handshaking. Note that DTE must be capable of handling a
12-second maximum response lag.
Pin
Pin 1
Data Carrier Detect
(DCD)1
Pin
Description
Pin
Description
Pin 4
Data Terminal Ready (DTR)
Pin 7
Request to Send (RTS)
Pin 2
Received Data (RD)
Pin 5
Signal Ground (SG)
Pin 8
Clear to Send (CTS)
Pin 3
Transmitted Data (TD)
Pin 6
Data Set Ready (DSR)
Pin 9
Ring Indicator
1 Not
96
Description
used.
SCADA-Modbus® System Guidelines
D.13 Complications with Floating Point Values
The manufacturer’s implementation of the Modbus protocol was based on the idea that we
would enable our flow meters to emulate a Modicon®, Compact 984 PLC. Consequently,
we follow the exact same format that Modicon uses for the storing and processing floating
point numbers. Additionally, the Modbus protocol does not define how floating point values
are packed (stored) into the internal memory addresses or “Registers” of the flow meter.
When integrating the Modbus-capable flow meters, be aware that these meters store and
process floating point numbers in the exact same format as the Modicon Compact 984
PLC.
All current models of Modicon PLCs, including the Compact 984, pack two bytes of data
into each register. This alone presents no problems. Unsigned two-byte (16-bit) integer
values in the range of 0 to 65535 can be stored and retrieved from these registers without
any problems or complications. The complications arise when the stored value is a floating
point value, which by IEEE definition, require 4 bytes (32 bits). The IEEE standard for
floating point values states in part that the 8 most significant bits represent the exponent
and the remaining 23 bits (plus one assumed bit) represent the mantissa and the sign of
the value.
Since a data “word” consists of two bytes, a floating point value is represented by two data
words. Because a single Modicon register consists of one word (or 2 bytes), two
consecutive Modicon registers are needed to store one floating point value.
The representation of a floating point value can be broken down into a “High Order” and a
“Low Order” word. Additionally, each word can be broken down into a high order byte and
a low order byte.
Table 20 and Table 21 depict how a IEEE floating point value is usually represented and
how the Modicon stores a floating-point value.
The complications arise because Modicon doesn't store floating point values in this
standard (IEEE) format. Modicon stores floating point values the opposite way with the
“Low-order” word in the first register and the “High-order” word in the second register.
Table 20 IEEE Floating Point Representation
First Register (i.e., 4001)
High Word, High Byte
High Word, Low Byte
Second Register (i.e., 4002)
Low Word, High Byte
Low Word, Low Byte
Table 21 Floating Point Values Representation
First Register (i.e., 4001)
Low Word, High Byte
Low Word, Low Byte
Second Register (i.e., 4002)
High Word, High Byte
High Word, Low Byte
Since the Modbus protocol doesn't define how floating point values are handled or stored,
some Modbus-capable servers incorrectly use the normal, “High word — Low word”
format for converting the Modbus message response to the client application. Since
Modicon stores the floating point values in the opposite order, the result is that the client
application may receive an incorrect representation of the floating point value from the
Modbus-capable server.
97
SCADA-Modbus® System Guidelines
D.14 Port Expanders and Protocol Converters
In some situations, there may not be a Modbus ASCII port available for use with the 940
Flow Meter. A good example might be where there is a need to install a flow meter at a
remote pump site that already has a single Modbus line connected to a PLC that is used to
control the pumps.
Port expanders are available from third party manufacturers; these allow several Modbus
slave devices to be connected to a single Modbus Master device. Typically, a single port
expander has 3–5 separate Modbus ports on it. Depending on the manufacturer, the user
may be able to configure each of these ports for different communications parameters. In
essence, not only does this type of port expander allow multiple slave devices to be
connected to a single Modbus master device, but it can also be configured to convert
incompatible communications parameters such as Modbus ASCII to RTU (or vice versa),
baud rate, parity, stop bits, etc.
In addition to the port expanders mentioned above, other protocol converters from
third-party manufacturers can be used to convert other industrial protocols to Modbus
ASCII.
D.15 Other Reference Material
SCADA ANSI Specification. ANSI/IEEE Std. C37. 1–1994.
Boyer, Stuart A. SCADA supervisory control and data acquisition. Research Triangle
Park, NC: Instrument Society of America. 1993.
MODICON. Modicon modbus protocol reference guide. North Andover, MA: MODICON,
Inc., Industrial Automation Systems. 1996.
AEG Schneider Automation. Modicon ladder logic block library user guide. North
Andover, MA: AEG Schneider Automation, Inc. 1996.
D.16 Troubleshooting Tips
Problem: 940 Flow Meter responds to some Modbus messages but not all
Response: Check the Register Addresses
The flow meter only responds to valid Modbus message requests. If a Modbus message
sent to the flow meter asks for stored register addresses for values that are outside of the
address range currently supported by the meter, the meter ignores the request.
The flow meter currently only supports register addresses 40001 through 40083.
Consequently, a request to read the value in any register address greater then 40083 will
be ignored. If a range of registers is requested and that range includes register addresses
greater then 40083, the entire request will be ignored
Response: Check the number of registers being polled
Additionally, the 940 Flow Meter checks all Modbus messages to see if the correct number
of registers is requested for the type of data being returned. The meter ignores the request
if the number of registers requested does not coincide with the correct number of registers
needed to accurately display the data. For example, Velocity is a floating point value
stored in register 40009–40010. Because all floating point values require two registers,
the meter would ignore a request to read just the data in register 40009, yet it would
respond correctly to a request to read the data stored in both registers 40009 AND 40010.
Consequently, if the meter received a single request to read both Level 40007–40008 and
Velocity 40009–40010, the request would have to be for an even number of registers for
the meter to respond.
98
SCADA-Modbus® System Guidelines
Problem: 940 Flow Meter does not respond to any Modbus message requests
Note: It is imperative that the DTR be asserted prior to the communication session and that it
remains asserted throughout the entire communication session.
Response: Check the DTR Signal/Line
The 940 Flow Meter will not respond to any Modbus messages until the device connected
to the RS232 port asserts (raises) the DTR line (DB-9, Pin 4 on the 1727 cable).
Response: Check the Baud Rate
The baud rate of the 940 Flow Meter is configured from 1200–19,200 and must match the
baud rate of the device communicating with the meter.
Response: Check the Communication Parameters
The communications parameters of the 940 Flow Meter meter are fixed (except for the
baud rate) and can not be changed. The device communicating with the flow meter must
be configured with the exact same communication parameters as the meter. These
parameters are as follows:
•
7 Data Bits
•
1 Stop bit
•
1 Start bit
•
Even parity
Response: Check the Modbus Device Address assigned to the 940 Flow Meter
Modbus devices, including the 940 Flow Meter, have a unique configured device address
in the range of 1 to 247. This address is embedded in the first two characters of the
Modbus message. The flow meter only responds to messages encoded with the same
address as the meter. If the meter receives a valid Modbus message with an encoded
device address other than the address the meter is configured for, it ignores that
message.
Response: Check the Modbus mode
There are two different forms of Modbus: ASCII and RTU. Currently the 940 Flow Meter
only support Modbus ASCII. Consequently the device communicating with the meter must
be set up for Modbus ASCII. The meter will not respond to Modbus RTU messages.
Problem: The data values being returned by polling the meter with Modbus are not
the same as the data values displayed in the current status screen of the meter.
Response: Confirm that the correct register addresses are being polled.
Check to make sure the register address being polled corresponds to the correct data
channel. For example, if polling for FLOW, make sure the server or MMI is requesting data
from registers 40033–40034.
If polling for several values at the same time, try changing the polling so that only one
value is polled at a time. Then check to see if the polled value matches a different data
channel in the meter. For example, if polling for Level and it appears that the data for
Velocity is displayed instead, then probably the wrong registers are being polled.
Response: Check the data format of the Modbus server.
When configuring a Modbus server or MMI application to poll a 940 Flow Meter, it is
absolutely essential that the correct data format is selected for that particular data channel
(register). For example, when polling for Flow, Level or Velocity, which are all floating point
values, the Modbus server or MMI must be configured to read these values as floating
point values. If the server or MMI is formatting this data as a data type other than floating
point, the values will not be read or displayed correctly.
99
SCADA-Modbus® System Guidelines
Likewise, if polling the meter for engineering units, which are represented by integer
values, such as Flow Units of Measure or Level Units of Measure, the Modbus server or
MMI must be configured to read these values as Integers. If the server or MMI is
formatting this data as any data type other than Integer, the values will not be read or
displayed correctly.
Different Modbus servers and MMI manufacturers have different methods for configuring
the application to the appropriate data type contained within the register. Contact the
server or MMI manufacturer for details on how to configure the application to read the data
in the correct format.
100
Index
B
Batteries and Chargers ............................................ 87
Battery Compartment Desiccant ........................ 32, 57
Battery Disposal ....................................................... 87
Battery Internal Memory ........................................... 58
Battery Life ............................................................... 32
Battery Storage ........................................................ 87
C
Cleaning the Flow Meters ........................................ 58
Combined Sewer Overflow (CSO) Application ........ 84
Continuity Channel ................................................... 85
D
Data Analysis Software ............................................ 41
Data Retrieval .......................................................... 41
Desiccant Maintenance ............................................ 57
Difficult Sites ............................................................ 13
Downlook Ultrasonic Sensor .................................... 43
Dry Channel ............................................................. 82
E
Elbows, Sharp turns, and “Y” connections ............... 13
Event Input ............................................................... 36
F
Flow Equations ........................................................ 41
Flow proportional sampling ...................................... 37
Flow Pulse Output .................................................... 36
Fuses ....................................................................... 58
I
In-Pipe Ultrasonic Sensor ........................................ 49
Installation Considerations ....................................... 13
Installing the Battery Pack ....................................... 30
Intrinsically Safe Equipment ....................................... 8
Intrinsically Safe Installation Requirements ............... 8
Intrinsically Safe Wiring Practices .............................. 9
Invisible Range ........................................................ 43
L
Ladder Rungs .......................................................... 43
Lead Acid (Gel-Cell) ................................................. 87
M
Memory Batteries ..................................................... 58
Multiple Source Monitoring at a Single Site ............. 83
O
Optically Isolated Interface ....................................... 41
O-Ring Gasket ......................................................... 57
O-rings Replacement ............................................... 57
Outfalls ..................................................................... 13
P
Precautionary Labels ................................................. 7
Programming and Analysis ...................................... 41
Protecting the Sensor .............................................. 44
R
RAM memory ........................................................... 58
RS232 Batteries ....................................................... 59
RS232 Interface ....................................................... 59
RS232 Interface Wiring ............................................ 35
RS232 Serial Port .................................................... 35
S
Safety Precautions ..................................................... 7
Sampler Connector Pin Assignments ...................... 36
Sampler Interface Wiring ......................................... 37
Sampler Receptacle ................................................. 37
SCADA-Modbus® .................................................... 91
Seals .................................................................. 10, 57
Sensor Configurations ............................................. 13
Sensor Installation ................................................... 43
Sewer System Management Software ..................... 41
Site Selection ........................................................... 13
Software and Communications ................................ 41
Special Output/Sample Output ................................ 38
Specifications ............................................................. 3
911 ....................................................................... 3
940 ....................................................................... 4
Storing the Flow Meters ........................................... 58
V
Vertical Drops .......................................................... 13
W
Warranty .................................................................. 73
Maintenance ............................................................ 57
101