1
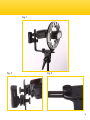
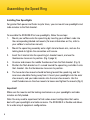
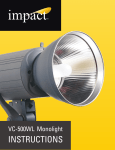
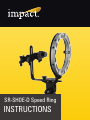
SR-SHOE-D Speed Ring
Instructions
Introduction
The Impact SR-SHOE-D Speed Ring for Dual Shoe Mount Flashes offers a portable
solution to achieve beautiful, soft lighting with equipment that you already own. It
mounts up to two speedlights and radio receivers for optimal power and efficient
recycle time, and accommodates a small- to medium-size rectangular, square, strip,
or octagonal softbox to control and shape your light.
The SR-SHOE-D is equipped with a 360° rotating, self-locking outer ring with labeled
rod mounts to make it easy to assemble and orient your softbox. Dual brackets
let you manipulate the angles and adjust the depth of the speedlights within your
softbox to adjust the light spread. The 5/8″ (16 mm) mounting adapter has sockets
for a light stand or boom arm, plus a built-in pivoting stand adapter with a ratchet
handle to adjust the vertical angle.
Precautions
•
Please read and follow these instructions and keep this manual in a safe place.
•
Clean this product with only a soft, dry cloth.
•
Keep this product away from children.
•
Use only parts provided by the manufacturer.
•
Make sure everything is secure before proceeding.
•
Make sure that this product is intact and that there are no missing parts.
•
To avoid damage to this product, be careful not to overtighten or improperly thread
any of the threaded fittings.
•
All photos are for illustrative purposes only.
Contents:
·· Impact SR-SHOE-D Speed Ring
·· User manual
·· One-Year Limited Warranty
2
Overview
A
B
1
C
6
2
7
8
9
4
3
5
A. Speed Ring:
B. L Bracket
1.
2.
3.
4.
5.
6.
C. Flash Bracket:
Softbox rod mounts
L-bracket mount
Locking knob
Ratchet handle
Mounting socket
L Bracket thumbscrew
7.
8.
9.
Shoe mounts (×4)
Small thumbscrews (×4)
Large thumbscrews (×5)
Also Included: User manual
Specifications
• Mounting socket: 5/8″ (16 mm)
• Dimensions (H × W × D): 12″ × 7.5″ × 10″ (30.5 × 19 × 25.4 cm)
• Weight: 3 lb. (1.4 kg)
3
Assembling the Speed Ring
Installing One Speedlight
You can use the SR-SHOE-D with a single speedlight and radio remote by mounting
them directly to the L bracket.
To assemble the SR-SHOE-D for a single speedlight, follow these steps:
1.
Mount your softbox onto the speed ring by inserting your softbox’s rods into
the corresponding labeled rod mounts (for more information on this, refer to
your softbox’s instruction manual).
2.
Mount the speed ring assembly onto a light stand or boom arm, and use the
locking knob to tighten the connection until secure.
3.
Insert the L bracket into the speed ring’s L-bracket mount, and use the
thumbscrew to secure its position. (Fig. 3)
4.
On the flash bracket, fully loosen the large thumbscrew from two of the shoe
mounts until the shoe mounts detach. (Fig. 2)
5.
Note: When installing a single speedlight and radio remote on the SR-SHOE-D,
you will not need to attach the flash bracket to the L bracket.
6.
Slide the large thumbscrews toward the center of the flash bracket to remove
them.
7.
Attach the shoe mounts to the L bracket. The top shoe mount should be facing
toward the speed ring, and the bottom one should be facing away from it.
8.
Insert your speedlight into the top shoe mount, and your radio remote into the
bottom shoe mount. Use the small thumbscrew on the shoe mounts to loosen
and tighten the mounts. (Fig. 1)
Important!
Make sure the mounts and the locking mechanisms on your speedlight and radio
remote are fully locked.
4
Fig. 1
Fig. 2
Fig. 3
5
Assembling the Speed Ring
Installing Two Speedlights
For greater flash power and faster recycle times, you can mount two speedlights and
radio remotes to the flash bracket.
To assemble the SR-SHOE-D for two speedlights, follow these steps:
1.
Mount your softbox onto the speed ring by inserting your softbox’s rods into
the corresponding labeled rod mounts (for more information on this, refer to
your softbox’s instruction manual).
2.
Mount the speed ring assembly onto a light stand or boom arm, and use the
locking knob to tighten the connection until secure.
3.
Insert the L bracket into the speed ring’s L-bracket mount, and use the
thumbscrew to secure its position. (Fig. 3 page 5)
4.
Unscrew and remove the middle thumbscrew from the flash bracket. (Fig. 5)
5.
Position the flash bracket so it’s curved toward the speed ring, and slide it onto
the L bracket. Use the thumbscrew to secure its position.
6.
The two outer shoe mounts should be facing toward the speed ring, and the
inner ones should be facing away from it. Insert your speedlights into the outer
shoe mounts, and your radio remotes into the inner shoe mounts. Use the
small thumbscrew on the shoe mounts to loosen and tighten the mounts. (Fig .4)
Important!
Make sure the mounts and the locking mechanisms on your speedlights and radio
remotes are fully locked.
Note: You may need to experiment to find a shoe-mount configuration that works
best with your speedlights and radio receivers. The SR-SHOE-D is flexible and allows
for a wide array of equipment configurations.
6
Making Adjustments
Rotating Your Softbox
The SR-SHOE-D’s outer ring rotates 360°, so you can change your softbox’s
orientation while shooting. To change the orientation of your softbox, carefully rotate
the outer ring to the desired angle. The outer ring’s self-locking feature will hold the
softbox in its new position.
Adjusting the Tilt
You can adjust the tilt of the speed ring assembly by loosening the ratchet handle.
Make sure to keep one hand on the assembly to hold it steady, until you have
retightened the ratchet handle.
Fig. 4
Fig. 5
7
One-Year Limited Warranty
This IMPACT product is warranted to the original purchaser to be free from
defects in materials and workmanship under normal consumer use for a period of
one (1) year from the original purchase date or thirty (30) days after replacement,
whichever occurs later. The warranty provider’s responsibility with respect
to this limited warranty shall be limited solely to repair or replacement, at the
provider’s discretion, of any product that fails during normal use of this product in
its intended manner and in its intended environment. Inoperability of the product
or part(s) shall be determined by the warranty provider. If the product has been
discontinued, the warranty provider reserves the right to replace it with a model
of equivalent quality and function.
This warranty does not cover damage or defect caused by misuse, neglect,
accident, alteration, abuse, improper installation or maintenance. EXCEPT AS
PROVIDED HEREIN, THE WARRANTY PROVIDER MAKES NEITHER ANY EXPRESS
WARRANTIES NOR ANY IMPLIED WARRANTIES, INCLUDING BUT NOT LIMITED
TO ANY IMPLIED WARRANTY OF MERCHANTABILITY OR FITNESS FOR A
PARTICULAR PURPOSE. This warranty provides you with specific legal rights, and
you may also have additional rights that vary from state to state.
To obtain warranty coverage, contact the Impact Customer Service Department
to obtain a return merchandise authorization (“RMA”) number, and return the
defective product to Impact along with the RMA number and proof of purchase.
Shipment of the defective product is at the purchaser’s own risk and expense.
For more information or to arrange service, visit www.impactstudiolighting.com
or call Customer Service at 212-594-2353.
Product warranty provided by the Gradus Group.
www.gradusgroup.com
IMPACT is a registered trademark of the Gradus Group.
© 2014 Gradus Group LLC. All Rights Reserved.
GG1