Transcript
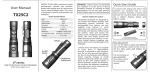
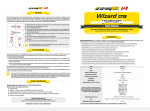
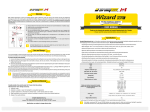
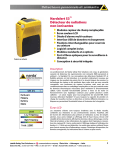
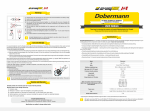
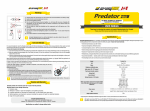
User Manual
DX30-R / PX30-R
Regular
MINI
EAGTAC DX30LC2-R and PX30LC2-R pack
big lumen output and long beam
distance in a compact, tough and grippy
body. They offer built-in li-ion fast charging feature using common USB port*,
versatile user interface, and highly
efficient low drop-out buck LED driver.
Be crazy lumen be with you in the dark.
Quick Specifications
Quick Start Guide
Remove the battery isolation plastic
disc (if any). Unscrew the tailcap and
insert battery (w/ protrude top) to use.
Ensure the positive battery terminal is
facing the LED. Replace tailcap and
tighten snugly.
DX30LC2-R Base Shown
Runtime (2xCR123A)
0.8 to 130+ hrs
by
Runtime (1x18650)ETTested
3500mAh 1.5 to 150+ hrs
Circuit
C3200L SC + C950
Batteries
1x18650 or 2xCR123A
Voltage
2.7V-6.0V
DX30LC2-R Kit
Brightness Adjustment
+ charging port
ON/OFF + Brightness Adjustment
Tailcap
+ charging port
DX30LC2-RM
EAGTAC
High Performance Tactical Flashlight
http://www.eagtac.com
Battery level indicator
After user switches on the ashlight or
changes brightness levels, the indicator reports the estimated battery
capacity by ashing the blue LED
under the on/off switch boot.
# of Flash Battery Capacity
1
<25%
2
25-50%
3
50-75%
4
>75%
At higher level, ashlight may report
lower battery capacity. This is normal.
*USB charging port requirement
User can also charge the ashlight
using any 5V USB port found on the
wall/car charger that comes with
your cell phone/tablet (rated at 1A
output or higher). When charging
with computer USB port, ensure the
USB port is able to sustain 1A current,
or it may prolong the charging time.
Compatible battery charging type
This ashlight will only charge a
single protected 3.6V/3.7V 18650
li-ion battery. Do not charge any
other battery type such as 3.0V
CR123A or 3.0V/3.7V RCR123A.
WARNING - Lithium and Li-ion batteries
can explode or cause burns if disassembled, shorted, or exposed to high
temperature. Do not mix with used or
other battery types or install backwards.
Charging your battery
Remove the waterproof cover and
insert the charging cable to charge
the battery. You must turn on the
ashlight switch (regular model only)
at the tailcap to charge. The ashlight
will switch off the LED output during
charge automatically. The ashlight
reports the current battery capacity
by ashlight the LED indicator.
# of Flash
Battery Capacity
1
<50%
2
50-75%
3
>75%
Constant ON
100% (done)
* The indicator may start ashing when you plug in
the charging cable. Switch on the tailcap switch to
start charging and re ect the current charging level.
After charging is done, turn off the
ashlight and replace the waterproof
cap to ensure water tightness.
AC-DC USB wall charger (optional)
The kit model (US) includes a UL
certi ed 1A USB wall charger.
Basic ON and OFF (Mini model)
Turn on the light at MAX by pressing
and holding the on/off switch button.
Turn on the light at LOW output by
pressing and releasing the
switch button quickly.
LED (Front)
Tail-cap
Basic ON and OFF (Regular model)
To turn on the light at LOW, press and
hold the side switch while turning on
the ashlight by pressing the tailcap
switch boot. To turn on the ashlight at
MAX, press the tailcap switch boot until
it clicks. To momentarily switch
on the light, apply light
pressure on the
switch boot.
Adjusting output level
With ashlight turned on, press the side
switch to cycle through ve output
levels.
MAX Very Low Low Med High
Very Low Low Med High MAX
Hidden AUX output
Press and hold the side switch for more
than 3 seconds to enter AUX output.
AUX1 AUX2 ...
Bi-directional clip (Removeable)
Swap the head and tailcap position to
reverse the pocket clip direction. The
pocket clip is also user removeable.
Energy saving feature
This preverses runtime by reducing
output current by 15% after 200
seconds at turbo mode.
Battery Safety Precaution
All EAGTAC ashlights are designed to
use button-top battery with protruding
positive terminal. For rechargeable li-ion
battery, use only EAGTAC li-ion battery, or
other protected li-ion battery with compatible length and diameter. When using
third party li-ion battery, ensure its
protection circuit is able to offer 5 amp or
higher current in order to function
normally with this ashlight.
Do not mix new and used lithium or li-ion
batteries. Do not mix batteries with
different brand, capacity, voltage, or
install batteries backwards. When the
output starts to dim (this implies battery
is almost drained), replace the batteries.
Do not drain the batteries completely
empty especailly when you’re using two
(or more) batteries in series.
Maintenance
Periodically clean the battery contact, PCB
board contact area, machined thread, and
o-ring with a lint free cloth. Apply a thin
coating of EAGTAC synthetic PTFE lubricant to the machined thread and o-rings.
Troubleshooting - Flashlight does not
turn on or fails to switch between
outputs normally:
1) Replace new batteries
2) Ensure retainer ring inside tailcap is tight
3) Clean all conductive contacts
4) Check battery polarity
“No Hassle” EAGTAC Warranty
For repair, replacement, or other inquiries
contact your EAGTAC dealer. You can also
reach our customer support via email at
[email protected].
We warrant our ashlights to be free from
defects in workmanship and materials. We will
repair, replace at our option, without charging
any product or part which is found to be
defective under normal use within 120
months from the date of purchase with the
proof of purchase.
Electronics, chargers and rechargeable batteries are covered for a period of 12 months with
purchase receipt. Such repair or replacement
shall be the purchaser’s sole and exclusive
remedy under this warranty. Normal wear and
tear including batteries draining is not
covered, nor is damage resulting from modi cation, misuse, abuse, neglect, faulty battery,
battery leakage, improper maintenance or
repaired by anyone other than EAGTAC or
authorized dealer.