1
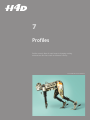
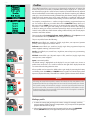
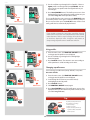
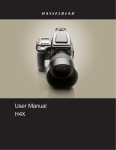
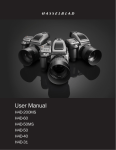
H4D User Manual H4D-200MS H4D-60 H4D-50MS H4D-50 H4D-40 H4D-31 H4D 7 Profiles Profiles not only allow for rapid setup in changing working environments but also ensure an element of security. Photo: Mark Holthusen / Hasselblad Masters 48 H4D Profiles The profiles feature allows rapid access to pre-determined combinations of settings that increase the speed and security of workflow. One example might be in a social situation where there might be a need for formal outdoor portraiture followed by informal indoor handheld flash-assisted wide-angle shots, both situations requiring very different settings in a stressful environment. By predetermining the relevant settings required beforehand for each situation, they can be saved collectively as a profile. By calling up the profile, you can then be assured that all the settings are correct at the press of one button. For example, you might choose – autofocus single, bracketing, programmed exposure, etc – for outdoors. Once set, you would click on the red PROFILES button, select a profile name and press SAVE. A new name can be entered for the new profile - ‘Outdoors’, for instance - and saved again. New settings are made for the indoor shots changing to flash, Pv setting, etc and the procedure repeated. By simply accessing ‘Outdoors’ or ‘Indoors’ in the profile list, all the relevant settings will be instantly and correctly implemented to match the situation. There are eight profiles: Default, Full auto, Studio, Fill flash. and four Spare reserved for customization. All except Default can be changed and renamed. The pre-set profiles feature the following: Default: normal flash sync, autofocus (single), single drive, auto exposure (aperture priority), centre weighted, user button -None Full auto: normal flash sync, autofocus (single), single drive, programmed exposure, centre weighted metering, user button -None 1 Studio: normal flash sync, manual focus, single drive, manual exposure, spot metering. user button - AF ISO / WB Save Fill flash: normal flash sync (adjusted output -1.7EV), autofocus (single), single drive, auto exposure, centre weighted. Spare: customized profiles. The default setting is highlighted on the display for easy and rapid access. Access to profiles lower on the list is via a scroll bar visible on the right of the display. Rotate the rear control wheel to bring them into view. 2 ONrOFF PROFILES/ESC All user profiles can be restored to default values again simply by removing the battery and holding down the MENU and ISO/WB buttons together and while keeping them depressed, replace the battery. There will be an audible signal that denotes the restoration. Note 3 F R 4 All settings are stored when a profile is created. This includes the ISO, white balance, color temperature and color tint settings that were current at the time the profile was created. These profile settings will override the settings in use at the time the profile button was pressed. In other words, remember to check for unintentional ISO, white balance or color temperature changes when using profiles. (Color tint is not a user setting but is stored after a manual white balance has been made). .BLJOHBQSPöMF ISO / WB Save 1) Activate the camera and go through the various settings (for example, autofocus, aperture priority, fill flash exposure compensation, etc.) you require for the particular purpose and save them as you go. 2) When all the required settings have been made, click (not press!) the PROFILES button (ON.OFF button) on the grip and the profile screen will appear. 49 H4D 1 3) Use the scroll bar to go through the list of profiles. Choose a Spare profile or a named profile (except Default). You can either save the new profile under the original name or you can change it 4) Press Save (ISO/WB button). The Profile name screen is then displayed where you can rename the profile to what suits you (see under *NBHF*OGP for procedure details). To use a profile from the main screen, press the PROFILES button to reach the profiles screen again. Scroll down the list to the profile you want and then press the Load (AF) button. All the saved settings will then be automatically implemented. 2 ONrOFF PROFILES/ESC 3 Note If you decided to change the settings but nevertheless keep the Profile name on the list, the new set of parameters will be retained under that name. That is to say, the settings will not be the same as listed here, despite the name. It might be safer practice to always change the profile name to avoid later confusion. AF Load 6TJOHQSPöMFT 1 2 1) From the main screen, click PROFILES (ON.OFF button) on the grip and the profile screen will appear. 2) Use the scroll bar to go through the list and highlight the desired profile. 3) Press Load (AF button). The camera is now set according to all the parameters stored according to the name. F R ONrOFF PROFILES/ESC 3 $IBOHJOHBQSPöMFOBNF You can change a profile name (except ‘Default’) at any time. 4 Proceed as follows: 1) From the main screen, click PROFILES (ON.OFF button) on the grip and the profile screen will appear. 2) Scroll through the list (front or rear control wheels) and highlight the desired profile. 3) Press Load (AF button). 4) Click PROFILES (ON.OFF button) again. 5) Press Save (ISO/WB button) The Profile name screen is then displayed where you can rename the profile to what suits you (see under Image Info 4.2). AF ONrOFF Load PROFILES/ESC 5 Tip ISO / WB ISO/WB Save MENU 50 To quickly reset all profiles back to the original factory settings: 1. Remove battery. 2. Wait 510 seconds. 3. Replace the battery while keeping both the Menu and IS0/WB buttons pressed. H4D Hasselblad A/S Hejrevej 30, DK - 2400 Copenhagen, Denmark Victor Hasselblad AB Box 220, SE - 401 23 Göteborg, Sweden 09.2011 - UK v15 141