1
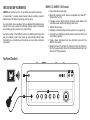
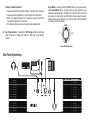
AMPLIFi 75 / AMPLIFi 150
Pilot’s Guide
Manuel de pilotage
Pilotenhandbuch
Pilotenhandboek
Manual del Piloto
取扱説明書
40-00-0354 Rev C
Pilot’s Guide also available at www.line6.com/manuals
©2013 Line 6, Inc.
Important Safety Instructions
C A U T ION
RISK OF ELECTRIC SHOCK
DO NOT OPEN
WARNING : TO REDUCE THE RISK OF FIRE OR ELECTRIC SHOCK, DO NOT REMOVE SCREWS. NO USER-SERVICEABLE PARTS
INSIDE. REFER SERVICING TO QUALIFIED SERVICE PERSONNEL.
WARNING : TO REDUCE THE RISK OF FIRE OR ELECTRIC SHOCK, DO NOT EXPOSE THE APPLIANCE TO RAIN OR MOISTURE.
CAUTION: This equipment has been tested and found to comply with the limits for a Class B digital device pursuant to Part 15 of FCC Rules. Operation is
subject to the following two conditions: (1) This device may not cause harmful interference, and (2) this device must accept any interference received, including interference that may cause undesired operation.
The lightning symbol within a triangle means “electrical caution!” It
indicates the presence of information about operating voltage and
potential risks of electrical shock.
The exclamation point within a triangle means “caution!” Please
read the information next to all caution signs.
Please Note: Line 6 is a registered trademark of Line 6, Inc. registered in the U.S. and other countries. AMPLIFi is a trademark of Line 6, Inc. All
rights reserved. iPod touch®, iPhone® and iPad® are trademarks of Apple, Inc. registered in the U.S. and other countries. App StoreSM is a service
mark of Apple, Inc. Apple is not responsible for the operation of this device or its compliance with safety and regulatory standards. The Bluetooth®
word mark and logos are registered trademarks owned by Bluetooth SIG, Inc. and any use of such marks by Line 6 is under license. Android is a
trademark of Google, Inc.
Line 6, Inc.:
26580 Agoura Road,
Calabasas, CA 91302-1921 USA
The POD, Clifton House, Butler’s leap.
Rugby, Warwickshire, United Kingdom, CV 21 3RQ
SERIAL NO:
You should read these Important Safety Instructions. Keep these instructions in a safe place
• Read these instructions.
• Keep these instructions.
• Heed all warnings.
• Follow all instructions. • Do not use this apparatus near water. • Clean only with dry cloth.
• Do not block any ventilation openings. Install in accordance with the manufacturer’s instructions.
• Do not install near any heat sources such as radiators, heat registers, stoves, or other apparatus (including amplifiers) that produce heat.
• This apparatus shall be connected to a MAINS socket outlet with a protective earthing connection.
• Do not defeat the safety purpose of the polarized or grounding-type plug. A polarized plug has two blades with one wider than the other. A grounding
type plug has two blades and a third grounding prong. The wide blade or the third prong are provided for your safety. If the provided plug does not fit into
your outlet, consult an electrician for replacement of the obsolete outlet.
• Protect the power cord from being walked on or pinched particularly at plugs, convenience receptacles, and the point where they exit from the apparatus.
• Only use attachments/accessories specified by the manufacturer.
• Use only with the cart, stand, tripod, bracket, or table specified by the manufacturer, or sold with the apparatus. When a cart is used, use caution when
moving the cart/apparatus combination to avoid injury from tip-over.
• Unplug this apparatus during lightning storms or when unused for long periods of time.
• Refer all servicing to qualified service personnel. Servicing is required when the apparatus has been damaged in any way, such as power-supply cord or
plug is damaged, liquid has been spilled or objects have fallen into the apparatus, the apparatus has been exposed to rain or moisture, does not operate
normally, or has been dropped.
• The apparatus shall not be exposed to dripping or splashing and that no objects filled with liquids, such as vases, shall be placed on the apparatus.
• WARNING: To reduce the risk of fire or electric shock do not expose this apparatus to rain or moisture.
• The appliance coupler is used as the disconnect device, the disconnect device shall remain readily operable.
• Connect only to AC power outlets rated: 100/120V 220/240V 50/60Hz (depending on the voltage range of the included power supply).
• Prolonged listening at high volume levels may cause irreparable hearing loss and/or damage. Always be sure to practice “safe listening.”
• Service is required when the apparatus has been damaged in any way, such as:
• power-supply cord or plug is damaged. • liquid has been spilled or objects have fallen into the apparatus.
• the unit has been exposed to rain or moisture. • the unit is dropped or the enclosure is damaged.
• the unit does not operate normally or changes in performance in a significant way.
THE GUITAR AMP, REINVENTED
AMPLIFi 75 / AMPLIFi 150 Features:
• High-performance guitar amp
• Bluetooth streaming audio device (compatible with AndroidTM,
iOS and Mac® or PC)
• 5 speaker stereo design delivers full-range stereo effects and
incredible sound quality when playing back music
• AMPLIFi Remote app
• Wirelessly control and deep edit every aspect of your guitar rig
• Automatic tone-matching instantly delivers tones that match your
music library selection
• Create, share, download and rate unlimited tones with the
AMPLIFi community
• Made for iPhone® 5s, iPhone 5c, iPhone 5, iPhone 4S, iPhone 4,
iPad® (4th generation), iPad mini, iPad (3rd generation), iPad 2 and
iPod touch® (5th generation).
AMPLIFi is more than an amp. It’s an entirely new guitar experience.
A revolutionary 5 speaker stereo design delivers incredibly powerful,
detailed tones that other amps simply can’t produce.
You can stream music wirelessly from any Bluetooth® enabled device
directly to the amp—perfect for jamming, playing songs at rehearsals
and cranking up the volume on your music library.
And at the center of the AMPLIFi world is a breakthrough iOS app that
lets you wirelessly control your guitar rig, automatically delivers tones
that match your music library, and connects you to an online community
of guitarists.
Top Panel Controls
5
A
B
C
D
1
3
2
4
DRIVE
BASS
MID
TREBLE
FX
REVERB
BLEND
6
1. Bluetooth® Pairing Button - Using Bluetooth, your AMPLIFi Amp
will communicate wirelessly with your iOS device. Before you run
the AMPLIFi Remote app, set up Bluetooth as follows:
To pair your amp with your iOS device:
• Enter Pairing Mode by pressing the Bluetooth button - it will flash.
• Your amp's unique name will appear on your iOS device.
• Select your amp's unique name - this pairs it up with your device!
Master Volume LED RIng
DRIVE: Adjusts the current Amp Model's Drive level.
Master Volume LED Ring - The ring of LEDs surrounding the Master
Volume knob light up in various ways, depending on the current
parameter being adjusted, as follows:
• Master Volume: LEDs are lit red to indicate Master Volume level.
• Guitar Level: when the Secondary Function is activated via knob
press, all LEDs are lit white; as your guitar level is adjusted, LEDs
are lit red.
• Tone Controls: when an individual Tone Control is adjusted, the
saved level is indicated in red; all other LEDs are lit white to display
the current level as you turn the knob.
FX: Adjusts the FX parameter saved with the preset and selected in
the AMPLIFi Remote application.
5. Preset Select Button - There are 4 onboard Presets stored in your
AMPLIFi amp's internal memory: Presets A, B, C and D. These can
be overwritten at any time, replaced by up to 4 Favorite Presets.
2. Guitar Input - plug in your 1/4 inch guitar cable here. Run the AMPLIFi
amp in standalone mode or with the AMPLIFi Remote app.
3. Tone Controls - When using AMPLIFi Remote with your iOS device,
all Tone adjustments can be made using the app Editor. You can also
tweak your guitar sound manually with these onboard Tone controls:
BASS, MID, TREBLE: Adjusts the Bass, Mid and Treble levels for
the current Amp Model's tone stack.
REVERB: Adjusts the Reverb level for the current Guitar Preset.
4. Master Volume Knob - This big knob controls the overall output
level of your AMPLIFi amp. It also has a Secondary Function of
adjusting your guitar level relative to the overall audio mix. This can
be useful when you're jamming to a track and your guitar level is too
soft or too loud.
To achieve a good balance, simply press the Master Volume knob to
activate its Secondary Function, then set your guitar level as desired.
After 5 seconds, the knob reverts to Master Volume control.
A
B
C
D
Preset Select and Tap Tempo Buttons
To Recall A Preset: Press the Preset Select Button repeatedly to
cycle through the A, B, C and D Presets. The white LEDs will indicate
your current selection.
Tuner Mode - Press and hold the TAP button for a few seconds to
enter Tuner Mode. When you play a note on your guitar, the tuner
will detect it automatically. LEDs light up to the left center of the LED
ring when your note is flat, and to the right of center when it's sharp.
When the top center LED is lit, your note is in tune. Touch any knob
or button to exit Tuner Mode.
To Save A Favorite Preset:
• Press and hold the Preset Select Button; Preset A's LED will flash.
• Press the button repeatedly to cycle through the Preset slots.
• When the desired Preset slot is selected, press and hold the
Preset Select Button for 2 seconds.
• Your Preset will be saved as a Favorite in the selected slot.
IN TUNE
+5
-5
+10
-10
6. Tap Tempo Button - Pressing the TAP Tempo button a few times
sets the tempo of Delays and other FX that have a Tap Tempo
feature.
FLAT
-20
+20
-30
SHARP
+30
-50
+50
IN TUNE
Tuner LED Indicators
Rear Panel Connections
7
8
9
10
11
7. Headphones - plug in your 1/4 inch stereo headphones cable here. AMPLIFi Remote Application For iOS
Headphones volume is controlled by the Master Volume knob.
Download the latest version of the free AMPLIFi Remote iOS application
8. Aux Input - plug an external mixer or other device into the 1/8 inch in the App StoreSM.
Aux Input for connecting a mic, keyboard or other instrument.
And while you're online, don't forget to register your AMPLIFi amp!
9. FBV Input - plug in a Line 6 FBV Express or FBV Shortboard MkII
here. The following FBV functionality is supported:
• Preset A B C D select
AMPLIFi Firmware Updates
• Tap Tempo and Tuner
Always run the latest firmware in your AMPLIFi amplifier. Your AMPLIFi
• Expression pedal control of assigned parameters
Remote application will inform you whenever a firmware update is
10.USB Input - for future use.
available, so you'll always know you have the latest version!
11.Power - switch on the power with this rocker switch, located just
above the AC cable receptacle. To reset to Factory settings, press
and hold Master Volume knob and Tone button at power up.