1
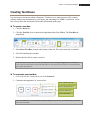
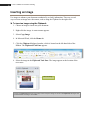
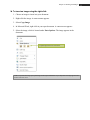
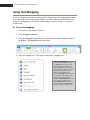
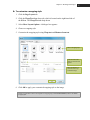
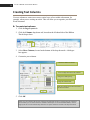
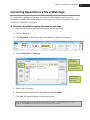
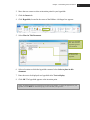
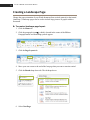
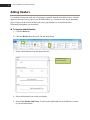
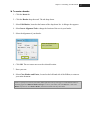
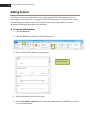
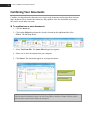
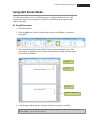
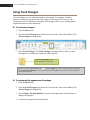
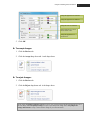
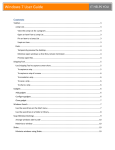
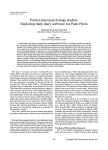
Microsoft Word 2010: A User’s Manual for Freelance Writers Isabella Broderick-Forster Microsoft Word 2010: A User’s Manual for Freelance Writers Isabella Broderick-Forster Intermediate Technical Writing I Acknowledgements Acknowledgements First, I’d like to thank my Intermediate Technical Writing I professor, Janine Solberg. If it had not been for her weekly office hours and her willingness to put up with both my scheduled and unscheduled visits, this manual may not have been possible. I’d also like to thank my roommates, who not only tested many of the instructions included in this manual, but also endured the pains of editing draft after draft of my modules throughout the semester. I’d like to give a special thanks to my family. My brother, who is a freelance writer, provided essential insight into the field of freelance writing. In addition, I’d like to thank my mother. When I was plagued by the restrictions of my 2009 Macbook with Microsoft Word 2008, she let me flourish on her PC. And I would be a fool to forget my father, whose wake-up calls on early mornings proved to be the necessary push that I needed to get to the library. Finally, thank you to Anne from Tall Poppy Café. Without your beautiful picture, titled “Coffee Laptop”, my cover page would be blank. i ii Introduction Introduction Welcome to your user’s manual for freelance writers. A freelance writer works independently on temporary contracts rather than for a longterm employer. Freelance writers are hired to do a variety of assignments from grant proposals to online articles. This manual will teach you to perform useful tasks in the freelance writing field using Microsoft Word 2010 for PC. Written for users who have a familiarity with Word, this manual offers step-by-step instructions to complete both simple and complicated features. The instructions are independent from one another so they can either be completed in chronological order or on an as needed basis. At first glance this program seems pretty straight forward, but by reading this manual, you will discover many features that will prove valuable in the field of freelance writing. This manual offers instructions for a variety of tasks including: Using Text Wrapping Creating Watermarks Creating Hyperlinks Adjusting AutoSave Changing Page Orientation And more… If you want to navigate Microsoft Word 2010 with ease, this manual is here to help. You will no longer have to wage a war on Word to perform basic function because those days are over. By reading these instructions you are not only benefitting your work but you are broadening your mind. iii iv Table of Contents Table of Contents Introduction Acknowledgements .................................................................................................. i Introduction ............................................................................................................ iii Table of Contents .................................................................................................... v Chapter 1: Customizing Microsoft Word 2010 Setting Your Default Font ....................................................................................... 3 Changing the Language of Your Document ........................................................... 4 Adjusting AutoSave ................................................................................................ 5 Chapter 2: Working with Images Creating Text Boxes ............................................................................................... 9 Inserting an Image................................................................................................. 10 Creating a Screen Capture .................................................................................... 12 Using Text Wrapping ............................................................................................ 14 Chapter 3: Formatting Your Document Creating a Hanging Indent .................................................................................... 19 Creating Text Columns ......................................................................................... 20 Connecting Hyperlinks to a File or Web Page...................................................... 21 Connecting Hyperlinks in Your Document .......................................................... 22 Creating a Landscape Page ................................................................................... 24 Adding Headers .................................................................................................... 26 Adding Footers...................................................................................................... 28 Creating Watermarks ............................................................................................ 30 Combining Your Documents ................................................................................ 32 Chapter 4: Editing Your Document Using Split Screen Mode ...................................................................................... 35 Using Track Changes ............................................................................................ 36 Running a Spelling and Grammar Check ............................................................. 38 v Chapter 1: Customizing Microsoft Word 2010 Chapter 1: Customizing Microsoft Word 2010 Setting a Default Font Changing the Language of a Document Adjusting AutoSave 1 2 A User’s Manual for Freelance Writers Chapter 1: Customizing Microsoft Word 2010 3 Setting Your Default Font Use default fonts to save a specific font to Microsoft Word. Once a default font is set, future documents in Microsoft Word will open using this font. For writers who consistently use one font, a default font eliminates time spent swapping one font for another. ► To set your default font: 1. Click the Home tab. 2. Click the dialogue box launcher, which is located to the right of the word Font. A dialogue box appears. 3. Customize your default font. Select a Font. Select a Font Size. Select a Font Style. Select Font Effects. Preview your default font. 4. Preview the font at the bottom of the dialogue box. 5. Click Set As Default. A second dialogue box appears. 6. Select This document only or All documents based on the normal template. 7. Click OK. NOTE: This document only applies the default font to your current document only. All documents based on the normal template applies the default font to both your current and future documents. 4 A User’s Manual for Freelance Writers Changing the Language of a Document Change the language of a document or selection of text when you are writing a Word document in a different language. Microsoft Word does not recognize words outside of the set language, which is English. When you change the set language, the proofing tools will access the dictionary of the chosen language. ► To change the language of a document: 1. Click the Review tab. 2. Click the Language drop-down tab, located on the left-hand side of the Ribbon. The Language tab drops down. 3. Select Set Proofing Language. A dialogue box appears. Your current language is displayed here. Choose a language. 4. Choose a language. 5. Click OK. The proofing tools are now set to the chosen language. NOTE: Select Set As Default to automatically use this language in future Microsoft Word documents. Chapter 1: Customizing Microsoft Word 2010 5 Adjusting AutoSave Use AutoSave to automatically save your Microsoft Word document in specific time intervals. You can set Word to save your document as frequently as every minute. If your computer crashes, AutoSave allows you to recover your lost documents. ► To adjust AutoSave: 1. Click the File tab. 2. Select Options, located in the left-hand column. The Word Options dialogue box appears. 3. Select Save. 4. Decrease the time interval using the arrows next to Save AutoRecover information. Adjust the time interval in minutes. 5. Click OK. The document automatically saves in intervals of the selected number of minutes. NOTE: Setting AutoSave to small intervals of time may cause Microsoft Word to operate slower. 6 A User’s Manual for Freelance Writers Chapter 2: Working with Images Chapter 2: Working with Images Creating Text Boxes Inserting an Image Creating a Screen Capture Using Text Wrapping 7 8 A User’s Manual for Freelance Writers Chapter 2: Working with Images Creating Text Boxes Use text boxes to insert text within a document. Text boxes serve many purposes, like creating callouts, adding extra information to a document, and containing text within a certain area. A text box is freely moveable and isolated from other information on the page. ► To create a text box: 1. Click the Insert tab. 2. Click the Text Box icon, located on the right-hand side of the Ribbon. The Text Box tab drops down. 3. Select Draw Text Box, located at the bottom of the tab. The cursor turns into a crosshair. 4. Left-click and drag the crosshair. 5. Release the left-click to create a text box. NOTE: If the text exceeds the space within the box, enlarge the text box clicking and dragging the circles located at the corners of the box and the squares located on the sides of the box. The circles alter the whole box at once and the squares alter a specific side of the box. ► To customize your text box: 1. Click on the text box. Word redirects you to the Format tab. 2. Customize the appearance of your text box. Choose a default shape style. Choose a background color. Choose an outline color. Choose a shape effect. NOTE: If the Format tab is not automatically selected after clicking on your text box, click on the Format tab, located on the left side of the Ribbon. 9 10 A User’s Manual for Freelance Writing Inserting an Image Use images to enhance your document aesthetically or clarify information. There are several ways to insert an image into a document, such as using the Clipboard or the right-click. ► To insert an image using the Clipboard: 1. Choose an image to insert into your document. 2. Right-click the image. A context menu appears. 3. Select Copy Image. 4. In Microsoft Word, click the Home tab. 5. Click the Clipboard dialogue launcher, which is located on the left-hand side of the Ribbon. The Clipboard Task Pane appears. 6. Select the image in the Clipboard Task Pane. The image appears at the location of the text cursor. Select the image. NOTE: The Clipboard holds twenty-four images. After twenty-four images are stored in the Clipboard, old images must be deleted before new images can be added. Chapter 2: Working with Images ► To insert an image using the right-click: 1. Choose an image to insert into your document. 2. Right-click the image. A context menu appears. 3. Select Copy Image. 4. In Microsoft Word, right-click in your open document. A context menu appears. 5. Select the image, which is located under Paste Options. The image appears in the document. Copied images and text are stored here. NOTE: To paste the last image you copied using a shortcut; press Ctrl and V on your keyboard. The image appears at the location of the text cursor. 11 12 A User’s Manual for Freelance Writers Creating a Screen Capture Use screen captures to take a static image of either the whole screen or part of the screen. A full screen capture takes a picture of all the content displayed on a monitor. A partial screen capture takes a picture of specific images or regions displayed on a monitor. After a screen capture is taken, you can insert it into a Microsoft Word document. ► To create a full screen capture: 1. Prepare your screen for a screen capture. 2. Press Ctrl and Prtscn on the keyboard to take a static image of the whole screen. 3. In Microsoft Word, click the Home tab. 4. Click the Clipboard dialogue launcher, located on the left-hand side of the Ribbon. The Clipboard Task Pane appears. 5. Move your text cursor to the insertion point. 6. Select the image in the Clipboard Task Pane. The image appears at the location of the text cursor. Select the image of your screen capture. Chapter 2: Working with Images ► To create a partial screen capture using the Snipping Tool: 1. Choose an image to capture. 2. Click the Windows Symbol , which is located in the bottom left-hand corner of the screen. A context box appears. 3. Select the Snipping Tool. The screen greys and a dialogue box appears. 4. Click on New. The New tab drops down. NOTE: There are several different Snip types. A Free-form Snip allows you to draw around an image using the cursor. A Rectangular Snip allows you to create a box around an image by dragging the cursor. A Window Snip takes a full screen capture of an open program. 5. Select Rectangular Snip. 6. Left-click and drag your cursor around the image. 7. Release the left-click to capture the image. 8. In Microsoft Word, click the Home tab. 9. Click the Clipboard dialogue box launcher, which is located on the left-hand side of the Ribbon. The Clipboard Task Pane appears. 10. Select the image in the Clipboard Task Pane. The image appears at the location of the text cursor. 13 14 A User’s Manual for Freelance Writers Using Text Wrapping Use text wrapping to incorporate an image into a body of text. Text wrapping determines how your image will be incorporated into the text and how the text flows around your image. Text wrapping can be used to include images in articles, blogs or any type of written work. ► To use text wrapping: 1. Left-click on your image to select it. 2. Click the Page Layout tab. 3. Click the Wrap Text drop-down tab, which is located on the right-hand side of the Ribbon. The Wrap Text tab drops down. 4. Select a wrapping style. Your image assumes the wrapping style. NOTE: In Line with Text incorporates the image into the line of text. Square allows the text to flow around the image in the shape of a square. Tight allows the text to flow closely around the edges of the shape. This wrapping style allows you to move it freely throughout your document. Through allows the text to flow closely around the edges of the image, filling in any white space available. Top and Bottom allows the text to flow above and below the image. Behind Text allows the text to overlap the image. In Front of Text allows the image to overlap the text. Chapter 2: Working with Images 15 ► To customize a wrapping style: 1. Click the Page Layout tab. 2. Click the Wrap Text drop-down tab, which is located on the right-hand side of the Ribbon. The Wrap Text tab drops down. 3. Select More Layout Options. A dialogue box appears. 4. Choose a wrapping style. 5. Customize the wrapping style using Wrap text and Distance from text. Select a wrapping style. Select the side of the image in which the text appears. Select the distance at which the text wraps around the image. 6. Click OK to apply your customized wrapping style to the image. NOTE: If you decide to return to the original text wrapping style, select In Line with Text, which is the default wrapping style. Chapter 3: Formatting Your Document Chapter 3: Formatting Your Document Creating a Hanging Indent Creating Text Columns Connecting Hyperlinks to a File or Web Page Connecting Hyperlinks within Your Document Creating a Landscape Page Adding Headers Adding Footers Creating a Watermark Combining Your Documents 17 18 A User’s Manual for Freelance Writers Chapter 3: Formatting Your Document Creating a Hanging Indent Use a hanging indent to create a paragraph that has every line, excluding the first line, indented. Hanging indents may be used to create lists, outlines or bibliographies. ► To create a hanging indent: 1. Click the Page Layout tab. 2. Click the Paragraph dialogue box launcher, located in the center of the Ribbon. A dialogue box appears. 3. Select Hanging on the drop-down tab below Special. Select Hanging to create a hanging indent. Select the indentation amount in inches. 4. Adjust the indentation amount below By. 5. Click OK to apply the paragraph settings. NOTE: The hanging indent is applied to both current and future paragraphs. 19 20 A User’s Manual for Freelance Writers Creating Text Columns Use text columns to create two or more vertical rows of text within a document, for example, when you are writing an article. This will allow you to organize your Microsoft Word document. ► To create text columns: 1. Click the Page Layout tab. 2. Click the Columns drop-down tab, located on the left-hand side of the Ribbon. The tab drops down. 3. Select More Columns, located at the bottom of the drop-down tab. A dialogue box appears. 4. Customize your columns. Choose the number of columns. Insert a straight line between the columns. Change the column spacing. Change the column width. Apply the columns to the whole document or part of the document. 5. Click OK. NOTE: Once one column is full, the text continues in the following column. To quickly apply text columns to your document, you can choose from a list of default column styles. To access the default columns, click the Page Layout tab. Click the Columns drop-down tab. The preset columns are located on the drop-down menu. Chapter 3: Formatting Your Document Connecting Hyperlinks to a File or Web Page Use a hyperlink to quickly navigate from one location to other marked locations in your document. Hyperlinks make locating outside sources quick and efficient. Hyperlinks can be used to connect to other files or web pages. ► To create a hyperlink to another document or web page: 1. Move the text cursor to select an insertion point for your hyperlink. 2. Click the Insert tab. 3. Click Hyperlink, located in the center of the Ribbon. A dialogue box appears. 4. Select Existing File or Web Page. Enter your hyperlink title. Browse your computer for a file. Enter web page address or file address here. 5. Select a file or web page. 6. Enter the text to be displayed as a hyperlink after Text to display. 7. Click OK. The hyperlink appears at the insertion point. NOTE: The default appearance for hyperlinks is blue and with an underline. To change the appearance of your hyperlink, click the Home tab. In the Font group you can customize your hyperlink. 21 22 A User’s Manual for Freelance Writers Connecting Hyperlinks in your Document Use a hyperlink to quickly navigate from one location to other marked locations in your Word document. Hyperlinks make locating specific areas within a document quick and efficient. Hyperlinks can be used in long documents to shorten to time it takes to scroll through information by connecting the hyperlink to bookmarks or headings. ► To create a hyperlink to a specific location in your current document: 1. Mark the hyperlink location in your current document. There are two ways to mark a hyperlink location: Create a bookmark. To insert a bookmark click on the Insert tab. Select Bookmark. Below Bookmark name, enter a name. Click Add. Enter the bookmark name here. NOTE: When creating a bookmark name, there are several restrictions. The name must start with a letter. The only acceptable symbol is the underscore symbol as long as it is not the first character. Spaces also cannot be used. Apply a heading style. To apply a heading style, select a heading in your current document. Click on the Home tab. In the Styles group, select a heading style. Select a heading style. Browse heading styles. Chapter 3: Formatting Your Document 23 2. Move the text cursor to select an insertion point for your hyperlink. 3. Click the Insert tab. 4. Click Hyperlink, located in the center of the Ribbon. A dialogue box appears. 5. Select Place in This Document. Enter your hyperlink title. This is how the hyperlink appears in your document. Select a location to connect to the hyperlink. 6. Select a location to which the hyperlink connects below Select a place in this document. 7. Enter the text to be displayed as a hyperlink after Text to display. 8. Click OK. The hyperlink appears at the insertion point. NOTE: The default appearance for hyperlinks is blue and with an underline. To change the appearance of your hyperlink, click the Home tab. In the Font group you can customize your hyperlink. 24 A User’s Manual for Freelance Writers Creating a Landscape Page Change the page orientation of your Word document from vertical (portrait) to horizontal (landscape). Landscape pages can be used to include large pictures or graphs within a document. ► To create a landscape page layout: 1. Click the Home tab. 2. Click the paragraph icon ( ), which is located in the center of the Ribbon. Paragraph marks and formatting symbols appear. 3. Click the Page Layout tab. 4. Move your text cursor to the end of the last page that you want to remain vertical. 5. Click the Breaks drop-down tab. The tab drops down. 6. Select Next Page. Chapter 3: Formatting Your Document 25 7. Move your text cursor to the end of the page that you want to make horizontal. 8. Click the Breaks drop-down tab. The tab drops down. 9. Select Next Page. 10. Select the text or image to be included on the landscape page. 11. Click the Orientation drop-down tab. The tab drops down. 12. Select Landscape. The orientation of the page changes from vertical to horizontal. NOTE: To hide the paragraph marks and formatting symbols, click the Home tab, and then click on the paragraph icon. 26 A User’s Manual for Freelance Writers Adding Headers Use headers to insert text at the top of your page, separated from the main body of text. A header appears at the top of every page in your Word document, or, if selected, at the top of alternating pages. Footers can be used to include your name, page numbers or section distinctions consistently throughout your document. ► To insert a default header: 1. Click the Insert tab. 2. Click the Header drop-down tab. The tab drops down. 3. Select a default header from the drop-down list. Scroll down to view more preset headers. 4. Select the bracketed text to edit your header. 5. Select Close Header and Footer, located on the right-hand side of the Ribbon, to return to your main document. Chapter 3: Formatting Your Document ► To create a header: 1. Click the Insert tab. 2. Click the Header drop-down tab. The tab drops down. 3. Select Edit Header, located at the bottom of the drop-down list. A dialogue box appears. 4. Select Insert Alignment Tab to change the location of the text in your header. 5. Select the alignment of your header. Select the alignment of the text in your header. 6. Click OK. The text cursor moves to the selected location. 7. Enter your text. 8. Select Close Header and Footer, located on the left-hand side of the Ribbon, to return to your main document. NOTE: To quickly access and exit your header, double right-click at the top of the page. To create different headers on alternating pages select Different Odd & Even Pages. To remove your header, click on the Insert tab. Click on the Header drop-down tab. Click Remove Header, located at the bottom of the drop-down menu. 27 28 A User’s Manual for Freelance Writers Adding Footers Use footers to insert text at the bottom of your page, separated from the main body of text. A footer appears at the bottom of every page in your Word document or, if selected, at the bottom of alternating pages. Footers can be used to include your name, page numbers or section distinctions consistently throughout your document. ► To insert a default footer: 1. Click the Insert tab. 2. Click the Footer drop-down tab. The tab drops down. 3. Select a default footer from the drop-down list. Scroll down to view more preset headers. 4. Select the bracket text to edit your footer. 5. Select Close Header and Footer, located on the right-hand side of the Ribbon, to return to your main document. Chapter 3: Formatting Your Document ► To create a footer: 1. Click the Insert tab. 2. Click the Footer drop-down tab. The tab drops down. 3. Select Edit Footer, located at the bottom of the drop-down list. A dialogue box appears. 4. Select Insert Alignment Tab to change the location of your footer. 5. Select the alignment of your footer. Select the alignment of the text in your footer. 6. Click OK. The text cursor moves to the selected location. 7. Enter your text. 8. Select Close Header and Footer, located on the left-hand side of the Ribbon, to return to your main document. NOTE: To quickly access and exit your footer, double right-click at the bottom of the page. To create different footers on alternating pages select Different Odd & Even Pages. To remove your footer, click on the Insert tab. Click on the Footer drop-down tab. Click Remove Footer, located at the bottom of the drop-down menu. 29 30 A User’s Manual for Freelance Writers Creating Watermarks Use watermarks to insert an image or text in the background of your document. Watermarks can be used to enhance the aesthetics of a document, to state the purpose of a document, or to personalize a document. ► To create a watermark: 1. Click the Page Layout tab. 2. Click the Watermark drop-down tab, located in the center of the Ribbon. The Watermark tab drops down. 3. Select a default watermark from the drop-down list. The watermark appears on your document. ► To customize a picture watermark: 1. Click the Page Layout tab. 2. Click the Watermark drop-down tab, located in the center of the Ribbon. The Watermark tab drops down. 3. Select Custom Watermark, located at the bottom of the drop-down tab. A dialogue appears. 4. Select Picture watermark. Browse your computer for an image. NOTE: You can customize your watermark by choosing a picture that you have saved to your computer. You can select the scale of the picture. Also, you can select whether or not the picture will be opaque or semitransparent by checking off washout. Chapter 3: Formatting Your Document 5. Click OK. The watermark appears in your document ► To customize a text watermark: 1. Click the Page Layout tab. 2. Click the Watermark drop-down tab, located in the center of the Ribbon. The Watermark tab drops down. 3. Select Custom Watermark located at the bottom of the drop-down tab. A dialogue appears. 4. Select Text watermark. Enter your text here. NOTE: You can customize your watermark by choosing a language, font, font color, and size. You can change the layout to make the text appear horizontal or diagonal. To make the text semitransparent, check off semitransparent. 5. Click OK. The watermark appears on your document. 31 32 A User’s Manual for Freelance Writers Combining Your Documents Combine your documents by choosing two or more saved documents and merging them into one large document. These inserted documents are fully editable. Once the documents are merged, they can be saved under one name. ► To combine two or more documents: 1. Click the Insert tab. 2. Click on the Object drop-down tab, which is located on the right-hand side of the Ribbon. The tab drops down. 3. Select Text From File. The Insert File dialogue box appears. 4. Select one or more documents from your computer. 5. Click Insert. The documents appear in your open document. Browse your computer for Word documents. Select a document. NOTE: You can only select documents that are saved to your computer or hard drive. When inserting documents into Microsoft Word, the documents will appear in the order in which they are selected, for example, Document 1 appears before Document 2, and Document 3 appears after Document 2. Chapter 4: Editing Your Document Chapter 4: Editing Your Document Using Split Screen Mode Using Track Changes Running a Spelling and Grammar Check 33 34 A User’s Manual for Freelance Writers Chapter 4: Editing Your Document 35 Using Split Screen Mode Use split screen mode to view two different pages of a single document at once. Split screen mode allows you to compare text and access information from separate pages within a document. ► To split the screen: 1. Click the View tab. 2. Click the Split icon, which is located in the center of the Ribbon. A horizontal line appears. 3. Move the horizontal line to the middle of your document using the cursor. The screen splits. A duplicate of your current document and a second scroll bar appear below the horizontal line. Document 1 Scroll bar 1 Scroll bar 2 Duplicate of Document 1 4. Scroll through each documents using the document’s respective scroll bar. NOTE: Changes made to one document are present on the other document. To turn Split Screen mode off, click the Remove Split icon. The horizontal line disappears 36 A User’s Manual for Freelance Writers Using Track Changes Use track changes to view alterations made to a document. For example, if another person is editing your document, his or her changes will be marked. For writers who consistently receive feedback on documents, track changes allows you to distinguish the original document from the alterations. ► To track your changes: 1. Click the Review tab. 2. Click the Track Changes drop-down tab, located in the center of the Ribbon. The Track Changes tab drops down. 3. Select Track Changes. The Track Changes icon turns yellow to alert you that the program is on and future alterations will be marked. Click the Track Changes icon to enable and disable Track Changes. NOTE: To view the original document, click and select Original. To view the original document with markups, select Original: Show Markup. To view the final document, select Final. The final document includes alterations without showing markups. ► To customize the appearance of markups: 1. Click the Review tab. 2. Click the Track Changes drop-down tab, located in the center of the Ribbon. The Track Changes tab drops down. 3. Select Change Tracking Options to customize the appearance of the markups. A dialogue box appears. 4. Customize the appearance of the markups. Chapter 4: Editing Your Document 37 Change the appearance of insertions. Change the appearance of deletions. Change the color of comments. Select Track Moves to track the movement of text. Change the appearance of relocated text. 5. Click OK. ► To accept changes: 1. Click the Review tab. 2. Click the Accept drop-down tab. A tab drops down. ► To reject changes: 1. Click the Review tab. 2. Click the Reject drop-down tab. A tab drops down. NOTE: Select Accept/Reject and Move to Next to accept or reject a specific change and then automatically move on to the next change. Select Accept/Reject Change to accept or reject that specific change. Select Accept/Reject All Changes in Document to accept or select all of the changes in your current document. 38 A User’s Manual for Freelance Writers Running a Spelling and Grammar Check Use Spelling and Grammar check to proofread your document. Spelling and Grammar check will scan your document for spelling and grammatical errors. If errors are detected, this feature will offer you suggestions to correct them. ► To check your spelling and grammar: 1. Click the Review tab. 2. Click Spelling & Grammar which is located on the left-hand side of the Ribbon. A dialogue box appears. 3. Select a correction under Suggestions. The error is displayed here in red. Select a correction. 4. Click Change to accept the correction. NOTE: If you do not agree with the spelling and grammar check, select Ignore Once to accept a word or phrasing one time. Select Ignore All to accept a specific word or phrasing every time it appears in the document. Select Add to Dictionary to accept a specific word when it is used in future documents.