1
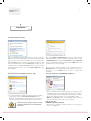
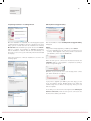
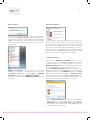
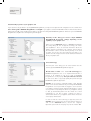
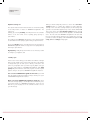
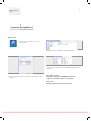
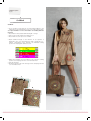
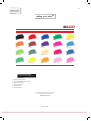
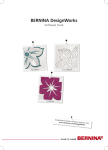
BERNINA DesignWorks
Software Suite
Crysta lWork
Pa int W or k
Cu tW or k
DesignWork
s Projects in
more languag
w w w.bern
es at:
ina.com/De
signWorks
2
Table of contents
Copyright 03
Registration05
System Requirements
06
Installation07
Projects 16
Tips & Tricks
24
Quick Reference Guide
27
File Export
28
edding color palette
30
3
BERNINA DesignWorks
Copyright
ational AG,
«COPYRIGHT 2009-2012 BY BERNINA Intern
ALL RIGHTS RESERVED»
No parts of this publication or the accompanying software may be copied or distributed,
transmitted, transcribed, stored in a retrieval system or translated into any human or
computer language, in any form or by any means, electronic, mechanical, magnetic,
manual, or otherwise, or disclosed to any third party without the express written
permission of:
BERNINA International AG
Seestrasse 161
8266 Steckborn / Switzerland
www.bernina.com
4
BERNINA DesignWorks
Copyright
L ic e nc e Agr e e me n t !
NOTE
The screen illustrations in this publication are intended to be
representations, not exact duplicates of the screen layouts
generated by the software.
PRINTED USER MANUAL & Printed DesignWorks Book
Registered users of BERNINA DesginWorks Software/CutWork
Software are permitted to create one (1) copy of the BERNINA
DesignWorks Software User Manual for their personal use. This
can be printed with a personal printer or through a commercial
printing company.
LIMITED WARRANTY
BERNINA International AG warrants for a period of 90 days,
commencing from the date of delivery of the software to you, that
the USB Security Key (Dongle or Hardware Key) and the BERNINA
CutWork, PaintWork and/or CrystalWork Accessory (collectively
referred to as «the Products») are free from defects in materials
and workmanship. Your exclusive remedy for breach of warranty
is to return the products together with proof of purchase to BERNINA
or its authorized dealers within the warranty period, and they
will be replaced free of charge. You are responsible for the cost
of shipping and insurance, and bear the risk of loss, damage and
misplacement of «the Products». The purchaser relies on his own
skill and judgement in selecting the software for his own use and
assumes the entire risk as to the results and performance of the
software. Subject to warranties and conditions imposed by law,
BERNINA International AG expressly disclaims all other warranties
and conditions, whether expressed or implied, including without
limitation, warranties and conditions of merchantability, fitness
for a particular purpose, title and non-infringement. BERNINA
International AG specifically does not warrant that the software
will meet the purchaser’s requirements or run without interruption
or error, or appear precisely as described in the accompanying
documentation and onscreen documentation.
LIMITATIONS OF LIABILITY
To the maximum extent permitted by applicable law, in no
event will BERNINA International AG or its developers, officers,
employees, licensors or affiliates be liable to you for any
consequential, incidental or indirect damages (including but
not limited to damages for loss of business profits, business
interruption, loss of business information and the like), whether
foreseeable, or unforeseeable, arising out of the use of or inability
to use the software or accompanying USB Security Key, cable, or
the BERNINA CutWork, PaintWork and/or CrystalWork Accessory
and accompanying documentation, regardless of the basis of the
claim and even if BERNINA, its licensors or an authorized BERNINA
representative have been advised of the possibility of such
damages. Some states or jurisdictions do not allow the exclusion
of incidental, consequential or special damages, so the above
limitation or exclusion may not apply to you.
TERMINATION
Your License to use the BERNINA DesignWorks Software is effective
as long as you comply with the terms and conditions of the End
User License Agreement (EULA). Your license to use the BERNINA
DesignWorks Software will terminate automatically without notice
from BERNINA International AG or its licensors if you fail to comply
with any of the terms of the EULA. You may terminate this license
at any time by returning the BERNINADesignWorks Software
and all copies thereof, the USB Security Key (dongle), the dongle
security device cable, the BERNINA CutWork, PaintWork and/or
CrystalWork Accessory and all accompanying documentation to
BERNINA International AG.
CONTACT
If you have any questions, please contact your BERNINA distributor,
or
BERNINA International AG
CH-8266 Steckborn / Switzerland
www.bernina.com
Software Copyright © 2009-2012
DRAWstitch Ltd. All rights reserved.
Artwork and manual Copyright © 2009 BERNINA International
AG. All rights reserved. BERNINA is a trademark and/or registered
trademark of BERNINA International AG.
DRAWstitch is a trademark and/or registered trademark of
DRAWstitch Ltd.
BERNINA DesignWorks
Registration
Registration
To receive warranty benefits, software service packs, and information about future product
enhancements, register online and receive a free DesignWorks design. Only new software
that was purchased from an authorized BERNINA Dealer is covered under warranty. Please register under www.bernina.com
Click «Support», then «Software Registration».
Se rvic e -Pa ck
We recommend to download and install the current DesignWorks Service Pack Update.
www.bernina.com/downloads
5
6
BERNINA DesignWorks
System Requirement
System Requirements
Minimum
Recommended
CPU: Minimum 1,5 GHz Intel or AMD processor
CPU: Minimum 1,5 GHz Intel or AMD processor
RAM: 1 GB of RAM (for Windows XP O/S) or 2 GB of RAM (for
Windows VistaTM & Windows® 7), 3GB of RAM (for Windows
VistaTM 64-bit and Windows® 7 64-bit)
RAM: 2 GB of RAM (for Windows XP O/S) or 3 GB of RAM (for
Windows VistaTM & Windows® 7), 4GB of RAM (for Windows
VistaTM 64-bit and Windows® 7 64-bit)
Hard disk: 1 GB of free uncompressed space
Hard disk: 1 GB of free uncompressed space
CD-ROM: For installation
CD-ROM: For installation
Graphics card: Minimum: 3D DirectX 9 accelerator with at least
128 MB dedicated RAM, 32-bit color.
Graphics card: 3D DirectX 10 accelerator with at least 512 MB
dedicated RAM, 32-bit color.
If the machine has Windows Vista/7 it must be Aero capable
If the machine has Windows® VistaTM /7 it must be Aero
capable
Monitor Resolution: 1024 x 768
Monitor Resolution: 1024 x 768
O/S: Windows XP®, or Windows VistaTM, Windows® 7 with
the latest Service Packs
Ports: Available USB port for the USB Security Key. Available USB
port for BERNINA USB stick or sewing machine connection (aurora)
O/S: Windows XP®, or Windows VistaTM, Windows® 7 (32-64
bit) with the latest Service Packs
Ports: Available USB port for the USB Security Key. Available USB
port for BERNINA USB stick or sewing machine connection (aurora)
Mouse: available
Mouse: available
Printer: Windows-compatible
Printer: Windows-compatible
7
BERNINA DesignWorks
Installation
Installation
Inserting installation media
Insert the BERNINA DesignWorks installation CD into your CDROM drive. It is recommended that you close all running programs
before you proceed. If your computer does not have the CDROM AUTORUN feature activated, open Windows Explorer and
from the CD-ROM drive run the «setup.exe» program. If your
computer has the «CD-ROM AUTORUN feature», you will see the
following window on your screen. Select Run Setup.exe to start
the installation.
A. If you are NOT the Administrator of the system the following
Dialog will appear. In order to install the software you have to login
as Administrator by entering the User name and the Password
in the relevant fields. Afterwards by clicking the «OK»-button the
installation will continue normally.
User Account Control (Windows Vista /7 only)
B. If you are running Windows Vista operating system as
Administrator, the following dialog will appear. In this screen
you have to select the Allow option, in order to continue the
installation.
Start the Installation of BERNINA DesignWorks
• If you are running the installation in Windows Vista operating
system and you have the User Account Control option
enabled a Security Warning will appear informing you about
the new software and if you are allowing it to be executed.
• Wait for a while until the installer prepares your system for the
installation. When the following dialog appears you are ready to
start installing files. Press «Next»-button on this dialog to continue.
By pressing «Help» you have access to this installation guide.
• Before you proceed, make sure that none of the following
devices is attached (connected) on your computer:
Unplug the USB security key and turn off your
embroidery machine before continuing with
installation.
USB Security key
BERNINA embroidery machine
• Wait until the installation wizard prompts you to plug these
devices on a USB port.
8
BERNINA DesignWorks
Installation
License agreement
Change Current Destination Folder window
• The following screen is the License Agreement window Click
on the first «radio»-button of this window to confirm that you
accept the terms of the license agreement.
In this window you can select another directory to install BERNINA
DesignWorks or keep the current one that is shown in the dialog.
Browse by the navigation controls of this window to a folder you
prefer and the click «OK»-button to continue.
CAUTION!
PLEASE READ CAREFULLY THE TERMS & CONDITIONS OF THE
LICENSE AGREEMENT
• Then click the «Next»-button.
Setup type
Program destination folder
Select installation type window.
• The Destination Folder dialog will appear. You can either press
«Next»-button to leave the default destination folder or by
clicking the «change»-button you will be prompted to use
another folder. In case you want to change the installation folder
by clicking next you will be directed
A. If you choose Complete all program features will be installed
automatically. If you press the «Next»-button the installation
procedure will proceed to the Ready to install dialog
B. If you choose Custom, you have to specify which features of the
program you want to install (recommended only for experienced
users). Click the «Next»-button.
9
BERNINA DesignWorks
Installation
Custom setup
Ready to install
The Custom Setup Window will appear. In this window you can
add or remove specific features that you choose. The main fields,
which you can modify, are Image Tracer and Samples. If you
click the symbols placed on the left of the choices, you can
expand all subsequent features and components. By clicking on an
icon you get 3 options to choose from:
You are now ready to install. Click Install for installation to begin.
At this point you must select whether you like to install the EC on
PC 3.1 (BERNINA embroidery machine control software), or not.
In case that you don’t want to directly connect a BERNINA aurora
family embroidery machine, leave this option unchecked.
It is recommended that you install EC on PC 3.1 on your computer
in order to be able to save to the BERNINA USB Stick and use the
Export to BERNINA functionality of the software.
• This feature will be installed on local hard disk. This
option is active only on the final subsections. Example: With this
option you can activate one or more color table. In case that all
sub-features are not enabled, the main feature is marked with
the
icon.
• This feature and all sub-features will be installed on local
hard disk. This option is active on features that have subfeatures. Example: With this option you can activate all available
options of the Color tables section. A main feature that all of its
sub-features are enabled is marked with the
icon.
• This feature will not be available. This option can disable
the specific feature that you choose in case of subfolder, or
disable all the options of the main feature. This is marked with
the
icon.
• Once you have selected the features you want to add/remove,
click on the «Next»-button.
If you select to install EC on PC 3.1 on your computer the
installation will start immediately. In case that a previous version is
found you will be prompted to remove it and then the installation
will automatically proceed with the installation.
Once the installation of EC on PC 3.1 is finished the installation of
BERNINA DesignWorks will automatically continue.
Notice:
• The installation of EC on PC may need to add .Net Framework
2.0 that is a prerequisite for EC on PC 3.1. This installation may
take a while so please be patient.
10
BERNINA DesignWorks
Installation
Completing installation – Installing DirectX
USB Key Remote Upgrade utility
Once the installation is completed, the following figure appears
confirming that the installation has been completed. In the same
dialog you are notified that after this installation has finished,
DirectX 9.0c will be installed in your system. Click on the «Finish»button to complete the Installation of BERNINA DesignWorks
and the installation of DirectX 9.0c will start automatically. At
this point you can connect your embroidery machine and the USB
Security key.
After the installation ends the USB Key Remote Upgrade Utility
will appear.
NOTICE:
• If you have already upgraded your USB Key Click Cancel.
• If you are upgrading form an older version you must insert one
(or more) 16-bit Upgrade code(s), that you have received from
your distributor, in the respective Code fields.
Follow the instructions of DirectX installation as shown in the
following figures
Make sure that you are connected to the internet and click the
«Upgrade»-button. If the upgrade is completed successfully a
success message will appear.
Otherwise if you receive an error code message please contact
your dealer / distributor for support.
If you prefer to upgrade your USB Key at a later stage, you can
access the USB Key Remote Upgrade Utility. From within the
software using the tools Menu > Security Keys. Enter your code
and select update.
In case that you see an error like in the figure below «Check your
internet connection», make sure that you are connected to the
internet and-or disable your firewall.
11
BERNINA DesignWorks
Installation
Restart required
At this point the installation has ended and a dialog will appear
prompting to restart your system in order to work with your
newly installed program. You can press Yes to restart immediately
or No if you are planning to restart later. Before pressing Yes make
sure that all other programs have already been closed in order to
avoid data loss.
Restarting Installation
In case you want to cancel the installation in any of the previous
steps, press the «cancel»-button. The following window will
appear. A rollback of actions will be done and your system will
be restored to pre installation time. In case you have accidentally
pressed the «cancel»-button and stopped installation, you have to
start over again. So, using Windows explorer, locate the CD-ROM
drive, that contains the BERNINA DesignWorks installation CD and
double-click it so that the installation starts over again.
Program maintenance
BERNINA DesignWorks software has been successfully
installed on your computer. To execute/run the software open
the Windows™ Start menu, click Programs ➩ BERNINA
DesignWorks and then click on BERNINA DesignWorks.
You can also Double click the BERNINA DesignWorks icon on
your desktop.
Once you have BERNINA DesignWorks installed in your
computer, you can use the BERNINA DesignWorks CD in order to
modify and repair parts of the existing program or even remove
BERNINA DesignWorks from your computer. In order to activate
the program maintenance options please do the following:
Insert the BERNINA DesignWorks installation CD into your CDROM drive. If you don’t have the AUTORUN function enabled, open
the Windows Explorer, go to CD-ROM drive and click on «setup.
exe». If you are running the installation in Windows Vista/7
operating system and you have the User Account Control option
enabled a Security screen will appear informing you about the
new software and if you are allowing it to be executed.
• If you are NOT the Administrator of the PC the following Dialog
will appear. In order to install the software you have to login as
Administrator by entering the User name and the Password
in the relevant fields. Afterwards by clicking «OK»-button the
installation will continue normally.
12
BERNINA DesignWorks
Installation
Modify
• If you are running Windows Vista operating system as
Administrator, the following dialog will appear. In this screen
you have to select the Allow option, in order to continue the
installation.
The following window will appear:
Click on the «Next»-button to continue selecting maintenance
options.
From the general maintenance screen you can select the choice
Modify and then click «Next»-button in order to modify the
installed program. The following window will appear. This window
enables you to change the program features that are installed,
by adding/removing Color tables and other parts. Once you
have selected the features you want to add/remove, click on the
«Next»-button.
The 3 main fields, which you can modify, are image Tracer and
Samples. If you click the symbols placed on the far left of the
choices, you can expand all subsequent features and components.
By clicking on an icon you get 3 options to choose from:
• This feature will be installed on local hard disk. This option
is active only on the final subsections. Example: With this option
you can activate the Image Tracer add-on. In case that all subfeatures are not enabled the main feature is marked with the
icon.
• This feature and all sub-features will be installed on local
hard disk. This option is active on features that have subfeatures. Example: With this option you can activate all available
options of color table section. A main feature that all of its subfeatures are enabled is marked with the
icon.
• This feature will not be available. This option can disable the
specific feature that you choose in case of subfolder or disable all
the options of the main feature. This is marked with the
icon.
From this window you can choose to Modify, Repair or Remove
BERNINA DesignWorks software from your computer
The following window will appear.
Click on the «Install»-button.
The installation of additional features will begin.
13
BERNINA DesignWorks
Installation
Remove
Once the installation is completed, the following window will
appear confirming that the installation has been completed. Click
on the «Finish»-button to complete the process.
The last maintenance option is to remove the program. From the
initial maintenance window select the remove option and click
on the «Next»-button. This feature is used to remove BERNINA
DesignWorks and its installed accessories from your computer.
On the appearing window shown above, click the «Remove»button to uninstall the program.
Repair
The next maintenance option is Repair. This option helps you
repair errors caused by improper use or because of missing parts
of the program. It also fixes missing or corrupt files, shortcuts
and registry entries. Select Repair from the main maintenance
widow and click on the «Next»-button. The following window
will appear. Click on the «Install»-button. The automatic repair of
the program will begin.
Once the installation is complete, the following window will
appear confirming that the installation has been completed. Click
on the «Finish»-button to complete the process.
Once the removal is completed, the following window will appear
confirming that the removal has been completed. Click on the
«Finish»-button to complete the installation process.
14
BERNINA DesignWorks
Installation
Customize 3D properties of your graphics card
If you experience any problems in opening BERNINA DesignWorks you may need to adjust the 3D configuration of the software from
Start >All Programs >BERNINA DesignWorks > Config3D. If your graphic card has 64 Mb RAM and above with the latest drivers
and the DirectX 9.0C or later installed, there will be no problem in working with BERNINA DesignWorks. Whenever you load «BERNINA
DesignWorks Config3D» the following dialog box will appear.
Generally in this dialog you need to adjust BERNINA
DesignWorks® 3D preview settings depending on the
capability of your graphic card.
When you click «Advanced»-button of BERNINA DesignWorks
3D config dialog the Info list appears showing your «Video
card capabilities». Those are technical information about the
graphic card that is installed in your computer. This list with all
the information can be send via email by clicking on the Send
via email. You can also select the Technology you want to use,
optimize the 3D settings and view useful technical information
about your graphic card.
Select Technology
From this part of the dialog you can select between the two
technologies that BERNINA DesignWorks supports.
DirectX 9.0C or newer is the default 3D technology that
BERNINA DesignWorks uses. So it’s required «DirectX 9.0c or
newer» to be installed on your PC in order for BERNINA
DesignWorks to work properly. This option must be selected
in order to be able to enjoy high quality 3D preview through
BERNINA DesignWorks application.
OpenGL can be used by compatible graphic cards. OpenGL
option can be used as alternative way of viewing 3D in BERNINA
DesignWorks. It is an option that we suggest to use in case that
your graphic card has problems with Direct3D graphics. In both
cases you have to keep always the drivers of your graphic card up
to date, by downloading them from the official site of their
manufacturer. If you have a laptop computer you have to
download the drivers for your graphic card from the official site
of the laptop manufacturer.
In order to find out if the technology is supported, select the
OpenGL option and from the Info list that appears when you
click on the «Advanced»-button, check if the «Supports
OpenGL» option from the «Property» list, has the «Value» Yes.
15
BERNINA DesignWorks
Installation
Optimize settings for
The options that are listed in this area have to do with the quality
of the 3D preview of stitches in BERNINA DesignWorks. The
options are
Stability, by selecting Stability, the 3D preview of the software
will be set at the lowest level of quality giving priority to
performance.
Speed, By selecting Speed the 3D preview of the software will be
set at medium level of quality together with good performance.
By selecting Quality, in this case 3D preview of the stitch part of
BERNINA DesignWorks will be set at good level of quality without
affecting its performance.
High Quality, finally 3D preview will be set to the best possible
according to your graphic card.
I usually open
In this section of the dialog you can define the number of designs
that you may usually need to work at the same time. The number
of designs that you can have open is directly connected to the
power of your graphic card. If you have a good graphic card, you
can have many instances of BERNINA DesignWorks with High
quality 3D preview. On the other hand, if you do not have a good
graphic card you can open less BERNINA DesignWorks instances.
Few concurrent BERNINA DesignWorks windows option will
keep the quality of 3D preview high in a way to allow you to open
few BERNINA DesignWorks instances.
Many concurrent BERNINA DesignWorks windows option
will set an average quality to the 3D preview but will allow you to
open many instances of BERNINA DesignWorks. Select the one
that fits to your everyday use of the software and let it choose
your 3D settings.
When you finish setting 3D you have to click on the «Save User
settings»-button to confirm the changes you have made. By
clicking on the «Save User settings»-button, the 3D settings that
you have selected will be applied only on the current Windows®
user. If you click on the «Save Global Settings»-button, the 3D
settings that you have selected will be applied to all Windows®
users. The next time that BERNINA DesignWorks will start will
have the new 3D settings running. If the software does not start
you have to reduce the quality of 3D in BERNINA DesignWorks 3D
setup, save the settings and try again.
16
BERNINA DesignWorks
Projects
Projec ts
17
BERNINA DesignWorks
Projects
Preparing DesignWorks
Open the file
• Doubleclick on Desktop-Icon to start
the software.
• In «Open» click on «Libraries» and «Documents».
• Select the desired file in the folder «BERNINA Design Works
samples».
• Click on «Open Existing» in the window «New Design» and
«Browse».
The design is opened.
Prepare the design for the BERNINA embroidery
computer. See chapter: «Export your Design».
Please note:
Designs with Crystal are saved separately.
18
BERNINA DesignWorks
Projects
PaintWork
PaintWork
Important:
As the texture of fabrics and pens affects the look of the designs
it is strongly recommended to create a sample first!
• Hoop the fabric along with the recommended stabilizer in the
suggested embroidery hoop and attach the hoop to the
embroidery module.
• Depending on the material, read the information given in the
tutorial «Tips & Tricks» if necessary.
• Open the Paintwork Design in the machine.
A paint sequence is illustrated in the color information bar.
Tip: Use the Stitch plate/CutWork/straight = orange when
adding stitches.
• Attach and select PaintWork Tool # 93, insert the appropriate
pen adapter.
• Select the pen color according to the color displayed and hoop.
• Adjust the pen height according to the desired line density of the
pen.
• Start the machine.
• Paint each color in series according to color information bar.
• Fix the color as recommended by the pen manufacturer.
19
BERNINA DesignWorks
Projects
CutWork
CutWork
• Hoop the fabric along with the recommended stabilizer in the
embroidery hoop and attach the hoop to the embroidery module.
See «Tips and Tricks» for more information on handling different
materials.
• Attached the Stitch plate/CutWork/straight = orange.
• Remove the needle and fix the CutWork Tool.
• Attach and select the presser foot # 44C.
• Open CutWork Design on the machine. A cut sequence is
displayed in the color information bar with a CutWork Tool symbol. Depending on the machine, the individual cutting
positions are displayed in different colors.
• Adjust the CutWork Tool according to the respective cutting
position as it is displayed in the color information bar.
• Start the machine.
• Work through all of the four cutting positions as displayed in the
color information bar.
20
BERNINA DesignWorks
Projects
CrystalWork
CrystalWork
Materials
• Carrier paper (baking/parchment paper)
• Template material (green)
• Backingboard (cardboard)
• Transfer Tape
Hoop the carrier paper for the templates
• Following carrier paper for template material is recommended by
BERNINA
• Freezer Paper
• Baking or parchment paper, to fit hoop.
Important:
The CrystalWork container is placed beneath the hoop;
therefore the carrier paper must be on the inner hoop, unlike
embroidering where the material is hooped under the inner
hoop.
For designs with many different stone sizes and colors it is
required to create separate templates for every size or color.
• Put the carrier paper on the inner hoop.
• Attach the outer hoop and tighten the carrier paper from all
sides. Remove excess paper.
• Cut the template material (green) to size according to the size of
the design (print preview).
• Place the template material on the hoop.
Tip: The exact position of the template material on the hoop
can be determined on the sewing computer via the function
<Virtual positioning>.
21
BERNINA DesignWorks
Projects
Opening CrystalWork Design on sewing computer
In the color information bar of the machine displays a
CrystalWork Design with a crystal symbol and the respective
crystal size and color.
• Attach and select the CrystalWork foot # 48
• Insert and select the Stitch plate/CutWork/straight = orange
• Attach appropriate punch stamp and the die plate
• Attach the hoop to the module, remove template material
backing and adhere
• Start the machine
• Depending on the size of the Crystal Designs the CrystalWork
container must be emptied. The filling level of the container is
determined automatically. If the maximal filling quantity is
attained, a message appears to empty the container. Remove the
hoop and empty the CrystalWork container.
• Attach the container and the hoop again and continue in the
Design.
Attention:
When changing from one design sequence to the next, make
sure to insert the appropriate punch stamps and die plates
according to the size of the stones. The four sizes of the
punch stamp SS06, SS10, SS12 and SS16 are engraved on the
die plate and the punch stamp.
• After finishing the design, remove the template material from the
carrier paper and stick on working in a tray to cardboard.
• Pour crystals on the template and gently brush in a circular
movement into position.
• Face up: remove excess crystals.
22
BERNINA DesignWorks
Projects
• Cut transfer tape according to the size of the design and place it
on the crystals. Apply pressure..
• Remove the tape with the Crystal Design slowly. Being careful
that all the crystals stick to the tape.
• Place the Design on the desired surface and press with a dry iron
about 20 seconds.
• Remove the tape slowly.
Attention:
• The ironing temperature as well as the length of time when
ironing has to suit the fabric.
• Use a press cloth for delicate fabrics.
23
BERNINA DesignWorks
Projects
Combined
Combined designs
• Hoop the fabric along with the stabilizer in the predefined
embroidery hoop and attach the hoop to the embroidery module.
• As soon as the design is opened in the machine, the color
information bar shows the process. When changing from one
design sequence to the next, make sure that the appropriate
presser foot is attached for every application.
•
PaintWorkTool # 93
• Insert the appropriate pen adapter and pen.
Embroidery Foot # 26,
• Insert needle and thread the machine.
CutWorkTool # 44C
• Insert CutWorkTool and rotate according to the the cutting
positions from 1-4.
Design combinations with CrystalWork
• Having finished the design, open the separately exported Crystal
Design.
• Hoop the carrier paper on the embroidery hoop, attach the hoop
to the embroidery module and position the template material.
CrystalWork Foot # 48
• Attach punch stamp and die plate.
Work out all the design sequences in series according to the
display in the color information bar.
After finishing the design combination
Fix the colors as recommended by the pen manufacturer and iron
on the crystals..
24
BERNINA DesignWorks
Tips & Tricks
Tips & Tricks
25
BERNINA DesignWorks
Tips & Tricks
PaintWork
CutWork
Painting
Flowing colors into each other
• Depending on the fabric texture and density the colors flow into
each other in different ways. Always do a «test» on the fabric.
• Wet the fabric to obtain a more intense result of blending color.
• To prevent the colors from blending into each other, allow the
previous color to dry completely. Ironing can speed up the drying
process.
3D
• An interesting 3D effect can be obtained by using a thinner pen
for the edging than for the filled areas.
• Details can be additionally highlighted by embroidery.
Fixing
• For an optimal preservation of the colors make sure that attention
is paid to the advice given from the manufacturer.
Selection of the pen
• Make your own experiment with different pens, fabrics and
other surfaces.
Paint
• Pens required to be shaken are suitable only for small areas.
• Before fixing the pen, paint a test sample to make the color flow.
• When painting larger areas, interrupt the painting process,
remove the pen, shake it, and paint a test sample before fixing it
again and going on with the process via the «Start»-button.
Painting on Jersey
• Use recommended stabilizer.
• To prevent slipping of jersey, fix a second stabilizer under the
fabric.
• Do not press the pen too firmly on the fabric, otherwise the pen
may stick.
• With very thin jersey, paint twice and iron in between.
Tool
• Adjust the height of the pen with the dial.
• Always use sturdy, firm embroidery stabilizer when cutting with
the CutWork Tool.
• The fabric should be taut in the hoop.
• When cutting thin, lightweight, plain-weave or satin-weave
fabrics, we recommend to use spray starch (even several times).
This ensures a neat cut.
• Hoop highly stiff embroidery stabilizer underlay. Baste the fabric
to the stabilizer or stick it on using spray adhesive if the fabric
cannot or should not be hooped or sandwich layers between
two layers of stabilizer.
26
BERNINA DesignWorks
Tips & Tricks
CrystalWork
To adjust on single stones of a CrystalWork filling or outline, the
filling must be separated to single stones. Once the stones are
separated they cannot be combined anymore. To keep track of
a big amount of stones it is helpful to arrange the single stones
in the same level using the function Group by Color in the
sequence manager.
• Use water-soluble stabilizers (e.g. Soluweb) for eyelet embroidery.
The cut-out areas are covered with a sufficiently large piece of
water-soluble stabilizer and basted around the embroidery
design.
• We recommend to activate the «Running before» function
before cutting out a series of forms.
• Cutting offset: Make sure that the cutting line is at least 0.8mm
from the pre-stitched line, or the thread might be cut. To do this,
set the offset setting of the cutting line to -0.8mm.
• «Net Fill»: A «net filling» also requires correct setting of the
offset value. The net filling should overlap the cut-out area by at
least 1mm in order to ensure that the filling will be stitched as far
as onto the fabric edge and the needle won’t stitch into the void.
Furthermore, we recommend to use water-soluble stabilizer as
with eyelet embroidery.
• We recommend to use double-sided, self-adhesive stabilizer for
making appliqués (e.g. Double-Stick by Steam-a-Seam).
• Take care not to position the cut-out objects in a CutWork
design too close to each other. The cut-outs have a stabilityreducing effect on the fabric.
• If the CutWork design includes several cut-outs, use the
«Combine» function to pool them. This reduces the number of
colour changes considerably.
• Designs that have been edited in the CutWork software must
not be rotated again afterwards! After exporting the design, the
positions of the CutWork Tool are fixed and will be lost if the
design is rotated again in the sewing computer.
• It is recommended to create a print version of the design before
exporting it.
• The print version shows the needed amount of crystals, it also
can be used as a layout template.
• Hoop the carrier paper as tigut as possible and cut off excess.
• Set the inner hoop 1-2mm above the outer hoop so the carrier
paper to hovers slightly above the container.
• The exact position of the design can be determined easily when
you go first to the corner points of the design using the stitch
sequence control.
• Having a large design with many crystals, the distance between
the stones should be chosen wider as the material of the
template is prone to breakage when the perforation is too
narrow. Template material is weakened when punched holes are
too close together.
• Individual, minor template breakage can be pasted over using
cello- tape/scotch-tape as long as the template is still in the
hoop. Punch faulty holes again by using the stitch sequence
control.
• For designs with many different colors it is required to create
separate templates for every color.
• Designs with crystals of different sizes can be added on the same
template. Be careful that the bigger crystals are placed first when
you fill the template.
27
BERNINA DesignWorks
Quick Reference Guide
Quick Reference Guide
Software Manual
New............................................................Ctrl+N
Stitch..........................................................Ctrl+2
Open..........................................................Ctrl+O
Rectangle selection..................................
Save...........................................................Ctrl+S
Lasso selection..........................................
Export........................................................Ctrl+B
Edit shape nodes......................................F10
Print...........................................................Ctrl+P
Zoom in......................................................Z
Copy...........................................................Ctrl+C
Paste..........................................................Shift+V
Zoom previous..........................................F3
Undo..........................................................Ctrl+Z
Pan.............................................................H
Redo...........................................................Ctrl+Shift+Z
Measure.....................................................F9
Select fabric..............................................Ctrl+F
Directions..................................................D
Edit palette................................................Ctrl+L
Divide........................................................Shift+D
Manage the hoop options.......................Ctrl+H
Slow redraw..............................................Shift+F11
100%..........................................................Shift+1
Create freehand shapes...........................F5
Weld...........................................................
Create bezier shapes................................Shift+F5
Trim............................................................
Create outline shape................................Ctrl+F5
Draw..........................................................Ctrl+1
Magic wand tool.......................................
Intersect....................................................
Create crystal shape.................................
Help............................................................Shift+F1
Create ellipse............................................F7
Align left...................................................L
Zoom all.....................................................F4
Create pie..................................................Shift+F7
Align centers vertically............................C
Create rectangle.......................................F6
Align right.................................................R
Create trapezoid.......................................Shift+F6
Aligns top..................................................T
Create polygon.........................................Y
Align centers horizontally.......................E
Create star shape......................................S
Align bottom.............................................B
Edit text.....................................................F8
Make same width.....................................Shift+W
Create rectangular array..........................
Make same height....................................Shift+H
Create circular array.................................
Make same size.........................................Shift+S
Autoborder...............................................
Equal horizontal spacing.........................Shift+C
Auto-sequence control............................
Equal vertical spacing..............................Shift+E
28
BERNINA DesignWorks
File Export
File Export
Cut Wor k de sign s
Cut Wor k / Pa in t Wor k
de sign s
When exporting motifs to the BERNINA embroidery computer,
please mind the following steps:
• Leftclick on «Export to BERNINA» in the toolbar.
• Leftclick on «Export to BERNINA» in the toolbar.
• «BERNINA Device Selection» appears.
• Select application.
• «BERNINA Device Selection» appears.
• Select USB-Stick.
• Find detailed help support concerning the application for aurora
or Deco 340 in the instruction manual.
• The design is saved on the USB-Stick.
29
BERNINA DesignWorks
File Export
C rys talW ork de sign
• Export CrystalWork from the design combination.
File -> Export -> Crystals to Machine
De sign Wor ks de sign
In a design combination where CrystalWork is part of it, following
steps are necessary:
• See CutWork / PaintWork design.
• Export CrystalWork from the design combination.
• File -> Export -> Crystals to Machine.
• Select USB-Stick.
• The design is saved on the USB-Stick.
• Select USB-Stick.
• The design is saved on the USB-Stick.
E xa mple
• Insert BERNINA USB-Stick into PC.
• Select the USB-Stick in the «BERNINA Device Selection».
• The design is saved on the USB-Stick.
• Install your sewing / embroidering computer along with the
embroidery module and the suitable tool.
30
BERNINA DesignWorks
edding color palette
edding color palette
Farbkarte A6_ e4500+e4600_f_A6 25.04.12 16:44 Seite 2
001. black
002. red
003. blue
004. green
005. yellow
006. orange
007. brown
008. violet
009. pink
010. light blue
011. light green
012. grey
016. light orange
019. carmine red
033. orient blue
034. pale green
065. neon yellow
066. neon orange
068. neon violet
069. neon pink
Printing on paper does not give exact reproduction of the ink colours.
o t he r r e c omm e nde d pe ns
• Marabu Textile Painter
• Colors by WACO Stoffmalstifte
• Stained by Sharpie
• Javana Artmarker
• Marvy Uchida
• Nerchau Farben
© Copyright by BERNINA International AG
CH-8266 Steckborn Switzerland
www.bernina.com
033708.50.04