1
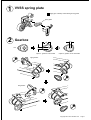
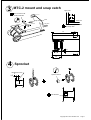
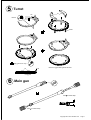
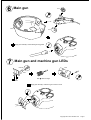
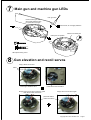
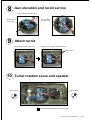
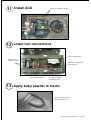
RC Conversion Kit for Tamiya (Asuka)
1/35 Sherman Firefly
with MTC-2 and ACU
User Manual
Attention!
1) This kit is designed for experienced model makers. It may be
difficult for beginners. Please read this manual thoroughly to see
if you have the required skills and tools.
2) Cutting tools are used frequently in this kit. Extra care should be
taken to avoid injury. Wear hand gloves and eye protection
spectacle if necessary.
3) Keep room well ventilated when working with cements, paints
and organic solvents.
4) Visit www.35rctank.com for addition tips and update information.
scriber
apply cement
side cutter
do not apply cement
modelling knife
apply instant glue
carving knife
wait overnight
hand saw
solder
Attention!
Copyright 2015 www.35rctank.com
Page 1
1
VVSS spring plate
Apply glue carefully! Avoid sticking moving parts!
spring plate
2
Gearbox
15
6
6
A10
Option 1: gearbox is removable
Option 2: gearbox is not removable
right gearbox
left gearbox
Copyright 2015 www.35rctank.com
Page 2
3
MTC-2 mount and snap catch
upper hull
MTC-2 mount must
locate at left side
5
4
lower hull
snap catch
Use 1mm PS plate to make
two snap catch
12
72
0.5
30
4
drill
3,5
Sprocket
3.5mm hole
sprocket mount
note direction
Copyright 2015 www.35rctank.com
Page 3
5
Turret
A1
H5
remove
M2x5
apply glue to A1 only!
remove ring gear after glue is secured
A1
H5
ring gear
6
Main gun
Drill
3 x 6mm deep
5.5
Drill
2 x 25mm deep
Copyright 2015 www.35rctank.com
Page 4
6
Main gun
F12
F31
F12
apply glue carefully! avoid sticking moving parts!
7
Main gun and machine gun LEDs
remove
F30
C42
Drill
0.6mm through
6mm
apply glue carefully! make sure gun is free to recoil!
Copyright 2015 www.35rctank.com
Page 5
7
Main gun and machine gun LEDs
main gun LED
insert machine gun LED
secure with adhesive tape
cut optical fibre to length
press fit here, do not apply adhesive
attach turret lower part
notice push rod position
LED expose during recoil
8
Gun elevation and recoil servos
Step1) attach recoil servo
M2x5
remove gun elevation servo
notice telfon tube orientation
Step2) remove recoil servo temporary, pass
LED cables under recoil servo
Step3) secure recoil servo again
pass LED cables
under recoil servo
Copyright 2015 www.35rctank.com
Page 6
8
Gun elevation and recoil servos
Step4) install gun elevation servo
insert push rod
to servo arm
9
pass all cables
through center
Attach turret
Step1) position turret to upper hull
Step2) secure ring gear with M2x5 screws
M2x5 screws
10 Turret rotation servo and speaker
apply cement
apply cement
0.5mm clearance between pinion and ring gear
Copyright 2015 www.35rctank.com
Page 7
11 Install ACU
secure ACU with M1.7 screws
12 Lower hull connections
AAA x 4 battery case
secure MTC-2
by M2 x 3 screws
Spektrum 2.4G AR6110e
micro receiver
keep cables at left side
secure power switch
by adhesive tape
13 Apply baby powder to tracks
apply some baby power to
tracks for smoother run
Copyright 2015 www.35rctank.com
Page 8