1
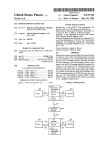
MEMO
TO:
Global Sales Team
CC:
Dave Magner, Gary Kochis, Dave Redmond
FROM:
Brian Mueller
DATE:
December 18, 2009
SUBJECT:
WR2 Product Testing in Field
During the Design Validation Field Test of the WR2 Wireless Rain Sensor it came to our
attention that some State and perhaps local laws require manual testing of the wireless
rain sensor after installation, and perhaps as an annual requirement to demonstrate
functionality of the device.
Case in point #1: Florida state law requires a rain sensor on every irrigation installation.
For commercial jobs an inspector must verify the rain sensor is working and be shown
how it will stop irrigation by activating a zone and then demonstrating the ability to
suspend irrigation. This can be demonstrated on some competitive products such as
Hunter by depressing the button in the middle of the sensor.
Residential systems in Florida have not been well monitored to date, however Senate
Bill 494 was recently signed by the Governor and it steps up the enforcement of
wireless rain sensor validation testing. Licensed contractors are now required to inspect
and test the functionality of the rain sensor before performing any maintenance work.
They can be fined if they perform work on a system that does not comply.
Case in point #2: Local laws in Texas require contractors to manually test the low
temperature shut off feature of the wireless rain / freeze sensor on an annual basis.
To comply with these and perhaps other requirements for manually testing the wireless
rain / freeze sensor, I recommend the following approaches.
Rainfall suspends irrigation
Natural precipitation is unavailable
1. Option #1 - Remove the sensor cap containing the disks. Wet the disks and
replace the sensor cap on the unit. Witness the LCD “rainfall indicator” icon
water level increase. Once the “water level” reaches the programmed set point,
the device will trip, suspending irrigation. An audible click is heard as the relay
opens. A rain cloud along with an “X” adjacent to the rotor will appear. The disks
will dry out in 24-72 hours depending on environmental conditions.
2. Option #2 – Using an eraser from the back of a pencil; gently push down on the
stem centered in the middle of the sensor cap. As you push down on the stem, it
will depress the diagram that covers the lower housing of the sensor body. As
the diaphragm is depressed, the water level in “rainfall indicator” icon will
increase until it reaches the set point, tripping the device. This movement in the
rainfall indicator may take up to 45 seconds. An audible click is heard as the
relay opens. A rain cloud along with an “X” adjacent to the rotor will appear.
This is the least desired option as the contractor could inadvertently damage the
stem or diaphragm by pushing down too aggressively.
Natural precipitation is available
1. Option #1: If water is registered in the "rainfall indicator" icon on the LCD display
but the set point is above the water level, initiate a manual start of a zone, and
then manually adjust the set point to be at or below the indicated water level.
Once you exit back to the main screen, the rain cloud and “X” adjacent to the
rotor will appear. An audible click is heard as the relay opens and irrigation is
suspended.
2. Option #2: If the test occurs during the scheduled irrigation cycle, and it is
raining, the rain cloud and “X” adjacent to the rotor will appear. This indicates
that the “Quick Shut Off” feature is operational and has suspended irrigation
regardless of rainfall accumulation.
Low Temperature suspends irrigation
Low temperatures are present during test
• If temperatures are below 41 degrees Fahrenheit, adjust the temperature set
point to be above the recorded temperature in the “temperature indicator” icon. If
the set point is above the recorded temperature, a snowflake and “X” adjacent to
the rotor will appear. An audible click is heard as the relay opens and irrigation
is suspended.
Low temperatures are not present during testing
• Testing can only be achieved if the rain / freeze sensor measures the actual
ambient temperature. To achieve this environment obtain a small cooler (e.g.
Igloo or other small container that would normally be used to keep your favorite
beverage cold). Fill the cooler with ice. Remove the sensor from its mount and
place it in the cooler. Ensure the sensor is completely covered with ice. After
about 10-15 minutes, observe the reading inside the “Temperature Indicator”
Icon (i.e. thermometer) on the Controller Interface. Adjust the “Temperature Set
Point” icon so that the arrowhead is above the temperature segment bar inside
the thermometer. The WR2 will suspend irrigation when the measured
temperature is at or below the set point. A snowflake and “X” adjacent to the
rotor will appear. An audible click is heard as the relay opens and irrigation is
suspended.
In the design of the WR2 wireless rain sensor, we elected to focus on ease of
programming and speed of installation. Feedback from contractors indicated they
approved of a “self test” feature which eliminated the need for manually testing the
device on the jobsite. As such, the WR2 series sensors were designed with “self test”
features. The User Manual explains the “self test” feature in Section 4:
The Sensor is successfully paired to the Controller Interface when the “Sensor Indicator / Pairing Status”
icon stops flashing. Once paired, sensor signal strength and battery life are communicated via the
Controller Interface icons. Additionally, a blinking light on the bottom of the Sensor indicates signal
strength for 20 minutes immediately following successful pairing. These “self test” features are an
indication that your WR2 Wireless Sensor is operational.