1
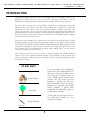
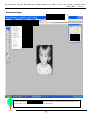
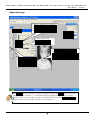
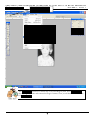
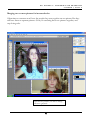
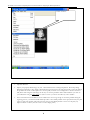
P H O T O S H O P
I M A G E
E N H A N C I N G
T E C H N I Q U E S
A S
T H E Y
A P P L Y
T O
M E T A L E N G R A V I N G
• V O L U M E 1 , P A R T 1
© 2006 ClearImage System
The Insider’s Secrets to
Image Preparation
Photoshop image enhancing techniques as they apply to metal engraving
© 2006 Clear Image Technologies
Vol. I
Part 1
2
P H O T O S H O P
I M A G E
E N H A N C I N G
T E C H N I Q U E S
A S
T H E Y
A P P L Y
T O M E T A L E N G R A V I N G
• V O L U M E 1 , P A R T 1
INTRODUCTION
I purchased an MPX-60 three years ago, from a distributor who was very happy to sell it to me.
Problem was, I didn’t know how to use it. And when I did figure out the basics, I was left
disappointed with the image. I believed the machine was capable of much more, so I persisted.
My story is about the many hours of ruined blanks, wasted money and frustrating consults with
distributors. They were either to busy with their next MPX sale, too impatient to explain the
fundamentals or often unable to spell out the methods required to produce crystal clear, vivid
images, time after time. My story is about a journey that began with frustration and ended in the
profound satisfaction, using my techniques, of having created a breathtaking image engraved onto a
thin slice of metal. Finally, it is time to share these secrets with the serious Metaza operator, captured
for the first time is a series that reveals all.
1. Double click on the
Adobe Photoshop icon to
The series has been divided into two volumes. They are as follows: The Insiders Secret’s to Image
start the
programas they apply to metal engraving
Preparation which covers Photoshop image enhancing
techniques
and, Volume II, The Insider’s Secrets to Driver Output Preparation which reveals the secret
methods for configuring the output software to produce razor sharp images. While both volumes
work together, and are recommended for producing highly defined images, you may deem it
necessary to purchase only one or the other.
This volume has been written for two groups of people, beginning and experienced Metaza
operators. If you are an experienced Metaza operator, you may find the step by step detail slow,
however, both groups will find great value in the insider’s secrets to creating spectacularly clear, sharp
and vivid photo charms.
ICON KEY
For your reference, I have highlighted
certain areas with informational icons.
They are as follows: the Insider’s Secret
icon represents the highest degree of
value; valuable trade secrets found
nowhere else. The Power Tip icon
represents a practical tip, one level
below an Insider’s Secret. The Design
Principle icon represents professional
artistic principles I gained while
completing my Advertising degree at
the University of Florida.
Insider’s Secret
Power Tip
At this point we will assume that you
have Photoshop installed on your
computer. Let’s begin.
Design Principle
3
P H O T O S H O P
I M A G E
E N H A N C I N G
T E C H N I Q U E S
A S
T H E Y
A P P L Y
T O M E T A L E N G R A V I N G
• V O L U M E 1 , P A R T 1
Convert the image
Image>Mode>Grayscale
Convert the image to grayscale. Grayscale mode is essential to capturing the subtle shades and
textures that give the appearance of depth and dimension.
4
P H O T O S H O P
I M A G E
E N H A N C I N G
T E C H N I Q U E S
A S
T H E Y
A P P L Y
T O
M E T A L E N G R A V I N G
• V O L U M E 1 , P A R T 1
Lighten the image
3. Make a mental note of the plot
point location, as it will disappear
when you release the mouse. Now
click where that point was.
4. Now, click on the
bottom plot point to
anchor it.
2. Click the eyedropper tool on the
darkest part of the face. You will
notice a plot point appear on the
curves graph box when you click and
hold.
1. The Curves graph box
appears and the
eyedropper tool is
automatically selected.
The Curves function is critical to a properly lightened image. The curves function allows the
image to lighten selectively, i.e., the dark shades become light first, followed by the light
shades. In this way, the proper contrast is maintained. Do not use the Brightness/Contrast
function since all of the shades will lighten at the same rate.
5
P H O T O S H O P
I M A G E
Unsharp mask
E N H A N C I N G
T E C H N I Q U E S
Filter>Sharpen>Unsharp
Mask
A S
T H E Y
A P P L Y
T O
M E T A L E N G R A V I N G
• V O L U M E 1 , P A R T 1
The unsharp mask function is a critical step to the ClearImage System. What unsharp mask
does is bring out, define and contrast the image’s features. Next, we will define the exact values
for unsharp mask.
6
P H O T O S H O P
I M A G E
E N H A N C I N G
T E C H N I Q U E S
A S
T H E Y
A P P L Y
T O
M E T A L E N G R A V I N G
• V O L U M E 1 , P A R T 1
2. Click OK
1. Set values
Amount: 104%
Radius: 31.7
Threshold: 1
Notice how the image is dramatically defined. After you enter the unsharp values, they will
reappear next time, there is no need to re-enter them. These unsharp values are really
valuable. Share them with no one.
7
P H O T O S H O P
I M A G E
E N H A N C I N G
T E C H N I Q U E S
Airbrush the background black
A S
T H E Y
A P P L Y
T O
M E T A L E N G R A V I N G
• V O L U M E 1 , P A R T 1
3. Click OK
1. Click on the
Color Picker Icon.
2. Click on
black
I have discovered that when the background is airbrushed black (disregarded) the stylus and
machine resources are focused on the face (as opposed to the background) resulting in a
highly defined face. Here’s why, if the stylus is busy with the background, it tends to not
sense the difference between the background image and the face, the result is a less defined
face. Furthermore, when you eliminate the background, the charm will complete faster since
there is less impact duty.
8
P H O T O S H O P
I M A G E
E N H A N C I N G
1. Click on the
paintbrush Icon
T E C H N I Q U E S
A S
T H E Y
A P P L Y
T O
M E T A L E N G R A V I N G
• V O L U M E 1 , P A R T 1
3. The paintbrush selector box
will appear
4. Select brush number # 17
2. Right click
anywhere on
the image
5. Slide the master
diameter selector over
to increase or decrease
the size of your brush
A number 17 brush is ideal, even with a shaky hand, and is the secret to creating a
professional outline. This brush will allow you to closely outline the subject, a little over
spray is ok and even encouraged, since this creates an excellent finish.
9
P H O T O S H O P
I M A G E
E N H A N C I N G
T E C H N I Q U E S
A S
T H E Y
A P P L Y
T O
M E T A L E N G R A V I N G
• V O L U M E 1 , P A R T 1
1.Choose JPEG from drop-down menu.
2. Create a File name in the File name box.
3. Save.
4. Remember where you saved the file, since
you will need to reopen again in Dr. Metaza.
Be sure to use the JPEG file type. It offers the finest image quality
for the MPX engraver.
10
P H O T O S H O P
I M A G E
E N H A N C I N G
T E C H N I Q U E S
A S
T H E Y
A P P L Y
T O
M E T A L E N G R A V I N G
• V O L U M E 1 , P A R T 1
Set values:
• Quality 12
• Maximum
• Baseline
(standard)
• Click OK
Save as JPEG file, in our opinion, the most pleasing output. After saving your JPEG in
Photoshop, you can minimize Photoshop. Congratulations, you have completed the first part to
the ClearImage System. We can now minimize Photoshop and turn our attention to part 2, Dr.
Metaza 2 Setup.
11
D R .
M E T A Z A
2 -
P R E P A R I N G F O R E N G R A V I N G
• V O L U M E I , P A R T 2
Additional valuable information
How to correct newspaper clippings , magazine photos/obituaries with pixilated
look
Many times a customer may bring you a newspaper clipping photo, obituary photo or magazine photo
to scan. The scanner will reproduce the tiny dots that make up the picture causing a grainy and
unattractive photo. This is particularly noticeable when you import the picture into Dr. Metaza 2.
There is an easy solution that will allow you to smooth out the appearance of the photo.
40
D R .
M E T A Z A
2 -
P R E P A R I N G F O R E N G R A V I N G
• V O L U M E I , P A R T 2
Merging two or more pictures for increased sales
Often times a customer won’t have the people they want together on one picture. But they
will have them on separate pictures. Now you can bring these two pictures together, and
stop losing sales.
Open the two pictures you want to merge,
convert to grayscale.
42
The Insider’s Secrets to Driver Output Preparation- Essential elements to configuring the MPX output software
© 2006 ClearImage System
The Insider’s Secrets
to Driver Output
Preparation
Essential elements to configuring the MPX output software
© 2006 Clear Image Technologies
Vol. II
2
The Insider’s Secrets to Driver Output Preparation- Essential elements to configuring the MPX output software
INTRODUCTION
I purchased an MPX-60 three years ago, from a distributor who was very happy to sell it to me.
Problem was, I didn’t know how to use it. And when I did figure out the basics, I was left
disappointed with the image. I believed the machine was capable of much more, so I persisted.
My story is about the many hours of ruined blanks, wasted money and frustrating consults with
distributors. They were either to busy with their next MPX sale, too impatient to explain the
fundamentals or often unable to spell out the methods required to produce crystal clear, vivid
images, time after time. My story is about a journey that began with frustration and ended in the
profound satisfaction, using my techniques, of having created a breathtaking image engraved onto a
thin slice of metal. Finally, it is time to share these secrets with the serious Metaza operator, captured
for the first time is a series that reveals all.
The series has been divided into two volumes. They are as follows: The Insiders Secret’s to Image
Preparation which covers Photoshop image enhancing techniques as they apply to metal engraving
and, Volume II, The Insider’s Secrets to Driver Output Preparation which reveals the secret
methods for configuring the output software to produce razor sharp images. While both volumes
work together, and are recommended for producing highly defined images, you may deem it
necessary to purchase only one or the other.
This volume has been written for two groups of people, beginning and experienced Metaza
operators. If you are an experienced Metaza operator, you may find the step by step detail slow,
however, both groups will find great value in the insider’s secrets to creating spectacularly clear, sharp
and vivid photo charms.
ICON KEY
Insiders Secret
For your reference, I have highlighted
certain areas with informational icons.
They are as follows: the Insider’s
Secret icon represents the highest
degree of value; valuable trade secrets
found nowhere else. The Power Tip
icon represents a practical tip, one
level below an Insider’s Secret.
Power Tip
At this point we will assume that your
image has been edited, has been
imported into Dr. Metaza 2 and that
you are now ready to print onto your
pendant. Let’s begin.
3
6. Click
on Image
The Insider’s Secrets to Driver Output Preparation- Essential elements to configuring the MPX output
software
Correction
3. Do not be alarmed,
click Ok.
1. Now you are in the Material tab. You may
need to adjust the Offset, which centers the
stylus. It is presumed you know how to do
this, if not you can download the user manual,
which explains
http://www.rolanddga.com/rnet30/files/supp
ort/mpx60_users_manual.pdf
5. Select
Millimeters
4. I have Bi-Directional checked because it speeds up the engraving process,
and I have found that any lack of resolution is not enough to warrant the
sacrifice of speed, all too important in operating a retail location, whose
product purchasing decision is usually based on an impulse.
2. *Check mark the Extended Size box, even if you
are not working with an extended sized pendant (over
50mm). What this does is send a signal to the stylus to
level out any imbalance in the striking algorithm.
*I can’t tell you how important it is to check the Extended Size box for outputting streakfree engravings. If everything you’ve tried before has not worked to even out any streaks in
your engravings, checking this extended size box should correct this unwanted anomaly
inherent in the Metaza engraver.
4
The Insider’s Secrets to Driver Output Preparation- Essential elements to configuring the MPX output software
Benchmark the impact settings
3.Leave the Impact Speed at 15 mm per
second. It only needs to be slowed down when
you are engraving a pendant in which you
would like to maximize the quality of the text
engraving.
4. We will benchmark our Impact-Min at 350 and our
Impact Max at 585. This is the optimal starting point.
I have found these settings to give you the best
chance at obtaining an optimal image on the first try.
5. Click Ok.
2. We will only use one Registration and its corresponding
impact attributes, even for metals of different composition,
such as gold- plated or nickel-plated. I have found that the
difference in hardness of these metals is not enough to
justify the introduction of another registration component
and its associated variables, creating even more complexity,
in an endeavor already as difficult as metal engraving.
6. Click Ok.
7. Minimize the Printers Folder
5
The Insider’s Secrets to Driver Output Preparation- Essential elements to configuring the MPX output software
4.Click on Print…
1.
Open Dr. Metaza 2
2.
Import your properly edited image, see (Vol. 1 The Insider's Secrets to Image Preparation- Photoshop Image
Enhancing Techniques as they Apply to Metal Engraving) Notice how I am sizing the picture to span only half of
the pendant. We do this to allow space for a next test print, in which case we simply move it down to the lower
half, all the while using the same image. In this way we conserve pendants. Please understand that you must do
your calibrations using the exact image for each test so that you do not introduce any other variables.
3.
I have found that the natural adhesive on the rubber mat is not strong enough to secure the pendant during the
engraving process; you will need double sided tape. Place a 28 x 50mm pendant on the tape; flatten with your plexi
square. At this point I polish, with some pressure, the top of the blank pendant to secure it to the pad (very
important that it not move, this also serves to remove finger prints).
6
The Insider’s Secrets to Driver Output Preparation- Essential elements to configuring the MPX output software
Inspect your image
Initial benchmark
settings
Table 1
Adjustments
Result
Min 350 and max 585
Interval
585-350=235
Too light, you must decrease the min
and decrease the max at the same rate
using increments of five. Keep
decreasing until you reach the
optimal image*
Min 350 and max 585
Interval
585-350=235
Too dark, you must increase the min
and increase the max at the same rate
using increments of five. Keep
decreasing until you reach the
optimal image*
Min 345 and Max 580
Min 355 and Max 590
The above relationship is essential in understanding how to set the impact setting for
your engraver. You will notice that at all times, whether you are increasing or
decreasing the brightness of the image, you must maintain the same interval between
the maximum and minimum impact settings (585-350=235). You will follow this
relationship after you print your first test pendant and for each successive pendant until
you have fine-tuned the image to an amazing masterpiece. The *optimal image should
have bright whites, subtle shades of gray and dark blacks, all coexisting on one pendant.
Note: every time you install the drivers onto your computer for the first time, you must
re-calibrate the minimum and maximum impact settings. These settings will never
translate into the same striking force, so forget about writing the settings down and
saving them for next time. The good news is that once they are calibrated onto your
computer, they should remain. I say should, because they have been known to “drift”
occasionally.
An *optimal image will have three distinct qualities merged into one image. They are bright whites,
subtle shades of gray and deep black regions, faithfully reproduced on one pendant. If you have
captured this optimal image, engraved onto your first test pendant with the initial settings, then
congratulations, no further adjustments are needed. If your image, however, lacks these three
distinct qualities you will need to fine-tune your settings. Let’s Begin:
7