1
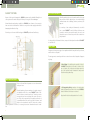
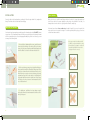
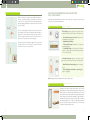
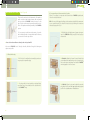
Customer ser vice
902 023 323
www.pladur.com
[email protected]
User’s manual
Learn all about the advantages of Pladur ®
ER-07351997
ER-07351997
Valdemoro Central Offices
and Factory - Madrid
Laminated Plasterboard Sheets,
Manufactured Products
and Adhesive Pastes.
PLADUR® is a registered trademark of Grupo URALITA • 1/February 2008 EDITION
CONTENTS
WELCOME TO YOUR NEW PLADUR® HOUSE
» Pladur® registered trademark
3
4
PLADUR® SYSTEMS
» Inner partition walls
» Outer partition walls
» Wall linings
» Ceilings
5
6
7
7
8
ANCHORS
» Types of load
» Installation
» Anchors for downward loads on partition walls
and linings
» Anchors for eccentric loads on partition walls
and linings
» Loads on ceilings
9
10
12
15
DECORATION
» With paint
» With tiles
» With wallpaper or fabric
23
24
25
26
MAINTENANCE AND SMALL REPAIRS
» Minor damage
» Repairs in which it is necessary to replace a
PLADUR® board
» Another practical solution for replacing sections of
damaged PLADUR®
27
28
29
TYPES OF FIXING
31
17
22
30
1
WELCOME TO YOUR NEW
PLADUR® HOUSE
1
2
WELCOME TO YOUR NEW PLADUR® HOUSE
PLADUR
PLADUR® REGISTERED TRADEMARK
PLADUR® is a registered trademark for interior plasterboard for ceilings, partition walls and
wall linings marketed by Yesos Ibéricos S.A., a Grupo Uralita company. With over 25 years’
experience in the Iberian market, PLADUR® is the leading brand in interior construction,
with its own production center in Spain. It is the market leader in millions of m2 installed and
leader in services for its customers
PLADUR® is a range of building materials and services especially designed for interior construction: partition walls, ceilings and lining (facing for walls).
The elements which make up PLADUR® systems are
combined to construct the basic pieces of interior
construction. There is a PLADUR® system suitable for
every use. The elements which make up PLADUR®
systems are: sheet(s) of laminated PLADUR® plasterboard covered with two layers of special multilayer cellulose. The product is marketed in the form of
boards of different widths. The material is pleasant to
the touch, warm and not flammable. It can very easily
be cut, screwed, drilled, nailed, glued and decorated
and is also fire resistant, as well as providing thermal
insulation, soundproofing and moisture regulation.
The vertical and horizontal framework is galvanized steel, providing the system and the mineral
wool which reinforces the acoustic and thermal properties with strength and sturdiness.
PLADUR® products have the very highest quality, which has undergone testing.
PLADUR® meets all regulations and has obtained a number of seals and stamps which guarantee its quality and compliance with safety requirements.
ER-07351997
ER-07351997
®
SYSTEMS
2
PLADUR® SYSTEMS
PLADUR® SYSTEMS
OUTER PARTITION WALLS
Because of their special characteristics, PLADUR® systems must be handled differently from
other systems on the market. Doing so will allow you to enjoy all of their advantages.
Generally speaking, these are the partition walls which separate your home from the adjoining one or from the building’s
communal areas such as landings, staircases, entrances, hallways, etc.
Normal decoration and upkeep is possible in a PLADUR® home. However, it is necessary to
have some technical information to be able to carry out these tasks properly and without
damaging the walls and ceilings
It is made up of two sturdy steel frameworks, onto which
two or more PLADUR® boards of different thicknesses are
screwed. As with the inner partition walls, the services run
through the center of the structure, which also contains insulating material.
We invite you to discover the different types of PLADUR® partition walls and facing.
It is also possible to find mixed solutions, composed of a brick partition wall with PLADUR®
on each side of it.
WALL LININGS
Linings are the facing on any type of non-partition wall which may be found in your home,
whether interior or a façade.
The two types most commonly used in home construction are: direct lining and self-supporting lining.
» Direct lining is the building unit created by “sticking”
a PLADUR®, board directly to the wall or columns. In the
case of façades, this incorporates insulating material to
give it the required thermal characteristics and prevent
heat from entering and exiting.
INNER PARTITION WALLS
These are the walls which separate one room from another
inside your home.
Generally speaking, they are made up of a sturdy rust-proof
steel framework with one or more PLADUR® boards of different thicknesses screwed to each side. The various services
necessary for your home run though the center of the structure. These are incorporated into the partition wall when it
is assembled without the need for any kind of channel, and
therefore do not weaken the wall. The interior also contains
insulating material to reinforce, if necessary, the structure’s thermal and acoustic insulation.
» Self-supporting lining is made up of a sturdy galvanized steel framework onto which one or more PLADUR®
boards of different thicknesses are screwed
Façade walls include insulating material on the inside.
2
3
PLADUR® SYSTEMS
ANCHORS
CEILINGS
PLADUR® suspended ceilings are made up of a structure
bearing sturdy steel profiles which are suitably attached to a
building slab and onto which PLADUR® boards are screwed.
Like all PLADUR® units, its facing has a flat finish. Together
with a special treatment for the joints and screws, this makes
any type of final decoration possible.
3
ANCHORS
TYPES OF LOAD
LOADS BY USE
PLADUR® systems offer many advantages. Among these are the ease, speed and neatness with which the fixings necessary to attach objects or loads for decoration or other
purposes can be installed. The ease and reliability of this is surprising. We will first discuss
the objects to be attached, organized by their weight, use and volume.
» Fixed objects, are those which, once they are hung,
are not going to be moved, such as pictures, ornaments, mirrors, lamps, etc.
LOADS BY WEIGHT
» Light loads, of up to 15 kilograms, such as pictures,
wall lights, ornaments, etc.
» Moveable objects, unlike fixed objects, will later
be subjected to stresses which can sometimes be very
severe: coat racks, towel racks, toilet paper holders,
hanging wardrobes, shelves, etc.
» Medium loads, of up to 30 kilograms, such as small
sets of shelves or individual shelves, larger mirrors, coat
racks, towel bars or small cabinets.
LOADS BY VOLUME
» Downward load, objects which are attached to the
wall without projecting very far from its surface. These
transfer a downward load to the facing. That is, they
subject the wall to downward pressure.
» Heavy loads, of over 30 kilograms, such as water
heaters, radiators or hanging cabinets.
» Eccentric load, objects with a certain volume or
which project from the surface transfer an eccentric
load. In addition to subjecting the wall to downward
pressure, they pull outwards.
10
11
3
ANCHORS
DRILL PROPERLY
INSTALLATION
Once the object to be hung has been considered, follow the steps below. First, analyze the
facing. Then make the hole and install the wall plug.
MEASURE THE THICKNESS
Your home’s developer may have provided you with information about the PLADUR® systems
in your home. This is important, because this will give you the thickness of the board you want
to drill into and allow you to choose the appropriate wall plug. If this is not the case, you can
use any of the following tricks:
1. If an outlet box is attached with screws, carefully remove
it and check the thickness of the facing. If it does not have
screws, this is because it has been attached with paste and
it will be difficult to check the thickness with this trick.
Make the holes to install the wall plugs with an electric drill, using high-speed steel
bits. Choose a bit of the same diameter as the plug to be installed. If in doubt, it is
always better to make the hole slightly smaller than the wall plug.
Bits must have at least four centimeters of usable length. If you use a longer bit, be
very careful never to exceed this length. To install very small plastic plugs, you can use
a small hand brace and bit.
Never try to make holes without a drill
or drill bit – using a screwdriver or other
pointed object, for example – as this will
create distorted drill holes into which
the plugs will not fit correctly.
2. At the spot where you are going to install a wall plug or
fixing, make a hole with the thinnest drill bit you have. Push
a fine piece of wire with a knot tied at the end into the hole.
When the wire encounters no more resistance, pull gently
outwards until you feel the knot catch on the back part of
the board. Mark the wire at the outside level of the facing.
Pull firmly on the wire to remove it and measure the thickness of the board on it.
3. For bathrooms, ventilation ducts are always covered
with a grille. Remove this and measure the thickness of the
facing in the space.
12
13
3
ANCHORS
CHOOSE THE RIGHT ANCHOR
When it comes to choosing the most suitable wall plugs or
anchors, consider the thickness of the board you are going
to drill into. The smooth barrel which wall plugs generally
have must be approximately the same thickness as the board
((e) in the figure).
Do not use large plugs for light loads. Ask the professional
who supplies them for advice. Remember that sometimes a
simple pin or nail inserted at an angle is sufficient. Boxes of
anchors usually include instructions. This will give you more
information to help you choose the right plug.
ANCHORS FOR DOWNWARD LOWS ON PARTITION
WALLS AND LININGS
Remember that downward loads are those whose objects do not project very far from the
wall, and so only exert downward force.
(Up to 15 kg. per point)
SINGLE-POINT LIGHT LOADS
» Fixed objects: pictures, light mirrors, picture frames
or ornaments. Attach these directly to the board using:
» Floreat picture hangers or hooks. Maximum of 5
kilograms per anchoring point
» Standard plastic fixings.
» “Tulip” plastic fixings. Maximum of 5 kilograms
per anchoring point
» Self-drilling fixings. For boards with a thickness
equal to or greater than 19 mm and facings made up
of two or more boards
The type and size of wall plug will depend on the wall and
the type of load. To choose the ideal one, please follow the
instructions in the four sections below.
» Moveable elements: hangers, towel bars, toilet
paper holders. Attach these directly to the board using:
» Metal hollow wall anchor plugs small or mediumsized.
» Plastic wall plugs: retractable or opening (plastplug or toggle type)
NB: These types of anchor are defined in the “Types of fixing” section.
MEDIUM SINGLE-POINT LOADS
(Up to 30 kg. per point)
Remember that medium loads included small sets of shelves,
display cabinets, heavy wall lamps, large pictures, heavy mirrors,
heavy curtains, etc. Both fixed and moveable loads can be anchored directly to the boards themselves, always using mediumsized or large hollow wall anchor, retractable, toggle, butterfly or
similar model plugs. Leave a minimum of some 40 cm. between
each anchoring point (Fig. 1, Page 16). Light cabinets and small
sets of shelves which project more than 25 cm. from the wall
should be considered eccentric loads.
14
15
ANCHORS
HEAVY SINGLE-POINT LOADS
(Over 30 kg. per point)
This section refers to objects such as water heaters, radiators,
narrow yet heavy sets of shelves, etc.
Generally speaking, installation of these objects has already
been planned for during assembly of the PLADUR® systems
and the necessary reinforcements have been placed inside the
partition walls.
ANCHORS FOR ECCENTRIC LOADS ON PARTITION WALLS
AND LININGS
Eccentric loads are those which project a great deal from the surface or which have a large
volume, subjecting the wall to downward and outward pressure.
LIGHT LOADS
(Up to 75 Kg/ml)
Eccentric loads are generally extended, created by voluminous
objects whose center of gravity is some distance from the wall.
This is the case of kitchen cabinets, shelving units with very wide
shelves, etc. As we saw above, they pull away from the wall
because they act as a lever arm.
Should it be necessary to include a new load not previously
anticipated, see the “Incorporating a reinforcement” section.
EXTENDED LOADS
In this section we are discussing only furniture which projects
from the wall up to a maximum of 60 cm. If the depth exceeds
this measure, further precautions must be taken. Please consult
with PLADUR® technical services.
Types of load such as long coat racks, heavy molding, large
pictures or murals, etc. are handled the same way as single-point loads, taking the same precautions.
Once we know the weight of the item, distribute the load
over as many anchors as necessary (Fig. 2), in such a way
that they do not exceed the 30 kg. per point established
above, and that each anchoring point is separated by at
least 40 cm. (Fig. 1).
Choose the appropriate wall plug depending on the type
of load (fixed or moveable), as indicated for single-point loads.
To hang these items, follow the advice below:
1. Always use hollow wall anchor, retractable, toggle, butterfly, etc. wall plugs for anchoring. They can be attached directly
to the board.
2. Each anchor must support a maximum of 25 kg.
3. Each load must be attached with a minimum of two anchors.
4. The table below shows the number of anchors recommended according to the weight and depth of the load.
NUMBER OF ANCHORS RECOMMENDED BY WEIGHT AND DEPTH
DEPTH OF CABINET OR SHELF
Fig. 1: Minimum space between
anchoring points
16
Fig. 2: Load distribution
MAX. WEIGHT OF THE CABINET
OR SHELF PER LINEAR METER
3
30 cm
40 cm
50 cm 60 cm
60 Kg
3
x
x
x
50 Kg
3
3
x
x
40 Kg
2
2
2
x
30 Kg
2
2
2
2
X = Installing a cabinet or shelf of these
characteristics is not recommended, as it
places excessive strain on the PLADUR®
wall. If this is done, it is essential that the
PLADUR® wall be reinforced as indicated in
the following section.
17
3
ANCHORS
MEDIUM AND HEAVY LOADS
(Over 75 kg per ml)
These must be anchored to the framework of the partition
walls or reinforced with sturdy elements. We recommend
that you check with PLADUR® technical services. For this
type of load, a reinforcement is generally installed in the interior of the partition wall during assembly of the PLADUR®
system.
If it is necessary to install new reinforcements, it is preferable to obtain the advice of a specialized installer. However,
you can also follow the steps below:
b/ Incorporating a reinforcement into façades.
When it is necessary to incorporate reinforcement into a PLADUR® façade board,
follow the instructions below.
NB: In the case of self-supporting lining, reinforcements are installed in the same manner as on partition walls. You must first locate the studs, following the instructions
indicated on page 20 in Fig. 2.
1. With the help of a keyhole saw or jigsaw, cut an opening in the PLADUR® wall big enough to insert a plug or
wooden lath.
» How do I anchor medium or heavy loads on façade walls?
In the case of PLADUR® “stuck” directly to the wall, called direct lining, the following two
options are possible:
a/ Direct Anchoring
1. Drill a hole in the wall and insert a wall plug and screw
long enough to expand the plug.
2. It is also possible to insert a plastic or metal wall plug
more than four or five centimeters of the total thickness
of the PLADUR® lining.
18
2. Solution A. Attach it to the wall or insert it inside. Now
you can attach the same board you cut out, screwing it to
the wooden piece and placing four daubs of PLADUR®
anchoring paste on the four corners.
2. Solution B. If you do not want to attach the wooden
plug, attach it to the wall with appropriate wall plugs and
position the original board as indicated above.
19
3
ANCHORS
3. Plaster the resulting joints and screws, using PLADUR®
reinforcement tape and joint paste.
b/ Incorporating a reinforcement into partition walls.
1. With the help of a jigsaw, cut an opening in the PLADUR®
wall which runs from the axis of one vertical stud to the axis
of the next one.
» How do I anchor medium and heavy loads on partition walls?
Two options are also available here:
a/ Anclaje Directo.
2. Fit and screw in a wooden reinforcement between the
two studs (one end can be fitted and the other anchored.)
Check that the reinforcement is firmly attached to both.
1. Locate the vertical studs of the partition wall framework and anchor directly to these, using hollow wall
anchor or similar wall plugs.
3. Place pieces of wood in the upper and lower parts of the
hole, screwing them to the boards
2. The stud can be located using a small magnet or “metal-seeking” instrument. (These are not expensive, and
can be found in hardware stores.)
4. Replace the same board cut out at the beginning and
screw it to the pieces of wood and the studs. Then plaster
the joints and screws using PLADUR® reinforcement tape
and joint paste.
20
21
3
4
ANCHORS
D E C O R AT I O N
LOADS ON CEILINGS
In all cases, you must use large anchors or butterfly, spring toggle or hollow wall anchor plugs.
LOADS UP TO 3 KG
Install hanging form the board itself, using the wall plugs mentioned above. There must be at least 40 cm. between anchors.
LOADS OF 3 TO 10 Kg
These must be anchored to the
metal framework which runs
through the interior of PLADUR®
ceilings. Anchors on a single profile must be separated by at least
1.20 m.
Use wall plugs like those indicated above.
LOADS OF MORE THAN 10 Kg
These loads must be anchored to the building slab.
Now that we have seen the wall plugs which must be used and all the measures to employ,
once again we recommend that you consult “Types of Fixing” to recognize them more easily.
22
4
D E C O R AT I O N
Painting, papering or tiling your PLADUR® walls will be simpler and more eye-catching than
with conventional walls.
WITH TILES
First prime the surface to be tiled. Always use cement glue applied to the surface using a
serrated trowel. Do not do this over a very large area, making sure you install the tiles before
the cement dries.
WITH PAINT
To paint your PLADUR® walls, proceed exactly as you would
with any other type of wall or ceiling. It is necessary to first
prime the surface. This way the facing will have the same
texture as the entire surface and provide a better finish.
This will also make later maintenance easier.
If the PLADUR® surface is already painted and you want to
touch up or change the paint, proceed as follows:
If you want to re-cover the tiling, there are several possibilities:
1. There are various types of cement on the market
which allow you to glue a new layer of tiles over an existing one, provided that the latter is firmly attached.
» If the existing paint is flat tempera, skip troweled or stipple finished, moisten the
surface slightly with a brush and clean water. Then carefully lift off the old paint with
a spatula.
Allow the surface to dry. Plaster over any small imperfections which have appeared.
Allow to dry and lightly sand the surface. Apply a coat of primer. You can then repaint or decorate.
2. Another option is gluing a 6.5 or 10 mm. board of
PLADUR® over the tiling, anchoring it with plugs while
gluing. On top of this you can re-tile, paint, paper, etc.
» If the old paint is vinyl, synthetic enamel or oil, only those areas which are loose or
where bubbles have formed must be removed. Plaster the damaged areas, sand and
apply a coat of primer before applying the new paint.
Remember that in order to obtain a good finish, you must apply at least two coats of paint,
being sure to apply the second coat perpendicular to the first.
3. Lastly, you can remove the old tiles, using a thick spatula as a lever on each of them. Once all the pieces of old
tile are removed, there are two possibilities:
» Scratch the adhered cement glue hard – if the surface is primed, this will be much easier – and then
plaster over any damaged areas, apply primer and redecorate.
» Another alternative is leveling the surface with cement glue, allowing it to dry and then re-tiling.
24
25
4
5
D E C O R AT I O N
WITH WALLPAPER OR FABRIC
Before applying wallpaper, it is very important to prime
the entire surface first. This way, if you decide to remove the paper in the future, the job will be much
easier. Of course, any type of paper can be hung.
If the surface is already covered with wallpaper and
you want to remove it, whether to hang new paper
or change the type of decoration, moisten the wall as
indicated for removing tempera paint. Little by little,
the paper will lift away. Remove it gently with the
help of a spatula. Gently sand the imperfections in
the surface. If necessary, apply primer. You can now
redecorate the surface as you like.
For fabric, proceed normally as with any other type of wall. You can apply fabric with or
without an undercloth.
26
MAINTENANCE
A N D S M A L L R E PA I R S
5
MAINTENANCE AND SMALL REPAIRS
Keeping PLADUR® surfaces in perfect condition or repairing minor damage resulting
from daily use is a simple task. Follow these instructions and your walls were always look
brand new.
REPAIRS WHERE IT IS NECESSARY TO REPLACE A PLADUR®
BOARD
If you have to replace a rather extensive area of PLADUR® or carry out significant repair
work – for example, replace or repair plumbing – we recommend following the steps
below:
MINOR DAMAGE
For minor damage such as scratches or chips where only the surface of the PLADUR® has
been damaged, repair is very simple.
1. Cut out a piece of the board around the damaged area
or where repair is needed with a keyhole saw or a jigsaw.
1. Scrape the damaged area with a knife to remove
traces of loose cellulose and possible damaged plaster.
2. Repair the problem if necessary. (Remember that when
cutting the board, you can choose the area which would
result in less damage and require less repair.)
2. Apply a paint primer or sealant to prepare the surface.
3. Surround the interior of the space with profiles or pieces of wood, leaving half visible. Firmly screw these pieces
to the board in place.
3. Finish off by applying a regular plaster with a spatula.
If the area is somewhat large, we recommend PLADUR®
joint paste.
28
4. Place a piece of PLADUR® board over the hole (If the
previous one is only wet, allow it to dry and it can be
reinstalled). Screw this board to the wood. Then make a
beveled edge around the join and plaster it. If the hole to
be covered is large, reinforce it with PLADUR® paper tape
and cover with PLADUR® joint paste.
29
5
6
MAINTENANCE AND SMALL REPAIRS
TYPES OF FIXING
ANOTHER PRACTICAL SOLUTION FOR REPLACING
SECTIONS OF DAMAGED PLADUR®.
1. With a pointed saw, cut a triangle out of the board, and
if necessary make the repair.
2. Take the cut piece or a similar one, put a few daubs of
PLADUR® anchoring paste or white glue on the corners
and insert it into the hole. Position it “crosswise” and pull
hard towards you until it is firmly attached.
3. If the size of the hole does not allow you to work comfortably, before inserting the piece in the hole, drill two
holes in the center of the piece and run a wire through
them, allowing you to pull better. Insert the piece, turn it
and pull firmly towards you, using a stick or screwdriver
as a “tourniquet”.
4. Clean off the excess anchoring paste and once the previous piece has set, apply a few daubs of paste or white
glue (depending on what was used above) to a piece the
exact size of the hole. Position it inside the hole and press
down firmly. Finally, bevel the joints and plaster them, as
in the previous example.
30
6
TYPES OF FIXING
To assist you, we provide a full list of wall plugs and fixings which can be used on PLADUR®
systems, as well as how they are installed and operate.
Carefully chose the most suitable design and size, depending on the object to be hung. This
will make your work perfect and lasting.
Standard plastic fixings
Recommended for loads of 5 to 10 kg. per point, depending
on the diameter.
Only for fixed and downward loads.
Floreat picture hangers
Recommended for maximum loads of 5 kg. per hook, 10 kg.
for two and 15 kg. for three hooks.
Only for fixed and downward loads.
Hollow wall anchor plug
Recommended for loads of 10 to 30 kg. per point, depending on the diameter, and ceilings.
For moveable and fixed loads.
“Tulip” plastic fixing
Recommended for loads up to 5 kg. per point.
Only for fixed and downward loads.
32
33
6
TYPES OF FIXING
Plasplug or retractable cavity anchors
Recommended for loads of 10 to 25 kg. per point, depending
on the diameter.
Spring toggle
Recommended for hanging from ceilings.
For fixed and moveable loads.
Plastic toggle
Recommended for loads of 10 to 15 kg. per point, depending
on the model.
Butterfly fixing
Recommended for hanging from ceilings.
For fixed and moveable loads.
34
35
6
TY
I PPOE SS D
OEF CF U
I XEILNGGU E S
Self-drilling fixings
For boards 19 mm or thicker and facings with two or more
boards.
For fixed and downward loads.
NB:
» These anchors can easily be purchased at hardware stores, hypermarkets and specialized DIY stores.
» All load figures and wall plug choice indicated in this manual refer to work on facings made up of
one board (13 mm or thicker). For facings made up of more boards, follow the same limits and plug
choices indicated.
36
Customer ser vice
902 023 323
www.pladur.com
[email protected]
User’s manual
Learn all about the advantages of Pladur ®
ER-07351997
ER-07351997
Valdemoro Central Offices
and Factory - Madrid
Laminated Plasterboard Sheets,
Manufactured Products
and Adhesive Pastes.
PLADUR® is a registered trademark of Grupo URALITA • 1/February 2008 EDITION