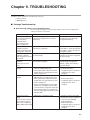
1
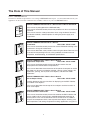
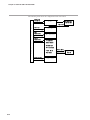
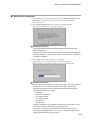
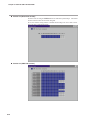
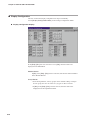
No. CP-SP-1124E
SMART TERMINAL
EST555Z
User's Manual
DMC10 Package
POW
ER
Thank you for purchasing the
DMC10 Package for the EST555Z.
This manual contains information for
ensuring correct use of the EST555Z. It
also provides necessary information for
installation, maintenance and troubleshooting.
This manual should be read by those
who design and maintain devices that
use the EST555Z.
Be sure to keep this manual nearby for
handy reference.
RESTRICTIONS ON USE
When using this product in applications that require particular safety or when using this
product in important facilities, pay attention to the safety of the overall system and
equipment. For example, install fail-safe mechanisms, carry out redundancy checks
and periodic inspections, and adopt other appropriate safety measures as required.
NOTICE
Be sure that the user receives this manual before the product is used.
Copying or duplicating this user’s manual in part or in whole is forbidden. The information and specifications in this manual are subject to
change without notice.
Considerable effort has been made to ensure that this manual is free
from inaccuracies and omissions. If you should find an error or omission, please contact Yamatake Corporation.
In no event is Yamatake Corporation liable to anyone for any indirect,
special or consequential damages as a result of using this product.
©2001 Yamatake Corporation ALL RIGHTS RESERVED
TM
The SMART TERMINAL is a trademark of Yamatake Corporation in Japan.
i
The Role of This Manual
Outline of EST555Z Manuals
The below 6 manuals are provided to cover a range of EST555Z-related topics. Use the manual that best fits your
application. In the event such a manual is not available, contact us or your local EST555Z dealer.
SMART TERMINAL EST555Z User's Manual Manual No.CP-UM-5229E
C P - UM
User's
-0123E
Manual
NG
WARNI
N
CAUTIO
WAR N
CAU T
ING
ION
This manual is packaged with the EST555Z body.
This manual should be read by those who produce units that use the Smart
Terminal.
This manual contains safety precautions when using the Smart Terminal,
installation methods, and descriptions for wiring the power supply and
signal lines.
SMART TERMINAL EST555Z User's Manual
Installation
Manual No. CP-SP-1103E
This manual should be read by those who use the EST555Z to design units
and those in charge of maintenance.
This manual describes safety cautions when using the Smart Terminal, how
to install for incorporating into units, wiring methods, maintenance and
inspection, troubleshooting, and hardware specifications.
SMART TERMINAL EST-Z Series User's Manual
Application Preparation
Manual No. CP-SP-1088E
This manual should be read by those who design screens that are
displayed on the EST-Z Series and operations.
This manual describes the environment of the personal computer on which
AP Editor can be used, installation methods, startup, system settings, file
operations, printing, how to paste smart objects, and other AP Editor
operations.
SMART TERMINAL EST-Z Series User's Manual
Smart Object Library
Manual No. CP-SP-1089E
Graphic elements that have functions for displaying on the EST-Z Series
are called “smart objects.”
This manual describes the concept of smart objects and the functions of
each smart object.
SMART TERMINAL EST-Z Series User's Manual
Communications Connection
Manual No. CP-SP-1090E
This manual should be read by those who combine the EST-Z Series with
PLCs made by other manufacturers and dedicated board computers to
build systems. This manual describes how to connect to PLCs, address
maps that correspond to PLCs, how to paste smart objects, drawing, and
other operations and settings required for making applications using PLCs.
ii
SMART TERMINAL EST555Z User's Manual
DMC10 Package
Manual No. CP-SP-1124E
This manual.
This package is used when constructing systems by connecting the
EST555Z to Yamatake Distributed Multi-channel Controller DMC10.
This manual describes the specifications of the software package, how to
use the package, how to install the software, and how to operate the
software.
iii
Organization of This User's Manual
This manual is organized as follows:
Chapter 1. SYSTEM CONFIGURATION
This chapter describes the system configuration of the EST555Z with a
modular type controller DMC10 when using the Package.
Chapter 2. FUNCTIONAL OUTLINE
This chapter describes the outline of the various functions of the Package.
Chapter 3. COMMUNICATION CONNECTIONS
This chapter describes how to connect the EST555Z, the DMC10, and the
CMC10B. For further details, see also the manuals of the DMC10 and the
CMC10B.
Chapter 4. COMMUNICATION SETUP
This chapter describes the communication parameters and how to
configure the communication addresses.
Chapter 5. HOW TO USE THE PACKAGE
This chapter describes how to install the Package and how to download it
to the EST555Z, in addition to providing information on configuration that
should performed before using the Package. Be sure to read this chapter
and perform the necessary configuration before using the Package.
Chapter 6. DMC10 SETUP AND MONITORING
This chapter describes items that can be setup and monitored using the
Package during operation, and provides screen flows diagrams.
Chapter 7. USAGE EXAMPLES - GATEWAY AND CONTROL SWITCH
This chapter describes data exchange with the PLC using the gateway
function of the EST555Z, and RUN/READY change of the DMC10 using
the control switch.
Chapter 8. COMBINED USE WITH USER APPLICATION
The Package can be used with a user-application created by the user.
This chapter describes how to use the Package with a user-application.
Chapter 9. TROUBLESHOOTING
This chapter describes how to remedy problems that might occur.
iv
Contents
The Role of This Manual
Organization of This User's Manual
Conventions Used in This Manual
Chapter 1.
SYSTEM CONFIGURATION
■ Direct-link and CMC-link • • • • • • • • • • • • • • • • • • • • • • • • • • • • • • • • • • • • • • • • • • • • • • • 1-1
■ User Application and the Package • • • • • • • • • • • • • • • • • • • • • • • • • • • • • • • • • • • • • 1-3
Chapter 2.
FUNCTIONAL OUTLINE
■
■
■
■
■
■
Chapter 3.
Auto Device Assignment • • • • • • • • • • • • • • • • • • • • • • • • • • • • • • • • • • • • • • • • • • • • • • • 2-1
Configuration Function • • • • • • • • • • • • • • • • • • • • • • • • • • • • • • • • • • • • • • • • • • • • • • • • 2-2
Monitor Function • • • • • • • • • • • • • • • • • • • • • • • • • • • • • • • • • • • • • • • • • • • • • • • • • • • • • • • 2-3
SP Configuration • • • • • • • • • • • • • • • • • • • • • • • • • • • • • • • • • • • • • • • • • • • • • • • • • • • • • • • 2-5
Control Switch • • • • • • • • • • • • • • • • • • • • • • • • • • • • • • • • • • • • • • • • • • • • • • • • • • • • • • • • • 2-5
Configuration Setup • • • • • • • • • • • • • • • • • • • • • • • • • • • • • • • • • • • • • • • • • • • • • • • • • • • 2-6
COMMUNICATION CONNECTIONS
■ Direct-link • • • • • • • • • • • • • • • • • • • • • • • • • • • • • • • • • • • • • • • • • • • • • • • • • • • • • • • • • • • • • • 3-1
■ CMC-link • • • • • • • • • • • • • • • • • • • • • • • • • • • • • • • • • • • • • • • • • • • • • • • • • • • • • • • • • • • • • • • 3-2
Chapter 4.
COMMUNICATION SETUP
■ Configuration of the Communication Parameters • • • • • • • • • • • • • • • • • • • • • • 4-1
■ Configuration of the Communication Addresses • • • • • • • • • • • • • • • • • • • • • • 4-2
Chapter 5.
HOW TO USE THE PACKAGE
5-1 Install the Package to the PC • • • • • • • • • • • • • • • • • • • • • • • • • • • • • • • • • • • • • • • • • • • • • • 5-1
5-2 Download the Package to EST555Z • • • • • • • • • • • • • • • • • • • • • • • • • • • • • • • • • • • • • • • • 5-2
■ Download the Package only • • • • • • • • • • • • • • • • • • • • • • • • • • • • • • • • • • • • • • • • • • • 5-2
■ Download the User Application and the Package • • • • • • • • • • • • • • • • • • • • • • 5-4
■ Download User-data of the Package • • • • • • • • • • • • • • • • • • • • • • • • • • • • • • • • • • • 5-7
■ Upload User-data of the Package • • • • • • • • • • • • • • • • • • • • • • • • • • • • • • • • • • • • • • 5-8
5-3 Configuration Setup of the Package • • • • • • • • • • • • • • • • • • • • • • • • • • • • • • • • • • • • • • 5-10
■ Start Up the Package • • • • • • • • • • • • • • • • • • • • • • • • • • • • • • • • • • • • • • • • • • • • • • • • • 5-10
■ Auto Device Assignment • • • • • • • • • • • • • • • • • • • • • • • • • • • • • • • • • • • • • • • • • • • • • 5-13
■ Name Configuration • • • • • • • • • • • • • • • • • • • • • • • • • • • • • • • • • • • • • • • • • • • • • • • • • • 5-15
■ Display Configuration• • • • • • • • • • • • • • • • • • • • • • • • • • • • • • • • • • • • • • • • • • • • • • • • • 5-16
■ Alarm Definition • • • • • • • • • • • • • • • • • • • • • • • • • • • • • • • • • • • • • • • • • • • • • • • • • • • • • • 5-20
v
Chapter 6.
DMC10 SETUP AND MONITORING
■ DMC10 Setup • • • • • • • • • • • • • • • • • • • • • • • • • • • • • • • • • • • • • • • • • • • • • • • • • • • • • • • • • • 6-1
■ DMC10 Monitor • • • • • • • • • • • • • • • • • • • • • • • • • • • • • • • • • • • • • • • • • • • • • • • • • • • • • • • 6-11
■ DMC10 Alarm Monitor • • • • • • • • • • • • • • • • • • • • • • • • • • • • • • • • • • • • • • • • • • • • • • • • 6-15
Chapter 7.
USAGE EXAMPLES - GATEWAY AND CONTROL SWITCH
■ PLC Data Exchange with the EST555Z Gateway Function • • • • • • • • • • • • • 7-1
■ Control DMC10 using the Control Switch • • • • • • • • • • • • • • • • • • • • • • • • • • • • • • 7-7
Chapter 8.
COMBINED USE WITH USER APPLICATION
Chapter 9.
TROUBLESHOOTING
■ Package Troubleshooting • • • • • • • • • • • • • • • • • • • • • • • • • • • • • • • • • • • • • • • • • • • • • • 9-1
■ DMC10 Troubleshooting • • • • • • • • • • • • • • • • • • • • • • • • • • • • • • • • • • • • • • • • • • • • • • • 9-2
vi
Conventions Used in This Manual
The following conventions are used in this manual:
Handling Precautions
: Handling Precautions indicate items that the user should pay attention
to when handling the DMC10 Package.
Note
: Notes indicate useful information that the user might benefit by
knowing.
(1), (2), (3)
: Circled numbers indicate steps in a sequence or indicate
corresponding parts in an explanation.
>>
: Indicates the result of an operation, the indication of the personal
computer and the EST or the EST action after an operation.
[A] [B] [C] etc.
: This indicates a key on the personal computer’s keyboard.
vii
Chapter 1. SYSTEM CONFIGURATION
■ Direct-link and CMC-link
The DMC10 Package (hereinafter referred to as the Package) software is available
in two versions, Direct-link version and CMC-link version. The user should select
the appropriate one according to their application.
The Direct-link version is used when the number of DMC10 units to be connected
is 15 or less and the EST555Z and the DMC10 are to be connected directly.
The CMC-link version is used when the number of DMC10 units to be connected
is 16 or more. In this case, the EST555Z and the DMC10 are connected via a
CMC10B. A maximum of 16 CMC10B units can be connected to the EST555Z
and a maximum of 15 DMC10 can be connected to each CMC10B. A group of
one CMC10B and the DMC10 units that are connected to it are called one “unit”.
Handling Precautions
The event-output-module DMC10E is not counted in the number of units
connected to the DMC10.
● System configuration of Direct-link
EST555Z
Module
CH4
DMC10
DMC10
0
RS-485(3 wire)
0
Max. 15 DMC10s can be connected
Note
For the Direct-link version, the SDU10 (Compact Operation Unit for the DMC10)
can be connected between the EST555Z and the DMC10. In this case, the device
address of the SDU10 is required to be 0. For detail information, refer to the
User’s Manual, Compact Operation Unit SDU10 for Distributed Multichannel Controller DMC10 User’s Manual, (Manual No. CP-SP-1096E).
Handling Precautions
• The DMC10 should be connected to CH4 of the EST555Z. CH1 to CH3
can not be used.
• When using the Package, equipment other than the DMC10 cannot be
connected to CH4 of the EST555Z at the same time.
1-1
Chapter 1. SYSTEM CONFIGURATION
● System configuration of CMC-link
EST555Z
Module
CH4
CMC10B
DMC10
DMC10
LOADER
2 3 4
1
0
5
9
6
8 7 X10
2 3 4
1
0
5
9
6
8 7 X10
1
0
power
SD
2
RD
Max. 15 DMC10s can be connected
HOST CMC
CMC ADDRESS
RS-485(3 wire)
HOST CMC
B.RATE
RD
CMC LOCAL
SD
11
12
13
14
ERR
15
RESET
CMC10
Unit
CMC10B
Max. 16 units
DMC10
DMC10
Max. 15 DMC10s can be connected
Handling Precautions
• For the CMC-link version, the SDU10 (Compact Operation Unit for the
DMC10) can not be connected.
• CMC10B should be connected to CH4 of the EST555Z.
CH1 to CH3 can not be used.
• When connecting the CMC10B to CH4 of the EST555Z, other
equipment can not be connected to this port.
• The configuration of the CMC10B such as Folder and Buffering
Configuration are done automatically by the Package when Auto device
assignment is performed. Configuration such as Buffering data
definition can not be performed by the user. Do not change the
configuration of the CMC10B after performing Auto device assignment.
For the details of Auto device assignment, see 5-3 Configuration Setup
of the Package.
Note
The explanation in this manual is common to both the Direct-link version and
CMC-link version. The screen examples are that of the CMC-link version, and
where there is any difference between two versions, it is explained each time.
1-2
Chapter 1. SYSTEM CONFIGURATION
■ User Application and the Package
The user can use a User Application along with the Package.
For information on how to create a User Application, see the following manual:
SMART TERMINAL EST-Z Series User’s Manual Application Preparation
(Manual No. CP-SP-1088E).
When operation starts after both the User Application and the Package have been
downloaded, the No.1 screen (Panel 1) of the User Application starts first.
A Panel change switch (dedicated package change) should have been included in
the User Application in advance.
For details, see Chapter 8. COMBINED USE WITH USER APPLICATION.
Handling Precautions
When the [EST Information] of the DMC10 is [4] or less, the Package
cannot be used.
Only the DMC10 with [EST Information] of [5], or later, can be used.
The EST information can be checked as follows with the DMC10s PC
loader SLP-D10 : [Setup] → [Standard] → [Information] →
[EST Information]
1-3
Chapter 2. FUNCTIONAL OUTLINE
This chapter describes the outline of the various functions of the Package.
■ Auto Device Assignment
The Package determines how many CMC10B and DMC10 units are connected to
the EST555Z and automatically performs the device assignment. Information
such as the model No. of the DMC10, which options are used, the PV input
parameters, etc, are registered to the EST555Z by the Auto Device Assignment.
Auto Device Assignment must be performed when starting up the system.
2-1
Chapter 2. FUNCTION OUTLINE
■ Configuration Function
The parameters that are necessary for general use of the DMC10 can be
configured by the Package.
The following is a list of such parameters:
Functions
Type
Standard
PV inputs
Item
Input type
Temp Unit
Decimal point position
PV range low limit
PV range high limit
PV bias
SP low limit
SP high limit
SP Down Ramp
SP Up Ramp
Control outputs
Control output
Control action
Time proportional cycle
Operation at AUTO/MANUAL change
Pre-set manual value
Output at Ready
Heat/Cool Deadzone
SP / Control
parameter
SP
Proportional band (P)
Integral time (I)
Derivative time (D)
Manual reset (RE)
Differential (DIFF)
Option
Event
Type
Channel
Event Value (Main)
Event Value (Sub)
Hysteresis
Direct/Reverse
Standby
Output assignment 1 to 3
Logic
ON delay time
OFF delay time
Latch
Polarity (energizing/de-energizing)
CT Input
CT Input CH
functions
Waiting time before measuring
RSW input
Type
functions
Channel
Input assignment 1 to 3
Logic
Polarity
2-2
Remarks
Chapter 2. FUNCTION OUTLINE
Functions
Option
Type
AUX. output
functions
Item
Remarks
Type
Channel
Output type
Value at 0% output
Value at 100% output
Special
Multiple SP
functions
Event special
RSW special
*1
Remote SP
*2
Heat/Cool
*1, *2
Position Proportional Control
*1, *3
Display only. Setting is not possible.
*2 DMC10D (High function model) only.
*3 Only applicable for DMC10 units which have Position Proportional/Module
Control Model.
■ Monitor Function
The Package has the following Monitor functions:
● Module monitor
Monitors one DMC10 module at a time. The following functions are available:
• PV monitor
• SP monitor/change
• MV monitor/change (in MANUAL mode)
• RUN/READY status monitor/change
• AUTO/MANUAL mode monitor/change
• AT status monitor/change
• LOCAL/REMOTE status monitor/change
• input/output monitor
• alarm monitor
• basic trend of PV&SP and MV
2-3
Chapter 2. FUNCTION OUTLINE
● Group monitor
All the DMC10 units within the same unit are monitored.
2 items that are selected from the following list of items can be monitored by one
screen, and a maximum of four screens can be defined:
PV, SP, MV, CT, SP Sel, AUTO/MANUAL, RUN/READY, LOCAL/REMOTE,
AT status.
● Alarm monitor
The Package monitors the alarm status of all the connected DMC10 units. On the
“Module Monitor” screen, “Group Monitor” screen, “Control Switch” screen and
the “SP Configuration” screen, the Alarm lamp indicates whether alarms are
occurring. The “Alarm List” screen and “Alarm Mod Detail” screen are also
provided. The user can add user-set events as alarms, in addition to the PV input
alarm, device alarm and communications error alarm.
2-4
Chapter 2. FUNCTION OUTLINE
■ SP Configuration
The SPs of all the DMC10 units within the same unit are monitored.
SP can be set for each CH.
■ Control Switch
The Control switch enables the user to select a DMC10 channel and change a
group of SPs with one operation, or to change the modes such as RUN/READY,
AUTO/MANUAL, AT-stop/-start with one operation.
The user can define up to 8 control switches.
Note
The Control switch definition can be made in [Package Configuration Menu] →
[Display Configuration]. For detail information, refer to the ●Control switch
definition display (p. 5-18).
2-5
Chapter 2. FUNCTION OUTLINE
■ Configuration Setup
The user can set the configuration according to the application.
● Name configuration
Unit name, module name, and CH name can be configured for the CMC10B and
DMC10 units which were registered by the Auto device assignment. (The unit
name can be set only with the CMC-link version.)
The initial names are Unit01, Module01, ch1, etc.
● Display configuration
Unused functions can be deleted from the menus on the screen.
Functions such as SP change and Mode change can be disabled.
● Alarm definition
The Package monitors DMC10 alarms such as PV input alarm, device alarm, and
communications alarm.
The user can add the user-defined DMC10 events to the alarms.
2-6
Chapter 3. COMMUNICATION CONNECTIONS
■ Direct-link
EST555Z
*
*
0
DMC10
0
DMC10
0
DMC10
* Do not connect a terminating resistor at both ends of transmission line.
Handling Precautions
• When linking two or more DMC10s, ensure that the communications
disconnection switch is set to the “CONNECT→” side. (Factory default)
In this case, wiring is not necessary.
For details, refer to the following manual:
Distributed Multi-channel Controller DMC10 Description of Functional
Manual (Manual No. CP-UM-5143E)
• The DMC10 has a built-in resistance equivalent to a terminating resistor.
Do not connect an external terminating resistor.
• Do not connect a terminating resistor externally even when the SDU10
(Compact Operation Unit for the DMC10) is connected between the
EST555Z and the DMC10.
3-1
Chapter 3. COMMUNICATION CONNECTION
■ CMC-link
● Connecting EST555Z and CMC10B
EST555Z
*
CMC10B
CMC10B
DMC10s linked
CMC10B
DMC10s linked
*
DMC10s linked
* Connect a terminating resistor at both ends of transmission line.
! ! ● Connecting CMC10B and DMC10
Handling Precautions
• When linking the DMC10 to a CMC10B, or two or more DMC10s ensure
that the communication disconnection switch is set to the
“CONNECT→” side(Factory default).
For details, refer to the following manuals.
Communication Controller CMC10B (CPL/CPL Converter)
User's Manual (Design Manual) Manual No.CP-SP-1064E
Module Controller DMC10 Description of Function Manual
(Manual No. CP-UM-5143E)
• Connect terminating resistor (120 to 150 Ω, 1/2W) to both ends of the
EST555Z and the CMC10B.
3-2
• The DMC10 has a built-in resistance equivalent to a terminating resistor.
Do not connect an external terminating resistor.
Chapter 4. COMMUNICATION SETUP
■ Configuration of the Communication Parameters
The communication parameters of the Package are as follows:
Baud rate : 19200 bps
Data format : bit length 8, even parity, 1 stop bit
● Configuration of EST555Z
The communication parameters are set automatically in the EST555Z when a
Package is downloaded to it.
● Configuration of DMC10
The DMC10s communication parameters are set as above when shipped from the
factory. To confirm, open the “Communication” item with the DMC10 PC loader.
The settings should be as follows:
Baud rate : 3 (19200 bps)
Data format : 0 (8bit/ even parity/ 1 stop bit)
● Configuration of CMC10B (CMC-link version only)
The CMC10B requires two types of communication configuration; “Host
Communications Setup” to connect with the EST555Z and “Local
Communications Setup” to connect with the DMC10.
The transmission speed of the “Host Communications Setup” is set by the rotary
switch on the CMC10Bs front panel.
Rotary Switch HOST↔CMC B.RATE : 2 (19200bps)
Handling Precautions
The new setting of the CMC10Bs rotary switch becomes effective after
switching the power OFF, then ON again.
Other conditions are set as above when shipping from the factory. To confirm, use
the CMC10B PC loader. The settings should be as follows:
• Host Communication
Data format : 0 (8bit/ even parity/ 1 stop bit)
• Local Communication
Baud rate : 2 (19200 bps)
Data format : 0 (8bit/ even parity/ 1 stop bit)
4-1
Chapter 4. COMMUNICATIONS SETUP
■ Configuration of the Communication Addresses
● Configuration of EST555Z
The EST555Z does not require any communication address configuration.
● Configuration of DMC10 (Direct-link)
For Direct-link, set the communication address rotary switch “ADR” of the 1st
through to 15th (max.) DMC10 for 1 to 15 (1 to F), respectively.
Handling Precautions
• Each DMC10 must have a different communication address.
If the number of the DMC10 units connected is 14 or less, one or more
communication address can be reserved for the additional installation of
units in the future.
For example, the DMC10 communication address can be set as follows:
1, 2, 5· · ·
Unused addresses in this example are available for future use.
• The new setting of the DMC10s rotary switch becomes effective after
switching the power OFF, then ON again.
● Configuration of CMC10B/DMC10 (CMC-link)
For CMC-link,
(1) Set the [CMC ADDRESS] rotary switches on the front face of the 1st through
to 16th(max.) CMC10B for 01 to 16, respectively. The Address is set by the
two rotary switches, [x 10] and [x 1]. When setting an address of less than 10,
the [x 10] switch must be set for 0.
(2) Set the communication address rotary switch [ADR] of the 1st through to 15th
(max.) DMC10 that are connected to CMC10B for 1 to 15 (1 to F),
respectively.
Handling Precautions
• Each DMC10 that is connected to the same CMC10B must have a
different communication address.
If the number of the DMC10 connected is 14 or less, one or more
communication address can be reserved for the additional installation of
units in the future.
For example, The DMC10 communication address can be set as
follows: 1, 2, 5· · ·
Unused addresses in this example are available for the future use.
• A DMC10 that is connected to a different CMC10B can use the same
communication address.
• The new settings of the CMC10Bs and DMC10s rotary switches become
effective after switching the power OFF, then ON again.
4-2
Chapter 5. HOW TO USE THE PACKAGE
5 - 1 Install the Package to the PC
In order to install the Package, the AP Editor should have been installed in the PC. For information on the
installation of the AP editor, see the following manual:
SMART TERMINAL EST-Z Series User’s Manual Application Preparation (Manual No.CP-SP-1088E)
This section describes how to install the Package to the AP Editor in the PC.
(1) Insert the Package floppy disc to the floppy drive of the PC.
Double-click [My Computer].
(2) Right-click the floppy drive icon and select [Open] from the pull-down menu.
(3) Files on the floppy disc are displayed. Double-click [Setup.exe].
(4) Setup screen will be displayed.
(5) Follow the instructions on the screen to continue the setup.
5-1
Chapter 5. HOW TO USE THE PACKAGE
5 - 2 Download the Package to EST555Z
■ Download the Package only
Handling Precautions
• All the EST555Z applications will be initialized by performing the
downloading described in this section.
• By downloading the Package again to an EST555Z in which the
Package has already been downloaded, the configuration will be
initialized and any settings the user has made will be lost.
The items to be initialized are all the items described in
5-3 Configuration Setup of the Package (p.5-10).
(1) Connect the PC and the EST555Z and turn on the power of the EST555Z.
(2) Startup the AP Editor.
Without opening any files, click [Online] in the menu-bar → [Download from
PC to EST] → [Download Dedicated Package].
(3) Select the Package.
Select either the Direct-link or the CMC-link and click [OK].
5-2
Chapter 5. HOW TO USE THE PACKAGE
(4) Download the Package.
Download will begin after [OK] has been clicked.
When the download has been completed, the following screen will be
displayed:
If you want to start the EST, select [Yes].
5-3
Chapter 5. HOW TO USE THE PACKAGE
■ Download the User Application and the Package
Handling Precautions
• If the Package has not already been downloaded to the EST555Z, the
Package will be downloaded along with the User application by
performing the download described in this section. If the Package has
already been downloaded, only the User application will be downloaded.
• If downloading a User application only, the Package will be deleted.
By downloading the Package again, the configuration will be initialized
and any settings the user has made will be lost.
The items which will be initialized are all the items described in
5-3 Configuration Setup of the Package (p.5-10).
(1) Connect the PC and the EST555Z and turn on the power of the EST555Z.
(2) Startup the AP Editor and create a User application.
For information on how to create a User application, see the following manual:
SMART TERMINAL EST-Z Series User’s Manual Application
Preparation (Manual No.CP-SP-1088E)
(3) Setup the Package.
Open [Configuration Information] → [General] from the application
manager.
5-4
Chapter 5. HOW TO USE THE PACKAGE
(4) Setup the options.
Click on [Package/Option] and select either the Direct-link or the CMC-link.
Click [OK].
By clicking [OK], the communication settings of CH4 will be automatically
changed according to the selected Package.
(5) Save the file.
5-5
Chapter 5. HOW TO USE THE PACKAGE
(6) Download the application.
Click [Online] in the menu-bar → [Download from PC to EST] →
[Download All].
Follow the messages on the screen to perform the download:
When the download has been completed, the following screen will be
displayed:
If you want to start the EST, select [Yes].
5-6
Chapter 5. HOW TO USE THE PACKAGE
■ Download User-data of the Package
This section describes how to download the User-data (the data set by the user) of
the Package such as Display Configuration and Name Configuration.
Use the User-data that has been uploaded from the EST.
(1) Click [Online] in the menu bar → [Download from PC to EST] →
[Download User Data].
>> The following window will be displayed:
(2) User-data select dialog will be displayed after selecting the file.
• Data type
• File name
• Browse
: Items that can be downloaded are displayed. Select the
item to download and mark the check box.
: File names to download are displayed.
: Click this button to display the file select window to change
the file to download.
5-7
Chapter 5. HOW TO USE THE PACKAGE
(3) Click [OK]. “Communications Status” screen will be displayed.
>> Click [OK]. Download will be executed.
Handling Precautions
If the package has not been installed, downloading of the User-data of the
Package is not possible.
■ Upload User-data of the Package
This section describes how to upload the User-data of the Package (already
downloaded) in the EST such as Display Configuration and Name Configuration.
(1) Click [Online] in the menu bar → [Upload from EST to PC] → [Upload
User Data].
>>User-data select dialog will be displayed.
5-8
• Data type
: Items that can be uploaded are displayed. Select the item to
upload and mark the check box.
• File name
: Input the file name for the uploaded data. The default
folder is the one in which the package is installed.
• Browse
: Click this button to display the file select window to change
where to save the uploaded data.
Chapter 5. HOW TO USE THE PACKAGE
(2) Click [OK]. “Communications Status” screen will be displayed.
>> Click [OK]. Upload will be executed.
Handling Precautions
• If the package has not been installed, uploading the User-data of the
Package is not possible.
• Do not edit the uploaded data other than by using the EST. Otherwise,
the package may not function correctly after such edited data has been
downloaded.
5-9
Chapter 5. HOW TO USE THE PACKAGE
5 - 3 Configuration Setup of the Package
After downloading the Package, the user should perform the necessary configuration in order to use the Package.
● Auto device assignment
The device configuration of the CMC10B and the DMC10 that are connected to
the EST555Z are registered to the EST555Z by the Auto Device Assignment.
This must be performed when starting up the system or when the basic parameters
of the DMC10 have been changed by PC loader.
● Name configuration
Unit names can be given to the CMC10B, and module names and channel names
can be given to the DMC10.
● Display configuration
The user can choose the necessary display functions.
Display Configuration data can be uploaded/downloaded as User-data.
● Alarm definition
The DMC10 events specified by the user can be added to the DMC10 Alarm
monitoring.
Note
Although the Auto device assignment must be performed when starting up the
system for the first time, other items can be set or changed afterwards.
■ Start Up the Package
When starting up the Package for the first time after downloading, the following
screen will be displayed:
>> Touch [OK] to display the main menu.
Note
After the Auto device assignment has been completed once, this screen does not
appear when starting the Package. Instead, the message “Please wait...” will be
displayed for about 15 seconds (10 seconds for the Direct-link version) after the
power is turned on and then the MAIN MENU will appear.
5-10
Chapter 5. HOW TO USE THE PACKAGE
● Main menu
To display the “DMC10 MAIN MENU”, press the lower left corner (the
diagonally shaded areas in the above screen example) for at least 3 sec.
Note
The user can select which items are displayed in the main menu. See ■ Display
Configuration (p.5-16) for detailed information.
Handling Precautions
[Exit] is not displayed when only a Package is downloaded and a Userapplication is not used.
See Chapter 8. COMBINED USE WITH USER APPLICATION for
detailed information.
● Package configuration menu
5-11
Chapter 5. HOW TO USE THE PACKAGE
The following chart shows the configuration menu screen flow:
(
(
) " "
) * "
) %+ ) %&
'
) % "
5-12
+ , " !"#$
%&
'
Chapter 5. HOW TO USE THE PACKAGE
■ Auto Device Assignment
(1) Check that all the devices that comprise the system (EST555Z, CMC10B and
DMC10) are connected correctly and the communications configured.
Turn the power on.
(2) Touch [Auto Assignment] in the “Package Configuration Menu”.
The following confirmation screen will be displayed:
Handling Precautions
The Control Switch Assignment will be initialized by executing this Auto
Device Assignment.
The gateway function in action halts while the Auto Device Assignment
is being executed. It resumes again when the Auto Device Assignment
has been completed.
(3) Touch [OK] to execute the Auto Device Assignment.
The following screen will be displayed to indicate the progress:
When completed, it will display the Device list screen automatically.
Handling Precautions
When the system configuration is changed or when any of the following
parameters are changed by the DMC10 PC loader after the Auto
Device Assignment has been performed, Auto Device Assignment
should be performed once again.
• Input type
• Decimal point position
• PV range low limit
• PV range high limit
• SP low limit
• SP high limit
If these parameters are changed by the Setup of the Package, it is not
necessary to perform Auto Device Assignment again.
Conversely, if when position proportional control mode is used its
control type is changed from 1 or 2, to 0, 3, or 4,then it is necessary to
perform Auto Device Assignment again.
5-13
Chapter 5. HOW TO USE THE PACKAGE
● Device list (Direct-link version)
In this screen, the assigned DMC10 units are indicated by blue lamps. Check that
all the connected devices have been assigned.
If not, check if the wiring and the communication settings are correct and execute
the Auto device assignment again.
● Device list (CMC-link version)
5-14
Chapter 5. HOW TO USE THE PACKAGE
■ Name Configuration
The user can give names to the CMC10B units, DMC10 modules and channels.
In the initial settings after downloading the package, the default names are as
follows: Unit names are Unit01 to Unit16, Module names are Module01 to
Module15, and Channel names are ch1 to ch4.
If the user does not need to give other names, this configuration is not necessary.
Touch [Name Configuration] in the Package Configuration Menu.
The following screen will be displayed:
● Name configuration display
• For the Direct-link version, Unit Name is not provided.
• For the CMC-link version, when selecting Unit, all the Module Names within
the Unit will be displayed.
• When Unit/Module Names are selected, the keyboard will pop up.
● Screen keyboard
Unit Name and Module Name can be entered up to 12 letters, and CH Name up to
6 letters.
5-15
Chapter 5. HOW TO USE THE PACKAGE
■ Display Configuration
The user can alter the display configuration for improved usability.
Touch [Display Configuration Menu] in the Package Configuration Menu.
● Display configuration display
If the [Enb] / [Dis] switch of each item is set to [Dis], that item will not be
displayed in the Main Menu.
Module Monitor
If [Dis] of the [Enb] / [Dis] switch is selected, that function will be disabled
in the Module Monitor.
Group Monitor
• In the Group Monitor, four (4) groups can be defined as Disp1 to Disp4.
In each group, the user can select two (2) types of data to monitor.
• If [Dis] of the [Enb] / [Dis] switch is selected, that item will not be
displayed in the Group Monitor Menu.
5-16
Chapter 5. HOW TO USE THE PACKAGE
• Touch an item to display the “Selection Menu” and select the data to
monitor.
SP Configuration
No configuration is required.
Control Switch
• If [Dis] of the [Enb] / [Dis] switch is selected, that switch will not be
displayed in the “Control Switch” screen.
• Touch [More] to go to the screens to define each switch.
Setup Menu
If [Dis] of the [Enb] / [Dis] switch is selected, that switch will not be
displayed in the “Setup Menu” screen.
5-17
Chapter 5. HOW TO USE THE PACKAGE
● Control switch definition display
The user can change the SP Group or the Mode by one operation by assigning
such functions to the Control Switch.
• Touch [SW Name] to popup the keyboard. Input the desired name for the
switch. (Up to 12 letters.)
• Touch [Type] to display the “Selection Menu”. Select the function to be
executed.
The selectable functions are: SP No.1 to 8, RUN, READY, AUTO, MANUAL,
AT stop, AT start.
• For the Direct-link version, Unit selection is not performed.
• When selecting Unit in the CMC-link version, all the modules within the Unit
are displayed.
• Select a location to write with Control Switch for each CH. For the CMC-link
version, configure for all the required Units.
• [All OFF in this Unit] and [All ON in this Unit] switches change all the
channels at once.
5-18
Chapter 5. HOW TO USE THE PACKAGE
Handling Precautions
• In order to select SP No., “Multi SP” of the “Special Functions” of the
target module should be [Enb].
With the 4CH model of the DMC10, if 5 or a larger number is selected as
the SP No., a communications error will occur when the Control Switch is
executed.
• If the DMC10 channels have operation conditions defined with the
remote switch input(RSW) or event bus output(BUS), such channels
cannot be changed by the Control switch.
For example, if the user attempts to assign “RUN/READY” of the control
switch to a channel that has the condition “RUN when the remote switch
input is on”, a communication error will occur.
5-19
Chapter 5. HOW TO USE THE PACKAGE
■ Alarm Definition
When using a User application and Package together, the user can select whether
the DMC10 Alarm Monitor functions during the operation of the User application
with “Enb” or “Dis”.
If only the Package is used, this selection is meaningless.
The user can also add user-set events to the DMC10 Alarm Monitor.
In the 4 event relay outputs type DMC10 a total of 8 events can be defined
including the 4 event bus outputs.
Even in a DMC10 without events, 8 events can be defined if “On” is selected in
the Event Special section.
In this configuration, the user defines if each event is added as an alarm or not.
As the definition made in this Alarm Definition acts as the logical OR to the
events of all the connected DMC10 units, this is used, for example, when the user
wants to use one event channel as the high limit alarm through all the connected
DMC10 units.
• If [Dis] of the [Enb] / [Dis] switch is selected, that event will not be added to
the Alarm Monitor.
• Touch a [Name] to popup the keyboard. The user can input the event name.
Such event names are displayed in the Alarm module detail screen.
• For detailed information of the DMC10 events, see the following manual.
Distributed Multi-channel Controller DMC10 User's Manual Functional
Description (Manual No. CP-UM-5143E)
Handling Precautions
The alarm definition of the Package acts separately from the alarm monitor
of the User application that was created by the AP editor.
5-20
Chapter 6. DMC10 SETUP AND MONITORING
■ DMC10 Setup
This section describes how to display and configure the necessary data before
operating the DMC10.
The data is displayed and configured on a per module basis.
The following chart shows the screen flow:
M
! "
! " $&
n
! '
! ' $(
#
$%
M
a
i
e
n
u
#
#
$%
*1 : Unit Selection is not provided in the Direct-link version.
*2 : If the Event Special is not used, this name is displayed as Event Functions.
*3 : If the Event Special is not used, Event Out Assign is not available.
6-1
Chapter 6. DMC10 SETUP AND MONITORING
● Unit / Module selection
Touch [Setup Menu] in the MAIN MENU.
Select the target unit by [Unit/Module Selection] (CMC-link version only).
↓
Select the target module by [Module Selection].
The “Setup Menu” screen of the target module is displayed.
● Setup menu
• To select the unit and module again, touch
on the left of the Unit Name.
• Previous Module or next Module is displayed with
.
6-2
Chapter 6. DMC10 SETUP AND MONITORING
● Special functions
The Special Functions of the DMC10 are configured with this screen.
• If [Dis] of the [Enb] / [Dis] switch is selected, that function becomes inactive.
• Remote SP Input is displayed and configurable only in DMC10D (High
function model).
• Heat/Cool is displayed only in DMC10D (High function model.)
• Position Proportional/Module Control will only be displayed for models which
have this function.
Handling Precautions
• Enb/Dis of Heat/Cool, and the Heat/Cool Output Assignment can not be
configured by the Package.
They must be configured with the PC loader.
• Enb/Dis of Position Proportional/Module Control and the type of Position
Proportional/Module Control can not be configured by the Package.
It must be configured with the PC loader.
• The [Enb] / [Dis] switch of the Remote SP Input is selectable only when
the Heat/Cool is [Dis] and when the type of Position Proportional/Module
Control is set as 0, 3, or 4.
6-3
Chapter 6. DMC10 SETUP AND MONITORING
● PV Input functions
The data for the PV input of each channel is displayed and configured with this
screen.
Handling Precautions
If the SP range is changed after the SP has been set by the ● SP/Control
parameter (p.6-6), a Range Check will not be performed.
Check the range by yourself and set the SP again if necessary.
6-4
Chapter 6. DMC10 SETUP AND MONITORING
● Control output functions
The data for the Control output of each channel is displayed and configured with
this screen.
• When Position Proportional/Module Control is not available
• When Position Proportional/Module Control is available.
Touch [Set] switch of Position Proportional/Module Control to display
“PosnProp/ModCtrl” screen.
6-5
Chapter 6. DMC10 SETUP AND MONITORING
● Position proportional/module control
The parameters necessary for Position Proportional/Module Control can be
configured.
When feedback(FB) is being used, auto motor adjustment can be performed.
● SP/Control parameters
When Multi SP of Special Functions is [Dis], the SP is set for only one
display/setting.
6-6
Chapter 6. DMC10 SETUP AND MONITORING
● Event functions
• When Event Special of Special Functions is configured to [Enb], the item
names are displayed as TBL1 to TBL8 instead of EV1 to EV4 and BUS1 to
BUS4.
• Touch [Set]switch of Delay to display the following “Event Delay”
configuration screen:
6-7
Chapter 6. DMC10 SETUP AND MONITORING
● Event output assignment
• When Event Special of Special Functions is configured to [Dis], this screen will
not be displayed.
• Touch Output Assign 1 to 3 to popup display the following “Bit Input” screen
of Event Output:
6-8
Chapter 6. DMC10 SETUP AND MONITORING
● RSW input functions
• This is the screen when RSW Special is set as [Dis].
• This is the screen when RSW Special is set as [Enb].
• Touch Input Assign 1 to 3 to popup display the following “Bit Input” screen of
RSW Input:
6-9
Chapter 6. DMC10 SETUP AND MONITORING
● AUX output functions
This screen is not displayed for DMC10 units without an AUX Output.
● CT(current) input functions
This screen is not displayed for DMC10 units without a Current Transformer input
functions.
6-10
Chapter 6. DMC10 SETUP AND MONITORING
■ DMC10 Monitor
This section describes DMC10s Monitor function.
The following chart shows the screen flow of the monitoring functions:
M
e
n
u
M
a
i
n
! !" #$
%
&
'
* Unit Selection is not provided in the Direct-link version.
6-11
Chapter 6. DMC10 SETUP AND MONITORING
● Module monitor
DMC10 can be monitored per module.
• Touch SP of each channel. The numeric keypad pops up. Input the desired SP
value.
• In MANUAL mode, the numeric keypad pops up by touching the MV of each
channel.
Input the desired MV value.
• Touch R/R(RUN/READY), A/M(AUTO/MANUAL), AT(Start/Stop) and
L/R(LOCAL/REMOTE) of each CH to change the mode.
• Touch PID values of each CH. A numeric key-pad pops up to enter a desired
value.
• Touch the range value in the trend graph. A numeric key-pad pops up to change
the numeric value. The change can be made within -2000 to +10000 range.
The initial value and decimal point are the same as CH1 input range.
• Touch the value of Cycle in the trend graph. A numeric key-pad pops up to
change the Cycle value. Configurable range is 1 to 10 seconds (initial value is 2
seconds).
• Touch each switch of PV, SP and MV to change the display/non-display of
graph.
• Previous Module or next Module is displayed with
.
Handling Precautions
• Switches that have been set as “Dis” in the Package configuration will
not respond.
• Mode change may not be possible depending on the status of the
DMC10.
• Trend data is cleared after exiting out of the Module Monitor.
• Trend data is cleared when the cycle is changed.
• To save the Trend data for a long time or to display only the desired
channels, use Trend Smart Objects in the User application.
6-12
Chapter 6. DMC10 SETUP AND MONITORING
The lamps indicate the following conditions:
Lamp
ON when
OUT
Output terminal of the CH is ON
EV
EVENT terminal is ON
BUS
BUS output is ON,
This lamp indicates the event bus output status of each module,
instead of the OR status of the BUS of the connected modules.
RSW
Remote switch input is ON
ALM (PV)
PV input of the CH is in error
ALM (OTH)
Other errors have occurred
● Manual motor operation
When Position Proportional/Module Control is being used without feedback
(control type 3 or 4), the motor can be operated manually.
In MANUAL operation, touch [MAN] switch at the bottom of channel to display
the following screen:
After pressing [Open] or [Close] once, that state will continue until [Off] is
pressed. Press [Off] once the motor comes to a halt.
● Group monitor menu
The Menu that has been registered in the Package Configuration will be displayed.
6-13
Chapter 6. DMC10 SETUP AND MONITORING
● Group monitor 1 to 4
Touch an item in the Group Monitor Menu and select a unit
[Unit Selection](CMC-link version only) to go to the “Group Monitor” screen.
Here, all CH data within the selected Unit are displayed.
• Previous item or next item is displayed with
.
• Previous Unit or next Unit is displayed with
.
● SP configuration
SP values of all CHs within the selected Unit can be displayed/changed.
• Touch SP value of each CH. A numeric key-pad pops up to enter SP value.
• Touch
on the left of Unit Name to make Unit selection. (Only CMC-link
version)
• Previous Unit or next Unit can be displayed with
.
6-14
Chapter 6. DMC10 SETUP AND MONITORING
● Control switch
Control Switches that have been defined in the Package Configuration are
displayed.
Touch a switch to display its Confirmation screen. Touch [OK] to execute the
Control Switch.
■ DMC10 Alarm Monitor
The alarms of the DMC10 can be checked with the [Alarm] lamp in the screens of
“DMC10 MAIN MENU”, “Module Monitor”, “Group Monitor”, and “Control
Switch”.
Touch [Alarm]switch to go to the “Alarm Monitor”.
The following chart shows the screen flow of the “Alarm Monitor” :
*1 : In the Direct-link version, it goes directly to the “Alarm Module List” by
touching [Alarm].
*2 : Only at occurrence of communication error.
6-15
Chapter 6. DMC10 SETUP AND MONITORING
● Alarm unit selection (CMC-link version only)
• The modules that have errors are indicated with red lamps.
• Select Unit to go to “Module Selection” screen.
• [Comm] lamp lights when an error occurs in the communications with Unit
(CMC10B). Touch [Comm] to go to the “Comm Error Unit List” screen.
[Comm] is not displayed when communication is normal.
● Alarm module selection
• The modules that have errors are indicated with red lamps. Touch a module to
go to its “Alarm Module Detail”.
• [Comm] lamp lights in red when communication error occurs. Touch [Comm]
to go to the “Comm Error Module List”.
6-16
Chapter 6. DMC10 SETUP AND MONITORING
● Alarm module detail
The alarm details of each module are displayed.
• The items that have an error are indicated with red lamps.
• On the right of the screen, the events that have been defined in the “Alarm
Definition” of the “Package Configuration Menu” are displayed.
● Communication error unit list (CMC-link version only)
Unit list is displayed.
The units that have errors are indicated with red lamps.
● Communication error module list
List of modules within the Unit in question is displayed.
The modules that have errors are indicated with red lamps.
6-17
Chapter 7. USAGE EXAMPLES - GATEWAY
AND CONTROL SWITCH
This chapter describes examples using the high-level functions of EST555Z/CMC10B/DMC10.
■ PLC Data Exchange with the EST555Z Gateway Function
The EST555Z Gateway function is used when the EST555Z is connected with a PLC.
With this function, the user can read DMC10 data such as PV and Events to the
PLC and write settings such as SP from the PLC to the DMC10.
● In Direct-link :
Function details are defined by [Configuration Information] - [Gateway] of the
EST555Z AP Editor.
To read the DMC10 data to PLC :
DMC10 communication address and data address are specified in Source device.
PLC communication address and register address are specified in Destination device.
To write the data from PLC to DMC10:reverse the above.
PLC addresses are specified in Source device.
DMC10 addresses are specified in Destination device.
For detailed information on the Gateway function, see the following manual:
SMART TERMINAL EST-Z Series User’s Manual Application Preparation
(Manual No.CP-SP-1088E)
Handling Precautions
• EST555Z operation may slow down if the Gateway function is run often.
In such a case, reduce the Gateway running frequency.
• To use the Gateway function, the user needs to create a User
application and download it to the EST555Z together with the Package.
● In CMC-link :
The CMC10B which is assigned by Package performs cyclical reads of the basic
data of connected DMC10 units. The EST555Z can read out the data in the read
data area of the CMC10B. For the SP and communication DI (COM1 to COM 4)
of each DMC10, the write area is reserved in the CMC10B. When data is
transmitted from PLC to this area in one single operation, the CMC10B then
writes that data to each DMC10.
To read and write to the CMC10B data area, use the EST555Z Gateway function.
The Gateway function is defined by [Configuration Information] → [Gateway]
of the EST555Z AP Editor.
To read the DMC10 data to PLC :
CMC10B communication address and read data area are specified in Source
device.
PLC communication address and register address are specified in
Destination device.
To write the data from PLC to DMC10:reverse to the above.
PLC addresses are specified in Source device.
CMC10B address and write data area are specified in Destination device.
For detailed information on the Gateway function, see the following manual.
SMART TERMINAL EST-Z Series User’s Manual Application Preparation
(Manual No.CP-SP-1088E)
The read and write data area of CMC10B are listed in the following tables:
7-1
Chapter 7. USAGE EXAMPLES - GATEWAY AND CONTROL SWITCH
•
CMC10B read data area (1001W to 1420W)
DMC Communication address
1
2
3
4
5
6
7
8
Alarm
1001
1029
1057
1085
1113
1141
1169
1197
Reserved
1002
1030
1058
1086
1114
1142
1170
1198
Reserved
1003
1031
1059
1087
1115
1143
1171
1199
Control status 1
1004
1032
1060
1088
1116
1144
1172
1200
Control status 2
1005
1033
1061
1089
1117
1145
1173
1201
RSW internal calculation result
1006
1034
1062
1090
1118
1146
1174
1202
RSW Input state
1007
1035
1063
1091
1119
1147
1175
1203
Event output/Control output state
1008
1036
1064
1092
1120
1148
1176
1204
PV 1
1009
1037
1065
1093
1121
1149
1177
1205
PV 2
1010
1038
1066
1094
1122
1150
1178
1206
PV 3
1011
1039
1067
1095
1123
1151
1179
1207
PV 4
1012
1040
1068
1096
1124
1152
1180
1208
Current SP 1
1013
1041
1069
1097
1125
1153
1181
1209
Current SP 2
1014
1042
1070
1098
1126
1154
1182
1210
Current SP 3
1015
1043
1071
1099
1127
1155
1183
1211
Current SP 4
1016
1044
1072
1100
1128
1156
1184
1212
Current SP No.1
1017
1045
1073
1101
1129
1157
1185
1213
Current SP No.2
1018
1046
1074
1102
1130
1158
1186
1214
Current SP No.3
1019
1047
1075
1103
1131
1159
1187
1215
Current SP No.4
1020
1048
1076
1104
1132
1160
1188
1216
MV 1
1021
1049
1077
1105
1133
1161
1189
1217
MV 2
1022
1050
1078
1106
1134
1162
1190
1218
MV 3
1023
1051
1079
1107
1135
1163
1191
1219
MV 4
1024
1052
1080
1108
1136
1164
1192
1220
CT 1
1025
1053
1081
1109
1137
1165
1193
1221
CT 2
1026
1054
1082
1110
1138
1166
1194
1222
CT 3
1027
1055
1083
1111
1139
1167
1195
1223
CT 4
1028
1056
1084
1112
1140
1168
1196
1224
DMC Communication address
7-2
9
10
11
12
13
14
15
Alarm
1225
1253
1281
1309
1337
1365
1393
Reserved
1226
1254
1282
1310
1338
1366
1394
Reserved
1227
1255
1283
1311
1339
1367
1395
Control status 1
1228
1256
1284
1312
1340
1368
1396
Control status 2
1229
1257
1285
1313
1341
1369
1397
RSW internal calculation result
1230
1258
1286
1314
1342
1370
1398
RSW Input state
1231
1259
1287
1315
1343
1371
1399
Event output/Control output state
1232
1260
1288
1316
1344
1372
1400
PV 1
1233
1261
1289
1317
1345
1373
1401
PV 2
1234
1262
1290
1318
1346
1374
1402
PV 3
1235
1263
1291
1319
1347
1375
1403
PV 4
1236
1264
1292
1320
1348
1376
1404
Chapter 7. USAGE EXAMPLES - GATEWAY AND CONTROL SWITCH
DMC Communication address
•
9
10
11
12
13
14
15
Current SP 1
1237
1265
1293
1321
1349
1377
1405
Current SP 2
1238
1266
1294
1322
1350
1378
1406
Current SP 3
1239
1267
1295
1323
1351
1379
1407
Current SP 4
1240
1268
1296
1324
1352
1380
1408
Current SP No.1
1241
1269
1297
1325
1353
1381
1409
Current SP No. 2
1242
1270
1298
1326
1354
1382
1410
Current SP No.3
1243
1271
1299
1327
1355
1383
1411
Current SP No.4
1244
1272
1300
1328
1356
1384
1412
MV 1
1245
1273
1301
1329
1357
1385
1413
MV 2
1246
1274
1302
1330
1358
1386
1414
MV 3
1247
1275
1303
1331
1359
1387
1415
MV 4
1248
1276
1304
1332
1360
1388
1416
CT 1
1249
1277
1305
1333
1361
1389
1417
CT 2
1250
1278
1306
1334
1362
1390
1418
CT 3
1251
1279
1307
1335
1363
1391
1419
CT 4
1252
1280
1308
1336
1364
1392
1420
Alarm
215 214 213 212 211 210
29
28
27
26
25
24
23
22
21
20
16
10
9
8
7
6
5
4
3
2
1
15
14
Bit
13
12
11
Item
Value
1
Event 1 internal calculation result
0 : OFF
1 : ON
2
Event 2 internal calculation result
0 : OFF
1 : ON
3
Event 3 internal calculation result
0 : OFF
1 : ON
4
Event 4 internal calculation result
0 : OFF
1 : ON
5
Event 5 internal calculation result
0 : OFF
1 : ON
6
Event 6 internal calculation result
0 : OFF
1 : ON
7
Event 7 internal calculation result
0 : OFF
1 : ON
8
Event 8 internal calculation result
0 : OFF
1 : ON
9
PV error of channel 1
0 : OK
1 : Error
10
PV error of channel 2
0 : OK
1 : Error
11
PV error of channel 3
0 : OK
1 : Error
12
PV error of channel 4
0 : OK
1 : Error
13
Reserved
always 0
14
Checksum error in RAM (Parameter area)
0 : OK
1 : Error
15
Checksum error in RAM (Adjustment area)
0 : OK
1 : Error
16
Checksum error in EEPROM
0 : OK
1 : Error
7-3
Chapter 7. USAGE EXAMPLES - GATEWAY AND CONTROL SWITCH
•
Control Status 1
215 214 213 212 211 210
29
28
27
26
25
24
23
22
21
20
16
10
9
8
7
6
5
4
3
2
1
15
14
13
12
Bit
•
Item
Value
1
PVCH1 AUTO/MANUAL mode
0 : AUTO
2
PVCH1 RUN/READY mode
0 : RUN
1 : READY
3
PVCH1 RSP mode
0 : LOCAL
1 : REMOTE
4
PVCH1 AT mode (Auto tune)
0 : AT Stop 1 : AT Start
5
PVCH2 AUTO/MANUAL mode
0 : AUTO
6
PVCH2 RUN/READY mode
0 : RUN
1 : READY
7
PVCH2 LOCAL/REMOTE mode
0 : LOCAL
1 : REMOTE
8
PVCH2 AT mode (Auto tune)
0 : AT Stop 1 : AT Start
9
PVCH3 AUTO/MANUAL mode
0 : AUTO
1 : MANUAL
10
PVCH3 RUN/READY mode
0 : RUN
1 : READY
11
Reserved
always 0
12
PVCH3 AT mode (Auto tune)
0 : AT Stop 1 : AT Start
13
PVCH4 AUTO/MANUAL mode
0 : AUTO
1 : MANUAL
14
PVCH4 RUN/READY mode
0 : RUN
1 : READY
15
Reserved
always 0
16
PVCH4 AT mode (Auto tune)
0 : AT Stop 1 : AT Start
1 : MANUAL
1 : MANUAL
Control Status 2
215 214 213 212 211 210
29
28
27
26
25
24
23
22
21
20
16
10
9
8
7
6
5
4
3
2
1
15
14
Bit
7-4
11
13
12
11
Item
Value
1 PVCH1 Self-tuning correction/
correction standby
0 : correction
1 : correction standby
2 Reserved
always 0
3 Reserved
always 0
4 Reserved
always 0
5 PVCH2 Self-tuning correction/
correction standby
0 : correction
1 : correction standby
6 Reserved
always 0
7 Reserved
always 0
8 Reserved
always 0
9 PVCH3 Self-tuning correction/
correction standby
0 : correction
1 : correction standby
10 Reserved
always 0
11 Reserved
always 0
12 Reserved
always 0
13 PVCH4 Self-tuning correction/
correction standby
0 : correction
1 : correction standby
14 Reserved
always 0
15 Reserved
always 0
16 Reserved
always 0
Chapter 7. USAGE EXAMPLES - GATEWAY AND CONTROL SWITCH
•
RSW internal calculation result
215 214 213 212 211 210
29
28
27
26
25
24
23
22
21
20
16
10
9
8
7
6
5
4
3
2
1
15
14
13
Bit
•
12
11
Item
1
RSW internal calculation result 1
2
RSW internal calculation result 2
3
RSW internal calculation result 3
4
RSW internal calculation result 4
5
RSW internal calculation result 5
6
RSW internal calculation result 6
7
RSW internal calculation result 7
8
RSW internal calculation result 8
9
Reserved
10
Reserved
11
Reserved
12
Reserved
13
Communication DI 1
14
Communication DI 2
15
Communication DI 3
16
Communication DI 4
Value
RSW Input mode
Contents are same as the DMC10 1045W. For detail information, refer to the
Distributed Multi-channel Controller DMC10 User's Manual Functional
Description (Manual No. CP-UM-5143E).
•
Event output/Control output mode
Contents are same as the DMC10 1046W. For detail information, refer to the
Distributed Multi-channel Controller DMC10 User's Manual Functional
Description (Manual No. CP-UM-5143E).
7-5
Chapter 7. USAGE EXAMPLES - GATEWAY AND CONTROL SWITCH
•
CMC10B write data area (1676W to 1795W)
DMC10
Comm.
address
Current SP
DMC10 Data
Comm.DI1 to 4
DMC10 Data
5008-5011
5101-5104
1
2
3
4
5
6
7
8
9
10
11
12
13
14
15
1676-1679
1680-1683
1684-1687
1688-1691
1692-1695
1696-1699
1700-1703
1704-1707
1708-1711
1712-1715
1716-1719
1720-1723
1724-1727
1728-1731
1732-1735
1736-1739
1740-1743
1744-1747
1748-1751
1752-1755
1756-1759
1760-1763
1764-1767
1768-1771
1772-1775
1776-1779
1780-1783
1784-1787
1788-1791
1792-1795
Handling Precautions
• Data written to the above area will be written to the DMC10 EEPROM.
• Writing to Comm. DI1 to 4 is not possible when the EST Info of the
DMC10 is less than “4”.
• Errors occurring between CMC10B and DMC10 cannot be detected by
the Gateway function, that writes the data from PLC to DMC10 through
CMC10B. The errors that can be detected by the Gateway function are
the errors occurring between the PLC, EST555Z and CMC10B.
To check if the data has been written to the DMC10 correctly, use other
measures such as comparing the data written from PLC and the data
read after a certain time.
• EST555Z operation may slow down if the Gateway function is run often.
In such a case, reduce the Gateway running frequency.
7-6
Chapter 7. USAGE EXAMPLES - GATEWAY AND CONTROL SWITCH
■ Control DMC10 using the Control Switch
The following example shows how to change RUN/READY of all the connected
DMC10 using the Control switch:
The Package should be configured as follows.
(1) Touch [Display Configuration Menu] of the [Package Configuration.
Menu], then [Control Switch]. Set the SW1 and SW2 as Enb.
(2) Touch [More] of SW1 to go to its “Control Switch Definition” screen.
Set the SW Name and Type as in the following example:
(3) To operate all the DMC10 in one operation, press [All ON] for each unit. If
separate operation to some CH is necessary, set OFF/ON of those CH
separately.
(4) Touch [More] of SW2 in the screen of (1) to go to its “Control Switch
Definition” screen. Set the SW Name and Type as in the following example:
(5) Configure the same as in (3)
Now configuration has been completed.
7-7
Chapter 7. USAGE EXAMPLES - GATEWAY AND CONTROL SWITCH
To check the operation, touch [Control Switch] in the MAIN MENU.
The following screen should appear:
• [All Run]
• [All Ready]
7-8
To RUN all the DMC10 at once.
To make all the DMC10 READY at once.
Chapter 8. COMBINED USE WITH USER
APPLICATION
In addition to the functions of the Package, users can create their own application screens.
For information on how to create a User application, see the following manual:
SMART TERMINAL EST-Z Series User’s Manual Application Preparation (Manual No.CP-SP-1088E)
When turning the power on after downloading both a User application and a Package, screen 1(panel 1) of the User
application will start.
To go to the Package screen, attach a “Panel Change” object on any desired screen of the User application.
Select [Dedicated Package Change] as the parameter type, when configuring the object.
Touch this object to go to the main menu of the Package.
To go back to the User application from the Package, touch [Exit] on the “DMC10 MAIN MENU” screen of the
Package.
Handling Precautions
• When calling up the Package, the screen size should be the whole
screen size (640x480 dot).
• Do not call up the Package when more than one screen is already
opened. Since when returning from the Package, only one screen can
be started again.
• If starting the [Dedicated Package Change] with External Execution, do
not attach it to the back ground panel. Since the user panel will not be
able to be started when returning from the Package.
The background panel of the User application is running even while the Package is being operated.
The user can select whether, or not, to let the Package monitor DMC10 alarms while the User application is being
operated as follows: Go to [Alarm Definition] of the Package Configuration Menu.
Select [Enb] / [Dis] of the “Package Alarm with User apli”.
8-1
Chapter 8. COMBINED USE WITH USER APPLICATION
● Illustration of transition between Package and User application
!!" ! ● Package status devices that can be checked from the User application
The operation status of the Package can be checked from the User application.
The devices that can be checked are as follows:
Status device
TR800010.2
TR800010.8
TR800011.0
8-2
Name
DMC10 Alarm Monitor
Description
0 : Not monitoring
1 : Monitoring
CMC Buffering Error
0 : No error
(CMC link version only)
1 : Error
DMC10 Alarms
0 : No Alarm
1 : Alarm
Valid only when the Alarm monitor
is active during the User
application's operation.
Chapter 9. TROUBLESHOOTING
Problems can be divided into the following categories.
• Package related
• DMC10 related
■ Package Troubleshooting
● Error message appears on the package display
Error messages that appear on the package display, their causes and appropriate
counter measures are as follows:
Error Message
Auto device assignment
has not been performed,
can’t commence
communications.
Please perform auto
device assignment.
No DMC10 devices
could be assigned.
Please verify wiring and
configuration, then retry.
DMC package does not
support this module.
Auto assignment can't be
performed.
WRITE destination not
specified.
Please specify, then
retry.
Error reading data from
module.
Error writing data to
module.
Cause
Counter measure
Device configuration is unknown, since
auto device assignment has not been
performed.
Perform [Auto Device
Assignment] of the [Package
Configuration Menu].
No valid DMC10 was detected through
auto device assignment.
Check communication settings of
each device. Check the wiring of
the cables. Perform auto device
assignment again.
Change the DMC10 unit for one
with the version that is supported
by the Package.
The version of the DMC10 is not supported
by the Package.
The write destination of the control switch
has not been specified.
• Data cannot be read because of DMC10
failure or communication error.
• The target module is different from the
module that was registered by the auto
device assignment.
• Data cannot be written because of
DMC10 failure or communication error.
• The target module is different from the
module that was registered by the auto
device assignment.
• One of the following items of the target
module was changed by the PC loader
after auto device assignment: Input type,
decimal point position, PV range lower
limit, PV range upper limit, SP lower limit,
SP upper limit
Start-up processing
• CMC Buffer configuration failed.
failed.
Please reset the power to
the modules,or perform
device auto-assignment.
(ONLY CMC-LINK TYPE)
Setup the type and assignment
with [Package Configuration
Menu] → [Disp. Conf. Menu] →
[Control Switch].
• Check the wiring of the cables.
• Perform Auto device
assignment again, if the device
configuration has been
changed.
• Check the wiring of the cables.
• Perform Auto device
assignment again, if the device
configuration has been
changed.
• Check the wiring of the cables
• Check if the power is supplied
correctly to the CMC10B.
Reboot EST555Z.
• Perform Auto device
assignment again, if the device
configuration has been
changed.
9-1
Chapter 9. TROUBLESHOOTING
● Flash Memory Troubleshooting
For the Package, each data of the following operations is written into the blank
flash-memory of the EST555Z:
• When Auto Device Assignment is executed.
• When Unit/Module Name configuration is performed.
• When Display Configuration is registered. (When returning from “Package
Configuration Menu”.)
• When PV input data of the DMC10 is configured.
The memory is consumed little by little when this data is written. If the memory
has becomes full, the following message will be displayed:
Execute [Garbage Collection] of the system screen in accordance with the
indication of the screen. This operation can delete unnecessary data in the
memory and optimize the memory.
● Other troubleshooting
Troubles
MODE or SP/MV that have
been changed by Module
monitor are not reflected to
DMC10 screens.
Error messages are
displayed when executing
Control switches.
Cause
Write cannot be accepted owing to the
DMC10 operation status.
e.g.: MANUAL change during ON/OFF
control, RUN/READY is defined by
RSW input.
• Write cannot be accepted owing to the
DMC10 operation status.
e.g.: MANUAL change during ON/OFF
control, SP number change when
the Multi SP group is not used, SP
No. 5 to 8 in 4CH model.
• Write destination of the Control switches
has not been specified.
Counter measure
Modify the settings to match
the DMC10 operation status.
Modify the settings to match
the DMC10 operation status.
■ DMC10 Troubleshooting
When DMC10 alarms occur, use “Alarm List” screen or “Alarm Module Detail”
screen to check where the alarms are occurring and the details of the alarms.
For information on the cause and counter measures for each alarm, see the
following DMC10 manual:
Distributed Multi-channel Controller DMC10 User's Manual Functional
Description (Manual No. CP-UM-5143E)
9-2
Revision History
Edition
Revised pages
Printed
Date
Manual Number
01-12
08-03
CP-SP-1124E 1st Edition
2nd Edition Endpaper
Description
Trademark description changed.
Specifications are subject to change without notice.
Advanced Automation Company
1-12-2 Kawana, Fujisawa
Kanagawa 251-8522 Japan
URL: http://www.azbil.com
Printed on recycled paper.
(07)
Printed in Japan.
1st Edition: Issued in Dec. 2001(C)
2nd Edition: Issued in Mar. 2008(G)