1
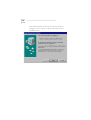
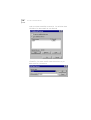
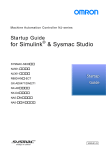
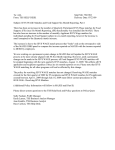
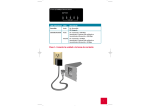
3Com U.S. Robotics ISDN CARD PnP INTERNAL User manual Internal ISDN card with plug & play Hardware installation . ... ... ... ... ... ... ... ... ..19 Installation with Windows 95 ... ... ... ... ... ..21 Analogue POTS - telephone connection ... ..37 On-line services ... ... ... ... ... ... ... ... ... ... ... ..43 Rectifying errors.. ... ... ... ... ... ... ... ... ... ... ..57 http://www.3com.com/ Part no. 2.024.314. January 1998 3Com Corporation ■ 5400 Bayfront Plaza ■ Santa Clara, California ■ 95052 8145 The contents of this manual are the property of the 3Com Corporation. The reproduction, transfer, copying or storing of this manual or parts of this manual in a data retrieval system in any form or any way, whether it be electronic, mechanical, magnetic or any other form, is permissible only with the prior written agreement of the 3Com Corporation. The information contained in this manual may be changed without prior notification. Furthermore, the 3Com Corporation does not accept any responsibility for updating the information contained herein. The 3Com Corporation provides no warranties for this manual, nor any implicit or explicit warranty for the usual trade quality or suitability for a specific purpose. 3Com reserves the right to improve or modify the products or programs described herein at any time. THE 3COM CORPORATION ACCEPTS NO RESPONSIBILITY FOR DAMAGES OR CONSEQUENTIAL DAMAGES, INCLUDING BUT NOT EXCLUDING BUSINESS, , INCOME OR DATA LOSSES, WHICH ARE ATTRIBUTABLE TO THE SUPPLY, APPLICATION OR USE OF THIS MANUAL OR THE PRODUCTS REFERRED TO IN IT. 1998, 3Com Corporation or its subsidiaries. All rights reserved. ii CONTENTS ABOUT THIS MANUAL Introduction 7 Where do you find information in this manual? Conventions 7 7 1 FOREWORD Product description Licences/guarantees 9 10 2 WHY ISDN ? What does ISDN offer? The ISDN line 12 11 3 INTERFACES IN ISDN CAPI 13 Standards in the world - Dial-up network/NDISWAN 14 4 INSTALLATION Installation requirements 17 Hardware interfaces, PnP 17 Installation of your 3Com U.S. Robotics ISDN CARD PnP INTERNAL 17 5 INSTALLING AND CONFIGURING THE SOFTWARE Installation in Windows 95 19 Dial-Up Network - Connecting With The World Possible Errors and Conflicts 32 28 6 V.42BIS DATA COMPRESSION V.42bis compression 35 iii Activating V.42bis in Windows 95 35 7 USING THE ANALOGUE DEVICE PORT (POTS TELEPHONE CONNECTION) Connection of the telephone 37 Suitability of the telephone 37 Supplementary Services 37 8 APPLICATIONS 9 ON-LINE SERVICES “Regular” ISP with Multilink-PPP 44 10 IF YOU HAVE PROBLEMS After installation of the 3Com U.S.Robotics ISDN CARD PnP INTERNAL 47 PC will not boot up. 47 Windows 95 47 Installation problems 47 "No fax operation possible". 47 "No dialling possible". 47 "Calls cannot be received". 48 "No Internet connection can be set up". 48 "Device not recognised." 48 11 IF YOU HAVE PROBLEMS... Technical Support 50 12 U.S. ROBOTICS ON-LINE CONTACTS 13 LIMITS OF THE GUARANTEE A APPENDIX A1: Updates 55 A2: Multiple subscriber numbers (MSN) A3: Table of ISDN messages 56 iv 55 A4: CAPI V1.1 error messages 57 A5: Diagram of the ISDN Cable 58 v vi ABOUT THIS MANUAL Introduction This manual describes the installation and operation of the 3Com U.S. Robotics ISDN CARD PnP INTERNAL as well as a great deal of further information on ISDN and the use of your ISDN card in connection with the application programs. If the information in the “README.TXT” file on the installation diskettes (CD) differs from the contents of this manual, follow the instructions in the “README.TXT” file. Where do you find information in this manual? Read the following chapters to obtain more specific information. When you want to find out more about: Read Basics of ISDN Chapters 2-3 Installation of the hardware Chapter 4 Installation of the software Chapter 5 On-line services Chapter 9 Installation problems Chapter 10 Conventions Tables 1 and 2 contain symbols and conventions that are used in this manual. Table 1 Reference symbols Symbol Reference type Description Information Important functions and instructions. Warning Information about important components that may be damaged. 8 ABOUT THIS MANUAL Table 2 Text conventions Convention Description Screen display This font represents text which is displayed on the screen or is input by you. Words in bold type Bold is used for text that should stand out. FOREWORD 1 Congratulations! You have chosen a 3Com U.S. Robotics ISDN CARD PnP INTERNAL. U.S. Robotics has been the leading manufacturer and developer of data transfer technology since 1976. U.S. Robotics’ go-ahead technology opens up a whole new world for you in the field of data transfer with your new ISDN terminal adapter. As an innovator in the field of data communications, U.S. Robotics has long been supplying the market with the latest technology at prices to suit everyone’s pocket. You will find further information on U.S. Robotics on our home pages on the world wide web under http://www.3Com.com/ Product description The 3Com U.S. Robotics ISDN CARD PnP INTERNAL allows you to connect your PC to the ISDN network. The card has an S0-interface which must be connected to your ISDN wall socket using the cable supplied. With the 3Com U.S. Robotics ISDN CARD PnP INTERNAL you can use the following functions: ■ ■ ■ ■ ISDN data communication V.42bis data compression Analogue POTS telephone connection with top of the range features (The range of features supported depends on the services available from your Network Provider) Windows Plug&Play support The bundled application software can control your ISDN card via the Common ISDN API (CAPI) and enable you to use the following applications: ■ File transfer/eurofile transfer driver with explorer surface: File transfer from PC to PC with drag-and-drop 1-10 CHAPTER 1: FOREWORD ■ ■ ■ ■ Fax G3 send-and-receive using Microsoft Exchange (in Windows 95) and a Windows printer driver Call responder/Mailbox function, storage of data, fax or voice communication in Exchange/inbox Terminal emulation (e.g. ANSI, TTY, VT52/100/220) with all the necessary transfer protocols (X-, Y-, Z-Modem etc.) Use as an ISDN modem for communication between analogue services (e.g. modem-mailbox) and terminal software on your PC. Licences/guarantees The 3Com U.S. Robotics ISDN CARD PnP INTERNAL has the licence number CE 0682 X. The 3Com U.S. Robotics ISDN CARD PnP INTERNAL complies with European Directive EN60950 when the mounting of the ISDN card is attached by the holding screw. The 3Com U.S. Robotics ISDN CARD PnP INTERNAL complies with European rules governing suppression of electro-magnetic interference: EN50081-1, in this case EN55022 Class B for electro-magnetic field radiation and EN50082-1 for electro-magnetic influence. In normal use, i.e. after installation in a PC, the 3Com U.S. Robotics ISDN CARD PnP INTERNAL is protected against electrical surges. However, when you open your PC and the anti-static packaging of the ISDN card, make sure that you discharge any static electricity. Hold the card only by the corners or by the protective metal cover. WHY ISDN ? 2 ISDN is an accromyn for Integrated Services Digital Network - that is, a service-integrating digital telecommunications network. You can access all sorts of electronic communication systems with ISDN. You can surf the Internet, conduct your banking from home, or connect on-line with your place of work. What does ISDN offer? The ISDN telecommunications network makes available to the user digital utility channels with 64 kbit/s of transfer speed. These base channels - B channels - are suitable for different telecommunications services and this is what gives them a decisive advantage over public networks. With an ISDN line you are able to transfer not only data, which is the case with other networks (for example Datex-P), but also voice, text and graphics. This brings enormous cost advantages, especially for smaller firms, because the lines for voice, fax or data transfer - whichever is required - can be used to their best advantage. A top of the range ISDN line in Euro ISDN has two B channels and one D channel for connection control. ISDN is way ahead of the field when it comes to choice of connections, for the following reasons: ■ ■ ■ ■ Short connection times averaging 1.8 seconds No “handshaking”, as you often get with a normal analogue modem Optimum use of resources High data transfer rate of 64kbit/s per B channel In parallel with the B channels, which are used with the Euro ISDN standard for telecommunications, a separate control channel - the D channel - is available. The D 2-12 CHAPTER 2: WHY ISDN ? channel is responsible for call connection and disconnection, as well as the control of the relevant data. The B channels can be used independently of each other, or can be combined for data transfer. The user therefore has a flexible band width available with the present ISDN terminal adapter, as long as these channel multiplexes are supported by the software. The ISDN line If you have a normal telephone connection, upgrading these days to ISDN is, in most cases, no problem at all. You complete an order form, which incorporates the terms explained above, and then the network provider will install the ISDN line. A line connector apparatus (NT) is fitted onto the two wires of your old telephone connection. This is the connection device, incorporating two ISDN SO ports. As such, there are two utility channels (B channels) for data transfer with an individual bandwidth of 64kbit/s and one D channel on your ISDN base connection. In Europe, the standardised ISDN protocol Euro-ISDN is in operation. It is based on the DSS 1 protocol (Digital Subscriber Signalling system 1), which is responsible for setting up the connection and controlling it.. 3 INTERFACES IN ISDN CAPI Technical systems can answer a wide range of user needs if they can be standardised. CAPI stands for Common ISDN Application Programmers Interface, and enables all card manufacturers to use a standard interface for application programs. CAPI ensures that the application programs such as a terminal program, a BTX decoder, or a simple program for indicating incoming calls on the screen - are compatible with all ISDN cards incorporating a CAPI interface. CAPI, however, is not the only standard. German National ISDN with CAPI 1.1 was the first standard established. Many shareware programs are still based on this. Following European harmonisation, CAPI 2.0, with updated specifications, was introduced. This was more compatible with the Euro ISDN (DSSI), as its method of operation was modified and it omitted functions that were supported only by the German national ISDN system. New software is usually supplied at least with CAPI 2.0, so the days of CAPI 1.1 are definitely numbered. The CAPI specification is not a disk-based concept. This means that the CAPI interface works in the same way in different operating systems. The mechanism of the response of hardware drivers is different in the various operating systems architectures. A different combination of files is therefore needed for each operating system. 3-14 CHAPTER 3: INTERFACES IN ISDN Table 3-1 Installed driver components for CAPI USRCAPI.VXD Virtual device driver for CAPI functions CAPISTUB.VXD Virtual device driver for CAPI responses CAPI20.DLL CAPI 2.0 dynamic link library (16 bit) CAPI2032.DLL CAPI 2.0 dynamic link library (32 bit) It is even possible, in principle, for other operating systems (e.g. Unix) to program CAPI drivers. Standards in the world - Dial-up network/NDISWAN In Windows 95, a service was integrated into the operating system that would otherwise only have been possible using additional software: the dial-up network (RAS - Remote Access Service). With the dial-up network, you can set up a network connection to other computer systems and networks using a modem or an ISDN terminal adapter. This is similar to connection with a network card. The only limitations are that setting up the connection takes some time; that the connection ought to be cut off when it is not being used, in order to reduce your telephone bill (Windows can do this for you); and that some more complicated forms of the interconnections are not supported directly by the networks. However, you can get additional software to eliminate these limitations. As soon as Microsoft recognised that ISDN had achieved a presence in the marketplace that was likely to endure, a modification of the NDIS network standard for the Windows operating system was developed - NDISWAN. NDIS had been introduced as a standard software interface for network cards in Windows. With the addition of WAN - Wide Area Network - this specification has brought about significant improvements in transfer techniques for slower wide area networks (64kbit with ISDN compared to the usual 10 or 100 Mbit in a LAN ). Standards in the world - Dial-up network/NDISWAN 3-15 NDISWAN uses ISDN only as a network card and is not nearly as flexible as CAPI. If, therefore, you want to use NDISWAN as a network connection, it is better to have it integrated into Windows. As a rule, it is faster this way, and the architecture is simpler. Microsoft provides these functions with the ISDN accelerator pack that is included with the Windows 95 installation pack. The NDISWAN driver for your 3Com U.S. Robotics ISDN CARD PnP INTERNAL is set up on your system at installation, together with the ISDN accelerator pack from Microsoft. An NDISWAN driver can be operated as an installed modem by the Windows 95 dial-up network and allows you, for example, to set up a connection to an Internet service provider using the TCP/IP protocol, or to access your company’s network using the IPX protocol, so that you can receive files on your company’s Novell servers. The following files are installed for the NDISWAN operation. Table 3-2 Installed driver components for NDISWAN TPAWMAC.SYS Virtual device driver for NDISWAN functions MSISDN11.EXE MS ISDN accelerator pack (this set-up installs the necessary files) All the operating driver variants for CAPI 2.0 and NDISWAN are supplied with your 3Com U. S. Robotics ISDN CARD PnP INTERNAL. 3-16 CHAPTER 3: INTERFACES IN ISDN INSTALLATION 4 Installation requirements In order to install your 3Com U.S. Robotics ISDN CARD PnP INTERNAL, your computer must fulfil the following conditions. It must: ■ ■ ■ ■ ■ be IBM AT or compatible have Windows 95 have at least 8MB memory have a free card socket (16 bit) with free interrupt have a CD-Rom drive and hard disk If you use another operating system or your PC does not have all of the specifications mentioned above, please consult your dealer. Hardware interfaces, PnP Your 3Com U.S. Robotics ISDN CARD PnP INTERNAL is operated by an interrupt request (IRQ) and an input/output address (I/O address), just like an ISA card. You do not normally need to worry about the set-up of these values, as it is dealt with by Plug&Play under Windows 95. This means that when you boot up your computer, the necessary settings are automatically taken up by Windows 95. Installation of your 3Com U.S. Robotics ISDN CARD PnP INTERNAL 1 Turn off your PC and all peripheral equipment (e.g. printer) and unplug the power cable. 2 Open the housing of your PC. 3 Take off the protective covering (mounting) of a free 16bit slot (ISA slot). 4-18 CHAPTER 4: INSTALLATION 4 Insert your 3Com U.S. Robotics ISDN CARD PnP INTERNAL into the free slot. Screw the mounting on the back of the ISDN card firmly onto the back of the computer. 5 Close your computer. Warning! Make sure that you earth yourself before touching the metal contacts in order to avoid electrostatic damage to your PC and the card (e.g. by brief contact with a heating element). 6 Connect the ISDN card with the S0-bus of your network provider using the supplied ISDN cable. Note! During boot-up of your computer, please insert the CD into the CD-Rom drive and continue with the software installation in the next chapter. If you insert the CD too late after starting up your computer, the automatic installation routine will not start. 5 INSTALLING AND CONFIGURING THE SOFTWARE Installation in Windows 95 The ISA Plug&Play card ensures that the required settings for communication with the operating system are taken up automatically for you with your 3Com U.S.Robotics ISDN CARD PnP INTERNAL. We are assuming that you have still not installed a network. If you have already installed a network or a Dial-up network on your computer, some of the steps shown may not be applicable. Note! Please note that the installation CD must be inserted during the boot-up of the computer for the first time, and after installation of the card. 1 Start your computer (after you have installed your ISDN card). The Plug&Play function of Windows 95 will recognise a new hardware component. If the installation does not start automatically, you can start Setup manually by typing: D:\SETUP while in Start/Run and confirming it by clicking on OK. 5-20 CHAPTER 5: INSTALLING AND CONFIGURING THE SOFTWARE After starting Windows 95 you will see the following message. Click on “Next” to begin the search for the installation files. Installation in Windows 95 5-21 With the CD inserted into the CD-Rom, the driver files are located. Confirm the start of the Setup procedure by clicking on “Next”. 5-22 CHAPTER 5: INSTALLING AND CONFIGURING THE SOFTWARE Now you start the driver installation. Click on “Next” in order to carry on. Another information window appears that you can close by clicking on “Continue”. Installation in Windows 95 5-23 2 Now select the language for the installation. You must now shut down all programs so that the Setup procedure can be carried out without any problems. After Setup has completed the system starts up again automatically. In order to avoid loss of data, please close down all other programs. Click on “Next” to carry on. 5-24 CHAPTER 5: INSTALLING AND CONFIGURING THE SOFTWARE 3 In the following picture, select a suitable path for your installation or confirm the default destination path by clicking on “Next”. 4 Then decide which folder your ISDN card installation should be placed in: Installation in Windows 95 5-25 You now need to install the necessary files on your computer. If you have not already installed a network or Dial-up network on your computer, your system will now inform you to do so. 5 Choose a computer name and a work group under Network/Identification. If later you want to connect with a Windows work group or domain, give your computer a name (e.g. MICHAEL AT HOME) and ascertain the name of the work group in your office. If you want to connect “only” to your Internet provider, these particulars are not important and you can put in anything you want. However, in Windows, you must put something in here. After you close down the network installation, Windows starts to copy the necessary files. If you do not have the contents of the Windows 95 CD on the computer, insert the Windows 95 CD and confirm any 5-26 CHAPTER 5: INSTALLING AND CONFIGURING THE SOFTWARE query that is raised about the system. If you have installed a disk version of Windows 95, put the disk corresponding to the query into the disk drive. TIP! So that you do not have to insert the Windows 95 CD for software installation in the future, you can copy the Win95 directory of the CD onto your hard drive (e.g. under c:\Install\Win95). Type in the path to these files when Windows 95 asks for the Windows CD. With some computers that have been set up by the manufacturer, you may even find the Windows installation files in C:\WINDOWS\OPTIONS\CABS. You have now finished installing the Dial-up network and the ISDN driver. Next, the drivers for CAPI 2.0 and NDISWAN - which support the Dial-up network for Windows - must be installed. You must therefore start up Windows again with the installation CD inserted, so that this installation section can be completed. When this section has been completed successfully, you will receive the message below to restart your computer. Please click “OK” to continue. Installation in Windows 95 5-27 6 After rebooting the machine, the installation segment for the ISDN configuration will commence. If, for example, you have MSN enabled on your ISDN line as a supplementary service, you will be able to allocate an individual telephone number to both the data port and analogue device port. Application programs, which activate the ISDN card with CAPI, can set the call numbers of the two channels independently. If you do not want to use V.42bis data compression (see chapter V.42bis), delete the tick from the corresponding box. 5-28 CHAPTER 5: INSTALLING AND CONFIGURING THE SOFTWARE After completing and clicking “OK”, your system will restart again. If you now want to use your ISDN card for Telephone/Fax and other services available with the bundled application software, install the application software when asked. However, if you wish to go on-line immediately to the Internet or to your firm’s network without installing the bundled application software, follow the instructions for the installation of Dial-up networking. Dial-Up Network - Connecting With The World After successfully installing the card driver, you can connect your computer with other computers or networks using Dial-Up Networking. We will demonstrate in the following example how you can set up a connection with an Internet provider. 1 Once you have received an ISDN telephone number, user name and password from your Internet provider, you can make a new connection in My Computer/Dial-Up Networking. Double click “Make New Connection” under Dial-Up Networking and create a name for your connection. Choose “ISDN Port0”or “ISDN Port1” as your modem. Dial-Up Network - Connecting With The World 5-29 5-30 CHAPTER 5: INSTALLING AND CONFIGURING THE SOFTWARE 2 Type the telephone number of the Internet provider. The connection is now created. Dial-Up Network - Connecting With The World 5-31 3 To activate the TCP/IP protocol used for the Internet connection, right click the new connection icon created and select ”Properties“. 4 Select ”Server Type” and set the protocols as follows: 5-32 CHAPTER 5: INSTALLING AND CONFIGURING THE SOFTWARE Limiting the protocols selected will speed up the connection process. Now you can start the connection by double clicking the icon. 5 Type in your user name and password. When your connection details have been correctly entered and validated, you should now be connected to the Internet. You can browse the Internet with an Internet browser. You can obtain help on browsing the Internet with the supplied documentation that comes with your Internet browser. Possible Errors and Conflicts If you have not successfully installed your ISDN card, you can first of all check whether the card is operating properly by looking under “Status” in the ISDN configuration. You have the following information window under the icon Start/Programs/3COM ISDN Utilities: ISDN configuration: Here you can type in your MSN telephone numbers and activate or suppress the special features of your 3Com U.S.Robotics ISDN CARD PnP INTERNAL. Possible Errors and Conflicts 5-33 The “Status” button shows you the components that are currently installed. If a component is missing here, tick the corresponding box. If a box is not ticked, the relevant component can be installed simply by ticking it. 5-34 CHAPTER 5: INSTALLING AND CONFIGURING THE SOFTWARE V.42BIS DATA COMPRESSION 6 V.42bis compression V.42bis is a standardised compression procedure. It speeds up data transfer by making the amount of data transferred more compact. When it reaches the other end the original data is restored back to its original size prior to transfer. If you have already compressed your data before transfer (e.g. with ZIP or LHARC), V.42bis will not normally be able to compress it further. In this case there are no advantages in using V.42bis. In order to make data transfer possible with V.42bis, both communicating parties must have V.42bis enabled. This can be done in two ways: ■ ■ The bundled application software and other CAPI Software will switch V.42bis on for specific data transfers automatically. You can set up your ISDN card in such a way that V.42bis is used automatically. Please make sure that the person you are trying to call uses V.42bis as well. Activating V.42bis in Windows 95 When you install under Windows 95, V.42bis compression is automatically activated. 6-36 CHAPTER 6: V.42BIS DATA COMPRESSION If you subsequently check the setting or would like to change it, choose ISDN configuration in the Start/Programs/3COM ISDN Utilities. This dialogue screen allows you to adjust the setting of V.42bis. 7 USING THE ANALOGUE DEVICE PORT (POTS TELEPHONE CONNECTION) Connection of the telephone On the 3Com U.S. Robotics ISDN CARD PNP INTERNAL, you will find two connection sockets. The wider socket (RJ45) is used with the supplied ISDN cable for connection to the ISDN wall socket. An analogue device (eg. analogue telephone) can be connected via the supplied Tail Lead to the smaller socket (RJ11). Suitability of the telephone The analogue telephone that you are going to use must support tone dialling. You will know whether your telephone has tone dialling because, when you dial, different notes are used for different buttons and there are no pulses. To be able to use the luxury performance features outlined in the following section, you will require a telephone with a “Flash”, “Recall” or “R” button. Supplementary Services Note! Some of the functions mentioned (e.g. Call divert, Three-way calls) are only possible if your telephone company supports / has activated these features on your ISDN line. If in doubt, ask your telephone company. You can use the following ISDN performance features on the analogue POTS Telephone connection when supported / activated by your telephone company. Some of the functions are only available when the ‘Call Waiting’ box in the ISDN configuration (described in more detail above) is activated. 7-38 CHAPTER 7: USING THE ANALOGUE DEVICE PORT (POTS TELEPHONE CONNECTION) If there is no conversation going on, the telephone rings as usual. You can accept the call by lifting the receiver. If you are already having a conversation, you have two possibilities as outlined in the following two tables: Table 7-1 Functions for setting up another connection Function Button(s) Effect End current conversation. Begin new one. Replace receiver The current conversation will end. You will hear dialling tone and be able to dial another number Instigate another call. RECALL The current conversation is placed on hold. You will hear dialling tone and be able to dial another number. Table 7-2 Functions with the second call or a current conversation and one that is placed on hold. Function Button(s) Effect Accept the call RECALL 1 (or replace receiver) The current conversation will end and the call that is waiting will be taken. Call waiting. RECALL 2 The current conversation will be placed on hold and the call that is waiting will be taken. Three-way call RECALL 3 The current conversation will be placed on hold and the call that is waiting will be switched in. Supplementary Services 7-39 When you are currently having a telephone conversation and a second call comes in (assuming that Call Waiting is enabled in the ISDN Configuration screen), you will be made aware of the new call by hearing two beeping sounds one after the other in the receiver. Note! This function will occur regardless of the services supported / activated by your telephone company. 7-40 CHAPTER 7: USING THE ANALOGUE DEVICE PORT (POTS TELEPHONE CONNECTION) 8 APPLICATIONS There are many software applications that you can install with the 3Com U.S.Robotics ISDN CARD PnP INTERNAL. You can find out how to install and use this software from the corresponding software manuals. The following is important if the applications programs are to be compatible with the 3Com U.S. Robotics ISDN CARD Pnp INTERNAL: Find out whether the version of the application software actually supports ISDN too. You can find this out in the installation routine of the application software or if you see a name like "ISDN.." or "CAPI..". In case of doubt, please ask your dealer. 8-42 CHAPTER 8: APPLICATIONS 9 ON-LINE SERVICES With your 3Com U.S.Robotics ISDN CARD PnP INTERNAL you can use a large number of different on-line services. On-line services offer information on a wide range of subjects and are continually being updated. On-line services offer the latest information, just as newspapers and magazines do, but by electronic means. Find out what different services are on offer before you decide on a service that is suitable for you. The big on-line services usually offer suitable software packages to enable you to gain access to them. The big access software packages may also contain a CAPI activator. Therefore, when you install the software, you can also use CAPI as an access medium instead of a modem. The big on-line services also offer Internet access as a part of their software so that when you activate the software the Internet is available to you. Smaller on-line services and mailboxes usually offer access only via a terminal program. With the additional bundled application software provided with your ISDN card, you can install virtual modem drivers that operate with a Windows 95 compatible terminal application (e.g. Hyperterminal). The bundled application software places these CAPI modems in a virtual COM interface, so that you can access your ISDN card from terminal programs which support only COM ports. You can find out which protocol and which virtual modem type you need from the operators of the on-line services or mailbox. 9-44 CHAPTER 9: ON-LINE SERVICES “Regular” ISP with Multilink-PPP Note! To achieve a Multilink-PPP connection, you will require Dial-Up Networking V1.2 or higher. For a multilink connection it is however, necessary, that your server offers this possibility and that you have the authority to use it. If you want a multilink connection (i.e. a connection with which you can transfer data over both B channels at a rate of 128Kbit/s) you must do the following after creating a connection within Dial-Up Networking.: 1 Select My Computer/Dial-up networking. Now, select the properties of the connection (e.g. with the right mouse button). “Regular” ISP with Multilink-PPP 9-45 2 Under “Set additional devices” you can now add another device using the keys “Settings”, “Use additional devices” and “Add”. If the connection is defined by, for example, “ISDN Port0”, you can add “ISDN Port1”within Additional Devices in 9-46 CHAPTER 9: ON-LINE SERVICES order to activate a multilink connection. You will then have 128 Kbit/s for data transfer at your disposal. By using the “Add” button you can install a further connection. You must use the channel that has not yet been used for a connection. IF YOU HAVE PROBLEMS 10 Please read the following instructions so that you can deal with possible installation problems. After installation of the 3Com U.S.Robotics ISDN CARD PnP INTERNAL PC will not boot up. Check that the ISDN card has been inserted properly. Windows 95 Installation problems 1 Completely deinstall the network and remove all modems. Also, please take out the "Connections" in the Windows Setup. If the card has already been installed once, erase all *.inf files for the card too. If the bundled software application has already been installed, please deinstall this also. 2 Insert the installation CD. 3 Restart the machine. "No fax operation possible". Fax operation is possible only with software which is set up for CAPI. If necessary, check the installation of the software. "No dialling possible". Check whether the device is connected correctly to the ISDN line via the RJ-45 socket on the 3Com U.S. Robotics ISDN CARD PnP INTERNAL. When attempting an analogue call using the Analogue Device Port, try selecting the command "Ignore dialling tone" within the software used. 10-48 CHAPTER 10: IF YOU HAVE PROBLEMS If the analogue connection is still not possible, check that the supplied Tail Lead is correctly connected to the RJ-11 socket of the 3Com U.S. Robotics ISDN CARD PnP INTERNAL. If necessary, contact our support hotline. "Calls cannot be received". Check the settings of the software used in manual or automatic receive. You must also ensure that the telephone numbers have been correctly configured with the ISDN Configurator. "No Internet connection can be set up". Please check that the TCP/IP protocol has been set up for the network in the ”System Control Panel“, ”Network”. If necessary, consult the online help in Windows to establish which protocol must be set up. "Device not recognised." Boot up the PC only with the appropriate card that includes ISDN. If the device is still not recognised, please change it or check the compatibility with the PC-Board. 11 IF YOU HAVE PROBLEMS... Should you encounter any difficulties with your ISDN CARD PnP INTERNAL, refer to the manual first. Call or visit your dealer, if they are unable to assist you, contact the 3Com Technical Support. Upon contacting 3Com you will be issued with a Return Materials Authorisation (RMA). This should be quoted when contacting the Technical Support Department in relation to your query. Should you be advised to return your modem, 3Com will repair or replace the unit for you. Important notice: Please ensure your unit is packaged securely and that the RMA number is clearly visible on the outside of the package. Please ship the unit with all charges pre-paid and insured. Please note that 3Com modems cannot be returned without prior approval by the 3Com Technical Support Department. 11-50 CHAPTER 11: IF YOU HAVE PROBLEMS... Technical Support Table 11-1 Contact numbers UK Fax: Tel: 0118 969 4222 0118 944 1000 Benelux From Netherlands : 0900 – 20 25 406 From Belgium : 070 – 23 32 45 (dutch spoken) 070 – 23 32 46 (french spoken) Sweden Technical support : 08.58.705790 To get an RMA : 08.51.992035 Norway To get an RMA : 00.47.(0)2350.0097 Finland To get an RMA : (09).8171.0015 Denmark Technical support : 45.4810.5080 To get an RMA : 45.3544.5531 For all other countries Fax: Tel: +33.(0)3.20.19.24.34 +33.(0)3.20.19.24.24 Table 11-2 3Com On-Line ressources for any country : Email address : CompuServe: BBS: Fax: Hotline: Web site: [email protected] GO THREECOM +33.(0)3.20.79.95.00 +33.(0)3.20.19.24.34 +33.(0)3.20.19.24.24 http://www.3com.com 12 U.S. ROBOTICS ON-LINE CONTACTS Getting on-line to the U.S. Robotics BBS This is what you have to do to connect with the U.S. Robotics Bulletin Board System: 1 Run terminal software suitable for ISDN on your computer and select transfer protocol V.120 or X.75 . 2 Key in the following telephone number for: The U.K. U.S. Robotics BBS: 01189 692200. The European U.S. Robotics BBS: +33 (0) 3207 99500 3 When you connect to our BBS for the first time, you will be asked to key in your name and a password, and to fill in a questionnaire. 4 Press the “Enter” key after registering each piece of information until you arrive at the main menu. Select the appropriate letter to carry out the function you require. U.S. Robotics offer a range of further options for technical support. Choose one of the following options if you need help with your new ISDN card. ■ Internet on inquiry Offers automatic technical help in a library with product information, file cards and installation help. In order to receive an index of the documents available, send an empty e-mail message to: UK: uk [email protected] Any other country: euro [email protected]. You will receive the document by e-mail if you indicate under the reference the three-figure document number. 12-52 CHAPTER 12: U.S. ROBOTICS ON-LINE CONTACTS ■ World Wide Web The 3Com home page, which contains the same information as the list on “Internet on inquiry” as well as information on 3Com U.S. Robotics: http://www.3com.com/ ■ Fax and hotline for technical support Technical questions on 3Com/U.S. Robotics modems can also be answered by fax or by our representatives in the technical support team (see chapter 11). 13 LIMITS OF THE GUARANTEE U.S. Robotics Inc. guarantees for the original user or the end user that this product is free from material or manufacturing defects for a period of five years from the purchase date. Within this guarantee period and on production of proof of purchase, this product shall be repaired at our expense without charge for replacement parts or labour costs, or shall be replaced (with the same or similar model). This guarantee is not valid if the product has been modified, misused, or exposed to abnormal operating conditions (including, but not restricted to this, damage due to lightning strikes or water). THE REPAIR OR REPLACEMENT WORK IN THIS GUARANTEE REPRESENTS THE ONLY COMPENSATION FOR THE PURCHASER. THIS GUARANTEE REPLACES ALL OTHER EXPRESS OR IMPLIED GUARANTEES INCLUDING ALL GUARANTEES REFERRING TO THE COMMERCIAL CAPABILITY OR SUITABILITY OF THE PRODUCT FOR A CERTAIN USE OR PURPOSE. U.S. ROBOTICS SHALL BE IN NO WAY RESPONSIBLE TO THE PURCHASER FOR INDIRECT OR CONSEQUENTIAL DAMAGES OF ANY SORT. This limited guarantee allows you certain rights in law. Depending on your country of residence, you may have further rights. In some countries, the exclusion or limitation of accidental or consequential damage or limitation with regard to an implied guarantee time is not valid. Therefore, the limitations or exclusions referred to above may not apply to you. For service under this guarantee, contact U.S. Robotics Customer Support Service (see chapter 11). 13-54 CHAPTER 13: LIMITS OF THE GUARANTEE A APPENDIX A1: Updates You can obtain updates for your ISDN card from the 3Com U.S. Robotics BBS or on the 3Com U.S. Robotics Website. A2: Multiple subscriber numbers (MSN) The MSN(s) is/are the last number(s) of your ISDN number. When a call comes in, the ISDN device checks the chosen MSN and the service required (e.g. speech, data transfer, 64kbit/s, fax, ...). With different MSN settings you are able to use several extensions for the same service on the same ISDN line, or you can dial direct. If, when a call comes in, the MSNs are not distinguishable, the call is taken by the first available extension. A-56 APPENDIX A3: Table of ISDN messages Table A-1 ISDN messages Original decimal /hexadecimal 1/1 6/6 16 / 0x10 18 / 0x12 19 / 0x13 17 / 0x11 21 / 0x15 22 / 0x16 26 / 0x1A 27 / 0x1B 29 / 0x1D 31 / 0x1F 34 / 0x22 38 / 0x26 41 / 0x29 42 / 0x2A 47 / 0x2F 50 / 0x32 57 / 0x39 58 / 0x3A 63 / 0x3F 65 / 0x41 70 / 0x46 79 / 0x4F 88 / 0x58 111 / 0x6F 127 / 0x7F Meaning Number not assigned Channel not acceptable Normal set-up User engaged No answer from user (i.e. DTR not turned on) Call not accepted Number changed User set-up not selected No longer in operation Set-up not accepted Normal connection interrupted - no further details No B channel available ISDN Network not operational Temporary failure of the ISDN network Overloading of the ISDN network Overloading of the ISDN network No subscription for the desired application Carrier feature not authorised Carrier feature not available Service/option not available Carrier feature not implemented Only limited digital carrier feature (BC) available Service/option not implemented Incompatible target Protocol error - no further details Network interworking error - no further details A-57 A4: CAPI V1.1 error messages Table A-2 CAPI error messages Number hexadecimal Meaning 0x1001 Error in API_REGISTER 0x1002 Invalid application recognition signal 0x1003 Invalid message 0x1004 Invalid command, subcmd 0x1005 Queue full 0x1006 Queue empty 0x1007 Queue overflow 0x1008 Deinstallation error 0x2001 Invalid controller 0x2002 Invalid PLCI 0x2003 Invalid NCCI 0x2004 Invalid type 0x3101 Defective B channel 0x3102 Defective info-mask 0x3103 Defective EAZ service mask 0x3104 Defective SI service mask 0x3105 Invalid protocol layer 2 0x3106 Invalid DLPD 0x3107 Invalid protocol layer 2 0x3108 Invalid NCPD 0x3109 Invalid NCPIs 0x3201 General controller error 0x3202 LISTEN_REQs not clear 0x3203 Function not supported 0x3204 PLCI idle 0x3205 NCCI idle 0x3206 Protocol 12 not supported 0x3207 Protocol 12 cannot now be selected 0x3208 Protocol 13 not supported 0x3209 Protocol 13 cannot now be selected 0x320a Invalid DLPD parameter 0x320b Invalid NCPD parameter 0x320c Invalid NCPI parameter (Table Continued on next page.) A-58 APPENDIX Table A-2 CAPI error messages 0x320d 0x3301 0x3302 0x3303 0x3304 0x3305 0x3306 0x3307 0x3308 0x3309 0x330a 0x330b 0x330c Data length not supported Set-up error D channel layer 1 Set-up error D channel layer 2 Set-up error B channel layer 1 Set-up error B channel layer 2 Disconnection D channel layer 1 Disconnection D channel layer 2 Disconnection D channel layer 3 Disconnection B channel layer 1 Disconnection B channel layer 2 Disconnection B channel layer 3 Restoration B channel layer 2 Restoration B channel layer 3 A5: Diagram of the ISDN Cable Diagram of the 8 terminal ISDN S0 interface plugs (RJ45) (CCITT I.430/ISO 8877) Table A-3 Pin layout Pin 1 2 3 4 5 6 7 8 Signal No connection No connection STA (transfer A) SRA (receive A) SRB (receive B) STB (transfer B) -48V dc -48V dc retain