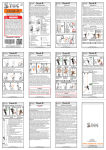
1
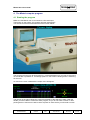
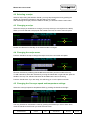
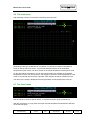
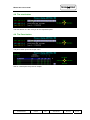
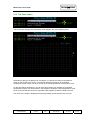
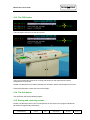
TECHN
PRINT
MISTRAL 360
Forced Air Convection Oven
User manual
Version 2.00
TECHN
Mistral 360 user manual
1.
2.
3.
4.
PRINT
Introduction ............................................................................................................................ 2
Setting up............................................................................................................................... 3
Specifications......................................................................................................................... 4
The Mistral computer program. ............................................................................................. 5
4.1
Starting the program ......................................................................................... 5
4.2
Selecting a recipe. ............................................................................................ 6
4.3
Changing a recipe............................................................................................. 6
4.4
Changing the recipe name................................................................................ 6
4.5
Changing the Conveyer speed and temperature settings. ............................... 6
4.6
The main menu ................................................................................................. 7
4.7
The clear button ................................................................................................ 7
4.8
The start button................................................................................................. 8
4.9
The Parm button ............................................................................................... 8
4.10
The Zone button................................................................................................ 9
4.11
The Sense button.............................................................................................. 10
4.12
The Print button ................................................................................................ 11
4.13
The PCB button ................................................................................................ 12
4.14
The Quit button ................................................................................................. 12
4.15
Storing and retrieving recipies .......................................................................... 12
(c) TechnoPrint. Ermelo
The Netherlands
Mistral User
manual
Version:
2.00
Published by:
TechnoPrint
Date:
22.10.07
Page:
1 of 13
TECHN
Mistral 360 user manual
PRINT
1. Introduction
This manual is designed to help you get the most out of the Forced Air Convection Oven
program in the shortest possible time. It is written for the new and experienced PC user in
mind.
Who should read this manual
Anybody who want to use the Technoprint Forced Air Convection oven or get an impression
on how to use the oven.
How this manual is organised
The first section of the manual describes the unpacking and installation of the oven. Included
is a describtion of the principles and specification of the oven.
The main section of the manual is build around questions a user might have concerning the
computer program, such as:
•
•
How do I change the conveyor speed.
What is shown on the animation display.
The last section of the manual explaines the messages you will probably never see:
The error messages. What do they mean and what can you possibly do to recover from such
a situation..
The figures
The figures in this manual were captured with the intention of providing the clearest possible
tutorial for the program. The default screen positions and sizes were used in most cases.
Because the oven program can be configered in many ways, do not be concerned if you
detect minor differences between the figures in this manual and what you see on your own
computer screen.
(c) TechnoPrint. Ermelo
The Netherlands
Mistral User
manual
Version:
2.00
Published by:
TechnoPrint
Date:
22.10.07
Page:
2 of 13
TECHN
Mistral 360 user manual
PRINT
2. Setting up
Unpacking the Oven:
Carefully unpack the oven and safe the original package in case you need to ship the unit.
(removal etc.)
Check first to ensure that the following items are packed with the oven:
•
•
•
•
•
•
monitor support
monitor
personal computer
connection cables
operating manual
2 thermocouples
Before starting the oven:
Operate the oven in a well ventilated room.
Keep the oven away from people who are not directly operating the unit.
Power source:
220/380 VAC, 3-phase, neutral and earth are required.
It has to be connected to a well earthed outlet. Installation may only be done by a qualified
electrical engineer.
Exhaust
To connect the exhaust: move the exhaust pipe over the stud at the rear of the oven. From
there you can exhaust directly to the outside as long as the distance is less than 3 meter.
When the distance is greater than 3 meter, you will require an additional exhaust ventilation
unit.
(c) TechnoPrint. Ermelo
The Netherlands
Mistral User
manual
Version:
2.00
Published by:
TechnoPrint
Date:
22.10.07
Page:
3 of 13
TECHN
Mistral 360 user manual
PRINT
3. Specifications
Introduction
The reflow oven MISTRAL-360 is developed for reflow soldering of SMT boards, hybrid
boards or curing adhesives.
Transport system
The boards are transported through the oven on a conveyor consisting of high grade stanless
steel spring wires with variable speed between 5 and 120 cm/min (2 and 48 Inch/min).
Heating system
The heating is by forced air convection. This reduces the shadow effects, no colour
sensitivity, no hot spots and cold solder joints.
Cooling system
Bottom cooling fans at the offload section ensure cooling of your circuits before they leave
the transport belt.
Control
All functions are controlled by a personal computer, which is easy to program.
The thermocouples allow you to connect a testcircuit to the computer, in order to read out two
different temperature profiles.
Exhaust
The integrated exhaust system transports fumes to an outdoor or filtration unit.
(c) TechnoPrint. Ermelo
The Netherlands
Mistral User
manual
Version:
2.00
Published by:
TechnoPrint
Date:
22.10.07
Page:
4 of 13
TECHN
Mistral 360 user manual
PRINT
4. The Mistral computer program.
4.1 Starting the program
Make sure the Mistral oven is connected to a free serial port.
Then power on the system, the program will start automaticaly.
You will see a screen that looks like the screen shown below.
The program will now scan te serial ports for a connected Mistral oven, as long as the oven is
not connected or powered on, a message apears on the screen indicating that it is searching
for the oven.
As soon as the oven is detected the recipe menu will appear.
The arrows on the right indicate the current functionality of the selection handle. With this
handle you will be able to control the entire program, so you do not need a mouse or other
pointing device. However to install or select a printer or other device you will need a mouse.
(c) TechnoPrint. Ermelo
The Netherlands
Mistral User
manual
Version:
2.00
Published by:
TechnoPrint
Date:
22.10.07
Page:
5 of 13
TECHN
Mistral 360 user manual
PRINT
4.2 Selecting a recipe.
Select a recipe using the selection handle, you may step through the list by pushing the
handle up or down as indicated on the right side of your screen.
After selecting the recipe push the handle to the left, you will then enter the main menu.
4.3 Changing a recipe.
Select the recipe you would like to change. (You may store up to 32 recipies in the table)
When you have selected a recipe push the handle to the left, the next screen will apear.
Please note that the functionality of the select handle is changed.
4.4 Changing the recipe name.
Push the handle to the top to change the recipe name, the next screen will apear:
Remove character by selecting first the BS button and then push the handle to the top.
To add characters, select the character by moving the handle left or right and then push the
handle to the top. The selected character will be added at the end of the string.
Push the handle down if you are ready, this will bring you in to the previous screen.
4.5 Changing the Conveyer speed and temperature settings.
Select the conveyer speed or temperature field, by pushing the handle to the right.
You may increase or decrease the value by pushing the handle up or down. When done,
move the handle to the left until you enter the main menu.
(c) TechnoPrint. Ermelo
The Netherlands
Mistral User
manual
Version:
2.00
Published by:
TechnoPrint
Date:
22.10.07
Page:
6 of 13
TECHN
Mistral 360 user manual
PRINT
4.6 The main menu
After selecting a recipe you will enter automaticly the main menu.
Depending of the type of Mistral oven connected, you will see a number of temperature
zones on the top left of the screen. The number between brackets is the requested
temperature by the recipe. The other number is the actual temperature of the specific zone.
On the right side of the diagram, you will note colored balls, they indicate the requested
temperature as well. The colored lines in the diagram indicate the current temperature of the
zones. If the colored lines reach the right side of the diagram the will be shifted to the left.
The name of the recipe is displayed and the (requested) current speed of the conveyer.
4.7 The clear button
Use the handle to select a specific button. To activate the button push the handle up.
With the clear button you may clear the screen and the temperature measurement will start
on the left side again.
(c) TechnoPrint. Ermelo
The Netherlands
Mistral User
manual
Version:
2.00
Published by:
TechnoPrint
Date:
22.10.07
Page:
7 of 13
TECHN
Mistral 360 user manual
PRINT
4.8 The start button
The start button runs the conveyer at the requested speed.
4.9 The Parm button
The parm button opens the recipe menu.
See for a description the previous chapter.
(c) TechnoPrint. Ermelo
The Netherlands
Mistral User
manual
Version:
2.00
Published by:
TechnoPrint
Date:
22.10.07
Page:
8 of 13
TECHN
Mistral 360 user manual
PRINT
4.10 The Zone button
The zone button displays the temperature zone diagram, this is the diagram below.
Depending of the type of Mistral oven connected, you will see a number of temperature
zones on the top left of the screen. The number between brackets is the requested
temperature by the recipe. The other number is the actual temperature of the specific zone.
On the right side of the diagram, you will note colored balls, they indicate the requested
temperature as well. The colored lines in the diagram indicate the current temperature of the
zones. If the colored lines reach the right side of the diagram the will be shifted to the left.
The name of the recipe is displayed and the (requested) current speed of the conveyer.
(c) TechnoPrint. Ermelo
The Netherlands
Mistral User
manual
Version:
2.00
Published by:
TechnoPrint
Date:
22.10.07
Page:
9 of 13
TECHN
Mistral 360 user manual
PRINT
4.11 The Sense button
The sense button shows the sense diagram.
The next screen will appear:
Note that there are now, sensors displayed on the top left of the screen. (depending on the
type of Mistral oven connected) Also the diagram has been changed. The temperature axis is
the same only the time axis is now different. This axis shows you the time that is needed for a
PCB to pass through the oven. It is calculated from the conveyer speed and the length of the
oven chamber. In this case it means that it will take 70 seconds for a PCB to pass all the
zones in the oven.
To measure the temperature on certain points of your PCB, stick the sensors on this points
and place the PCB on the conveyerbelts. To get an accurate measure please hit the clear
button as soon as the PCB enters the oven.
You will see the temperatures on the PCB indicated in the diagram, let it run until the PCB
exits the oven. The measuring will stop automaticly and wil show you the results.
See the next page.
(c) TechnoPrint. Ermelo
The Netherlands
Mistral User
manual
Version:
2.00
Published by:
TechnoPrint
Date:
22.10.07
Page:
10 of 13
TECHN
Mistral 360 user manual
PRINT
Now you may select the Print button to get a hardcopy of this screen and the used recipe.
Press the Zone button again to enter the main screen.
4.12 The Print button
With the Print button you can make a hardcopy of your screen.
Please note that a printer must be predefined by your Windows software, see your Windows
user manual of how to define a printer.
(c) TechnoPrint. Ermelo
The Netherlands
Mistral User
manual
Version:
2.00
Published by:
TechnoPrint
Date:
22.10.07
Page:
11 of 13
TECHN
Mistral 360 user manual
PRINT
4.13 The PCB button
The PCB button will show you the next screen:
This is just an animation of the oven running and shows you the requested and actual
temperatures of the zones.
Please note that there is no relation between the animation and the actual speed of the oven!
Press the PCB button to enter the main screen again.
4.14 The Quit button
The quit button will exit the Mistral program.
4.15 Storing and retrieving recipies
Please note that there are no save or load buttons for the recipies, this program handles all
parameter savings/loading automaticly.
(c) TechnoPrint. Ermelo
The Netherlands
Mistral User
manual
Version:
2.00
Published by:
TechnoPrint
Date:
22.10.07
Page:
12 of 13