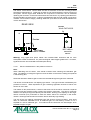
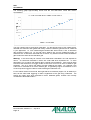
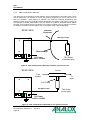
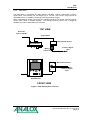
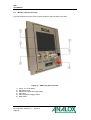
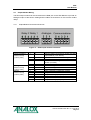
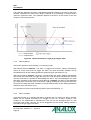
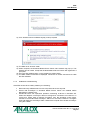
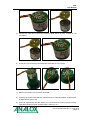
1
SDA
User Manual
Analox Ltd.
15 Ellerbeck Court, Stokesley Business Park
North Yorkshire, TS9 5PT, UK
T: +44 (0)1642 711400 F: +44 (0)1642 713900
W: www.analox.net E: [email protected]
This support line is closed on UK public holidays
SDA
User Manual
List of Contents
1
Safety warnings ...................................................................................................................3
1.1
Electrochemical Sensors (O2/CO) – Caustic Electrolyte ............................................3
1.2
Pressurised gas ..........................................................................................................4
1.3
Helium Ingress ............................................................................................................4
1.4
ESD and Electric Shock..............................................................................................4
2 Introduction ..........................................................................................................................5
3 Overview ..............................................................................................................................6
3.1
Packing Overview .......................................................................................................6
3.2
Networking Capability .................................................................................................8
3.3
System Overviews ................................................................................................... 11
3.4
Accessories ............................................................................................................. 22
3.5
Monitor Controls Overview ...................................................................................... 24
4 Installation ........................................................................................................................ 25
4.1
Mounting .................................................................................................................. 25
4.2
Monitor and Sensor Wiring ...................................................................................... 28
4.3
Output Module Wiring .............................................................................................. 33
4.4
Brackets ................................................................................................................... 35
4.5
Pipe work ................................................................................................................. 39
5 Operation .......................................................................................................................... 40
5.1
Start-up .................................................................................................................... 40
5.2
Display ..................................................................................................................... 41
5.3
Sensor readings ....................................................................................................... 43
5.4
Alarms ...................................................................................................................... 44
5.5
Calibration adjustment ............................................................................................. 48
5.6
Menu ........................................................................................................................ 51
5.7
Adjusting the backlight ............................................................................................. 52
5.8
Viewing device information ...................................................................................... 52
5.9
Data-logging ............................................................................................................ 52
5.10 Changing network parameters ................................................................................ 53
5.11 Serial data output ..................................................................................................... 53
5.12 Output module ......................................................................................................... 54
5.13 Power modes ........................................................................................................... 55
5.14 Cell replacement reminder....................................................................................... 56
6 Configuration .................................................................................................................... 58
6.1
Software installation................................................................................................. 58
6.2
Making a connection ................................................................................................ 62
6.3
Changing options ..................................................................................................... 63
6.4
Downloading data logs ............................................................................................ 65
6.5
Setting the time ........................................................................................................ 67
7 Troubleshooting ................................................................................................................ 68
7.1
Fault conditions ........................................................................................................ 68
7.2
Fault logging ............................................................................................................ 68
7.3
Problems and actions .............................................................................................. 69
8 Maintenance ..................................................................................................................... 70
8.1
Oxygen cell replacement ......................................................................................... 70
8.2
Carbon monoxide cell replacement ......................................................................... 72
8.3
Helium cell replacement .......................................................................................... 74
8.4
Reconfiguring a unit ................................................................................................. 74
9 Spares and Accessories ................................................................................................... 76
9.1
Spares...................................................................................................................... 76
9.2
Accessories ............................................................................................................. 76
9.3
Recommended calibration gases ............................................................................ 77
9.4
Servicing .................................................................................................................. 77
10
Specifications ............................................................................................................... 78
Document Ref: XK0-801-11- July 2014
Page 1
SDA
User Manual
10.1
10.2
10.3
10.4
10.5
10.6
10.7
10.8
11
12
13
14
SDA Monitor ............................................................................................................ 78
MEC oxygen sensor ................................................................................................ 79
MEC carbon monoxide sensor ................................................................................ 79
Carbon dioxide sensor ............................................................................................. 80
Temperature & humidity probe ................................................................................ 80
MEC helium sensor ................................................................................................. 81
SDA Output Module ................................................................................................. 81
IP Rating and General Care .................................................................................... 83
Warranty Information ................................................................................................... 84
Fault Reporting To Analox ........................................................................................... 85
Declarations of Conformity .......................................................................................... 86
Disposal ....................................................................................................................... 87
Document Ref: XK0-801-11 - July 2014
Page 2
SDA
User Manual
1
Safety warnings
1.1
Electrochemical Sensors (O2/CO) – Caustic Electrolyte
Electrochemical sensors contain caustic compounds. Under normal conditions the sensor will
be safely sealed. To prevent leakage, the unit must not be exposed to temperatures outside
the specified range, or be exposed to organic vapours, which may cause physical damage to
the body of the sensor. The unit must not be stored in areas containing organic solvents or in
flammable liquid stores.
When the life of the sensor has expired or it is leaking or otherwise damaged it must be
disposed of safely in accordance with local regulations.
The carbon monoxide cell contains an acidic electrolyte (sulphuric acid) whilst the oxygen cell
contains alkaline electrolyte (potassium hydroxide). In the event of an accident, use the
following first aid procedures:
Body
Part
Skin
Effect
First Aid Procedures
Contact could result in a chemical
burn. Persons with pre-existing skin
disorders may be more susceptible
to the effects of the substance.
Immediately flush the skin thoroughly
with water for at least 15 minutes.
Remove contaminated clothing and
wash before re-use. Obtain medical
advice if continued irritation.
Ingestion
Corrosive. May cause sore throat,
abdominal pain, nausea, and
severe burns of the mouth, throat,
and stomach, and may be fatal.
If swallowed DO NOT INDUCE
VOMITING. Wash out mouth thoroughly
with water and give plenty of water to
drink.
Obtain
medical
advice
immediately
Eye
Persons with pre-existing eye
problems may be more susceptible
to the effects of the substance.
Irrigate thoroughly with water for at least
15 minutes. Obtain medical advice
immediately.
Corrosive. May cause redness,
pain, blurred vision, and eye burns.
Contact can result in the permanent
loss of sight.
Inhalation
Persons with pre-existing impaired
respiratory function may be more
susceptible to the effects of the
substance. Inhalation is not an
expected hazard unless heated to
high temperatures. Mist or vapour
inhalation can cause irritation to the
nose, throat, and upper respiratory
tract.
Remove to fresh air. Rest and keep
warm. Obtain medical advice if
applicable.
Document Ref: XK0-801-11- July 2014
Page 3
SDA
User Manual
1.2
Pressurised gas
1)
Do not exceed the specified maximum pressures.
damage to the equipment and to personnel.
2)
Users of this equipment MUST be familiar with the handling of pressurised gas.
3)
Take particular care when handling toxic or flammable gases. In such cases ensure
that all exhaust is vented into well ventilated areas.
4)
For systems with exhaust outlets, do not block the exhaust outlet.
1.3
Helium Ingress
Failure to do so may result in
Care must be taken when choosing the location for the SDA sensor modules that include
atmospheric pressure compensation. These include the MEC O2 % (MECO2ABB) and SDA
CO2 modules. Helium can diffuse into the pressure sensing components in the sensor
housing and affect the overall sensor accuracy.
To avoid helium ingress issue with the sensor modules, they should be fitted into well
ventilated panels or racks where the content in the atmosphere is ideally less than 1% helium.
Levels exceeding this will degrade sensor performance and levels greater than 5% will reduce
sensor life expectancy. Note that this does not affect the MEC O2 partial pressure sensor
(MECO2ABAP) as this is does not include automatic pressure compensation.
1.4
ESD and Electric Shock
To prevent damage to the SDA units they must not be operated with any casework removed
to prevent the likelihood of damage to the electronic components and accidental electric
shock. The rear USB and Ethernet connectors are shielded to and internal electronic ground
and should not be connected to protective earth. The stud on the rear of the case provides
the main connection to protective earth which must be connected to maintain EMC
performance.
Document Ref: XK0-801-11 - July 2014
Page 4
SDA
User Manual
2
Introduction
The SDA range is composed of a family of atmospheric analysis systems which are suitable
for applications where continuous monitoring of atmospheres is required. Each type of system
in the range will provide independent measurement and display of atmospheric variables with
clear audible and visual alarms to warn when potentially dangerous levels are reached.
The SDA range is designed to be highly modular and flexible so that it can be easily
integrated into custom atmospheric monitoring solutions.
The core of each analyser is a compact monitor unit which provides the display and user
interface for the system. A full colour 3.5” TFT display gives clear reading and status
information and is suitable for a wide range of lighting and mounting positions. The controls
present quick and simple access to the most common system functions such as calibration
and alarm adjustment, with more detailed setup and diagnostic information accessed through
an easy to use menu system.
The RS485 communication ports on the rear of a monitor provide connections to a range of
Analox gas and environmental sensors and peripherals. These provide the flexibility to mount
sensors and peripherals alongside the monitor or up to hundreds of metres away without
affecting performance.
The SDA range is compliant with the type approval specifications from the major classification
societies in the marine industry for both the general power distribution and bridge zones (refer
to section 13 for more details).
Document Ref: XK0-801-11- July 2014
Page 5
SDA
User Manual
3
Overview
3.1
Packing Overview
Oxygen system
1)
2)
3)
4)
5)
6)
7)
8)
9)
Oxygen monitor (rack or panel mount)
MEC oxygen sensor
Push in flow adaptor
2 way Phoenix connector (DC power)
5 way Phoenix connector (sensor communications & power)
5 way Phoenix connector (output module communications & power)
USB lead
User manual
Test certificate
Carbon dioxide system (separates)
1)
2)
3)
4)
5)
6)
7)
8)
Carbon dioxide monitor (rack or panel mount)
Carbon dioxide sensor module (rack or panel mount)
2 way Phoenix connector (DC power)
5 way Phoenix connector (sensor communications & power)
5 way Phoenix connector (output module communications & power)
USB lead
User manual
Test certificate
Carbon dioxide system (combined panel mount)
1)
2)
3)
4)
5)
6)
7)
Combined carbon dioxide monitor and sensor module
2 way Phoenix connector (DC power)
5 way Phoenix connector (sensor communications & power)
5 way Phoenix connector (output module communications & power)
USB lead
User manual
Test certificate
Carbon monoxide system
1)
2)
3)
4)
5)
6)
7)
8)
9)
Carbon monoxide monitor (rack or panel mount)
MEC carbon monoxide sensor
Push in flow adaptor
2 way Phoenix connector (DC power)
5 way Phoenix connector (sensor communications & power)
5 way Phoenix connector (output module communications & power)
USB lead
User manual
Test certificate
Document Ref: XK0-801-11 - July 2014
Page 6
SDA
User Manual
Temperature & Humidity system
1)
2)
3)
4)
5)
6)
7)
8)
Temperature & Humidity monitor (rack or panel mount)
Temperature & Humidity probe (Chamber or In-line variant)
2 way Phoenix connector (DC power)
5 way Phoenix connector (sensor communications & power)
5 way Phoenix connector (output module communications & power)
USB lead
User manual
Test certificate
Helium system
1)
2)
3)
4)
5)
6)
7)
8)
9)
Helium monitor (rack or panel mount)
MEC helium sensor
Push in flow adaptor
2 way Phoenix connector (DC power)
5 way Phoenix connector (sensor communications & power)
5 way Phoenix connector (output module communications & power)
USB lead
User manual
Test certificate
Depth system
1)
2)
3)
4)
5)
6)
7)
8)
9)
10)
Depth monitor (rack or panel mount)
MEC 4-20mA module
Pressure sensor (If specified at time of order, own pressure sensor can be used)
Pressure sensor 4-20mA cable
2 way Phoenix connector (DC power)
5 way Phoenix connector (sensor communications & power)
5 way Phoenix connector (output module communications & power)
USB lead
User manual
Test certificate
Accessories (optional)
1)
2)
3)
4)
5)
AC-DC +24VDC panel mounted power supply unit (PSU)
MEC sensor only mounting plate
Combined mounting plate (PSU, SDA Output module and MEC Oxygen sensor)
SDA Output module (bracket / panel mount)
SDA Flow meter plate (rack or panel mount)
Document Ref: XK0-801-11- July 2014
Page 7
SDA
User Manual
3.2
Networking Capability
The SDA system is capable of sharing data across Ethernet networks, either for
communications between SDA Units for conversion and compensation, or with an active host,
or passive listening device for external communications, via the RJ45 socket that can be
found at the rear of the SDA Unit. Multiple SDA Units can be linked together, or on a host
network, via an Ethernet Switch Unit.
There are currently 2 core transport protocol methods are used in the SDA:
1. User Datagram Protocol (UDP). Using this core protocol, each SDA, when
configured, will transmit data, in a pre-determined format, which can then be utilized
by other SDA’s, or an external PC for the following purposes:
a. Intra-SDA sharing of data for cross-compensation purposes. For example,
SDA Units can be configured to share pressure data across the network;
sensor value readings in ‘listening’ SDA Units can be manipulated to show
pressure-compensated values on the display.
b. External data access can be achieved where an external device, such as a
monitoring PC, could be used to listen to individual SDA’s on the network for
monitoring, or data-logging purposes. Each SDA can be configured to
broadcast data on a range of base ports, configurable in the Networking
Menu.
2. Transmission Control Protocol (TCP). Using this core protocol, external devices can
send requests to SDA Units for data, using a pre-determined format. A host device,
such as a PC, would send a request for data to one or more SDA Units on a network,
on an individual request basis, to specific IP addresses. The SDA Units can be userconfigured to specific IP addresses via the Networking Menu, so the user can specify
which addresses to use, where required.
For UDP communications, SDA Units are allocated a base port address, with an offset which
is determined by sensor type. There is an additional offset available to allow for multiple
types of the same gas sensor on the same network. Any device wishing to ‘listen’ to data
transmissions from the SDA Unit, must listen out on the specific Port Address for that SDA
and Sensor.
Document Ref: XK0-801-11 - July 2014
Page 8
SDA
User Manual
The following tables can be used to verify that the correct UDP address is set in your SDA:
Base Port = 900
Sensor Type
None
Carbon Dioxide
Oxygen
Carbon Monoxide
VOC
Dewpoint
Hydrogen
Helium
Pressure
Temperature
Humidity
Nitric Oxide
Nitrogen Dioxide
Hydrogen Sulphide
Sulphur Dioxide
Ozone
Offset Value
0
+1
+2
+3
+4
+5
+6
+7
+8
+9
+10
+11
+12
+13
+14
+15
Same sensor-type offsets can be calculated using the following table:
Base Port = 900
Same Type Sensor Number
1
2
3
4
5
6
7
8
9
10
11
12
13
14
15
16
Offset Value
+0
+100
+200
+300
+400
+500
+600
+700
+800
+900
+1000
+1100
+1200
+1300
+1400
+1500
Example 1
When using a single Oxygen SDA Unit, and a single Pressure SDA Unit, the UDP Port
Addresses should be configured as follows:
Oxygen = 900 (Base Port) + 2 (Oxygen Offset) = 902
Pressure = 900 (Base Port) + 8 (Pressure Offset) = 908
Document Ref: XK0-801-11- July 2014
Page 9
SDA
User Manual
Example 2
When using 2 Oxygen SDA Units, and a single Pressure SDA Unit on the network, the UDP
base port will need to be changed to avoid network conflicts:
Oxygen 1 = 900 (Base Port) + 2 (Oxygen Offset) = 902
Oxygen 2 = 1000 (Base Port) + 2 (Oxygen Offset) = 1002
Pressure = 900 (Base Port) + 8 (Pressure Offset) = 908
Note:
SDA Units that are listening to other sensor types on the network, will automatically be
configured to look on the appropriate port for the sensor type and the configured base port.
For example, if there are multiple Pressure SDA Units broadcasting data on the network, any
SDA wishing to use Pressure data from the UDP broadcasts, can only subscribe to the
pressure sensor on its own base port.
For TCP communications, the host PC would send data requests to SDA Units on an
individual basis, and the SDA Units will respond individually; the IP address and server port
are configurable in the Networking Menu.
The UDP and TCP Datagrams for SDA Communications are available on the Analox website,
and are also included on the SDA Software Disk.
Document Ref: XK0-801-11 - July 2014
Page 10
SDA
User Manual
3.3
System Overviews
3.3.1
SDA O2
There are two types of oxygen monitoring system arrangement based on a SDA Monitor and
MEC O2 sensor, depending on which monitoring application is required. The MEC O2 sensor
is designed to operate in either atmospheric or hyperbaric environments, to depths of 350
msw.
The atmospheric version of the sensor is ranged to 100% O2 and has inbuilt pressure
compensation which will automatically adjust to changes in the ambient atmospheric
pressure. This enables accurate measurement and adjustment when operating in
atmospheres between 700 mbara and 1300 mbara. When fitted with a flow adaptor, as shown
in the figure below, the 100% O2 version of the sensor can monitor a sample line from a
remote source or chamber (refer to section 4.5 for pipe work detail). When used without a
flow adaptor the MEC O2 sensor will measure oxygen in the surrounding ambient atmosphere
diffusing across the sensor membrane.
Warning: Ensure that when used with a flow adaptor that sample pressure is reduced down
to almost atmospheric pressure before passing to the sensor. This will prevent potential
damage to the sensor and affects that can cause elevated sensor readings. A flow rate
between 0.2 and 1.0 l/min is acceptable, 0.5 l/min is recommended.
DC Power
+12V to +32V DC
TOP VIEW
Oxygen Signal Cable
MEC Oxygen Sensor
Monitor
Sample Exhaust
Flow
Adaptor
Sample Input
Sample Exhaust
Sample Input Flow
0.2 l/min to 1.0 l/min
Oxygen Monitor
MEC Oxygen Sensor
FRONT VIEW
Figure 1 - SDA oxygen system overview
Document Ref: XK0-801-11- July 2014
Page 11
SDA
User Manual
3.3.2
SDA CO2
The SDA CO2 is composed of a SDA Monitor and a CO2 module with a 220mm signal cable.
The module contains the carbon dioxide sensor and is designed to fit alongside the monitor in
a rack or panel (depending on which type is supplied). Where longer distances are required
between the CO2 module and the monitor, the cable connection can be extended with the use
of a terminal block with a cable of 2 twisted pairs with an outer shield.
The sample lines are compatible with 6mm OD, 4mm ID flexible tubing. The input sample
passes through the flow meter first and can take a maximum input pressure of 6 bara.
Warning: The flow must be regulated on the flow meter to be greater than 0.2 l/min and less
than 1.0 l/min, a flow of 0.5 l/min is recommended. When both SDA O2 and SDA CO2 systems
are fitted in the same rack or panel, the exhaust line from the CO2 system may be connected
to input of the O2 flow adaptor to if it is required to monitor the same sample line.
Note:
When calibrating the CO2 sensor, care should be taken when selecting the calibration gas
used. The balance or background gas can have an effect on the sensor reading, if calibrating
with a nitrogen balance gas and the sensor is then shown a helium balance gas after
calibration, the sensor will read considerably lower. If calibrated with a helium balance gas
and the sensor is then shown a nitrogen balance gas after calibration, the sensor will read
considerably higher.
Select the calibration balance gas to match the intended background gas to be measured.
See section 4.5.2 for fitting details.
Document Ref: XK0-801-11 - July 2014
Page 12
SDA
User Manual
TOP VIEW
Sample Lines
CO2 Signal Cable
DC Power
+12V to +32VDC
Carbon Dioxide
Module
Monitor
Sample Exhaust
Flow
0.2 l/min to 1.0 l/min
Sample In
< 6 bara
Carbon Dioxide
Monitor
Carbon Dioxide
Module
FRONT VIEW
Figure 2 - SDA carbon dioxide system overview
Document Ref: XK0-801-11- July 2014
Page 13
SDA
User Manual
3.3.3
SDA CO
The SDA CO is composed of an SDA Monitor and MEC CO module with a 150mm signal
cable. The sensor is ranged to 20ppm CO and has inbuilt temperature compensation, which
will automatically adjust to changes in the ambient temperature. When fitted with a flow
adaptor, as shown in the figure below, the 20ppm CO version of the sensor can monitor a
sample line from a remote source or chamber (refer to section 4.5 for pipe work detail). When
used without a flow adaptor the MEC CO sensor will measure carbon monoxide in the
surrounding ambient atmosphere diffusing across the sensor membrane.
Warning: Ensure that when used with a flow adaptor that sample pressure is reduced down
to almost atmospheric pressure before passing to the sensor. This will prevent potential
damage to the sensor and affects that can cause elevated sensor readings. A flow rate
between 0.2 and 1.0 l/min is acceptable, 0.5 l/min is recommended.
Note:
When calibrating the CO sensor, care should be taken when selecting the calibration gas
used. The balance or background gas can have an effect on the sensor reading as explained
in section 3.3.3.1.
TOP VIEW
DC Power
+12V to +32V DC
CO Signal Cable
MEC CO Sensor
Monitor
Sample Exhaust
Flow
Adaptor
Sample Input
Sample Exhaust
Sample Input Flow
0.2 l/min to 1.0 l/min
CO Monitor
MEC CO Sensor
FRONT VIEW
Figure 3 - SDA carbon monoxide system overview
Document Ref: XK0-801-11 - July 2014
Page 14
SDA
User Manual
The sensor comes with a 150mm cable and will fit the either of the two mounting bracket
accessories (see section 9). These can be used on both rack and panel mounting versions of
the system. Where longer cable distances are required the connection can be extended
replacing the connector on the short cable with a terminal block or by replacing the cable from
the internal MEC connector block. A cable of 2 twisted pairs with an outer shield is required to
maintain communication integrity, enabling distances up to 500m to be achieved between the
monitor and sensor.
REAR VIEW
Ferrite
Wurth 74271633 S
Ferrites
DC Power
+12V to +32VDC
0 to 20ppm
MEC carbon
monoxide
sensor
Warning: Long signal and power cables can increase EMC emissions and be more
susceptible to EMC interference. For power and signal cable lengths greater than 1.5 metres,
signal ferrites are recommended to be fitted (see above).
3.3.3.1
Sensor characteristics in the presence of helium
Note:
When calibrating the CO sensor, care should be taken when selecting the calibration gas
used. The balance or background gas can have an effect on the sensor reading as explained
in the following text.
Select the calibration balance gas to match the intended background gas to be measured.
The carbon monoxide sensor is a capillary type sensor. This type of sensor is affected by the
presence of helium. When exposed to a gas containing significant amounts of helium the
sensor will over-read.
The reason for this phenomenon, is down to the small size of the helium molecule compared
to other molecules present (mostly nitrogen and oxygen molecules). The helium molecules
diffuse more rapidly through the capillary into the sensor, allowing more capacity for the larger
carbon monoxide (CO) molecules to enter the sensor. More CO molecules in the sensor
results in a stronger electrochemical reaction and an artificially high reading.
The size of the over reading is dependent upon the amount of helium present. As a worst
case, an instrument calibrated on an air balanced gas, will over-read by a factor of 2.3 if
exposed to a helium balanced gas. This means that the instrument will read 4.6ppm when
exposed to 2ppm CO gas.
Document Ref: XK0-801-11- July 2014
Page 15
SDA
User Manual
The following graph approximately shows how the over-read factor varies with Helium
concentration:
This over-reading can be removed by calibration. For the best accuracy of CO measurement,
calibrate the instrument with gases that closely match the balance gas that will be measured
in your application. I.e. if the measured gas contains 99% Helium and 1% O2, a calibration
gas containing 18ppm CO, 1% O2 and helium balance will give the greatest accuracy of
measurement. It should be noted that this correction only works while the measured balance
gas remains the same as the calibration gas
Warning: In the same way as a sensor over-reads when calibrated in air and exposed to
helium. An instrument calibrated in helium will under-read when exposed to air. In some
applications it is normal for the balance gas to change during operation. Care must be taken
to ensure that the alarms will trigger at the correct level of CO for all levels of balance gas
expected. This is to ensure the safety of those breathing the gases. For example if the
instrument is calibrated on a helium balance gas, a significantly higher concentration of CO
will be required to trigger the alarms if the balance gas measured is air.
For this reason Analox recommend, that a gas that is air balanced (18ppm CO, air balance) is
best, as this offers safe triggering of alarms regardless of the gas being measured. The
alarms will trigger early when exposed to helium balanced gases, however this normally
considered to be a safe situation.
Document Ref: XK0-801-11 - July 2014
Page 16
SDA
User Manual
3.3.4
SDA He
The SDA He is composed of a SDA Monitor and MEC He module with a 150mm signal cable.
The sensor is ranged to 100% He. When fitted with a flow adaptor, as shown in the figure
below, the sensor can monitor a sample line from a remote source or chamber (refer to
section 4.5 for pipe work detail). When used without a flow adaptor the MEC He sensor will
measure helium in the surrounding ambient atmosphere diffusing across the sensor
membrane.
Warning: Ensure that when used with a flow adaptor that sample pressure is reduced down
to almost atmospheric pressure before passing to the sensor. This will prevent potential
damage to the sensor and affects that can cause elevated sensor readings. A flow rate
between 0.2 and 1.0 l/min is acceptable, 0.5 l/min is recommended.
TOP VIEW
DC Power
+12V to +32V DC
He Signal Cable
MEC He Sensor
Monitor
Sample Exhaust
Flow
Adaptor
Sample Input
Sample Exhaust
Sample Input Flow
0.2 l/min to 1.0 l/min
He Monitor
MEC He Sensor
FRONT VIEW
Figure 4- SDA helium system overview
Warning: Ensure that when used with a flow adaptor that sample pressure is reduced down
to almost atmospheric pressure before passing to the sensor. This will prevent potential
damage to the sensor and affects that can cause elevated sensor readings. A flow rate
between 0.2 and 1.0 l/min is acceptable, 0.5 l/min is recommended.
Document Ref: XK0-801-11- July 2014
Page 17
SDA
User Manual
3.3.5
SDA Temperature & Humidity
The SDA T&H is composed of a SDA Monitor and a Temperature & Humidity probe, which
can be used either in a chamber or in-line. The probe is ranged to 0 to 100 ºC (32 to 212 ºF)
and 0 to 100%RH. When fitted in a chamber, the probe will measure temperature and
relative humidity in the surrounding ambient atmosphere (As shown in the Figure 5 below) up
to pressures of 35bara, when fitted in-line, the probe will measure temperature and relative
humidity in the piped air supply (As shown in the Figure 6 below) up to a maximum pressure
of 100bara, connection can be made to the in-line probe using a G½ female fitting.
Chamber
Penetrator
REAR VIEW
T&H Signal Cable
Chamber Wall
DC Power
+12V to +32VDC
T&H Probe
(Chamber type)
Figure 5 - SDA Temperature & Humidity chamber system overview
REAR VIEW
Air line
From
system
To
diver
G1/2 Fitting
T&H Signal Cable
T&H Probe
(In-line type)
DC Power
+12V to +32VDC
Figure 6 - SDA Temperature & Humidity In-line system overview
Document Ref: XK0-801-11 - July 2014
Page 18
SDA
User Manual
3.3.6
SDA Depth
The SDA Depth is composed of a SDA Monitor and MEC 4-20mA module with a 150mm
signal cable. The sensors can be ranged up to 100 bar (The correct range should be
calibrated at time of installation according to the target sensor range).
When connected the sensor can monitor an analogue signal from a remote 4-20mA pressure
sensor either inside or outside chamber. The mating connector cable is 2m in length as
standard, this can be extended by the end user.
TOP VIEW
DC Power
+12V to +28V DC
Signal Cable
MEC 4-20mA Sensor
Depth Monitor
Pressure Signal
Input
Mating
Connector
MEC 4-20mA Sensor
Pressure Signal
Input
Depth Monitor
FRONT VIEW
Figure 7- SDA depth system overview
Document Ref: XK0-801-11- July 2014
Page 19
SDA
User Manual
Figure 8- SDA depth sensor connection
Document Ref: XK0-801-11 - July 2014
Page 20
SDA
User Manual
3.3.7
Longer signal cables
The standard MEC sensor comes with a 150mm cable and will fit either of the two mounting
bracket accessories (see section 3.4). These can be used on both rack and panel mounting
versions of the system. Where longer cable distances are required the connection can be
extended replacing the connector on the short cable with a terminal block or by replacing the
cable from the internal MEC connector block. A cable of 2 twisted pairs with an outer shield is
required to maintain communication integrity, enabling distances up to 500m to be achieved
between the monitor and sensor.
The hyperbaric version of the O2 sensor will measure partial pressures up to 3000 mbar O2
and operate in pressures up to 36 bara. In this application a longer cable must be fitted to
provide the connection to the monitor, which remains outside of the hyperbaric atmosphere
(see figure below).
Chamber
Penetrator
REAR VIEW
SDA Monitor
Ferrite
Wurth 74271633 S
Ferrites
Chamber Wall
Sensor
DC Power
+12V to +32VDC
Figure 9 – Sensor inside a saturation dive chamber
Warning: Long signal and power cables can increase EMC emissions and be more
susceptible to EMC interference. For power and signal cable lengths greater than 1.5 metres,
signal ferrites are recommended to be fitted (see above).
Document Ref: XK0-801-11- July 2014
Page 21
SDA
User Manual
3.4
Accessories
3.4.1 Mounting plate accessories
Two brackets may be used to mount the MEC sensor to SDA Monitor. If a power supply or
SDA Output Module is required the combined bracket can be fitted. Refer to section 4.4 for
more detail.
Sample Input Flow
0.2 l/min to 1.0 l/min
Flow Adapter
DC Power
+12V to +32VDC
Sample
Exhaust
MEC Sensor
Monitor
Sensor Bracket
TOP VIEW
Flow Adapter
Sample Input Flow
0.2 l/min to 1.0 l/min
DC Power
+12V to +32VDC
Sample
Exhaust
PSU (Optional)
Output Module
(Optional)
MEC Sensor
Monitor
Universal Bracket
TOP VIEW
Figure 10 – Mounting plates and accessories overview
Document Ref: XK0-801-11 - July 2014
Page 22
SDA
User Manual
3.4.2
Operation in the Bridge Zone
The SDA systems meets EMC requirements for the general power distribution zones defined
in type approval specifications for Lloyd’s Register, DNV and ABS classification societies. To
fit into the bridge zone a filter must be fitted to comply with rules on radio interference, as
shown below to the DC supply. Refer to section 4 for detailed system wiring.
SDA Monitor
REAR VIEW
MEC
Oxygen
Sensor
Sensor Signal Cable
Optional Bridge
Zone Filter
(AST 2533-1005)
P
P
PE
N
N
DC Power
+12V to +32VDC
Figure 11 – Bridge distribution zone
Document Ref: XK0-801-11- July 2014
Page 23
SDA
User Manual
3.5
Monitor Controls Overview
Figure 6 shows an overview of the controls located on the front panel of an SDA.
Figure 12 – SDA front panel overview
1)
2)
3)
4)
5)
6)
Colour TFT LCD display
Adjustment knob
Calibration adjustment toggle switch
Set button
Alarm adjustment toggle switch
Mute button
Document Ref: XK0-801-11 - July 2014
Page 24
SDA
User Manual
4
Installation
Please observe the safety information in section 1 before installation.
4.1
Mounting
4.1.1 Rack Mounting
Rack versions are designed to be mounted onto standard 19” mounting rails. The systems
are 3U high and 21hp wide so 4 modules will occupy the full width of the standard 84hp wide
19” rail.
4.1.2 Panel Mounting
Panel versions are suitable for direct mounting into instrument panels and they will fit the
same apertures used by the older series of Analox 1000 and 5001 analysers. The cut-out
aperture should measure as follows:
•
•
Height
Width
-
112mm
102mm
Mounting centres for panel mount variants should be as follows:
Holes
Height
Width
Centred
-
4 x 6mm
122.5mm
91.4mm
On cut out
91,4
45,7
112
61,25
45,7
61,25
122,5
•
•
•
•
Ø6
102
Figure 13 - Panel mounting holes
Document Ref: XK0-801-11- July 2014
Page 25
SDA
User Manual
4.1.3
Panel Mounting Procedure
1) To mount the panel variant instrument, take the two supplied brackets and remove
the backing from the adhesive foam.
2) Place the brackets behind the panel and align the M5 holes with the 6mm holes in the
panel, adhere the brackets to the rear of the panel with the adhesive foam.
3) Align the instrument up to the panel and secure in place with the four provided
M5x25mm Pozi-Pan screws.
Document Ref: XK0-801-11 - July 2014
Page 26
SDA
User Manual
4.1.4
The Combined Panel Adaptor Mounting Procedure
A combined panel mount adaptor plate kit (XK0-445K) is also available as an accessory to
mount a rack mount CO2 variant into an existing combined panel cut out.
This can be mounted to the panel as per the steps below.
1)
Remove the rack mount fixings from the monitor and CO2 module
2)
Place the monitor into the adaptor plate (left hand side) and align with the four tapped
M3 holes
3)
Secure the monitor in place with four of the provided M3x8mm Pozi-Pan screws and
M3 Nordlock washers
4)
Place the CO2 module through the remaining space and align with the remaining four
tapped M3 holes
5)
Secure in place with the remaining four M3x8mm Pozi-Pan screws and M3 Nordlock
washers
7) Finally, secure the assembly into your panel using the provided M5x25mm Pozi-Pan
screws and M5 captive nuts.
Figure 14 – Building the combined panel
Document Ref: XK0-801-11- July 2014
Page 27
SDA
User Manual
4.2
Monitor and Sensor Wiring
Warning: Long signal and power cables can increase EMC emissions and be more
susceptible to EMC interference. For power and signal cable lengths greater than 1.5 metres
signal ferrites are recommended to be clipped onto the cable (see section 3.3.1).
4.2.1
Monitor Connectors Overview
The SDA Monitor provides the connectors for all the system interconnections at the rear of
the unit as shown in the figure below.
Figure 15 – SDA monitor rear connectors
PC Communication
Connector
Tech – USB Type A socket
PC – USB Type B socket
Description
Reserved
USB connection to a PC. Used for configuration
and downloading historic data (optional).
Ethernet connection for networking functionality
Network – RJ45 socket
Sensor and Peripheral Connectors
Connector
Pin
Function
Monitor Data
1
V+
Phoenix MVC 5
way
2
RS485 A
(3.5mm pitch)
3
RS485 B
4
RS485 Ref
Monitor Sensor
Phoenix MVC 5
way
(3.5mm pitch)
Protective Earth
Monitor Power
Phoenix MVC 2
way
(3.5mm pitch)
5
1
VV+
2
3
4
RS485 A
RS485 B
RS485 Ref
5
M4
Stud
VChassis
Earth
1
Vin+
2
Vin-
Document Ref: XK0-801-11 - July 2014
Page 28
Comments
+5V DC supply output used to power the SDA
Output Module (max 390mA).
Differential TxD-/RxD- aka inverting pin
Differential TxD+/RxD+ aka non-inverting pin
Common reference signal to connect to remote
RS485 device. If not required it should be
looped back to pin 5 (0V).
0V DC connection for the supply output
+5V DC supply output used to power an SDA
sensor (max 390mA).
Differential TxD-/RxD- aka inverting pin
Differential TxD+/RxD+ aka non-inverting pin
Common reference signal to connect to remote
RS485 device. If not required it should be
looped back to pin 5 (0V).
0V DC connection for the supply output
Connects the system casework to the local
protective earth. Sensor cable shields are also
connected here.
Supply input +12 V DC to +32 V DC.
(15 W maximum, 3 W typical)
Supply input 0V DC
SDA
User Manual
4.2.2
The Power Connection
The monitor can be directly powered from a DC source, using the supplied two way Phoenix
connector as shown in the steps below.
1) Supplied DC connector
4) Secure using a terminal driver
2) Connect +VE
3) Connect 0V
5) Connect to the DC input on the rear of the monitor
The monitor can also be powered from an AC source. The AC adaptor (XK0-662) can be
purchased as an accessory from Analox, this is only suitable for UK 230VAC mains power,
this will connect directly into the DC input on the rear of the monitor. This can be mounted in a
location of your choice or to the combined mounting bracket (XK0-472K) as detailed in
section 4.4
A universal plug in PSU (XK0-667) is also available, this can be purchased as an accessory
from Analox. To change plug type on this PSU follow the steps below.
Press clip and remove blanking cover
Select the correct plug type and insert into PSU as shown
This can now be connected directly into the SDA as shown in section 4.2.2 step 5
Document Ref: XK0-801-11- July 2014
Page 29
SDA
User Manual
To power two SDA monitors from one power supply, the following steps should be followed:
Cut a suitable length of
7/0.2mm red/black
twisted wire
Remove the 2 way connector
and bootlace ferrules from the
cable and strip back 7mm
Twist the red wire with the
white wire and then the two
black wires together as shown
and crimp with red and black
1.5mm bootlace ferrules as
shown
Crimp the free end of the
red/black twisted wires with red
and black 1.5mm bootlace
ferrules and connect to the two
way connector supplied with
the SDA
Connect the linked end
to the remaining two
way connector as
shown
The PSU is now ready
and can be connected
to two SDA monitors as
described in section
2.2.2 step 5
4.2.3
Protective Earth
Warning: The M4 stud next to the power connection must be connected to the local
protective earth to provide ESD and surge protection. This stud also provides the shield
connection to the sensor and data port cables and is required to maintain EMC performance.
4.2.4
Sensor and Data Wiring
The Sensor connector provides the power and communication link to any SDA sensor
attached. The Data connector will automatically control the SDA Output module if attached
otherwise this port will revert to a continuous data output stream that can be utilised by other
third party equipment for data logging purposes. See section 5.10 for detail on connection
baud rate and data formats.
The wiring for both sensor and output module should follow the arrangement in the following
figure:
Document Ref: XK0-801-11 - July 2014
Page 30
SDA
User Manual
Figure 16 – Sensor wiring
Note: For Temperature & Humidity probe wiring, wire colours are different as shown below,
but the functions are the same.
Document Ref: XK0-801-11- July 2014
Page 31
SDA
User Manual
4.2.5
Depth SDA pressure sensor power
The pressure sensor (Active type) supplied with a depth SDA requires an external 24VDC
supply. This can be powered through the supplied MEC 4-20mA module using the flying lead
coming from the module, this should be connected to the same terminal of the 2 way screw
terminal block as the 24VDC wire for the system as shown, the earth lead coming from the
Bulgin cable connector should be fitted to the M4 stud and secured with the M4 nut as shown.
Document Ref: XK0-801-11 - July 2014
Page 32
SDA
User Manual
4.3
Output Module Wiring
The SDA output module can be connected to the Data port on the SDA Monitor to provide an
analogue output of the sensor reading and the status of the alarms on the volt free contact
relays.
4.3.1
Output Module Connections Overview
Figure 17 – SDA output module connectors
Connector
Communications
Phoenix 5 way
(3.5mm pitch)
Analogue
Phoenix 3 way
(3.5mm pitch)
Relays
Phoenix 6 way
(3.5mm pitch)
Pin
1
Function
V+
2
3
4
RS485 A
RS485 B
RS485 Ref
5
1
2
3
1
2
3
4
5
6
VSinkCom
+Src
NC
COM
NO
NC
COM
NO
Comments
+5V DC supply input used to power the SDA
Output Module (max 300mA).
Differential TxD-/RxD- aka inverting pin
Differential TxD+/RxD+ aka non-inverting pin
Common reference signal to connect to SDA
Monitor (not used).
0V DC connection for the supply output
Passive analogue current connection
Common analogue current connection
Active analogue current connection
Relay 1 Normally Closed (NC) contact
Relay 1 common
Relay 1 Normally Open (NO) contact
Relay 2 Normally Closed (NC) contact
Relay 2 common
Relay 2 Normally Open (NO) contact
Document Ref: XK0-801-11- July 2014
Page 33
SDA
User Manual
4.3.2
Analogue Output
The analogue output may be configured by wiring to either the current sink (passive) or to the
current source (active). When configured as an active source the default drive voltage is
nominally +13V DC.
By use of a suitable load resistor with the active source connection, the unit may provide a
voltage output with full scale output configurable to over +12V DC depending on the value of
the resistor used. For 0-1V output, the resistor would be 50R, for 0-2V use 100R etc.
If an external current source is used, the unit should be wired as a current sink using pins 1
and 2, with the negative of the external source connected to pin 1. The drive voltage of the
external source should be no more than 48V due to the overvoltage protection diodes, but the
unit only requires a compliance voltage of less than 1V to properly control the output current.
If an external current sink is used (e.g., a simple analogue meter), the unit should be wired as
a current source using pins 2 and 3. In this case, the positive of the source is on pin 3. The
resistance of the external sink must be considered; as standard the unit is configured to drive
an external resistance up to at least 550R (greater than 12V compliance voltage).
4.3.3
Relay Outputs
There are two identical controllable relay outputs with a single change-over contact each, with
the COM (common) line connected to either NO (normally open) or NC (normally closed).
For true failsafe the NO-COM contact pair can be used to indicate an OK state when closed,
so that disconnections or open circuit cable faults will provide the fault state.
For details of the operational states of the relays when connected to an SDA see section
5.12.2.
Document Ref: XK0-801-11 - July 2014
Page 34
SDA
User Manual
4.4
Brackets
There are two brackets available for the SDA, one for only mounting the MEC oxygen sensor,
the other will fit the sensor, power supply and output module as required.
4.4.1
Fitting the MEC-only bracket
The MEC only bracket (XK0-473K) is suitable for mounting the MEC sensor to the rear of the
monitor. The MEC sensor must be fitted to the bracket before fitting the bracket to the rear of
the monitor. This is detailed in the steps below.
1) Bracket kit (XK0-
2) Remove MEC lid
4) Replace MEC lid
5) Secure with 3mm Hex key & M4 Nyloc nuts
3) Insert M4 screw
Screws
6) Finished assembly
The bracket and the MEC sensor can then be attached to the rear of the monitor as per the
steps below.
7) Remove 2 x M3 x 6mm Pozi Pan Screws
and Nordlock washers from rear of monitor
9) Secure bracket with 2 x M3 x 6mm Pozi-Pan
Screws and Nordlock washers
8) Align mounting hole with standoff
10) Connect MEC
sensor
11) Connect MEC sensor
earth to earth stud
Document Ref: XK0-801-11- July 2014
Page 35
SDA
User Manual
4.4.2
Fitting the combined MEC and power supply mounting bracket
The combined MEC and power supply bracket (XK0-472K), can be used to mount the
optional AC power supply, MEC sensor and/or an output module. Mount the bracket to the
monitor follow the steps below.
2) Align mounting hole with standoff
1) Remove 2 x M3 x 6mm Pozi Pan Screws
and Nordlock washers from rear of monitor
3) Secure in place with the 2 x M3 x 6mm Pozi Pan
Screws and Nordlock washers from rear of monitor
4.4.3
Fitting the MEC sensor to the rear of the bracket
1) Remove lid from
MEC
2) Insert the supplied M4 cap screws into each
mounting hole
4) Align M4 cap Screws
with standoffs
3) Replace MEC lid
5) Tighten the M4 cap Screws with a 3mm hex key
6) Connect the MEC
sensor
Document Ref: XK0-801-11 - July 2014
Page 36
7) Connect MEC
sensor earth to earth
stud
SDA
User Manual
4.4.4
Fitting the SDA output module to the bracket
1) Remove lid from
output module
2) Insert the supplied M4 x 8mm Pozi-Pan
Screws into each mounting hole
4) Tighten the M4 Pozi
Pan screws
5) Replace lid on
output module
6) Connect output module cable
4.4.5
3) Align screws with
standoffs
7) Connect output
module earth to earth
Fitting the external UK DC adaptor (XK0-662 only)
1) Align the PSU mounting holes with the four outer M4 threaded
inserts on the bracket
2) Secure in place with the supplied M4 x 8mm
Pozi Pan screws
3) Connect to the DC input on the rear of the
monitor
Document Ref: XK0-801-11- July 2014
Page 37
SDA
User Manual
4.4.6
Completed assembly of combined MEC and power supply mounting bracket
Figure 18 shows an overview of the combined bracket fitted with the MEC sensor, AC power
supply and SDA output module.
Figure 18 – Assembly with the combined mounting bracket
1)
2)
3)
4)
MEC sensor
Bracket
Optional UK AC power supply
Optional output module
Document Ref: XK0-801-11 - July 2014
Page 38
SDA
User Manual
4.5
Pipe work
Warning: Exhaust lines can produce back pressure at the sensor which will affect the sensor
reading. Keep this line as short as possible, e.g. less than 150 mm. It is acceptable to use no
exhaust tube if it is appropriate for the type of sample gas. The pressure of the sample gas
must be close to the ambient pressure otherwise damage may occur to the sensors and
sensor accuracies will be affected. The inlet flow rate to the sensors must be between 0.2 to
1.0 l/min, 0.5 l/min is recommended. When SDA flow meters are used the input pressures to
the meter must not exceed 6 bara.
4.5.1
MEC sensor pipe work
The MEC sensor is supplied with a two port flow adaptor. The tubing should be trimmed to the
correct length then the flow adaptor removed to fit the tubing onto the spigots.
Inlet
Outlet
1) Connect pipe work to
flow adaptor
2) Connect flow adaptor to the inlet of the MEC sensor
The MEC sensor sample input line can also be piped to a dedicated SDA flow adaptor unit or
connected to the exhaust of the SDA CO2 sensor module.
4.5.2
Carbon dioxide sensor module pipe work
The CO2 sensor module should be connected as per the following steps.
1) Remove bulkhead pipe securing nuts
3) Fit Gas Input and Exhaust
pipe-work to bulkheads
2) Fit securing nuts to pipes
4) Secure pipe work in
place with securing nuts
5) Finished connections
Document Ref: XK0-801-11- July 2014
Page 39
SDA
User Manual
5
5.1
Operation
Start-up
An SDA will automatically start up when power is supplied to it. Initially, the SDA will display
a splash screen which will be displayed for a few seconds after which the display will go blank
for up to 15 seconds. The SDA will then show the main display as described in section 5.2.1.
Upon start-up, an attached sensor may require a short time to warm up as described in
section 5.3.2.
Figure 19 – Start-up splash screen
Document Ref: XK0-801-11 - July 2014
Page 40
SDA
User Manual
5.2
Display
5.2.1
Main display screen
Under normal operation the SDA will display its main display screen. Figure 20 explains the
elements of the main screen for a single sensor SDA, Figure 21 explains the elements of a
dual sensor SDA.
Figure 20 – Main display overview
1)
2)
3)
4)
5)
6)
7)
Device identification label
Live sensor reading
Sensor type and display units
System status indicator
Alarm direction indicators
Alarm names
Alarm set-points
Document Ref: XK0-801-11- July 2014
Page 41
SDA
User Manual
Figure 21 – Main display overview
1)
2)
3)
4)
5)
6)
7)
Device identification label
Live sensor reading
Sensor type and display units
System status indicator
Alarm direction indicators
Sensor 1 alarm values
Sensor 2 alarm values
Document Ref: XK0-801-11 - July 2014
Page 42
SDA
User Manual
5.2.2
System status indicator
The system status indicator shows the current status of the SDA system. If any alarm
condition has been identified then the system status indicator will turn red and display the
word ‘Alarm’. If any system fault is identified then the status indicator will turn yellow and
display the word ‘Fault’. In no current alarm or fault conditions have been identified then the
system status indicator will turn green and display the word ‘OK’. Figure 22 shows the
different system status indicator states.
Figure 22 – System status indicator
5.2.3
Device identification label
At the top of the main display screen is the device identification label. By default this label
indicates the type of SDA as shown in Figure 23. An SDA can be configured using the SDA
software to display a custom identification label. This can be used to help identify individual
units in a large panel. Figure 24 shows an example of a custom identification label. For
instructions on how to configure the identification label see section 6.3.1.
Figure 23 – Default device identification label for an SDA – O2
Figure 24 – Example of a custom identification label
5.3
5.3.1
Sensor readings
Sensor reading update
When a sensor is attached to an SDA a live reading from the sensor will be displayed in the
centre of the main display. This reading will be updated on the display once per second. If no
valid sensor reading is currently available then three dashes (‘---‘) will be shown instead.
5.3.2
Sensor warm-up
Under certain circumstances, when the digital sensor attached to the SDA cannot display a
valid reading then the display will show that the sensor is in a warm-up state. Warm-up occurs
when the SDA is initially powered up and may last 10 to 60 seconds depending on the sensor
type attached. Under certain circumstances the sensor may enter a warm-up state whilst it
processes information such as after a calibration adjustment has been attempted or when a
sensor is re-connected after being disconnected. Whilst in a warm-up state, the display
reading is shown as three dashes (‘---‘) and a warm-up processing animation is displayed
(Figure 25).
Document Ref: XK0-801-11- July 2014
Page 43
SDA
User Manual
Figure 25 – Example of a sensor that is in a warm-up state
5.4
Alarms
Each SDA comes with two alarms defined for each sensor attached. Each alarm is defined by
a set-point and a direction. The name, set-point and direction of both alarms are shown on the
main display screen as shown in Figure 20 and Figure 21. Every second, as the sensor
reading is updated, each alarm is checked against the current reading. For high-going
direction alarms, an alarm condition will be triggered if the sensor reading is greater than the
alarm set-point. Conversely, for low-going direction alarms, an alarm condition will be
triggered if the sensor reading is less than the alarm set-point.
Figure 26 – A low-going alarm that has been triggered
When an alarm condition is identified the horn will immediately sound and the system status
indicator will flash, coloured red, showing the word ‘alarm’. In addition the sensor reading will
be displayed, coloured red, and the set-point for the alarm that has been triggered will be
highlighted. Figure 26 shows an example of a low-going alarm that has been triggered by a
low oxygen reading.
Document Ref: XK0-801-11 - July 2014
Page 44
SDA
User Manual
Figure 27 – Example of two high-going alarms
In cases where two alarms with the same direction are defined, the horn and alarm status will
be triggered when the first alarm condition is met. If the sensor reading continues in the same
direction and the second alarm condition is met then both alarm conditions will be shown as
triggered. Figure 27 shows an example of two high-going carbon dioxide alarms.
If the first alarm is triggered and the horn is subsequently muted, the horn will be re-activated
if the second alarm is triggered.
Figure 28 - Example of active alarms on dual sensor system
5.4.1
Muting alarms
When an alarm condition is triggered and the horn sounds, the horn can be muted by
pressing the red mute button. This will mute the horn in all occasions where the horn is
activated. In addition, when an alarm is muted, the system status indicator on the display will
stop flashing and will instead be shown in solid red to indicate that the alarm has been
acknowledged.
5.4.2
Clearing alarms and hysteresis
To avoid nuisance re-triggering of alarms when a sensor reading is fluctuating around an
alarm set-point, each alarm has a hysteresis band applied to it. This hysteresis applies to the
clearing of an already triggered alarm. An alarm will always trigger immediately when the
sensor reading passes the set-point in the correct direction. However, when the sensor
returns in the opposite direction through the same set-point, it must go an amount beyond the
set-point before the alarm will clear. This extra amount required to clear an alarm is the
alarm’s hysteresis. Figure 29 shows an example of a hysteresis band on a high going alarm.
Document Ref: XK0-801-11- July 2014
Page 45
SDA
User Manual
The hysteresis applied to an alarm is adjusted automatically based on the value of the alarm
set-point. Hysteresis for each sensor range is defined by a percentage of set-point and a
maximum hysteresis value. The hysteresis applied to the alarm is the smaller of the two
values for a particular set-point.
Figure 29 - Hysteresis band on a high going oxygen alarm
5.4.3
Latching alarms
Alarms can operate in either latching or non-latching mode.
With latching alarms disabled, if an alarm is triggered and sensor reading subsequently
returns to a level that would not trigger the alarm, the visual and audio indicators will be
cancelled as soon as the reading passes the hysteresis point (see section 5.4.2).
With latching alarms enabled, if an alarm is triggered and the sensor reading subsequently
returns to a level that would not trigger the alarm, the visual and audio indicators will continue
until the mute button is pressed to acknowledge the alarm. Once acknowledged, the visual
and audio indicators will be cancelled. Whilst latching is enabled, if an alarm is acknowledged
by pressing the mute button prior to the sensor reading passing back through the alarm setpoint then the visual and audio indicators will be cancelled as soon as the reading passes the
hysteresis point (see section 5.4.2).
For instructions on how to set the latching alarms option see section 6.3.1.
5.4.4
Alarm reminders
In situations where it is important that alarm conditions are not missed, the alarm reminder
feature can be enabled. Reminders will re-trigger the horn for an alarm condition if the
condition is not cleared after a specified time. The horn will be re-triggered even if it has
previously been muted. The horn will not be retriggered once the sensor reading reaches a
level that no longer triggers the alarm.
Document Ref: XK0-801-11 - July 2014
Page 46
SDA
User Manual
For instructions on how to set the alarm reminder option and reminder timeout see section
4.3.2.
5.4.5
Adjusting alarm set-points
Each of the SDA’s alarm set-points can be individually adjusted to suit the monitoring
application. To adjust a set-point, first select the alarm to adjust by pushing and holding the
alarm-adjust toggle switch in the direction of the chosen alarm (up for higher alarm, down for
lower alarm - Figure 30).
Note: For dual sensor devices, the left toggle switch is used to adjust the first sensor’s alarms
and the right toggle switch is used to adjust the second sensor’s alarms.
Note: The alarm-adjust toggle switch must be held in the chosen state until the new set-point
is confirmed. Releasing the switch prior to confirmation will return the set-point to its original
value.
Figure 30 - Selecting an alarm to adjust
When the alarm-adjust toggle switch is held in the adjustment position, the alarm adjustment
panel will be shown in place of the alarm set-points panel (Figure 31 - 1) showing the name of
the alarm to be adjusted and the current alarm set-point, coloured yellow.
Using the adjustment knob, the set-point can be adjusted by rotating the knob clock-wise to
increase the set-point and anti-clockwise to decrease the set-point (Figure 31 - 2).
Once the desired new set-point is shown, press the set button to confirm the value. Once
confirmed the set-point number displayed will turn green (Figure 31 - 3). Once the new setpoint is confirmed, alarm-adjust toggle switch can be released. The alarm set-points panel will
return to the screen showing the new value for the alarm set-point which was adjusted.
Figure 31 - Example of alarm set-point adjustment
Document Ref: XK0-801-11- July 2014
Page 47
SDA
User Manual
5.5
Calibration adjustment
Whilst in use, an SDA’s sensor should be periodically calibrated at intervals deemed
necessary for the monitoring application by exposing the sensor to gas of a known
concentration. Calibration adjustments of the sensor’s output can be made where necessary
as follows.
Note: For certain sensors (such as the temperature and humidity sensor), it is not possible to
perform a user calibration adjustment. Where this is the case, the calibration feature will not
be available for the sensor.
Each sensor’s output is defined by two calibration points, one low and one high. To perform a
successful calibration adjustment, both low and high calibration points should be adjusted.
Note: The high and low calibrations performed on a sensor should be selected appropriately.
Some sensors (e.g. carbon dioxide) require that the low calibration is a true zero calibration
adjustment. For these sensors, a gas with a known zero concentration of the target gas
should be used. For other sensors where the low calibration adjustment is not restricted, a
high and low calibration adjustment value should be selected. The selected gas
concentrations should best reflect the range over which the sensor is intended to be used for
greater reading accuracy.
Note: When calibrating the CO sensor, care should be taken when selecting the calibration
gas used. The balance or background gas can have an effect on the sensor reading. See
section 3.3.3.1 for details of calibration gas selection for Co version.
Typically, a % oxygen sensor (MECO2ABBP) monitoring a sample line in a saturation diving
scenario, at a depth of 200msw, and maintaining an oxygen partial pressure of 400mbar
ppO2, the analyser is expected to read 1.90%. Therefore the high calibration gas in such a
case is likely to be chosen between 3 and 5% oxygen in helium, which ensures that the
analyser is calibrated close to the point of interest. It is vital that at shallower depths, the
analyser is recalibrated, since any errors at this calibration point will be magnified at shallower
depths, when the oxygen content is higher. Note that the MEC and the SDA CO2 sensor
modules contain an atmospheric pressure sensor which will automatically compensate for
pressure effects on the gas during calibration (observe safety warnings on helium ingress,
see section Error! Reference source not found.).
To calibrate the partial pressure oxygen sensor (MECO2ABAP) the operator must enter the
correct partial pressure gas value at the SDA Monitor. If the sensor is in a hyperbaric
atmosphere, for example in a Saturation Dive Chamber this value may be derived from other
sensors monitoring the chamber. If the sensor is at atmospheric pressure and bottled
calibration gas is used then the certified partial pressure value of the calibration gas must be
calculated by the operator when the calibration step is performed. Note that the partial
pressure MEC O2 sensor does not include automatic atmospheric pressure compensation.
A gas containing 50% O2 would be equivalent to 500mbar at the sensor under exactly 1bara
atmosphere. The operator must adjust the calibration value according to the current
atmospheric pressure, so for this gas if the pressure is 1017mbara, (1.017bara) then
multiplying 500mbar by 1.017 will determine that 508.5mbar of O2 will be present at the
sensor. The operator can enter this compensated value during the calibration step, see
below.
Document Ref: XK0-801-11 - July 2014
Page 48
SDA
User Manual
5.5.1 Performing an adjustment
To perform a calibration adjustment, first expose the sensor to the appropriate calibration gas
of known concentration. The sensor should be allowed to settle for a period of time so that the
sensor reading can stabilise. This will depend on both the settling time of the sensor and on
the length of pipe-work and the flow rate of gas between the gas source and the sensor.
Once the sensor reading has settled for the applied calibration gas, the calibration adjustment
can begin by pushing and holding the Calibration toggle switch in the direction of the
calibration point to be adjusted (up for high calibration adjustment, down for low calibration
adjustment).
Figure 32 - Calibration adjustment
With the toggle switch held, the calibration value entry panel will be shown (Figure 32-1) with
the value coloured blue. Rotating the adjustment knob allows the calibration value to be
increased or decreased. The adjustment knob should be rotated until the known
concentration of the calibration gas is displayed.
Note: The calibration value that can be entered is limited to zero as a minimum value and the
maximum range of the sensor plus 10% for the maximum calibration value. For certain
sensors (e.g. carbon dioxide) the low calibration must be performed with zero concentration of
the target gas. In these cases the calibration adjustment value cannot be changed by rotating
the adjustment knob and the display will show the word ‘zero’.
To begin the calibration adjustment process, press the set button. If the calibration toggle
switch is released at any time before the set button is pressed then the adjustment will be
aborted.
Once an adjustment has begun the sensor will take a moment to process the adjustment
request (Figure 32-2) and will decide whether the value supplied is reasonable. See
troubleshooting (Section 7) for possible invalid calibration conditions.
If a calibration adjustment is accepted then a ‘Calibration OK’ message will be shown (Figure
32-3). Should an adjustment request be rejected then a ‘Calibration failed’ message will be
shown instead (Figure 32-4). Both of these messages can be cleared by pressing the mute
button.
After any calibration adjustment request is processed, the sensor may enter a warm-up state
for a few seconds during which time the sensor reading will not be available.
Document Ref: XK0-801-11- July 2014
Page 49
SDA
User Manual
Note: The calibration adjustment window can also be accessed from the main menu. For dual
sensor systems with sensors that can be user calibrated, this is the only way to access the
calibration adjustment feature.
5.5.2 Calibration adjustment reminders
For situations where regular calibration adjustments are performed, a useful reminder can be
enabled using the SDA software. For instructions on how to enable and configure the
calibration adjust reminder feature see section 6.3.2.
When enabled, the SDA will show a flashing reminder below the sensor reading when a
calibration adjustment is due (Figure 33). The reminder is displayed when the time since the
last full high and low calibration adjustment was performed exceeds the reminder period
specified when the feature is enabled. If the feature is disabled, no reminder will be displayed.
A calibration adjustment reminder will only be cleared once a both a high and low calibration
adjustment have been performed. Both adjustments should be performed with as little time
between as possible. If not performed together, the calibration adjustment reminder will be
shown based on the time of the earlier of the two adjustments.
Figure 33 - A calibration adjustment reminder
Document Ref: XK0-801-11 - July 2014
Page 50
SDA
User Manual
5.6
Menu
The device main menu can be accessed from the main screen by pressing the set button.
The sensor reading shall remain in screen whilst the menu is display as show in Figure 34.
Figure 34 - The main menu
The highlighted menu option can be changed by rotating the adjustment knob. Clockwise
moves the cursor downwards and anti-clockwise moves it upwards. An arrow at the top or
bottom of a menu indicates that there are more menu options above or below those currently
shown.
To select a menu item, highlight it and press the set button. Depending on the menu item
selected, the selected action will be performed or a sub-menu will be displayed. Figure 34
shows the main menu with the backlight menu item highlighted. Pressing set displays the
backlight sub-menu as shown in Figure 35 which shows that a backlight value of 40% has
been selected. Pressing the set button will set the display backlight to 40%. The backlight
menu will remain on-screen and can be closed by selecting exit or by pressing the mute
button.
Figure 35 - The backlight sub-menu
Document Ref: XK0-801-11- July 2014
Page 51
SDA
User Manual
Selecting the back option from a sub-menu will return to the previous menu level. The mute
button can be pressed at any time whilst using the menu to return to the main screen.
5.7
Adjusting the backlight
The brightness of the SDA display can be changed to suit the lighting conditions of its location
by adjusting the backlight intensity. To adjust the backlight level, enter the main menu and
select ‘Backlight’. Next select the desired backlight intensity level (10-100%) from the menu.
Note: Due to the nature of the display technology, the maximum intensity of the display will
slightly degrade over the lifespan of the product. For new systems it is recommended that the
backlight is set to an initial intensity level of 60% or less to maximise the lifespan of the
display.
5.8
Viewing device information
To view a range of information about an SDA including serial number, enabled options and
attached peripherals access the main menu and select the ‘Information’ option. This will
display the device information screen (Figure 36). To close the information screen and return
to the main screen, press the mute button.
Figure 36 - The device information screen (single and dual sensor systems)
5.9
Data-logging
If the data-logging feature is enabled on an SDA then it will maintain a log of system and
sensor data whenever the device is powered up. Data is logged every 10 seconds and
includes the system status, average, minimum and maximum readings for the 10 second
period. An SDA operates a 90 day rolling log. Once 90 days worth of data is collected, the
oldest day’s data will be deleted so only the most recent 90 days are recorded.
Data can be downloaded into daily log files in .CSV (comma-separated values) format for
easy import into popular spreadsheet applications. For instructions on downloading data-log
files see section 6.4. An example of a typical data log file is shown below.
Date
28/02/2011
28/02/2011
28/02/2011
28/02/2011
Time
14:34:10
14:34:20
14:34:30
14:34:40
Status
OK
OK
OK
Fault
Document Ref: XK0-801-11 - July 2014
Page 52
Units
ppm
ppm
ppm
ppm
CO2 Average
397
398
401
CO2 Max
399
400
402
CO2 Min
395
398
400
SDA
User Manual
5.10 Changing network parameters
From the main menu select the Network menu, then the Parameters sub menu, here the user
can change the IP address of the monitor so that they can connect to their own network.
Using the encoder to change the values in each parameter, use the SET button to toggle
through each parameter and edit, use the SET button to move through until Save is reached,
use the encoder to change to Yes and then press the Mute button to confirm. The system will
then reboot with the new IP address.
5.11 Serial data output
Under normal operation, without an output module attached to the device (see section 5.12),
an SDA will continuously output information about the current system status and sensor
reading via the data port. The data is output via an RS485 serial stream in a readable ASCII
format. For details of how to make a correct physical connection to the data port in order to
collect the output data see section 4.3. The set-up parameters for an external system to
correctly receive the output data are as follows.
BAUD rate:
Date bits:
Parity:
Stop bits:
Flow control:
9600
8
None
1
None
The format of the data output stream is a comma-delimited ASCII character string terminated
by a carriage return character (0Dh) and a line feed character (0Ah). A terminated character
string is output once per second. This stream is designed to be read and displayed by a
terminal program, written to a text file for data-logging or captured by a third party software to
be interpreted and used in external applications. The comma delimited nature of the string
Document Ref: XK0-801-11- July 2014
Page 53
SDA
User Manual
allows it to be easily logged to a .CSV file for simple import into popular spreadsheet
applications.
The content of each terminated string consists of the following:
•
•
•
•
•
•
•
Date (YYYY-MM-DD)
Time (HH:MM:SS)
System status (OK or Fault)
The units type of the sensor data to follow (%, ppm, etc)
The average sensor reading
The minimum sensor reading since the last data string
The maximum sensor reading since the last data string
The following shows two examples of typical data strings. The second shows a fault condition
in which case the sensor readings are not shown.
2011-03-23,09:49:31,OK,ppm,625,625,625↵
2011-03-24,10:36:12,Fault,%, , , ↵
Note: For a dual sensor device, the output message is extended with the second sensor’s
data appended. For example:
2011-03-23,09:49:31,OK,C,25.4,25.3,25.5,%,35,35,36↵
2011-03-24,10:36:12,Fault,%, , , ↵
5.12 Output module
To expand a single sensor SDA to provide relays and an analogue output, an optional Analox
output module can be connected to the system.
Note: The output module can only provide analogue and relay output for one sensor. If
attached to a dual sensor unit, the output module will provide outputs for the first sensor only.
5.12.1 Connecting an output module
To connect an output module, the SDA should first be disconnected from the DC power
supply. The output module communication cable should be connected to the Data port on the
rear of the SDA (see section 4.2.4 for instructions on connecting to the Data port).
When power is applied to an SDA with an output module is connected it will automatically
recognise that the module is connected. A few seconds after the main screen is shown on
start-up, the output module will begin to reflect the sensor reading and alarm status. The
connection status of an output module can be viewed on the information screen (see section
5.8).
5.12.2 Relays
An output module provides two relays. Each relay is mapped to one of the SDA alarms. Relay
1 is mapped to the lower alarm and Relay 2 is mapped to the higher alarm (Figure 37). If an
alarm is not active then its corresponding relay will be in the energised state (connection
between Com and NO is made). If an alarm is triggered then the corresponding relay will
switch to the de-energised state (connection between Com and NC is made).
Document Ref: XK0-801-11 - July 2014
Page 54
SDA
User Manual
Figure 37 - Alarm relay mapping
If any system fault is detected then both relays will switch to their de-energised alarm states
to correspond with the fault alarm that is raised for a system fault.
5.12.3 Analogue output
The output module’s analogue output is used to reflect the SDA’s sensor reading. The
nominal range of the output current is 4-20mA (see section 4.3 for connection details). This
range corresponds to the range of the sensor attached. For example, for a 5000ppm ranged
carbon dioxide sensor, 0ppm carbon dioxide measured will correspond to an output of 4mA
and 5000ppm carbon dioxide measured will correspond to an output of 20mA.
If any system fault is detected then the analogue output will output a current beyond the
20mA upper range of the sensor range (approx. 22mA) to correspond with the fault alarm that
is raised for a system fault.
5.12.4 Communication & power faults
If a faulty or intermittent connection exists between an SDA and an output module whilst the
output module remains powered then the output module will assume a fault and set its relay
and analogue output to their fault states as described above.
If power to an output module is lost, the relays will return to a de-energised alarm state and
the analogue output will output 0mA.
5.13 Power modes
When connected to a DC power supply, and SDA device will start up automatically and
remain powered whilst connected.
5.13.1 Sleep mode
An SDA can be switched into a sleep mode which will allow the device to remain powered but
silent. No alarms will be raised whilst in sleep mode. Also in sleep mode, the display will be
powered down and any data-logging enabled will be paused. The unit and sensors will remain
powered to allow for a quick wake-up from sleep mode. All buttons except for the set button
will be disabled whilst in sleep mode.
To switch the device into sleep mode, access the main menu (see 5.6) and select “Power...”
followed by “Sleep”.
To wake the device from sleep mode, press the set button. The display will be switched on,
monitoring for alarms will begin again and data-logging will re-commence.
Document Ref: XK0-801-11- July 2014
Page 55
SDA
User Manual
5.13.2 Restarting
To prompt a full reboot of an SDA device, access the main menu (see 5.6) and select
“Power...” followed by the “Restart...” option. This option will ask for confirmation. Selecting
yes will force the system to restart.
5.14 Cell replacement reminder
For SDA sensors which use electrochemical technology, such as the MEC sensor, the
electrochemical cell part of the sensor needs to be periodically replaced as the cell depletes.
To aid with the timely replacement of cells the SDA provides a cell replacement reminder
feature. This feature is only available for sensors which require cell replacement (e.g.
oxygen). Sensors which do not use electrochemical technology (e.g. carbon dioxide) do not
use this feature.
The cell replacement reminder feature can be enabled or disabled using the SDA software as
described in section 6.3.2.
If the cell replacement feature is enabled and the sensor is an electrochemical type, the SDA
will show an onscreen warning when the cell is due to be replaced as shown in Figure 38.
The cell replacement reminder is shown once the number of days that have elapsed since the
cell was last replaced exceeds the cell replacement reminder period defined using the SDA
software.
Figure 38 - Sensor change reminder
The cell reminder period can be adjusted using the SDA software to suit expected sensor
usage. For example, some oxygen cells are expected to last for 2 years in atmospheric levels
of oxygen. However, oxygen cells will deplete faster if they are exposed to higher levels of
oxygen, so if the sensor is expected to be exposed to higher levels of oxygen over its service
then the reminder period can be shortened in order to serve as a reminder that the cell is
expected to age more quickly.
Note: The cell replacement feature is intended to be used only as a guide and cannot
accurately determine the lifespan of a cell. If a sensor becomes difficult to calibrate after a
period of time in service then it should be replaced regardless of the reminder status.
5.14.1 Replacing a cell and resetting the reminder
Once an electrochemical cell has been replaced (see section 8.1), the cell replacement
reminder will continue to be shown and needs to be manually reset. For SDAs which use
Document Ref: XK0-801-11 - July 2014
Page 56
SDA
User Manual
electrochemical sensors, this warning can be reset from the SDA menu. To do this open the
main menu and select ‘Replace cell...’. Select the sensor to reset and confirm the action.
Upon confirmation, this will store the current date as the date on which the cell was last
replaced.
Document Ref: XK0-801-11- July 2014
Page 57
SDA
User Manual
6
Configuration
In order to set options on an SDA, the SDA software is provided to allow a device to be
configured using a USB connection. The SDA software is designed to run on Microsoft
Windows®.
6.1
Software installation
Note: Before connecting an SDA to a computer, the appropriate software should be installed.
6.1.1
Software requirements
The SDA software is designed to run on Microsoft Windows® and has the following
prerequisites:
•
•
•
•
6.1.2
Microsoft Windows XP®, Windows Vista® or Windows 7®
Microsoft .NET Framework 3.5 SP1 or later
Microsoft ActiveSync® 4.5 or later (Windows XP® only)
Microsoft Windows Mobile Device Centre 6.1 or later (Windows Vista® & Windows
7® only)
Windows® XP Installation
To install the SDA software on Windows XP®, perform the following steps.
1) Unplug all unnecessary USB devices from the computer.
2) If not already installed, install Microsoft ActiveSync® 4.5 or later. This software is
available as a free download from the Microsoft Download Centre
3) If installing from the SDA software CD, insert the disc into the CD drive.
4) Connect the SDA to the computer using the USB cable and switch on the SDA.
5) Windows will pop up a message stating that it has found new hardware.
6) The ‘Found New Hardware Wizard’ window will be shown.
7) Select ‘No, not this time’ and click ‘Next’.
8) On the next screen, select ‘Install from a list or specified location (Advanced)’ and
click next.
9) On the next screen, select ‘Search for the best drivers in these locations’, uncheck
‘Search removable media’ and check ‘Include this location in the search.
10) Click ‘Browse’ and locate the SDA driver folder. This will be the folder named ‘Drivers’
on the SDA software disc. Click ‘Next’ to begin installation.
11) The SDA drivers will be installed. This may take a few moments. When the
installation is complete, click ‘Finish’.
12) The device should automatically connect to ActiveSync and may pop up the
ActiveSync window. This window can be closed.
Document Ref: XK0-801-11 - July 2014
Page 58
SDA
User Manual
13) From the SDA software disk, run the installer file called ‘Setup’.
14) The installer will check that the .NET Framework 3.5 SP 1 is installed. If not you will
be prompted to allow the framework to be installed. Alternatively the .NET Framework
is available as a free download from the Microsoft Download Centre
15) Once the installer is satisfied that the .NET Framework is installed, the SDA installer
wizard will be displayed. Follow the on-screen instructions to install the SDA software.
6.1.3
Windows® Vista & Windows® 7 Installation
To install the SDA software on Windows® Vista or Windows7 ®, perform the following steps.
1) Unplug all unnecessary USB devices from the computer.
2) If not already installed, install Microsoft Windows Mobile Device Centre 6.1 or later for
the appropriate version of Windows. This software is available as a free download
from the Microsoft Download Centre. Ensure that the appropriate 32bit or 64bit
download is selected for your version of Windows®.
3) If installing from the SDA software CD, insert the disc into the CD drive.
4) Connect the SDA to the computer using the USB cable and switch on the SDA.
5) Windows will pop up a message box stating that it is attempting to install drivers.
Windows will fail to find drivers for the device.
6) Access the system properties window by clicking on the Windows start menu, rightclicking on ‘Computer’ and selecting properties.
7) On the system properties window, click ‘Advanced system settings’.
8) Select the ‘Hardware’ tab and click ‘Device Manager’.
Document Ref: XK0-801-11- July 2014
Page 59
SDA
User Manual
9) In the device manager window, locate ‘YELLOW’ under ‘Other devices’. Right click
this and select ‘Properties’.
10) Select the ‘Driver’ tab and click ‘Update Driver...’.
11) Click ‘Browse my computer for driver software’.
12) Click ‘Browse’ and locate the SDA driver folder. This will be the folder named ‘Drivers’
on the SDA software disc. Click ‘Next’.
Document Ref: XK0-801-11 - July 2014
Page 60
SDA
User Manual
13) Click ‘Install this driver software anyway’ when prompted.
14) The SDA driver will then install.
15) When complete, the Windows Mobile Device Centre main window may pop up. This
window can be closed. Accept the Windows Mobile Device Centre user agreement if
prompted.
16) From the SDA software disk, run the installer file called ‘Setup’.
17) The SDA installer wizard will be displayed. Follow the on-screen instructions to install
the SDA software.
6.1.4
Installation troubleshooting
If the SDA drivers fail to install, please try the following:
•
•
•
Disconnect any USB devices from the computer that are not required.
Ensure that ActiveSync or Windows Mobile Device Centre are installed before
attempting to install drivers.
Sometimes users can experience problems connecting a device on Windows XP.
When this happens, ActiveSync does not recognise a connection to the device. To
correct this, select ‘Add or Remove Programs’ from the Windows control panel.
Choose to remove Microsoft ActiveSync. After this is removed, browse to C:\Program
Files and delete the ActiveSync folder. Restart the computer and reinstall ActiveSync
using the installer.
Document Ref: XK0-801-11- July 2014
Page 61
SDA
User Manual
6.1.5
Running the software
To run the SDA software, select the program from the Windows® start menu, Analox folder.
When the software runs without a device connected, the window shown in Figure 39 will be
displayed.
Figure 39 - SDA software without device connected
6.2
Making a connection
Note: The SDA software uses Microsoft ActiveSync® to communicate with an SDA. Before
connecting to an SDA, ensure that any other windows mobile devices or devices which make
use of ActiveSync® are disconnected from the computer.
Always connect only one SDA to the computer at a time. To connect an SDA to the computer,
connect one end of the USB cable provided to the SDA PC port on the rear panel and
connect the other end of the cable to a free USB port on the computer. Power the SDA device
and allow it to start up.
Once connected and powered, Windows® should detect the device and display an
information bubble confirming the connection. On the first time connecting an SDA to the
computer, message bubbles may be shown explaining that device drivers are being installed.
This should take a few moments.
When the device connects, on Window XP® systems, the ActiveSync window will pop up.
This window should be closed. On Window 7® systems, the Windows Mobile Device Center
window will be shown. This window should be closed.
If not already open, run the SDA software. The SDA software will recognise the device and
read the current settings form the device. Once fully connected the window shown in Figure
40 will be displayed.
6.2.1
Connection troubleshooting
If the SDA fails to connect, please try the following:
•
•
•
•
•
•
Disconnect the SDA from the computer
Fo to the folder C:\Program Files|Microsoft ActiveSync\Drivers and look for the file
called wceusbsh.sys
Select this file, copy it and paste it into the following folder
C:\Windows\System32\drivers
Restart the computer
When restarted, connect the powered up SDA to the computer
Follow the user manual instructions for installation of the device drivers. This time the
installer should locate the correct file and install correctly
Document Ref: XK0-801-11 - July 2014
Page 62
SDA
User Manual
6.2.2
Disconnecting
To disconnect an SDA from the computer, first wait until all settings have been saved
correctly and that any file downloads have completed then remove the USB cable from the
computer.
6.3
Changing options
On connection to an SDA, a copy of all of the device’s options is created in the SDA software.
The options are presented over a set of tabs. To view the options tabs, click the ‘Options’
button. Using these tabs the options can be viewed and modified as required. No changes are
made to the device’s options until the changes are applied to the device. To apply any
changes made click the ‘Apply Changes’ button (shown in Figure 40). This will upload the
new options to the device. The SDA will confirm that the options have been saved by playing
a confirmation sound.
Any changes made to options can be discarded as long as they have not yet been applied to
the device. To re-download the current device settings form an SDA, click the ‘Read Options’
button (shown in Figure 40).
Figure 40 - SDA software with device connected showing general options
6.3.1
General options
The general device options are displayed by clicking on the ‘General’ tab. Figure 40 shows
the general options.
Custom label
A custom label can be enabled by checking the ‘Custom label’ checkbox. If enabled, a custom
text label can be added to the text box. This will instruct the SDA to display a custom text
label on its main screen as described in section 5.2.3.
If the custom label checkbox is unchecked then the device will show a default label which will
be the configuration type (e.g. ‘Oxygen’).
Document Ref: XK0-801-11- July 2014
Page 63
SDA
User Manual
Latching alarms
The latching alarms checkbox enables or disables latching alarms as described in section
5.4.3.
Repeating alarms
The repeating alarms checkbox enables or disables the alarm reminder feature as described
in section 5.4.4. If the repeating alarms feature is enabled, an alarm repeat interval should be
set. This defines the time in seconds before a muted alarm will be re-triggered. Setting this
value to zero will automatically disable the feature.
Date and time
The ‘Set Time...’ button can be used to set the date and time on the device as described in
section 6.5.
Setting IP address
The IP address can also be changed from within the PC Tool as well as on the instrument
itself. Under the General tab, in the IP Address box, enter the new IP address of the
instrument, then click Apply Changes.
Note: Any changes made to the general options will not come into effect on an SDA device
until the ‘Apply Changes’ button has been clicked with the exception of setting the date and
time (see section 6.5).
6.3.2
Reminder options
The reminders options are displayed by clicking on the ‘Reminders’ tab. Figure 41 shows the
reminders options.
Document Ref: XK0-801-11 - July 2014
Page 64
SDA
User Manual
Figure 41 - Reminder options
Calibration reminder
The ‘Calibration adjust reminder’ checkbox enables or disables the calibration adjust reminder
as described in section 5.5.2. If the calibration adjust reminder feature is enabled, a reminder
interval should be set. This defines the time in hours since the last full calibration adjust
before a calibration adjust reminder will be displayed on the SDA. Setting this value to zero
will automatically disable the feature.
Cell replacement reminder
The ‘Cell replacement reminder’ checkbox enables or disables the cell replacement reminder
as described in section 5.14. If the cell replacement reminder feature is enabled, a reminder
interval should be set. This defines the time in days since the cell was last replaced before a
cell replacement reminder will be displayed on the SDA. Setting this value to zero will
automatically disable the feature.
Note: For sensors where there is no cell to replace such as carbon dioxide, this feature will
not be available and cell replacement reminders will not be shown on the SDA. This feature
applies only to sensors with electrochemical cells which deplete over time.
6.4
Downloading data logs
If an SDA is enabled with internal data-logging then the data stored on the device can be
downloaded using the SDA software. To view the data-log management controls, click the
‘Logs’ button (Figure 42). If data-logging is enabled on the device, a list of the data-log files
available on the device will be shown. This list will be empty if data-logging is not enabled.
The data-log files are stored by date. Each date’s file contains all of the data logged whilst the
device was running during a particular day. This list can be refreshed by pressing the
‘Refresh’ button.
Document Ref: XK0-801-11- July 2014
Page 65
SDA
User Manual
Figure 42 -The data logs available on a connected SDA
Data-log files can be downloaded individually or in batches. To select the files that are to be
downloaded, click on the checkbox next to each of the files of interest. The ‘All’ and ‘None’
buttons can be used to select or deselect all of the files respectively. Once a selection has
been made, the log file download can be started by clicking the ‘Download’ button. Figure 43
shows a selection of files being downloaded.
Note: The time taken to download data logs will vary depending on the number of log files
selected and the amount of log data inside each file. This process may take several minutes.
It’s should also be noted that downloading a full data log may download up to 50MB of log
data. Please ensure that there is enough storage space on the target disk before beginning a
download.
Document Ref: XK0-801-11 - July 2014
Page 66
SDA
User Manual
Figure 43 - Downloading data logs from an SDA
Although the internal data-logging operates a rolling log with automatic cleanup of older data,
the data-logs on the device can be managed manually using the SDA software. To delete
unwanted files from a device, select the files for deletion and click the ‘Delete’ button.
6.5
Setting the time
The SDA’s internal date and time is used for data-logging and for issuing various reminders.
The internal clock can be set to the appropriate date and time using the SDA software. With
an SDA connected to the SDA software, select the ‘General’ tab. Click the ‘Set Time...’
button. This we display the window shown in Figure 44. The default time shown will be the
system date and time of the computer running the software. This date and time can be
changed if required. To set the date & time on the device click OK. The SDA will play a sound
to acknowledge that the date and time have been set successfully.
Figure 44 - Setting the date and time on an SDA
Document Ref: XK0-801-11- July 2014
Page 67
SDA
User Manual
7
7.1
Troubleshooting
Fault conditions
An instrument constantly monitors itself for fault conditions. Any fault conditions that are
identified will trigger a fault alarm. When a fault alarm is raised, the horn will sound
immediately. Faults will be indicated on the display by flashing the system status indicator in
yellow as shown in Figure 45. Fault alarms can be muted in the same way as standard alarms
by pressing the mute button. When pressed, the horn will deactivate and the system status
indicator will be shown as solid yellow to indicate that the fault has been acknowledged.
All fault alarms are latching so if an intermittent fault is indentified and subsequently cleared,
the alarm will continue to be displayed and sounded until the mute button is pressed to
acknowledge the fault.
Information about the fault condition identified is displayed below the sensor reading as
shown in Figure 45 in which a sensor communication fault is shown. In cases where a fault
prevents a valid reading from being obtained from a sensor then the reading will not be shown
on the display and will instead be replaced by ‘---‘.
Figure 45 - A system showing a fault condition
7.2
Fault logging
All instances of fault conditions that are identified will be logged to the instrument’s
diagnostics log. Both the point at which the fault is indentified and the point at which the fault
is cleared will be logged. The diagnostics log can be downloaded using the SDA software. To
download the log, connect to the device as described in section 6. Access the ‘Advanced’ tab
and click ‘Download diagnostics log...’. This will give the option to specify a save location for
the log file.
Document Ref: XK0-801-11 - July 2014
Page 68
SDA
User Manual
7.3
Problems and actions
Problem
‘Sensor comms fault’ shown on the
display.
‘Sensor range fault’ shown on the
display
‘Sensor fault’ shown on the display
‘Sensor fatal error’ shown on the display
‘Net Flt: Bad Pressure’
‘Net Flt: No Pressure’
‘Net Flt: Bad Oxygen’
‘Net Flt: No Oxygen’
Action
• A serial communication link has
been lost with the sensor.
• Check that the sensor connector
is firmly connected to the sensor
port at the rear of the unit.
• Check that all screw terminal
connections and cable crimps are
securely fitted to the sensor
connector and that the wires are
connected
to
the
correct
terminals.
• Check that the cable that
connects to the sensor is not
damaged.
• The sensor is detecting a
condition outside of its effective
range.
• Check that the sensor is not
being exposed to conditions
outside of its effective range.
• Re-calibrate the unit.
• Restart the SDA device.
• If the problem persists, please
contact your supplier.
• The sensor has detected a fault
in its operation.
• Restart the SDA unit.
• If the problem persists, please
contact your supplier.
• The sensor has detected a fault
in its operation.
• Restart the SDA unit.
• If the problem persists, please
contact your supplier.
• Pressure reading obtained via the
network is invalid
• No pressure reading obtained on
the network.
• Oxygen reading obtained via the
network is invalid.
• No Oxygen reading obtained on
the network.
Document Ref: XK0-801-11- July 2014
Page 69
SDA
User Manual
8
8.1
Maintenance
Oxygen cell replacement
Replacement part number for your cell is: 9100-9212-9HM
When a replacement cell is received check that the sensor has not leaked. The sensors are
themselves sealed and do not under normal circumstances present a health hazard however
if leakage of the electrolyte has occurred use rubber gloves and wear chemical splash
goggles to handle and clean up. Rinse contaminated surfaces with water. If anybody comes
into contact with the electrolyte, please refer to section Error! Reference source not found.
for safety and handling guidelines.
1)
Ensure all electrical connections between the MEC and monitor equipment are
disconnected.
2)
Loosen the corner screws of the enclosure and remove the lid.
Figure 46 - Removing the MEC lid
3)
Using a terminal screwdriver push down the clamp release button to release the
clamp and gently pull the cell wire from the clamp. Repeat this for both the red and
black wires.
Figure 47 - Disconnecting the cell
Document Ref: XK0-801-11 - July 2014
Page 70
SDA
User Manual
4)
Unscrew the green lock ring from the chimney of the cell housing and remove from the
enclosure lid.
Figure 48 - Removing the cell from the lid
5)
Fit the new cell in to the enclosure lid and secure in place using the lock ring.
6)
Using a terminal screwdriver push down the clamp release button to release the clamp.
Push the ferrule of the cell wire in to the clamp and remove the screwdriver from the
clamp release button. Gently pull on the wire to ensure that the wire is held by the
clamp. Repeat this for both the red and black wires, taking note of the correct polarity
as shown below.
Red (+ve)
Black (-ve)
Figure 49 - Connecting a new cell
7)
Fit the enclosure lid and secure in place using the corner screws.
8)
Following an oxygen cell replacement a full calibration MUST be performed, as
described in section 5.5.
9)
If the cell replacement reminder option is in use then the reminder must be manually
reset after replacing the cell, as described in section 5.14.1.
Document Ref: XK0-801-11- July 2014
Page 71
SDA
User Manual
8.2
Carbon monoxide cell replacement
The part number for your sensor’s replacement cell is: 9100-2030
When a replacement cell is received check that the cell has not leaked. The cells are
themselves sealed and do not under normal circumstances present a health hazard however
if leakage of the electrolyte has occurred use rubber gloves and wear chemical splash
goggles to handle and clean up. Rinse contaminated surfaces with water. If contact is made
with the electrolyte, please refer to section 9.1 for safety and handling guidelines.
1) Ensure all electrical connections between the MEC and monitor equipment are
disconnected.
2) Use a flat blade screwdriver to pop out the cell holder from the sensor bulkhead
fitting.
3) Rotate the cell PCB connector clockwise to release from the cell holder.
4) Disconnect the cell from the PCB connector.
Document Ref: XK0-801-11 - July 2014
Page 72
SDA
User Manual
5) Connect the new cell to the PCB connector (Note that it will only connect in one
orientation).
6) Fit the cell in to the housing and rotate anti-clockwise to lock in place.
7) Refit the cell holder in to the sensor bulkhead.
8) Following an carbon monoxide cell replacement a full calibration MUST be performed,
as described in section 3.5.
9) If the cell replacement reminder option is in use then the reminder must be manually
reset after replacing the cell, as described in section 3.13.1.
Document Ref: XK0-801-11- July 2014
Page 73
SDA
User Manual
8.3
Helium cell replacement
Replacement part number for your cell is: VQ546MR
1)
Helium sensor replacement is done in the same way as shown in section 8.2 for the
carbon monoxide cell sensor replacement.
1) Following a helium sensor cell replacement a full calibration MUST be performed, as
described in section 3.5.
2) If the cell replacement reminder option is in use then the reminder must be manually
reset after replacing the cell, as described in section 3.13.1.
8.4
Reconfiguring a unit
Warning: The procedure for reconfiguring a unit should be performed under the
understanding that it will remove all current settings from a unit and write default settings for a
new configuration to the device. Only perform this procedure if you are certain you wish to reconfigure a device.
It may occasionally be necessary to change the configuration of a unit to operate with a
different sensor or range, for example, when configuring a spare SDA to be swapped out for
another unit.
Re-configuration of a unit is performed by using XML configuration files. You may need to
contact your supplier to be provided with a set of configuration files. Re-configuration is
performed using the SDA software. In order for the configuration files to be available to the
SDA software they should be placed in a folder named ‘config’ within the folder from which
the SDA software runs. This will usually be at the location ‘C:\Program Files\Analox\SDA
Setup\config’ but may vary depending on the location chosen on installation of the software.
The SDA software should be closed and re-opened once the configuration files are correctly
located.
Once the configuration files are available to the software, connect a device and access the
‘Advanced’ tab (Figure 50). From the drop down menu under ‘Device configuration’ select the
appropriate configuration file and click ‘ConfigureT’. A warning will be shown explaining the
implications of re-configuring a device. Click OK to start the re-configuration.
Document Ref: XK0-801-11 - July 2014
Page 74
SDA
User Manual
Figure 50 - Advanced options
The new configuration shall be uploaded to the device and a sound will be played by the SDA
when the upload is complete.
Note: Following a re-configuration, the device should be powered down and re-powered
before use.
Document Ref: XK0-801-11- July 2014
Page 75
SDA
User Manual
9
9.1
Spares and Accessories
Spares
Description
Part Number
9212-9HM for MEC O2 Sensor Assembly
9100-9212-9HM
O2 MEC sensor module, 0-100% O2
MECO2ABBP
O2 MEC sensor module, 0-3000mbar ppO2
MECO2ABAP
Carbon monoxide sensor only
9100-2030
CO MEC sensor module, 0-20ppm
MECCOEBAP
Helium sensor only
VQ546MR
He MEC sensor module, 0-100% in N2
MECHEMBDP
Flow Meter for CO2 Module/Flow Meter Panel
5981-0502
O2 Monitor, Rack (%O2)*
SDARAAXA
O2 Monitor, Panel (%O2)*
SDAPAAXA
O2 Monitor, Rack (ppO2)*
SDARAEXA
O2 Monitor, Panel (ppO2)*
SDAPAEXA
CO2 Monitor, Rack (5000ppm CO2)*
SDARBBXA
CO2 Monitor, Rack (10000ppm CO2)*
SDARBCXA
CO2 Monitor, Panel (5000ppm CO2)*
SDAPBBXA
CO2 Monitor, Panel (10000ppm CO2)*
SDAPBCXA
CO Monitor, Rack (20ppm CO)*
SDARCFXA
CO Monitor, Panel (20ppm CO)*
SDAPCFXA
He Monitor, Rack (0 to 100% He)*
SDARGKXA
He Monitor, Panel (0 to 100% He)*
SDAPGKXA
CO2 Module, Rack, - 0-5000ppm in N2
SDARCO2ASN
CO2 Module, Rack, - 0-5000ppm in He
SDARCO2ASH
CO2 Module, Rack, - 0-10000ppm in N2
SDARCO2ALN
CO2 Module, Rack, - 0-10000ppm in He
SDARCO2ALH
CO2 Module, Panel, - 0-5000ppm in N2
SDAPCO2ASN
CO2 Module, Panel, - 0-5000ppm in He
SDAPCO2ASH
CO2 Module, Panel, - 0-10000ppm in N2
SDAPCO2ALN
CO2 Module, Panel, - 0-10000ppm in He
SDAPCO2ALH
* Data logging option is available with all monitors, please enquire.
9.2
Service /
Replacement
Intervals
2 years
As required
As required
2 years
As required
5 years
As required
As required
As required
As required
As required
As required
As required
As required
As required
As required
As required
As required
As required
As required
5 years
5 years
5 years
5 years
5 years
5 years
5 years
5 years
Accessories
Description
O2 & PSU Bracket Kit
O2 Only Bracket Kit
UK 230VAC Monitor Power Supply
Universal Plug-In Monitor Power Supply
Output Module - Current
Flow Meter Panel - Panel Mount
Flow Meter Panel - Rack Mount
Document Ref: XK0-801-11 - July 2014
Page 76
Part Number
XK0-472K
XK0-473K
XK0-662
XK0-667
SDAOMCURRENT
SDAFMPANEL
SDAFMRACK
SDA
User Manual
9.3
Recommended calibration gases
9.3.1 Oxygen
Item
Description
1
0.5LPM 110L bottle regulator
2
Zero calibration gas, 100% nitrogen
3
Span calibration gas, 100% oxygen
9.3.2 Carbon dioxide (N2 background gas)
Item
Description
1
0.5LPM 110L bottle regulator
2
Zero calibration gas, 100% nitrogen
3
Span calibration gas (0.5% CO2
balance N2) (5000ppm variants)
4
Span calibration gas (1% CO2
balance N2) (10000ppm variants)
9.3.3 Carbon dioxide (He background gas)
Item
Description
1
0.5LPM 110L bottle regulator
2
Zero calibration gas, 100% helium
3
Span calibration gas (0.5% CO2
balance He) (5000ppm variants)
4
Span calibration gas (1% CO2
balance He) (10000ppm variants)
9.3.4 Carbon monoxide (N2 background gas)
Item
Description
1
0.5LPM 110L bottle regulator
2
Zero calibration gas (20.9% oxygen,
balance nitrogen)
3
Span calibration gas (18ppm carbon
monoxide, 20.9% oxygen, balance
nitrogen)
9.3.5 Carbon monoxide (He background gas)
Item
Description
1
0.5LPM 110L bottle regulator
2
Zero calibration gas (20.9% oxygen,
balance nitrogen)
3
Span calibration gas, (18ppm carbon
monoxide, 20.9% oxygen, balance
helium)
9.3.6 Helium (N2 and air variants)
Item
Description
1
0.5LPM 110L bottle regulator
2
Zero calibration gas (100% nitrogen)
3
Span calibration gas, (100% helium)
Part no.
SA7L705XFLIND
SA7L10308
SA7L110160
Part no.
SA7L705XFLIND
SA7L10308
SA7L10303
SA7L110108
Part no.
SA7L705XFLIND
SA7L110120
SA7L110110
SA7L110109
Part no.
SA7L705XFLIND
SA7L110179
SA7L110176
Part no.
SA7L705XFLIND
SA7L110179
SA7L110175
Part no.
SA7L705XFLIND
SA7L10308
SA7L10501
9.4
Servicing
Only the electrolytic cell of the MEC oxygen sensor is designed to be user replaceable.
Please consult Analox if any other parts from a SDA module require replacement.
Document Ref: XK0-801-11- July 2014
Page 77
SDA
User Manual
10
Specifications
10.1 SDA Monitor
Power Source
Operating
Current
Fuses
Display Panel
Alarm
Indicators
Operator
Controls
Environmental
Conditions
Dimensions
Weights
Audio
Operational life
External stabilised 12-32V DC supply, (regulation < ±300mV).
NOTE: Depth SDA requires 12-28VDC supply (range limited by sensor).
External 110-230V AC supply (option only).
SDA Monitor: Maximum 640mA at 24V DC supply
SDA O2 System: Average 200mA at 24V DC supply
SDA CO System: Average 200mA at 24V DC supply
SDA CO2 System: Average 300mA at 24V DC supply
SDA He System: Average 300mA at 24V DC supply
Monitor: Internal 2A slow blow micro fuse on in monitor PCB.
Sensor and data ports: 400mA shutdown protection on +5V DC supply.
320 x 240 TFT colour graphic display with 10 brightness levels.
Displays current values of measured parameters using 14mm high large
characters.
Onscreen visual indication of faults and 2 fully adjustable alarm levels.
(optional volt free contacts for individual alarms with SDA Output
Module)
2 x momentary action toggle switches for alarm and calibration functions
2 x momentary action push buttons for mute and function selection
1 x rotary encoder for value adjustment and menu navigation
Rating: IP22
Operating temperature: -5 to +55°C
Storage temperature: -10 to +70°C
Operating pressure: 700 to 1300 mbar absolute
Humidity: 0 to 95% RH at +55°C non-condensing
Rack: 106 x 129 x 31mm
Panel: 120 x 133 x 31mm
Rack: 595g
Panel: 665g
Speaker: 1W, used for user interface navigation.
Buzzer: 88dB at 10cm, frequency 2400±400Hz, alarm and fault
indication.
The product is expected to achieve an operational life of at least 10
years with anticipated continuous usage for periods of 30 days in typical
applications.
Document Ref: XK0-801-11 - July 2014
Page 78
SDA
User Manual
10.2 MEC oxygen sensor
Power Source
Operating
Current
Detection Mode
Range and
Accuracies
Communication
Link
Environmental
Conditions
+5V DC ±500mV
Maximum 20mA at +5V DC supply
Electrochemical
100% O2: ±0.035% O2, ±1% of reading, ±0.15% of reading / °C
3000mbar ppO2: ±0.35mbar ppO2, ±1% of reading,
±0.15% of reading / °C
RS485 serial data, 9600bps, no parity, 1 stop bit.
Distance up to 500m
Rating: IP65
Operating temperature: -5 to +55°C
*Storage temperature: -10 to +70°C
Operating pressure: 700 to 1300 mbar absolute
Humidity: 0 to 99% RH at +55°C non-condensing
65 x 50 x 35 mm
99g
2 years for the electrochemical cell in atmospheric air
0.2 to 1.0 litres/minute
Dimensions
Weights
Sensor Life
Remote sensor
gas flow rate
* Note that if the sensor is to be stored below -10°C then the electrochemical cell should be
removed from the unit and stored in a warmer environment so as to prevent the electrolyte
from freezing and causing damage to the cell.
10.3 MEC carbon monoxide sensor
Power Source
Operating
Current
Detection Mode
Range and
Accuracies
Communication
Link
Environmental
Conditions
+5V DC ±500mV
Maximum 20mA at +5V DC supply
Electrochemical
20ppm CO: ±1ppm CO, ±5% of reading, ±0.5ppm of reading / °C
RS485 serial data, 9600bps, no parity, 1 stop bit.
Distance up to 500m
Rating: IP65
Operating temperature: -5 to +55°C
*Storage temperature: -10 to +70°C
Operating pressure: 700 to 1300 mbar absolute
Humidity: 0 to 99% RH at +55°C non-condensing
65 x 50 x 35 mm
99g
2 years for the electrochemical cell in atmospheric air
0.2 to 1.0 litres/minute
Dimensions
Weights
Sensor Life
Remote sensor
gas flow rate
* Note that if the sensor is to be stored below -10°C then the electrochemical cell should be
removed from the unit and stored in a warmer environment so as to prevent the electrolyte
from freezing and causing damage to the cell.
Document Ref: XK0-801-11- July 2014
Page 79
SDA
User Manual
10.4 Carbon dioxide sensor
Power Source
Operating
Current
Detection Mode
Range and
Accuracies
Response Time
Warm Up Time
Communication
Link
Environmental
Conditions
Dimensions
Weights
Sensor Life
Remote sensor
gas flow rate
+5V DC ±500mV
CO2 Sensor: Maximum 390mA at +5V DC supply
Infra-red
5000ppm CO2: ±25ppm CO2, ±1% of reading, ±2.5ppm CO2 / °C
10000ppm (1%) CO2: ±50ppm CO2, ±1% of reading, ±5ppm CO2 / °C
T90 in <30seconds
40 seconds
RS485 serial data, 9600bps, no parity, 1 stop bit.
Distance up to 500m
Rating: IP22
Operating temperature: -5 to +55°C
Storage temperature: -10 to +70°C
Operating pressure: 700 to 1300 mbar absolute
Humidity: 0 to 95% RH at +55°C non-condensing
Rack: 106 x 129 x 194mm
Panel: 120 x 133 x 194mm
Rack: 1393g
Panel: 2081g
5 years in operation
0.2 to 1.0 litres/minute
Maximum sample input pressure 6bara
10.5 Temperature & humidity probe
Power Source
Range and
Accuracies
Response Time
Communication
Link
Environmental
Conditions
Sensor Life
+5V DC ±500mV
0 to 100ºC (32 to 212 ºF) and 0 to 100%RH
±3°C (temperature)
±10% RH (humidity)
τ63: 3 to 12 seconds
RS485 serial data, 19200bps, no parity, 1 stop bit.
Distance up to 500m
Rating: IP22
Operating temperature: -5 to +55°C
Storage temperature: -10 to +70°C
Operating pressure (Chamber version): 35 bar absolute
Operating pressure (In-line version): 100 bar absolute
Humidity: 0 to 95% RH at +55°C non-condensing
5 years in operation
Document Ref: XK0-801-11 - July 2014
Page 80
SDA
User Manual
10.6 Pressure sensor & 4-20mA MEC
Power Source
Operating
Current
Range and
Accuracies
Communication
Link
Environmental
Conditions
Pressure sensor – 12-28V DC (Supplied by SDA via 4-20mA MEC)
4-20mA MEC - +5V DC ±500mV
Pressure sensor – 30mA Maximum
4-20mA MEC - Maximum 20mA at +5V DC supply
± 0.30%FS
Pressure sensor - 4-20mA, 2 wire (Active)
4-20mA MEC - RS485 serial data, 9600bps, no parity, 1 stop bit.
Rating: IP65
Operating temperature: 0 to +40°C
Storage temperature: -10 to +70°C
Humidity: 0 to 95% RH at +55°C non-condensing
10.7 MEC helium sensor
Power Source
Operating
Current
Detection Mode
Range and
Accuracies
Communication
Link
Environmental
Conditions
Dimensions
Weights
Sensor Life
Remote sensor
gas flow rate
+5V DC ±500mV
Maximum 80mA at +5V DC supply
Pellistor
0 to 100% He: ± (2%FS + Temp coefficient)
Temperature coefficient =
0.05 %FS/°C or 0.028 %FS/°F
RS485 serial data, 9600bps, no parity, 1 stop bit.
Distance up to 500m
Rating: IP65
Operating temperature: -5 to +55°C
*Storage temperature: -10 to +70°C
Operating pressure: 700 to 1300 mbar absolute
Humidity: 0 to 99% RH at +55°C non-condensing
65 x 50 x 35 mm
99g
Up to 5 years
0.2 to 1.0 litres/minute
10.8 SDA Output Module
Power Source
Operating
Current
Range and
resolution
Communication
Link
Outputs
+5V DC ±500mV
Maximum 300mA at +5V DC supply
0 to 23mA FS, 0.023mA
RS485 serial data, 9600bps, no parity, 1 stop bit.
Distance up to 500m
2 x relays (1 per alarm), volts free, changeover contacts
- Maximum ratings: 125 VAC, 60 VDC, 1 A, 62.5 VA, 30 W
1 x 4 to 20mA Isolated output (short circuit protected)
- Maximum load resistance 500Ω standard, 1k Ω high compliance.
1 x status LED
Document Ref: XK0-801-11- July 2014
Page 81
SDA
User Manual
Environmental
Conditions
Dimensions
Weights
Rating: IP22
Operating temperature: -5 to +55°C
Storage temperature: -10 to +70°C
Operating pressure: 700 to 1300 mbar absolute
Humidity: 0 to 95% RH at +55°C non-condensing
98 x 64 x 38 mm
118g without cables
Document Ref: XK0-801-11 - July 2014
Page 82
SDA
User Manual
10.9 IP Rating and General Care
The SDA Monitor is designed to provide an IP22 rating for the front panel of the SDA Monitor.
The Monitor should be fitted into a suitable rack or panel to cover the rear of the unit to
provide protection over the rear connectors to at least IP22.
Although designed to be water resistant the MEC oxygen sensors should not be intentionally
immersed in liquid or left outside unprotected.
To clean any of the SDA equipment, use a damp soft cloth.
Document Ref: XK0-801-11- July 2014
Page 83
SDA
User Manual
11
Warranty Information
We provide the following Warranties for the SDA and associated accessories
A 1 year electronics warranty.
A 2 year graded sensor warranty.
In both cases the warranty period runs from the date of our invoice.
We warrant that the equipment will be free from defects in workmanship and materials.
The warranty does not extend to and we will not be liable for defects caused by the
effects of normal wear and tear, erosion, corrosion, fire, explosion, misuse, use in any
context or application for which the equipment is not designed or recommended, or
unauthorised modification.
Following a valid warranty claim in accordance with the above, the equipment, upon
return to us, would be repaired or replaced without cost or charge but in our discretion we
may elect instead to provide to you which ever is the lesser of the cost of replacement or
a refund of net purchase price paid as per our Invoice on initial purchase from us. We
shall have no liability for losses, damages, costs or delays whatsoever. We shall have no
liability for any incidental or consequential losses or damages. All express or implied
warranties as to satisfactory or merchantable quality, fitness for a particular or general
purpose or otherwise are excluded and no such Warranties are made or provided, save
as set out in this clause.
In order to effectively notify a warranty claim, the claim with all relevant information and
documentation should be sent in writing to:
Analox Ltd
15 Ellerbeck Court
Stokesley Business Park
Stokesley
North Yorkshire
TS9 5PT
Or by e-mail to : [email protected]
Or by Fax to : +44 1642 713900
We reserve the right to require from you proof of dispatch to us of the notification of
warranty claim by any of the above alternative means.
The equipment should not be sent to us without our prior written authority. All shipping
and Insurance costs of returned equipment are to be born by you and at your risk. All
returned items must be properly and sufficiently packed.
Document Ref: XK0-801-11 - July 2014
Page 84
SDA
User Manual
12 Fault Reporting To Analox
Date
Customer Details
Customer Contact
Address
Country
Telephone
Fax
Email
Equipment Details (where applicable)
Monitor Serial No
Sensor Serial No
Output Module Serial No
Others
System Operating Voltage
Customer’s Description of Fault
To be completed by Analox
Date Manufactured
Monitor SW Version
Monitor BSP Version
Design Change Note Ref
(if applicable)
Comments
Document Ref: XK0-801-11- July 2014
Page 85
SDA
User Manual
13
Declarations of Conformity
Document Ref: XK0-801-11 - July 2014
Page 86
SDA
User Manual
14
Disposal
According to WEEE regulation this electronic product cannot be placed in household waste
bins. Please check local regulations for information on the disposal of electronic products in
your area.
Document Ref: XK0-801-11- July 2014
Page 87