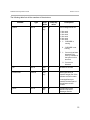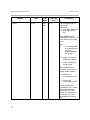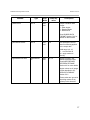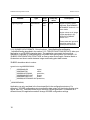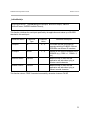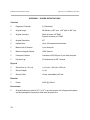
1
3D-BIRD
™
ORIENTATION MEASUREMENT DEVICE
INSTALLATION AND OPERATION GUIDE
910120-A Rev A
January 15, 2001
Copyright 2001 Ascension Technology Corporation
PO Box 527
Burlington, Vermont 05402 USA
(802) 893-6657
http://www.ascension-tech.com
3D-BIRD
™
ORIENTATION MEASUREMENT DEVICE
INSTALLATION AND OPERATION GUIDE
910120-A Rev A
January 15, 2001
Copyright 2001 Ascension Technology Corporation
PO Box 527
Burlington, Vermont 05402 USA
(802) 893-6657
http://www.ascension-tech.com
TABLE OF CONTENTS
1.0 INTRODUCTION . . . . . . . . . . . . . . . . . . . . . . . . . . . . . . . . . . . . . . . . . . . . . . . . . . . . . . . . 1
1.1 PRODUCT ADVISORY . . . . . . . . . . . . . . . . . . . . . . . . . . . . . . . . . . . . . . . . . . . . . 2
1.2 WARM UP PERIOD . . . . . . . . . . . . . . . . . . . . . . . . . . . . . . . . . . . . . . . . . . . . . . . . 3
2.0 INSTALLATION . . . . . . . . . . . . . . . . . . . . . . . . . . . . . . . . . . . . . . . . . . . . . . . . . . . . . . . . . 4
2.1 SENSOR LOCATION . . . . . . . . . . . . . . . . . . . . . . . . . . . . . . . . . . . . . . . . . . . . . . . 5
2.2 CONNECTING 3D-BIRD . . . . . . . . . . . . . . . . . . . . . . . . . . . . . . . . . . . . . . . . . . . . . 5
3.0 INCLUDED SOFTWARE . . . . . . . . . . . . . . . . . . . . . . . . . . . . . . . . . . . . . . . . . . . . . . . . . . 6
3.1 USING THE 3D-BIRD Test . . . . . . . . . . . . . . . . . . . . . . . . . . . . . . . . . . . . . . . . . . . 6
4.0 3D-BIRD COORDINATE SYSTEM . . . . . . . . . . . . . . . . . . . . . . . . . . . . . . . . . . . . . . . . . . 8
4.1 SENSOR ALIGNMENT . . . . . . . . . . . . . . . . . . . . . . . . . . . . . . . . . . . . . . . . . . . . . . 8
4.2 USER DEFINED REFERENCE FRAME . . . . . . . . . . . . . . . . . . . . . . . . . . . . . . . . . 9
4.3 3D-BIRD AUTO-ALIGNMENT . . . . . . . . . . . . . . . . . . . . . . . . . . . . . . . . . . . . . . . . 10
5.0 WINDOWS DRIVER . . . . . . . . . . . . . . . . . . . . . . . . . . . . . . . . . . . . . . . . . . . . . . . . . . . .
5.1 INTERFACE BETWEEN DRIVER AND 3D-BIRD . . . . . . . . . . . . . . . . . . . . . . . . .
5.2 INTERFACE BETWEEN APPLICATION AND DRIVER . . . . . . . . . . . . . . . . . . . .
5.3 INTERFACE DETAILED DESCRIPTION . . . . . . . . . . . . . . . . . . . . . . . . . . . . . . . .
5.3.1 3D-BIRD CONFIGURATION STRUCTURE . . . . . . . . . . . . . . . . . . . . . .
5.3.2 3D-BIRD DATA FORMATS . . . . . . . . . . . . . . . . . . . . . . . . . . . . . . . . . . .
EULER ANGLES . . . . . . . . . . . . . . . . . . . . . . . . . . . . . . . . . . . . . . . . .
MATRIX . . . . . . . . . . . . . . . . . . . . . . . . . . . . . . . . . . . . . . . . . . . . . . . .
QUATERNION . . . . . . . . . . . . . . . . . . . . . . . . . . . . . . . . . . . . . . . . . . .
5.3.3 DRIVER FUNCTIONS DETAILS . . . . . . . . . . . . . . . . . . . . . . . . . . . . . . .
_3dbirdGetDeviceConfig . . . . . . . . . . . . . . . . . . . . . . . . . . . . . . . . . . .
_3dbirdGetMostRecentReading . . . . . . . . . . . . . . . . . . . . . . . . . . . . . .
_3dbirdGetReading . . . . . . . . . . . . . . . . . . . . . . . . . . . . . . . . . . . . . . .
_3dbirdReadingReady . . . . . . . . . . . . . . . . . . . . . . . . . . . . . . . . . . . . .
_3dbirdResetOrientation . . . . . . . . . . . . . . . . . . . . . . . . . . . . . . . . . . . .
_3dbirdSetDeviceConfig . . . . . . . . . . . . . . . . . . . . . . . . . . . . . . . . . . . .
_3dbirdShutDown . . . . . . . . . . . . . . . . . . . . . . . . . . . . . . . . . . . . . . . . .
_3dbirdStartStream . . . . . . . . . . . . . . . . . . . . . . . . . . . . . . . . . . . . . . .
_3dbirdWakeUp . . . . . . . . . . . . . . . . . . . . . . . . . . . . . . . . . . . . . . . . . .
13
13
13
14
14
18
19
20
21
22
23
24
25
26
27
28
29
30
31
6.0 ERROR MESSAGES . . . . . . . . . . . . . . . . . . . . . . . . . . . . . . . . . . . . . . . . . . . . . . . . . . . . 32
7.0 TROUBLESHOOTING . . . . . . . . . . . . . . . . . . . . . . . . . . . . . . . . . . . . . . . . . . . . . . . . . . . 33
APPENDIX I - 3D-BIRD SPECIFICATIONS . . . . . . . . . . . . . . . . . . . . . . . . . . . . . . . . . . . . . . 34
APPENDIX II - APPLICATION NOTES . . . . . . . . . . . . . . . . . . . . . . . . . . . . . . . . . . . . . . . . . . 35
Converting the 3D-BIRD Outputs to a Graphics Modeling Matrix . . . . . . . . . . . . . . . . . 35
i
APPENDIX III - FCC REGULATION AND CANADIAN REGULATIONS . . . . . . . . . . . . . . . . . 37
APPENDIX IV - EC DECLARATION OF CONFORMITY . . . . . . . . . . . . . . . . . . . . . . . . . . . . 38
APPENDIX V - CE SPECIFICATIONS . . . . . . . . . . . . . . . . . . . . . . . . . . . . . . . . . . . . . . . . . . 39
ii
USER MANUAL REVISIONS
Manual Date
January 15, 2001
Rev
A
Changes
Initial release.
iii
Installation and Operation Guide
Introduction
1.0 INTRODUCTION
The 3D-BIRD is a three degrees-of-freedom measuring device that measures the orientation of
a small sensor in real time, allowing you to track the orientation of any object to which is
attached. The 3D-BIRD determines orientation by measuring outputs from
solid-state inertial and non-inertial sensors. Since there is no signal transmitter needed to
perform measurements, the motion area of the 3D-BIRD is virtually unlimited.
The tracker consists of a small sensor unit (sensor) with an RS-232 / Power cable. It can be
plugged directly into a serial port on your host computer. There is no intermediate electronic
unit, which simplifies the system setup. The sensor unit includes all the sensors as well as the
microprocessor that controls sensor data acquisition and communication between the 3D-BIRD
and the host computer. Up to four 3D-BIRDs can be connected to a single computer - one 3DBIRD per serial port.
In addition to this manual, you can now receive on-line assistance at Ascension’s web site:
http://www.ascension-tech.com/support/troubleshoot/index.htm
1
Installation and Operation Guide
Introduction
1.1 PRODUCT ADVISORY
The 3D-BIRD sensors – along with its attached cables/connectors – are sensitive electronic
components. To obtain good tracking performance and maintain your warranty, treat them
carefully.
Most failures in the field occur because the cables attached to the sensors is mishandled.
Always remember that these components are not designed to withstand sever jolting,
contortions, or high-impact shocks. When handling your cables, please observe the following:
C
Never flex, pull or twist cables. This is the most common cause of tracker
failure. Note that there is a strain relief where the sensor head attaches to its
cable. Its job is to protect the delicate connection between the cable conductors
and the sensor assembly head. It is also the area in which sensors are attached
to the object that is being tracked. When attaching the sensor to the object that
is to be tracked, be sure you do not pull, twist or repeatedly bend the cable here.
Consider adding a secondary strain relief if the cable is prone to contortions.
C
Never yank the sensor off its mounting bracket or holder by grabbing the
cable and pulling.
C
Never carry, throw or swing a sensor by its cable.
C
Never let the sensor impact with a hard object.
C
Never add your own extensions/connectors to our sensor/transmitter cables
without our pre-approval. Our cables are precisely bundled and shielded to
minimize noise and ensure accurate performance within specification. If you add
an extension without our knowledge or approval, you may compromise the
performance and/or negate certain regulatory certifications. You will also void
your warranty. If you need to extend your cable lengths, please contact our tech
support team first:
Phone: 1-802-893-6657
Fax: 1-802-893-6659
Email: [email protected]
2
Installation and Operation Guide
Introduction
1.2 WARM UP PERIOD
A minimum warm up period of fifteen minutes is required to allow electronic circuitry time to
equilibrate to temperature changes in order to achieve the highest degree of accuracy from the
tracker.
3
Installation and Operation Guide
Installation
2.0 INSTALLATION
The 3D-BIRD is shipped to you in one box containing the following:
C
C
C
C
One senor unit with RS232 / power cable attached to it.
100 - 240 VAC, 1.0A, 47 - 63Hz regulated power supply with power cord.
One 3 ½ inch DOS-formatted diskette of 3D-BIRD drivers and user software.
One Installation and Operation Guide (this document).
If there are any discrepancies or your shipment is damaged, call Ascension Technology at
(802) 893-6657 between the hours of 9 AM and 5 PM Eastern Standard Time or fax us at (802)
893-6659. You can also e-mail us at [email protected].
Sensor assembly for
mounting on head or object
to be tracked.
4
3D-BIRD sensor connects directly to the
RS-232 serial port of your host computer.
Sensor data is processed by the 3D-BIRD
driver residing in your computer.
Installation and Operation Guide
Installation
2.1 SENSOR LOCATION
The sensor should be mounted on a non-metallic surface such as wood or plastic, using nonmetallic bolts or 300 series stainless steel bolts. It should not be located near power cords,
power supplies or other low frequency current-generating devices. Their emanations will be
picked up by the sensor and converted into noise on the output orientation measurements. The
sensor will pick up noise when it is operated near a CRT-type display. The amount of noise will
vary depending on the operating frequency of the CRT and the amount of shielding built into
the CRT.
2.2 CONNECTING 3D-BIRD
To connect the 3D-BIRD to your computer you need to do the following:
C
Shut the computer's power off.
C
Attach the DB9 connector of the 3D-BIRD RS232 / power cable to the serial port
connector of your computer. Screw in this connector.
C
Plug the power supply into the electric outlet.
C
You can attach up to four 3D-BIRDs into your computer, one 3D-BIRD per
computer serial port.
Power can then be turned on and commands sent to the 3D-BIRDs.
5
Installation and Operation Guide
Included Software
3.0 INCLUDED SOFTWARE
One high density 3.5 inch DOS formatted diskette is included with your tracker. This diskette
contains a Windows driver for the 3D-BIRD and an application called “3dBird Test.exe” that
allows you to set up and run the 3D-BIRD and monitor its outputs. Additionally, this diskette
contains complete commented source code of the “3dBird Test.exe” application that shows you
how to use all the C++ functions you'll need for talking to the 3D-BIRD from your own
application.
Feel free to incorporate any of this software into your own application or product. Also, see the
file, “3dbird.h” for a description of these functions and additional programming notes. To use
the driver, simply include the header file “3dbird.h” in your application code, link with the library
module “3dbird.lib”, and put the dynamic-link libraries “3dbird.dll” and “3dbalg.dll” anywhere on
the path.
3.1 USING THE 3dBird Test
Have your 3D-BIRD attached to a serial port of your computer and powered up to start 3dBird
Test.exe test application.
Go to Configuration / Comm Port to set COM port in use.
To change 3D-BIRD configuration settings, go to Configuration / 3D-BIRD. Read 3D-BIRD
CONFIGURATION STRUCTURE Section 5.3.1. for 3D-BIRD configuration parameters details.
Note that 3dBird Test does not allow you to change COM port and 3D-BIRD configuration
settings while the 3D-BIRD is streaming data. You need to stop data stream, change setting,
then stream again.
Select Run / Start Streaming to run the 3D-BIRD. Please remember to keep the 3D-BIRD still
during the start to allow for self-calibration.
When the 3D-BIRD is running, you can see test data on your screen in the format you selected
as well as a 3-axis cross that tracks orientation of the 3D-BIRD sensor. When you rotate the
sensor, the cross on the screen will follow it.
To reset sensor orientation, select Run / Reset Orientation. Please remember to keep the
3D-BIRD still during reset to allow for self-calibration. Read the _3dbirdResetOrientation
Section below for more details on reset.
Run / Stop Streaming shuts the 3D-BIRD down. To run it again select Run / Start Streaming.
6
Installation and Operation Guide
Included Software
If you want to collect 3D-BIRD data into a file, go to File / New to a specify the file name. To
start data logging into the file, select File / Data Logging. To pause or stop data logging,
unselect File / Data Logging. Please note that the files are saved as tab delimited text files and
get really large!
7
Installation and Operation Guide
3D-BIRD Coordinate System
4.0 3D-BIRD COORDINATE SYSTEM
Orientation of the 3D-BIRD sensor is measured with respect to the right-handed reference
frame that has its X-axis pointing local magnetic north, Y-axis pointing east, and Z-axis pointing
down, along earth gravity field vector. In Figure 1, the 3D-BIRD sensor is shown in zero
orientation with its x, y, and z axes aligned with X, Y and Z axes of the reference frame.
+ Y
+ y
+ X
MAG NETIC NO RTH
+ Z
DOWN
+ x
+ z
Figure 1. Reference Frame
4.1 SENSOR ALIGNMENT
In some applications, you may want to mathematically change the sensor's x, y and z axes to
an orientation which differs from that of the actual sensor and align them with the coordinate
frame of the object being tracked.
For example:
Suppose that during installation on the helmet you find it necessary, due to physical
requirements, to cock the sensor by Azim = -90E, Elev = 0E and Roll = -30E with respect to your
8
Installation and Operation Guide
3D-BIRD Coordinate System
helmet coordinate frame Xh Yh Zh as shown in Figure 2 a. To compensate, use
anglesAngleAlign structure described in 3D-BIRD CONFIGURATION STRUCTURE Section
5.3.1. Once the Sensor Alignment procedure is executed, orientations will be computed as if the
sensor were aligned with the helmet as shown in Figure 2 b.
+ Yh
+ Y h
+ Xh
+ X h
+ Zh
+ Z h
a) Cocked Sensor
b) Aligned Sensor
Figure 2. Angle Align
4.2 USER DEFINED REFERENCE FRAME
In some applications, it may be desirable to have the orientation measured with respect to a
reference frame other than the frame defined by directions of earth magnetic and gravity field
described in 3D-BIRD COORDINATE SYSTEM Section 4.0 above.
For example:
Suppose that you have your sensor leveled and its angle outputs are Azim = -45E, Elev = 0E
and Roll = 0E. Suppose that you want this orientation of the sensor to become a new reference
frame, meaning that current directions of x, y and z axes of the sensor become directions of the
Xref, Yref and Zref axes of the new reference frame as shown in Figure 3. To define the new
reference frame, use anglesReferenceFrame structure described in 3D-BIRD
9
Installation and Operation Guide
3D-BIRD Coordinate System
CONFIGURATION STRUCTURE Section 5.3.1. Once the Reference Frame procedure is
executed, orientations will be computed with respect to the new reference frame.
+ Y re f
+ Y
+ X
m a g ne tic n o rth
+ Z
+ y
+ X re f
+ Z re f
down
+ x
+ z
Figure 3. Reference Frame
4.3 3D-BIRD AUTO-ALIGNMENT
3D-BIRD Auto-Alignment procedure allows you to simplify and combine Sensor Alignment and
Reference Frame procedures. To be able to use the Auto-Alignment procedure, the sensor
needs to be mounted on the tracked object in such a way that it is not cocked in the azimuth
10
Installation and Operation Guide
3D-BIRD Coordinate System
direction, and is cocked by less than 90Ein the elevation and roll directions.
Figure 4 shows the sensor cocked by Azim = 0E, Elev = 45E and Roll = -60E with respect to the
helmet coordinate frame Xh, Yh, Zh.
+ Yh
+ Xh
+ Zh
Figure 4. Sensor Mounting for Auto-Alignment
The object must be leveled before you execute Auto-Alignment procedure. Auto-Alignment
mathematically aligns the sensor's x, y and z axes with the coordinate frame of the object and
defines a new reference frame based on its current orientation. Figure 5 shows Xref, Yref and
Zref axes of the new reference frame are aligned with current directions of the helmet Xh, Yh
and Zh axes and current orientation of the helmet is a new zero orientation.
11
Installation and Operation Guide
3D-BIRD Coordinate System
Figure 5. Auto-Alignment
12
Installation and Operation Guide
Windows Driver
5.0 WINDOWS DRIVER
3D-BIRD uses your computer to process its computation. If your computer is running under
Windows operating system, you can use the 3D-BIRD windows driver provided with the 3DBIRD (see Section 3.0 -- INCLUDED SOFTWARE) to collect and process 3D-BIRD data. The
driver is described in this section. To use the 3D-BIRD driver, include “3dbird.h” file in your
source code, link with the library module “3dbird.lib”, and put the dynamic-link libraries
“3dbird.dll” and “3dbalg.dll” anywhere on the DLL search path.
The latest version of the driver can be downloaded directly from our ftp site ftp://ftp.ascensiontech.com. If your computer is using a different operating system or you want to develop your
own driver, please contact our tech support team:
Phone: 1-802-893-6657
Fax: 1-802-893-6659
Email: [email protected]
5.1 INTERFACE BETWEEN DRIVER AND 3D-BIRD
3D-BIRD uses a serial interface to send data to your computer. The windows driver initializes
the serial port of your computer to communicate to the 3D-BIRD. Once initialized and running,
3D-BIRD is streaming 160 data records per second at a rate of 38,400 Baud. Each data record
is 20 bytes-long. Once a complete data record arrives at the computer, it is processed by the
driver and new orientation data becomes available, resulting in a maximum measurement rate
of 160 measurements per second.
5.2 INTERFACE BETWEEN APPLICATION AND DRIVER
This section summarizes the steps that must be performed by an application to initialize and run
the 3D-BIRD. Please read the INTERFACE DETAILED DESCRIPTION Section 5.3 for further
details.
The windows driver allows you to run up to four 3D-BIRDs on a single computer – one per serial
port of the computer. Each 3D-BIRD is treated as a separate entity -- it is initialized, operated
and shut down independently from other units.
To initialize a 3D-BIRD, call _3dbirdWakeUp(). The first parameter to this routine is an ID
number, chosen by the calling procedure, which will be used to identify the 3D-BIRD in all
subsequent procedure calls.
13
Installation and Operation Guide
Windows Driver
After waking up the 3D-BIRD, you will typically want to change its configuration. This can be
done by obtaining a copy of the current 3D-BIRD configuration structure, modifying the relevant
fields, and then sending the structure back to the 3D-BIRD. The routines that are used to do
this are _3dbirdGetDeviceConfig() and _3dbirdSetDeveiceConfig().
After the 3D-BIRD has been configured, you can call _3dbirdStartStream() to start a stream of
data and collect the frames as they arrive. If you want to collect all the data frames in order, you
should repeatedly call _3dbirdGetReading() to get them one by one. If you only want the most
recently arrived data frame, you should instead call _3dbirdGetMostRecentReading(). To find
out if a new frame is waiting to be retrieved, you can call _3dbirdReadingReady().
To shut down the 3D-BIRD, call _3dbirdShutDown(). This stops all data transmission and
disables all further communication with the 3D-BIRD (until another wake up command is
issued.)
5.3 INTERFACE DETAILED DESCRIPTION
This section provides details of the interface between applications and the 3D-BIRD Windows
driver, describes 3D-BIRD configuration parameters and describes available data formats.
5.3.1 3D-BIRD CONFIGURATION STRUCTURE. Driver functions _3dbirdGetDeviceConfig,
_3dbirdSetDeviceConfig described in the section 5.3.3 - DRIVER FUNCTIONS DETAILS, allow
you to get current configuration of the 3D-BIRD and change certain parameters of the
configuration. Configuration of 3D_BIRD is defined as a structure:
typedef struct tag3DBIRDDEVICECONFIG
{
BYTE
byStatus;
BYTE
byID;
WORD
wSoftwareRev;
BYTE
byError;
BYTE
bySetup;
BYTE
byDataFormat;
BYTE
byDCFilterParameter
_3DBIRDANGLES
anglesReferenceFrame;
_3DBIRDANGLES
anglesAngleAlign;
}
_3DBIRDDEVICECONFIG
See 3D-BIRD DATA FORMATS Section 5.3.2. for _3DBIRDANGLES structure definition.
14
Installation and Operation Guide
Windows Driver
The following table lists all the members of the structure:
Member
byStatus
Type
BYTE
Read
Write
read
only
Power Up
value
0
Description
The bit assignments are:
0
1
2
3
4
5
6
Not used
Not used
Not used
Not used
Not used
Not used
1 - if 3D-BIRD is
running
0 - if 3D-BIRD is not
running
7
1 - if an error has been
detected. Error
code is available in
the byError in this
structure
0 - if no error is
detected
byID
BYTE
read
only
wSoftwareRev
WORD
read
only
7
3D-BIRD ID number
Most significant byte
contains integer part of the
software revision number
Least significant byte
contains fractional part of
the software revision
number
byError
BYTE
read
only
0
Contains error code,
defined in the Error
Messages Section
15
Installation and Operation Guide
Member
bySetup
Windows Driver
Type
BYTE
Read
Write
read /
write
Power Up
value
0x1F
Description
The bit assignments are:
0 Not used
1 Not used
2 1 - Auto-Align mode is ON
0 - Auto-Align mode is
OFF
Read 3D-BIRD AUTOALIGNMENT Section 4.3 for
more details on Auto-Align
mode
Note:
C
In Auto-Align mode
anglesReferenceFr
ame and
anglesAngleAlign
are ignored
3 1 - output orientation in
floating point format
0 - output orientation in
integer format
Read 3D-BIRD DATA
FORMAT Section 5.3.2 for
details on data formats.
4 1 - azimuth drift
compensation is ON
0 - azimuth drift
compensation is OFF
Turning azimuth drift
compensation OFF allows
you to reduce tracking
distortion due to metal
objects in a tracking area,
but can result in a slow
accumulation of azimuth
error.
16
Installation and Operation Guide
Member
byDataFormat
Windows Driver
Type
BYTE
Read
Write
read /
write
Power Up
value
1
Description
Output orientation data
format:
1 - Euler Angles
2 - Rotation Matrix
3 - Quaternions
Read 3D-BIRD DATA
FORMAT Section 5.3.2 for
details on data formats.
byDCFilterParameter
BYTE
read /
write
10
This parameter controls
amount of filtering applied
to the output data
Valid range is 0..10:
0 - turn the filter off
10 - apply maximum
filtering
anglesReferenceFrame
BIRDANGLE
S
read /
write
0, 0, 0
Angles to specify user
defined reference frame.
Read USER DEFINED
REFERENCE FRAME
Section 4.2 for more details.
Angles values are in integer
format described in 3DBIRD DATA FORMAT
Section 5.3.2
These values are ignored in
Auto-Align mode, set by
bySetup in this structure.
17
Installation and Operation Guide
Member
anglesAngleAlign
Windows Driver
Type
BIRDANGLE
S
Read
Write
read /
write
Power Up
value
0, 0, 0
Description
Angles to specify sensor
alignment. Read SENSOR
ALIGNMENT Section 4.1 for
more details.
Angles values are in integer
format described in 3DBIRD DATA FORMAT
Section 5.3.2
These values are ignored in
Auto-Align mode, set by
bySetup in this structure.
5.3.2 3D-BIRD DATA FORMATS. Driver functions _3dbirdGetMostRecentReading,
_3dbirdGetReading described in the section 5.3.3 - DRIVER FUNCTIONS DETAILS, allow your
application to get 3D-BIRD orientation data. The application can control the format that
orientation is reported in. Read description of byDataFormat and bySetup in the section 5.3.1
3D-BIRD CONFIGURATION STRUCTURE on how to select Euler Angles, Rotation Matrix or
Quaternions and how to switch between integer and floating point data formats.
3D-BIRD orientation data is a union:
typedef union tag3DBIRDREADING
{
_3DBIRDANGLES
angles;
_3DBIRDMATRIX
matrix;
_3DBIRDQUATERNION
quaternion;
_3DBIRDANGLESFLOAT
fangles;
_3DBIRDMATRIXFLOAT
fmatrix;
_3DBIRDQUATERNIONFLOAT fquaternion;
}
_3DBIRDREADING;
Application can only read data in the format specified in the configuration structure. For
example, if 3D-BIRD configuration structure specifies data output in Euler Angles floating point
format, then only _3DBIRDREADING.fangles structure contains good data. To read data in a
different format, the application needs to change 3D-BIRD configuration settings.
18
Installation and Operation Guide
Windows Driver
EULER ANGLES
In EULER ANGLES mode, the 3D-BIRD returns the Euler angles in radians of the sensor with
respect to the reference coordinate frame. The Euler angles are defined as rotations about the
Z, Y, and X axes of the sensor. These angles are called Azimuth, Elevation and Roll. Azimuth
takes on values between ± ð , Elevation takes on values between ± ð /2, and Roll takes on
values between ± ð . As elevation approaches ± ð /2, the Azimuth and Roll become very noisy
and exhibit large errors. At ± ð /2 the Azimuth and Roll become undefined. This behavior is not
a limitation of the 3D-BIRD – it is an inherent characteristics of these Euler angles. If you
need stable representation of the sensor orientation at high Elevation angles, use the MATRIX
or QUATERNIONS output mode.
If your application reads EULER ANGLES in integer format, the scaling of all angles is full scale
= 180E. That is, +179.99E = 0x7FFF, 0E = 0x0, -180E = 0x8000.
3D-BIRD Euler Angles structures are defined as the following:
// Euler Angles in floating point format
typedef struct tag3DBIRDANGLESFLOAT
{
float fazimuth;
float felevation;
float froll;
}
_3DBIRDANGLESFLOAT;
// Euler Angles in integer format
typedef struct tag3DBIRDANGLES
{
int
nazimuth;
int
nelevation;
int
nroll;
}
_3DBIRDANGLES;
19
Installation and Operation Guide
Windows Driver
MATRIX
In MATRIX mode, the 3D-BIRD returns 9 elements of the rotation matrix that define the
orientation of the sensor with respect to the reference coordinate frame. If you want a threedimensional image to follow the rotation of the sensor, you must multiply your image
coordinates by this rotation matrix. The nine elements of the rotation matrix in Euler angle
notation are defined generically by:
*
* COS(E)*COS(A)
*
*
*-COS(R)*SIN(A)
*+SIN(R)*SIN(E)*COS(A)
*
*
* SIN(R)*SIN(A)
*+COS(R)*SIN(E)*COS(A)
*
COS(E)*SIN(A)
- SIN(E)
COS(R)*COS(A)
+SIN(R)*SIN(E)*SIN(A)
SIN(R)*COS(E)
-SIN(R)*COS(A)
+COS(R)*SIN(E)*SIN(A)
COS(R)*COS(E)
*
*
*
*
*
*
*
*
*
*
*
where R = Roll, E = Elevation, A = Azimuth.
The matrix elements take values between ± 1. If your application reads MATRIX in integer
format, the scaling of all elements is, +.99996 = 0x7FFF, 0 = 0x0, -1 = 0x8000.
3D-BIRD Matrix structures are defined as the following:
// Rotation Matrix in floating point format
typedef struct tag3DBIRDMATRIXFLOAT
{
float f[3][3];
}
_3DBIRDMATRIXFLOAT;
// Rotation matrix in integer format
typedef struct tag3DBIRDMATRIX
{
int
n[3][3];
}
_3DBIRDMATRIX;
20
Installation and Operation Guide
Windows Driver
QUATERNION
In QUATERNION mode, the 3D-BIRD returns the four quaternion parameters that describe the
orientation of the sensor with respect to the reference coordinate frame.
The quaternions, q0, q1, q2, and q3 where q0 is the scalar component, have been extracted from
the MATRIX output using the algorithm described in "Quaternion from Rotation Matrix" by
Stanley W. Shepperd, Journal of Guidance and Control, Vol. 1, May-June 1978, pp. 223-4.
The quaternions take values between ± 1. If your application reads QUATERNIONS in integer
format, the scaling of all quaternions is, +.99996 = 0x7FFF, 0 = 0x0, -1 = 0x8000.
3D-BIRD Quaternions structures are defined as the following:
// Quaternions in floating point format
typedef struct tag3DBIRDQUATERNIONFLOAT
{
float fQ0;
float fQ1;
float fQ2;
float fQ3;
}
_3DBIRDQUATERNIONFLOAT;
// Quaternions in integer format
typedef struct tag3DBIRDQUATERNION
{
int
nQ0;
int
nQ1;
int
nQ2;
int
nQ3;
}
_3DBIRDQUATERNION;
21
Installation and Operation Guide
Windows Driver
5.3.3 DRIVER FUNCTIONS DETAILS
All Windows driver functions are listed alphabetically in the following section. Each function
description explains those parameters that are passed to the function and what values are
returned by the function. All the functions are declared in “3dbird.h” header file. Include
“3dbird.h” file in your source code, link with the library module “3dbird.lib”, and put the dynamiclink libraries “3dbird.dll” and “3dbalg.dll” anywhere on the DLL search path.
22
Installation and Operation Guide
Windows Driver
_3dbirdGetDeviceConfig
BOOL DLLEXPORT _3dbirdGetDeviceConfig(int nGroupID, _3DBIRDDEVICECONFIG
*pdevcfg);
This function gets the configuration of the 3D-BIRD.
Parameter
Name
nGroupID
Parameter Type
int
Parameter
Value
Parameter Description
0,...,3
3D-BIRD ID number that was
passed to _3dbirdWakeUp
Read _3dbirdWakeUp
description for more details.
pdevcfg
_3DBIRDDEVICECONFIG *
Pointer to the
_3DBIRDDEVICECONFIG
3D-BIRD configuration
structure
Read Section 5.3.1 - 3DBIRD CONFIGURATION
STRUCTURE, for details on
_3DBIRDDEVICECONFIG
This function returns TRUE if executed successfully; otherwise it returns FALSE.
23
Installation and Operation Guide
Windows Driver
_3dbirdGetMostRecentReading
BOOL DLLEXPORT _3dbirdGetMostRecentReading(int nGroupID, _3DBIRDREADING
*preading);
This function returns the latest orientation data frame from the 3D-BIRD. Use
_3dbirdGetReading function if your application requires all the data frames in the order they
were computed, rather than just the latest data frame.
Parameter
Name
nGroupID
Parameter Type
int
Parameter
Value
Parameter Description
0,...,3
3D-BIRD ID number that was passed
to _3dbirdWakeUp
Read _3dbirdWakeUp description for
more details.
pdevcfg
_3DBIRDREADING*
Pointer to the _3DBIRDREADING
orientation data structure
Read Section 5.3.2 - 3D-BIRD DATA
FORMATS, for details on
_3DBIRDREADING .
This function returns TRUE if executed successfully; otherwise it returns FALSE.
24
Installation and Operation Guide
Windows Driver
_3dbirdGetReading
BOOL DLLEXPORT _3dbirdGetReading(int nGroupID, _3DBIRDREADING *preading);
This function returns the next available orientation data frame from the 3D-BIRD. Use
_3dbirdGetMostRecentReading function if your application requires the latest data frame rather
than all the data frames in the order they were computed.
Parameter
Name
nGroupID
Parameter Type
int
Parameter
Value
Parameter Description
0,...,3
3D-BIRD ID number that was passed
to _3dbirdWakeUp
Read _3dbirdWakeUp description for
more details.
pdevcfg
_3DBIRDREADING*
Pointer to the _3DBIRDREADING
orientation data structure
Read Section 5.3.2 - 3D-BIRD DATA
FORMATS, for details on
_3DBIRDREADING .
This function returns TRUE if executed successfully; otherwise it returns FALSE.
25
Installation and Operation Guide
Windows Driver
_3dbirdReadingReady
BOOL DLLEXPORT _3dbirdReadingReady(int nGroupID);
This function determines if the 3D-BIRD has new orientation data frame available.
Parameter
Name
nGroupID
Parameter Type
int
Parameter
Value
Parameter Description
0,...,3
3D-BIRD ID number that was passed
to _3dbirdWakeUp
Read _3dbirdWakeUp description for
more details.
This function returns TRUE if new orientation data is available; otherwise it returns FALSE.
26
Installation and Operation Guide
Windows Driver
_3dbirdResetOrientation
BOOL DLLEXPORT _3dbirdResetOrientation(int nGroupID);
If AUTO-ALIGN mode is enabled, 3D-BIRD executes Auto-Align procedure described in 3DBIRD AUTO-ALIGNMENT Section 4.3. If AUTO-ALIGN mode is disabled then 3D-BIRD resets
any accumulated error. Description of bySetup in 3D-BIRD CONFIGURATION STRUCTURE
Section 5.3.1 explains how to enable or disable the AUTO-ALIGN mode.
Parameter
Name
nGroupID
Parameter Type
int
Parameter
Value
Parameter Description
0,...,3
3D-BIRD ID number that was passed
to _3dbirdWakeUp
Read _3dbirdWakeUp description for
more details.
This function returns TRUE if executed successfully; otherwise it returns FALSE.
27
Installation and Operation Guide
Windows Driver
_3dbirdSetDeviceConfig
BOOL DLLEXPORT _3dbirdSetDeviceConfig(int nGroupID, _3DBIRDDEVICECONFIG
*pdevcfg);
This function sets the configuration of the 3D-BIRD.
Parameter
Name
nGroupID
Parameter Type
int
Parameter
Value
Parameter Description
0,...,3
3D-BIRD ID number that was
passed to _3dbirdWakeUp
Read _3dbirdWakeUp
description for more details
pdevcfg
_3DBIRDDEVICECONFIG *
Pointer to the
_3DBIRDDEVICECONFIG
3D-BIRD configuration
structure
Read Section 5.3.1 - 3DBIRD CONFIGURATION
STRUCTURE, for details on
_3DBIRDDEVICECONFIG
This function returns TRUE if executed successfully; otherwise it returns FALSE.
28
Installation and Operation Guide
Windows Driver
_3dbirdShutDown
void DLLEXPORT _3dbirdShutDown(int nGroupID);
This function shuts down the 3D-BIRD. Call function _3dbirdWakeUp to restart the 3D-BIRD.
Parameter
Name
nGroupID
Parameter Type
int
Parameter
Value
Parameter Description
0,...,3
3D-BIRD ID number that was passed
to _3dbirdWakeUp
Read _3dbirdWakeUp description for
more details.
This is a void function; it does not return any value.
29
Installation and Operation Guide
Windows Driver
_3dbirdStartStream
BOOL DLLEXPORT _3dbirdStartStream(int nGroupID);
This function initiates a data stream from the 3D-BIRD.
Parameter
Name
nGroupID
Parameter Type
int
Parameter
Value
Parameter Description
0,...,3
3D-BIRD ID number that was passed
to _3dbirdWakeUp
Read _3dbirdWakeUp description for
more details.
This function returns TRUE if executed successfully; otherwise it returns FALSE.
30
Installation and Operation Guide
Windows Driver
_3dbirdWakeUp
BOOL DLLEXPORT _3dbirdWakeUp(int nGroupID, WORD wComport, DWORD
dwReadTimeout, DWORD dwWriteTimeout);
This function initializes the serial port specified by the application and wakes up a 3D-BIRD
attached to this serial port.
Parameter Name
Parameter
Type
Parameter
Value
Parameter Description
nGroupID
int
0,...,3
ID number that the user wants to
associate with this 3D-BIRD. Different
3D-BIRDs use different ID numbers.
wComport
WORD
1,...,4
Number of the comport attached to the
3D-BIRD (e.g., COM1 = 1, COM2 = 2,
etc.)
dwReadTimeout
DWORD
Maximum time in msec that the
application will take when trying to
receive a serial character
dwWriteTimeout
DWORD
Maximum time in msec that the
application will take when trying to
transmit a serial character
This function returns TRUE if executed successfully; otherwise it returns FALSE.
31
Installation and Operation Guide
Error Messages
6.0 ERROR MESSAGES
The 3D-BIRD keeps track of system errors. When an error occurs, the byStatus byte
ERROR bit is set to a '1', and the error code is put into the byError byte in the 3D-BIRD
configuration structure _3DBIRDDEVICECONFIG. The user can query the
_3DBIRDDEVICECONFIG structure by calling the _3dbirdGetDeviceConfig(). When the user
reads _3DBIRDDEVICECONFIG, the ERROR bit is reset to a '0', and the error code in byError
byte is also reset to '0'.
All the error codes have the most significant bit set. The table below provides details of the 3DBIRD errors. Corrective actions with an * indicate that the user should not attempt this fix
instead Ascension Technology should be contacted.
For technical assistance, call Ascension Technology at 802-893-6657 between the hours of 9
AM and 5 PM United States Eastern Standard Time or fax us at 802-893-6659. You can also email us at [email protected].
Error Code
0x83
32
Description
3D-BIRD
Configuration Data
Corrupt
Cause
The driver was not
able to read the 3DBIRD Calibration
Data Structure.
Action
* Calibrate the 3DBIRD and set the
‘Initialized Code’ in
the calibration data
structure.
Installation and Operation Guide
Troubleshooting
7.0 TROUBLESHOOTING
If you are experiencing trouble with the 3D-BIRD, try the following:
IF YOU CANNOT TALK TO THE 3D-BIRD:
C
Make sure the power supply is plugged to the external power means before your
application tries to communicate to the 3D-BIRD.
C
Make sure the 3D-BIRD is plugged into the COM port that your application is using.
C
Make sure you don’t have multiple applications trying to use the same COM port.
IF YOU CAN COMMUNICATE WITH THE 3D-BIRD BUT THE DATA IS BAD:
C
Make sure the 3D-BIRD is not placed directly on top of metal during operation. You
should keep it at least two inches away from metal.
C
Check that your application is using correct values to define Sensor Alignment and
Reference Frame or Auto-Alignment mode is used correctly. Read 3D-BIRD
COORDINATE SYSTEM Section 4 for more details.
C
If orientation data is continuously drifting, make sure you keep the 3D-BIRD still during
calls to _3dbirdStartStream() and _3dbirdResetOrientation() functions. The 3D-BIRD
performs self-calibration that takes about 0.5 sec and needs to stay still during this
period of time.
There are no fuses or other user-serviceable parts in the 3D-BIRD sensor.
For technical assistance, call Ascension Technology at 802-893-6657 between the hours
of 9 AM and 5 PM Eastern Standard Time or fax us at 802-893-6659. You can also e-mail
us at [email protected]
33
Installation and Operation Guide
Appendix I - 3D-BIRD Specifications
APPENDIX I - 3D-BIRD SPECIFICATIONS
Technical
C
Degrees of Freedom:
3 (Orientation)
C
Angular range:
All altitude (± 180o yaw, ± 90o pitch ± 180o roll)
C
Angular Accuracy:
Static Accuracy 2.5o RMS
Dynamic Accuracy 4.0o RMS
C
Angular Resolution:
0.2o
C
Update Rate:
Up to 160 measurements/second
C
Maximum # of Sensors:
1 per serial port
C
Maximum Angular Speed:
1000 o/second
C
Computer Interface:
Connects to RS-232 port of your host computer
C
Dynamic Lag:
15 milliseconds at 360 o/second
Physical
C
Sensor Size (L x W x H):
1.41 inch x 1.08 inch x 0.92 inch
C
Sensor Weight:
1.0 oz.
C
Sensor Cable:
15 feet, extendable to 30 feet
Electrical
C
Power:
5VDC @ 100 mA
Environment
C
34
All specifications are valid at 30o C ± 10o in an environment void of large metal objects
and electromagnetic frequencies other than the power line.
Installation and Operation Guide
Appendix II - Application Notes
APPENDIX II - APPLICATION NOTES
Application Note #1
Converting the 3D-BIRD Outputs to a Graphics Modeling Matrix
Purpose: Build the 12 elements of a standard computer graphics modeling matrix,
MM(i, j), given the 9 matrix output elements from the 3D-BIRD, MB(i, j) and the X, Y, Z position
outputs Xpos, Ypos, and Zpos measured by some external means in 3D-BIRD coordinate
frame.
The standard computer graphics XYZ coordinate system is as follows: positive X axis points to
the right, positive Y axis points up, positive Z points towards you.
Standard Graphic Coordinate
System
The 3D-BIRD's XYZ coordinate system as follows: positive X axis points towards local magnetic
North, positive Y axis points to the left, positive Z axis points down.
3D-BIRD Coordinate System
To have the screen image follow the rotations of the 3D-BIRD's sensor, the following
35
Installation and Operation Guide
Appendix II - Application Notes
transformations from 3D-BIRD coordinates to modeling matrix elements are required:
MM(1,1) = MB(2,2)
MM(1,2) = MB(2,3)
MM(1,3) = - MB(2,1)
MM(1,4) = 0.
MM(2,1) = MB(3,2)
MM(2,2) = MB(3,3)
MM(2,3) = - MB(3,1)
MM(2,4) = 0.
MM(3,1) = - MB(1,2)
MM(3,2) = - MB(1,3)
MM(3,3) = MB(1,1)
MM(3,4) = 0.
MM(4,1) = - Ypos
MM(4,2) = - Zpos
MM(4,3) = Xpos
MM(4,4) = 1.0
36
Installation and Operation Guide
Appendix II - Application Notes
APPENDIX III - FCC REGULATION AND CANADIAN REGULATIONS
FCC Regulations
Warning: Changes or modifications to this unit not expressly approved by the party responsible
for compliance could void the user's authority to operate the equipment.
NOTE: This equipment has been tested and found to comply with the limits for a Class A digital
device, pursuant to Part 15 of the FCC Rules. These limits are designed to provide reasonable
protection against harmful interference when the equipment is operated in a commercial
environment. This equipment generates, uses, and can radiate radio frequency energy and, if
not installed and used in accordance with the instruction manual, may cause harmful
interference to radio communications. Operation of this equipment in a residential area is likely
to cause harmful interference in which case the user will be required to correct the interference
at the user’s expense.
Canadian Regulations
This digital apparatus does not exceed the Class A limits for radio noise emissions from digital
apparatus set out in the Radio Interference Regulation of the Canadian Department of
Communications.
Le present appareil numerique n'emet pas de bruits radioelectriques depassant les limites
applicables aux appareils numeriques de la class A prescrites dans le Reglement sur le
brouillage radioelectrique edicte par le ministere des Communications du Canada.
37
Installation and Operation Guide
Appendix II - Application Notes
APPENDIX IV - EC DECLARATION OF CONFORMITY
EC Declaration of Conformity
Issued by
Ascension Technology Corporation
PO Box 527
Burlington, VT 05402 USA
802-893-6657
Equipment Description:
Tested With:
3D-BIRD Model
3D-BIRD Tracking System
5V @ 100 mA
No -5V or -12V or 12V
The 3D-BIRD passed all CE directives when using a 490CDT Canon
Laptop PC S/N6101208118
Year of Manufacture:
2000
Applicable Directives:
73/23/EEC, Low Voltage Directive
89/336/EEC, EMC Directive
Applicable Standards:
EN 61010-1: 1995
Safety Requirements for Electrical Equipment for Measurement,
Control and Laboratory Use, General Requirements
EN 61326-1: 1998
Electromagnetic Compatibility - Generic Emission Standard,
Residential, Commercial and Light Industry
Authorized by:
38
_________________ Date: ________
Jay Monahan
Chief Operations Officer
Ascension Technology Corporation
Installation and Operation Guide
Appendix V - CE Specifications
APPENDIX V - CE SPECIFICATIONS
CE Specifications
There are no fuse or user serviceable parts on the 3D-BIRD.
Modification or use of the equipment in any way that is not specified by
Ascension Technology may impair the protection and accuracy provided
by the equipment.
The exclamation point within an equilateral triangle is intended to alert the user to important
operating and maintenance (servicing) instructions in the appliance literature.
Equipment Maintenance:
C
Do not expose the 3D-BIRD to rain or condensing moisture.
C
Keep the equipment away from extreme sources of heat.
C
Do not let the sensor impact with a hard object.
39
Installation and Operation Guide
Appendix VI - Ascension Technology Corporation
Ascension Technology Corporation
PO Box 527
Burlington, VT 05402 USA
(802) 893-6657
http://www.ascension-tech.com
40